In this articles series, I will provide you with an insight into the identity models available and the authentication story for Exchange Online.
Exchange Online Identity Models & Authentication Demystified (Part 1)
Introduction
In this article series, I will provide you with an insight into the authentication story for Exchange Online. That is, I will go through the fundamentals, which are the available identity models, but I will also explain the authentication methods for the different users/clients/devices. Since the authentication story is going through a significant transformation, I will explain how the authentication is today and what you can expect in the near future.
When it comes to improving the authentication story, the Office 365 Business Group has really listened to the customer feedback received over the last couple of years and although we didn't see many changes for, if you ask me, too long this doesn’t mean nothing has been going on inside Microsoft. Actually a team was put together to only focus on improving the authentication story for Exchange Online users/clients and Office 365 workload Users/clients in general.
Note:
Although a big chunk of the stuff we will cover in this article series will also apply to several of the other Office 365 workloads, our main focus will be on the Exchange Online workload.
Let’s get going. As usual, we have a lot to cover.
Starting with the Fundamentals – Identity Models
So as many of us know, the workloads included with the Office 365 Software As a Service (SaaS) offering are really just workloads enabled on an Azure Active Directory (AAD) tenant. This means that provisioned objects (cloud identities or synchronized users) are stored in the AAD tenant and authentication occurs against the respective AAD authentication endpoints. For this reason, one of the very fundamental and important decisions you need to take is around what identity model to use within the organization.
The authentication process differs quite a bit depending on the identity model you decide to use. We have three identity models to choose from, as depicted in the following conceptual diagram.
Figure 1: Conceptual diagram of the three identity models available
Cloud Identities
The first identity model is cloud identities where users are provisioned directly in the AAD/Office 365 tenant using the Office 365 or Azure portal. The portal also supports bulk user provisioning based on a CSV containing up to 250 users. For more advanced provision requirements, you can of course also use the Azure Active Directory PowerShell for the provisioning process.
Figure 2: Users provisioned directly in the tenant
The major benefit of the cloud identity model is that you do not need to make any changes or deploy any new servers in the on-premises infrastructure.
Figure 3: Authentication for “Cloud Identities” model
However, since the cloud identity model means that a new identity will be created for the end users, it also means the end users will be provided with a new set of credentials. For this reason, this identity model is primarily targeted at:
- Small enterprises that do not already have an on-premises Active Directory. Since the cloud identity model does not require any servers to be deployed on-premises, the enterprises can get up and running quickly.
- Larger enterprises that want to try Exchange Online and other Office 365 workloads without needing to make significant changes in the on-premises Active Directory. If you go through this scenario, you can later convert to one of the other identity models if required. This is done by matching the cloud user identities with the respective on-premises Active Directory users using SMTP based soft matching.
- Enterprises with up to 2.000 mailbox users that for one reason or another wish to migrate from on-premise Exchange to Exchange Online using a cut-over migration. The cut-over migration process itself includes provisioning of the users in the tenant. As mentioned, a cut-over migration supports up to 2.000 user mailboxes, but it is possible to circumvent this limit by hiding users from the GAL or if you are dealing with a merger of multiple on-premises Active Directories to a single AAD/Office 365 tenant. If you go through this scenario, you can later convert to one of the other identity models using the same method as in the previous scenario.
If you are dealing with a large enterprise that already relies heavily on Active Directory, you should not go with cloud identities unless you match one of the above scenarios. Introducing an additional set of credentials to your end users is a move in the wrong direction as they not only need to use different passwords and typically also username as most end users in large enterprises still use the SAM account name (domain\alias) for authentication purposes against the on-premises Active Directory. The AAD/Office 365 tenant expects the end user to authenticate with a user principal name (UPN) in the form of “alias@azurelab.dk”.
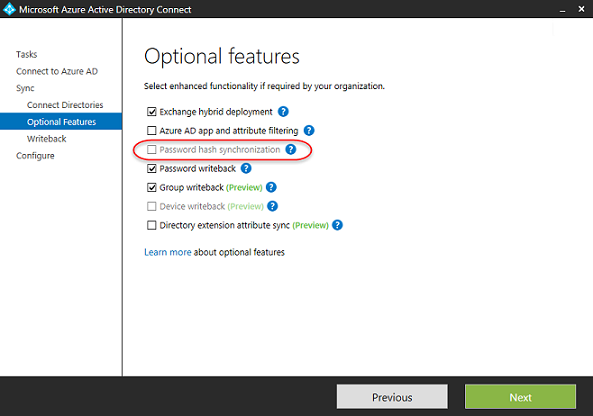
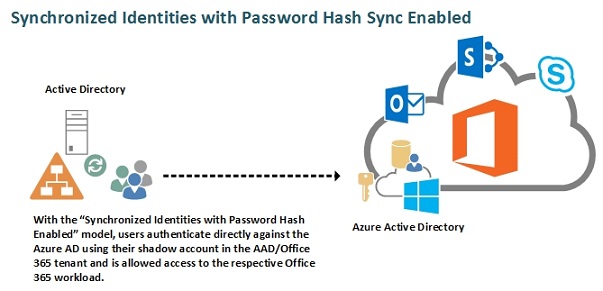
Synchronized Identities with Password Hash Sync Enabled
The second identity model is synchronized identities, where the existing users in the on-premises Active Directory are synchronized to the AAD/Office 365 tenant using a directory synchronization tool. Three Microsoft directory synchronization tools exist today. We have the first one that was released named “DirSync”, which is still fully supported and the one that will be downloaded if you follow the steps in the Office 365 portal.
The second tool is the Azure AD Sync (AADSync), which was released in order to provide a tool that supported multi-forest scenarios and more. Although the AADSync tool is still supported by Microsoft, it is no longer possible to download it as it has been replaced by the third tool released.
The third tool is named Azure AD Connect (AADConnect) and is the recommended directory synchronization tool going forward as this is where the resources will be used. AADConnect supports all the features included in the AADSync tool and more. In addition, the setup wizard includes steps for configuring AD FS servers in your on-premises environment, if you want to go with federated identities.
All the three above mentioned tools support the password hash synchronization option, which is highly recommended to enable in a directory synchronization scenario where AD FS will not be used for federation purposes.
Figure 4: Enabling Password hash synchronization
Since this identity model works by installing directory synchronization tool on a server in your on-premises infrastructure, you must usually deploy a new server for this purpose. I say usually as it is supported to install the tool on a Domain Controller, however I only recommend doing so in a test environment.
If you deal with a very large organization, you may also need to use a dedicated SQL database as the local SQL Express instance that is installed by default “only” supports up to 100.000 synchronized objects (including users, groups and contacts).
Figure 5: Users synchronized from the on-premises Active Directory
The major benefit of using this identity model over the cloud identities is that users will be provisioned automatically using the directory synchronization tool and will be able to use the same set of credentials as they already use in their on-premises Active Directory resulting in not a “single sign-on” but “same sign-on” scenario where the user object and passwords are managed in the on-premises Active Directory. In a “same sign-on” scenario, the end user will, as mentioned, be able to use his existing credentials but needs to authenticate when accessing an Office 365 workload.
Figure 6: Authentication flow for the “Synchronized Identities with Password Hash Sync enabled” model
When authenticated, a cookie will be generated so the user only needs to authenticate the first time he accesses an Office 365 workload during a workday. The cookie will then usually be kept alive. However, this of course depends on the specific user patterns within the organization.
It is also worth mentioning that the user cannot use his SAM account name to access Office 365 workloads, but instead needs to use his user principal name (UPN), which means that the end user may see this as being provided with a new username as he will typically use his SAM account name for Active Directory based authentication.
Unlike user attributes on an on-premises Active Directory object, which in case of a change are being synchronized every third hour by the synchronization tool, the password of a user is checked every second minute and synchronized in case a password change has occurred.
Moreover, it’s important to note that the end user passwords will not be stored in the AAD/Office 365 tenant. It will be a hash of a hash of the on-premises Active Directory password that will be stored there and the password itself cannot be retrieved through the hash of the hash of the password by a malicious user.
Synchronized identities with password sync enabled is primarily targeted at:
- Small and larger enterprises that already have an on-premises Active Directory and want end users to be provisioned automatically and also manage users in the on-premises Active Directory as well as allowing end users to use their existing Active Directory password (via same sign-on method) to access Office 365 workloads. All this without the need to make major changes in the on-premises infrastructure as in only deploying a single server on-premises.
- Larger enterprises that want to trial Exchange Online and other Office 365 workloads without needing to make significant changes in the on-premises Active Directory. If you go through this scenario, you can later convert to the federated identities model if required. This is done by matching the cloud user identities with the respective on-premises Active Directory users using hard matching via the “ImmutableID” or SMTP based soft matching.
This concludes part 1 of this multi-part article in which I provide you with an insight into the identity models available and the authentication story for users/clients connecting to the Exchange Online workload and Office 365 workloads in general.
Exchange Online Identity Models & Authentication Demystified (Part 2)
In this part2 I will provide you with an insight into the third identity model, which is federated identities.
Introduction
In part 1 of this article series revolving around the available identity models and the authentication story for Exchange Online, I provided you with an insight into the two of the three identity models (cloud identities and synched users with password hash sync enabled) that are supported with AAD/Office 365. I also explained which types of scenarios were the primary targets for each identity model.
In this part 2, we will continue where we left off in part 1.
Let’s get going. As usual, we have a lot to cover.
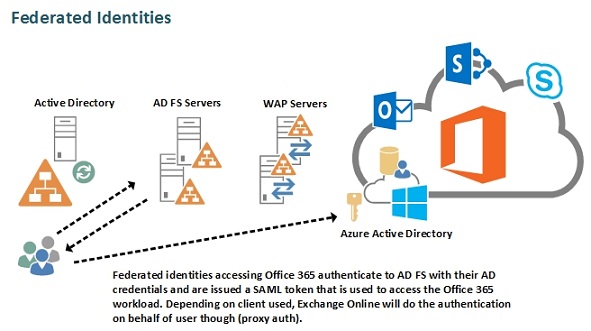
Federated Identities
The third and last identity model is what we refer to as the “Federated Identities” model. Just like with the “Synchronized Identities with Password Hash enabled” model, this model requires that we synchronize our on-premises Active Directory users to the AAD/Office 365 tenant using one of the supported directory synchronization tools (preferably AADConnect). But the similarities end here. Because although the synchronization aspects are identical, the authentication parts are very different.
Unlike with the “Synchronized Identities with Password Hash enabled” model, where a hash of the hash of the password is synchronized together with the user object to the AAD/Office 365 tenant, the Federated Identities model uses Active Directory Federation Service (AD FS) technology to establish a federation trust between the tenant and the on-premises Active Directory.
Note:You can combine “Federated Identities” with “Synchronized Identities with Password Hash enabled” model. More specifically, you can use the “Synchronized Identities with Password Hash enabled” model as a backup (failover) for “Federated Identities” model. This means that in case your AD FS farm or even your Active Directory is unavailable for a longer period of time, you can convert the domain(s) in the AAD/Office 365 tenant from federated domain(s) to managed domains and thereby allow users to authenticate against Azure Active Directory and be granted access the respective Office 365 workload(s). For the glory details on how this works in detail, see
this TechNet Wiki article.
Although it’s generally recommend to choose the least complex identity model, larger organizations that have one or more Active Directory forests and often also a complex on-premises infrastructure in many cases wants to keep the authentication mechanisms on-premises in order to have more control and options available when it comes to granular end user access management. In addition, nowadays there’s also a good portion of organizations that already have an AD FS farm in place for other federation purposes and see it as a natural step to also use this solution for AAD/Office 365 federation purposes as well.
Note:Although the focus of this article is on Active Directory as the identity provider, Microsoft also support the use of third party SAML 2.0 based identity providers to implement single sign-on (read more
here). Shibboleth based Identity Providers are also supported, however only a limited set of clients are supported in such a scenario (read more
here).
Another reason to go with “Federated Identities” model over the “Synchronized Identities with Password Hash enabled” model is in order to provide the end users with a true “single sign-on” solution instead of a “same sign-on” solution. True “single sign-on” does not hold true for all client version scenarios though (more on this later in this article series). However, what’s attractive to the organizations is that it’s the end users Active Directory credentials that are used to authenticate against Azure Active Directory.
Figure 1: When user access the AAD/Office 365 logon page being redirected to the on-premises federation service
Figure 2:Web Application Proxy Logon page
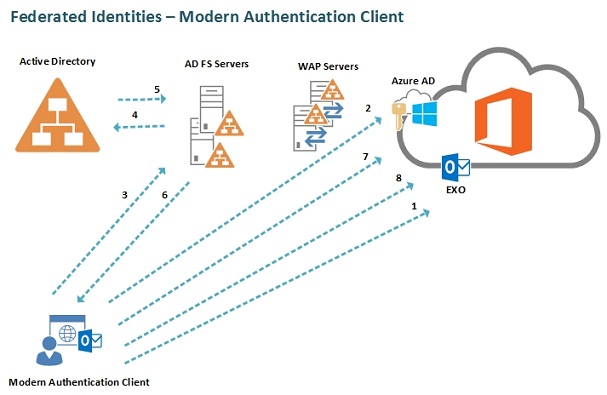
With the “Federated Identities” model, when a user tries to access an Office 365 workload, he will get an SAML security token from AD FS, which is handed to Azure AD as proof for being allowed to access the respective workload as shown in the following conceptual diagram. When it comes to Exchange Online, this flow depends on the client type and client version though as Exchange Online is a little special when it comes to authentication. We will talk a lot more about this later in the article series.
Figure 3: Federated Identities authentication flow
As already mentioned, going with the “Federated Identities” model makes sense for organizations that want more control and options available when it comes to granular end user access management, but you should bear in mind this model requires at least four servers on-premises (two ADFS servers on the internal network and two WAP servers in the perimeter network).
Although a single server AD FS and a single WAP server is sufficient as authentication endpoint for several thousand users (of course depending on user concurrency etc.) in AAD/Office 365 you would want to deploy a highly available federation farm. The reason for this is because if the federation service becomes unavailable, your end users will not be able to authenticate against AAD and for this reason also not be able to access any of the Office 365 workloads unless you initiate a failover to password hash sync, which depending on your specific topology can take several hours.
Some of the more important reasons why you want to go with the “Federate Identities” model are listed below:
- The organization already has an AD FS farm in place and wishes to use this for AAD/Office 365 federation purposes.
- The organization already has an existing smart card or multi-factor authentication (MFA) solution and do not want to (or are not yet ready to) switch to the MFA solution provided by an Azure AD (required Azure AD Premium subscription).
- The organization has a security policy stating that a hash of a hash of the on-premises password must not be synchronized to the AAD/Office 365 tenant.
- The organization wants to leverage the AD FS extranet lockout feature to protect users on the corporate network from AD account lockouts and brute force password guessing attacks. The Office 365 account lockout policy is 10 unsuccessful attempts and after that the end user is forced through a CAPTHA dialog as part of the logon.
- The organization wants to have a true single sign-on solution and not a same sign-on solution. Bear in mind though that true SSO is not possible for rich clients (such as the desktop Outlook client) that use basic authentication. For Outlook 2013 and later, this can be solved by enabling modern authentication (more on this later in this article series).
- The organization wishes to control at what time the end users are allowed to access Office 365 workloads using logon hours. Note: Personally, I have never encountered a customer with this requirement.
- The organization wish to use client access policies to control which clients may access Office 365 based on location (i.e. block Outlook Anywhere from an external network).
- The organization wants a user account that is being disabled in the Active Directory to be “immediately” reflected for AAD/Office 365 access. It will not be immediately, but quicker than what is the case for the “Synchronized Identities with Password Hash enabled” model.
- The organization wants to use AD FS based conditional access (workplace join, group membership, device registration, certificate based access etc.).
- The organization wants to enable password expiry notifications for end users (will be shown in the Office 365 portal).
- The organization want to make use of custom claim rules for more detailed audit control.
- The organization wants to provide the end users with a transparent login experience for web based access to Office 365 using smart links.
- The organization wants detailed information for sign-in attempts (auditing), which will be logged in the Windows event log on the AD FS servers.
- The organization cannot change/use the UPN as required and instead wants to use alternate login IDs.
This concludes part 2 of this multi-part article in which I provide you with an insight into the new Modern Authentication story and how it affects clients connecting to Exchange Online.
Exchange Online Identity Models & Authentication Demystified (Part 3)
In this part 3 we will switch focus to the Exchange Online authentication side of things. We will dive into how Exchange clients authenticate up until today in the different identity scenarios.
Introduction
In part 2 of this article series revolving around the available identity models and the authentication story for Exchange Online, I provided you with an insight into the third identity model, which is federated identities.
In this part 3, we will continue where we left off in part 2.
Let’s get going. As usual, we have a lot to cover.
Exchange Online Client Authentication – The Past & Today
So as we discussed in the previous two parts of this article series, you can choose between three different identity models. Cloud Identities, Synchronized Identities with Password Hash enabled and Federated Identities. Depending on the model chosen, when you access the Exchange Online workload, you will need to:
- Authenticate with your cloud credentials (UPN and password) when the workload is accessed
- Authenticate with your cloud credentials (UPN and password), that match the on-premises AD credentials (aka “Same Sign-On”)
- Authenticate automatically using on-premises AD credentials, when domain-joined and domain-connected (aka “Single Sign-On”)
However, when it comes to the “Federated Identities” model, depending on the client as well as the version of a client used to access the Exchange Online workload, the above does not necessarily match the reality. As you know, we can access our mailbox using several different clients. We have the Outlook Desktop client, Outlook on the Web (OotW), the Outlook app for iOS and Android, ActiveSync based clients, IMAP/POP clients, SMTP clients and clients based on the Exchange Web Services (EWS) protocol such as Outlook for Mac.
When it comes to the different clients accessing the Exchange Online workload in an “Federated Identities” model, they use different endpoints for authentication. We have the following endpoints for Exchange client authentication:
Passive Federation (WS-Fed Passive Profiles)
This endpoint is used by web clients or by all clients that use the new modern authentication method. For now, we will focus on non-modern authentication, so the only Exchange Online client using this endpoint is Outlook on the Web (OotW). A passive profile client that is domain-joined and located on internal network authenticates directly with the AD FS (STS) endpoint on-premises.
More specifically, when the web client connects to “
outlook.office365.com” either by redirection from the on-premises Exchange OotW URL in a hybrid deployment scenario or by selecting the Outlook app title in the Office Portal, Exchange Online redirects the web client to the authentication endpoint in Azure Active Directory (
login.microsoftonline.com).
Figure 1: Web Client redirected from login.microsoftonline.com to on-premises AD FS farm
The Azure AD authentication endpoint will detect the UPN domain is federated and do another redirection to the internal AD FS endpoint on-premises (in my case “
fs.azurelab.dk”), where AD FS will require the client to authenticate.
Once authenticated, AD FS will retrieve the necessary claims related information from Active Directory and provide the web client with a token holding the claims about the user. The client will present the token to Azure AD and after successful authentication, the web client will be redirected back to “
outlook.office365.com” and access the mailbox via OotW.
I have tried to explain this flow visually in the below conceptual diagram (
Figure 2).
Figure 2: Authentication Flow for Domain-joined Passive Profile Clients on internal network
In case the client was located on an external network, the same steps would apply with the only difference of having the redirection to “
fs.azurelab.dk” go through the Web Application Proxy (WAP) servers to the internal AD FS farm to which the external DNS record for “
fs.azurelab.dk” would resolve. Since the user is not authenticated, he will need to authenticate via the sign-in page on the WAP servers. Otherwise all the steps apply.
Figure 3: WAP Sign-in Page
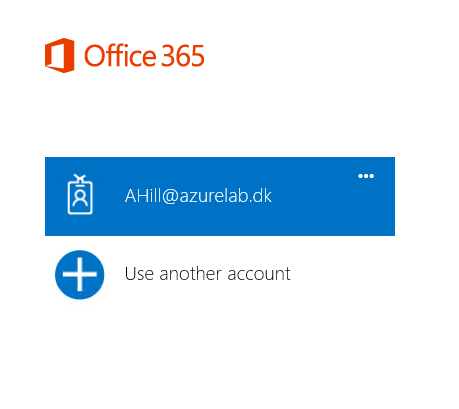
Since both internal and external client will always hit “
login.microsoftonline.com”, it is possible to have the client remember the UPN of the respective user (
Figure 4), so that is doesn’t have to enter it each time he is required to authenticate.
Figure 4: UPN remembered in the web client
Basic Authentication (Basic Auth Profiles)
This endpoint is used by non-browser based clients or non-modern authentication enabled clients that authenticate using basic authentication. Clients such as the Outlook Desktop client, IMAP/POP clients, Exchange ActiveSync (EAS) based clients, Exchange Web Services (EWS) based clients and TLS secured SMTP sessions use basic authentication. Basic authentication based clients have in common that Exchange Online does the authentication with AD FS on behalf of the client also known as proxy authentication.
More specifically, the client sends the Basic authentication credentials to Exchange Online over SSL/TLS (
outlook.office3365.com) and then Exchange Online sends the authentication credentials to Azure AD using something called proxy authentication (proxy auth). Azure AD returns the respective endpoint for the on-premises AD FS farm (in my case “
fs.azurelab.dk”) to Exchange Online. Note though that Exchange Online connects to the end point through the WAP servers and not directly.
The internal AD FS servers then authenticate with Active Directory and is provided with a logon token containing the necessary user claims. The AD FS servers send this token to Exchange Online, which again sends it to Azure AD. Azure AD returns it to Exchange Online in a state where it can be used to authenticate the client.
I have tried to explain this flow visually in the below conceptual diagram (
Figure 5).
Figure 5: Authentication Flow for Basic Authentication based Clients
Although this article series is about Exchange Online specific authentication, it its worth mentioning there is a third endpoint known as the Active Federation (WS-Trust Active Profiles) endpoint, which is used by so called rich/MEX clients. This is Office applications (including Skype for Business), but of course except the Outlook desktop client, which we covered above. These clients use the
Microsoft Online Services Sign-In Assistant (SIA) assistant if Office 2010 or the built-in SIA DLL files if using Office 2013, to provide the end user with a good SSO experience. Unlike Basic authentication, these clients authenticate directly with AD FS as in they do now use the WAP servers.
A Closer Look at the AD FS Connection Endpoints On-Premises
Let’s take a closer look at the authentication endpoints, that web (browser-based) clients, Rich/MEX Client profiles and Exchange Online (when a Basic authentication client is used) are redirected to on-premises in a federated identity scenario. To do so, we will connect to our AAD/Office 365 tenant using the
Azure Active Directory PowerShell module and run the following command:
Get-MsolFederationProperty –DomainName “Insert federated domain” | flIn my lab environment, they look like those shown in
Figure 6.
Figure 6: Federation Property settings in Exchange Online tenant
The AD FS (STS) endpoints in
Figure 6 are used as follows:
- ActiveClientSignInUrl: https://fs.azurelab.dk/adfs/services/trust/2005/usernamemixed is used
by Basic Authentication based clients - FederationMetadataUrl: https://fs.azurelab.dk/adfs/services/trust/mex is used by Rich/MEX clients
- PassiveClientSignInUrl: https://fs.azurelab.dk/adfs/ls/ is used by web (browser-based) clients and clients with modern authentication enabled (more on this later).
As you can see from the above, we need a more standardized model for the authentication flow, which all of us agree is quite complex today. The authentication flow is of course a little less complicated for non-federated scenarios, but without question, there is a need to have a more standardized approach going forward. And as I mentioned in the introductory of the first article, this is where the dedicated Office client authentication team that was established almost two years ago comes into the picture. Beginning with the next part in this article series, we will take a look at what they have up their sleeve.
This concludes part 3 of this multi-part article in which I provide you with an insight into the new Modern Authentication story and how it affects clients connecting to Exchange Online.
Exchange Online Identity Models & Authentication Demystified (Part 4)
In this part 4 we will switch focus to the Exchange Online authentication as it was in the past up until now. We will go through the two major pain points that customers had to deal with up until recently.
Introduction
In part 3 of this article series revolving around the available identity models and the authentication story for Exchange Online, I provided you with an insight into the third identity model, which is federated identities.
Let’s get going. As usual, we have a lot to cover.
Authentication Story for Exchange Online Clients Up Until Today
As explained in the previous part of this article series, the authentication story for Office 365 clients had room for improvement. More specifically, it makes sense to introduce a more standardized authentication model, where all Office 365 clients use the same authentication method and endpoint. Doing so would also have a direct impact on the authentication experience seen from the end user’s perspective.
In the following we will go through what can be considered the two most frustrating Exchange Online client authentication pain points that exist for Enterprise customers up until today.
Credentials Must Be Stored on the Outlook Desktop Client Machine
Back since September 2007, where the Microsoft Business Productivity Online Standard Suite (aka BPOS) was announced, the Exchange Online workload has only had support for basic authentication when it comes to clients like the Outlook Desktop client, IMAP/POP clients, Exchange ActiveSync (EAS) clients, Exchange Web Services (EWS), and TLS secured SMTP clients.
Sure, we have without doubt come a long way since the “
Microsoft Online Services Sign In” client that were installed on the end user’s client machine in order to configure Outlook (and other Office application) profiles and to authenticate the end user’s BPOS account in order to simulate an SSO experience but Enterprise customers still suffers, when it comes to basic authentication based clients.
Figure 1: MSOL Sign-In assistant
With the launch of the first version of Office 365 (also referred to as wave 14 which were based on 2010 versions of the respective workloads) back in October 2011, the situation for Office clients was improved further with the introduction of the Microsoft Online Services Sign-in Assistant (or in short MOS SIA). The MOS SIA was a stand-alone package, which basically consisted of dynamic link library files (DLLs) and a Windows service (see more details
here), that improved the login experience for Office 2010 clients.
The MOS SIA was installed automatically on the client machine, if the Office 365 Desktop Setup tool was used. However, since Office 365 Desktop Setup tool required local administrator permissions on the client machine, most organizations deployed the MOS SIA package using their software deployment solution like SCCM.
Figure 2: Microsoft Online Services Sign-in Assistant Stand-alone package installed
On February 27, 2013, the second wave of Office 365 (also referred to as wave 15 which was based on 2013 versions of the respective workloads and the one that is in use as of this writing) was launched. Around the same time, Office 2013 was made generally available. With Office 2013, a MOS SIA is baked into the product removing the need to install the stand-alone MOS SIA package. However, the sign-in experience for Exchange Online clients were not improved as Exchange Online (now running Exchange 2013) still only supported basic authentication for the aforementioned non-browser based clients.
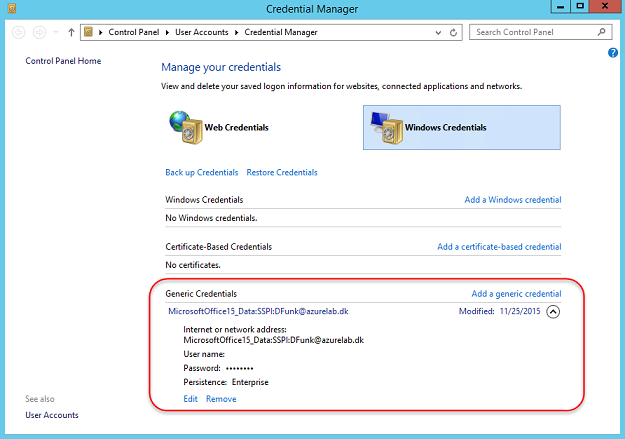
You see, despite the improvements made over time since the inception of Microsoft cloud services, because of the basic authentication requirement, the credentials have to be presented to Exchange Online, as in, they must be entered every time the Outlook Desktop client is launched or be saved in the Windows credential manager on the client. Refer back to the previous article in this series for the details around the proxy authentication flow that is the reason behind this requirement.
Figure 3: End user challenged for credentials in Outlook Desktop client
Since the credentials are stored client-side, it means that when the password expires or is changed for other reasons, the end user will need to enter it again and in order to avoid constant prompting ensure the updated password is saved to the credential manager.
Figure 4: Credential Manager on Windows 10 Client
Lack of Real Multi-Factor Authentication for Basic Authentication Clients
Multi-Factor Authentication (MFA) was made available to end users back on February 10, 2014. Although the MFA feature is based on Microsoft Azure, the feature is included in the covered Office 365 plans at no additional cost.There is also another more feature rich MFA solution available, but that one requires an Azure AD Premium subscription or the Enterprise Mobility Suite (EMS). You can find a comparison of the MFA editions
here.
Note:Although MFA wasn’t made available to end users before in February, 2014, it has been available to Office 365 administrative users since June 2013.
The MFA feature included with Office 365 includes support for mobile app, phone call and SMS as a second factor based authentication and has worked very well for browser based access to the Office 365 workloads, which in our case is Outlook on the Web (OotW) access to a mailbox.
Figure 5: MFA Enabled for End User accessing his mailbox using Outlook on the App (OotW)
However, the situation was far from ideal for rich clients, which in our case is the basic authentication based Exchange Online clients mentioned earlier since they, until recently, were not supported by any of the MFA options. Instead we needed to use so called App passwords for this client type.
An App password is a new randomly generated password that is created when MFA is enabled for an end user. It has nothing do to with MFA, but is merely just a new password that had to be used for basic authentication based clients. So in addition to the end users existing password, she now had to use the App password for Outlook on her desktop client, any mobile devices using the ActiveSync protocol and the other clients mentioned earlier.
Figure 6: With MFA enabled, Basic Authentication based Clients use App Passwords
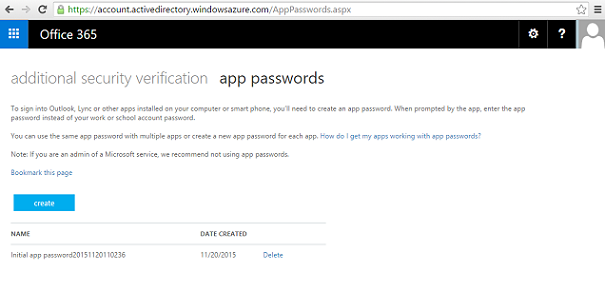
The App password can only be seen at the initial creation, so if the end user needs to set up a new basic authentication device or client later on, he needs to generate one more App password for this purpose now having three passwords in use. Yes, you see where this is going right? A lot of extra calls to the service desk and a confused end user wasting time messing around with App passwords.
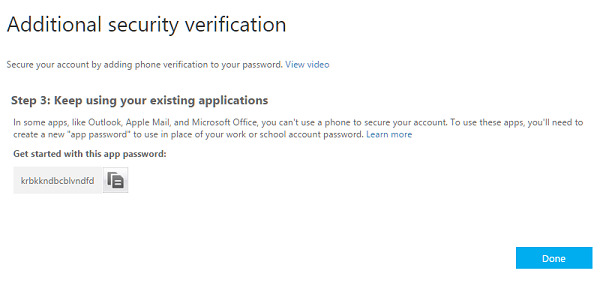
As you can see in
Figure 7, an App password is not something the end user will be able to remember as it is a complete random set of letters and not something he can relate to, like often is the case with passwords generated by the end user themself. This is of course good for security, but not for the end user. I fear some end users could come up with the “bright” idea of storing this password in an unencrypted fashion somewhere on their device or client, so they do not need to create a new one when/if required.
Figure 7: An example of an App Password
Although App passwords were only meant to be a temporary thing until modern authentication saw the day of light, it was a painful temporary period.
Good thing is, the Office 365 modern authentication team (formerly known as the Office 2013 modern authentication), that were established back in the beginning of 2014 were busy working on a new authentication story for Office 365 clients.
This concludes part 4 of this multi-part article in which I provide you with an insight into the new Modern Authentication story and how it affects clients connecting to Exchange Online.
Exchange Online Identity Models & Authentication Demystified (Part 5)
In this article we will take a closer look at what modern authentication consists of and how the authentication flow looks like for ADAL enabled Outlook clients.
Introduction
In part 4 of this article series revolving around the available identity models and the authentication story for Exchange Online, our focus was on the Exchange Online authentication story as it was in the past up until now. We talked about the two major pain points seen from the end user/client perspective.
Let’s get going.
Modern Authentication, ADAL and OAuth – What is it?
Over the last couple of years, the respective teams at Microsoft have worked on moving their cloud services (including the Office 365 workloads) to an OAuth based authentication model. For those that are not familiar with OAuth, let me give you a short explanation. OAuth (Open Authentication) is an open authorization standard that was born back in November 2006, so it is by no means a new standard.
OAuth is used by most of the largest and popular service providers both in the consumer and enterprise space nowadays. More specifically service providers like Amazon, Facebook, LinkedIn, Google, Instagram, Foursquare, Twitter, DropBox and PayPal use OAuth and most of them have done so for many years. Actually, several of them used OAuth based authentication from the day they were born. Yammer which was acquired by Microsoft also used OAuth based authentication and still does this today.
As you can see OAuth is the authorization standard when it comes to cloud services and it was therefore a natural move for Microsoft to start moving their cloud services to this standard as well. And so they did and as of today most of the Microsoft cloud services including the browser based Office 365 workloads use OAuth today. Even things like Exchange hybrid configurations and Exchange Web Services (EWS) can utilize OAuth today.
Since OAuth is an authentication model mostly used for web based clients and services, Microsoft had to come up with a plan for utilizing this standard for rich/active clients like the Outlook Desktop client so they could fulfill the goal of ending up with a single authentication model used by all Office 365 clients and services irrespective of the devices used.
The Azure Active Directory team at Microsoft created the so called Azure AD Authentication Library (ADAL) that assists developers in enabling client application to authenticate users to Azure Active Directory (AAD) or on-premises Active Directory (AD) using OAuth based authentication.
When it comes to Office applications accessing Office 365 workloads, the Modern Authentication team naturally decided to use ADAL to facilitate sign in with Azure AD for Office client applications going forward. ADAL replaces the Microsoft Online Sign-in Assistant (SIA), that we talked about in the previous article, and when it comes to supported Office versions, Office 2013 and later is supported. For Office 2016, ADAL is included with the RTM build and for Office 2013, it is included in March 2015. Office 2013 also requires you to enable a registry key to be set in order to facilitate ADAL based authentication. Also, for the Exchange Online workload, you must ensure the tenant has OAuth based authentication support enabled (more on this in the next article).
By enabling ADAL for Office client applications, they will use an in-application browser control to render the Azure AD sign in experience in the same fashion as browser-based Office 365 clients like the Outlook on the Web (OotW). ADAL based OAuth authentication works for federated as well as non-federated scenarios.
With ADAL enabled in the Office client, we no longer rely on using basic authentication for the Outlook client and because of this, we also no longer need to store the credentials of the user on the client device, which is a huge step forward that eliminates one of the major pain points we talked about in the previous article. It also means that Exchange Online no longer needs to send the authentication credentials to Azure AD using proxy authentication (proxy auth) as we now use the WS-Fed passive profiles instead of the WS-Trust Active Profiles.
Modern Authentication (OAuth) Client Tokens Explained
When we enable ADAL for an Office client (aka modern authentication), we use OAuth based authentication as I also mentioned earlier. OAuth uses access and refresh tokens to allow access to Office 365 workloads using Azure Active Directory. In the OAuth world, two tokens are provided to the client when it has authenticated successfully against Azure AD. An access token is a JSON Web Token (JWT) which is valid for 1 hour and a refresh token which is valid for 14 days.
If the tokens are active, which they will be if Office 365 workloads are accessed frequently, which usually is the case (especially for the Outlook desktop client), the refresh token can be valid for up to 90 days. So with frequent use of Office 365 workloads, the end user would only need to authenticate every third month as the access token will be kept alive by the refresh token. However, bear in mind the refresh token on the client can be invalidated. There are a few things that can invalidate a refresh token, the most common being the end user password being changed after the refresh token has been issued.
The same access and refresh tokens are used for federated and non-federated scenarios and should not be confused with SAML tokens, which are the ones end users are provided with from the identity provider (AD FS). And bear in mind, the life time values for access and refresh tokens cannot be changed. You do have more options at your disposal for federated scenarios though as you can leverage the features in AD FS 3.0.
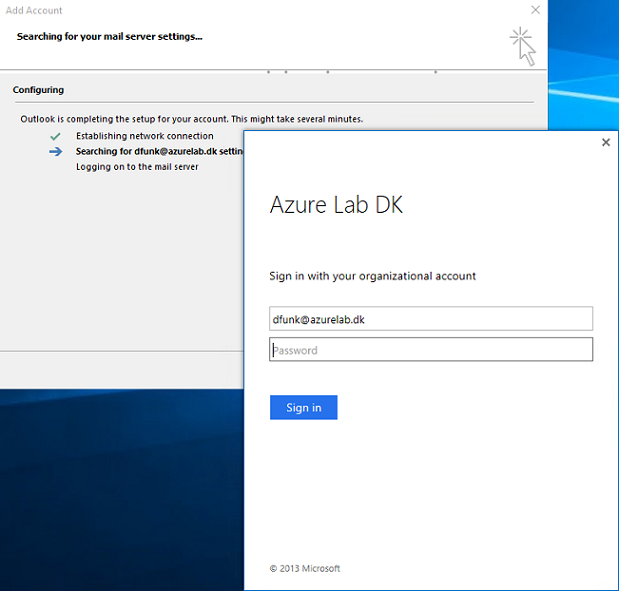
If an end user does not have valid tokens on the client, he will be prompted for credentials as shown in
Figure 1.
Figure 1: ADAL enabled Outlook Client prompted for credentials
The above login page is from the AD FS servers in a federated identities model. If you have a non-federated identity model, you will see the login page from Azure AD.
For general information around session timeouts for Office 365 clients other than ADAL enabled clients, see
this piece of documentation on the Office 365 Support site.
Exchange Authentication Flow for Modern Authentication Clients
In a Federated Identities model where AD FS is used for federation and where ADAL is enabled on the Office client, the authentication flow will, as already mentioned, be identical to the flow for browser-based clients in a federated identities model as depicted in
Figure 2.
Figure 2: Authentication Flow for ADAL enabled Outlook Client
However, the involved components and mechanisms differ a little, so let me explain what happens under the hood. The Outlook desktop client is launched and will try to connect to “
outlook.office365.com”.
Exchange Online redirects the ADAL enabled Outlook client to the authentication endpoint in Azure Active Directory (
login.microsoftonline.com). The Outlook client will use the ADAL browser control to reach out to Azure Active Directory. The Azure AD authentication endpoint will detect the UPN domain is federated and do another redirection to the internal AD FS endpoint on-premises (in my case “
fs.azurelab.dk”), where AD FS will require the client to authenticate.
Once authenticated, AD FS will retrieve the necessary claims related information from Active Directory and provide the ADAL enabled Outlook client with a SAML token holding the claims about the user. The client will present the token to Azure AD and after successful authentication, the client will be provided with a JWT token, that the Outlook client can use with Exchange Online on behalf of the user. The major benefit here is that the Outlook client, unlike when basic authentication is used, never handles the user’s credentials as such.
For domain-joined clients located on the internal network, you should rarely see a prompt for credentials, when you open an ADAL enabled Outlook client. For external ADAL enabled Outlook clients, it depends on how frequently the end user access Exchange Online as explained in the “
Modern Authentication (OAuth) Client Tokens Explained“ section.
So as you can see, we now have a single authentication flow for all clients accessing Office 365 workloads and unlike when basic authentication is used, the authentication will be more transparent to end the user as it does not involve using the credentials manager to store credentials on the client.
This concludes part 5 of this multi-part article in which I provide you with an insight into the new Modern Authentication story and how it affects clients connecting to Exchange Online.
Exchange Online Identity Models & Authentication Demystified (Part 6)
In this article we will enable modern authentication for our Exchange Online tenant and then connect to a mailbox using an Outlook desktop client that has ADAL enabled.
Introduction
In part 5 of this article series revolving around the available identity models and the authentication story for Exchange Online, our focus was on the Exchange Online authentication story as it was up until now. We took a closer look at what modern authentication consists of and how the authentication flow looks like for ADAL enabled Outlook clients.
Let’s get going.
Enabling ADAL Client Support at the Tenant Level
So as discussed previously in this article series, most of the Office 365 clients have already been automatically moved to the modern authentication model in an automatic fashion. However, in order to utilize modern authentication for ADAL based clients like the Outlook desktop client, one or two things (depending on the version of the respective Outlook client) must be performed. The first thing is to ensure modern authentication support is enabled in the Exchange Online tenant.
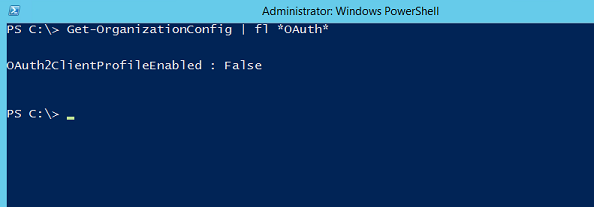
In order to enable this, we need to connect to Exchange Online using PowerShell and set the parameter “
Oauth2ClientProfileEnabled” to “
true”. This parameter lives under the “
OrganizationConfig” noun. Let’s first verify whether it is enabled or disabled for our Exchange Online tenant. We can do so with the following command:
Get-OrganizationConfig | fl *Oauth* Figure 1: Verifying the configuration state of the OAuth2ClientProfileEnabled parameter
As you can see in my case it is set to false. So we need to enable it using the following command:
Set-OrganizationConfig –OAuth2ClientProfileEnabled $true Figure 2: Setting OAuth2ClientProfileEnabled to “True”
Note:
It is not possible to enable modern authentication for ADAL based clients in Exchange Online using the UI. However, I was told some time ago that this will be possible via a simple knob sometime in the future.
I have been asked quite a few times whether enabling ”
OAuth2ClientProfileEnabled” will affect Outlook 2013 desktop clients that currently use basic authentication based authentication. The answer is no, this will not affect these clients as long as the required registry key (more on this key later) has not been set on the client machine.
However, bear in mind that it would affect Outlook 2016 desktop clients as they will try to use modern authentication by default. I am mentioning this as organizations usually want to take changes like this one through a test run on a set of selected pilot users prior to enabling it for everyone in the organization. So if you use Office 2016 in your organization, you would want to disable modern authentication using the relevant registry key (more on this this key in the next section).
Important:The expectation from the Office 365 team is that customers will use the Outlook desktop 2016 in its default authentication mode, which as mentioned is modern authentication. If you disable ADAL in the Outlook 2016 desktop client in order to use the old basic authentication method while modern authentication is enabled in the Exchange Online tenant, you can run into IDCRL related bugs. Hopefully these will be fixed in the near future, but needless to say, thorough testing is key.
Enabling ADAL for Modern Authentication Clients
Ok so with the tenant side of things prepared, let us switch to the client side. So as I already mentioned, the only Outlook desktop versions that support modern authentication through the use of the ADAL component is Outlook 2013 and Outlook 2016.
For Outlook 2013, you must have the March 2015 update applied. With that said, you should of course always strive after using the latest cumulative updates available for the client. Outlook 2013 also requires a registry key to be set on the client machine. The following registry keys should be set for the Outlook 2013 desktop client:
| Registry Key | Type | Value |
| HKCU\SOFTWARE\Microsoft\Office\15.0\Common\Identity\EnableADAL | REG_DWORD | 1 |
| HKCU\SOFTWARE\Microsoft\Office\15.0\Common\Identity\Version | REG_DWORD | 1 |
Table 1: Enabling ADAL for an Outlook 2013 Desktop Client
Outlook 2016 supports modern authentication via the ADAL component out of the box. So no need to set any registry keys when in a pure Outlook 2016 environment. However as mentioned in the previous section, you may want to disable modern authentication for all users except the pilot users for a period of time. To disable modern authentication in the Outlook 2016 desktop client, you need to use the following registry key:
Figure 3: Disabling ADAL in the Outlook 2016 Desktop Client
When ADAL is disabled, we get the “good” old basic authentication as shown in
Figure 4.
Figure 4: ADAL Disabled in Outlook 2016 – Basic Authentication Prompt
If you use Windows 10 based client devices with Outlook 2016 clients that have modern authentication disabled per above, bear in mind you may have issues with the autodiscover service hanging on search for your mail server settings when setting up a profile. To fix this, you need to add the following registry key:
| Registry Key | Type | Value |
| HKCU\SOFTWARE\Microsoft\Exchange\MSOAuthDisabled | REG_DWORD | 1 |
Table 2: Disabling MSO Authentication for an Outlook 2016 Desktop Client
As you can see, the Outlook 2016 desktop client was clearly developed and tested with modern authentication in mind.
Using an Outlook Desktop Client after enabling Modern Authentication
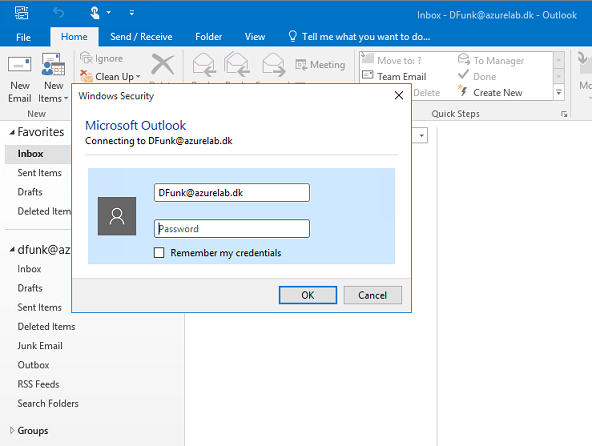
Let us try to launch an Outlook desktop client, in this case Outlook 2016, but will be the same experience for Outlook 2013, to see how the experience is from the end user side. Instead of the old Outlook credentials dialog box, the end user will now see the modern login screen.
Depending on the identity model used in your organization and whether end users are using a domain-joined client or not, the experience will differ. For the “
Cloud Identities” and the “
Synchronized Identities with Password Hash Sync Enabled”, the user will be prompted for credentials the first time they launch Outlook. But remember, it will only be the first time as the logon and refresh tokens will come into effect from there. So unless the client is not used for longer periods, the logon token will be refreshed using the refresh token in a transparent fashion meaning that the end user will not be prompted for authentication.
Figure 5: End User Prompted for authentication in a non-federated scenario
If you use a “Federated Identities” model and the client is domain-joined, the end user will get a transparent login experience similar to the browser based Outlook on the Web client (OotW). If the client is not domain-joined, he will be presented with the AD FS login page as shown in Figure 5.
Figure 6: End User Prompted for authentication in a Federated scenario
This concludes part 6 of this multi-part article in which I provide you with an insight into the new Modern Authentication story and how it affects clients connecting to Exchange Online.
Exchange Online Identity Models & Authentication Demystified (Part 7)
In this article we will look at the new multi-factor authentication (MFA) options that can be utilized by ADAL enabled Outlook desktop clients.
Introduction
In part 6 of this article series revolving around the available identity models and the authentication story for Exchange Online, we enabled modern authentication for our Exchange Online tenant and connected to a mailbox using an Outlook desktop client that had ADAL enabled.
In this part 7, we will continue where we left off in part 6.
The Definition of Multi-Factor Authentication
As we mentioned back in part 4 of this multi-part article, the multi factor authentication (MFA) story for basic authentication based authentication clients such as the Outlook desktop client was very poor as it relied on so called “app passwords”, which really did not have much to do with MFA whatsoever.
So what is the definition of multi-factor authentication? Well, it really lies in the words. It is a control access method enforced in order for an end user to access a solution, system, network or service. In addition to the end user’s credentials, that usually consists of a username and password and an extra factor or should we say piece of evidence such as something the end users know, have or are is required in order to gain access. In short, it’s an extra layer (factor) of security, which is extra important for services such as Office 365 that are directly exposed to the Internet.
When it comes to Office 365, the “app passwords” feature that basic authentication clients could utilize was just a new password that the end user needed to use to authenticate using a basic authentication client. IT was not an extra password that had to be used, but a password that simply replaced the old password for these clients.
Back in the days when it was companies such as RSA that ruled this market, the end user was often provided with a USB dongle (hardware token), which in RSA lingo was referred to as SecurID. Naturally, this has shifted towards software tokens, mobile device apps and for larger organizations smartcards (physical or virtual).
Fortunately, modern authentication improves the MFA story significantly. As a matter of fact, we now have a true MFA story for all Exchange Online clients.
Office 365 Multi-Factor Authentication Versions
When it comes to MFA, we have three versions to choose between:
- Multi-Factor Authentication for Office 365 This is the version that can be used with the Office 365 workloads without any additional charges. It comes with an Office 365 subscription by default.
- Multi-Factor Authentication for Azure Administrators This is the same subset of MFA capabilities as the previous one but for Azure Administrators specifically. This one is also free of charge and can be utilized by Azure administrators in general but also Office 365 Global Administrators, which of course is strongly recommended as these accounts have pretty powerful permissions.
- Azure Multi-Factor Authentication Lastly, we have the Azure Multi-Factor Authentication which offers a richer set of features and configuration options plus includes advanced reporting and support for a range of on-premises and cloud based applications. It is important to note this requires Azure Active Directory Premium (ADDP).
A comparison chart that lists the three MFA versions and included features for each can be found
here.
In this article our focus will be on the free MFA version included with an Office 365 subscription. I will cover the MFA version included with AADP in another article series.
Enabling Multi-Factor Authentication for an End User
Okay so as you know, we enabled modern authentication on the tenant level in our previous article and connected to an Exchange Online mailbox using an Outlook 2016 desktop client, which means that we did not have to set any registry keys on the client machine.
In the following, we will enable MFA for the respective mailbox user, which just requires a couple of clicks.
Launch the Office 365 Portal and click “
Active Users” and then “
Set up” to the right of “
Set Multi-factor authentication requirements” as shown in
Figure 1 below.
![]() Figure 1:
Figure 1: Click Set up under Active Users in the Office 365 Portal
This will take us to multi-factor authentication user management section in the Azure Active Directory portal.
Figure 2: Multi-factor authentication user management section in the Azure Active Directory portal
In order to enable MFA for a user tick him or her and then click “
Enable” under “
quick steps”. The dialogue box in
Figure 3 will appear. Click “
enable multi-factor auth”.
Figure 3: Enable multi-factor authentication
We will now be told the update was completed successfully and can click “
close”.
Figure 4: Updates completed successfully page
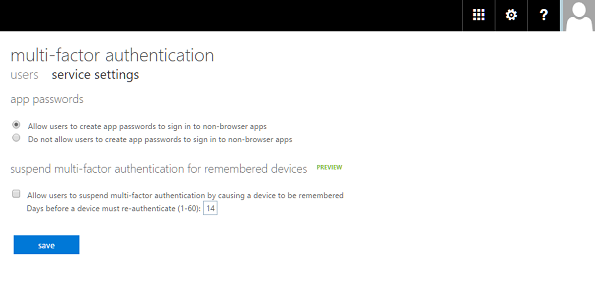
We have now enable MFA for a user. However, before we move on to test MFA from the client, let’s click on the “
service settings” tab on the “
multi-factor authentication” page.
Here we can specify whether a user is allowed to create an app password for non-browser app purposes. We also have an option to suspend multi-factor authentication for remembered devices, which is a pretty neat feature used to specify after how many days a remembered device should be forced to re-authenticate.
Figure 5: Multi-factor authentication service settings
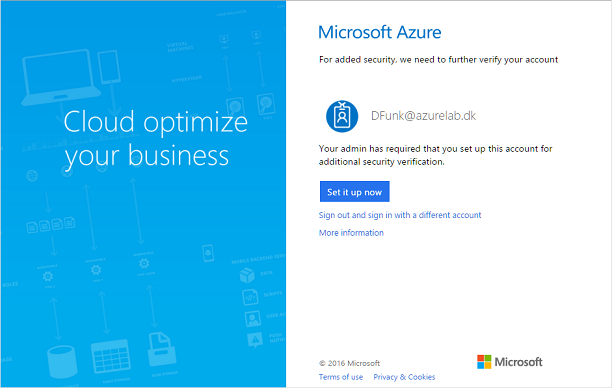
End User MFA Configuration Options
After MFA has been enabled for the user, the first time he logs on again he will be presented with the page shown in
Figure 6. Because MFA has been enabled, he needs to set up his account. More specifically, specify which second factor he wishes to use to complete authentication.
Figure 6: End user prompted to complete MFA set up
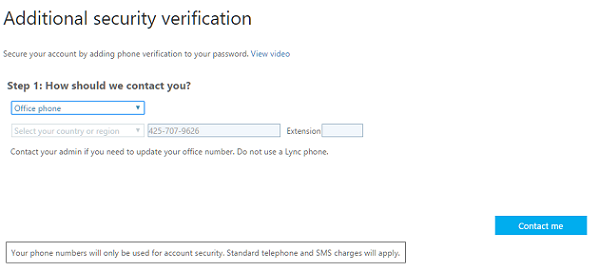
Clicking “
Set it up now” will take the user to the page shown in
Figure 7. Here he can specify the second factor authentication method.
The default is “Authentication phone”, which will call or send a text message to the mobile number specified. If the calling method is selected, the user then needs to press hashtag (#) and he will be authenticated and taken to the respective workload. If text message is selected, he will need to enter the code received on the login page.
Figure 7: Authentication phone The second method is “
Office phone”, which can be used to specify a good old Office phone for those of you who still have one. You can even specify the extension. Note you should not use a Lync phone.
Figure 8: Office phone method
The last method is “
Mobile app”, which makes it possible to use the Azure authentication app. We can receive a notification or use a verification code.
What I personally like about this method is you can use finger touch authentication in the app.
Figure 9: Mobile app method
After having chosen the second factor authentication method, the user will be taken to the page shown in Figure 11. As you can see, he will be provided with an app password he can use for clients that do not support ADAL.
Figure 10: Generated app password for clients not supporting ADAL
Testing MFA from a Client Machine
Ok let’s switch to a device with the Outlook desktop client installed. First, I will show you what an end user should expect when setting up a new Outlook profile. If not connected to the domain, the user will get the login page shown in
Figure 11 which is the login page on a Web Application Proxy (WAP) server.
Figure 11: WAP server login page
After the user has specified UPN and password, he will be redirected to the “login.microsoftonline.com” login page for Office 365/AAD as shown in
Figure 12. In this example the default MFS authentication method has been selected so the user will need to answer the call and press hashtag (#).
Figure 12: User is called on his mobile phone for the second factor authentication
If the user was domain joined and domain connected, he would not be taken to the WAP Login page, but directly to the login page shown in
Figure 13.
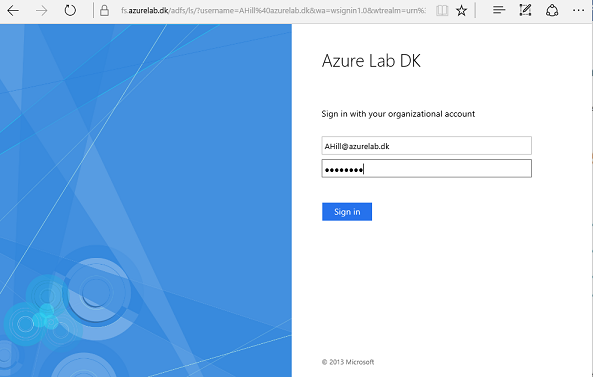
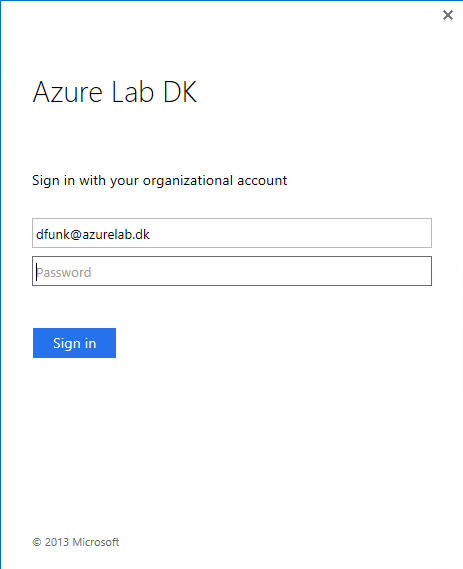
If the end user already had an Outlook profile created and MFA is enabled, he will be prompted in a similar fashion depending on whether he is on an external network or domain joined and domain connected. If on an external network, he will need to enter his credentials on a WAP server as shown in
Figure 13.
Figure 13: Prompted for credentials on a WAP server
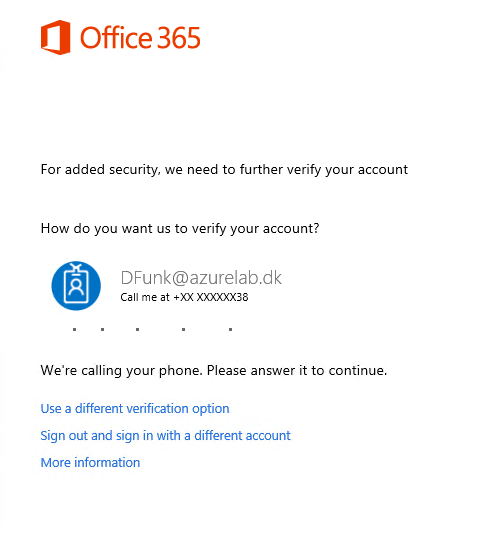
Now the use will be called on his mobile device.
Figure 14: End user called on his mobile phone
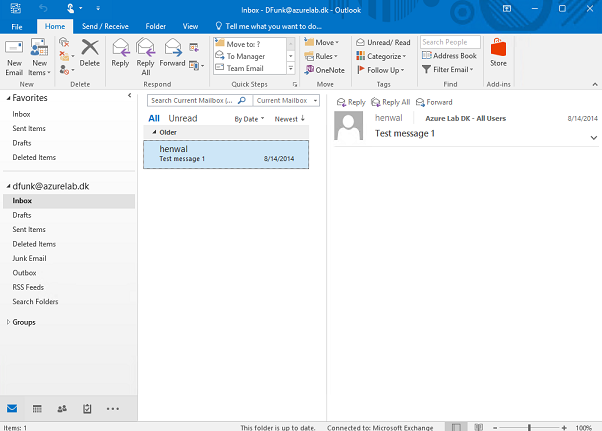
And just like that, the user is connected to his mailbox in Exchange Online.
Now remember from here the logon and refresh token behavior I discussed earlier will kick in, which means that subsequent launches of the Outlook desktop client won’t prompt for any credentials if the client is used in a frequent manner.
Figure 15: Connected to his Mailbox in Exchange Online
This concludes part 7 of this multi-part article in which I provide you with an insight into the new Modern Authentication story and how it affects clients connecting to Exchange Online.
To Be Continued.