Quantcast
Channel: Tech Support
Viewing all 880 articles
Browse latest View live

How to Jailbreak iOS 8.1 – iOS 8 using Pangu

$
0
0
To everyone’s surprise, and as we reported first, the Pangu jailbreak for iOS 8 and iOS 8.1 was released earlier today courtesy of a mysterious team of Chinese jailbreak developers.

Some important points before you proceed:

  • This tutorial is for Windows users. Pangu team hasn’t released a Mac version yet.
  • Please note Pangu is an untethered jailbreak for iOS 8 and iOS 8.1
  • You won’t be able to install Cydia, as it is incompatible with iOS 8 and iOS 8.1
  • Pangu supports following iOS 8 and iOS 8.1 devices:
    • iPhone 6, iPhone 6 Plus, iPhone 5s, iPhone 5c, iPhone 5, iPhone 4S
    • iPad Air, iPad 4, iPad 3, iPad 2
    • iPad mini, Retina iPad mini
    • iPod touch 5G
  • Please disable the passcode as the jailbreak may fail, if the passcode is enabled (Settings -> General -> Passcode Lock On -> Turn Passcode Off).
  • Take a backup of your device using iTunes before proceeding.
  • Please ensure you’ve updated iTunes to the latest version.
  • Please note that jailbreaking your iOS device may void your warranty and hence proceed with caution and at your own risk.
Step 1: Download the latest version of Pangu jailbreak from this link
Step 2: Connect your device to your computer, and use iCloud or iTunes to back up any and all personal information that you need to keep safe. The jailbreak has been reported to be working in most cases, but on the off chance something goes wrong, it’s a good idea to have an escape plan.
Step 3: The Pangu team says that if you’ve done an OTA update, the jailbreak might not work. So please do a fresh install of iOS 8.1.
Step 4: Disable Passcode from Settings > Touch ID & Passcode and turn off Find my iPhone from Settings > iCloud > Find my iPhone.
Step 5: Please launch the application as an Administrator. Right Click on the Pangu exe and select the “Run as Administrator” option.


Step 6: You should be presented with a screen like the one seen below. The application is in Chinese, and if you don’t have the required Chinese fonts on your laptop, you might see question marks instead of Chinese text.


Step 7: Uncheck the checkbox on the left that says “PP” and then click on the blue Jailbreak button.
Step 8: You’ll see the progress of the jailbreak, and the current stage in the 6 step jailbreak process. Follow the on-screen instructions.


Step 9:  You’ll see that your device tells you there’s a restore in progress. Wait for your device to reboot several times. The entire process should take around 5 to 10 minutes.

Step 10: After the jailbreak process completes, you’ll see a Pangu app on your device. This confirms that your device is jailbroken. While there’s no Cydia, you can install OpenSSH, and a few other tools to play around with the jailbroken iOS device’s file system. Hopefully, Cydia will be available through this app as well.

Download link for All Versions of VMware vSphere Client

$
0
0
Download link of all versions of vSphere Client starting from vSphere Client v4.1 Update 1 to the latest release vSphere Client v5.5 Update 2. Just click on the vSphere Client Image in the below table to directly download the respective vSphere Client version.


vSphere Client Version
Installer File Name
Download
VMware vSphere Client v4.1 Update 1
VMware-viclient-all-4.1.0-345043.exe
Description: vMware vSphere Client
VMware vSphere Client v4.1 Update 2
VMware-viclient-all-4.1.0-491557.exe
Description: vMware vSphere Client
VMware vSphere Client v4.1 Update 3
VMware-viclient-all-4.1.0-799345.exe
Description: vMware vSphere Client
VMware vSphere Client v5.0
VMware-viclient-all-5.0.0-455964.exe
Description: vMware vSphere Client
VMware vSphere Client v5.0 Update 1
VMware-viclient-all-5.0.0-623373.exe
Description: vMware vSphere Client
VMware vSphere Client v5.0 Update 2
VMware-viclient-all-5.0.0-913577.exe
Description: vMware vSphere Client
VMware vSphere Client v5.0 Update 3
VMware-viclient-all-5.0.0-1300600.exe
Description: vMware vSphere Client
VMware vSphere Client v5.1
VMware-viclient-all-5.1.0-786111.exe
Description: vMware vSphere Client
VMware vSphere Client 5.1.0a
VMware-viclient-all-5.1.0-860230.exe
Description: vMware vSphere Client
VMware vSphere Client 5.1.0b
VMware-viclient-all-5.1.0-941893.exe
Description: vMware vSphere Client
VMware vSphere Client 5.1 Update 1
VMware-viclient-all-5.1.0-1064113.exe
Description: vMware vSphere Client
VMware vSphere Client 5.1 Update 1b
VMware-viclient-all-5.1.0-1235233.exe
Description: vMware vSphere Client
VMware vSphere Client 5.1 Update 2
VMware-viclient-all-5.1.0-11471691.exe
Description: vMware vSphere Client
VMware vSphere Client 5.5
VMware-viclient-all-5.5.0-1281650.exe
Description: vMware vSphere Client
VMware vSphere Client 5.5 Update 1
VMware-viclient-all-5.5.0-1618071.exe
Description: vMware vSphere Client
VMware vSphere Client 5.5 Update 2
VMware-viclient-all-5.5.0-1993072.exe
Description: vMware vSphere Client

Avanset VCE Exam Simulator Pro v1.1.7 + Crack

$
0
0
Avanset VCE Exam Simulator Pro v1.1.7 is an advanced exam and preparation software for learners and instructors to create their own pieces of practice examinations on a PC. This virtual exam maker let you prepare yourself for any kind of exams through practicing whether it's a drive test, science test, literature test and so on. 

Download Avanset VCE Exam Simulator Pro 1.1.7 free and save time and energy testing your skills, so as human nowadays tend to learn from technology devices more than books, this way a person will never feel boring exam preparation.

Download Link Coming Soon!

How to Install and Configure VNC on Ubuntu 14.04

$
0
0
VNC, or "Virtual Network Computing", is a connection system that allows you to use your keyboard and mouse to interact with a graphical desktop environment on a remote server. VNC makes managing files, software, and settings on a remote server easier for users who are not yet comfortable with working with the command line.

In this article, we will be setting up VNC on an Ubuntu 14.04 server and connecting to it securely through an SSH tunnel. The VNC server we will be using is TightVNC, a fast and lightweight remote control package. This choice will ensure that our VNC connection will be smooth and stable even on slower Internet connections.


Prerequisites

Before you begin with this guide, there are a few steps that need to be completed first.
You will need an Ubuntu 14.04 server installed and configured with a non-root user that has sudo privileges.

Once you have your non-root user, you can use it to SSH into your Ubuntu server and continue with the installation of your VNC server.

Step One — Install Desktop Environment and VNC Server

By default, most Linux server installations will not come with a graphical desktop environment. If this is the case, we'll need to begin by installing one that we can work with. In this example, we will install XFCE4, which is very lightweight while still being familiar to most users.

We can get the XFCE packages, along with the package for TightVNC, directly from Ubuntu's software repositories using apt:
sudo apt-get update
sudo apt-get install xfce4 xfce4-goodies tightvncserver

To complete the VNC server's initial configuration, use the vncserver command to set up a secure password:
vncserver

(After you set up your access password, you will be asked if you would like to enter a view-only password. Users who log in with the view-only password will not be able to control the VNC instance with their mouse or keyboard. This is a helpful option if you want to demonstrate something to other people using your VNC server.)

vncserver completes the installation of VNC by creating default configuration files and connection information for our server to use. With these packages installed, you are ready to configure your VNC server and graphical desktop.

Step Two — Configure VNC Server

First, we need to tell our VNC server what commands to perform when it starts up. These commands are located in a configuration file called xstartup. Our VNC server has an xstartup file preloaded already, but we need to use some different commands for our XFCE desktop.

When VNC is first set up, it launches a default server instance on port 5901. This port is called a display port, and is referred to by VNC as :1. VNC can launch multiple instances on other display ports, like :2, :3, etc. When working with VNC servers, remember that :X is a display port that refers to 5900+X.
Since we are going to be changing how our VNC servers are configured, we'll need to first stop the VNC server instance that is running on port 5901:
vncserver -kill :1

Before we begin configuring our new xstartup file, let's back up the original in case we need it later:
mv ~/.vnc/xstartup ~/.vnc/xstartup.bak
Now we can open a new xstartup file with nano:
nano ~/.vnc/xstartup

Insert these commands into the file so that they are performed automatically whenever you start or restart your VNC server:
#!/bin/bash
xrdb $HOME/.Xresources
startxfce4 &

The first command in the file, xrdb $HOME/.Xresources, tells VNC's GUI framework to read the server user's .Xresources file. .Xresources is where a user can make changes to certain settings of the graphical desktop, like terminal colors, cursor themes, and font rendering.

The second command simply tells the server to launch XFCE, which is where you will find all of the graphical software that you need to comfortably manage your server.

To ensure that the VNC server will be able to use this new startup file properly, we'll need to grant executable privileges to it:
sudo chmod +x ~/.vnc/xstartup

Step Three — Create a VNC Service File

To easily control our new VNC server, we should set it up as an Ubuntu service. This will allow us to start, stop, and restart our VNC server as needed.

First, open a new service file in /etc/init.d with nano:
sudo nano /etc/init.d/vncserver

The first block of data will be where we declare some common settings that VNC will be referring to a lot, like our username and the display resolution.
#!/bin/bash
PATH="$PATH:/usr/bin/"
export USER="user"
DISPLAY="1"
DEPTH="16"
GEOMETRY="1024x768"
OPTIONS="-depth ${DEPTH} -geometry ${GEOMETRY} :${DISPLAY} -localhost"
. /lib/lsb/init-functions

Be sure to replace user with the non-root user that you have set up, and change 1024x768 if you want to use another screen resolution for your virtual display.

Next, we can start inserting the command instructions that will allow us to manage the new service. The following block binds the command needed to start a VNC server, and feedback that it is being started, to the command keyword start.
case "$1" in
start)
log_action_begin_msg "Starting vncserver for user '${USER}' on localhost:${DISPLAY}"
su ${USER} -c "/usr/bin/vncserver ${OPTIONS}"
;;

The next block creates the command keyword stop, which will immediately kill an existing VNC server instance.
stop)
log_action_begin_msg "Stopping vncserver for user '${USER}' on localhost:${DISPLAY}"
su ${USER} -c "/usr/bin/vncserver -kill :${DISPLAY}"
;;

The final block is for the command keyword restart, which is simply the two previous commands (stop and start) combined into one command.
restart)
$0 stop
$0 start
;;
esac
exit 0

Once all of those blocks are in your service script, you can save and close that file. Make this service script executable, so that you can use the commands that you just set up:
sudo chmod +x /etc/init.d/vncserver

Now try using the service and command to start a new VNC server instance:
sudo service vncserver start

Step Four — Connect to Your VNC Desktop

To test your VNC server, you'll need to use a client that supports VNC connections over SSH tunnels. If you are using Windows, you could use TightVNC, RealVNC, or UltraVNC. Mac OS X users can use the built-in Screen Sharing, or can use a cross-platform app like RealVNC.

First, we need to create an SSH connection on your local computer that securely forwards to the localhost connection for VNC. You can do this via the terminal on Linux or OS X via the following command:

(Remember to replace user and server_ip_address with the username and IP you used to connect to your server via SSH.)
ssh -L 5901:127.0.0.1:5901 -N -f -l userserver_ip_address

If you are using a graphical SSH client, like PuTTY, use server_ip_address as the connection IP, and set localhost:5901 as a new forwarded port in the program's SSH tunnel settings.

Next, you can use your VNC viewer to connect to the VNC server at localhost:5901. Make sure you don't forget that :5901 at the end, as that is the only port that the VNC instance is accessible from.

Once you are connected, you should see the default XFCE desktop ready for configuration and use! It should look something like this:


Once you have verified that the VNC connection is working, add your VNC service to the default services, so that it will automatically start whenever you boot your server:
sudo update-rc.d vncserver defaults
 

Conclusion

You should now have a secured VNC server up and running on your Ubuntu 14.04 server. Now you'll be able to manage your server's files, software, and settings with an easy-to-use graphical interface.

Mirror Anything from Your Computer to Your TV Using Google Chromecast

$
0
0

Outputting your computer to your HDTV via HDMI works well. Unfortunately, your computer’s location depends upon the length of your cable. With Google Chromecast, however, you can literally mirror any browser tab or even your desktop, from anywhere, in just a few clicks.

The point when video card manufacturers started including HDMI outputs was a great moment. Similarly, when TV makers began adding VGA inputs, we had yet another great way to add a huge second (or third) display to our setups. The implications, beyond the logical I-can-project-my-computer-now train of thought were pretty apparent. If you wanted to use your TV now to play games from your computer, or watch movies on a big screen, you could now do so easily and cheaply.


The problem, as we mentioned, is that you have to set up your computer right next to your TV. Most HDMI cables are six to ten feet long. You can obviously buy longer lengths but the point is, even with all these fantastic projection capabilities, you’re still tethered by a bulky black cable.

Enter Chromecast, Exit Cables

Google Chromecast is an amazing little gadget that costs less than a tank of gas
For $35, you get a tiny HDMI dongle that’s about the same size as a USB thumbdrive, but it does so much more! One of Chromecast’s best features is the ability to “cast” tabs or even your entire comptuer’s desktop.

To get started, you obviously need a Chromecast. You also need to use Google Chrome and you should install the Google Cast extension. You might also want to install the Chromecast app while you’re at it, but it’s optional.

Casting Chrome Tabs

With your software installed, you can start casting, which is more akin to mirroring, but who are we to split hairs? To cast a tab, click the “Google Cast” button in Chrome.


If you have more than one Chromecast on your network, you’ll obviously see them all. Select the Chromecast from the dropdown menu and your Chrome tab will appear on your TV.
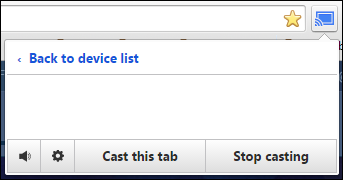
If you want to stop casting, simply click the Cast button again, and then click “Stop casting.”


If you want to cast another tab, select it, click the Cast button and click “Cast this tab.”


Casting tabs is super easy, but your results may vary. It works fairly well though, and we don’t notice a disconcerting amount of lag and stutter.

You can also stream many video files in a Google Chrome tab.


Once you start casting your tabbed video, you can click the full-screen button and it will fill out the whole screen on your output device. You can then tear off this tab as a separate window and minimize it to your taskbar. Just keep in mind that, if you’re using a slower computer, you might notice your output quality suffer a bit if you continue to use your computer for other tasks.

Know also, not all video formats are supported. You can overcome this limitation by either casting your entire screen (described below) or moving the file over to your Android device and casting your screen.

Advanced Casting Features

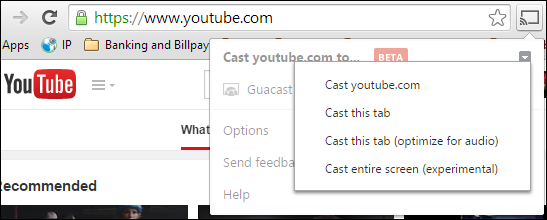
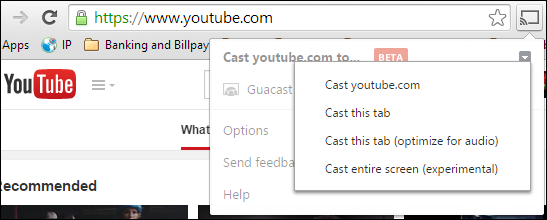
Casting tabs is easy, but there’s far more to it than just that. Clicking again on the Cast button in Chrome, choose the small arrow in the upper-right corner, and you will see three to four other options.


Let’s go through and explain each one so you have a firm grasp on what they all do.

Casting Tabs Optimized for Audio

A lot of TVs come with pretty sweet speakers, or you might have added a sound bar recently and use it listen to Pandora, Spotify, or other streaming services. The problem with normal tab casting is that audio is played on the source and output device, which means you can get some really poor results. Furthermore, you more than likely will get an echo effect, such as if you have the same program playing on two TVs in separate rooms.

If you click “cast this tab (optimize for audio)” however, audio output will be completely routed to your output device. Not only will you not have to mute your source device, but audio quality should be fairly solid.


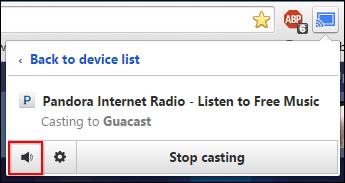
 Note, when you cast with optimized audio, you control volume using the app/webpage and/or your TV. Using your computer’s volume controls will have no effect. You can mute your audio from your device, however, by clicking the little mute button as shown in the following image.


If you want to cast more than one tab, such as another app, or simply your entire desktop, then you need to click “Cast entire screen.”

Casting Your Desktop

While casting tabs is still considered a beta feature, casting your desktop is labeled “experimental.” That said, in our experience, it works very well for something that is still under development.
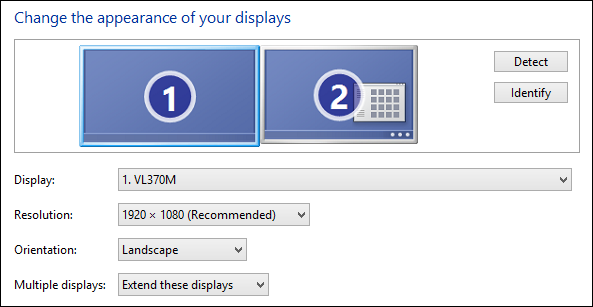
We should all now be familiar with how to project our desktop to a TV or similar output medium. Normally we right-click on the desktop and choose “Screen Resolution.”


With the resolution control panel open, you can now choose your TV as your second (or third) display.


The advantage to this method is that because it’s connected via HDMI cable (or VGA), you experience no lag or stutter. You can also extend the desktop, rather than simply mirroring it. That said, in the end, you’re still connected by a cable, so you can only move the computer as far as its length will allow.

Casting your entire screen, however, means that you can move your computer anywhere, and as long as it can send and receive data to your router, you should have a fairly positive experience.


When you cast your screen to your TV or similar device, you’ll be shown a warning screen. Naturally, you want to click “Yes” here.


Once your screen appears on the output device, your computer will show a small control bar at the bottom of your display. You can grab and drag this bar to anywhere else on the screen, or you can simply click “Hide” to make it go away.


You can always stop casting by clicking Cast, and then the “Stop Casting” button.


In our experience, casting the screen is a tolerable enough feature that you might bust out for presentations or just showing off a web page, but at this point, it’s a less-than-ideal way to stream video. That’s not to say it doesn’t work. In our tests, we tried playing a 650 MB .MP4 video on VLC on an aging but still capable desktop computer, and an even older and less capable laptop.

The weaker laptop cast the video with a great deal of ghosting. The desktop fared somewhat better, with no ghosting, but lag and dropped frames made for a less-than-pleasant viewing experience. Note, changing the resolution on the source computer had no noticeable effect on output quality.

We assume the more powerful the computer, the better your screen-casting experience may be, but it’s definitely not going to offer the type of results that connecting computer directly to the TV will yield.
 

Casting High-Quality Video for Optimal Results

You may have noticed in an earlier screenshot, that there is a special option to cast websites such as YouTube, directly to your Chromecast.


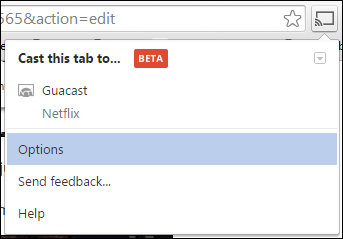
You can do this on an increasing number of services such as YouTube and Netflix, just as if you were casting from your mobile device. Note in the following screenshot, when you cast from Netflix, it still allows you to control playback from your computer, but the actual video is cast to your TV instead being mirrored.


This means you won’t experience any quality problems because the video is being streamed directly from your router to your Chromecast, instead of from your computer, to the router, and then to the Chromecast.
Not all streaming websites support this capability but it’s nice to see Chromecast users no longer have to use a mobile device with a dedicated app to watch Netflix on their TVs.

What’s in Those Options?

Let’s wrap up with the options that you keep seeing when you click on the Cast button.


The Options are simple. Basically you can only choose the quality of your casting tabs.


If you’re experiencing far too many performance issues, then you can set the quality for a lower bitrate. This will obviously have a noticeable effect on how things appear on your output display, but it’s a great way to adjust for better playback when you’re casting a movie or video from a Chrome tab.

The Google Chromecast is already proving to be a very versatile streaming device with lots of potential, and this is just what you can do with using a simple browser tab. On top of that, you can also customize your Chromecast with custom wallpapers, so we’re definitely looking forward to seeing what else this little $35 gadget can do in future updates.

How to Optimize Your Android Phone’s Battery Life Using Greenify

$
0
0

Using Smartphones as daily drivers for calls, web browsing, taking pictures, using social media, and keeping in touch with friends and family. With the disparity of battery capacities on Android devices, Apps like “Greenfly” can maximize battery life throughout the day.


Downloading and Accessing Greenify on the Google Play Store

When Greenify was first created, it required users to have root, or full access to their phone. Earlier this year, the creators of Greenify made Greenify’s “Auto Hibernation” features fully accessible to non-rooted phones. Its battery saving benefits can currently be reaped without having root access to your phone. If you don’t already have it, let’s download the app!

First click on the “Google Play” store icon of your Android device. Your icon arrangement is obviously going vary a whole lot from mine, so don’t fret if your apps are in a different order than mine.


The Google Play Store appears. Within the Google Play Store, we’re going to select the “Search Button” and type in “Greenify”.


Once we type in Greenifiy under the search option, a few different options should appear. One of them will be the Greenify app that we actually want to click.


Click on the Greenify app highlighted below. The App Screen promptly appears afterward.


Note: There are actually two versions of the Greenify app itself. There is the one on the Google Play Store that is a the Paid donation version, and there is the free Greenify app. The Paid Donation version of the app offers a few additional experimental features, and it offers users that like that app the opportunity to support the App’s originator. For the sake of this tutorial, we are going to cover how to use the free one as non-rooted users. Feel free to download the paid version of the app if you’d like, but you do not need to do so to reap the core and primary benefits of this application. Look to the below picture to see what I am referring to. 
 

Once you have access to the Greenify screen app screen pictured below, click on the “Install” Button to initiate the installation of the app on to your device. An “Install” pop up appears.


On the “Install” pop-up below, click “Accept”. Greenify will install itself and place its icon on an available spot within one of your App Pages. If your app pages are full, the Android OS will create another one to make room for the application. Locate Greenify within your pages and click on it to launch the app.


Caution: If you have root access and the donation version, do your research before hibernating system apps. Shutting down certain system apps may put you at risk of making your phone unstable and disabling apps that you actually want to run in the background. The Power Users amongst you guys have been warned!

Using Greenify without Root Access

Using Greenify without root can bring many battery saving effects. Without further ado, let’s jump in to shutting down some of our apps. The picture below will show how your non-rooted screen will look like. Once you see that screen, click on the Greenify screen.


Once you click the Greenify button, the “App Analyzer” screen appears. The App Analyzer screen allows you to actually select and delegate which apps you want to hibernate or Greenify.


Notice the “Blue Lettered Categories” under some of the Apps? Greenify breaks your system Apps into four categories. These categories include: “Running in Background”, “Scheduled Running”, and “May Slow Down the Device When”. The May Slow down Device When is the third and last category that Greenify divides your Apps into. The below screenshot shows this last category.


Alternatively, if we want access to all of your apps, you can click the option button with the three dots up top to reveal the “Show All” option to reveal more of your applications. Click on the ”box” on the right of the Show All text to “Show All”.


After clicking the Show All app option, you can scroll down to see the rest of your apps. If like many people you have a lot of apps, you may need to click one more arrow at the bottom to see all of your Apps. Click the arrow under the blue lettered “More” category. All of your apps should be revealed.

Greenifying your Apps

In the first section of the article, we discussed how to download Greenify and looked at the categories in which Greenify labels your commonly used apps. Now we’re going to actually try to Hibernate or Greenify some of our apps.
Make sure you’re at the App Analyzer screen. The App Analyzer screen looks much like the screen below.


Now we’re going to select apps from each of the three main categories that I mentioned earlier. Each app that you select to Greenify will turn blue when highlighted. Feel free to select any amount of apps that you want.


Note: I wouldn’t recommend picking apps that you commonly use whose functionality relies on regularly phoning home. These apps can include Apps like Google Maps or Weather and conditions apps. Apps like the ones I mentioned work best when they are left alone, and may cause dysfunction or having to manually refresh them. For example, imagine having your weather app lagging days behind unless you manually refresh it. First world problem, I know,  but I just thought I would mention this. 

After you have picked the apps you want, Go back to the top of the App Analyzer screen and click on the checkmark button.


After clicking the checkmark button, and attempting to Hibernate your first couple of apps, Greenify will present users with note about Greenifying without Root Access. Users can press the OK button on the bottom of that screen to advance to their Greenified Apps.


Below are the Apps that I decided to Greenify. Notice that many of my applications like the Greenify warning specified require “Manual Hibernation”, while many apps hibernate right off the bat.


In order to easily manually Greenify click on the “Option” at the bottom right hand corner. A pop up box with the options: Create hibernation shortcut, Experimental Features, and About appear. Click on the “Create Hibernation Shortcut” to create shortcut we will use to manually put apps to sleep. The Hibernate Now shortcut instantly appears on one of your vacant Android page spot.


For the sake of our example we are going to attempt to manually shut down “Dolphin Browser”. Click on the “Hibernate Now” button.


Since the Dolphin Browser is at the very top of the queue to manually shutdown, it will be the first one that will manually shut down. After clicking the “Hibernate Now” Screen, the App info screen appears. This App info screen will have a statement that informs the user on how to manually hibernate apps. Click the “Force Stop” Button as instructed to Manually Activate apps.

The App that we will attempt to Manually Hibernate will give us lip about pressing “Force Stop”, but press ”OK” anyway.


Pressing “Force Stop” Manually Hibernates our pesky Dolphin Browser. Our once stubborn Dolphin Browser app will finally be hibernated under the Hibernate category below. We can rinse and repeat as necessary for other apps that require Manual Hibernation.


Hibernating Apps the Easy Way with Automated Hibernation

Remember this pesky little screen we saw a while back? For us non-rooted brethren, this screen will now be our friend in enabling us to “Automated Hibernation. Even for the stubborn apps that don’t do so initially.


To enable Automated Hibernation, click on the “Enable Automation Button”. The “Accessibility Screen” appears.

You will see several different panes governing Accessibility options. To change the Accessibility Settings in Greenery, we are going to have click on the Greenery service and click it from “Off” to “On.”


The Greenify Settings screen now appears. We are going to have similarly set this screen from “Off” to On.


The “Stop Greenify?” warning will appear below. We are going to have to shut off Greenify to allow our changes to the Accessibility Settings to take. Press “OK” on that warning box.


Finally users are going to have to have to re-enable Greenify to Finalize and cement the Greenify Accessibility Process. You will see one more final dialog box that you will have to contend with. Press “OK”.


Click on Hibernate Now Button that we have created previously and you will find that your apps will behave quite differently than when we were Manually Hibernating our apps.


That’s it! We now know how to both manually Greenify individual apps as well as setting it to Automate Hibernation for us.

Conclusion

In a smartphone imperative world, it is crucial to ensure that we can maximize battery life as much as possible. Apps like Greenify allow non-rooted and rooted users alike to maximize their battery life. Power Users can use the Donation Package version of Greenify to full reap all of Greenify’s useful tools. But for the rest of us, we can Manually Hibernate and Automatically Hibernate our apps with ease.

Play Your Android Games and Videos on the TV with Google Chromecast

$
0
0

There’s a lot you can do with the Google Chromecast but did you know you can cast your screen from your Android phone or tablet to any Chromecast-equipped display? It’s easy, and we’re going to tell you how to do it. The Google Chromecast rocks. It’s cheap ($35), tiny, and there’s so much you can do with it. If that’s not enough to convince you, then we urge you to check out our Chromecast review!

We’ve told you already how to cast any video from your desktop or laptop to your Chromecast. In this article we will show you now how to cast your Android device’s (phone or tablet) screen to your TV. Before you can cast, you need to make sure your device is ready.


The All Important Chromecast App

The first thing you will need, other than an Android phone or tablet, is the Chromecast app from the Google Play store.


Once installed, turn your TV’s mode to the HDMI input where your Chromecast is plugged in. Open the Chromecast app and you will see your Chromecast device(s) on your network.


Tap the area where it says “Devices” to reveal the Chromecast settings. Tap “Cast screen” to continue.


As you can see, screen casting is currently in beta. In our tests it works fairly flawlessly but understand you may encounter an occasional glitch or problem. In any event, when you’re ready, tap “Cast Screen.”


Your device list will appear. If you have more than one Chromecast installed on your network, obviously there will be more than one here. Tap the Chromecast to which you want to cast your screen, and it should subsequently appear on your TV or similar device.


If you’re using so-called pure Android, there’s an even faster way to cast your screen. Touch your finger to the status bar to reveal the settings panel. What you see may vary from our screenshot, but regardless there should be a Cast Screen button. Tap it to open the cast screen controls.


It makes no difference if this settings is turned “On” or “Off” so we won’t even bother. Instead, tap the Chromecast to which you want to cast your screen. That’s all you need to do.


Whenever you’re casting anything, you will see the Cast icon in the status bar. When you’re done and you want to disconnect, simply pull down and tap “Disconnect.”


That’s all for that, so simple and yet so awesome. That said, how well does it work?

A Few Minor Drawbacks

So, screen casting is obviously a neat trick, and we can see the immediate value, but to that end, is it worth using? How does it perform? Can you watch movies and play games from your device without any noticeable or irritating lag? The short answer is yes, you can and you’ll likely be fairly pleased with the results. Of course, there are some drawbacks but these are very minor; they’re more like caveats than glaring problems.

First, if you’re casting, it will be adhere to the behavior of your device. This means, when your screen times out, it will too on your TV. Also, whenever you view something in portrait mode (home screens on most phones don’t switch to landscape), it will appear as such on whatever you’re casting to.

Keep in mind too that you’re mirroring devices, which means that the source device must stay awake. Bottom line, if you plan on watching movies and videos for long, extended periods, you may want to plug your source device in.

Finally, and this is most important, whatever happens on your device will appear for all to see, so if you have any private texts or messages that arrive while you’re casting, others may be able to see and read them.

Yes, But How Does it Perform?

Let’s get to the nitty-gritty: performance. How well does screen casting work with stuff like movies and games?

As far as movies and videos are concerned, the experience is fairly flawless. You can use any free video player, such as MX Player or the tried-and-true VLC (still in beta), and you can watch just about anything on your device and project it to your big screen.

The results are clear, crisp, and responsive, so we’re pretty sure you’ll be pleased with them.


But, what about games? The appeal of being able to play games on your device is obvious. Being able to play them on a big screen heightens that appeal even more. We tried out several games on a variety of Nexus device (4, 5, and 7), and are pleased to report that casting games to our big screen did not noticeably affect performance (other than being not very good at them).
 
Lag, if any, was barely noticeable. Games ran as smoothly on our TV as they did on our devices. The only real drawback was that most games run in portrait mode.


The biggest factor in judging performance will be your device. For example, games for us performed appreciably better on the Nexus 5 and Nexus 7, than the Nexus 4. Keep that in mind, but know that we were able to play a number of games that required flicks, taps, and other assorted movements with satisfying results.

Screen casting is an easy and inexpensive way to project your device to any big screen in your house with a Chromecast attached. In fact, it’s so easy, that we now often use it to watch many of our favorite videos or just lazily surf the Internet from the couch.

How To Install Zentyal on Ubuntu 14.04

$
0
0
Most businesses require several server types such as file servers, print servers, email servers, etc. Zentyal combines these services and more, as a complete small business server for Linux.

Zentyal servers are simple to use because of the Graphical User Interface (GUI). The GUI provides an easy and intuitive interface for use by novice and experienced administrators alike. Command-line administration is available, too. We'll be showing how to use both of these methods in this tutorial.


To see a list of the specific software that can be installed with Zentyal, please see either of the Installing Packages sections.

Some people may be familiar with the Microsoft Small Business Server (SBS), now called Windows Server Essentials. Zentyal is a similar product that is based on Linux, and more specifically Ubuntu. Zentyal is also a drop-in replacement for Microsoft SBS and Microsoft Exchange Servers. Since Zentyal is open source, it is a cost-effective choice.

Zentyal Editions

There are two types of Zentyal available. The first is the Community Edition and the other is the Commercial Edition.

The Community Edition has all the latest features, stable or otherwise. No official support is offered by the company for technical issues. No cloud services are provided with the Community Edition. A new version is released every three months with unofficial support for the most recent release. Users are unlimited.

The Commercial Edition has all the latest features, stable and tested. Support is offered based on the Small and Medium Business Edition. Cloud Services are integrated into the server and based on the SMB Edition. The number of users supported by the Commercial Edition is based on the SMB Edition purchased. A new Commercial Edition is released every two years and supported for four years.

Note: The Community Edition cannot be upgraded to the Commercial Edition.

Zentyal Requirements

Zentyal is Debian-based and built on the latest Ubuntu Long Term Support (LTS) version. The current hardware requirements for Zentyal 3.5 are based on Ubuntu Trusty 14.04.1 LTS (kernel 3.5). Zentyal uses the LXDE desktop and the Openbox window manager.

The minimum hardware requirements for Ubuntu Server Edition include 300 MHz CPU, 128 MB of RAM, and 500 MB of disk space. Of course, these are bare minimums and would produce undesired responses on a network when running multiple network services.

Keep in mind that every network service requires different hardware resources and the more services installed, the more hardware requirements are increased. In most cases, it is best to start with the basic services you require and then add other services as needed. If the server starts to lag in processing user requests, you should consider upgrading your server plan.

Depending on your number of users, and which Zentyal services you plan to run, your hardware requirements will change. These are the Zentyal recommendations.


Profile
Number of Users
CPU
RAM
Disk Space
Network Cards
Gateway
<50 span="">50>
P4
2 GB
80 GB
2+
Infrastructure
50+
Xeon dual core
4 GB
160 GB
2+
<50 span="">50>
P4
1 GB
80 GB
1
Office
50+
P4
2 GB
160 GB
1
<50 span="">50>
P4
1 GB
250 GB
1
Communications
50+
Xeon dual core
2 GB
500 GB
1
<100 span="">100>
Xeon dual core
4 GB
250 GB
1
100+
Xeon dual core
8 GB
500 GB
1
 
We'll talk more about the profiles and different types of Zentyal services later in the article.

Installing Zentyal

1 GB Virtual/Physical Ubuntu 14.04 machine


First, you need to add the Zentyal repository to your repository list with the following command:
sudo add-apt-repository "deb http://archive.zentyal.org/zentyal 3.5 main extra"

After the packages are downloaded they should be verified using a public key from Zentyal. To add the public key, execute the following two commands:
sudo apt-key adv --keyserver keyserver.ubuntu.com --recv-keys 10E239FF wget -q http://keys.zentyal.org/zentyal-3.5-archive.asc -O- | sudo apt-key add -
Now that the repository list is updated, you need to update the package lists from the repositories. To
update the package lists, execute this command:
sudo apt-get update

Once the package list is updated, you can install Zentyal by running:
sudo apt-get install zentyal

When prompted, set a secure root password (twice) for MySQL. Confirm port 443.
Zentyal is now installed.

If you prefer to use the command line to install your Zentyal packages, read the next section. Or, if you prefer to use a dashboard, skip to the Accessing Zentyal Dashboard section.

Installing Packages (Command Line)

Now, you can start installing the specific services you require. There are four basic profiles which install many related modules at once. These profiles are:
  • zentyal-office— The profile is for setting up an office network to share resources. Resources can include files, printers, calendars, user profiles, and groups.
  • zentyal-communication— Server can be used for business communications such as email, instant messaging, and Voice Over IP (VOIP).
  • zentyal-gateway— The server will be a controlled gateway for the business to and from the Internet. Internet access can be controlled and secured for internal systems and users.
  • zentyal-infrastructure— The server can manage the network infrastructure for the business. Managment consists of NTP, DHCP, DNS, etc.
You can see what's installed with each profile here. To install a profile, run this command:
sudo apt-get install zenytal-office

You can also install each module individually as needed. For example, if you wanted only the antivirus module of the Office profile installed, you would execute the following:
sudo apt-get install zentyal-antivirus

You can also install all the profiles in one command:
sudo apt-get install zentyal-all

When you are installing certain packages, you will need to provide information about your systems via the interactive menus.

Some of the module names are straightforward, but here is a defined list of Zentyal packages:
  • zentyal-all - Zentyal - All Component Modules (all Profiles)
  • zentyal-office - Zentyal Office Suite (Profile)
  • zentyal-antivirus - Zentyal Antivirus
  • zentyal-dns– Zentyal DNS
  • zentyal-ebackup - Zentyal Backup
  • zentyal-firewall– Zentyal Firewall Services
  • zentyal-ntp– NTP Services
  • zentyal-remoteservices - Zentyal Cloud Client
  • zentyal-samba - Zentyal File Sharing and Domain Services
  • zentyal-communication - Zentyal Communications Suite
  • zentyal-jabber - Zentyal Jabber (Instant Messaging)
  • zentyal-mail - Zentyal Mail Service
  • zentyal-mailfilter - Zentyal Mail Filter
  • zentyal-gateway - Zentyal Gateway Suite
  • zentyal-l7-protocols - Zentyal Layer-7 Filter
  • zentyal-squid– HTTP Proxy
  • zentyal-trafficshaping - Zentyal Traffic Shaping
  • zentyal-infrastructure - Zentyal Network Infrastructure Suite
  • zentyal-ca– Zentyal Certificate Authority
  • zentyal-dhcp– DHCP Services
  • zentyal-openvpn– VPN Services
  • zentyal-webserver - Zentyal Web Server
Other modules which are not included in the profiles are as follows:
  • zentyal-bwmonitor - Zentyal Bandwidth Monitor
  • zentyal-captiveportal - Zentyal Captive Portal
  • zentyal-ips - Zentyal Intrusion Prevention System
  • zentyal-ipsec - Zentyal IPsec and L2TP/IPsec
  • zentyal-monitor - Zentyal Monitor
  • zentyal-nut - Zentyal UPS Management
  • zentyal-openchange - Zentyal OpenChange Server
  • zentyal-radius - Zentyal RADIUS
  • zentyal-software - Zentyal Software Management
  • zentyal-sogo - Zentyal OpenChange Webmail
  • zentyal-usercorner - Zentyal User Corner
  • zentyal-users - Zentyal Users and Computers
  • zentyal-webmail - Zentyal Webmail Service

Accessing the Zentyal Dashboard

Access the Zentyal dashboard by visiting the IP address or domain of your server in your browser, over HTTPS (port 443):
https://SERVER IP

The Zentyal server creates a self-signed SSL certificate for use when being accessed remotely. Any browser accessing the server's dashboard remotely will be asked if the site is trusted and an exception will need to be made as shown below. The method will vary based on your browser.

Because of the SSL certificate, an error is generated that the site is untrusted. You need to click on the line I Understand the Risks. Then click on the Add Exception button. Select Confirm Security Exception. After the exception is added, it is a permanent listing that does not occur again unless the server IP Address should change.


You should see the dashboard login page.


Your Zentyal username and password are the same user and password that you use to SSH to your Ubuntu server. This user must be added to the sudo group. (Granting full permissions to the user by some other method will NOT work.) If an existing user account needs to be added to the sudo group, run the following command:
sudo adduser username sudo

To add more Zentyal users, add new Ubuntu users. To add a new user use the following command to create the user and also add the user to the sudo group:
sudo adduser username --ingroup sudo

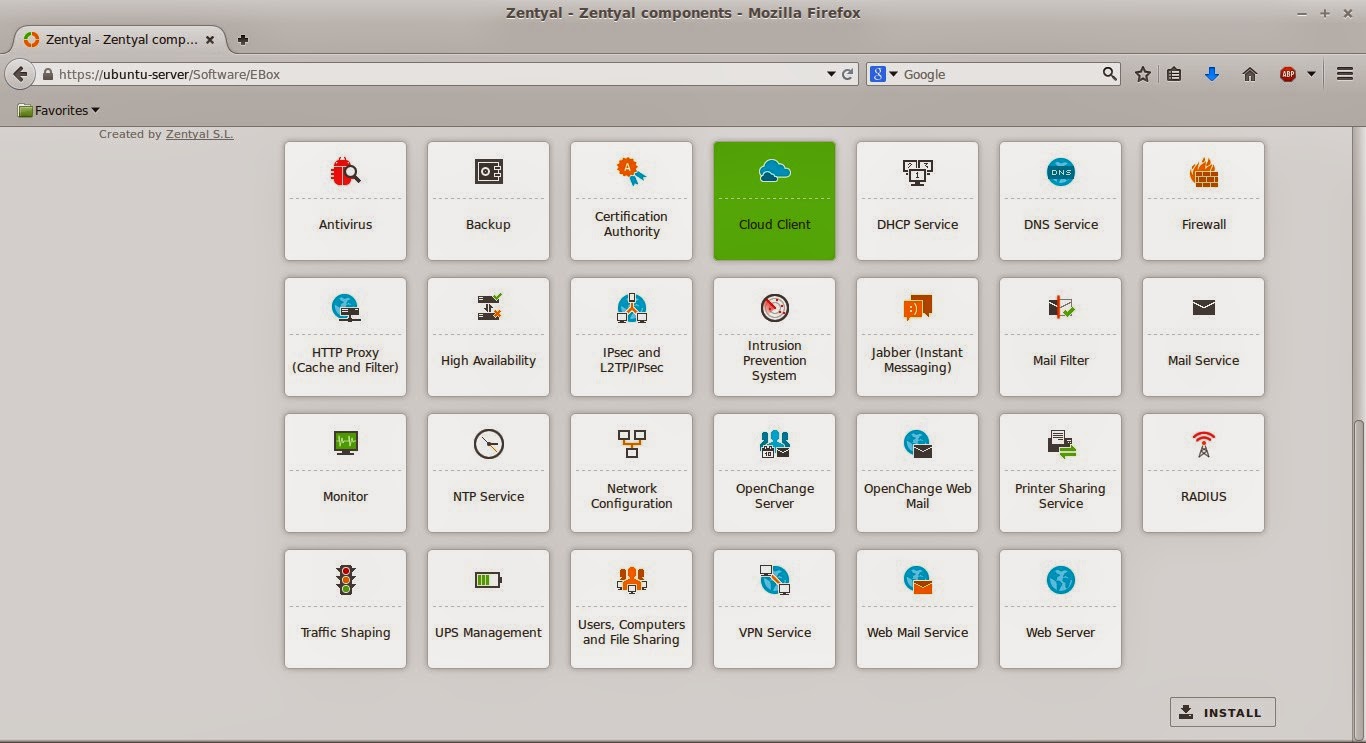
Once you log into the Zentyal server, you will see a collection of packages available for installation.


You can also see a module list at https://SERVER IP/Software/EBox as shown below.


Installing Packages (Dashboard)

You can install Zentyal packages from the dashboard. There are four basic profiles which install many related modules at once. You can see what's installed with each profile here. Or, check the list below:
Office:

This profile sets up shared office resources like files, printers, calendars, user profiles, and groups.
  • Samba4
  • Heimdal Kerberos
  • CUPS
  • Duplicity
Communication:
This profile includes email, instant messaging, and Voice Over IP (VOIP).
  • Postfix
  • Dovecot
  • Roundcube
  • Sieve
  • Fetchmail
  • Spamassassin
  • ClamAV
  • Postgrey
  • OpenChange
  • Roundcube
  • ejabbered
Gateway:
This profile includes software to control and secure Internet access.
  • Corosync
  • Pacemaker
  • Netfilter
  • Iproute2
Linux networking subsystem:
  • Iproute2
  • Squid
  • Dansguardian
  • ClamAV
  • FREERadius
  • OpenVPN
  • OpenSWAN
  • xl2tpd
  • Suricata
  • Amavisd-new
  • Spamassasin
  • ClamAV
  • Postgrey
Infrastructure:
This profile allows you to manage the office network, including NTP, DHCP, DNS, etc.
  • ISC DHCP
  • BIND 9
  • NTPd
  • OpenSSL
  • Apache
  • NUT
In the left-hand navigation, go to "Software Management" then "Zentyal Components"– You'll see the four profiles at the top. (Or, click View basic mode to see the four profiles.)


Below the profiles is a list of all the modules you can install individually.


The previous images show the basic view. If you click on View advanced mode, the screen should look like this:


Once you have selected your modules, click the INSTALL button at the bottom of the page.
Once the packages are installed, you'll see links for them in the dashboard navigation menu on the left. You can start setting up your new software through the Zentyal dashboard by navigating to the appropriate menu item in the control panel.

Updating Packages (Dashboard)

It's important to keep your system up to date with the latest security patches and features.
Let's install some updates from the dashboard. Click the Dashboard link on the left. In the image below, you can see there are 26 System Updates, with 12 of them being Security Updates. To start the system update, simply click on 26 system updates (12 security).


This will take you to the System updates page with a list of all updates available for the Zentyal server.


Here you can check the items you wish to update. At the bottom is an item to Update all packages as shown below.


Once you have selected the necessary updates, you can click on the UPDATE button at the bottom of the page. The download and installation of the update packages will begin as shown below.


Once done, you should see a screen similar to the one below, which shows that the update successfully completed.


Once the update is completed, you can press the UPDATE LIST button to verify that no other updates are available.

Conclusion

For a small or medium business, Zentyal is a server that can do it all. Services can be enabled as they are needed and disabled when they are not needed. Zentyal is also user-friendly enough that novice administrators can perform system updates and profile/module installation, using the command line or the Graphical User Interface (GUI).

If needed, multiple Zentyal servers can be used to distribute the services required by the business to create a more efficient network.

How To Set Up Apache Virtual Hosts on CentOS 7

$
0
0
The Apache web server is the most popular way of serving web content on the Internet. It serves more than half of all of the Internet's active websites, and is extremely powerful and flexible.

Apache breaks down its functionality and components into individual units that can be customized and configured independently. The basic unit that describes an individual site or domain is called a virtual host. Virtual hosts allow one server to host multiple domains or interfaces by using a matching system. This is relevant to anyone looking to host more than one site off of a single Server.

Each domain that is configured will direct the visitor to a specific directory holding that site's information, without ever indicating that the same server is also responsible for other sites. This scheme is expandable without any software limit, as long as your server can handle the traffic that all of the sites attract.

In this guide, we will walk through how to set up Apache virtual hosts on a CentOS 7 Server. During this process, you'll learn how to serve different content to different visitors depending on which domains they are requesting.


Prerequisites

Before you begin with this guide, there are a few steps that need to be completed first.
You will need access to a CentOS 7 server with a non-root user that has sudo privileges. If you haven't configured this yet, you can run through the CentOS 7 initial server setup guide to create this account.

You will also need to have Apache installed in order to configure virtual hosts for it. If you haven't already done so, you can use yum to install Apache through CentOS's default software repositories:
sudo yum -y install httpd

Next, enable Apache as a CentOS service so that it will automatically start after a reboot:
sudo systemctl enable httpd.service
After these steps are complete, log in as your non-root user account through SSH and continue with the tutorial.

Note: The example configuration in this guide will make one virtual host for example.com and another for example2.com. These will be referenced throughout the guide, but you should substitute your own domains or values while following along.

If you do not have any real domains to play with, we will show you how to test your virtual host configuration with dummy values near the end of the tutorial.

Step One — Create the Directory Structure

First, we need to make a directory structure that will hold the site data to serve to visitors.
Our document root (the top-level directory that Apache looks at to find content to serve) will be set to individual directories in the /var/www directory. We will create a directory here for each of the virtual hosts that we plan on making.

Within each of these directories, we will create a public_html directory that will hold our actual files. This gives us some flexibility in our hosting.

We can make these directories using the mkdir command (with a -p flag that allows us to create a folder with a nested folder inside of it):
sudo mkdir -p /var/www/example.com/public_html
sudo mkdir -p /var/www/example2.com/public_html

Step Two — Grant Permissions

We now have the directory structure for our files, but they are owned by our root user. If we want our regular user to be able to modify files in our web directories, we can change the ownership with chown:
sudo chown -R $USER:$USER /var/www/example.com/public_html
sudo chown -R $USER:$USER /var/www/example2.com/public_html

The $USER variable will take the value of the user you are currently logged in as when you submit the command. By doing this, our regular user now owns the public_html subdirectories where we will be storing our content.

We should also modify our permissions a little bit to ensure that read access is permitted to the general web directory, and all of the files and folders inside, so that pages can be served correctly:
sudo chmod -R 755 /var/www

Your web server should now have the permissions it needs to serve content, and your user should be able to create content within the appropriate folders.

Step Three — Create Demo Pages for Each Virtual Host

Now that we have our directory structure in place, let's create some content to serve.
Because this is just for demonstration and testing, our pages will be very simple. We are just going to make an index.html page for each site that identifies that specific domain.

Let's start with example.com. We can open up an index.html file in our editor by typing:

In this file, create a simple HTML document that indicates the site that the page is connected to. For this guide, the file for our first domain will look like this:

nano /var/www/example.com/public_html/index.html


Welcome to <span class="highlight">Example.com</span>!


Success! The example.com virtual host is working!


Save and close the file when you are finished.

We can copy this file to use as the template for our second site's index.html by typing:
cp /var/www/example.com/public_html/index.html /var/www/example2.com/public_html/index.html
Now let's open that file and modify the relevant pieces of information:
 
nano /var/www/example2.com/public_html/index.html


Welcome to <span class="highlight">Example2.com</span>!


Success! The example2.com virtual host is working!


Save and close this file as well. You now have the pages necessary to test the virtual host configuration.

Step Four — Create New Virtual Host Files

Virtual host files are what specify the configuration of our separate sites and dictate how the Apache web server will respond to various domain requests.

To begin, we will need to set up the directory that our virtual hosts will be stored in, as well as the directory that tells Apache that a virtual host is ready to serve to visitors. The sites-available directory will keep all of our virtual host files, while the sites-enabled directory will hold symbolic links to virtual hosts that we want to publish. We can make both directories by typing:
sudo mkdir /etc/httpd/sites-available
sudo mkdir /etc/httpd/sites-enabled

Note: This directory layout was introduced by Debian contributors, but we are including it here for added flexibility with managing our virtual hosts (as it's easier to temporarily enable and disable virtual hosts this way).

Next, we should tell Apache to look for virtual hosts in the sites-enabled directory. To accomplish this, we will edit Apache's main configuration file and add a line declaring an optional directory for additional configuration files:
sudo nano /etc/httpd/conf/httpd.conf

Add this line to the end of the file:
IncludeOptional sites-enabled/*.conf

Save and close the file when you are done adding that line. We are now ready to create our first virtual host file.

Create the First Virtual Host File

Start by opening the new file in your editor with root privileges:
sudo nano /etc/httpd/sites-available/example.com.conf

Note: Due to the configurations that we have outlined, all virtual host files must end in .conf.
First, start by making a pair of tags designating the content as a virtual host that is listening on port 80 (the default HTTP port):


Next we'll declare the main server name, www.example.com. We'll also make a server alias to point to example.com, so that requests for www.example.com and example.com deliver the same content:
 

ServerName www.example.com
ServerAlias example.com


Note: In order for the www version of the domain to work correctly, the domain's DNS configuration will need an A record or CNAME that points www requests to the server's IP. A wildcard (*) record will also work.

Finally, we'll finish up by pointing to the root directory of our publicly accessible web documents. We will also tell Apache where to store error and request logs for this particular site:


ServerName www.example.com
ServerAlias example.com
DocumentRoot /var/www/example.com/public_html
ErrorLog /var/www/example.com/error.log
CustomLog /var/www/example.com/requests.log combined


When you are finished writing out these items, you can save and close the file.

Copy First Virtual Host and Customize for Additional Domains

Now that we have our first virtual host file established, we can create our second one by copying that file and adjusting it as needed.

Start by copying it with cp:
sudo cp /etc/httpd/sites-available/example.com.conf /etc/httpd/sites-available/example2.com.conf

Open the new file with root privileges in your text editor:
sudo nano /etc/httpd/sites-available/example2.com.conf

You now need to modify all of the pieces of information to reference your second domain. When you are finished, your second virtual host file may look something like this:
 

ServerName www.example2.com
DocumentRoot /var/www/example2.com/public_html
ServerAlias example2.com
ErrorLog /var/www/example2.com/error.log
CustomLog /var/www/example2.com/requests.log combined


When you are finished making these changes, you can save and close the file.

Step Five — Enable the New Virtual Host Files

Now that we have created our virtual host files, we need to enable them so that Apache knows to serve them to visitors. To do this, we can create a symbolic link for each virtual host in the sites-enabled directory:

sudo ln -s /etc/httpd/sites-available/example.com.conf /etc/httpd/sites-enabled/example.com.conf 

sudo ln -s /etc/httpd/sites-available/example2.com.conf /etc/httpd/sites-enabled/example2.com.conf

When you are finished, restart Apache to make these changes take effect:
sudo apachectl restart

Step Six — Set Up Local Hosts File (Optional)

If you have been using example domains instead of actual domains to test this procedure, you can still test the functionality of your virtual hosts by temporarily modifying the hosts file on your local computer. This will intercept any requests for the domains that you configured and point them to your server, just as the DNS system would do if you were using registered domains. This will only work from your computer, though, and is simply useful for testing purposes.

Note: Make sure that you are operating on your local computer for these steps and not your CentOS server. You will need access to the administrative credentials for that computer.

If you are on a Mac or Linux computer, edit your local hosts file with administrative privileges by typing:
sudo nano /etc/hosts

If you are on a Windows machine, you can find instructions on altering your hosts file here.
The details that you need to add are the public IP address of yourCentOS Server  followed by the domain that you want to use to reach that Server:
 
127.0.0.1   localhost
127.0.1.1 guest-desktop
server_ip_address example.com
server_ip_address example2.com

This will direct any requests for example.com and example2.com on our local computer and send them to our server at server_ip_address.

Step Seven — Test Your Results

Now that you have your virtual hosts configured, you can test your setup easily by going to the domains that you configured in your web browser:
http://example.com

You should see a page that looks like this:


Likewise, if you visit your other domains, you will see the files that you created for them.
If all of the sites that you configured work well, then you have successfully configured your new Apache virtual hosts on the same CentOS server.

If you adjusted your home computer's hosts file, you may want to delete the lines that you added now that you've verified that your configuration works. This will prevent your hosts file from being filled with entries that are not actually necessary.

Conclusion

At this point, you should now have a single CentOS 7 server handling multiple sites with separate domains. You can expand this process by following the steps we outlined above to make additional virtual hosts later. There is no software limit on the number of domain names Apache can handle, so feel free to make as many as your server is capable of handling.

How To Create an SSL Certificate on Apache for CentOS 7

$
0
0
TLS, or "transport layer security", and its predecessor SSL, which stands for "secure sockets layer", are web protocols used to wrap normal traffic in a protected, encrypted wrapper. Using this technology, servers can send traffic safely between the server and the client without the concern that the messages will be intercepted and read by an outside party. The certificate system also assists users in verifying the identity of the sites that they are connecting with.

In this article, we will show you how to set up a self-signed SSL certificate for use with an Apache web server on a CentOS 7. A self-signed certificate will not validate the identity of your server, since it is not signed by a trusted certificate authorities, but it will allow you to encrypt communications between your server and your visitors.


Prerequisites

Before you begin with this guide, there are a few steps that need to be completed first.
You will need access to a CentOS 7 server with a non-root user that has sudo privileges. If you haven't configured this yet, you can run through the CentOS 7 initial server setup guide to create this account.

You will also need to have Apache installed in order to configure virtual hosts for it. If you haven't already done so, you can use yum to install Apache through CentOS's default software repositories:
sudo yum install httpd

Next, enable Apache as a CentOS service so that it will automatically start after a reboot:
sudo systemctl enable httpd.service

After these steps are complete, you can log in as your non-root user account through SSH and continue with the tutorial.

Step One — Install Mod SSL

In order to set up the self-signed certificate, we first have to be sure that mod_ssl, an Apache module that provides support for SSL encryption, is installed on our VPS. We can install mod_ssl with the yum command:
sudo yum install mod_ssl

The module will automatically be enabled during installation, and Apache will be able to start using an SSL certificate after it is restarted. You don't need to take any additional steps for mod_ssl to be ready for use.

Step Two — Create a New Certificate

Now that Apache is ready to use encryption, we can move on to generating a new SSL certificate. The certificate will store some basic information about your site, and will be accompanied by a key file that allows the server to securely handle encrypted data.

First, we need to create a new directory where we will store the server key and certificate:
sudo mkdir /etc/httpd/ssl

Now that we have a location to place our files, we can create the SSL key and certificate files with openssl:
sudo openssl req -x509 -nodes -days 365 -newkey rsa:2048 -keyout /etc/httpd/ssl/apache.key -out /etc/httpd/ssl/apache.crt
After you enter the request, you will be taken to a prompt where you can enter information about your website. Before we go over that, let's take a look at what is happening in the command we are issuing:
  • openssl: This is the basic command line tool for creating and managing OpenSSL certificates, keys, and other files.
  • req -x509: This specifies that we want to use X.509 certificate signing request (CSR) management. The "X.509" is a public key infrastructure standard that SSL and TLS adhere to for key and certificate management.
  • -nodes: This tells OpenSSL to skip the option to secure our certificate with a passphrase. We need Apache to be able to read the file, without user intervention, when the server starts up. A passphrase would prevent this from happening, since we would have to enter it after every restart.
  • -days 365: This option sets the length of time that the certificate will be considered valid. We set it for one year here.
  • -newkey rsa:2048: This specifies that we want to generate a new certificate and a new key at the same time. We did not create the key that is required to sign the certificate in a previous step, so we need to create it along with the certificate. The rsa:2048 portion tells it to make an RSA key that is 2048 bits long.
  • -keyout: This line tells OpenSSL where to place the generated private key file that we are creating.
  • -out: This tells OpenSSL where to place the certificate that we are creating.
Fill out the prompts appropriately. The most important line is the one that requests the Common Name. You need to enter the domain name that you want to be associated with your server. You can enter the public IP address instead if you do not have a domain name.

The full list of prompts will look something like this:
 
Country Name (2 letter code) [XX]:US
State or Province Name (full name) []:Example
Locality Name (eg, city) [Default City]:Example
Organization Name (eg, company) [Default Company Ltd]:Example Inc
Organizational Unit Name (eg, section) []:Example Dept
Common Name (eg, your name or your server's hostname) []:example.com
Email Address []:webmaster@example.com


Step Three — Set Up the Certificate

We now have all of the required components of the finished interface. The next thing to do is to set up the virtual hosts to display the new certificate.

Open Apache's SSL configuration file in your text editor with root privileges:
sudo nano /etc/httpd/conf.d/ssl.conf

Find the section that begins with . We need to make a few changes here to ensure that our SSL certificate is correctly applied to our site.

First, uncomment the DocumentRoot line and edit the address in quotes to the location of your site's document root. By default, this will be in /var/www/html, and you don't need to change this line if you have not changed the document root for your site. However, if you followed a guide like our Apache virtual hosts setup guide, your site's document root may be different.
DocumentRoot "/var/www/example.com/public_html"

Next, uncomment the ServerName line and replace www.example.com with your domain name or server
IP address (whichever one you put as the common name in your certificate):
 ServerName www.example.com:443

Find the SSLCertificateFile and SSLCertificateKeyFile lines and change them to the directory we made at /etc/httpd/ssl:
SSLCertificateFile /etc/httpd/ssl/apache.crt
SSLCertificateKeyFile /etc/httpd/ssl/apache.key

When you are finished making these changes, you can save and close the file.

Step Four — Activate the Certificate

By now, you have created an SSL certificate and configured your web server to apply it to your site. To apply all of these changes and start using your SSL encryption, you can restart the Apache server to reload its configurations and modules:
sudo apachectl restart

In your web browser, try visiting your domain name or IP with https:// to see your new certificate in action.
https://example.com/

Your web browser will likely warn you that the site's security certificate is not trusted. Since your certificate isn't signed by a certificate authority that the browser trusts, the browser is unable to verify the identity of the server that you are trying to connect to. We created a self-signed certificate instead of a trusted CA-signed certificate, so this makes perfect sense.

Once you add an exception to the browser's identity verification, you will be allowed to proceed to your newly secured site.

Conclusion

You have configured your Apache server to handle both HTTP and HTTPS requests. This will help you communicate with clients securely and avoid outside parties from being able to read your traffic.
If you are planning on using SSL for a public website, you should probably purchase an SSL certificate from a trusted certificate authority to prevent the scary warnings from being shown to each of your visitors.

How to Mount a Flash Drive on Your Android Device

$
0
0

Although mobile devices have more storage space than ever before it’s so easy to fill up; wouldn’t it be nice if you could just pop a flash drive right into your device and expand your storage on the fly? Read on as we show you how mount a flash drive on your Android device.


Why Do I Want To Do This?

Even if your Android device has a micro SD slot, and not all devices do unfortunately, it’s still inconvenient to remove the SD card to load it up with content or transfer files (especially if you have apps that rely on SD card storage). It’s also inconvenient to tether your device or wirelessly transfer the files, especially for files that you may not need to store inside the phone on the internal storage or SD storage.

If you want to bring a bunch of movies on a trip to watch on the plane or in your hotel, for example, you really don’t need to clutter up your internal storage options with bulky media files. Instead, it’s much easier to just throw files on a cheap and spacious flash drive and then mount the flash drive when you want to watch the movies, unload media you’ve created on the phone to free up space, or otherwise enjoy a multi-gigabyte storage boost.

Rare is the Android device that comes with a full size USB port, however, so you’ll need a little techno-wizardy to make it happen. Let’s look at what you need and how to check if your device supports the required equipment.

What Do I Need?

The magic that makes it possible to mount a regular USB flash drive on your Android device is a a USB specification known as USB On-The-Go (OTG). The specification was added to the USB standard way back in 2001 but don’t feel bad if you’ve never heard of it. Although the specification is over a decade old now it wasn’t until Android 3.1 Honeycomb (released in 2011) that Android natively supported OTG.

The most important element of the OTG specification is that it gives Android the ability to specify whether it is the master or the slave role when connected to a supported device. In other words even though the general role of your Android device is to be the slave (you attach it to your computer via a data sync cable and your computer acts as the host) the Android device can be the host thanks to OTG and storage devices can be mounted to it instead. That’s the most important element as far as our tutorial is concerned but If you’re curious about the OTG specification in a broader sense you can check out the USB On-The-Go Wikipedia entry here.

A Phone That Supports OTG

Unfortunately just because the specification is well established and Android has supported it for years doesn’t mean that your device automatically supports it. In addition to the required Android kernel component and/or drivers, there needs to be actual support by the physical hardware in your phone. No physical support for host mode via OTG, no OTG goodness.


Testing to see if your phone supports OTG is really easy, however, so don’t be discouraged. In addition to looking up the specs for your phone via search engine query you can also download a helper application, like USB OTG Checker, to test your device before investing energy into the project.

Note: It is possible to have a device that can support OTG on the hardware-level but that does not have the proper kernel/drivers for software-side OTG support. In such cases it’s possible to root a device and install drivers, flash a new ROM with OTG support, or otherwise remedy the situation, but those courses of action are beyond the scope of this particular guide and we note them simply so readers inclined to engage in such advanced tinkering know it’s a possibility. We recommend searching the excellent XDA-Developers forums for your phone’s model/carrier and the term “OTG” to see what other users are doing.

An OTG Cable

If your device supports OTG then it’s just a simple matter of picking out an OTG cable. OTG cables are dirt cheap, by the way, so don’t worry about breaking the bank. Although you can get OTG cables with all sorts of bells and whistles on them (SD card reader slots, etc.) we wouldn’t bother with the extras as it’s just as easy to plug in the devices you’re already using on your regular computer into a plain old dirt-cheap OTG cable.

In fact the only real decisions to be made when it comes to OTG cable shopping are: whether you want to wait a month on shipping from Hong Kong to get the cheapest one possible and whether or not you want an OTG with charging capabilities.

If you’re willing to wait on shipping, you can pick up a non-powered OTG cable for, we kid you not, $1.09 with free shipping. You’ll wait a few weeks for it to get sent parcel post from Hong Kong but it’ll cost you less than a truck stop cup of coffee. If you want a non-powered OTG cable right now, you can pick up this model for $4.99 with free Prime shipping.

If you plan on doing some serious media watching on your device using an OTG mounted flash drive, we’d recommend picking up an OTG cable with a power-passthrough so you can use a standard charging cable to pump juice to your device while you’re catching up on your favorite shows.

Again, if you’re in no rush you can pick up a powered OTG cable for $1.81. If you want it right now, you can pick up a similar model for $4.99 with free Prime shipping.

A Flash Drive

The final thing you need is a simple flash drive or other USB media (an external powered portable hard drive, an SD card in an SD card reader, etc. will all work). The only critical thing is that your flash media is formatted in FAT32. For the purposes of this tutorial we’re using the sturdy little Kingston Digital DataTraveler SE9 but any properly formatted and functioning drive will do.

Mounting the Drive

Just like with our How to Connect Your Android Phone to Your TV guide, the hardest part is checking your hardware and buying the right cable. Once you have the right hardware and the right cable, the experience is pure plug and play goodness.

Plug the OTG cable into your Android device (if you have a powered OTG cable, connect the power source at this time too). Plug the storage media into the OTG cable. You’ll see a notification in your notification bar that looks like a little USB symbol. If you pull the notification drawer down you’ll see a notice that there is now an attached USB storage option. You don’t have to do anything at this point as the drive is already mounted and available to Android.

If you do tap on the notification (or navigate to Settings ->Storage) you can take a closer look at the USB storage options.


When you’re done with the flash storage, this is the menu you want to visit in order to use the ‘Unmount USB storage” option to properly unmount and remove your media.

Otherwise, feel free to jump right into using the removable media. You can browse the file structure in the native Android file browser or your file browser of choice, you can copy files to and from the device, and you can watch any media stored on it.

Here is our flash drive as seen in the drive-selection menu in ES File Explorer, listed as “usbdisk”.


And here’s a screenshot of our file transfer test using the same file explorer.


File transfer is snappy as is media playback. Thanks to OTG we no longer need to crack open the case of our device to get at the micro SD card or play any advanced games balancing the storage load on our internal memory. For the dirt cheap price of an OTG cable and a big flash drive we can instantly expand our storage (and easily swap it out).

Google Wallet vs. Apple Pay: What You Need to Know

$
0
0
Apple Pay is shiny, new, and getting a lot of press. But Android users have had their own similar payment system for years: Google Wallet. Google Wallet isn’t limited to a small number of phones anymore. Goole Wallet usage is even increasing, which is no surprise. Mobile payments are getting more press and point-of-sale terminals that support contactless payments are popping up in more places.


The Basics

Both Apple Pay and Google Wallet are mobile payments services  that use your smartphone to pay for things. Both of these payment methods depend on NFC hardware — the phone communicates wirelessly with the contactless payment terminal. It’s similar to what Visa payWave and MasterCard PayPass use for contactless payments. This involves tapping or waving over a card over a reader instead of swiping or inserting the card.

Both of these payment systems piggy-back on top of the credit card infrastructure. You enter credit or debit card details and payments you make are charged to the card. You don’t have to connect these apps directly to a checking account, as you do with controversial competitors like CurrentC.

Microsoft created their own contactless-payments wallet feature, named Wallet, for Windows Phone 8. But no one uses it and there’s been little news about it since 2012 when Microsoft unveiled it. Microsoft’s contactless payment solution seems like a big failure, there’s really no way around that.


Supported Devices and Countries

Apple Pay works on the iPhone 6 and iPhone 6 Plus, as older iPhones don’t have the necessary NFC hardware.

Google Wallet works on a surpsingly large range of Android phones, as most Android phones sold in the past few years have had NFC hardware in them. In the past, Google Wallet had very limited availability, but it’s been available to a much wider range of devices since Android 4.4 KitKat. All Google Wallet requires is “an NFC-enabled Android device running 4.4 (KitKat) or higher on any carrier network,” according to Google.

USA Only: Unfortunately, both Apple Pay and Google Wallet are US-only at thi time. This is more understandable for Apple Pay, which just launched and seems serious about international expansion. But Google Wallet has been available in the US for more than three years, and there’s no indication it will ever be available in other countries. If you want to tap and pay with your phone and you don’t live in the US, you should probably buy an iPhone.

Google Wallet is to Apple Pay as Google Voice is to iMessage. The Google services are nice if you live in the US, but the rest of the world will need to buy iPhones to get similar functionality.


The Payment Experience

With at least one credit or debit card’s detailed entered on your mobile app of choice, here’s how you’d use them when it’s time to pay:

Apple Pay: Take your phone out of your pocket, rest a finger over the Touch ID sensor (without pressing down), and hold it over a contactless payment terminal. The iPhone uses Touch ID to authenticate your fingerprint and immediately processes the payment. Touch ID makes this more convenient as you don’t have to unlock your phone first.

Google Wallet: Take your phone out of your pocket, unlock the screen with your PIN or other unlock method, and hold it over the reader. You may then have to enter your Google Wallet PIN, which is supposed to be different from your phone-unlock PIN for security reasons. Where Apple Pay uses your fingerprint at the terminal, Google Wallet uses two different PINs — it’s just clunkier. At least you don’t have to open the Google Wallet app first.

These payment methods need to be as convenient as possible because they compete with a piece of plastic that can be swiped or inserted everywhere. In many non-US countries (like Canada), you can tap your plastic credit card on such readers all over the place. Of course, this doesn’t give you any fingerprint or PIN security. That’s why contactless payments have traditionally been limited to smaller-value purchases.


Merchants Don’t Get Your Credit Card Numbers

With many retailers — from Target to Home Depot — showing they’re not capable of securely handling credit card numbers without losing them, security is becoming a more pressing issue. Both Apple Pay and Google Wallet offer a big advantage here. When you pay with either system, the merchant never actually gets your credit card information. In a nutshell, they get a one-time code that authorizes them to make a single charge. Any malware infesting their payment terminals won’t be able to steal your credit card details and abuse it later.

With Apple Pay, the secure payment details are stored on the iPhone itself. With Google Wallet, they’re stored on Google’s servers “in the cloud.” This cloud-based token system is what allowed Google Wallet to work on more devices with Android 4.4, as it can work even when cellular carriers block its access to the “secure element” where it would be stored the device. Either way, the merchants you’re making purchases from don’t get your credit card details.


Why Bother?

Mobile payment solutions, or digital wallets, all have to pass the “why bother?” test. Google Wallet initially seemed to fail here — why bother whipping out your phone and entering two PINs when you can just use your credit card? Your credit card will also work in many places that don’t yet support contactless payments. Plus, the cellular carriers had their own service they were pushing — Softcard, the service formerly known as ISIS. Everyone was fighting over the space, but no one was making a lot of progress.

As usual, Apple isn’t rolling out an entirely new technology — they’re polishing something up and striking when the iron is hot. Retailers have failed spectacularly at securing credit card numbers recently, and NFC-including point-of-sale terminals are becoming more widespread in the USA thanks to the transition to EMV (or cards with “the chip”) that other countries have been using for a long time. The fingerprint reader also makes it more convenient to actually use without entering two PINs, scanning QR codes, or whatever other competing services want.

Google Wallet is still around, and progressing — slowly. Apple Pay is great news for Google Wallet users, as more NFC payment terminals will be available. Just don’t be surprised if the terminals don’t mention “Google Wallet” by name.


So, which is better? Well, that’s not really the question. You don’t really get a choice between Apple Pay and Google Wallet — you get a choice between an iPhone and an Android phone. Other considerations will probably be more important, and you’ll end up with whichever solution your chosen platform provides.

But, if you really want to corner us into answering, it’s very clear Apply Pay is better. The fingerprint-identification system is faster and more convenient than the two-PIN system Google thought up. Plus, when taking a view of the entire world instead of just the US, Apple Pay seems to be actually on a path to international expansion. Google Wallet isn’t seeing much development and looks confined to the USA, at least until Google starts caring about it again.

An Introduction to Cloud Hosting

$
0
0
Cloud hosting is a method of using online virtual servers that can be created, modified, and destroyed on demand. Cloud servers are allocated resources like CPU cores and memory by the physical server that it's hosted on and can be configured with a developer's choice of operating system and accompanying software. Cloud hosting can be used for hosting websites, sending and storing emails, and distributing web-based applications and other services.


In this guide, we will go over some of the basic concepts involved in cloud hosting, including how virtualization works, the components in a virtual environment, and comparisons with other common hosting methods.

What is "the Cloud"?

"The Cloud" is a common term that refers to servers connected to the Internet that are available for public use, either through paid leasing or as part of a software or platform service. A cloud-based service can take many forms, including web hosting, file hosting and sharing, and software distribution. "The Cloud" can also be used to refer to cloud computing, which is the practice of using several servers linked together to share the workload of a task. Instead of running a complex process on a single powerful machine, cloud computing distributes the task across many smaller computers.

Other Hosting Methods

Cloud hosting is just one of many different types of hosting available to customers and developers today, though there are some key differences between them. Traditionally, sites and apps with low budgets and low traffic would use shared hosting, while more demanding workloads would be hosted on dedicated servers.

Shared hosting is the most common and most affordable way to get a small and simple site up and running. In this scenario, hundreds or thousands of sites share a common pool of server resources, like memory and CPU. Shared hosting tends to offer the most basic and inflexible feature and pricing structures, as access to the site's underlying software is very limited due to the shared nature of the server.

Dedicated hosting is when a physical server machine is sold or leased to a single client. This is more flexible than shared hosting, as a developer has full control over the server's hardware, operating system, and software configuration. Dedicated servers are common among more demanding applications, such as enterprise software and commercial services like social media, online games, and development platforms.

How Virtualization Works

Cloud hosting environments are broken down into two main parts: the virtual servers that apps and websites can be hosted on and the physical hosts that manage the virtual servers. This virtualization is what is behind the features and advantages of cloud hosting: the relationship between host and virtual server provides flexibility and scaling that are not available through other hosting methods.

Virtual Servers

The most common form of cloud hosting today is the use of a virtual private server, or VPS. A VPS is a virtual server that acts like a real computer with its own operating system. While virtual servers share resources that are allocated to them by the host, their software is well isolated, so operations on one VPS won't affect the others.

Virtual servers are deployed and managed by the hypervisor of a physical host. Each virtual server has an operating system installed by the hypervisor and available to the user to add software on top of. For many practical purposes, a virtual server is identical in use to a dedicated physical server, though performance may be lower in some cases due to the virtual server sharing physical hardware resources with other servers on the same host.

Hosts

Resources are allocated to a virtual server by the physical server that it is hosted on. This host uses a software layer called a hypervisor to deploy, manage, and grant resources to the virtual servers that are under its control. The term "hypervisor" is often used to refer to the physical hosts that hypervisors (and their virtual servers) are installed on.
The host is in charge of allocating memory, CPU cores, and a network connection to a virtual server when one is launched. An ongoing duty of the hypervisor is to schedule processes between the virtual CPU cores and the physical ones, since multiple virtual servers may be utilizing the same physical cores. The method of choice for process scheduling is one of the key differences between different hypervisors.

Hypervisors

There are a few common hypervisor software available for cloud hosts today. These different virtualization methods have some key differences, but they all provide the tools that a host needs to deploy, maintain, move, and destroy virtual servers as needed.

KVM, short for "Kernel-Based Virtual Machine", is a virtualization infrastructure that is built in to the Linux kernel. When activated, this kernel module turns the Linux machine into a hypervisor, allowing it to begin hosting virtual servers. This method is in contrast from how other hypervisors usually work, as KVM does not need to create or emulate kernel components that are used for virtual hosting.

Xen is one of the most common hypervisors in use today. Unlike KVM, Xen uses a microkernel, which provides the tools needed to support virtual servers without modifying the host's kernel. Xen supports two distinct methods of virtualization: paravirtualization, which skips the need to emulate hardware but requires special modifications made to the virtual servers' operating system, and hardware-assisted virtualization, which uses special hardware features to efficiently emulate a virtual server so that they can use unmodified operating systems.

ESXi is an enterprise-level hypervisor offered by VMware. ESXi is unique in that it doesn't require the host to have an underlying operating system. This is referred to as a "type 1" hypervisor and is extremely efficient due to the lack of a "middleman" between the hardware and the virtual servers. With type 1 hypervisors like ESXi, no operating system needs to be loaded on the host because the hypervisor itself acts as the operating system.

Hyper-V is one of the most popular methods of virtualizing Windows servers and is available as a system service in Windows Server. This makes Hyper-V a common choice for developers working within a Windows software environment. Hyper-V is included in Windows Server 2008 and 2012 and is also available as a stand-alone server without an existing installation of Windows Server.

Why Cloud Hosting?

The features offered by virtualization lend themselves well to a cloud hosting environment. Virtual servers can be configured with a wide range of hardware resource allocations, and can often have resources added or removed as needs change over time. Some cloud hosts can move a virtual server from one hypervisor to another with little or no downtime or duplicate the server for redundancy in case of a node failure.

Customization

Developers often prefer to work in a VPS due to the control that they have over the virtual environment. Most virtual servers running Linux offer access to the root (administrator) account or sudo privileges by default, giving a developer the ability to install and modify whatever software they need.

This freedom of choice begins with the operating system. Most hypervisors are capable of hosting nearly any guest operating system, from open source software like Linux and BSD to proprietary systems like Windows. From there, developers can begin installing and configuring the building blocks needed for whatever they are working on. A cloud server's configurations might involve a web server, database, email service, or an app that has been developed and is ready for distribution.

Scalability

Cloud servers are very flexible in their ability to scale. Scaling methods fall into two broad categories: horizontal scaling and vertical scaling. Most hosting methods can scale one way or the other, but cloud hosting is unique in its ability to scale both horizontally and vertically. This is due to the virtual environment that a cloud server is built on: since its resources are an allocated portion of a larger physical pool, it's easy to adjust these resources or duplicate the virtual image to other hypervisors.

Horizontal scaling, often referred to as "scaling out", is the process of adding more nodes to a clustered system. This might involve adding more web servers to better manage traffic, adding new servers to a region to reduce latency, or adding more database workers to increase data transfer speed. Many newer web utilities, like CoreOS, Docker, and Couchbase, are built around efficient horizontal scaling.

Vertical scaling, or "scaling up", is when a single server is upgraded with additional resources. This might be an expansion of available memory, an allocation of more CPU cores, or some other upgrade that increases that server's capacity. These upgrades usually pave the way for additional software instances, like database workers, to operate on that server. Before horizontal scaling became cost-effective, vertical scaling was the method of choice to respond to increasing demand.

With cloud hosting, developers can scale depending on their application's needs — they can scale out by deploying additional VPS nodes, scale up by upgrading existing servers, or do both when server needs have dramatically increased.

Conclusion

By now, you should have a decent understanding of how cloud hosting works, including the relationship between hypervisors and the virtual servers that they are responsible for, as well as how cloud hosting compares to other common hosting methods. With this information in mind, you can choose the best hosting for your needs.

VCE Exam Simulator 1.1.6 - Download

$
0
0
https://dl.dropboxusercontent.com/content_link/kxpVAfwy8ZVvlBnjmxiLVYnAo5UPcDAFT39FHjjR6HwdB6GhnfCSkyVw00yYdF63?dl=1


A desktop exam engine for certification exam preparation. Create, edit and take exams that are just like the real thing.


VCE Exam Simulator - What's New

v1.1.6 (Oct 9, 2014)

Stability:
  • Fixed: Small miscellaneous bugs.
v1.1.5 (Oct 1, 2014)

Stability:
  • Fixed: Small miscellaneous bugs.
v1.1.4 (Sep 24, 2014)

Stability:
  • Fixed: Small miscellaneous bugs.
v1.1.3 (Sep 18, 2014)

Stability:
  • Added: Proxy settings in main settings.
  • Fixed: Importing questions with unicode symbols.
  • Fixed:"Take incorrectly questions" mode errors.
  • Fixed: Small miscellaneous bugs.
v1.1.2 (Aug 13, 2014)

Stability:
  • Fixed: Proxy settings don't work for all connections.
v1.1.1 (Aug 4, 2014)

Stability:
  • Fixed: Error during resuming session.
v1.1 (Jul 29, 2014)

Stability:
  • Fixed: Small miscellaneous bugs.
v1.0.2 (May 15, 2014)

Functionality:
  • Added: Update software ability for not logged users.
Stability:
  • Fixed: Error during changing number of choices and question type.
  • Fixed: Saving sessions bug.
  • Fixed: Saving proxy settings.
v1.0.1 (Apr 23, 2014)

Stability:
  • Fixed:"Stream read error" during searching.
  • Fixed: SQL injection bug.
  • Fixed: Small miscellaneous bugs.
v1.0 (Mar 23, 2014)

The new version of VCE Exam Simulator for Windows provides users with better functionality, improved stability and flawless user experience. This version incorporates the following enhancements:
Functionality:
  • Added: Advanced localization features, including full support of international symbols. The issue of some symbols/characters not being recognized has been fully fixed. 
  • Updated and enhanced: The option of restoring sessions in the training mode, enabling users to pick up their practice exactly where they left it.
  • Updated and enhanced: Color schemes have been updated to include better variety and bug-free operation.
  • Updated: spell-check for VCE Designer software to include 2014 dictionaries and vocabulary. 

Stability:
  • Updated: Improved security to run the latest VCE files and avoid version-caused glitches.
  • Updated: importing feature to ensure smooth and glitch-free importing of large files (over 1,000 questions).
  • Fixed:"Stream read error" during importing questions and changing the answer option, as well as during the printing process – for smooth operation of the app.
  • Enhanced: Application stability and performance, bugs and glitches causing random crashing have been fixed/removed. 
https://dl.dropboxusercontent.com/content_link/kxpVAfwy8ZVvlBnjmxiLVYnAo5UPcDAFT39FHjjR6HwdB6GhnfCSkyVw00yYdF63?dl=1

How Google "Translates" Pictures Into Words Using Vector Space Mathematics

$
0
0
Google engineers have trained a machine learning algorithm to write picture captions using the same techniques it developed for language translation.

Translating one language into another has always been a difficult task. But in recent years, Google has transformed this process by developing machine translation algorithms that change the nature of cross cultural communications through Google Translate.


Now that company is using the same machine learning technique to translate pictures into words. The result is a system that automatically generates picture captions that accurately describe the content of images. That’s something that will be useful for search engines, for automated publishing and for helping the visually impaired navigate the web and, indeed, the wider world.

The conventional approach to language translation is an iterative process that starts by translating words individually and then reordering the words and phrases to improve the translation. But in recent years, Google has worked out how to use its massive search database to translate text in an entirely different way.

The approach is essentially to count how often words appear next to, or close to, other words and then define them in an abstract vector space in relation to each other. This allows every word to be represented by a vector in this space and sentences to be represented by combinations of vectors.

Google goes on to make an important assumption. This is that specific words have the same relationship to each other regardless of the language. For example, the vector “king - man + woman = queen” should hold true in all languages.

That makes language translation a problem of vector space mathematics. Google Translate approaches it by turning a sentence into a vector and then using that vector to generate the equivalent sentence in another language.

Now Oriol Vinyals and pals at Google are using a similar approach to translate images into words. Their technique is to use a neural network to study a dataset of 100,000 images and their captions and so learn how to classify the content of images.

But instead of producing a set of words that describe the image, their algorithm produces a vector that represents the relationship between the words. This vector can then be plugged into Google’s existing translation algorithm to produce a caption in English, or indeed in any other language. In effect, Google’s machine learning approach has learnt to “translate” images into words.

To test the efficacy of this approach, they used human evaluators recruited from Amazon’s Mechanical Turk to rate captions generated automatically in this way along with those generated by other automated approaches and by humans.

The results show that the new system, which Google calls Neural Image Caption, fares well. Using a well known dataset of images called PASCAL, Neural image Capture clearly outperformed other automated approaches. “NIC yielded a BLEU score of 59, to be compared to the current state-of-the-art of 25, while human performance reaches 69,” says Vinyals and co.

That’s not bad and the approach looks set to get better as the size of the training datasets increases. “It is clear from these experiments that, as the size of the available datasets for image description increases, so will the performance of approaches like NIC,” say the Google team.

Clearly, this is yet another task for which the days of human supremacy over machines are numbered.


Ref: arxiv.org/abs/1411.4555  Show and Tell: A Neural Image Caption Generator

How To Setup and Configure an OpenVPN Server on CentOS 7

$
0
0
We're going to install and configure OpenVPN on a CentOS 7 server. We'll also discuss how to connect a client to the server on Windows, OS X, and Linux. OpenVPN is an open-source VPN application that lets you create and join a private network securely over the public Internet.


Prerequisites

You should complete these prerequisites:
  • CentOS 7 Virtual or Physical machine
  • root access to the server (several steps cannot be completed with just sudo access)
  • Domain or subdomain that resolves to your server that you can use for the certificates
Before we start we'll need to install the Extra Packages for Enterprise Linux (EPEL) repository. This is because OpenVPN isn't available in the default CentOS repositories. The EPEL repository is an additional repository managed by the Fedora Project containing non-standard but popular packages.
 
yum install epel-release

Step 1 — Installing OpenVPN

First we need to install OpenVPN. We'll also install Easy RSA for generating our SSL key pairs, which will secure our VPN connections.
 
yum install openvpn easy-rsa -y
 

Step 2 — Configuring OpenVPN

OpenVPN has example configuration files in its documentation directory. We're going to copy the sample server.conf file as a starting point for our own configuration file. 

cp /usr/share/doc/openvpn-*/sample/sample-config-files/server.conf /etc/openvpn

Let's open the file for editing.
 
vi /etc/openvpn/server.conf

There are a few lines we need to change in this file. Most of the lines just need to be uncommented (remove the ;). Other changes are marked in red.

When we generate our keys later, the default Diffie-Hellman encryption length for Easy RSA will be 2048 bytes, so we need to change the dh filename to dh2048.pem.
 
dh dh2048.pem

We need to uncomment the push "redirect-gateway def1 bypass-dhcp" line, which tells the client to redirect all traffic through our OpenVPN.
 
push "redirect-gateway def1 bypass-dhcp"

Next we need to provide DNS servers to the client, as it will not be able to use the default DNS servers provided by your Internet service provider. We're going to use Google's public DNS servers, 8.8.8.8 and 8.8.4.4.

Do this by uncommenting the push "dhcp-option DNS lines and updating the IP addresses.
 
push "dhcp-option DNS 8.8.8.8"
push "dhcp-option DNS 8.8.4.4"

We want OpenVPN to run with no privileges once it has started, so we need to tell it to run with a user and group of nobody. To enable this you'll need to uncomment these lines:
user nobody
group nobody
Save and exit the OpenVPN server configuration file.

Step 3 — Generating Keys and Certificates

Now that the server is configured we'll need to generate our keys and certificates. Easy RSA installs some scripts to generate these keys and certificates.

Let's create a directory for the keys to go in.
 
mkdir -p /etc/openvpn/easy-rsa/keys

We also need to copy the key and certificate generation scripts into the directory.
 
cp -rf /usr/share/easy-rsa/2.0/* /etc/openvpn/easy-rsa

To make life easier for ourselves we're going to edit the default values the script
uses so we don't have to type our information in each time. This information is stored
in the vars file so let's open this for editing.
 
vi /etc/openvpn/easy-rsa/vars

We're going to be changing the values that start with KEY_. Update the following values to be accurate for your organization.
The ones that matter the most are:
  • KEY_NAME: You should enter server here; you could enter something else, but then you would also have to update the configuration files that reference server.key and server.crt
  • KEY_CN: Enter the domain or subdomain that resolves to your server
For the other values, you can enter information for your organization based on the variable name.

. . .

# These are the default values for fields
# which will be placed in the certificate.
# Don't leave any of these fields blank.
export KEY_COUNTRY="US"
export KEY_PROVINCE="NY"
export KEY_CITY="New York"
export KEY_ORG="TechSupportPK"
export KEY_EMAIL="myeamil@example.com"
export KEY_OU="Community"

# X509 Subject Field
export KEY_NAME="server"

. . .

export KEY_CN=openvpn.example.com

. . .


We're also going to remove the chance of our OpenSSL configuration not loading due to the version being undetectable. We're going to do this by copying the required configuration file and removing the version number.
 
cp /etc/openvpn/easy-rsa/openssl-1.0.0.cnf /etc/openvpn/easy-rsa/openssl.cnf

To start generating our keys and certificates we need to move into our easy-rsa directory and source in our new variables.
 
cd /etc/openvpn/easy-rsa
source ./vars

Then we will clean up any keys and certificates which may already be in this folder and generate our certificate authority.
 
clean-all

When you build the certificate authority, you will be asked to enter all the information we put into the vars file, but you will see that your options are already set as the defaults. So, you can just press ENTER for each one.
 
./build-ca
 
The next things we need to generate will are the key and certificate for the server. Again you can just go through the questions and press ENTER for each one to use your defaults. At the end, answer Y (yes) to commit the changes.
 
./build-key-server server

We also need to generate a Diffie-Hellman key exchange file. This command will take a minute or
two to complete:
 
./build-dh

That's it for our server keys and certificates. Copy them all into our OpenVPN directory.
 
cd /etc/openvpn/easy-rsa/keys
cp dh2048.pem ca.crt server.crt server.key /etc/openvpn

All of our clients will also need certificates to be able to authenticate. These keys and certificates will be shared with your clients, and it's best to generate separate keys and certificates for each client you intend on connecting.

Make sure that if you do this you give them descriptive names, but for now we're going to have one client so we'll just call it client.
 
cd /etc/openvpn/easy-rsa
./build-key client

That's it for keys and certificates.

Step 4 — Routing

To keep things simple we're going to do our routing directly with iptables rather than the new firewalld.

First, make sure the iptables service is installed and enabled.
 
yum install iptables-services -y
systemctl mask firewalld
systemctl enable iptables
systemctl stop firewalld
systemctl start iptables
iptables --flush

Next we'll add a rule to iptables to forward our routing to our OpenVPN subnet, and save this rule.
 
iptables -t nat -A POSTROUTING -s 10.8.0.0/24 -o eth0 -j MASQUERADE
iptables-save > /etc/sysconfig/iptables

Then we must enable IP forwarding in sysctl. Open sysctl.conf for editing.
 
vi /etc/sysctl.conf

Add the following line at the top of the file:
 
net.ipv4.ip_forward = 1

Then restart the network service so the IP forwarding will take effect.
 
systemctl restart network.service
 

Step 5 — Starting OpenVPN

Now we're ready to run our OpenVPN service. So lets add it to systemctl:
 
systemctl -f enable openvpn@server.service

Start OpenVPN:
 
systemctl start openvpn@server.service

Well done; that's all the server-side configuration done for OpenVPN.

Next we'll talk about how to connect a client to the server.

Step 6 — Configuring a Client

Regardless of your client machine's operating system, you will definitely need a copy of the ca certificate from the server, along with the client key and certificate.

Locate the following files on the server. If you generated multiple client keys with unique descriptive names, then the key and certificate names will be different. In this article we used client.
 
/etc/openvpn/easy-rsa/keys/ca.crt
/etc/openvpn/easy-rsa/keys/client.crt
/etc/openvpn/easy-rsa/keys/client.key

Copy these three files to your client machine. You can use SFTP or your preferred method. You could even open the files in your text editor and copy and paste the contents into new files on your client machine.

Just make sure you make a note of where you save them.

We're going to create a file called client.ovpn. This is a configuration file for an OpenVPN client, telling it how to connect to the server.
  • You'll need to change the first line to reflect the name you gave the client in your key and certificate; in our case, this is just client
  • You also need to update the IP address from your_server_ip to the IP address of your server; port 1194 can stay the same
  • Make sure the paths to your key and certificate files are correct
client
dev tun
proto udp
remote your_server_ip 1194
resolv-retry infinite
nobind
persist-key
persist-tun
comp-lzo
verb 3
ca /path/to/ca.crt
cert /path/to/client.crt
key /path/to/client.key

This file can now be used by any OpenVPN client to connect to your server.

Windows:
On Windows, you will need the official OpenVPN Community Edition binaries which come with a GUI. Then, place your .ovpn configuration file into the proper directory, C:\Program Files\OpenVPN\config, and click Connect in the GUI. OpenVPN GUI on Windows must be executed with administrative privileges.

OS X:
On Mac OS X, the open source application Tunnelblick provides an interface similar to the OpenVPN GUI on Windows, and comes with OpenVPN and the required TUN/TAP drivers. As with Windows, the only step required is to place your .ovpn configuration file into the ~/Library/Application
Support/Tunnelblick/Configurations
directory. Or, you can double-click on your .ovpn file.

Linux:
On Linux, you should install OpenVPN from your distribution's official repositories. You can then invoke OpenVPN by executing:

sudo openvpn --config ~/path/to/client.ovpn
 

Conclusion

Congratulations! You should now have a fully operational virtual private network running on your OpenVPN server.

After you establish a successful client connection, you can verify that your traffic is being routed through the VPN by checking Google to reveal your public IP.

Virtual Cert Exam v1.2 Crack VCE Simulator Avanset

$
0
0
Virtual Cert Exam v1.2 Crack VCE Simulator Avanset download solution to open VCE Certification Exams


Ladies and Gentlemen, I want to let you know that this software (VCE version 1.2) wouldn’t be cracked, as will be hardly to pass the server’s security check, so I have mentioned few alternate to VCE for your consideration.

There are some aditional solutions:
  1. You can use a third-party app which is for “free” using this link (include step by step of how to install the app). I would recommend using BlueStacks instead of GenyMotion. Thanks goes to this  guy.
  2. Site 1 (exams converted to PDF files)
  3. Site 2 (10$/pdf file)

How To Install Froxlor Server Management Panel on Ubuntu 12.04

$
0
0
Froxlor is a server management control panel that can be used to manage multi-user or shared servers. It is an alternative to cPanel or Webmin that allows system administrators to manage customer contact information, as well as the domain names, email accounts, FTP accounts, support tickets, and webroots that are associated with them.


A caveat about Froxlor: the control panel does not automatically configure the underlying services that it uses. You will need a fairly high level of sysadmin knowledge to set up your web server, mail server, and other services. Once it's all set up, though, you can do pretty much any sysadmin task from the control panel, with an added layer of customer management.

Prerequisites

Have these prerequisites before you begin. Red text in this tutorial should be changed to match your desired configuration.
  • A registered domain name
  • The domain or subdomain you want to use for Froxlor should have an A record pointing to your server's IP address. The A record @ specifies the top level of your domain name (example.com), while an A record named froxlor specifies the subdomain froxlor.example.com. The FQDN of the server in the example in this tutorial is example.com
  • If you want to set up email addresses, your MX records also need to point to the server
  • A server (Physical or Virtual) running a fresh installation of Ubuntu 12.04. This ensures that the server is free of prior configurations or modifications
  • Make sure to specify your server’s hostname (Server Hostname) as your desired Fully Qualified Domain Name (FQDN). For example, example.com or froxlor.example.com. Your FQDN should match the A record you set up
  • A non-root sudo user, in addition to root access
Note: At the time of writing, Froxlor is not yet compatible with later versions of Ubuntu, so we will be installing it on Ubuntu 12.04.
Once you access the Ubuntu Machine, you can verify your hostname with the following command:
hostname

Check your fully-qualified domain name:
hostname -f

Knowing your hostname and FQDN can save headaches with mail servers later on.

Step 1 — Adding Froxlor’s Package Repository

The Froxlor Team does not publish its software on the official Ubuntu package repositories, so you will need to add the address of their repository to your server. To install the add-apt-repository package needed, first install the python-software-properties package.
sudo apt-get install python-software-properties

Then you can add Froxlor’s repository to your server:
sudo add-apt-repository "deb http://debian.froxlor.org wheezy main"

You will need to add the software keys for Froxlor’s repository to your system (again, this is not an official Ubuntu repository).
sudo apt-key adv --keyserver pool.sks-keyservers.net --recv-key FD88018B6F2D5390D051343FF6B4A8704F9E9BBC
Note: Software keys are used to authenticate the origin of Debian (Ubuntu) software packages. Each repository has its own key that has to be added to Ubuntu manually. When software packages are downloaded, Ubuntu compares the key of the package to the key of the repository it was suppose to come from. If the package is valid, the key will match. The reason you don't usually have to enter the keys for the official Ubuntu repositories is because they come installed with Ubuntu.

Step 2 — Installing Froxlor

With Froxlor’s repository key added to your server, update your server’s packages list.
sudo apt-get update

Then, install Froxlor. The php5-curl package is necessary for Froxlor to function properly, but at the time this tutorial was written Froxlor does not install php5-curl by itself.
sudo apt-get install froxlor php5-curl

You will notice Froxlor installs many other packages along with it. That is perfectly normal. Froxlor’s ability to manage customer domain names, email accounts, FTP accounts, support tickets, and webroots in one place relies on these dependencies. Dependencies are other packages that a package depends on to operate.

During Froxlor’s installation, some of its dependencies will ask you questions about your desired configuration. This is the first set of installation questions, as you will be installing more of Froxlor’s dependencies later on in Step 4. The first thing you will be asked looks like this:


Courier is one of the email servers Froxlor can use. Froxlor does not use Courier as the default Mail Transfer Agent (MTA) because Dovecot uses less memory, but it installs it as a dependency so you need to answer this question. Since you do not want to configure it manually, use your left arrow button to highlight in orange and press the ENTER or RETURN key on your keyboard.
The next thing you will see will be this image, or the one after it:


At first glance, this does not make sense because nothing will be highlighted in orange to make a selection. That is because you have to press the TAB key on your keyboard, and press ENTER or RETURN, then use your arrow key to select Internet Site from this menu:


Then press the ENTER or RETURN key again.
Next, Postfix will ask you a question. Postfix is another mail server that Froxlor can use. Make sure you enter your server's FQDN as the System mail name. Chances are, it will already be filled out for you. To accept the mail name Postfix suggests for you, press the ENTER or RETURN key.


Lastly, ProFTPD wants to know how it should run. ProFTPD is the default file transfer protocol (FTP) server that Froxlor can use. Make sure standalone is highlighted and press the ENTER or RETURN key.

Once the installation finishes, restart the Apache web server.
sudo service apache2 restart

From this point forward, you can access the Froxlor management panel using your server’s IP Address or FQDN with /froxlor appended. For example, you could visit http://your_server_ip_/froxlor or http://example.com/froxlor.

Step 3 — Configuring Froxlor

Use your favorite web browser to access Froxlor’s management panel on your server. The first time you access the management panel, it will welcome you to Froxlor and tell you Froxlor is not installed yet; hopefully that phrasing will be fixed in a later release of Froxlor. Nonetheless, click on the Start install link.

Froxlor will do a quick check that it has everything it needs on your server to operate properly. All requirements are satisfied should be printed in large green print at the bottom of the page. Click on the Click here to continue link in the bottom right-hand corner of the window.


Now it is time to give Froxlor some information about your configuration. Here are the options you will need to change or set:


  • Database connection > Password for the unprivileged MySQL-account: This will be the password for a new MySQL account Froxlor sets up to store its configuration settings and customer listings. You will need this password again in Step 4, but you do not need to remember it after that. Use the Secure Password Generator to generate a strong password. An example of a strong password could be &Mk9t(EX"Ce`e?T or w>hCt*5#S+$BePv.
  • Database connection > Password for the MySQL-root account: This is the same password you set in the prerequisite LAMP tutorial when you installed MySQL, for the root MySQL user. Froxlor needs to have access to the root MySQL account so that it can create new MySQL databases and users by itself, which is part of the beauty of Froxlor. You could set up a different privileged MySQL account for added security.
  • Administrator Account > Administrator Username: This is the username you will use to log into Froxlor using a web browser. It is recommended that you change the username to anything that is not the default username admin. In this tutorial, assume the user is named sammy.
  • Administrator Account > Administrator Password + (confirm): This is the password you will use to log into Froxlor using a web browser. You will have to type in this password often; for optimal security, use a complex, long password that can be remembered easily.
The rest of the fields should be fine left with the default settings, if you did your installation on a clean Ubuntu 12.04 Machine.

Once you are happy with your answers, click on the green Click here to continue button. Froxlor will test to make sure your settings are operational; once it decides they are, Froxlor was installed successfully will be printed in large green print at the bottom of the window.

Use the Click here to login link in the bottom right-hand corner of the window to go to Froxlor’s login page.

To log in, use the username and password you specified in the Administrator Account section of Froxlor’s setup in Step 3. You should also select your preferred language.

Step 4 — Installing and Configuring Froxlor’s Dependencies

At this point Froxlor itself is set up, but the underlying software that it uses to do the heavy lifting is not.

While Froxlor does not make this obvious during the its installation, there is more work to do beyond the initial installation and configuration process. In Froxlor’s current state on your server, it would not be able to operate at its full potential or execute commands on the server on the behalf of the control panel user.

To make Froxlor fully functional, we need to install more packages and run a series of commands on the server. An index of these commands is located in the Configuration menu of Froxlor’s management panel under the Server section.

Visit the Server > Configuration page now.

Froxlor’s configuration index uses three questions to direct you to the right set of commands. The first dropdown menu labeled Distribution needs the distribution of Linux you are running Froxlor on. You are running Ubuntu 12.04; always answer this question as Ubuntu 12.04 (Precise).


The next two menus, Service and Daemon, allow you to specify the category of service and the combination of daemons that you are using. Once you select from all three menus, Froxlor will redirect you to a page describing what to do and which commands to execute on your server. You will have to fill out the combination of these three questions once for each service.

The combination of services and daemons you need to select from the menu, and then execute the commands for, are listed below:
  • Web server: Ubuntu 12.04 (Precise) >> Webserver (HTTP) >> Apache 2
  • Mail sending: Ubuntu 12.04 (Precise) >> Mailserver (SMTP) >> Postfix/Dovecot
  • Mail inboxes: Ubuntu 12.04 (Precise) >> Mailserver (IMAP/POP3) >> Dovecot
  • FTP: Ubuntu 12.04 (Precise) >> FTP-server >> ProFTPd
  • Cron: Ubuntu 12.04 (Precise) >> Others (System) >> Crond (cronscript)
Once you select all three items from the menu, you'll be brought to a page of commands that need to be run and configuration files that need to be added to the server from the command line.

Froxlor’s configuration instructions assume you will be executing the commands as the root user, so you will need to elevate into a root shell before you begin.
sudo su
 

Configuration Walkthrough: Mailserver (IMAP/POP3)

We'll go through one additional server configuration for Froxlor in this tutorial. Once you've seen how to do it for the IMAP/POP3 server, you can follow a similar process for the other server components, such as the web server.

Make sure you have Ubuntu 12.04 (Precise) >> Mailserver (IMAP/POP3) >> Dovecot selected from the menu.

The IMAP/POP3 setup contains some oddities that the other sections do not, so this section needs some explaining.

First, Froxlor tells you to execute an apt-get command.


The problem with this command is that the dovecot-postfix package no longer exists. It has been merged into the mail-stack-delivery package. Omit the dovecot-postfix package from the command and run it like this instead:
apt-get install dovecot-imapd dovecot-pop3d dovecot-mysql mail-stack-delivery

Next, Froxlor asks you to change the following files or create them with
the following content if they do not exist.


What this really means is:
  • If the file already exists on the server you have two options: if it's a fresh installation you can simply rename the old file and replace it with Froxlor's version. If you have existing configurations you need to preserve, you can merge your existing file with Froxlor’s version
  • If the file does not exist, copy Froxlor’s version of the file onto your server
Since this server has no prior modifications, you do not have to merge the files. You can simply replace the file on your server with Froxlor’s version of the file. To do that, make sure the file path listed above a given text box exists and is empty.
echo > /etc/dovecot/conf.d/01-mail-stack-delivery.conf

To copy the contents of Froxlor’s version of the file to your server, highlight the text from the text box, right click on it and select Copy. Next, open the file on your server in the nano text editor.
nano /etc/dovecot/conf.d/01-mail-stack-delivery.conf

Right click on your Terminal window and select Paste. The contents of the file from Froxlor’s text box will appear inside of nano. Press the CONTROL + X keys simultaneously for a moment. The bottom of nano will ask you this:
Save modified buffer (ANSWERING "No" WILL DESTROY CHANGES) ?                    
Y Yes
N No ^C Cancel

Press the Y key on your keyboard to save your changes. Press ENTER.

Add the content for the other three files, /etc/dovecot/conf.d/10-auth.conf, /etc/dovecot/conf.d/auth-sql.conf.ext, and /etc/dovecot/dovecot-sql.conf.ext. You can use nano as we did for the first file.

Two of the files should already exist. Before you use nano to add Froxlor's content for those files, you can back up the originals:
mv /etc/dovecot/conf.d/10-auth.conf /etc/dovecot/conf.d/10-auth.conf.orig
mv /etc/dovecot/dovecot-sql.conf.ext /etc/dovecot/dovecot-sql.conf.ext.orig


For the last file, /etc/dovecot/dovecot-sql.conf.ext, notice how it says Please replace "MYSQL_PASSWORD" on your own. If you forgot your MySQL-password you'll find it in "lib/userdata.inc.php". Froxlor is referring to the unprivileged MySQL password you created specifically for Froxlor in Step 3. MYSQL_PASSWORD should be replaced with the unprivileged MySQL password anywhere it appears. Assuming the unprivileged MySQL password you created is &Mk9t(EX"Cee?T, this:
password = MYSQL_PASSWORD

Becomes this:
password = &Mk9t(EX"Cee?T

You should use your own MySQL password to replace MYSQL_PASSWORD.

Execute the chmod command:
chmod 0640 /etc/dovecot/dovecot-sql.conf.ext

Restart the service:
/etc/init.d/dovecot restart

Now you can go back to the Server > Configuration menu and select another dependency to install, such as your web server. Froxlor will show you more commands and configuration files. The rest of Froxlor’s dependency installations and configurations will be straightforward and should be followed as they are presented.

Note that Froxlor's instructions are not necessarily everything you will need to set up the server. You may have to do some troubleshooting with users, permissions, and other configuration settings from the command line to get everything to work. You can look up the specific server you are trying to install for more instructions. For example, you will likely have to look up additional configuration instructions for Dovecot to get email working.

Adding Customers, Domains, and More

Once you have all of your servers set up on the backend, you can start adding customers, domains, and email addresses through Froxlor. Start by going to the Resources > Customers menu and adding your first customer. You may want to check out the Froxlor demo site to see more configuration options.

Troubleshooting

At this point, Froxlor should be completely configured and functional. If you find that something is not working properly (e.g. cannot access FTP, not sending emails, etc.), you can refer to Froxlor's forums, AskUbuntu Q&A, or TechSupportPK user community.

Please be prepared to post program log files from the /var/log directory on your server to assist community members in resolving your problem. You can use Pastebin.com for posting program logs online.


Now that you have installed and configured Froxlor, you have a free alternative to cPanel or Webmin that will help you spend less time configuring and maintaining your multi-user or shared server.

To further customize your Froxlor installation, refer to the Server > Settings menu in Froxlor’s control panel. If you choose to change any of the default daemons, remember to follow Froxlor’s configuration instructions, jus like we did in the IMAP/POP3 section above.

How To Configure Custom Connection Options for your SSH Client

$
0
0
SSH, or secure shell, is the most common way of connecting to Linux hosts for remote administration. Although the basics of connecting to a single host are often rather straight forward, this can become unwieldy and a much more complicated task when you begin working with a large number of remote systems.

Fortunately, OpenSSH allows you to provide customized client-side connection options. These can be saved to a configuration file that can be used to define per-host values. This can help keep the different connection options you use for each host separated and organized, and can keep you from having to provide extensive options on the command line whenever you need to connect.

In this article, we'll cover the basics of the SSH client configuration file, and go over some common options.

Prerequisites


To complete this guide, you will need a working knowledge of SSH and some of the options that you can provide when connecting. You may also wish to configure SSH key-based authentication for some of your users or hosts, at the very least for testing purposes.

The SSH Config File Structure and Interpretation Algorithm


Each user on your local system can maintain a client-side SSH configuration file. These can contain any options that you would use on the command line to specify connection parameters, allowing you to store your common connection items and process them automatically on connection. It is always possible to override the values defined in the configuration file at the time of the connection through normal flags to the ssh command.

The Location of the SSH Client Config File


The client-side configuration file is called config and it is located in your user's home directory within the .ssh configuration directory. Often, this file is not created by default, so you may need to create it yourself:

touch ~/.ssh/config

Configuration File Structure


The config file is organized by hosts. Each host definition can define connection options for the specific matching host. Wildcards are also available to allow for options that should have a broader scope.

Each of the sections starts with a header defining the hosts that should match the configuration options that will follow. The specific configuration items for that matching host are then defined below. Only items that differ from the default values need to be specified, as the host will inherit the defaults for any undefined items. A section is defined from the Host header to the following Host header.

Typically, for organizational purposes and readability, the options being set for each host are indented. This is not a hard requirement, but a useful convention that allows for easier interpretation at a glance.

The general format will look something like this:

Host firsthost
SSH_OPTION_1custom_value
SSH_OPTION_2custom_value
SSH_OPTION_3custom_value


Host secondhost
ANOTHER_OPTIONcustom_value

Host *host
ANOTHER_OPTIONcustom_value


Host *
CHANGE_DEFAULTcustom_value

Here, we have four sections that will be applied on each connection attempt depending on whether the host in question matches.

Interpretation Algorithm


It is very important to understand the way that SSH will interpret the file to apply the configuration values defined within. This has large implications when using wildcards and the Host * generic host definition.

SSH will match the hostname given on the command line with each of the Host headers that define configuration sections. It will do this from the top of the file downwards, so order is incredibly important.

This is a good time to point out that the patterns in the Host definition do not have to match the actual host that you will be connecting with. You can essentially use these definitions to set up aliases for hosts that can be used in lieu of the actual host name.

For example, consider this definition:

Host devel
HostName devel.example.com
User tom

This host allows us to connect as tom@devel.example.com by typing this on the command line:

ssh devel

With this in mind, we can now discuss the way in which SSH applies each configuration option as it moves down the file. It starts at the top and checks each Host definition to see if it matches the value given on the command line.

When the first matching Host definition is found, each of the associated SSH options are applied to the upcoming connection. The interpretation does not end here though.

SSH then moves down the file, checking to see if other Host definitions also match. If another definition is found that matches the current hostname given on the command line, it will consider the SSH options associated with the new section. It will then apply any SSH options defined for the new section that have not already been defined by previous sections.

This last point is extremely important to internalize. SSH will interpret each of the Host sections that match the hostname given on the command line, in order. During this process, it will always use the first value given for each option. There is no way to override a value that has already been given by a previously matched section.

This means that your config file should follow the simple rule of having the most specific configurations at the top. More general definitions should come later on in order to apply options that were not defined by the previous matching sections.

Let's look again at the mock-up config file we used in the last section:

Host firsthost
SSH_OPTION_1custom_value
SSH_OPTION_2custom_value
SSH_OPTION_3custom_value


Host secondhost
ANOTHER_OPTIONcustom_value

Host *host
ANOTHER_OPTIONcustom_value


Host *
CHANGE_DEFAULTcustom_value

Here, we can see that the first two sections are defined by literal hostnames (or aliases), meaning that they do not use any wildcards. If we connect using ssh firsthost, the very first section will be the first to be applied. This will set SSH_OPTION_1, SSH_OPTION_2, and SSH_OPTION_3 for this connection.

It will check the second section and find that it does not match and move on. It will then find the third section and find that it matches. It will check ANOTHER_OPTION to see if it already has a value for that from previous sections. Finding that it doesn't, it will apply the value from this section. It will then match the last section since the Host * definition matches every connection. Since it doesn't have a value for the mock CHANGE_DEFAULT option from other sections, it will take the value from this section. The connection is then made with the options collected from this process.

Let's try this again, pretending to call ssh secondhost from the command line.

Again, it will start at the first section and check whether it matches. Since this matches only a connection to firsthost, it will skip this section. It will move on to the second section. Upon finding that this section matches the request, it will collect the value of ANOTHER_OPTION for this connection.

SSH then looks at the third definition and find that the wildcard matches the current connection. It will then check whether it already has a value for ANOTHER_OPTION. Since this option was defined in the second section, which was already matched, the value from the third section is dropped and has no effect.

SSH then checks the fourth section and applies the options within that have not been defined by previously matched sections. It then attempts the connection using the values it has gathered.

Basic Connection Options


Now that you have an idea about the general format you should use when designing your configuration file, let's discuss some common options and the format to use to specify them on the command line.

The first ones we will cover are the basic information necessary to connect to a remote host. Namely, the hostname, username, and port that the SSH daemon is running on.

To connect as a user named apollo to a host called example.com that runs its SSH daemon on port 4567 from the command line, we could give the variable information in a variety of ways. The most common would probably be:

ssh -p 4567 apollo@example.com

However, we could also use the full option names with the -o flag, like this:

ssh -o "User=apollo" -o "Port=4567" -o "HostName=example.com" anything

Here, we have set all of the options we wish to use with the -o flag. We have even specified the host as "anything" as an alias just as we could in the config file as we described above. The actual hostname is taken from the HostName option that we are setting.

The capitalized option names that we are using in the second form are the same that we must use in our config file. You can find a full list of available options by typing:

man ssh_config

To set these in our config file, we first must decide which hosts we want these options to be used for. Since we are discussing options that are specific to the host in question, we should probably use a literal host match.

We also have an opportunity at this point to assign an alias for this connection. Let's take advantage of that so that we do not have to type the entire hostname each time. We will use the alias "home" to refer to this connection and the associated options:

Host home

Now, we can define the connection details for this host. We can use the second format we used above to inform us as to what we should put in this section.

Host home
HostName example.com
User apollo
Port 4567

We define options using a key-value system. Each pair should be on a separate line. Keys can be separated from their associated values either by white space, or by an equal sign with optional white space. Thus, these are all identical as interpreted by our SSH client:

Port 4567
Port=4567
Port = 4567

The only difference is that depending on the option and value, using the equal sign with no spaces can allow you to specify an option on the command line without quoting. Since we are focusing on our config file, this is entirely up to your preferences.

Configuring Shared Options


So far, the configuration we have designed is incredibly simple. In its entirety, it looks like this:

Host home
HostName example.com
User apollo
Port 4567

What if we use the same username on both our work and home computers? We could add redundant options with our section defining the work machine like this:

Host home
HostName example.com
User apollo
Port 4567

Host work
HostName company.com
User apollo

This works, but we are repeating values. This is only a single option, so it is not a huge deal, but sometimes we want to share a large number of options. The best way of doing that is to break the shared options out into separate sections.

If we use the username "apollo" on all of the machines that we connect to, we could place this into our generic "Host" definition marked by a single * that matches every connection. Remember that the more generic sections should go further towards the bottom:

Host home
HostName example.com
Port 4567

Host work
HostName company.com

Host *
User apollo

This clears up the issue of repetition in our configuration and will work if "apollo" is your default username for the majority of new systems you connect to.

What if there are some systems that do not use this username? There are a few different ways that you can approach this, depending on how widely the username is shared.

If the "apollo" username is used on almost all of your hosts, it's probably best to leave it in the generic Host * section. This will apply to any hosts that have not received a username from sections above. For our anomalous machines that use a different username, we can override the default by providing an alternative. This will take precedence as long as it is defined before the generic section:

Host home
HostName example.com
Port 4567

Host work
HostName company.com

Host oddity
HostName weird.com
User zeus

Host *
User apollo

For the oddity host, SSH will connect using the username "zeus". All other connections will not receive their username until they hit the generic Host * definition.

What happens if the "apollo" username is shared by a few connections, but isn't common enough to use as a default value? If we are willing to rename the aliases that we are using to have a more common format, we can use a wildcard to apply additional options to just these two hosts.

We can change the home alias to something like hapollo and the work connection to something like wapollo. This way, both hosts share the apollo portion of their alias, allowing us to target it with a different section using wildcards:

Host hapollo
HostName example.com
Port 4567

Host wapollo
HostName company.com

Host *apollo
User apollo

Host *
User diffdefault

Here, we have moved the shared User definition to a host section that matches SSH connections trying to connect to hosts that end in apollo. Any connection not ending in apollo (and without its own Host section defining a User) will receive the username diffdefault.

Note that we have retained the ordering from most specific to least specific in our file. It is best to think of less specific Host sections as fallbacks as opposed to defaults due to the order in which the file is interpreted.

Common SSH Configuration Options


So far, we have discussed some of the basic options necessary to establish a connection. We have covered these options:

  • HostName: The actual hostname that should be used to establish the connection. This replaces any alias defined in the Host header. This option is not necessary if the Host definition specifies the actual valid hostname to connect to.
  • User: The username to be used for the connection.
  • Port: The port that the remote SSH daemon is running on. This option is only necessary if the remote SSH instance is not running on the default port 22.

There are many other useful options worth exploring. We will discuss some of the more common options, separated according to function.

General Tweaks and Connection Items


Some other tweaks that you may wish to configure on a broad level, perhaps in the Host * section, are below.

  • ServerAliveInterval: This option can be configured to let SSH know when to send a packet to test for a response from the sever. This can be useful if your connection is unreliable and you want to know if it is still available.
  • LogLevel: This configures the level of detail in which SSH will log on the client-side. This can be used for turning off logging in certain situations or increasing the verbosity when trying to debug. From least to most verbose, the levels are QUIET, FATAL, ERROR, INFO, VERBOSE, DEBUG1, DEBUG2, and DEBUG3.
  • StrictHostKeyChecking: This option configures whether ssh SSH will ever automatically add hosts to the ~/.ssh/known_hosts file. By default, this will be set to "ask" meaning that it will warn you if the Host Key received from the remote server does not match the one found in the known_hosts file. If you are constantly connecting to a large number of ephemeral hosts, you may want to turn this to "no". SSH will then automatically add any hosts to the file. This can have security implications, so think carefully before enabling it.
  • UserKnownHostsFile: This option specifies the location where SSH will store the information about hosts it has connected to. Usually you do not have to worry about this setting, but you may wish to set this to /dev/null if you have turned off strict host checking above.
  • VisualHostKey: This option can tell SSH to display an ASCII representation of the remote host's key upon connection. Turning this on can be an easy way to get familiar with your host's key, allowing you to easily recognize it if you have to connect from a different computer sometime in the future.
  • Compression: Turning compression on can be helpful for very slow connections. Most users will not need this.

With the above configuration items in mind, we could make a number of useful configuration tweaks.

For instance, if we are creating and destroying hosts very quickly at a cloud provider, something like this may be useful:

Host home
VisualHostKey yes

Host cloud*
StrictHostKeyChecking no
UserKnownHostsFile /dev/null
LogLevel QUIET

Host *
StrictHostKeyChecking ask
UserKnownHostsFile ~/.ssh/known_hosts
LogLevel INFO
ServerAliveInterval 120

This will turn on your visual host key for your home connection, allowing you to become familiar with it so you can recognize if it changes or when connecting from a different machine. We have also set up any host that begins with cloud* to not check hosts and not log failures. For other hosts, we have sane fallback values.

Connection Forwarding


One common use of SSH is forwarding connections, either allowing a local connection to tunnel through the remote host, or allowing the remote machine access to tunnel through the local machine. SSH can also do dynamic forwarding using protocols like SOCKS5 which include the forwarding information for the remote host.

The options that control this behavior are:

  • LocalForward: This option is used to specify a connection that will forward a local port's traffic to the remote machine, tunneling it out into the remote network. The first argument should be the local port you wish to direct traffic to and the second argument should be the address and port that you wish to direct that traffic to on the remote end.
  • RemoteForward: This option is used to define a remote port where traffic can be directed to in order to tunnel out of the local machine. The first argument should be the remote port where traffic will be directed on the remote system. The second argument should be the address and port to point the traffic to when it arrives on the local system.
  • DynamicForward: This is used to configure a local port that can be used with a dynamic forwarding protocol like SOCKS5. Traffic using the dynamic forwarding protocol can then be directed at this port on the local machine and on the remote end, it will be routed according to the included values.

These options can be used to forward ports in both directions, as you can see here:

# This will allow us to use port 8080 on the local machine
# in order to access example.com at port 80 from the remote machine
Host local_to_remote
LocalForward 8080 example.com:80

# This will allow us to offer access to internal.com at port 443
# to the remote machine through port 7777 on the other side
Host remote_to_local
RemoteForward 7777 internal.com:443

Other Forwarding


Along with connection forwarding, SSH allows other types of forwarding as well.

We can forward any SSH keys stored in an agent on our local machine, allowing us to connect from the remote system as using credentials stored on our local system. We can also start applications on a remote system and forward the graphical display to our local system using X11 forwarding.

These are the directives that are associated with these capabilities:

  • ForwardAgent: This option allows authentication keys stored on our local machine to be forwarded onto the system you are connecting to. This can allow you to hop from host-to-host using your home keys.
  • ForwardX11: If you want to be able to forward a graphical screen of an application running on the remote system, you can turn this option on.

These both are "yes" or "no" options.

Specifying Keys


If you have SSH keys configured for your hosts, these options can help you manage which keys to use for each host.

  • IdentityFile: This option can be used to specify the location of the key to use for each host. If your keys are in the default locations, each will be tried and you will not need to adjust this. If you have a number of keys, each devoted to different purposes, this can be used to specify the exact path where the correct key can be found.
  • IdentitiesOnly: This option can be used to force SSH to only rely on the identities provided in the config file. This may be necessary if an SSH agent has alternative keys in memory that are not valid for the host in question.

These options are especially useful if you have to keep track of a large number of keys for different hosts and use one or more SSH agents to assist.

Multiplexing SSH Over a Single TCP Connection


SSH has the ability to use a single TCP connection for multiple SSH connections to the same host machine. This can be useful if it takes awhile to establish a TCP handshake to the remote end as it removes this overhead from additional SSH connections.

The following options can be used to configure multiplexing with SSH:

  • ControlMaster: This option tells SSH whether to allow multiplexing when possible. Generally, if you wish to use this option, you should set it to "auto" in either the host section that is slow to connect or in the generic Host * section.
  • ControlPath: This option is used to specify the socket file that is used to control the connections. It should be to a location on the filesystem. Generally, this is given using SSH variables to easily label the socket by host. To name the socket based on username, remote host, and port, you can use /path/to/socket/%r@%h:%p.
  • ControlPersist: This option establishes the amount of time in seconds that the TCP connection should remain open after the final SSH connection has been closed. Setting this to a high number will allow you to open new connections after closing the first, but you can usually set this to something low like "1" to avoid keeping an unused TCP connection open.

Generally, you can set this up using a section that looks something like this:

Host *
ControlMaster auto
ControlPath ~/.ssh/multiplex/%r@%h:%p
ControlPersist 1

Afterwards, you should make sure that the directory is created:

mkdir -p ~/.ssh/multiplex

If you wish to not use multiplexing for a specific connection, you can select no multiplexing on the command line like this:

ssh -S none user@host

Conclusion


By now, it should be clear that you can heavily customize the options you use to connect to remote hosts. As long as you keep in mind the way that SSH will interpret the values, you can establish rich sets of specific values with reasonable fall backs.

Understanding and Implementing FastCGI Proxying in Nginx

$
0
0
Nginx has become one of the most flexible and powerful web server solutions available. However, in terms of design, it is first and foremost a proxy server. This focus means that Nginx is very performant when working to handle requests with other servers.

Nginx can proxy requests using http, FastCGI, uwsgi, SCGI, or memcached. In this article, we will discuss FastCGI proxying, which is one of the most common proxying protocols.

Why Use FastCGI Proxying?


FastCGI proxying within Nginx is generally used to translate client requests for an application server that does not or should not handle client requests directly. FastCGI is a protocol based on the earlier CGI, or common gateway interface, protocol meant to improve performance by not running each request as a separate process. It is used to efficiently interface with a server that processes requests for dynamic content.

One of the main use-cases of FastCGI proxying within Nginx is for PHP processing. Unlike Apache, which can handle PHP processing directly with the use of the mod_php module, Nginx must rely on a separate PHP processor to handle PHP requests. Most often, this processing is handled with php-fpm, a PHP processor that has been extensively tested to work with Nginx.

Nginx with FastCGI can be used with applications using other languages so long as there is an accessible component configured to respond to FastCGI requests.

FastCGI Proxying Basics


In general, proxying requests involves the proxy server, in this case Nginx, forwarding requests from clients to a backend server. The directive that Nginx uses to define the actual server to proxy to using the FastCGI protocol is fastcgi_pass.

For example, to forward any matching requests for PHP to a backend devoted to handling PHP processing using the FastCGI protocol, a basic location block may look something like this:

# server context

location ~ \.php$ {
fastcgi_pass 127.0.0.1:9000;
}

. . .


The above snippet won't actually work out of the box, because it gives too little information. Any time that a proxy connection is made, the original request must be translated to ensure that the proxied request makes sense to the backend server. Since we are changing protocols with a FastCGI pass, this involves some additional work.

While http-to-http proxying mainly involves augmenting http headers to ensure that the backend has the information it needs to respond to the proxy server on behalf of the client, FastCGI is a separate protocol that cannot read http headers. Due to this consideration, any pertinent information must be passed to the backend through other means.

The primary method of passing extra information when using the FastCGI protocol is with parameters. The background server should be configured to read and process these, modifying its behavior depending on what it finds. Nginx can set FastCGI parameters using the fastcgi_param directive.

The bare minimum configuration that will actually work in a FastCGI proxying scenario for PHP is something like this:

# server context

location ~ \.php$ {
fastcgi_param REQUEST_METHOD $request_method;
fastcgi_param SCRIPT_FILENAME $document_root$fastcgi_script_name;
fastcgi_pass 127.0.0.1:9000;
}

. . .


In the above configuration, we set two FastCGI parameters, called REQUEST_METHOD and SCRIPT_FILENAME. These are both required in order for the backend server to understand the nature of the request. The former tells it what type of operation it should be performing, while the latter tell the upstream which file to execute.

In the example, we used some Nginx variables to set the values of these parameters. The $request_method variable will always contain the http method requested by the client.

The SCRIPT_FILENAME parameter is set to a combination of the $document_root variable and the $fastcgi_script_name variable. The $document_root will contain the path to the base directory, as set by the root directive. The $fastcgi_script_name variable will be set to the request URI. If the request URI ends with a slash (/), the value of the fastcgi_index directive will be appended onto the end. This type of self-referential location definitions are possible because we are running the FastCGI processor on the same machine as our Nginx instance.

Let's look at another example:

# server context
root /var/www/html;

location /scripts {
fastcgi_param REQUEST_METHOD $request_method;
fastcgi_param SCRIPT_FILENAME $document_root$fastcgi_script_name;
fastcgi_index index.php;
fastcgi_pass unix:/var/run/php5-fpm.sock;
}

. . .


If the location above is selected to handle a request for /scripts/test/, the value of the SCRIPT_FILENAME will be a combination of the values of the root directive, the request URI, and the fastcgi_index directive. In this example, the parameter will be set to /var/www/html/scripts/test/index.php.

We made one other significant change in the configuration above in that we specified the FastCGI backend using a Unix socket instead of a network socket. Nginx can use either type of interface to connect to the FastCGI upstream. If the FastCGI processor lives on the same host, typically a Unix socket is recommended for security.

Breaking Out FastCGI Configuration


A key rule for maintainable code is to try to follow the DRY ("Don't Repeat Yourself") principle. This helps reduce errors, increase reusability, and allows for better organization. Considering that one of the core recommendations for administering Nginx is to always set directives at their broadest applicable scope, these fundamental goals also apply to Nginx configuration.

When dealing with FastCGI proxy configurations, most instances of use will share a large majority of the configuration. Because of this and because of the way that the Nginx inheritance model works, it is almost always advantageous to declare parameters in a general scope.

Declaring FastCGI Configuration Details in Parent Contexts


One way to reduce repetition is to declare the configuration details in a higher, parent context. All parameters outside of the actual fastcgi_pass can be specified at higher levels. They will cascade downwards into the location where the pass occurs. This means that multiple locations can use the same config.

For instance, we could modify the last configuration snippet from the above section to make it useful in more than one location:

# server context
root /var/www/html;

fastcgi_param REQUEST_METHOD $request_method;
fastcgi_param SCRIPT_FILENAME $document_root$fastcgi_script_name;
fastcgi_index index.php;

location /scripts {
fastcgi_pass unix:/var/run/php5-fpm.sock;
}

location ~ \.php$ {
fastcgi_pass 127.0.0.1:9000;
}

. . .


In the above example, both of the fastcgi_param declarations and the fastcgi_index directive are available in both of the location blocks that come after. This is one way to remove repetitive declarations.

However, the configuration above has one serious disadvantage. If any fastcgi_param is declared in the lower context, none of the fastcgi_param values from the parent context will be inherited. You either use only the inherited values, or you use none of them.

The fastcgi_param directive is an array directive in Nginx parlance. From a users perspective, an array directive is basically any directive that can be used more than once in a single context. Each subsequent declaration will append the new information to what Nginx knows from the previous declarations. The fastcgi_param directive was designed as an array directive in order to allow users to set multiple parameters.

Array directives inherit to child contexts in a different way than some other directives. The information from array directives will inherit to child contexts only if they are not present at any place in the child context. This means that if you use fastcgi_param within your location, it will effectively clear out the values inherited from the parent context completely.

For example, we could modify the above configuration slightly:

# server context
root /var/www/html;

fastcgi_param REQUEST_METHOD $request_method;
fastcgi_param SCRIPT_FILENAME $document_root$fastcgi_script_name;
fastcgi_index index.php;

location /scripts {
fastcgi_pass unix:/var/run/php5-fpm.sock;
}

location ~ \.php$ {
fastcgi_param QUERY_STRING $query_string;
fastcgi_pass 127.0.0.1:9000;
}

. . .


At first glance, you may think that the REQUEST_METHOD and SCRIPT_FILENAME parameters will be inherited into the second location block, with the QUERY_STRING parameter being additionally available for that specific context.

What actually happens is that all of the parent fastcgi_param values are wiped out in the second context, and only the QUERY_STRING parameter is set. The REQUEST_METHOD and SCRIPT_FILENAME parameters will remain unset.

A Note About Multiple Values for Parameters in the Same Context


One thing that is definitely worth mentioning at this point is the implications of setting multiple values for the same parameters within a single context. Let's take the following example as a discussion point:

# server context

location ~ \.php$ {
fastcgi_param REQUEST_METHOD $request_method;
fastcgi_param SCRIPT_FILENAME $request_uri;

fastcgi_param DOCUMENT_ROOT initial;
fastcgi_param DOCUMENT_ROOT override;

fastcgi_param TEST one;
fastcgi_param TEST two;
fastcgi_param TEST three;

fastcgi_pass 127.0.0.1:9000;
}

. . .


In the above example, we have set the TEST and DOCUMENT_ROOT parameters multiple times within a single context. Since fastcgi_param is an array directive, each subsequent declaration is added to Nginx's internal records. The TEST parameter will have declarations in the array setting it to one, two, and three.

What is important to realize at this point is that all of these will be passed to the FastCGI backend without any further processing from Nginx. This means that it is completely up to the chosen FastCGI processor to decide how to handle these values. Unfortunately, different FastCGI processors handle the passed values completely differently.

For instance, if the above parameters were received by PHP-FPM, the final value would be interpreted to override any of the previous values. So in this case, the TEST parameter would be set to three. Similarly, the DOCUMENT_ROOT parameter would be set to override.

However, if the above value is passed to something like FsgiWrap, the values are interpreted very differently. First, it makes an initial pass to decide which values to use to run the script. It will use the DOCUMENT_ROOT value of initial to look for the script. However, when it passes the actual parameters to the script, it will pass the final values, just like PHP-FPM.

This inconsistency and unpredictability means that you cannot and should not rely on the backend to correctly interpret your intentions when setting the same parameter more than one time. The only safe solution is to only declare each parameter once. This also means that there is no such thing as safely overriding a default value with the fastcgi_param directive.

Using Include to Source FastCGI Configuration from a Separate File


There is another way to separate out your common configuration items. We can use the include directive to read in the contents of a separate file to the location of the directive declaration.

This means that we can keep all of our common configuration items in a single file and include it anywhere in our configuration where we need it. Since Nginx will place the actual file contents where the include is called, we will not be inheriting downward from a parent context to a child. This will prevent the fastcgi_param values from being wiped out, allowing us to set additional parameters as necessary.

First, we can set our common FastCGI configuration values in a separate file in our configuration directory. We will call this file fastcgi_common:

fastcgi_param REQUEST_METHOD $request_method;
fastcgi_param SCRIPT_FILENAME $document_root$fastcgi_script_name;

Now, we can read in this file wherever we wish to use those configuration values:

# server context
root /var/www/html;

location /scripts {
include fastcgi_common;

fastcgi_index index.php;
fastcgi_pass unix:/var/run/php5-fpm.sock;
}

location ~ \.php$ {
include fastcgi_common;
fastcgi_param QUERY_STRING $query_string;
fastcgi_param CONTENT_TYPE $content_type;
fastcgi_param CONTENT_LENGTH $content_length;

fastcgi_index index.php;
fastcgi_pass 127.0.0.1:9000;
}

. . .


Here, we have moved some common fastcgi_param values to a file called fastcgi_common in our default Nginx configuration directory. We then source that file when we want to insert the values declared within.

There are a few things to note about this configuration.

The first thing is that we did not place any values that we may wish to customize on a per-location basis in the file we plan to source. Because of the problem with interpretation we mentioned above that occurs when setting multiple values for the same parameter, and because non-array directives can only be set once per context, only place items the common file that you will not want to change. Every directive (or parameter key) that we may wish to customize on a per-context basis should be left out of the common file.

The other thing that you may have noticed is that we set some additional FastCGI parameters in the second location block. This is the ability we were hoping to achieve. We were able to set additional fastcgi_param parameters as needed, without wiping out the common values.

Using the fastcgi_params File or the fastcgi.conf File


With the above strategy in mind, the Nginx developers and many distribution packaging teams have worked towards providing a sane set of common parameters that you can include in your FastCGI pass locations. These are called fastcgi_params or fastcgi.conf.

These two files are largely the same, with the only difference actually being a consequence of the issue we discussed earlier about passing multiple values for a single parameter. The fastcgi_params file does not contain a declaration for the SCRIPT_FILENAME parameter, while the fastcgi.conf file does.

The fastcgi_params file has been available for a much longer period of time. In order avoid breaking configurations that relied on fastcgi_params, when the decision was made to provide a default value for SCRIPT_FILENAME, a new file needed to be created. Not doing so may have resulted in that parameter being set in both the common file and FastCGI pass location. This is described in great detail in Martin Fjordvald's excellent post on the history of these two files.

Many package maintainers for popular distributions have elected to include only one of these files or to mirror their content exactly. If you only have one of these available, use the one that you have. Feel free to modify it to suit your needs as well.

If you have both of these files available to you, for most FastCGI pass locations, it is probably better to include the fastcgi.conf file, as it includes a declaration for the SCRIPT_FILENAME parameter. This is usually desirable, but there are some instances where you may wish to customize this value.

These can be included by referencing their location relative to the root Nginx configuration directory. The root Nginx configuration directory is usually something like /etc/nginx when Nginx has been installed with a package manager.

You can include the files like this:

# server context

location ~ \.php$ {
include fastcgi_params;
# You would use "fastcgi_param SCRIPT_FILENAME . . ." here afterwards

. . .

}

Or like this:

# server context

location ~ \.php$ {
include fastcgi.conf;

. . .

}

Important FastCGI Directives, Parameters, and Variables


In the above sections, we've set a fair number of parameters, often to Nginx variables, as a means of demonstrating other concepts. We have also introduced some FastCGI directives without too much explanation. In this section, we'll discuss some of the common directives to set, parameters that you might need to modify, and some variables that might contain the information you need.

Common FastCGI Directives


The following represent some of the most useful directives for working with FastCGI passes:

  • fastcgi_pass: The actual directive that passes requests in the current context to the backend. This defines the location where the FastCGI processor can be reached.
  • fastcgi_param: The array directive that can be used to set parameters to values. Most often, this is used in conjunction with Nginx variables to set FastCGI parameters to values specific to the request.
  • try_files: Not a FastCGI-specific directive, but a common directive used within FastCGI pass locations. This is often used as part of a request sanitation routine to make sure that the requested file exists before passing it to the FastCGI processor.
  • include: Again, not a FastCGI-specific directive, but one that gets heavy usage in FastCGI pass contexts. Most often, this is used to include common, shared configuration details in multiple locations.
  • fastcgi_split_path_info: This directive defines a regular expression with two captured groups. The first captured group is used as the value for the $fastcgi_script_name variable. The second captured group is used as the value for the $fastcgi_path_info variable. Both of these are often used to correctly parse the request so that the processor knows which pieces of the request are the files to run and which portions are additional information to pass to the script.
  • fastcgi_index: This defines the index file that should be appended to $fastcgi_script_name values that end with a slash (/). This is often useful if the SCRIPT_FILENAME parameter is set to $document_root$fastcgi_script_name and the location block is configured to accept requests with info after the file.
  • fastcgi_intercept_errors: This directive defines whether errors received from the FastCGI server should be handled by Nginx or passed directly to the client.

The above directives represent most of what you will be using when designing a typical FastCGI pass. You may not use all of these all of the time, but we can begin to see that they interact quite intimately with the FastCGI parameters and variables that we will talk about next.

Common Variables Used with FastCGI


Before we can talk about the parameters that you are likely to use with FastCGI passes, we should talk a bit about some common Nginx variables that we will take advantage of in setting those parameters. Some of these are defined by Nginx's FastCGI module, but most are from the Core module.

  • $query_string or $args: The arguments given in the original client request.
  • $is_args: Will equal "?" if there are arguments in the request and will be set to an empty string otherwise. This is useful when constructing parameters that may or may not have arguments.
  • $request_method: This indicates the original client request method. This can be useful in determining whether an operation should be permitted within the current context.
  • $content_type: This is set to the Content-Type request header. This information is needed by the proxy if the user's request is a POST in order to correctly handle the content that follows.
  • $content_length: This is set to the value of the Content-Length header from the client. This information is required for any client POST requests.
  • $fastcgi_script_name: This will contain the script file to be run. If the request ends in a slash (/), the value of the fastcgi_index directive will be appended to the end. In the event that the fastcgi_split_path_info directive is used, this variable will be set to the first captured group defined by that directive. The value of this variable should indicate the actual script to be run.
  • $request_filename: This variable will contain the file path for the requested file. It gets this value by taking the value of the current document root, taking into account both the root and alias directives, and the value of $fastcgi_script_name. This is a very flexible way of assigning the SCRIPT_FILENAME parameter.
  • $request_uri: The entire request as received from the client. This includes the script, any additional path info, plus any query strings.
  • $fastcgi_path_info: This variable contains additional path info that may be available after the script name in the request. This value sometimes contains another location that the script to execute should know about. This variable gets its value from the second captured regex group when using the fastcgi_split_path_info directive.
  • $document_root: This variable contains the current document root value. This will be set according to the root or alias directives.
  • $uri: This variable contains the current URI with normalization applied. Since certain directives that rewrite or internally redirect can have an impact on the URI, this variable will express those changes.

As you can see, there are quite a few variables available to you when deciding how to set the FastCGI parameters. Many of these are similar, but have some subtle differences that will impact the execution of your scripts.

Common FastCGI Parameters


FastCGI parameters represent key-value information that we wish to make available to the FastCGI processor we are sending the request to. Not every application will need the same parameters, so you will often need to consult the app's documentation.

Some of these parameters are necessary for the processor to correctly identify the script to run. Others are made available to the script, possibly modifying its behavior if it is configured to rely on the set parameters.

  • QUERY_STRING: This parameter should be set to any query string supplied by the client. This will typically be key-value pairs supplied after a "?" in the URI. Typically, this parameter is set to either the $query_string or $args variables, both of which should contain the same data.
  • REQUEST_METHOD: This parameter indicates to the FastCGI processor which type of action was requested by the client. This is one of the few parameters required to be set in order for the pass to function correctly.
  • CONTENT_TYPE: If the request method set above is "POST", this parameter must be set. It indicates the type of content that the FastCGI processor should expect. This is almost always just set to the $content_type variable, which is set according to info in the original request.
  • CONTENT_LENGTH: If the request method is "POST", this parameter must be set. This indicates the content length. This is almost always just set to $content_length, a variable that gets its value from information in the original client request.
  • SCRIPT_NAME: This parameter is used to indicate the name of the main script that will be run. This is an extremely important parameter that can be set in a variety of ways according to your needs. Often, this is set to $fastcgi_script_name, which should be the request URI, the request URI with the fastcgi_index appended if it ends with a slash, or the first captured group if using fastcgi_fix_path_info.
  • SCRIPT_FILENAME: This parameter specifies the actual location on disk of the script to run. Because of its relation to the SCRIPT_NAME parameter, some guides suggest that you use $document_root$fastcgi_script_name. Another alternative that has many advantages is to use $request_filename.
  • REQUEST_URI: This should contain the full, unmodified request URI, complete with the script to run, additional path info, and any arguments. Some applications prefer to parse this info themselves. This parameter gives them the information necessary to do that.
  • PATH_INFO: If cgi.fix_pathinfo is set to "1" in the PHP configuration file, this will contain any additional path information added after the script name. This is often used to define a file argument that the script should act upon. Setting cgi.fix_pathinfo to "1" can have security implications if the script requests are not sanitized through other means (we will discuss this later). Sometimes this is set to the $fastcgi_path_info variable, which contains the second captured group from the fastcgi_split_path_info directive. Other times, a temporary variable will need to be used as that value is sometimes clobbered by other processing.
  • PATH_TRANSLATED: This parameter maps the path information contained within PATH_INFO into an actual filesystem path. Usually, this will be set to something like $document_root$fastcgi_path_info, but sometimes the later variable must be replaced by the temporary saved variable as indicated above.

Checking Requests Before Passing to FastCGI


One very essential topic that we have not covered yet is how to safely pass dynamic requests to your application server. Passing all requests to the backend application, regardless of their validity, is not only inefficient, but also dangerous. It is possible for attackers to craft malicious requests in an attempt to get your server to run arbitrary code.

In order to address this issue, we should make sure that we are only sending legitimate requests to our FastCGI processors. We can do this in a variety of ways depending on the needs of our particular set up and whether the FastCGI processor lives on the same system as our Nginx instance.

One basic rule that should inform how we design our configuration is that we should never allow any processing and interpretation of user files. It is relatively easy for malicious users to embed valid code within seemingly innocent files, such as images. Once a file like this is uploaded to our server, we must ensure that it never makes its way to our FastCGI processor.

The major issue we are trying to solve here is one that is actually specified in the CGI specification. The spec allows for you to specify a script file to run, followed by additional path information that can be used by the script. This model of execution allows users to request a URI that may look like a legitimate script, while the actual portion that will be executed will be earlier in the path.

Consider a request for /test.jpg/index.php. If your configuration simply passes every request ending in .php to your processor without testing its legitimacy, the processor, if following the spec, will check for that location and execute it if possible. If it does not find the file, it will then follow the spec and attempt to execute the /test.jpg file, marking /index.php as the additional path information for the script. As you can see, this could allow for some very undesirable consequences when combined with the idea of user uploads.

There are a number of different ways to resolve this issue. The easiest, if your application does not rely on this extra path info for processing, is to simply turn it off in your processor. For PHP-FPM, you can turn this off in your php.ini file. For an example, on Ubuntu systems, you could edit this file:

sudo nano /etc/php5/fpm/php.ini

Simply search for the cgi.fix_pathinfo option, uncomment it and set it to "0" to disable this "feature":

cgi.fix_pathinfo=0

Restart your PHP-FPM process to make the change:

sudo service php5-fpm restart

This will cause PHP to only ever attempt execution on the last component of a path. So in our example above, if the /test.jpg/index.php file did not exist, PHP would correctly error instead of trying to execute /test.jpg.

Another option, if our FastCGI processor is on the same machine as our Nginx instance, is to simply check the existence of the files on disk before passing them to the processor. If the /test.jgp/index.php file doesn't exist, error out. If it does, then send it to the backend for processing. This will, in practice, result in much of the same behavior as we have above:

location ~ \.php$ {
try_files $uri =404;

. . .

}

If your application does rely on the path info behavior for correct interpretation, you can still safely allow this behavior by doing checks before deciding whether to send the request to the backend.

For instance, we could specifically match the directories where we allow untrusted uploads and ensure that they are not passed to our processor. For instance, if our application's uploads directory is /uploads/, we could create a location block like this that matches before any regular expressions are evaluated:

location ^~ /uploads {
}

Inside, we can disable any kind of processing for PHP files:

location ^~ /uploads {
location ~* \.php$ { return 403; }
}

The parent location will match for any request starting with /uploads and any request dealing with PHP files will return a 403 error instead of sending it along to a backend.

You can also use the fastcgi_split_path_info directive to manually define the portion of the request that should be interpreted as the script and the portion that should be defined as the extra path info using regular expressions. This allows you to still rely on the path info functionality, but to define exactly what you consider the script and what you consider the path.

For instance, we can set up a location block that considers the first instance of a path component ending in .php as the script to run. The rest will be considered the extra path info. This will mean that in the instance of a request for /test.jpg/index.php, the entire path can be sent to the processor as the script name with no extra path info.

This location may look something like this:

location ~ [^/]\.php(/|$) {

fastcgi_split_path_info ^(.+?\.php)(.*)$;
set $orig_path $fastcgi_path_info;

try_files $fastcgi_script_name =404;

fastcgi_pass unix:/var/run/php5-fpm.sock;
fastcgi_index index.php;
include fastcgi_params;

fastcgi_param SCRIPT_FILENAME $request_filename;
fastcgi_param PATH_INFO $orig_path;
fastcgi_param PATH_TRANSLATED $document_root$orig_path;
}

The block above should work for PHP configurations where cgi.fix_pathinfo is set to "1" to allow extra path info. Here, our location block matches not only requests that end with .php, but also those with .php just before a slash (/) indicating an additional directory component follows.

Inside the block, the fastcgi_split_path_info directive defines two captured groups with regular expressions. The first group matches the portion of the URI from the beginning to the first instance of .php and places that in the $fastcgi_script_name variable. It then places any info from that point onward into a second captured group, which it stores in a variable called $fastcgi_path_info.

We use the set directive to store the value held in $fastcgi_path_info at this point into a variable called $orig_path. This is because the $fastcgi_path_info variable will be wiped out in a moment by our try_files directive.

We test for the script name that we captured above using try_files. This is a file operation that will ensure that the script that we are trying to run is on disk. However, this also has a side-effect of clearing the $fastcgi_path_info variable.

After doing the conventional FastCGI pass, we set the SCRIPT_FILENAME as usual. We also set the PATH_INFO to the value we offloaded into the $orig_path variable. Although our $fastcgi_path_info was cleared, its original value is retained in this variable. We also set the PATH_TRANSLATED parameter to map the extra path info to the location where it exists on disk. We do this by combining the $document_root variable with the $orig_path variable.

This allows us to construct requests like /index.php/users/view so that our /index.php file can process information about the /users/view directory, while avoiding situations where /test.jpg/index.php will be run. It will always set the script to the shortest component ending in .php, thus avoiding this issue.

We could even make this work with an alias directive if we need to change the location of our script files. We would just have to account for this in both our location header and the fastcgi_split_path_info definition:

location ~ /test/.+[^/]\.php(/|$) {

alias /var/www/html;

fastcgi_split_path_info ^/test(.+?\.php)(.*)$;
set $orig_path $fastcgi_path_info;

try_files $fastcgi_script_name =404;

fastcgi_pass unix:/var/run/php5-fpm.sock;
fastcgi_index index.php;
include fastcgi_params;

fastcgi_param SCRIPT_FILENAME $request_filename;
fastcgi_param PATH_INFO $orig_path;
fastcgi_param PATH_TRANSLATED $document_root$orig_path;
}

These will allow you to run your applications that utilize the PATH_INFO parameter safely. Remember, you'll have to change the cgi.fix_pathinfo option in your php.ini file to "1" to make this work correctly. You may also have to turn off the security.limit_extensions in your php-fpm.conf file.

Conclusion


Hopefully, by now you have a better understanding of Nginx's FastCGI proxying capabilities. This ability allows Nginx to exercise its strengths in fast connection handling and serving static content, while offloading the responsibilities for dynamic content to better suited software. FastCGI allows Nginx to work with a great number of applications, in configurations that are performant and secure.
Viewing all 880 articles
Browse latest View live