In this article we’ll look at how Load Balancing works in Exchange 2016 and provide a sample implementation using a real-world load balancer.
Load Balancing in Exchange 2016 is simpler than previous versions. With a consolidation in the number of Exchange Server roles in Microsoft’s newest version of Exchange there are less decisions to make, and the way that traffic affinity is handled within Exchange makes it very simple to reliably load balance traffic.
If you are migrating from a previous version, then things have changed considerably. In Exchange 2010, the version you may be leaving behind, load balancing was often painful. Not only did web-based traffic require load balancing, but MAPI traffic required load balancing too, when using a Client Access Array. To make matters more complex, affinity between servers was required for most protocols.
Setting up, configuring and maintaining load balancing for Exchange 2010 required a reasonable amount of skill to configure properly, especially if configured for services such as SSL offload.
In Exchange 2013, load balancing was simplified considerably and it also reduced the number of roles, resulting in just Client Access and Mailbox roles.
Exchange 2016 simplifies things further and has a single role – the Mailbox role. The single role server provides all the functionality Exchange 2013 multi-role servers provided effectively allowing any inbound client traffic to connect to any Exchange mailbox server and route to the server currently hosting the active mailbox being accessed.
This means in Exchange 2016 the decisions for load balancing are very simple and it’s reasonably hard to make a bad decision. You can complicate it, but should you wish to make Load Balancing very simple you can do so.
Changes to how clients access Exchange 2016
One of the biggest changes to Exchange 2016 is to the server roles. In Exchange 2010, the familiar Client Access, Hub Transport, Mailbox and Unified Messaging Roles can be deployed together, or apart. In Exchange 2013 the roles were consolidated to just the Client Access role and Mailbox role.
Exchange 2016 consolidates these roles further to just the Mailbox role. Inside a Mailbox server, the Client Access proxy components introduced in Exchange 2013 are still present, along with the underlying full Client Access, Transport, Mailbox and Unified Messaging components. However, a Mailbox server always contains these multiple roles and cannot be split. Effectively, Microsoft are mandating multi-role servers for new deployments.
In Exchange 2013 the Client Access role did something very special. It ensured that when a user attempted to access their mailbox, the request was proxied back to the Mailbox server actively serving the users mailbox. This always ensured that services like Outlook on the Web were always rendered for the user on the mailbox server itself, removing the need for affinity.
The Exchange 2016 mailbox role now includes the same functionality, meaning that if two servers host different mailboxes they will proxy traffic for each other when required. The mailbox server hosting the active copy of the mailbox will serve the user accessing it, even if the user connects to another mailbox server.
Finally all client traffic from native Exchange clients like Outlook connect over HTTP/HTTPS. No client connectivity directly via MAPI is allowed.
Improvements to Load Balancing
These make load balancing for Exchange 2016 suddenly quite simple. HTTPS-only access from clients means that we've only got one protocol to consider, and HTTP is a great choice because it's failure states are well known, and clients typically respond in a uniform way.
The second improvement is to the way that affinity now works. As Outlook on the web is rendered on the same server that's hosting that user's mailbox database it doesn’t matter which mailbox server the load balancer directs traffic to. These have no notable performance impact if the load balancer directs traffic to another server because the OWA session is already running.
The challenge for session affinity when using forms-based authentication has also been solved. Previously it was essential to use affinity to avoid re-prompting for login when the load balancer redirected traffic to another server. This was solved in Exchange 2013 by improving the way HTTP cookies are handled by Exchange.
The authentication cookie is provided to use the user after logon, encrypted using the Client Access Server's SSL certificate. This enables a logged in user to resume that session on a different Client Access server without re-authentication; assuming servers share the same SSL certificate, and therefore are able to decrypt the authentication cookie the client presents.
Figure 1: Example request for a client accessing Exchange 2016
The new simplified infrastructure provides us the opportunity to make load balancing as simple as it possibly can – if desired, we can use DNS round robin, a technique that simply provides the client with the IP address of every mailbox server, and let the HTTP client do the rest. If one Exchange server fails completely, then the protocol is smart enough to attempt connection to another server.
There are a number of downsides to DNS round robin. It is not actually load balancing the traffic and there are no guarantees that each server will receive its fair share. It also has no service level monitoring, meaning that if a single service is failed, for example Outlook on the web, clients will simply see the error page rather than be automatically directed to another server. Finally it requires more external IP addresses when publishing externally, as each individual Exchange server will require an external IP address.
These reasons typically mean that a load balancer is very desirable when publishing Exchange 2016 to clients.
We will want a load balancer to monitor each Exchange client facing service and if a failure does occur, direct traffic to another server and take that service offline. We will also want the load balancer to perform some level of distribution of load to ensure that one particular mailbox server is not proxying the majority of client access.
When load balancing services using a load balancer we can utilize either Layer 4 or Layer 7 load balancing. Layer 4 load balancers do not look at the contents of the traffic and simply send the traffic onto the configured destination. Layer 7 load balancers have the ability to inspect the content of the traffic and direct accordingly.
A layer 4 load balancer requires less resources to perform well, but has a trade-off. When using a single IP address, it can only monitor a single service (such as Outlook on the web, ActiveSync, MAPI-HTTP etc) meaning that although the configuration is very simple, there is a risk one service may fail and although the server is available, clients may still connect to the failed service.
This typically means that a resilient Layer 4 implementation requires multiple IP addresses configured along with separate HTTP names configured per service (such as owa.contoso.com, eas.contoso.com, mapi.contoso.com). This allows service level monitoring information to be used.
A layer 7 load balancer trades off the raw performance benefits of layer 4 load balancing for the simplicity of having a single HTTP name (such as mail.contoso.com) with the benefits of per-service monitoring.
Layer 7 load balancers understand the HTTP path being accessed (such as /owa, /Microsoft-Server-ActiveSync, /mapi) and can then direct traffic only to working servers based on monitoring data. This means only a single IP address is required.
Summary
In above steps we’ve looked at how clients access Exchange 2016 and the various options available for configuring load balancing. In the below steps, we’ll configure simple load balancing using a Layer 4 load balancer.
Implementing Simple Load Balancing
We'll first look at the simplest configuration for load balancing in Exchange 2016, using a KEMP load balancer as an example to try out the configuration on.
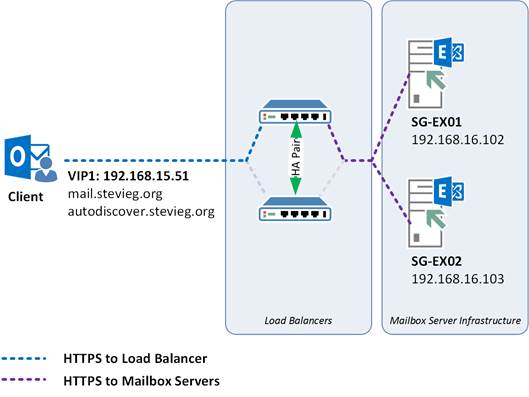
In our example, we'll be using a single HTTPS namespace for services like OWA, EWS, OAB and ActiveSync along with our Autodiscover namespace.
These two names will share Virtual IP (VIP) using the same SAN certificate. We'll be forwarding using Layer 4, and performing a check against the OWA URL. On the back-end we've just got two client access servers to load balance:
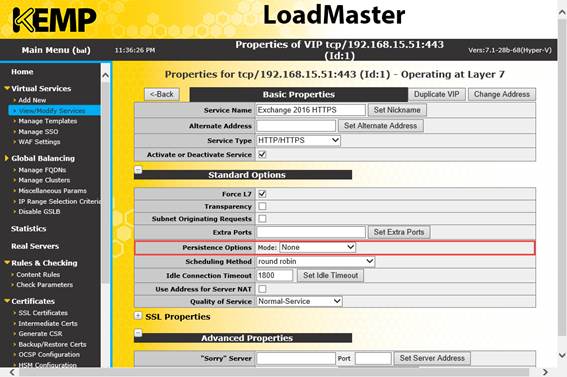
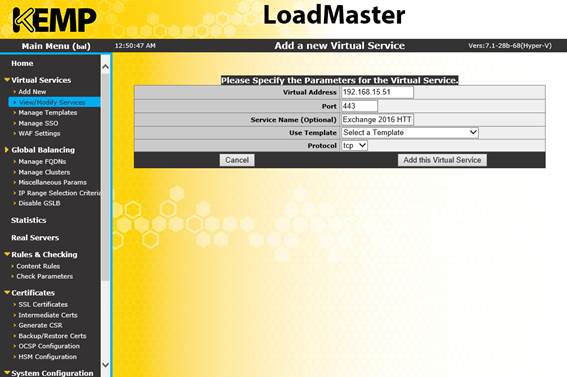
To add our single service, we'll log into our blank load balancer, and choose to add a new service, specifying our single VIP (in this case
192.168.15.51) along with the HTTPS port, TCP port 443:
Figure 2: Creating the initial VIP
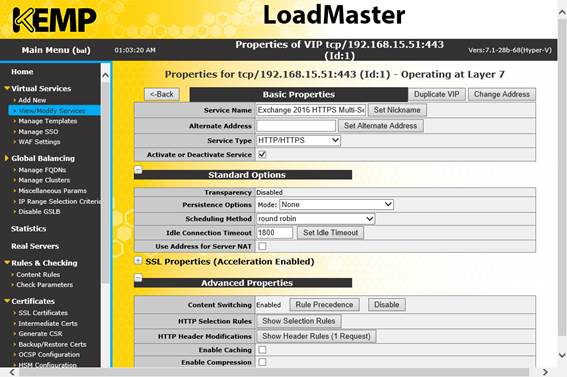
Next, we'll choose to inform the load balancer under the heading
Standard Options that the service is Layer 4 by deselecting
Force L7. We'll also make sure affinity is switched off by selecting
None within Persistence Options, and leave
Round Robin as the scheduling method to distribute load:
Figure 3: Selecting Standard Options for the Load Balancer
We'll leave the SSL properties and advanced options at their defaults, then move onto adding our Client Access servers under the heading
Real Servers.
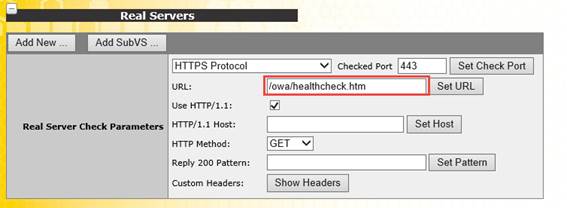
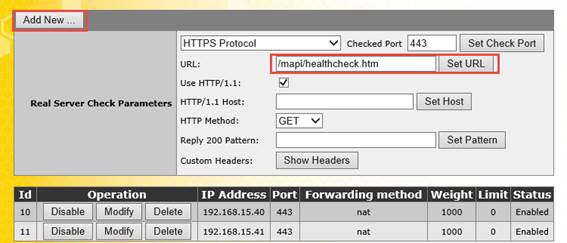
First, we'll define what to monitor by ensuring that within
Real Server Check Parameters, the HTTPS Protocol is defined and the URL is configured. We'll use /owa/healthcheck.htm as the URL then ensure we save that setting by choosing
Set URL:
Figure 4: Configuring the OWA check URL
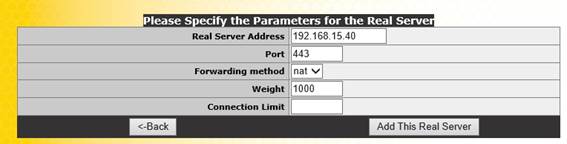
Next choose
Add New and then on the page that follows, enter the IP address of your first Client Access server in the field
Real Server Address. Leave all other options as their defaults, and choose
Add this real server to save the configuration. Repeat the process for each Client Access server.
Figure 5: Adding client access servers
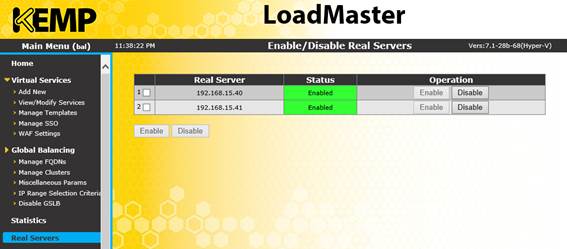
After adding both of our client access servers, choose View/Modify Services to list the VIPs. We should see our new VIP listed, along with each Client Access server under the Real Servers column. If all is well, the status should show in green as Up:
Figure 6: Completed load balancer configuration for a single IP
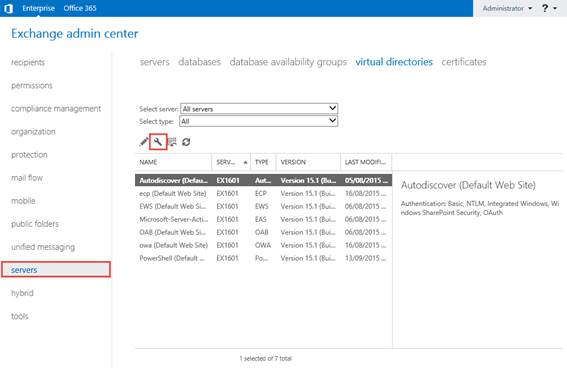
After ensuring that DNS records for our HTTPS namespaces - mail.stevieg.org and autodiscover.stevieg.org are configured to point at our VIP of 192.168.15.51, we'll then configure our Mailbox servers to use these names, by visiting the Exchange Admin Center, and then navigating to Virtual Directories. Within Virtual Directories, click on the Configure External Access Domain button highlighted below:
Figure 7: Configuring the HTTPS namespaces
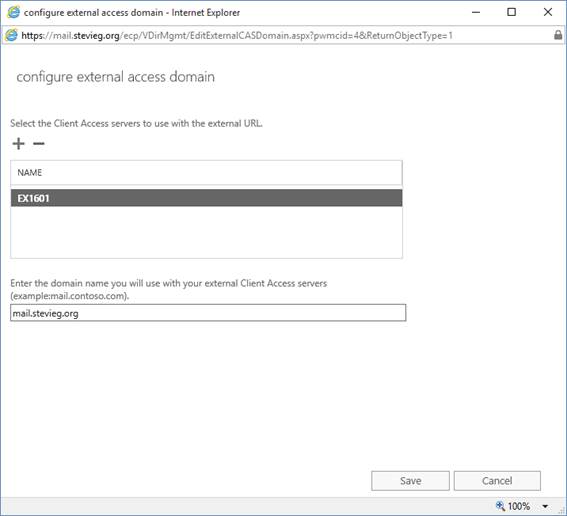
Next, we'll select both of our servers hosting the Client Access role and enter our primary HTTPS name, then choose
Save to implement our configuration of OWA, ECP, OAB, EWS and ActiveSync virtual directories.
Figure 8: Configuring a single namespace and applying it to all servers
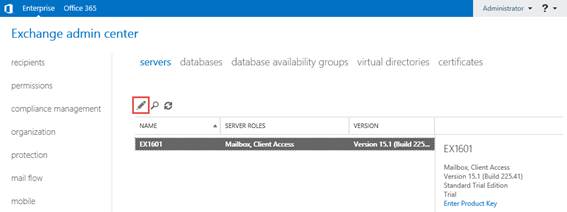
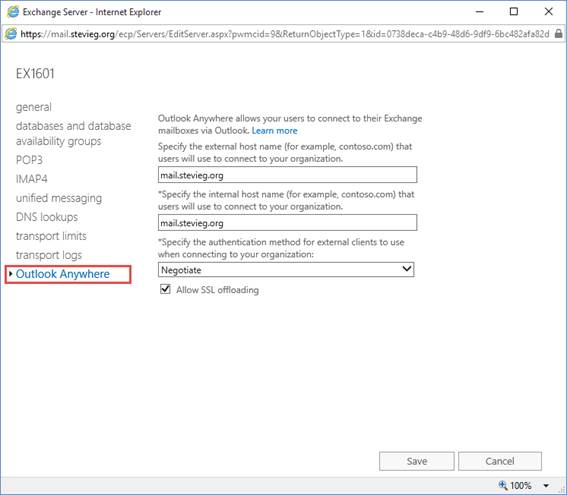
Finally, we'll configure Outlook Anywhere by navigating to the
Servers page and choosing each server one by one and selecting the
Edit icon highlighted below:
Figure 9: Editing the individual server Outlook Anywhere publishing
We'll then navigate to the
Outlook Anywhere tab of Server Properties window and enter our HTTPS namespace,
mail.stevieg.org for both the internal and external names:
Figure 10: Configuring the internal and external URL for Outlook Anywhere
After saving the configuration, along with performing an
iisreset /noforce against these servers, we should have a complete configuration.
Implementing Per-Service Load Balancing
With per-service load balancing, we have a number of different options available. We can use Layer 4 load balancing and use a separate name for each server and different corresponding IP address.
Alternatively, as we’ll describe here, we can use the same basic configuration used for the simple single server Layer 4 load balancing, and then add on some more intelligent features.
The feature we’ll add on using the KEMP load balancer is known as sub-virtual servers and requires the use of Layer 7 level load balancing. In essence, Layer 7 load balancing is able to examine the contents of the request, such as the URL specified, and then make intelligent decisions. Based on the URL provided, the Layer 7 load balancer is able to pass the request to a sub-virtual server which will then load-balance an individual service.
This has a number of benefits over and above the Layer 4 simple load balancer. Firstly, it provides service-level awareness, something we do not have with the configuration implemented above – we only have awareness for the service status of the Outlook on the web (OWA) service.
Secondly it only requires a single IP address. Layer 4 per-service load balancing requires multiple IP addresses as it is simply passing the request through as-is and is unable to make any intelligent services.
The great thing about what we’ll do now is that it doesn’t require any additional, special Exchange configuration. The changes we made earlier in this article to align the namespaces for HTTPS traffic for a single virtual IP all apply as-is for this example.
To get started though, let’s skip back to the KEMP load balancer and Add a new virtual service. We’ll create a new virtual service for Exchange 2016 HTTPS using our space VIP for this example implementation, 192.168.15.51, with basic options as shown below:
Figure 11: Creating a new virtual service
We will then examine the configuration for the newly created virtual service. As you’ll see when examining the configuration, the service type is set to HTTP/HTTPS and the Scheduling Method is set to Round Robin:
Figure 12: Viewing the newly created VS Scroll down to the SubVSs section within the configuration, and choose Add new
Figure 13: Creating a new virtual service
Upon choosing
Add new a new sub virtual server will be shown. Using a similar process to the single Layer 4 load balancer, we’ll set a check URL for monitoring, and then add both real servers.
In the example below, we’re creating a sub virtual service for the
MAPI protocol. We’ll specify the virtual directory check URL /mapi/healthcheck.htm and specify to use HTTP 1.1 and the GET method. When you’re finished, choose
Add new to add the next one:
Figure 14
We’ll need to repeat this process a number of times. The table below shows the multiple services we’ll add and the corresponding check URLs:
| Service | Check URL |
| Autodiscover | /Autodiscover/healthcheck.htm |
| ActiveSync | /Microsoft-server-activesync/healthcheck.htm |
| Exchange Admin Center | /ecp/healthcheck.htm |
| Exchange Web Services | /ews/healthcheck.htm |
| HTTP/MAPI | /mapi/healthchech.htm |
| Offline Address Book | /oab/healthcheck.htm |
| Outlook on the Web | /owa/healthcheck.htm |
| Exchange Management Shell | /powershell/healthcheck.htm |
| Outlook Anywhere | /rpc/healthcheck.htm |
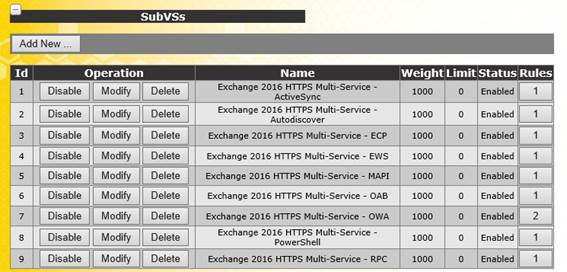
Table 1When you have finished creating each new sub virtual service, you should see each individual service listed. Each will be capable of monitoring an individual service.
Figure 15: Viewing individual status monitors
For the purposes of this article we will not go deeper on the KEMP specific details, as this is solely to illustrate the generic process. For the KEMP load balancer devices using this specific kind of per-service load balancing you’ll need to also import the specific SSL certificate used for the services, enable SSL re-encryption and configure sub virtual server rules to direct traffic based on the entered URL.
Summary
In the above steps we’ve explored the simple load balancing configuration required to direct traffic to your Exchange 2016 organization using Layer 4 load balancing, which provides an efficient, simple form of load balancing. As a representative example we’ve also looked at how the KEMP load balancer can be used to perform Layer 7 based per-service monitoring of services, at the expense of complexity.