Quantcast
Channel: Tech Support
Viewing all 880 articles
Browse latest View live

Put Your iPhone Face Down to Save Battery Life

$
0
0


iOS 9 brought a useful new feature you may not have noticed yet. Known as “Facedown detection”, your iPhone can detect when it’s placed face down and won’t turn the screen on when notifications arrive. This can save a lot of battery power if you regularly receive notifications.


How Facedown Detection Works

While the technology involved is a little more complex, the tip is simple. When you place your iPhone face up on a table, its screen will automatically turn on each time you receive a new notification on your lock screen. You can glance over at the phone to read the notification without even touching it.

If you don’t plan on looking at your iPhone’s notifications as they arrive, just place your screen face down. You’ll still hear notification sounds and your phone will still vibrate. However, when a notification arrives, its screen will remain powered off. This saves battery power.

Prior to iOS 9, your iPhone’s screen actually turned on every time you received a notification even when it was face down. There was no advantage to putting your iPhone face down aside from not seeing the notifications. The screen would keep turning on, using just as much battery power as if you placed the iPhone face up.


Which iPhones Does This Work With?

Like many iOS features, facedown detection doesn’t work on every iPhone. This particular feature works on the iPhone 5s, iPhone 6, iPhone 6 Plus, iPhone 6s, and iPhone 6s Plus, iPhone SE, iPhone 7, and iPhone 7 Plus.

It does not work on the iPhone 5, iPhone 5c, iPhone 4s, and other older iPhones. It also doesn’t work on any iPad or iPod Touch devices.


Facedown detection needs specific hardware because it uses the motion coprocessor, which is also used for your iPhone’s step tracking feature. In fact, it only works if that feature is on. If you head to Settings > Privacy > Motion and Fitness and disable the “Fitness Tracking” feature, facedown detection will stop working and your iPhone will turn on its display every time it receives a notification, even if it’s set face down on a surface.


This feature was introduced alongside Low Power Mode in iOS 9. Like Low Power Mode, it’s designed to help save battery power. But it will only save battery power if you know about this tip and choose to set your iPhone face down instead of face up when you don’t need to look at the screen.

How to Identify Hardware Component Failure in Your Computer

$
0
0
hard-drive-detects-failure

Concluding that your computer has a hardware problem is just the first step. If you’re dealing with a hardware issue and not a software issue, the next step is determining what hardware problem you’re actually dealing with.


If you purchased a laptop or pre-built desktop PC and it’s still under warranty, you don’t need to care about this. Have the manufacturer fix the PC for you — figuring it out is their problem.

If you’ve built your own PC or you want to fix a computer that’s out of warranty, this is something you’ll need to do on your own.


Blue Screen 101: Search for the Error Message

This may seem like obvious advice, but searching for information about a blue screen’s error message can help immensely. Most blue screens of death you’ll encounter on modern versions of Windows will likely be caused by hardware failures. The blue screen of death often displays information about the driver that crashed or the type of error it encountered.

For example, let’s say you encounter a blue screen that identified “NV4_disp.dll” as the driver that caused the blue screen. A quick Google search will reveal that this is the driver for NVIDIA graphics cards, so you now have somewhere to start. It’s possible that your graphics card is failing if you encounter such an error message.


Check Hard Drive SMART Status

Hard drives have a built in S.M.A.R.T. (Self-Monitoring, Analysis, and Reporting Technology) feature. The idea is that the hard drive monitors itself and will notice if it starts to fail, providing you with some advance notice before the drive fails completely. This isn’t perfect, so your hard drive may fail even if SMART says everything is okay.

If you see any sort of “SMART error” message, your hard drive is failing. You can use SMART analysis tools to view the SMART health status information your hard drives are reporting.


Test Your RAM

RAM failure can result in a variety of problems. If the computer writes data to RAM and the RAM returns different data because it’s malfunctioning, you may see application crashes, blue screens, and file system corruption.

To test your memory and see if it’s working properly, use Windows’ built-in Memory Diagnostic tool. The Memory Diagnostic tool will write data to every sector of your RAM and read it back afterwards, ensuring that all your RAM is working properly.

windows-memory-diagnostic


Check Heat Levels

How hot is is inside your computer? Overheating can rsult in blue screens, crashes, and abrupt shut downs. Your computer may be overheating because you’re in a very hot location, it’s ventilated poorly, a fan has stopped inside your computer, or it’s full of dust.

Your computer monitors its own internal temperatures and you can access this information. It’s generally available in your computer’s BIOS, but you can also view it with system information utilities such as SpeedFan or Speccy. Check your computer’s recommended temperature level and ensure it’s within the appropriate range.

If your computer is overheating, you may see problems only when you’re doing something demanding, such as playing a game that stresses your CPU and graphics card. Be sure to keep an eye on how hot your computer gets when it performs these demanding tasks, not only when it’s idle.

speedfan-temperatures


Stress Test Your CPU

You can use a utility like Prime95 to stress test your CPU. Such a utility will fore your computer’s CPU to perform calculations without allowing it to rest, working it hard and generating heat. If your CPU is becoming too hot, you’ll start to see errors or system crashes.

Overclockers use Prime95 to stress test their overclock settings — if Prime95 experiences errors, they throttle back on their overclocks to ensure the CPU runs cooler and more stable. It’s a good way to check if your CPU is stable under load.

cpu-torture-test


Stress Test Your Graphics Card

Your graphics card can also be stress tested. For example, if your graphics driver crashes while playing games, the games themselves crash, or you see odd graphical corruption, you can run a graphics benchmark utility like 3DMark. The benchmark will stress your graphics card and, if it’s overheating or failing under load, you’ll see graphical problems, crashes, or blue screens while running the benchmark.


If the benchmark seems to work fine but you have issues playing a certain game, it may just be a problem with that game.


Swap it Out

Not every hardware problem is easy to diagnose. If you have a bad motherboard or power supply, their problems may only manifest through occasional odd issues with other components. It’s hard to tell if these components are causing problems unless you replace them completely.

Ultimately, the best way to determine whether a component is faulty is to swap it out. For example, if you think your graphics card may be causing your computer to blue screen, pull the graphics card out of your computer and swap in a new graphics card. If everything is working well, it’s likely that your previous graphics card was bad.

This isn’t easy for people who don’t have boxes of components sitting around, but it’s the ideal way to troubleshoot. Troubleshooting is all about trial and error, and swapping components out allows you to pin down which component is actually causing the problem through a process of elimination.

This isn’t a complete guide to everything that could likely go wrong and how to identify it — someone could write a full textbook on identifying failing components and still not cover everything. But the tips above should give you some places to start dealing with the more common problems.

How to Identify Which Apps Are Draining Your Battery on an iPhone or iPad

$
0
0
lead_image_see_apps_draining_battery
Since iOS 8, you can now see which apps are draining your battery the most. This includes apps that drain your battery in the background — something that’s possible on iOS since Apple added the “background refresh” feature in iOS 7.


You can stop these apps from using so much battery power, especially if they’re draining that battery in the background while you aren’t actually using them. Apps do this to be helpful, but it uses power and costs battery life.


View Apps By Battery Usage

This information is available in the Settings screen. To access it, tap “Settings” on the Home screen and then tap “Battery”.

tapping_battery

Battery usage percentages display for each app currently consuming battery power, with the apps using the most battery power listed at the top.

battery_usage

Tapping the clock icon displays how many minutes each app has been active on the screen, in the background, or both.

NOTE: You can also tap on any app’s name to displays this information for all apps.

minutes_on_screen


Understanding Battery Usage

The Battery Usage list provides two different columns. You can see how much battery apps have been using in the past 24 hours, or in the past seven days. Tap either column to see the list.

In the “Time Since Last Full Charge” section, at the bottom of the “Battery Usage” list, you’ll see two amounts of time, “Usage” and “Standby”. “Usage” shows how much time you have actually used your phone in hours and minutes since the last time it was fully charged. The amount of time your phone has been sitting idle since the last full charge is shown next to “Standby”.

There are no actions you can take from this particular screen. As we mentioned before, tapping on an app’s name displays the number of minutes on screen and in the background.

time_since_last_full_charge

This screen works differently than the similar Battery screen on Android, which you may be familiar with. Android’s data resets when you charge the device, so the screen always shows data from the last charge cycle. On iOS, it always shows battery life over a period of time. For example, if you use your device very heavily and charge it three times a day, the “Last 24 Hours” list will show battery usage over those last three charges.

Keep this in mind — this list won’t show you exactly what drained your battery over the last charge. It will just show which apps are using the battery the most.


Make Apps Use Less Battery Power

In most cases, apps that appear in this list are using the battery power because you have your device on and are actively using the app. So, if you see Safari near the top of the list here, that’s because you spent a good amount of time using Safari on your device.

Of course, not all apps will use an equal amount of power. A graphically intensive game will use more battery life in 10 minutes than the Safari web browser or another basic app will.

For most apps here, there’s not a lot you can do to reduce their battery usage aside from using the app less. If you see a game using a lot of battery power, be aware how much battery that game is draining while you play it. Consider playing a less graphically intensive game if you want to play a game and need to stretch your battery farther.


Restricting “Background Activity” Apps

Some apps in this list have a “Background Activity” label. This means the app is using battery power by running in the background. For example, the Mail app automatically fetches new mail in the background. In the screenshot below, the AccuWeather and Surveys apps were refreshing in the background and using battery power.
background_activity


To prevent apps from using data in the background, navigate to Settings > General > Background App Refresh. Disable background refresh for battery-sucking apps here, preventing them from refreshing their data in the background.

background_app_refresh

Bear in mind that other things also reduce your device’s battery life. For example, the display uses a lot of battery power — turn down your display brightness to get more battery life. Push notifications, location access, Bluetooth, and other features also use battery power.

How to Permanently Delete Your Facebook Account

$
0
0


Social networks have become a necessary evil. Like mobile phones, we just can’t do without them, but there are all kinds of things we haven’t considered about their effect on people. Social networks have ushered in a whole new slew of unintended consequences.


We realize Facebook is the biggest, most obvious target, and there are a lot of other social networks out there, but given that Facebook has around 1.49 billion active users, we feel it’s obviously the most important one. Regardless, much of what we’ll tell you today can be applied to other social media platforms as well, especially quitting or deleting profiles.


Deactivating Your Account

Sadly for some, this may not work, and if your goal is to simply break the Facebook habit, then deactivating your account, at least for a time, can really help you get your priorities straightened out.

To deactivate your account, first open the “Settings” from your user menu.


Click on “Security” and then “Deactivate Your Account”, which is located at the very bottom.


There’s no difference between doing this on the website or a mobile app, such as here with the Facebook for Android app.


Facebook requires you supply a reason for leaving; you can give them any excuse you want.


Additionally, whatever excuse you give them will be countered by an attempt to try to get you to stay. Simply click the “Close” button on any window that pops up.


To deactivate your account, you will need to enter your password and click the “Deactivate Now” button.


Once deactivated, you will be logged out and your account will no longer be available to any of your friends. You can easily reactivate your account at any time by logging back in.

That said, if you’re really serious about taking time off, then you need to perform other actions as well. We recommend clearing your browser history and even removing your login credentials from your password manager (if you keep them stored). Doing so will be a subtle reminder, akin to a light slap on the hand, that you’re taking time off.


Delete Your Account Permanently

If for whatever reason you decide that you simply do not want to be on Facebook anymore, then you can completely delete your account. This is different from deactivation, which temporarily (or permanently, if you don’t go back) suspends your account.

Deleting your account does just what you think it does – your account is erased, though parts of you may remain as comments and sent messages. Everything else that you ever posted, any pictures, videos, or other items will be forever and irrevocably be gone.


Download Your Data

Before you proceed with the nuclear option, however, it is highly recommended that you download a copy of your Facebook data. When you do this, all your photos, posts, messages, and so on, will be archived and you will be sent a link from which you can download, and then store it somewhere else safely.

To download your Facebook data, first go to the account settings as detailed earlier and from the “General Account Settings” click on the link at the very bottom that says “download a copy of your Facebook data”.


Don’t delete your account before you actually download your data. Make sure you have it before proceeding.


Facebook doesn’t provide a simple link in your settings to delete your account, instead you will need to go to www.facebook.com/help/delete_account to get the process started.


You’re urged to take account deletion seriously because it is permanent. Once your account is gone, there’s no going back.

How to Setup a Home Media Server That You Can Access From Any Device

$
0
0


Local media servers have gone out of style. Microsoft no longer makes Windows Home Server and is phasing out Windows Media Center. But there are still great solutions if you want to run a home media server and stream to all your devices.


Bring Your Own Media

There are some good free software packages for this, but you’ll need to bring your own media. If you have a large collection of local video and music files — perhaps videos ripped from DVDs and music ripped from audio CDs — this may be the ideal way to access that content on all your devices without relying on streaming services like Netflix and Spotify.

These apps often allow you to browse and access photos, too — perfect if you’re the type of person who keeps a local photo collection, too.


Plex vs. Media Browser: Choose One

The two biggest solutions to recommend are probably Plex and Media Browser. Both work similarly, offering a server you install on a desktop PC, laptop, NAS device, or dedicated home server. You could also try Kodi, formerly known as XBMC — it can be a bit more complicated to set up and works a bit differently.

Plex and Media Browser both offer servers that run on Windows, Linux, Mac OS X, BSD, and various NAS devices. You can install it on a desktop computer, a dedicated server, or get a pre-made NAS device that supports the server software.

Plex offers clients for the Roku, Amazon Fire TV, Xbox, and PlayStation platforms — as well as Chromecast support. They offer mobile apps for iOS, Android, Windows Phone, and Windows 8. There’s also a web interface and powerful Plex application for computers, if you hook up a computer to your TV.


Media Browser offers clients for the Roku and some other TV-streaming devices, including Chromecast support. There are also mobile apps for for iOS, Android, Windows Phone, and Windows 8. Want to use it on a computer? There’s a convenient web-based interface.

Both have fairly similar features, although Plex definitely offers a more comprehensive suite of apps — PlayStation, Xbox, and Fire TV support, for example. However, some Plex services cost money. The iOS Plex app costs $5, and the Xbox and PlayStation app both require a “Plex Pass” subscription that will cost you $5 a month.

Media Browser and its apps are completely free, so there’s no monthly fee or per-app purchases you’ll have to deal with — then again, Media Browser doesn’t even offer PlayStation or Xbox support you could purchase if you wanted to. So, you’ll need to pick one — or, better yet, consider trying both and figuring out which one works best for you.


Setup the Server, Install the Apps, and Start Streaming

The setup process should just take a few minutes, no matter what server you choose to use. Install the Plex or Media Browser on your system of choice and set it up to point at your media. Both Plex and Media Browser offer an optional account system, which can simplify signing into the mobile and TV apps and connecting to your server remotely over the Internet.


You can then install the appropriate apps on your TV-streaming boxes, smartphones, and tablets. Use them to access your streaming media. This part is fairly easy. If you have a Chromecast, remember that you don’t need any special Plex or Media Browser app on your TV — you can install the appropriate app on your smartphone and then use it to cast media directly to your Chromecast.

img_54eec956e64c3

You’ll also need to run your own home server for this. If you have a desktop PC or laptop and are happy just accessing the server while your computer is running, you can just install the server software on your desktop computer.

You could also set up a dedicated server system to run the server, of course. That’d be a computer you could leave running all the time and even access your media server remotely over the Internet. It doesn’t have to be a full, high-powered computer — it could be a low-power, small-form-factor NAS device with a large hard drive for holding all those media files.

Protect Your Online Accounts By Removing Third-Party App Access

$
0
0
view-and-manage-websites-and-apps-that-can-access-your-accounts

You’ve probably given a few applications or websites access to your Google, Facebook, Twitter, Dropbox, or Microsoft account. Every application you’ve ever allowed keeps that access forever or at least until you revoke it.


In other words, there are probably quite a few other web services that have access to your personal data. You should regularly check your lists of connected services on the websites you use and remove services you no longer use.


Why Third Parties Probably Have Access to Your Accounts

When you use an application or web service that requires access to an account — for example, anything in your Google account, files in your Dropbox account, tweets on Twitter, and so on — that application generally doesn’t ask for the service’s password. Instead, the application requests access using something called OAuth. If you agree to the prompt, that app gets access to your account. The account’s website provides the service with a token it can use to access your account.

This is more secure than just giving the third-party application your password because you get to keep your password. It’s also possible to restrict access to specific data — for example, you might authorize a service to access your Gmail account but not your files in Google Drive or other data in your Google account.

When you give an app access, you see a permission prompt on the website you use. So, if you give an app access to your Google account, you’ll see a permission prompt on the Google website.

google-request-for-permission-oauth-prompt

So far, so good. But it’s easy to forget which apps and services have access to your account. You might try an app once and never use it again, or you might have stopped using an app years ago. If you don’t check your list of authorized applications and remove it, that app still has access. The app could use its access to gather data about your without your permission. 

The app could be sold to new owners who want to use the app to make a quick buck — like how popular Chrome extensions are sold to advertisers who pack them full of adware. Or the web service itself could be compromised by attackers who use its access to accounts to do something bad.

Changing your password won’t automatically revoke access to connected apps, either. Even if you change all your passwords and think you’re starting over from scratch, services you’ve given access to your account will maintain that access.

You should only give access to applications you trust and regularly use. If you don’t use a service or application anymore, you should remove its access just to be safe.

google-account-permissions


Use These Links

To secure your accounts, you’ll need to visit a specific page on each website you use and check your list of connected services. If you see a service or app you no longer use, revoke its access to your account with a click or two.

To speed this up, we’ve collected a list of links to the appropriate pages on popular websites that use OAuth. If you use a service, click its link to check your list of connected services. and revoke access to services you no longer use:
If you use another website and you’ve given third-party applications access to it with a similar-looking OAuth prompt, you’ll need to check its account settings page and look for a list of connected sites, services, or apps to manage.

It’s generally a bad idea to click links on websites that promise to access your Google, Microsoft, Facebook, or Twitter accounts and sign in with your password. Phishers impersonate sites in this way to steal your passwords. if you see a password prompt after clicking a link like the ones above somewhere on the web, be sure to verify that you’re actually on the real website and not a fake, imposter site.


revoke-access-to-connected-twitter-app

Deciding what applications to remove is easy — if you don’t use it, revoke access to it. Be sure to check your list of connected applications and websites regularly on the websites you use. If you give an application or service access to sensitive data, be sure to revoke its access when you stop using it.

Why Your iPhone is Asking You To “Trust This Computer”

$
0
0


Plug your iPhone or iPad into a USB port and you may be asked whether you want to “Trust This Computer.” You may even see this message when you plug your iPhone or iPad into a USB charger. This prompt helps protect your iPhone from malicious chargers. It also ensures no one can snatch your iPhone and access its data from a computer without your passcode.


A Computer or Device is Trying to Access Your Files

You’ll see this prompt when a computer or other device you’ve plugged your iPhone into is trying to access your files. For example, the first time you plug your iPhone into a Mac or PC running iTunes, you need to “trust this computer” before you can access your files and otherwise manage your device from iTunes.

This alert message only pops up when your iPhone or iPad is unlocked. This means that someone can’t grab your iPhone and plug it into their PC to get at your files — it will have to be unlocked first.


Avoiding Juice Jacking

If you plug your iPhone or iPad into a USB charger and see this prompt, don’t agree to it. This would give whatever device you’re plugged into access to your files. For example, if you ever plug it into a USB charger in a public place and see this alert, just say no.

“Juice jacking” is an attack that uses compromised USB chargers to access files on devices. Apple added this prompt in iOS 7 to prevent such attacks, ensuring your phone or tablet’s files are protected from devices you plug it into unless you specifically agree. Because the charging cable is the same as the data transfer cable, this provides an additional layer of security that allows you to charge your device without giving a malicious charger access to your stuff.

potentially malicious usb charging port


What if You Don’t Trust The Computer?

If you don’t trust a computer or device you’re plugged into, it won’t be able to access your files. Your iPhone or iPad will still charge from it normally, so there’s no real risk in plugging your phone or tablet into a USB charging port in a public place or someone else’s laptop if that’s all you have available to you. Just be sure to say “Don’t Trust” if you see the popup. If you leave your phone locked the whole time, it will just not trust the device it’s plugged into by default.


If You Change Your Mind Later

If you accidentally tapped “Don’t Trust” and you actually do want to trust the computer, don’t worry. You’ll see this alert each time you connect your iPhone or iPad to the device. Just unplug your iPhone or iPad and connect it again. You’ll see the prompt message again and you can agree to trust the computer. If you don’t see the message for some reason, try rebooting your iPhone or iPad.

If you accidentally tapped “Trust” and trusted a device you don’t want to trust, your iPhone or iPad will normally remember this choice and trust the computer every time you plug into it. You’ll probably want to unplug your iPhone or iPad first if you don’t trust the device it’s plugged into. Next, you’ll need to wipe the list of all trusted computers on your iPhone or iPad.

As of iOS 8, you can do this in Settings > General > Reset. Tap “Reset Network Settings,” which will wipe the list of trusted computers along with your network settings, or “Reset Location & Privacy,” which will wipe the list of trusted computers along with your location and privacy settings. After you do, you’ll get the “Trust This Computer?” prompt every time you plug your phone back into a device until you trust it again.


What Exactly Does Trusting This Computer Expose?

Trusting a computer exposes your iPhone or iPad’s data to it — everything you can access via iTunes. This includes your photos, files, contacts, media files, settings, and more. A trusted computer can pull files from your device and push files to it. Basically, everything you can do from within iTunes can be performed by a trusted computer.

This is no big deal if you actually trust a computer and are sitting down in front of it. The prompt just ensures you’re in control of which devices have this access, and that random charges aren’t given unrestricted access to your phone or tablet.

So, should you “trust this computer”? Well, if it’s your own computer and you plan on using iTunes or a similar program to access your device’s files, go right ahead. If you’re plugging it into someone else’s computer to charge or you see the prompt after plugging it into a USB charger, say no. You can always plug the device back in and agree to trust it if you do need to trust the computer in the future.

How to Setup a Mirrored Volume for File Redundancy on Windows 10

$
0
0

Keep your files protected from hard drive failure using the mirrored volume feature built-in on Windows 10.
In this Windows 10 guide, we'll walk you through the steps to create a mirrored volume on your computer to protect your data from drive failure.


It's not a matter of "if," it's a matter of "when." Sooner or later the hard drive on your computer will die, and the odds are that you will lose all your files stored on that drive.

Of course, there is a number of ways to prevent data loss. You can, for example, keep a current backup of your computer, you can make copies of your files to an external drive, or you can store your data in the cloud. However, similar to previous versions, Windows 10 includes a feature that let you mirror the data on one drive into another to offer data protection from a drive failure.

In Windows, we call the feature "mirror," but the concept actually comes from the standard RAID levels, which define a number of techniques to combine multiple hard drives to offer speed, redundancy, or performance.

On the standard RAID levels, "mirror" is defined as RAID 1, and it consists of having an exact bit-to-bit replica of the data in another hard drive. Usually, a mirror setup contains two hard drives, but you can always add more, as long you add them in pairs.


Before beginning

Before we dive in this guide, it's important to note that to create a mirrored volume on Windows 10, or with any operating system, you'll need at least two physical hard drives. Your second drive should be at least the same size as the original (a larger second drive is okay).


How to create a new mirrored volume

The instructions described below are to create a brand new mirrored volume where neither hard drive have any data.

To create a mirrored volume, do the following:
  • Use the Windows key + X keyboard shortcut to open the Power User menu and select Disk Management.
  • Right-click one of the empty drives, and select New Mirrored Volume.


  • Click Next.
  • Select the available drive from the left.
  • Click Add.
  • Specify the amount of space for the mirrored volume. 
Important: The volume cannot be larger than the amount of the available space in the smaller hard drive, as you can't mirror data to space you don't have.
  • Click Next.


  • Assign a drive letter or leave the default settings and click Next.
  • Select Format this volume with the following settings option making sure file system is set to NTFS, allocation unit size is set to default, and you enter a name for the volume.
  • Check the Perform a quick format option.
  • Click Next.


  • Click Finish.
  • Click Yes to convert the basic disks to dynamic disks, which is a requirement to create a mirrored volume on Windows.
Once the process completes, you'll only see one volume created, and as you store content on the new volume, the data will also automatically get replicated into the secondary drive.


How to create a mirrored volume with data already in the drive

The following instructions explain the steps to set up a mirrored volume when one of the drives already have data on it.

To create a mirrored volume with data already in the drive, do the following:
  • Use the Windows key + X keyboard shortcut to open the Power User menu and select Disk Management.
  • Right-click the primary drive with data on it, and select Add Mirror.


  • Choose the drive that will act as a duplicate.
  • Click Add Mirror


  • Click Yes to convert the basic disks to dynamic disks, which is a requirement to create a mirrored volume on Windows.
After completing the steps above, Windows 10 will synchronize the data on the primary drive to the second drive. This process can take a long time depending on the data you have stored in the volume.


How to recreate a mirror after drive failure

Once you set up a mirror, if either hard drive fails, you'll still be able to access your data. However, it's highly recommended that you replace the drive as soon as possible.

To recreate a mirror after a drive failure, do the following:
  • Use the Windows key + X keyboard shortcut to open the Power User menu and select Disk Management.
  • Right-click the hard drive in working conditions on the mirror and select Remove Mirror.


  • Select drive labeled Missing.
  • Click Remove Mirror.


  • Click Yes.
  • Right-click the primary drive with data on it, and select Add Mirror.


  • Select the new drive that will act as a mirror.
  • Click Add Mirror.


  • Click Yes to convert the basic disks to dynamic disks, which is a requirement to create a mirrored volume on Windows.
After completing the steps above, Windows 10 will synchronize the data onto the new drive. Then simply repeat the process whenever a drive fails (which hopefully shouldn't be very often).


Wrapping things app

The primary purpose of a mirror setup is to provide data redundancy to protect your files from a hard drive failure. It's not designed to offer speed or performance like other RAID array levels.

Although mirroring can protect your data, it's not a replacement for a data backup. If you accidentally delete a file from one drive, the action will also replicate to the second drive.

Finally, it's worth pointing out that thanks to the Windows 10 flexibility, you can also use Storage Spaces to create a mirrored volume.

How to Use Storage Spaces Features in Windows 10

$
0
0


Windows 10 is an operating system that delivers a lot of new features and improvements, including a new breed of apps that run across devices, a new web browser built for the modern web, a unified Store, improvements on security, and an updated, but yet familiar user interface.


The operating system also includes many familiar features found in Windows 7 and Windows 8.1. One of these features is Storage Spaces. This feature was originally introduced in Windows 8.x and let you group different types of drives, such as traditional rotating platters hard drives and Solid State Drives into a single storage pool, which then you can use to create "storage spaces".


What are Storage Spaces?

Storage Spaces are technically virtual drives that appear in File Explorer as normal local storage, and each storage space you create can be less, equal, or greater to the amount of the physical capacity available in the storage pool.

Storage Spaces support some drive technologies, including ATA, SATA, SAS and USB drives. Getting started with the feature only requires one or more drives, in addition to the drive where you have Windows installed.

You don't even have to use all the available drives to create storage spaces. For example, if you have three drives of 100GB each, you could only use two to create a "storage pool". Once you have a new pool, you can create a 200GB virtual drive that represents the total amount of space available, or you can provision and create a 1000GB virtual drive (storage space).

Of course, if you have a storage space of 1000GB that was created in a pool with 200GB of available physical storage, you can only store 200GB worth of data. However, as the drives begin to fill up, you will be notified to add more drives to accommodate more available space.

Also, you're not limited to one storage space per storage pool; you can create as many spaces as allowed by the available space. Let me explain. While you can create storage spaces of virtually any size, each time you create a new virtual drive, you will be using a small portion of the physically available storage, and eventually, you will run out of space as you keep creating more storage spaces.


Why Storage Spaces?

Although, there are not many scenarios where everyday users will be using this feature, "Storage Spaces" has numerous benefits. For example, you can use storage spaces to create a large network drive instead of sharing multiple drives in your network, which is cleaner and more efficient.

If you have different USB drives that you can connect to your computer to save your data, you can combine the drives into a single logical drive, which enables you to organize all your data in a single place -- and no more asking yourself: "In which drive did I save those photos?"

Perhaps the most important aspect of Storage Spaces isn't the ability to group different drive technologies with different sizes, but the ability to configure different types of data protection.


Resiliency

Storage Spaces supports four types of resiliency:
  • Simple: A simple storage space writes one copy of your data and does not protect you from driver failures. This option requires, at least, one drive, and each new additional drive adds another point of failure.
  • Two-way mirror: This option writes two copies of your data on the drives, which can protect your data from a single driver failure. Two-way mirror requires a least two drives.
  • Three-way mirror: This option works similar to the two-way mirror, but it writes three copies of your data on the drives, which will help you to protect your data from two simultaneous drive failures. Three-way mirror requires, at least, three drives.
  • Parity: Similar to the standard RAID 5 technology, Parity for a storage space writes your data with parity information on the available driver to help you protect your data from a single driver failure. This option requires a least three drivers.
The resiliency type you need will mainly depend on what you're trying to accomplish. If you're only interested in available space and drive speed, you could use the "Simple (no resiliency)" option. If you want to protect your data from drive failure, you can go with one of the two mirror types, but remember that the more copies of your data get written to disk, it will consume more storage. If you like a balance of available space and speed, then you should use the "Parity" option.

Here's something else to keep in mind. You can always make a storage space larger, but you cannot make the available space smaller. Every time you make a change it will cost you a quarter of a gigabyte of the available physical space, as such, you should plan in advance how large you want to make the storage space. Currently, the operating system allows a maximum of 63TB per storage space.


How to setup Storage Spaces

Now that you have a little background on Storage Spaces for Windows, below we'll go through how to use and manage the feature.


How to create a storage pool and storage space

1- Connect all the drives you want to participate on Storage Spaces.
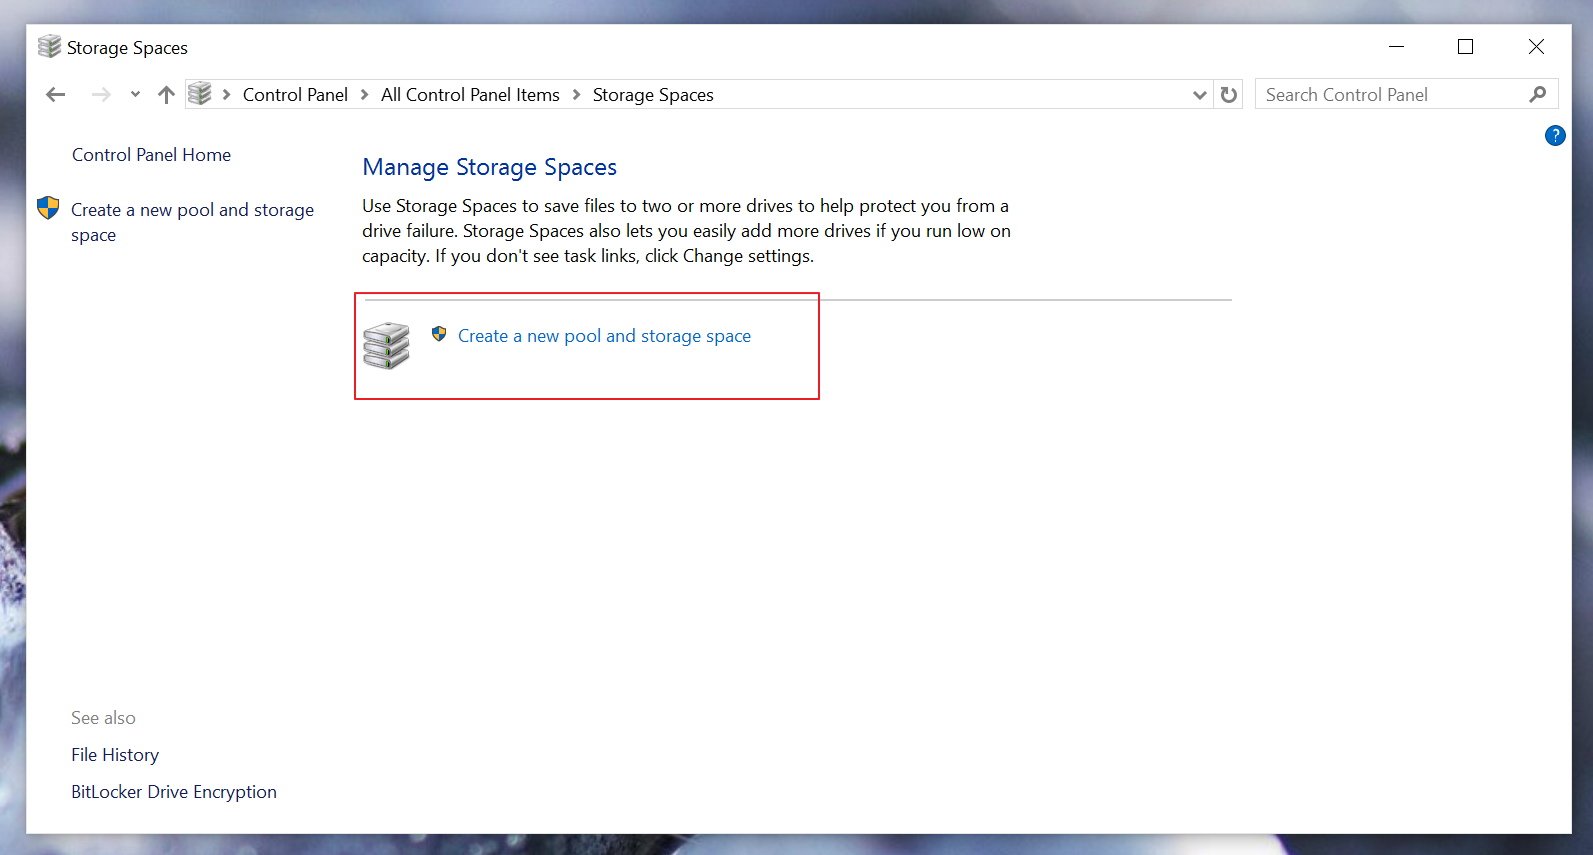
2- Open Start, do a search and open Storage Spaces.
3- Click the link Create a new pool and storage space.


4- Select the drives you want to be part of the pool and click Create Pool. It's important to note that all the data currently on the drives will be erased during the process.


5- Now, it's the time to create the storage space (virtual drive), choose a descriptive name, as it will get confusing if you don't. Then choose the drive letter and file system -- for most people NTFS will be fine, but you always REFS (Resilient File System), which is a new "local file system. It maximizes data availability, despite errors that would historically cause data loss or downtime. Data integrity ensures that business-critical data is protected from errors and available when needed."

6- Pick the resiliency type you want to use for this particular storage space.
7- Select the size you want to allocate. Remember that you can pick any size you want. It doesn't matter if you don't have the available physical space as you will get an alert when it's time to add more storage.
8- Click the Create storage space button to complete the process.


Now that you have created the storage space, in "Manage Storage Spaces" you can now view some useful information, such as physical storage usage, information about the storage space and from the participating physical drives.


How to create multiple storage spaces

1- If you want to create a second storage space, open Start, do a search and open Storage Spaces.
2- Click the Create a storage space link under the storage pool.


3- Choose your preferences (remember to pick a descriptive name).
4- Click the Create storage space button to complete the process (refer to the previous image).


How to add new drives to a storage pool

At any time, you can always add more drives to the pool to expand a storage space -- just follow the steps below:

1- While in "Manage Storage Spaces" click the Add drives from the storage pool.


2- The available drives you can add will appear, select the one you want, and click the Add drives button. You will also notice the Optimize drive usage to spread existing data across all drives, make sure this option is enabled as well.


How to change the size of a storage space

1- Open Start, do a search and open Storage Spaces.
2- Under the storage space you want to modify, click the Change option.


3- From this page, you can change the name of the "space", drive letter, and size. Make your changes, and click the Change storage space button to complete the process.


How to optimize drive usage

While "Storage Spaces" remains pretty much unchanged since Windows 8.1, Microsoft is adding a new feature to optimize drive usage in Windows 10. This feature is useful when you add new drives to an existing pool, as it will move some data to the newly added drive to better utilize the drives in the pool and capacity.

The optimization happens by default when you add a new drive to an existing pool, when you select the Optimize drive usage to spread existing data across all drives option. However, if you didn't check the option or drives were added before upgrading the pool, you need to perform an optimization manually.

1- While in Storage Spaces click the Optimize drive usage from the storage pool.


2- Click the Optimize drive usage button. Keep in mind that this process in intensive, as such you may notice your PC being slow for a while.


How to properly remove a drive in use

When you have a Storage Space configured, you cannot just disconnect a drive out of the blue, as it may cause data loss and other problems.

Fortunately, Windows 10 includes a mechanism to remove a drive properly from a pool, by moving the data on that drive other drives in the pool, and then you can disconnect the drive from your computer, or you can use to store something else.

Follow the step below to remove a drive from a pool:

1- Open Start, do a search and open Storage Spaces.
2- On the storage pool expand Physical drives.
3- Click the Prepare for removal option.


4- Make you're removing the correct drive and then click the Prepare for removal button.


5- Once again locate the drive you want to remove and click the Remove button (refer to the image in step number three).
6- Finally, click the Remove drive button to complete the process.


It's important to note that after you remove the drive, it won't be accessible through File Explorer. You'll need to open Disk Management and reformat the drive in question.

1- Simply, right-click the Start button, and click Disk Management, locate the drive with the "Unallocated" label.
2- Right-click the drive, select New Simple Volume and follow the on-screen instructions to format the drive using NTFS file system and performing a quick format.

Now the removed drive should be usable again.


How to delete a Storage Space

If you no longer need a storage space, you can easily delete it. Simply follow the steps below:

1- Open Start, do a search and open Storage Spaces.
2- Under "Storage Spaces" click the Delete option next to the "space" you no longer need. It's important to

note that that deleting a storage space permanently deletes the data it contains. The only way to recover is by using a previously made backup.


3- Once you're ready, click the Delete storage space.


How to delete a Storage Pool

You cannot delete a storage pool that contains a storage space. You first need to remove all the storage spaces created in a pool properly. Only then the option to delete the pool will be available.


1- Open Start, do a search and open Storage Spaces.
2- Click the Delete pool on the storage pool you want to remove.


3- Then click the Delete pool to complete the process.


Once you delete the pool, the participating drive will be reinstated to your system, but again, as I have mentioned in the steps, the drives won't be visible in File Explorer until you manually reformat each drive through Disk Management.


Additional information

  • Once set, you cannot change the storage space resiliency or file system.
  • Yes, you can add more drives and upgrade a storage space on-demand without disrupting access and affecting data already in the "space".
  • At any time, you can rename a pool or space.
  • Storage Spaces is available in Windows 10 Pro and Windows 10 Home.
  • The drive has to be around 5GB of size to be available in Storage Spaces.


Wrapping things up

By now, you should be able to use and manage Storage Spaces in Windows 10. If it was a bit confusing, just remember that with Storage Spaces for Windows, you can create one or more pools with the available drives on your system. In each pool, you can create one or more storage spaces (a virtual drive) of any size as available storage. You can always add more drives and upgrade the space as necessary.

Note: If all the options appear grayed out after creating a Storage Space, this is because you need Administrator Rights. To enable this feature simply click the Change settings button in the top-right corner of the settings page.

How to Take Ownership Of Files And Folders in Windows 10

$
0
0

When you need to modify system files or gain full control over another account's files, use this guide to learn the steps to take ownership of files and folders on Windows 10. In this guide, we'll walk you through the steps to take ownership of files and folders on your Windows 10 PC without the need of a third-party tool.


Windows 10's file system can be used to to assign permissions to specific groups and users to access files and folders on a computer.

When you're signed in to your Windows 10 account, you get full control over the files and folders you create, sometimes you may also need access to other files. It could be files from an old account from a user that's no longer around, or maybe some system files you need to tweak edit to customize certain aspects of the operating system.

If you don't have specific permissions, Windows 10 will deny you access. But if your account has administrative privileges, you can take ownership of certain files and folders on your computer.


How to take ownership of files and folders

  1. Open File Explorer.
  2. Browse and find the file or folder you want to have full access.
  3. Right-click it, and select Properties.
  4. Click the Security tab to access the NTFS permissions.
  5. Click the Advanced button.


  6. On the "Advanced Security Settings" page, you need to click the Change link, in the Owner's field.


  7. Click the Advanced button.
  8. On the "Select User or Group" page, click the Find Now button.
  9. From the search result, select your user account, and click OK.


  10. On the "Select User or Group" page, click OK.
  11. Click Apply.
  12. Click OK.


  13. Click OK again.
  14. Click OK one more time to complete this task.
It's important to note that if you're taking ownership of a folder, you can check the Replace ownership on subcontainers and object option in the Advanced Security Settings page to take control of the subfolders inside of the folder.

Now you'll need to grant full access control to your account, to do this use the following steps:
  1. Right-click the file or folder and select Properties.
  2. Click the Security tab to access the NTFS permissions.
  3. Click the Advanced button.
  4. Under the Permissions tab, click Add.


  5. Click Select a principal to add your user account.
  6. On the "Select User or Group" page, click the Find Now button.
  7. From the search result, select your user account, and click OK.
  8. On the "Select User or Group" page, click OK.


  9. On "Permission Entry", check the Full control option.
  10. Click OK.

  11. Click OK.
  12. Click Apply.
  13. Click OK.
  14. Click OK to close the file or folder properties to complete the task.


It's important to note that if you're taking ownership of a folder, you can check the Replace all existing inheritable permissions on all descendants with inheritable permissions for this object option in the Advanced Security Settings page to replace the subfolders permissions with the settings from the parent folder.

How to Manage Files and Use the File System on Your Android Phone

$
0
0
IMG_97321

Android’s user-visible file system is one of its advantages over iOS. It allows you to more easily work with files, opening them in any app of your choice as long as you know how.


Stock Android includes a pretty watered-down file manager by default. Some manufacturers do pre-install their own more powerful file managers on Android devices. In other cases, you may need a third-party app to really dig into the files on your phone. Here’s what you need to know.


How to Access Android’s Built-In File Manager

If you’re using a device with stock Android 6.x (Marshmallow) or newer, there’s a built-in file manager…it’s just hidden away in the Settings. Head to Settings > Storage > Other and you’ll have a full list of all the files and folders on your internal storage. (If you’d prefer this file manager be more easily accessible, the Marshmallow File Manager app will add it as an icon to your home screen.)

Screenshot_20160929-095148Screenshot_20160929-094512

In Nougat, things are a little different. The file manager is part of the “Downloads” app, but is essentially the same thing. You can see certain types of files–like images, videos, music, and downloads–from the “Downloads” shortcut in your app drawer. If you want to see your phone’s full file system, though, you’ll still have to go through Settings > Storage > Other. It will open the Downloads app with a previously hidden view that lets you view every folder and file on yoru device.

Screenshot_20160929-095050Screenshot_20160929-095204


But like I said, it’s pretty weak compared to some of the options available in Google Play. If you just want to browse files and perhaps move one or two things here and there, it gets the job done without the need for anything third-party, which is nice. If you’re looking for something more robust, however, off to the Play Store you go.


For More Powerful File Management, Install a File Manager App

Manufacturers like Samsung and LG include more robust file managers, often named something simple like “My Files” or “Files.” However, there’s a good chance you may need to install your own file manager app–either your device won’t have one, or the included one may not be up to snuff. Fortunately, there’s a huge selection of file managers available in Google Play.

Solid Explorer is one of the most popular file managers on the Play Store, and it’s chock-full of powerful features like cloud account access and the ability to run two Solid windows side-by-side in landscape mode (on any device!). It’s also well-supported, receiving frequent updates with new features. Solid is free to try for two weeks, but after that you’ll have to cough up $1.99 to keep using it.

Screenshot_20160929-091312


Understanding the File System Layout

Android’s file system layout isn’t identical to your PC’s. Here’s how it divides its storage:

  • Device Storage: This is the pool of storage you’ll be working with and accessing. Your’e free to access and modify any files here. Think of it a bit like your user directory on Windows or home directory on Linux or Mac. As on desktop operating systems, many apps dump some data files here–not sensitive data like passwords and login credentials, but downloaded files and other cache items.
  • Portable SD Card: Many Android devices also have SD card slots. You can plug the SD card into your computer or another device, load files onto it, and then plug it into your device (provided it’s formatted as portable storage and not internal storage). If you’re using a Marshmallow device and have your SD card formatted for use as internal storage, it won’t show up separately in your file manager–it will instead be part of your device storage.
  • Device Root: Your Android device also has a special system filesystem where its operating system files, installed applications, and sensitive application data are stored. Most file manager apps can’t modify this file system for security reasons, unless you have root access, and a file manager capable of using it. You probably don’t need to do that, though.

Screenshot_20160929-101356Screenshot_20160929-101517


Your device storage will include a number of folders created by Android. Some of these are created and used by apps for their cache files, so you shouldn’t mess with them or remove them. However, you can free up space by removing unnecessary files stored here.

Others are designed to store your personal files, though, and you should feel free to modify or delete files in them as necessary. These include:
  • DCIM: Photos you take are saved to this folder, just as they are on other digital cameras. Apps like Gallery and Photos display photos found here, but this is where the underlying image files are actually stored.
  • Download: Files you download are saved here, although you’re free to move them elsewhere or delete them altogether. You can also view these files in the Downloads app.
  • Movies, Music, Pictures, Ringtones, Video: These are folders designed for storage of your personal media files. When you connect your device to a computer, they give you an obvious place to put any music, video, or other files you want to copy to your Android device.
You can browse these folders from any file manager. A single tap on a file will bring up a list of installed apps that claim they support that file type. You can work with files directly, opening them in apps like you would on your computer.

Screenshot_20160929-091815Screenshot_20160929-091639


How to Copy Files to or from a PC

The process of copying files to or from a PC is easy. Just connect your Android device to a laptop or desktop computer using the appropriate USB cable—the one included with your device for charging will work. With the Android device in its default MTP mode (PTP is also available, and USB mass storage may be available on older devices), it will appear in your Windows or Linux file manager window as a standard device. (If it isn’t, you may need to tap the “Charging Only” notification and change it to MTP.) Then, on your PC, you can view and manage the files on your Android device’s internal storage, moving them back and forth as you please.

2016-09-29_10h56_21


Macs don’t include MTP support, so you’ll want to install the Android File Transfer app on your Mac and use it to transfer files back and forth when you connect your device. The app will automatically open whenever you connect an Android device to your Mac.

If you have an SD card, you can remove the SD card from your Android device and insert it into an SD card slot into your computer to access the files–again, assuming you’re using it as “portable storage” and not formatted for internal use. The latter will not work on any device aside from the one it’s been formatted for use on.

For wireless file transfers, we like AirDroid. It allows you to connect to your Android device over Wi-Fi with just a web browser, moving files back and forth without the necessity of a cable. It will likely be a bit slower, but it can be a life-saver if you’re out and about and didn’t bring the appropriate USB cable. For transferring files from Android to your PC, Portal is also a quick and easy solution.

For simple tasks, a file manager isn’t really even necessary. Files you download are available for use directly in the Downloads app. Photos you take appear in the Photos or Gallery apps. Even media files you copy to your device–music, videos, and pictures–are automatically indexed by a process called “Mediaserver.” This process scans your internal storage or SD card for media files and notes their location, building up a library of media files that media players and other applications can use. However, while a user-visible file system isn’t necessarily for everyone, it’s still there for people who want it.

How to Transfer Apps to SD Card on Moto E3 Power

$
0
0
Moto E3 Power

Almost a year after its release, Android OEMs have finally started warming up to Marshmallow’s Adoptable storage feature. Motorola, however, has adopted this feature right from its early days on all its devices, and things have remained the same under the company’s new management from Lenovo. The company’s latest handset, the Moto E3 Power, is no different here.


Featuring 16GB of internal storage, the Moto E3 Power also features a microSD card slot. With an SD card installed, one can easily move apps, games, and other content to the external storage. Adoptable storage, however, can be a bit confusing for a novice smartphone user. This is because moving apps and games to SD card on Marshmallow is not as simple as inserting a card into the phone, heading to the application manager and then moving apps to external storage. Nope, it requires a few more steps first.

While tedious, adoptable storage fuses the external storage with the internal storage of the device that leads to the overall device storage increasing. So, for example, if you insert a 32GB microSD card on the Moto E3 Power, the device storage section under Settings will show the handset as having 46GB of storage space after deducting the space lost for formatting and other system files.

If you have been wondering how to move apps to SD card on the Moto E3 Power, follow the steps below.

Step 1: Switch off your Moto E3 Power and insert a microSD card into it. Once your device boot into Android, you should get a notification saying an incompatible SD card has been inserted into the phone. Tap this notification to start the process of setting up the SD card on your Moto E3 Power and select Use as internal storage followed by Erase and format.

moto-e3-power-sd-card 
If you did not get any notification once your phone booted back into Android, it means that the inserted SD card was of proper format. Nonetheless, you will still have to format the card once again for Marshmallow’s adoptable storage feature to work. Head over to Settings -> Storage & USB. You should see the card you just inserted under ‘Portable storage.’

Step 2: Tap on its name to open the built-in file manager. Tap the 3-dot overflow menu button followed by  

Settings. From the menu that opens, select the Format as internal option followed by Erase and format.

Step 3: Depending on the size of the SD card inserted, the whole process can take as much as up to 5 mins. Once done, you might get an error message that the SD card you have inserted is too slow that can lead to the performance of the phone and the installed apps being affected.


Step 4: You will also get an option to migrate your existing data from internal storage to external storage once the SD card is setup. Doing this will move photos and videos to the SD card, and NOT app data. You still need to move the latter manually.

Once the process is complete, head over to Settings -> Storage & USB and you will notice that the total device storage has now increased to include the size of the SD card as well. It will be slightly lower than the total i.e. if you insert a 64GB card, it will not show up as 16+64 = 80GB, but around 70GB once you factor in the space that is lost to formatting and taken by Android OS itself.


Step 5: To move apps and games to SD card, head over to Settings -> Apps. Now, select the app that you want to move to SD card. Tap on Storage and select Change from under Storage used. Finally, select the SD card and confirm your selection by tapping Move. Depending on the size of the app or game and the speed of the SD card, the whole process can take a minute or two.


If you have not already purchased a microSD card with your Moto E3 Power, make sure to buy one that is at least Class 10 rated.

Remember that to use the same SD card on other devices, you will have to format it again. It will also not be recognised by your PC so you cannot directly transfer files to it.

How to Allow or Deny Certain Applications for Users in Windows

$
0
0
Allow or Deny Certain Applications in Windows

If you’d like to limit what apps a user can run on a PC, Windows gives you two options. You can block the apps you don’t want a user to run, or you can restrict them to running only specific apps. Here’s how to do it.


Be absolutely sure that you are making changes to a user account you actually want to restrict, and that you always have an unrestricted administrative account available to undo those changes. This is especially true if you are restricting users to a specific set of apps, as those users will lose access even to tools like Registry Editor and Local Group Policy Editor. 

If you do accidentally apply restrictions to your administrative account, the only way we’ve found to reverse the changes is to run System Restore by going to Settings > Update & Security > Recovery and clicking the “Restart now” button under Advanced Startup. From there, you can find the setting for running System Restore after a restart, since you won’t be able to run System Restore the normal way.


Home Users: Block or Restrict Apps by Editing the Registry

To block or restrict apps in the Home edition of Windows, you’ll need to dive into the Windows Registry to make some edits. The trick here is that you’ll want to log on as the user you want to make changes for, and then edit the Registry while logged onto their account. If you have multiple users for which you want to changes for, you’ll have to repeat the process for each user.

Standard warning: Registry Editor is a powerful tool and misusing it can render your system unstable or even inoperable. This is a pretty simple hack and as long as you stick to the instructions, you shouldn’t have any problems.


Block Certain Apps Through the Registry

First, you’ll need to log on to Windows using the user account for which you want to block apps. Open the Registry Editor by hitting Start and typing “regedit.” Press Enter to open Registry Editor and give it permission to make changes to your PC.


Allow or Deny Certain Applications in Windows

In the Registry Editor, use the left sidebar to navigate to the following key:
 
HKEY_CURRENT_USER\SOFTWARE\Microsoft\Windows\CurrentVersion\Policies
 
Allow or Deny Certain Applications in Windows

Next, you’re going to create a new subkey inside the Policies key. Right-click the Policies key, choose New > Key, and then name the new key Explorer .

Allow or Deny Certain Applications in Windows

Next you’re going to create a value inside the new Explorer key. Right-click the Explorer key and choose New > DWORD (32-bit) value. Name the new value DisallowRun .

Allow or Deny Certain Applications in Windows

Double-click the new DisallowRun value to open its properties dialog. Change the value from 0 to 1 in the “Value data” box and then click “OK.”

Allow or Deny Certain Applications in Windows

Back in the main Registry Editor window, you’re now going to create a new subkey inside the Explorer key. Right-click the Explorer key and choose New > Key. Name the new key DisallowRun , just like the value you already created.

Allow or Deny Certain Applications for users in Windows

Now, it’s time to start adding apps you want to block. You’ll do this by creating a new string value inside the DisallowRun key for each app you want to block. Right-click the DisallowRun value and then choose New > String Value. You’ll be naming these values with simple numbers, so name the first value you create “1.”

Allow or Deny Certain Applications in Windows

Double-click the new value to open its property dialog, type the name of the executable you want to block into the “Value data” box (e.g., notepad.exe ), and then click “OK.”

Allow or Deny Certain Applications in Windows

Repeat this process, naming the second string value “2” and the third “3” and so on, and then adding the executable file names you want to block to each value.


When you’re done, you can restart Windows, log onto that user account, and then test things by trying to run one of those apps. You should see a “Restrictions” window pop-up letting you know that you can’t run the app.

Allow or Deny Certain Applications in Windows

You’ll need to repeat this process for each user account for which you need to block apps. Though, if you’re blocking the same apps for multiple user accounts, you could always create your own Registry hack by exporting the DisallowRun key after you’ve configured the first user account and then importing it after logging onto to each subsequent account.

If you want to edit the list of blocked apps, just return to the DisallowRun key and make the changes you want. If you want to restore access to all apps, you can either delete the wholeExplorer key you created–along with DisallowRun subkey and all the values. Or you could just go back and change the value of the DisallowRun value you created from 1 back to 0, effectively turning off app blocking while leaving the list of apps in place should you want to turn it on again in the future.


Block Only Certain Apps Through the Registry

Restricting users to running only certain apps in the Registry follows almost exactly the same procedure as blocking specific apps. You’ll again need to log on to Windows using user account you want to change. Fire up Registry Editor and then head to the following key:

HKEY_CURRENT_USER\SOFTWARE\Microsoft\Windows\CurrentVersion\Policies

Right-click the Policies key, choose New > Key, and then name the new key Explorer .


Next you’re going to create a value inside the new Explorer key. Right-click the Explorer key and choose New > DWORD (32-bit) value. Name the new value RestrictRun .


Double-click the new RestrictRun value to open its properties dialog. Change the value from 0 to 1 in the “Value data” box and then click “OK.”


Back in the main Registry Editor window, you’re now going to create a new subkey inside the Explorer key. Right-click the Explorer key and choose New > Key. Name the new key RestrictRun , just like the value you already created.


Now, you’ll add apps to which the user is allowed access. Create a new string value inside the RestrictRun key for each app you want to block. Right-click the RestrictRun value and then choose New > String Value. You’ll be naming these values with simple numbers, so name the first value you create “1.”


Double-click the new value to open its property dialog, type the name of the executable you want to block into the “Value data” box (e.g., notepad.exe ), and then click “OK.”


Repeat this process, naming the values “2,” “3,” and so on, and then adding the executable file names you want the user to be able to run to each value.


When you’re done, restart Windows, log into that user account again, and test your settings. You should only be able to run apps to which you explicitly allowed access. You’ll need to repeat the process with each user account for which you want to restrict apps or create your own Registry hack you can use to apply settings to each user more quickly.

To reverse your changes, you can delete the Explorer key you created (along with the RestrictRun subkey and all values) or you can set that RestrictRun value you created back to 0, turning off restricted access.


Pro and Enterprise Users: Block or Restrict Apps with the Local Group Policy Editor

If you use the Pro or Enterprise version of Windows, blocking or restricting apps can be a little easier because you can use the Local Group Policy Editor to do the job. One big advantage is that you can apply policy settings to other users–or even groups of users–without having to log in as each user to make the changes the way you do when making these changes with Registry Editor.

The caveat here is that you’ll need to do a little extra setup by first creating a policy object for those users. You should also be aware that group policy is a pretty powerful tool, so it’s worth taking some time to learn what it can do. Also, if you’re on a company network, do everyone a favor and check with your admin first. If your work computer is part of a domain, it’s also likely that it’s part of a domain group policy that will supersede the local group policy, anyway.

The process for allowing or restricting apps with the Local Group Policy Editor is almost identical, so we’re going to show you how to restrict users to only running certain apps here and just point out the differences. Start by finding the MSC file you created for controlling policies for those particular users. Double-click to open it and allow it to make changes to your PC. In this example, we’re using one we created for applying policy to all non-administrative user accounts.

In the Group Policy window for those users, on the left-hand side, drill down to User Configuration > Administrative Templates > System. On the right, find the “Run only specified Windows applications” setting and double-click it to open its properties dialog. If you want to block specific applications rather than restricting them, you would open the “Don’t run specified Windows applications” setting instead.


In the properties window that opens, click the “Enabled” option and then click the “Show” button.


In the “Show Contents” window, click each line in the list and type the name of the excecutable you want users to be able to run (or the name of apps you want to block if that’s what you’re doing instead). When you’re done building your list, click “OK.”


You can now exit the Local Group Policy window. To test your changes, sign in with one of the affected user accounts and try to launch an app to which the user should not have access. Instead of launching the app, you should see an error message.


If you want to disable your changes, just head back into the Local Group Policy editor by double-clicking your MSC file again. This time, change the “Run only specified Windows applications” or “Don’t run specified Windows applications” options to “Disabled” or “Not Configured.” This will turn the setting off entirely. It will also reset your list of apps, so if you want to turn it on again, you’ll need to retype that list.

How to Fix an iPhone or iPad That Doesn’t Appear in iTunes

$
0
0
Fix iPhone or iPad That Doesn't Appear in iTunes

You plug your iPhone into your computer, ready to sync but the little icon doesn’t appear in iTunes’ toolbar, and you’re flummoxed. Here we have few possible solutions to fix this issue.


Start with the Obvious: Restart, Update, and Try Another USB Port


Fix iPhone or iPad That Doesn't Appear in iTunes

Before you try anything else, it’s worth going through the usual troubleshooting tips:
  • Restart your iPhone by pressing both the Power and Home buttons and hold them down. (In the case of the iPhone 7, press and hole the Power button and the volume down button.)
  • Restart your computer as well.
  • Make sure both Windows and iTunes are up to date. Click Start and type “Windows Update” to check for Windows updates, and head to Help > Check for Updates in iTunes to update iTunes. (You can even try reinstalling iTunes, if you’re feeling thorough.)
  • Try another USB cable, or another USB port on your computer. Plug it directly into your computer instead of a USB hub. You never know when you have bum hardware, and no amount of software troubleshooting can fix that problem.
With any luck, one of these simple tricks will fix the problem. But if not, read on.


Respond to the “Trust This Computer” Prompt


Fix iPhone or iPad That Doesn't Appear in iTunes

When you plug an iPhone or iPad into your computer for the first time, a message will pop up on your device, asking whether it should trust the computer it’s been plugged into. If you aren’t paying close attention, it’s easy to miss–and without responding to that prompt, your device won’t show up in iTunes.

Even if it isn’t the first time you plugged your device in some settings may have been reset, and you’ll need to respond to the prompt again. So check your device and see if the message has popped up. Tap “Trust” to continue.


Reset Your Location & Privacy Settings

If you ever pressed “Don’t Trust” by accident, your device won’t show up in iTunes and the message won’t pop up again. Thakfully, there’s a way to fix this.

This is stored in the “Location & Privacy” settings in iOS. You can reset them by going to Settings > General and tapping “Reset Location & Privacy”.

Fix iPhone or iPad That Doesn't Appear in iTunes

Next time you plug the device in, the “Trust This Computer” prompt should appear. (Note that this may also erase a few other settings–like which iOS apps are allowed to use your location–so you’ll have to deal with those prompts again too.)


Reinstall Apple’s Windows Drivers

Other times, things can go a little wonky with Apple’s drivers, and your Windows PC won’t recognize your iOS device properly anymore–even if you press “Trust” repeatedly. In my most recent bout with this problem, the drivers were to blame, and just needed reinstalling.

Close iTunes and plug your iPhone or iPad into your computer via USB. Then, click the Start menu and search for “Device Manager”. Select the Device Manager option that pops up.

Fix iPhone or iPad That Doesn't Appear in iTunes

Search for your iPhone or iPad in the Device Manager–you should find it under “Portable Devices”. Right-click it and choose “Update Driver Software”.


On the next window, select “Browse My Computer for Driver Software”.


Then, click “Let Me Pick From a List of Device Drivers on My Computer”.


On the next screen, click the “Have Disk” button.


On the Install From Disk window, click the Browse button. Navigate to C:\Program Files\Common File\Apple\Mobile Device Support\Drivers\usbaapl64.inf. Double-click the usbaapl64.inf file to select it, then click OK in the Install From Disk window.

NOTE: If you’re on an older 32-bit computer, the driver may be in C:\Program Files (x86)\Common Files\Apple\Mobile Device Support\Drivers instead.


Your PC should reinstall Apple’s mobile drivers. Close the Device Manager when you’re finished and start iTunes. You should find that your device is properly recognized.

5 Ways to Free Up Space on Your Android Phone

$
0
0

Android phones and tablets can fill up quickly as you download apps, add media files like music and movies, and cache data for use offline. Many lower-end devices may only include a few gigabytes of storage, making this even more of a problem.


The less space you have, the more time you’ll have to spend micromanaging the internal storage. If you find yourself regularly running out of space and needing to manage it, consider getting a phone or tablet with more storage next time around.


Use Android’s Built-in Storage Tool

Modern versions of Android have a Storage pane that will show you exactly what is taking up storage on your device. To find this, open the Settings screen and tap Storage. You can see how much space is used up by apps and their data, by pictures and videos, audio files, downloads, cached data, and miscellaneous other files.

Tap an option here to see exactly what’s using up space and delete it. For example, you could tap Apps to see a list of apps using up the most space and remove them. Tap downloads to view your downloads list where you can remove files and tap cached data to clear the data of all installed apps. Use the other options to view which files are taking up space and remove the ones you don’t want.


When dealing with apps, bear in mind that the app itself, its data, and its cache all add up to the total space used by the app. For example, if you have Spotify installed and you’ve cached lots of music offline, Spotify may be using over 1 GB of space. You could clear Spotify’s cache to forcibly remove this all, or launch the Spotify app and tell it to cache less data for offline listening. Any app that caches data for offline use will function like this. In the screenshot below, Google Play Music is only 40.66 MB in size on its own, but it’s storing 2.24 GB of cached music.

You can see how much space an app is using for those data files and remove the cached data for an individual app by tapping it in the Apps list, accessible by tapping Apps on the storage pane or by tapping Apps on the main Settings screen.


See Which Folders and Files Are Taking Up the Most Space

Android’s built-in tool is helpful for visualizing the space used by different types of data, but not the exact amount of space used by individual folders and files. For this, you’ll need a third-party app like the excellent and free DiskUsage. Install it from Google Play, launch it, and you can scan your device’s file system.

Use the visualization to see which folders and files are taking up the most space. You can delete them right from within the Disk Usage app to free up space. For example, you might see a leftover folder from a game or app you’ve uninstalled. That app should have removed that data, but you can do it by hand with this app. Select a folder or file, tap the menu button, and tap Delete to remove it.


Bear in mind that you could delete files that apps depend on here. Don’t delete data belonging to an app unless you’re willing to lose that data. In many cases, the data should be synced online in some way and you should just be able to re-download the data if you need it.


Add an SD Card and Move Data There


Many Android devices still ship with microSD card slots, although they are becoming less and less common on newer devices. If your phone or tablet does have a microSD card slot, you can purchase a microSD card and insert it into your device to gain more storage. The storage you gain can hold music, videos, pictures, and other media files–and, in some cases, even apps (see the next section). Some apps may allow you to move their cache locations to the SD card, too.

If your device already has an SD card, this is a good option if you want more storage. MicroSD cards are fairly cheap, so you can upgrade and get a lot more storage for a fairly low price. A quick look at Amazon shows 32 GB cards for $10 and 64 GB cards for $19.

After installing the SD card, format it as portable or internal storage (if your phone has Android 6.0 Marshmallow), then connect your device to your computer and move your music, media, and other files to the SD card’s free space.


Move Apps to the SD Card

Depending on your phone and version of Android, you can also move apps to the SD card to free up space.
Android Marshmallow users can do this by formatting the SD card as internal storage. Then, the SD card will be seen as local storage on that device. The system will determine which apps make the most sense to move to the SD card, then go ahead and move them over. You can’t discern between true internal storage and an SD card formatted for internal use, so there’s now way to manually move individual apps over. (You also won’t be able to move the SD card between devices anymore, unless you erase and re-format it.)


If you are running a pre-Marshmallow version of Android, you can move some apps using Android’s built-in features, or move any app by rooting your phone and partitioning your SD card.


Move Photos to the Cloud

Photos can take up a lot of space on a modern smartphone. Rather than storing them all on your phone, you could use an app that automatically uploads photos you take to an online account like Google Photos, Dropbox, Microsoft OneDrive, Flickr, or something else. Google Photos is integrated into the “Photos” app on your Android device and offers unlimited storage of photos. You can access them from within the Photos app or at photos.google.com on any computer.

However you do this, you can then use the Photos app on your device to remove the copies of photos stored on your device itself, potentially freeing up gigabytes of space. You could also just copy those photos to your computer and back them up the old-fashioned way, too. The best part about using this method is that you can still access all of your photos through the Photos app, regardless of whether they’re stored locally or in the cloud. It’s seamless (and brilliant).


If you don’t like Google Photos, you can also do this with other apps, like Dropbox.

The same trick could work with other files taking up a lot of space on your device—for example, you could upload a large music collection to a service like Google Play Music and stream it back to your device over an Internet connection, caching the files you need instead of storing your entire collection on the phone.

At the end of the day, these tricks will only go so far–so for your next phone, make sure you have enough storage for all your files. But in a pinch, these tricks should help you get a little more space to fit the stuff that matters.

How to Alter or Change Someone’s Eye Color in Adobe Photoshop

$
0
0

Have you ever wondered what you’d look like if your eyes were a different color? Mine are gray, but I’ve always thought brown would suit me. Sure, you could go and buy colored contacts, but it’s far simpler to just use Photoshop—or your favorite free image editor like GIMP—to change your eye color.


I’m going to demonstrate the technique using Photoshop so, if you’re using a different app, you just need to work out which equivalent tools are the most appropriate. The instructions should work in plenty of image editing programs.
Open the image you want to use in Photoshop. This is the image I’m working with.


To start, create a new blank layer with the Blend Mode set to color—the keyboard shortcut is Control+Shift+N for PC users, Command+Shift+N for Mac users. Then, under the “Mode” dropdown, choose “Color”.


Double-click on the foreground swatch and set it to a crazy color like the light blue in the image below.


Go to Edit > Fill and select Foreground Color to fill the blank layer with this color—you can also use the keyboard shortcut Alt+Backspace (on Windows) or Option+Delete (on a Mac). Everything in your image will now look a weird shade of blue. This is going to help you select out the eyes.


Add a black layer mask to the color layer by holding down Option or Alt and clicking on the New Layer Mask button. Remember, with a mask, white reveals and black conceals.


Zoom into the subjects eyes (Control-+ on Windows, Command-+ on Mac) and select the Brush tool by pressing B on your keyboard. Select the Soft Round bush from the Brush menu, set the Opacity to 100%, and the Flow to around 60%.


Reset the color swatches to their default values of black and white by pressing the D key, and then swap them so you have white as the foreground color by pressing X.


Select the layer mask and start painting white over the eyes. This will reveal the color layer. Carefully work your way around the iris avoiding the pupil until you’ve got a good mask. Repeat the process for the other eye. (You may need to change the size of your brush to fit certain areas, depending on your photo.)


The mask probably looks a little painted, so go to Filter > Blur > Gaussian Blur and add around 2 pixels of blur to the mask. This will smooth out the transitions.


Now that you have a good mask for both the eyes, it’s time to start coloring them a more natural shade.
Select the color layer, then double click on the foreground color swatch.


With some experimenting, I’ve found the following values are a good place to start when you’re changing someone’s eye color:
  • For blue eyes, set the H to 210, S to 7, and B to 70.
  • For gray eyes, set the H to 210, S to 3, and B to 70.
  • For green eyes, set the H to 100, S to 4, and B to 80.
  • For brown eyes, set the H to 40, S to 25, and B to 15.
Dial in whatever color you want to use and press OK. Go to Edit > Fill and then select Foreground Color to change the subject’s eyes.


Depending on the subjects base eye color, you’ll also need to brighten or darken the iris to make things look natural. Rebecca, the model in the photo I’m using, has dark brown eyes, so they need to be brightened up quite a bit. For my own lighter gray eyes, I often have to darken things.

Add a Curves Adjustment Layer to the image. It’s the best way to adjust brightness in Photoshop.


You’ve already made a great layer mask so there’s no point doing it again. Hold down Option or Alt and drag the layer mask from the color layer to the Curves layer. Now the Curves will only affect the eyes.


Pick a point on the curve and drag up to brighten the eyes or down to darken them as needed.


The values I’ve suggested in this article are just a starting place. Every image is unique. While most of the time the colors I recommend should give you a natural looking eye color, if they don’t look right to you, tweak the color and curves layers until they do.


Changing your own, or a friend’s eye color, in Photoshop is great fun. Everyone wants to know what they’d look like with blue or green eyes. You don’t have to limit yourself to natural eye colors, either–the same technique can be used to make wolf-like yellow eyes or Targaryen purple eyes.

How to Rebuild, Speed Up or Disable the Windows Search Index

$
0
0

Windows Search makes searching for files on your PC a lot faster, but if you find that things slow down when Windows indexes files or that Search isn’t working as expected, there are a few steps you can take.


Speed Up Indexing by Only Including Certain Locations

The best way to trim down the amount of processor time the indexing service uses is by trimming down the number of files being indexed. For example, if you don’t regularly perform searches of files on your C: drive, there’s really no need to be indexing the whole thing. Personally, I love the search function for my main documents folder and the Start Menu, but that’s about it. Why bother indexing everything else?

Open up indexing options, hit Start, type “indexing,” and then click “Indexing Options.”


In the “Indexing Options” window, click the “Modify” button.


And then use the “Indexed Locations” window to select the folder you want included in the index.


At the very least, you might want to include the Start menu to make it easier to launch programs just by typing their names. The rest is up to you, but most people go ahead and include folders with person files, such as Documents, Pictures, Videos, and so on. If you keep your personal files stored on another drive, note that those files are typically not indexed by default unless you’ve actually moved your personal document folders to that location.


Disable Windows Search Altogether if You Don’t Use It

If you really don’t use Windows Search at all, you can disable indexing completely by turning off the Windows Search service. This will stop the indexing of all files. You’ll still have access to search, of course. It will just take longer since it has to search through your files every time. If you’re thinking of disabling Search because it’s slowing things down, we recommend trimming down what files are getting indexed and seeing if that works for you first.

You should also note that other apps–notably Microsoft Outlook–use Windows Search to allow searching within those apps, so you’ll have to do without fast searching in those, as well.

That said, if you’re planning on using another search app or you just don’t search often and would rather not have the service running, Windows Search is easy to disable. Hit Start, type “services,” and then click the result.


On the right-hand side of the “Services” window, find the “Windows Search” entry and double-click it.


In the “Startup type” drop-down menu, select the “Disabled” option. This will prevent Windows Search from loading the next time you start your computer. Click the “Stop” button to go ahead and stop the Windows Search service now. When the service has stopped, click “OK.”


And that’s it. Windows Search is now disabled, a fact that Windows is happy to remind you about (and offer to fix) when you do perform searches.


If you want to turn Windows Search back on, all you have to do is return to it in the Services window, change the “Startup type” option back to “Automatic,” and then click Start to start the service back up.


Rebuild the Windows Search Index if You’re Experiencing Problems

If you are encountering problems with searching–unexpectedly slow searches, not finding things that should be indexed, or searches actually crashing–your best bet is to completely rebuild the search index. It will take a while to rebuild, but it’s usually worth it. Before you rebuild the index, though, it may be worth taking the time to trim down your index locations to just what you need to make the indexing process faster.

Open up the “Indexing Options” window by hitting start and typing “Indexing Options,” and then click the “Advanced” button.


In the “Advanced Options” window, click the “Rebuild” button.


After that, it’s just a matter of waiting while Windows rebuilds the index from scratch. You can keep using your PC normally, of course, but searching will continue to be spotty until the index is fully rebuilt. Also, Windows tries to do indexing while your PC is not being used, so it may be best to rebuild the index before going to sleep and just leaving your PC on for the night to do its job. You should be back to searching by the morning.

How to Revert Windows 10 Insider Preview Back to Stable Without Reinstalling

$
0
0

When you sign up for Insider Preview builds, Windows warns that you “may” need to reinstall Windows to get back to the stable version of Windows. But this is a worst case scenario, and there are other ways to get off the Insider Preview track.


Switch From Insider Preview Builds to a New Stable Build

If you’ve been using the Insider Preview, you have the opportunity to leave the Insider Preview program and return to the stable version of Windows 10 when the build you’re testing becomes stable.

For example, let’s say you opted into the Insider Preview program prior to the release of Windows 10’s Anniversary Update. When the Anniversary Update was finally released on August 2, 2016, it became part of the stable build–or “Current Branch”. Since Microsoft didn’t release any new Insider Preview builds for a short time after, the Insider Preview branch and Current branch were the same–and you could switch to stable without any issues.

If you want to leave the Insider Preview track when the build of Windows 10 you’re testing becomes stable, keep an eye out for the final, stable version to arrive on your device. This should be hard to miss if you keep track of Windows releases. Microsoft will announce a final release date and it will be reported in the press, too.

You can check the current build of Windows on your device by heading to Settings > System > About. Verify the “OS Build” number matches the number of the latest stable build provided by Microsoft. You can find the current stable build numbers on Microsoft’s website.

If the current build on your device is the same as the current stable build on Microsoft’s website, you can head to Settings > Update & Security > Windows Insider Program and use the “Stop Insider Preview Builds” button to opt out of Insider Previews.


Click the “Need to stop getting Insider builds completely?” link to opt out. You’ll stay on the current build of Windows 10 until a new stable build arrives, or until you opt back into Insider Previews.

This link only allows you to opt out when you’re using a stable build. Click it when you’re not using a stable build, and you’ll instead be taken to a Microsoft web page with more information about when you can opt out.


Roll Back Soon After Enabling Insider Previews

If you just joined the Insider Preview program in the last 10 days, you may be able to “go back” to the stable version of Windows 10.

To check if you can do this, head to Settings > Update & Security > Recovery. Click the “Get started” button under “Go back to an earlier build” if it’s available.


After rolling back, go to Settings > Update & Security > Windows Insider Program and tell Windows to stop giving you Insider Preview builds.

If there’s no way to permanently disable Insider Preview builds here, that’s because you downgraded from one Insider Preview build to an older Insider Preview build. You’ll need to reinstall Windows 10 to opt out.


If All Else Fails: Reinstall Windows 10

If it’s been more than 10 days since you opted into the Insider Preview program and there isn’t a stable version of Windows 10 set to arrive soon, there’s no easy way to opt out without reinstalling Windows 10 on your PC (or waiting until the stable build comes out).

Warning: This will erase the files on your computer. Be sure to back up your important files first. This will also erase your installed programs and revert any system settings changes, so you’ll have to reinstall your software and change system settings afterwards.

When you’re all backed up and ready to reinstall Windows, head to Microsoft’s Download Windows 10 website. Click the “Download tool now” link and run the downloaded “MediaCreationTool.exe” file.


Go through the Windows 10 Setup wizard, selecting “Upgrade this PC now”. The toolwill download the stable version of Windows 10 from Microsoft and proceed to install it on your PC, replacing the unstable version of Windows 10.


After the installation process is finished, you’ll have a fresh installation of the most recent stable build of Windows 10.

You won’t have to opt out of the Insider Preview program afterwards. Windows 10 won’t start receiving Insider Preview builds again unless you go out of your way to enable them.

How to Prevent Accidental Creation of a Pluggable Database (PDB) - Lone-PDB

$
0
0

From Oracle 12.1.0.2 onward the non-CDB architecture is deprecated. As a result you may decide to use the Multitenant architecture, but stick with a single pluggable database (PDB), also known as single-tenant or lone-PDB, so you don't have to pay for the Multitenant option. 


In Standard Edition you can't accidentally create additional PDBs, but in Enterprise Edition you are potentially one command away from having to buy some extra licenses. This article gives an example of a way to save yourself from the costly mistake of creating more than one user-defined PDB in a Lone-PDB instance.


Accidental Creation of a PDB

On checking the current instance we can see there is already an existing user-defined PDB.
SELECT con_id, name FROM v$pdbs;

CON_ID NAME
---------- ------------------------------
2 PDB$SEED
3 PDB1

SQL>
There is nothing in Enterprise Edition to stop you creating additional user-defined pluggable databases, even if you don't have the Multitenant option.
CREATE PLUGGABLE DATABASE pdb2 ADMIN USER pdbadmin IDENTIFIED BY Password1
FILE_NAME_CONVERT=('/u01/app/oracle/oradata/cdb1/pdbseed/','/u01/app/oracle/oradata/cdb1/pdb2/');

ALTER PLUGGABLE DATABASE pdb2 OPEN;

SELECT con_id, name FROM v$pdbs;

CON_ID NAME
---------- ------------------------------
2 PDB$SEED
3 PDB1
4 PDB2

SQL>
Having done this the database will have a "detected usage" reported in the DBA_FEATURE_USAGE_STATISTICS view. It takes a while for this to be visible, but we'll force a sample to check it.
-- Force usage sample.
EXEC DBMS_FEATURE_USAGE_INTERNAL.exec_db_usage_sampling(SYSDATE);


COLUMN name FORMAT A40
COLUMN detected_usages FORMAT 999999999999

SELECT name,
detected_usages,
aux_count,
last_usage_date
FROM dba_feature_usage_statistics
WHERE name = 'Oracle Pluggable Databases'
ORDER BY name;

NAME DETECTED_USAGES AUX_COUNT LAST_USAG
---------------------------------------- --------------- ---------- ---------
Oracle Pluggable Databases 16 2 04-OCT-16

SQL>
I'm doing this on a test instance, so it has detected the feature usage several times. The important point to notice here is the AUX_COUNT column, which indicates the number of user-defined PDBs currently running. Using the Multitenant architecture results in the detected usage, regardless of the number of PDBs, so this alone does not indicate if you need to buy the Multitenant option. If the AUX_COUNT column is greater than 1 for this feature, you need to buy the option!


Let's remove the PDB we just created.

ALTER PLUGGABLE DATABASE pdb2 CLOSE;
DROP PLUGGABLE DATABASE pdb2 INCLUDING DATAFILES;


What happens to the feature usage now?

-- Force usage sample.
EXEC DBMS_FEATURE_USAGE_INTERNAL.exec_db_usage_sampling(SYSDATE);


COLUMN name FORMAT A40
COLUMN detected_usages FORMAT 999999999999

SELECT name,
detected_usages,
aux_count,
last_usage_date
FROM dba_feature_usage_statistics
WHERE name = 'Oracle Pluggable Databases'
ORDER BY name;

NAME DETECTED_USAGES AUX_COUNT LAST_USAG
---------------------------------------- --------------- ---------- ---------
Oracle Pluggable Databases 17 1 04-OCT-16

SQL>
Notice the AUX_COUNT column now has a value of "1".


Prevent Accidental Creation of a PDB

We can prevent accidental creation of a PDB using a system trigger. The following trigger is fired for any "CREATE" DDL on the database where the ORA_DICT_OBJ_TYPE system defined event attribute is set to 'PLUGGABLE DATABASE'. It checks to see how many user-defined PDBs are already present. If the number of user-defined PDBs are in excess of the maximum allowed (1), then we raise an error.
CONN / AS SYSDBA

CREATE OR REPLACE TRIGGER max_1_pdb_trg
BEFORE CREATE ON DATABASE
WHEN (ora_dict_obj_type = 'PLUGGABLE DATABASE')
DECLARE
l_max_pdbs PLS_INTEGER := 1;
l_count PLS_INTEGER;
BEGIN
SELECT COUNT(*)
INTO l_count
FROM v$pdbs
WHERE con_id > 2;

IF l_count >= l_max_pdbs THEN
RAISE_APPLICATION_ERROR(-20001, 'More than 1 PDB requires the Multitenant option.' );
END IF;
END;
/
With the trigger in place, we attemtp to create another pluggable database.
CREATE PLUGGABLE DATABASE pdb2 ADMIN USER pdbadmin IDENTIFIED BY Password1
FILE_NAME_CONVERT=('/u01/app/oracle/oradata/cdb1/pdbseed/','/u01/app/oracle/oradata/cdb1/pdb2/');

CREATE PLUGGABLE DATABASE pdb2 ADMIN USER pdbadmin IDENTIFIED BY Password1
*
ERROR at line 1:
ORA-00604: error occurred at recursive SQL level 1
ORA-20001: More than 1 PDB requires the Multitenant option.
ORA-06512: at line 12

SQL>
As expected, the are prevented from creating a second user-defined PDB.


Cleanup After an Accident

Looking at the feature usage described above, it would appear in 12.1 all you need to do to recover from accidentally creating more than one PDB is to drop the extra PDBs. At this point I don't know if there is any other mechanism for tracking the maximum number of PDBs ever created in an instance, so I don't know if there is any record of a mistake left behind in the instance for future reference by auditors.
If you do accidentally create more than one user-defined PDB in a container database and you are paranoid about a potential licensing breach, you might want to do the following.
  • Create a new CDB instance with no PDBs.
  • Protect the new CDB instance with the trigger mentioned previously.
  • Unplug the PDB of interest from the original CDB.
  • Plug the PDB into the new clean CDB.
  • Throw away the original CDB instance.


Since the new CDB has never had more than one PDB present, there should be no way the instance could secretly track any breach of the license.

How to Connect to FTP Servers in Windows Without Additional Software

$
0
0

If you need to access an FTP server, you can install dedicated FTP clients with lots of features –but you don’t necessarily have to. Windows itself offers several ways for connecting to an FTP server, allowing you to download and upload files in a pinch.


How to Access FTP Servers in Windows’ File Explorer

The Windows file manager–known as File Explorer on Windows 10 and 8, and Windows Explorer on Windows 7–allows you to connect to FTP servers.

To connect to an FTP server, open a File Explorer or Windows Explorer window, click the “This PC” or “Computer”. Right-click in the right pane and select “Add a network location”.


Go through the wizard that appears and select “Choose a custom network location”.


In the “Specify the location of your website” dialog, enter the address of the ftp server in the form ftp://server.com .

For example, Microsoft’s FTP server is ftp.microsoft.com, so we’d enter ftp://ftp.microsoft.com here if we wanted to connect to that particular server.


If you don’t have a username and password, you can often check the “Log on anonymously” box and sign into the server without a username and password. This gives you limited access to the server–you can generally download publicly available files but not upload files, for example.

If you do have a username and password, enter your username here. The first time you connect to the FTP server, you’ll be prompted to enter your password.


You’ll now be asked to enter a name for the network location. Enter whatever name you like–the FTP site will appear with this name so you can easily remember which is which.


When you’re done, the FTP site will appear under “Network locations” in the This PC or Computer pane. Download files and upload files by copying and pasting them to and from this folder.


How to Access FTP Servers in the Command Prompt

You can also do this with the ftp command in a Command Prompt window. This command is comes built into Windows.

To do this, open a Command Prompt window. On Windows 10 or 8, right-click the Start button or press Windows+X on your keyboard and select “Command Prompt”. On Windows 7, search the Start menu for “Command Prompt”.


Type ftp at the prompt and press Enter. The prompt will change to an ftp> prompt.

To connect to a server, type open followed by the address of the FTP server. For example, to connect to Microsoft’s FTP server, you’d type:

open ftp.microsoft.com
 
You’ll then be prompted for a username. Enter the username and password to connect to the site. If you don’t have one, you can enter “Anonymous” followed by a blank password to see if the FTP server allows anonymous access.


Once you’re connected, you can navigate the FTP server with the dir and cd commands. To view the contents of the current directory, type:

dir
 
To change to another directory, type the cd command followed by the name of the directory. For example, you’d type the following command to change to a directory named “example”:

cd example
 

To upload or download files, use the get and push commands.

For example, to download a file named example.txt in the current FTP folder, you’d type:
get example.txt
 
To upload a file stored on your desktop named example.txt to the FTP server, you’d type:

put "C:\Users\YOURNAME\Desktop\example.txt"


When you’re done, just type the following command and press Enter to close the connection:

quit
 
 
While apps like Cyberduck or FileZilla offer plenty of advanced features that Windows’ built-in options don’t, both of the above are great options for basic FTP browsing, uploading, and downloading.
Viewing all 880 articles
Browse latest View live


<script src="https://jsc.adskeeper.com/r/s/rssing.com.1596347.js" async> </script>