Quantcast
Channel: Tech Support
Viewing all 880 articles
Browse latest View live

How to Setup Citrix Licensing Server 11.13.1.2

$
0
0

This article will walk you through step by step guide on how to install and configure Citrix licensing server. Adding a Citrix Licensing Server to your environment is important if you are going to setup and use Citrix products and solutions.


Prerequisites:

  • Downloaded the Citrix Licensing Server 11.13.1.2 (Build 16002) for Windows (www.citrix.com)
  • Windows 2012 R2
  • Domain name: techsupportpk.com
  • Account for setup: Administrator (TS\Administrator)


Installing Citrix Licensing Server 11.13.1.2

Unpack the .zip file and start the installer.


You will be presented with the screen below. Accept the license agreement and click on Next.


Choose your installation path and click on Next.


Next you will be presented by the port for the Licensing Server. Change it as you prefer, just make sure that it doesn’t interfere with services using those same ports on your server. Click on Next and the installation will begin.


After the installation has finished, you will be presented with a summary screen. I selected the option not to participate in the Customer Experience Improvement Experience Program. Make your choice and click on Finish.


Now it is time to upload your license. Go to the Start Menu and start the Citrix License Administration Console.


Your default browser will open with the correct URL for the Citrix License Administration Console. Click on “Continue to this website” to move past the SSL warning. We can fix this later, for now it is not important. Your session will be encrypted using the SSL certificate installed with the Citrix Licensing Server anyway.


Click on Administration.


You will be prompted to log on. Use your Domain Administrator (or the user used to install the Citrix Licensing Server) to log on. Click on Submit.


Click on Vendor Daemon Configuration in the menu on the left site. Then click on Import License.


Now click on Browse to locate your license file. Then click on Import License.


Click on OK after the import is finished.


The Citrix Licensing Server will only read the imported licenses after a reboot, or after the Citrix Licensing Server has been restarted. Let’s restart the license server. In the Run dialogue box enter services.msc and click on OK.


Locate the Citrix Licensing service, select it and click on the reboot icon in the menu.


Now switch back to your browser and reload (or re-open) the Citrix License Manager Console and go to the Dashboard. Your licenses should now be visible.


That's All for now.

Whats New in iPhone 7 And iPhone 7 Plus

$
0
0

Incredibly intelligent, amazing new options, one headphone jack lighter. iPhone 7 once again takes the familiar and puts a completely new spin on it. That starts on the surface, with new finishes like (matte) black and jet black, but goes all the way down to the the silicon with the new A10 Fusion chipset and Apple's first custom wireless chip, the W1. Add to that a re-imagined Force Touch Home button, a new camera with optical zoom and depth of field affects, wide gamut color from capture to display, booming stereo speakers, more and better LTE, water resistance as good as the original Apple Watch, and the list goes on and on.


Exit headphone jack, enter AirPods

Last things first: Apple has ditched the damn-near ubiquitous 3.5mm headphone jack. They're not the first company to do it, but they're by far the most influential. What this means is that your old, wired earbuds and cans will need a Lightning adapter to work with iPhone 7. That'll be in the box.


Adapters are one more thing to carry around, to lose, and to pay to replace, though. So, for many people there'll be real, short term pain.

To put their products where their beliefs are, Apple is also offering Lightning EarPods in the box. They're also offering the all-new AirPods: Two small, discrete — and discreet! — "hearables". They connect to each other and the iPhone wirelessly using Apple's first, custom radio chip: The Apple W1.

I had the chance to try them out and they do feel like what Apple likes to call "magic".

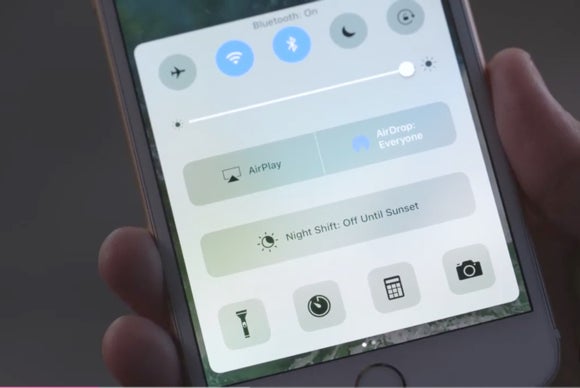
Pairing is super simple. Open the case and the AirPods take over Control Center on the iPhone. A couple taps and you're good to go. Apple Watch is set up at the same time and, thanks to iCloud sync, so are iPad and Mac. (They'll also work with older iPhones.)

Put them in and an infrared sensor detects your ear and automatically switches audio away from your phone. Pause your phone and start your watch, and AirPods automatically switch to them. Same with iPad and Mac.

Motion sensors embedded in the AirPods mean if you tap twice, you engage Siri. Or, if a call is coming in, you answer.

The drawbacks are what you imagine with tiny wireless devices: 5 hours of battery life on a single charge, though the case can recharge the AirPods up to 24 hours.

If you don't like AirPods but do like the wireless system, the W1 chipset will be available in three new Beats headphones as well, both over- and in-ear. I imagine there'll be a lot more to come, too.

Again, other company's have offered similar earpieces before, but not as aggressively nor at this scale. AirPods will be first-of-their kind for most people, and they'll have to perform well enough and for long enough that the gain justifies the loss.

That's the crux: Lightning EarPods and wireless AirPods can't simply 'not suck'. They have to be incredibly great, or the loss of 3.5mm, regardless of Apple's spin, won't have been worth it.

My guess is, much like the Dock-to-Lightning transition, a year or two from now most of us will be hard-pressed to even remember the iPhone ever had a 3.5mm jack.
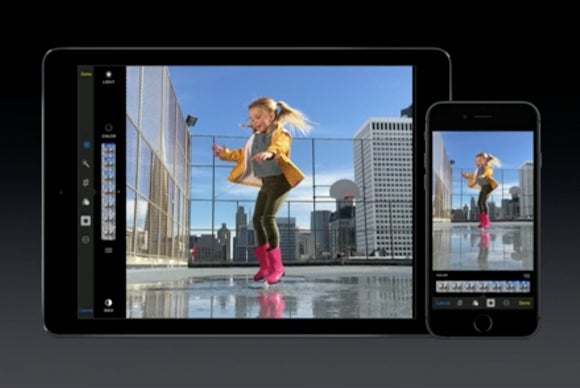
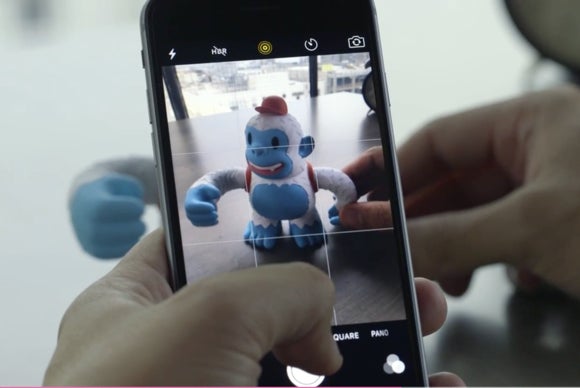
 

Cameras

Apple is more camera company than phone company now, since everything from messaging to social media competes for our communications, while at the same time amplifying the importance of photo and video sharing.


For the last few years, phone cameras have been getting incrementally better. A few outliers with massive lenses or complexity aside, we've gotten higher resolution and better low-light, a step at a time.

This year, though, Apple's attempting a double-step.

The 4.7-inch iPhone 7 camera is getting a good upgrade. It's still 12 megapixels but it has optical image stabilization (OIS) now as well, just like the 5.5-inch Plus model has had for the last couple of years.

There's also a new f/1.8 aperture, 6 element lens, and a sensor that's 60% faster and 30% more power efficient. The image signal processor (ISP) is smarter as well. That means better white balance, autofocus, auto-exposure, face recognition, object discovery, and more.

There's even a new 4 LED flash with flicker sensor to even better match ambient lighting when you really need to.

iPhone 7 Plus, though, gets two lenses. One wide angle, one telephoto, the camera app pulls in the combined data to give you up to 2x optical zoom, and up to 10x digital zoom.

Coming in October, there'll also be a new capture mode that simulates the kind of high depth of field you get on SLRs. Using both lenses, Apple builds a depth map, pulls out people or objects, applies a blur map, and then gives you beautiful bokeh.

It wasn't enabled on the demo units, so I couldn't try it, but the sample photos looked phenomenal.

The front FaceTime cameras are also getting a boost. They're 7 megapixels now, with the same deep trench isolation, wide gamut, and auto stabilization the rear camera got last year. So your selfies will look great too.

While Apple is abstracting away all the complexity for their own camera app, they're giving developers the ability to surface a lot of manual controls. That includes independent control of both lenses and full RAW support.

For anyone who loves photography or taking pictures, the new camera alone is worth the price of upgrade.


Water resistance

Last year Apple added a gasket and seals to iPhone 6s to help increase its chances of surviving minor, incidental contact with liquids. This year, iPhone is getting more serious.


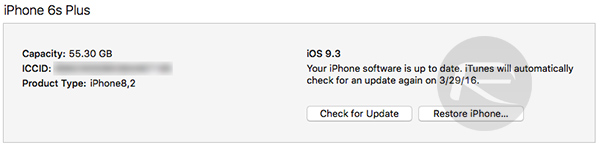
Rated IP67, same as the original Apple Watch, iPhone 7 — including its lack of a 3.5mm headphone jack — can survive brief exposure to water. It's still not meant for swimming — or shark diving — but it's significantly better than before.

Competitors have had water-resistant phones for a while, of course, including early versions that basically had a rugged, flanged case permanently welded on, or, more recently, used chemical or nano coatings. For Apple, it seems to have been less about doing it and more about how they're doing it — a way to prevent liquid damage without sacrificing design or the environmental standards the company considers vitally important.


Wide gamut, managed color

Over the last year Apple has been steadily improving its displays. The Retina 5K iMac went to the cinematic DCI-P3 wide-gamut standard, which made colors deeper and more accurate. The 9.7-inch iPad Pro got the same screen last March. Now iPhone 7 has it as well.

Look at all those colors!

It's amazing that Apple is pushing wide color and color management, device by device, through their entire product line. I can't wait until it's everywhere.

What we didn't get, though, is the True Tone screen of the 9.7-inch iPad Pro. It's a technology that measures and matches ambient color temperature so your screen never looks warm yellow or cool blue — it looks white as paper.

I also want that everywhere.


Force Press Home button and taptic engine

Just like the MacBook before it, the iPhone has given up it's old, mechanical Home button for a new, Force Touch button. It uses the taptic engine to fool our fingers into believing they're pressing or clicking something where no actual press or click exists. Yes, physics is a lie.

Home, sweet home

With the Home button, Apple is using different taptics to hint quick actions, messages, notifications, ringtones, and more. And developers get access too, so they can come up with their own experiences.
It's a huge win for everyone. Apple gets to remove the space taken up by the old switch while at the same time creating something more resilient, responsive, and flexible for customers.

The new taptics carry over to the screen as well. I got to try a video game where you feel the type of gun you're using, from powerful shells to rapid fire automatics. I also go to try a keyboard where you could almost feel each key.

Now the two taptic zones just need to merge into one.


Silicon intelligence

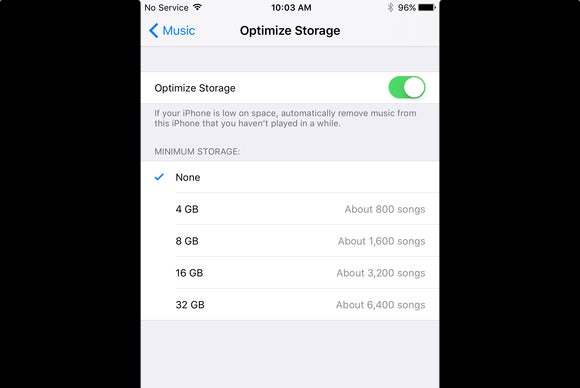
Apple likes to talk about some specs and not others. We'll have to wait for a teardown to find out exactly how much memory is inside each version of iPhone 7. Storage, though, which is how they segment pricing, is right up front: 32 GB, 128 GB, and 256 GB.

That's right, double everything.


While streaming services like Apple Music to efficiencies like App Thinning have reduced storage pressure, giant cameras shooting super high resolution photos and video have gobbled up far, far more. More people will be able to get by with the lowest storage level now, and those who want to keep everything with them all the time will love the new highest level.

No wonder Apple recently added a 2 TB tier to iCloud.

Far more importantly, at least to me, is the Apple A10 Fusion chip inside. It's quad core now... kinda. In a twist on big-endian/little-endian design, Apple has two high-performance cores, which are over 40% faster than last year and over 20x faster than the original iPhone. They're matched with two high-efficiency cores that provide significant power savings. Apple's using a custom-designed performance controller to manage it all, with real-time processor assignment for power/efficiency.

It's got six graphics cores as well, which are 50% faster than last year but with only two-thirds the power draw. And for those keeping hockey-curve score at home, it's over 240x faster than the original.
All told, it's enough to give iPhone 7 over two more hours of average battery life than the iPhone 6s, and iPhone 7 Plus over an hour more than iPhone 6s Plus.

Apple has also become more open about it's artificial intelligence (AI), machine learning (ml), and neural network endeavors. Apple has been using them for years in everything from software to services to the silicon that powers them, but now they're competitive. Apple's angle, though, is that — unlike the big internet companies — they're doing it while respecting our privacy. That means keeping our person data off the cloud and safely on our personal devices.

Some of us consider that critically important. Others couldn't care less. Either way, though, it has to work. And to work, all that AI, ML, and those neural networks have to also live on our personal devices, and in the silicon that powers them.

Apple has a unique advantage here. Even competitors who also make their own chips don't use those chips in all their phones. Apple does. When you stop and think about the implications of that, both right now and into the future, especially where it concerns localized neural networks, it's staggering.

Yes, sure, it'll find photos of all your fancy coffees or steak dinners in the blink of an eye, but imagine that type of on-die power being applied to everything. I can't stress this enough: If you're even remotely a fan of technology, you want to jump on Apple's chipsets as fast as possible.
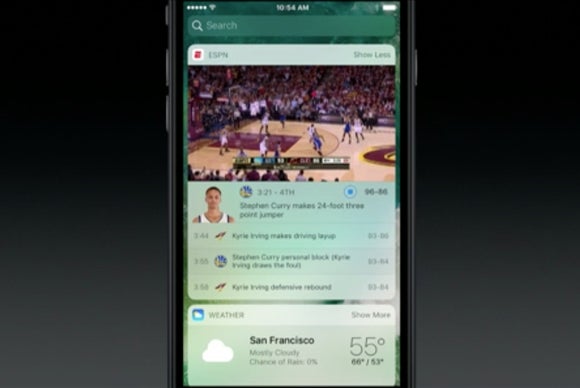
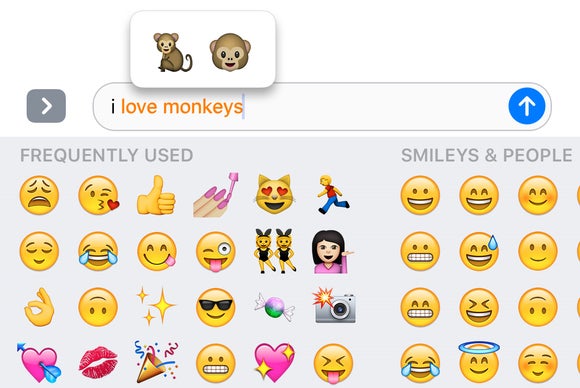
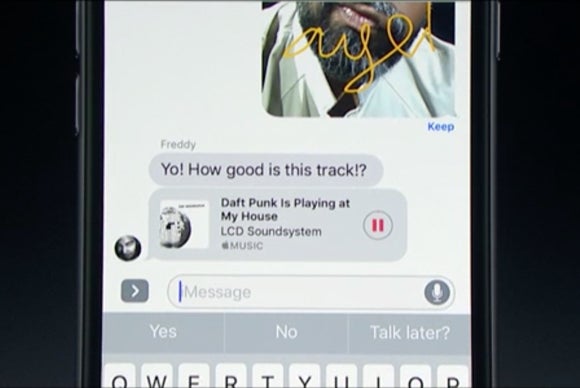
 

iOS 10

iPhone 7 will ship with iOS 10, Apple's next generation mobile operating system. This year, that includes new messaging features, Siri app integration, redesigned Music and News, a Home app for easier home automation setup and management, better widgets and notifications, and more, and more.


Should you upgrade? Should you switch?

Most people need a compelling reason to upgrade their phones more than once every second or third year. With iPhone 7, the big driver is the camera. If you want everything that new sensor has to offer — especially the new dual-lens sensor in the 5.5-inch model — then you want iPhone 7.

If you're still on an iPhone 6, the combination of last and this year's updates make for a compelling upgrade, like you're going from running to flying. If you're on an older iPhone, from walking to flying.

If you're currently on a Samsung or other Android device, the pitch remains the same: Apple provides a more coherent user experience, updates everyone — on every carrier, in every region — to the latest software and security patches exponentially faster than anyone else, and thanks to Apple Stores and AppleCare, has customer service second to none.


Pricing and availability

iPhone 7 goes on pre-order September 9 and ships on September 16. Starting price is the same as last year, $649 for the 32 GB iPhone 7.

For me, I'm getting the 256 GB iPhone 7 Plus. I just can't decide between the matte black and jet black. How about you?

Whats New in iOS 10

$
0
0
http://i-cdn.phonearena.com/images/articles/242734-thumb/iOS-10-1.jpg
With iOS 10, iPhone and iPad are about to get a bigger, bolder, and more brilliant makeover in more ways than one. iOS 7 was a complete redesign, wiping away rich textures and putting physics-based interactions in its place. iOS 8 was a functional revolution, decoupling features and activities from apps and letting them extend into other interfaces and continue across devices. iOS 9 introduced intelligence and proactivity, making the system and apps smarter from server to search. Now, iOS 10 takes the next step, using all of the advances that came before to make messaging more fun and flexible, Siri more open and accessible, notifications more persistent and convenient, and the entire experience cleaner and clearer.


iOS 10 Compatibility

Apple didn't go so far as to exclude all 32-bit devices from iOS 10 compatibility, but they did drop several older models from the list, including all non-Retina display devices.
  • iPhone SE
  • iPhone 6s
  • iPhone 6s Plus
  • iPhone 6
  • iPhone 6 Plus
  • iPhone 5s
  • iPhone 5c
  • iPhone 5
  • iPad Pro 9.7-inches
  • iPad Pro 12.9-inches
  • iPad Air 2
  • iPad Air
  • iPad 4
  • iPad mini 4
  • iPad mini 3
  • iPad mini 2
  • iPod touch 6


Lock screen, notifications, and controls

"Slide to unlock", a gesture that helped define the original iPhone experience, is gone. "Press home to unlock"— or "Press home to open" if you've authenticated with Touch ID — has replaced it. It was a little confusing at first, but once you get used to the other lock screen changes, it just feels right.


Control Center has been redesigned, and it, too, sacrifices density for legibility. In this case, though, I'm not sure the tradeoff is as worthwhile. Instead of a single pane there are now three panes, one for settings and tools, one for media controls, and one for HomeKit. You swipe between them and it feels... slow. I'm not sure if a tabbed representation, like notification center, would feel faster, or if I'll just get used to it with time.


Camera

For iPhone 7 Plus, there are new features in the Camera app to go with that new two lens system. There's a 2x button that, when you tap it, switches you to optical zoom. There's also a one-hand optimized circular interface that lets you thumb across from 2x optical to up to 10x digital.

Coming in October through a free software update, there'll also be a blur effect mode. Using both lenses, iPhone 7 will create a depth map, isolate any faces or objects, and then apply a blur effect to simulate high depth of field bokeh.

The samples look great, like they were shot with a great portrait camera and lens. Which iPhone 7 now has!


Messages

Messages, the most popular app on iOS, has been significantly updated for iOS 10. Quick selfies have moved from a touch-and-hold button to a live view in the photo picker. Digital Touch — sketches, heartbeats, and taps — has been brought over from the Apple Watch, and you can layer them on top of images and videos now as well. It makes Digital Touch available to an exponentially larger potential user base, but I'm not sure how many people will actually use it beyond some initial experimentation. Not so with the new emoji. 

They're going to be big. Literally.


Privacy and Photos

Apple believes privacy and security are key differentiators and points of attraction for the company's software and services, and lists them as major features as important as user experience. With iOS 10, Apple is again improving both with everything from encryption through extensions to differentiated privacy, which goes beyond anonymizing data to making sure no one, not even Apple, knows who the crowd is behind the crowd-sourcing.


Maps and Siri apps

Maps has gotten a makeover and I'm still getting used to it. (I had the old version down to muscle memory.) A lot of it is good, especially the much bigger, easier to see destination recommendations and controls. And it's absolutely simpler to use. It's also getting the same kind of proactive predictions Apple started introducing for Siri last year.


Home, Music, and News

Music and News have gotten complete makeovers in iOS 10, and the new Home app joins them in being "big, bold, and beautiful."


iPad and Swift Playgrounds


iPad doesn't fare as well this year as last. Safari can now go into Split View all by itself, either via a long press, a two-finger tap, or dragging a tab to the right edge of the screen. It works great. You can still go into multi-app Split View from Safari Split View. It'll collapse Safari back down to a single window but come right back to where you left it when you return.

There are a few other new features, like a redesigned Camera app, but nothing approaching the level of "pro" that we got in iOS 9. No drag-and-drop, for example.

My guess is that Apple isn't forgetting about iPad differentiation but is simply staggering it. iOS 10.0 is about updating everything, and more iPad-specific features will follow in a future update.

That said, there is one monumental new iPad feature, in the form of an app: Swift Playground. It's absolutely not Xcode for iOS, but it could be something even more important. Not since Hypercard has there been as powerful a way to get people familiar with code, and there's never been one offering well-integrated educational content like Playgrounds.

The potential for both the app and the ecosystem is tremendous, and my guess is its announcement will go down as one of the most important moments in programming for the next generation.

How to Disable All Built-in Advertising on Windows 10

$
0
0


Windows 10 has a lot of built-in advertising. This isn’t just about the free upgrade offer: Even if you purchase a new PC that comes with a Windows 10 license or spend $200 for a copy of Windows 10 Professional, you’ll see ads in your operating system. You can, however, disable a lot of it.


Disable Lock Screen Ads

Windows 10 now displays ads on the lock screen via Windows Spotlight. Sometimes, Windows Spotlight will just show off cool wallpapers, but it’ll also sneak in advertisements for games like Rise of the Tomb Raider and Quantum Break in the Windows Store.

To get rid of these lock screen ads, head to Settings & Personalization & Lock Screen and set the background to “Picture” or “Slideshow” instead of Windows Spotlight.

You’ll probably also want to disable the “Get fun facts, tips, and more from Windows and Cortana on your lock screen” option here, too.


Stop Suggested Apps From Appearing in the Start Menu

Windows 10 will occasionally show “suggested apps” in your Start menu. Suggested apps aren’t necessarily free, and we’ve seen Microsoft use this feature to advertise $60 PC games from the Windows Store (which, by the way, you shouldn’t buy). But mainly, they just take up valuable space in your Start menu.

To stop suggested apps from appearing in the Start menu, head to Settings > Personalization > Start and set the “Occasionally show suggestions in Start” setting to “Off”.


Get Rid of Nagging Tips

Windows 10 also has helpful “tips” that often serve to push Microsoft apps and services. Tips have included recommendations to use Microsoft Edge for better battery life, and an encouragement to use Microsoft Edge so you can earn Microsoft rewards points.

If you’d like to just use your own preferred applications without Microsoft nagging you, you’ll need to disable these tips. To do so, head to Settings > System > Notifications & Actions and disable the “Get tips, tricks, and suggestions as you use Windows” option.


Stop Cortana From Bouncing on the Taskbar

Cortana doesn’t just sit on your taskbar and wait for you to start talking to it. Cortana will regularly bounce in place, encouraging you to try using it.

If you don’t want Cortana nagging you, click the Cortana search bar, click the Settings icon, scroll down, and disable the “Taskbar Tidbits” option. From then on, Cortana will sit quietly until you want to use it.

If you don’t want Cortana running at all, you can choose to disable Cortana with a registry or group policy setting. Microsoft removed the old, easy toggle that lets you disable Cortana with the Anniversary Update, but the registry and group policy tricks still work.


Banish “Get Office” Notifications

Windows 10 includes a “Get Office” application that sits there, providing notifications suggesting you download Office 365 and enjoy a month-long free trial.

To stop those Get Office notifications, head to Settings > System > Notifications & Actions, scroll down, and set notifications for the “Get Office” app to “Off”. You can also simply find the Get Office app in your Start menu, right-click it, and select “Uninstall”. However, it may come back when you update Windows 10 in the future.


Uninstall Candy Crush Saga and Other Automatically Installed Apps

Windows 10 “automatically downloads” apps like Candy Crush Soda Saga, Flipboard, Twitter, and Minecraft: Windows 10 Edition when you sign in for the first time. PC manufacturers can also add their own apps and live tiles that appear installed by default.

These apps are installed as part of the “Microsoft Consumer Experience”. There was a group policy setting to disable this, but it was removed from consumer versions of Windows 10 in the Anniversary Update. Only Windows 10 Enterprise users–not even Windows 10 Professional users–can turn this off.

You can remove these apps and tiles, however. To do so, just open your Start menu, locate any apps you don’t want to use, right-click them, and select “Uninstall.” Apps like Candy Crush Soda Saga and FarmVille 2: Country Escape will appear as tiles by default, but you can also find them under the all apps list.

Some apps are simply given a tile but aren’t yet downloaded. To remove these tiles, just right-click the tile and select “Unpin from Start.” You won’t see an “Uninstall” option because the tiles are just links that take you to the Windows Store where you can download the app.


Disable Live Tiles and Unpin Windows Apps

While you can remove the apps that are installed as part of the Microsoft Consumer Experience program, Windows 10 also includes quite a few apps you can’t uninstall that advertise to you. For example, the Store and Xbox tiles often make use of the “live tile” feature to advertise apps and games Microsoft wants you to download.

To disable live tiles that advertise to you, right-click a tile and select More > Turn live tile off. You can also just right-click a tile and select “Unpin from Start” to get rid of the tile entirely. You can even choose to unpin all the tiles and only use the All Apps list to launch apps, if you like.


Avoid the Built-in Solitaire Game

Stay away from the “Microsoft Solitaire Collection” game preinstalled on Windows 10. This app doesn’t just have advertising–it has video ads that are 30 seconds long. You can avoid the advertising by paying $10 a year. Microsoft’s Minesweeper game isn’t installed by default, but it too has its own $10 a year subscription fee. Those are steep prices for games that used to be free.

Play another free Solitaire game instead. Google now offers a solitaire game–just search for “solitaire” and you can play ad-free solitaire in Google’s search results.


We’ve also put up our own completely free Solitaire and Minesweeper games on URLs that anybody can access in a desktop browser. We didn’t put any ads in these games, so you can play ad-free:

solitaireforfree.com
minesweeperforfree.com

Expect to see Microsoft add more advertising to Windows 10 in future major updates. Windows 10’s Anniversary Update turned more of the default tiles on the Start menu into “sponsored tiles”, for example.

Download iOS 10 - 10.0.1 And Install On iPhone 6s, 6, Plus, SE, 5s, 5c, 5, iPad, iPod

$
0
0
ios-10-beta-1-how-to-install

Final iOS 10 / 10.0.1 download IPSW links are now available to install on iPhone 6s, 6s Plus, 6, 6 Plus, SE, 5s, 5c, 5, iPad4 and over, and iPod touch 6th-generation. This final build is available to everyone worldwide.


iOS 10 is Apple’s latest major update for iPhone, iPad and iPod touch devices, bringing in a number of new features to one of the world’s most popular mobile platform. For a full list of features on what’s new in iOS 10, you can check out our separate detailed post on it here: iOS 10 Announced: Features, Release Date And More.


OTA Update: How to download and install iOS 10

By far the easiest way to update your compatible device to iOS 10 is to do it via OTA update method. While it’s easiest and fastest, it probably isn’t the best as with this method, some un-needed files are usually transferred over from the previous operating system, taking unnecessary disk space and resulting in performance issues. But if you can live with that, you can follow the instructions below to get onto iOS 10.

Step 1: From the device itself, head to Settings > General > Software Update.
Step 2: Wait for iOS to check for new OTA update.

Step 3: Once iOS 10 update is found, tap on Download and Install to begin installing the update.

ios 10 final ota


Clean Install: How to download and install IOS 10

Clean installing is our recommended way to go as iOS 10 is a major firmware update and it’s always better to start fresh to make sure no battery drainage or performance issues occur. Here’s how to go about clean installing iOS 10 on your device.

Step 1: Update to latest version of iTunes on your Windows PC or Mac.
Step 2: Download IPSW file of iOS 10 / 10.0.1 tailored for your device: iOS 10 / 10.0.1 Download IPSW Links For Final Version Released.

Step 3: Turn off Find My iPhone on the device. To do this, head to Settings > iCloud > Find My iPhone and toggle it to off.

Find My iPhone Taig jailbreak

Step 4: Connect your iPhone, iPad or iPod touch to your computer via the Lightning/USB cable.
Step 5: Now launch iTunes and select your device, as shown in the screenshot below.
 
itunes-summary-tab

Step 6: Next, if you are a Mac user, you need to hold the Alt key, for Windows users this will be the Shift key, and then click on the Restore iPhone… button. iTunes will now prompt you to select the IPSW firmware file. Select the iOS 10 / 10.0.1 firmware file you downloaded earlier.

It’s important to note that this will wipe your device completely. Make sure you have backed up as explained earlier in this post before going ahead with this step.

ios-9.3-restore

Step 7: Now sit back and relax as iTunes installs iOS 10 on your iPhone, iPad or iPod touch. Be patient as this could take some time depending on the speed of your computer and the type of device you are installing it on. Once installed, your device will reboot automatically and you’ll be greeted with Hello screen of iOS 10.


Enjoy!

Below are all the direct download links for iOS 10 / 10.0.1:

How to Remove Unwanted Apple's Built-in Apps From iOS 10 Home Screen

$
0
0


If you’re annoyed by the screen real estate that the stock Apple apps take up on your iPhone or iPad, there’s something new in iOS 10 you’ll love: the ability to remove them.


Out Of Sight, Out Of Mind

Let’s make one thing perfectly clear up front. This new feature lets you remove the apps from your home screen, but it does not actually remove the applications from your phone–it merely hides the icons.

Many of the pre-installed apps that come with your iOS device are core components that are integrated into Siri and other elements of the iOS experience. Ripping them out would cause more harm than good, but Apple understands that there are lots of people who simply don’t use apps like “News”, “Find My Friends”, or “Game Center” on their home screen. Rather than force people to shove them into a folder named “Apple Apps” to get them out of the way, you can now remove them from your home screen.

So, unfortunately, removing them will not free up space on your device. It will simply hide the app. But having that icon out of your face is still a welcome change.


The Stock Apps You Can Remove

So which apps can you hide with this new trick? Here’s a list of the apps you can now remove from view:

• Calculator• Music
• Calendar• News
• Compass• Notes
• Contacts• Podcasts
• FaceTime• Reminders
• Find My Friends• Stocks
• Home• Tips
• iBooks• Videos
• iCloud Drive• Voice Memos
• iTunes Store• Watch
• Mail• Weather
• Maps

There are a few caveats to this list. Removing the Contacts app doesn’t actually kill your contacts, it just removes the icon–you can still access contacts from the Contacts tab in the Phone app. If you remove the Music app, music playback won’t work with CarPlay (although if you’re regularly using Music with CarPlay, there’s slim chance you’d remove it in the first place). Finally, if you want to nix the Watch app, you’ll need to unpair your Apple Watch first (again, unless you sold your Apple watch, not a big chance you’ll run into this issue).

Also worth noting: there are probably a few apps you may have on your phone that seems like stock apps, but that you didn’t see on the list. Many people install Apple produced apps–like Pages and Garage Band–when they first get their iOS device. Those aren’t core iOS apps, and you can remove them and get the space back on your device just like you would any other App Store app.


How to Remove Stock Apps From Your Home Screen

Now that we’ve highlighted how removing apps from the home screen isn’t the same as truly deleting them, and listed off which apps you can hide using this trick, here’s the anti-climatic way you do it. You remove them like you’ve been removing regular downloaded apps forever.

Press and hold on an app until the app icon begins vibrating. Tap the “X” icon in the upper left corner.


Confirm you wish to remove the application from the home screen.


After confirmation, the home screen shortcut to the application will vanish.


How to Restore Stock Apps to Your Home Screen

Restoring the stock apps is a very simple affair. Simply open up the App Store app and search for the name of the app. Click on the download-from-cloud button.


Unlike the usual download process, you won’t fetch the app from the Apple servers, as the app never actually left your device. The “download” process will be instantaneously and the download icon should switch to “Open” in a fraction of a second. The app icon will now be back on your home screen, ready for you to position it where you see fit.

That’s all there is too it–thanks to the changes in iOS 10 you can finally get rid of all those never-used-apps without resorting to a kludgy fix like shoving them all in a home screen folder.

26 Awesome iOS 10 Features That Will Transform Your Life

$
0
0
http://core0.staticworld.net/images/article/2016/06/ios-10-live-photos-editing-100666233-orig.jpg
Packed with new features, hidden functionalities, and third-party app integration, iOS 10 has plenty to explore. Here are our favorite bells and whistles you can try for yourself once the official release is finally out.


Facial recognition that's not creepy

In iOS 10, you can search your Photos for specific friends—or even for yourself!—to find the perfect selfies. The Albums tab also has a new People section so you can easily see get all those mugshots in one place.

Don’t be super creeped out by being able to search for familiar faces on your iPhone. Apple has made sure that the iPhone analyzes only the photos that are stored locally on your device.

http://core0.staticworld.net/images/article/2016/06/ios-10-photos-facial-recognition-100666200-orig.jpg

Customizable widgets from your favorite apps

Now you can check the weather or the Warriors score without unlocking your iPhone. The latest iOS brings handy-dandy widgets to the iPhone. You will be able to access all your widgets by simply swiping right from the new lock screen.

These widgets are animated, expandable, and can even play videos and other multimedia, like a sports clip. To add a widget, simply use 3D Touch on your favorite app icon like Weather or ESPN and then tap “Add Widget.”

http://core0.staticworld.net/images/article/2016/06/ios-10-widgets-100666192-orig.jpg

Easier to emoji-fy your messages

Apple spent a lot of resources making iMessage and the Messages app way more visual in iOS 10. For starters, emoji sent by themselves are now three times bigger. And for emoji die-hards, iOS 10 can now suggest which words in your text you can substitute for a corresponding emoji.

After writing your message, tap on the emoji button and every instance where a word can be replaced by an emoji will be highlighted. Simply tap to replace and send your emojified message.

http://core0.staticworld.net/images/article/2016/09/ios-10-messages-tap-to-replace-emoji-translator-100681945-orig.jpg

Visual link-sharing in Messages

In iOS 10, Apple has also visualizes links sent in Messages. When you send a URL, Messages automatically turns it into a visual preview with a headline and image pulled from the website. Similarly, you can send a link to YouTube or Vimeo and have the recipients watch the video in-line.

You can also send tracks from Apple Music that the recipient can play without leaving Messages. There’s even an iMessage app to make it easier to find and share songs from Apple Music (more on iMessage apps later).

Every URL we tested in iOS 10 Messages showed up as a visual link, even Spotify tracks, although much to no one’s surprise, you’re not able to play those in-line.

http://core0.staticworld.net/images/article/2016/06/ios-10-visual-links-in-messages-100666226-orig.jpg


Siri's now integrated with third-party services

Siri in iOS 10 has finally been opened to developers, so you can use voice commands to request a Lyft, send a message via LinkedIn or WhatsApp, or find photos on Pinterest.

Just launch Siri as per usual and make sure you say the name of the third-party app in your command. Initially, Siri in iOS 10 has only been intended to function with six types of apps, but we’re certain Apple will expand the options over time.
http://core0.staticworld.net/images/article/2016/06/ios-10-siri-sdk-sirikit-lyft-100666193-orig.jpg


Apple Music gets personalized playlists

Apple touted a brand-new personalized playlist for Apple Music users during WWDC, but we’ve yet to test out this Discovery Mix playlist in iOS 10 public beta.

Apple Music does have two other personalized playlists currently on rotation, however: My New Music Mix and My Favorites Mix. My New Music surfaces new songs from artists in your library and My Favorite brings up songs that you’ve liked or listened to on repeat.

http://core0.staticworld.net/images/article/2016/09/apple-music-ios-10-personalized-playlists-100682192-orig.jpg


Song lyrics in Apple Music

Apple has integrated song lyrics in iOS 10, so now you know can karaoke to “Bohemian Rhapsody” without leaving Apple Music. When listening to a specific song, simply pull up to reveal the lyrics module. Here you can expand or hide the full lyrics. Unfortunately, Apple has not gotten the rights to display song lyrics from all the music publishers, so we still don’t know what Rihanna is singing about in her recent hit, “Work.”

http://core0.staticworld.net/images/article/2016/06/ios-10-apple-music-lyrics-100666205-orig.jpg


Voicemail transcription and spam-detection (beta)

Never listen to another voicemail again. With iOS 10 we get the launch of voicemail transcription, which translates your audio voicemails into text. Apple seems determined to keep making voicemails better. The lastes iOS also brings a CallKit so that developers can create extensions to detect voicemail spam.

http://core0.staticworld.net/images/article/2016/06/ios-10-voicemail-transcription-100666206-orig.jpg


Phone support for VoIP services

Apple knows that we now use different services for making voice calls, from Facebook Messenger to Slack to Skype to WhatsApp. So in order to create a more seamless user experience, all those third-party VoIP calls will resemble native Phone calls in iOS 10.

Furthermore, these calls will be saved in your Recents and Favorites, as well. And your Contacts will be updated so that you can call your friends via each one’s go-to third-party VoIP service.

http://core0.staticworld.net/images/article/2016/06/ios-10-voip-api-callkit-phone-calls-100666207-orig.jpg


More reasons to use 3D Touch

When 3D Touch was first introduced last year with the iPhone 6s and 6s Plus, it seemed more of a novelty than a real feature. With iOS 10, however, you can use 3D Touch in new, useful ways, from creating widgets by deep-pressing on app icons to interacting with dynamic notifications from the lock screen.

Use 3D Touch in your Notifications to reply to a Message, accept a Calendar invite, or even see where your Uber is on a map. And from the Notifications screen, you can also use 3D Touch to clear all your notifications at once.

http://core0.staticworld.net/images/article/2016/06/ios-10-3d-touch-notifications-100666181-orig.jpg


Bye, bye native apps

With iOS 10, you won’t ever have to see Stocks on your home screen ever again. Apple’s latest release gives you the option to remove native app icons. You’re not fully uninstalling the app, however, just removing the Home screen launcher and any user data.

Apple has pointed out that a native app’s main functionalities (and storage size) remain even if it has been removed from the Home screen, so that the rest of iOS doesn’t crash. You can now “reinstall” these native apps from the App Store if you want to launch them again from your Home screen.

http://core0.staticworld.net/images/article/2016/09/ios-10-native-apps-hide-remove-100681953-orig.jpg


Intelligent suggestions in QuickType

QuickType is also getting a boost in iOS 10. For example, if someone texts you asking where you are, QuickType will suggest to drop a pin of your current location. When someone asks for a friend’s phone number or email, QuickType will surface the correct contact info stored in your Contacts.

And if someone asks if you’re available at a certain time, QuickType will check your Calendar and let you know your availability or tap into “intelligent scheduling” to create a new event based on contextual information from the entire message thread.

http://core0.staticworld.net/images/article/2016/06/ios-10-quicktype-intelligent-suggestions-100666196-orig.jpg


Multilingual keyboard support

In addition to surfacing intelligent responses, QuickType now has multilingual support, which means that it will make its suggestions in whatever language you’re typing, even if you didn’t bother to switch to that language’s official keyboard.

To enable multilingual support, you will first need to add the different language keyboard, however in Settings –> General –> Keyboard.

http://core0.staticworld.net/images/article/2016/06/ios-10-multilingual-support-quicktype-100666199-orig.jpg


Apple Pay on the (mobile) web

No more fetching for your credit card ever again to make that impulse buy. Just make your online purchase using Apple Pay. In iOS 10, Apple Pay becomes a payment option in supported sites in mobile Safari. If you have Apple Pay set up on your device, all you’ll need to do is tap on the “Buy with Apple Pay” button and use Touch ID to authenticate the purchase.


http://core0.staticworld.net/images/article/2016/06/ios-10-apple-pay-on-mobile-web-100666241-orig.jpg

New Home app for controlling HomeKit devices

Apple has released a brand-new app as part of iOS 10, and it’s simply called Home. This new iOS app (also available for watchOS) is designed to control all your HomeKit-enabled accessories in the house.

In addition to tapping devices on or off, you can also create and create “Scenes” that group multiple devices together. And these Scenes can also be activated via Siri voice commands. Just tell Siri goodnight, for example, and Home will close the shades, adjust the thermostat, and lock the front door.


http://core0.staticworld.net/images/article/2016/06/ios-10-home-app-homekit-100666244-orig.jpg

Live Photos editing and stabilization

Apple is also giving iPhone users a way to edit Live Photos in iOS 10. You can trim the clip, add a filter, and select the still frame. Live Photos now also have digital video image stabilization, so they are “buttery smooth.”

http://core0.staticworld.net/images/article/2016/06/ios-10-live-photos-editing-100666233-orig.jpg


Proactive navigation in Maps

Have you ever been on the road and tried to search for something on the way while using turn-by-turn Navigation? Most likely it was the nearest In-N-Out, and chances are that Maps will find the one that you just passed.

In iOS 10, navigating in Maps gets more proactive, so you will be able to better assess the traffic conditions and find important pitstops, from gas stations to coffee shops, on the way to your final destination. Maps will even give you an updated estimate of how each stop will impact the length of your trip.

http://core0.staticworld.net/images/article/2016/06/ios-10-maps-proactive-navigation-100666201-orig.jpg

Third-party extensions in Maps

In iOS 10, Maps becomes your one-stop-shop, thanks to Apple opening it up to third-party app developers to create custom extensions. For example, you can find a restaurant on the map, make a reservation using OpenTable, and request an Uber to take you there, all without leaving the Maps app.

http://core0.staticworld.net/images/article/2016/06/ios-10-maps-third-party-extensions-opentable-100666202-orig.jpg


Safari gets Split View (iPad only)

Apple’s new iOS 10 brings Split View to Safari on iPad. This means that you can view and interact with two Safari windows side-by-side. Previously, you could only use Split View with one Safari window and another app, but it proves very useful to have two browser windows side-by-side.

http://core0.staticworld.net/images/article/2016/06/ios-10-split-view-in-safari-on-ipad-100666239-orig.jpg


Optimize music storage

This one is a big life-changer for Apple Music subscribers who own a 16GB iPhone. If you enable this new optimized storage feature, iOS 10 will detect which downloaded songs you haven’t listented to in a while and that are taking way too much space on your device. It will automatically then remove these downloads whenever you start getting low on storage.

Go to Settings > Music > Optimize Storage to enable this feature. Here you’ll also be able to choose the minimum storage you want allocated to music downloads, from 4GB (or 800 songs) to 32GB (about 6,400 songs).

http://core0.staticworld.net/images/article/2016/09/ios-10-optimize-storage-100681964-orig.jpg


New Bedtime feature in the Clock app

If you have trouble getting up in the morning, Bedtime is a new tab in the Clock app that will encourage you to get a better night’s sleep. You can choose at what time you want to wake up and pick how many hours of sleep you need to get a bedtime reminder. The feature then keeps track of your sleep activity so that you can be consistent and develop a fulfilling sleep schedule.

http://core0.staticworld.net/images/article/2016/09/ios-10-bedtime-clock-app-100681967-orig.jpg


Health app makes it easier to be an organ donor

According to Donate Life America, over 120,000 people in the U.S. are in need of an organ transplant that could save their lives. That’s why Apple has integrated organ donations into the Health app. When you first launch Health, you will be asked whether you are already an organ donor or if you want to sign up to the National Donate Life Registry. You can sign up later by tapping on your Medical ID tab. And know that your donor information is not sent to Apple.

http://core0.staticworld.net/images/article/2016/09/ios-10-health-app-organ-donations-100681968-orig.jpg


Launching the Camera won't stop the music

It may sound silly, but before iOS 10 it was impossible to take photos during a dance party because launching the Camera would automatically pause whatever audio was playing. So now, the music won’t abruptly stop when you want to take a picture or video. Party selfies and recording lip sync battles has never been this easy.

http://core0.staticworld.net/images/article/2016/09/iphone-6s-live-photos-100681977-orig.jpg


Change flashlight intensity in Control Center

No more blinding lights. In iOS 10, you can change the intensity of the flashlight: Pick between low, medium, and high. Simply pull up the Control Center and use 3D Touch to tap on the flashlight icon.

http://core0.staticworld.net/images/article/2016/09/ios-10-control-center-100681978-orig.jpg


Unsubscribe link at the top in Mail

Apple didn’t completely revamp Mail in iOS 10, but it did include a much-needed feature. Now, every time you get an email from a mailing list, you won’t have to scroll all the way down to tap “unsubscribe.” Mail will automatically generate an unsubscribe link at the very top.

http://core0.staticworld.net/images/article/2016/09/ios-10-mail-unsubscribe-100682189-orig.jpg

How to Unlock Your iOS 10 Devices With a Single Click Like in iOS 9

$
0
0

In iOS 10, Apple made a small but fundamental change to the way touch ID users unlock their iPhone, iPad or iPod touch. If you’re tired of seeing “Press home to open” or “Press home to unlock” every time to you grab your phone, here’s how to switch it back to the way it was in iOS 9.


Change the iOS 10 Touch ID Behavior Back to iOS 9’s

To change the functionality back to the iOS 9 style you’re familiar with, simply launch the Settings app.


Navigate in the Settings menu to the “General” entry and select it.


Scroll down a ways until you see the entry for “Accessibility”. Select it.


In the Accessibility menu, again, scroll quite a bit until you see the entry for “Home Button” and select it.


In the Home Button menu you’ll find an entry, turned off by default in iOS 10, labeled “Rest Finger to Unlock”. Toggle it on, as seen below.


You can now press the Home button and, with a single press, both awake and unlock your iOS device.While we can appreciate why Apple made the change (to facilitate access to secure apps from the lock screen), we also appreciate they left a method in to go back to the iOS 9 way of doing things.

How to Stop Certain People From Knowing You’ve Read Their iMessage

$
0
0
00_lead_image_read_receipt_vs_delivered

By default, iMessage sends a read receipt back to the sender, so they can see when you’ve read their message. You can turn this feature off completely, but what if you want to send read receipts to some people but not others?


In iOS 10, you can now turn off read receipts within each conversation separately. Say you don’t want your mother-in-law to know when you’ve read her messages. You can turn off read receipts in the conversation with her, but leave the main setting on for everyone else.

The Send Read Receipts option in each conversation overrides the Send Read Receipts options for Messages in the main iPhone settings. So, to turn off the Send Read Receipts option for certain people, but leave it on for everyone else, first make sure the Send Read Receipts option is on in your iPhone’s settings.

01_send_read_receipts_off_in_messages_settings

Then, to turn off read receipts for a specific person, open the conversation in Messages with that person. Tap on the “i” icon in the upper-right corner of the screen.

02_tapping_i_icon

The Send Read Receipts slider button is green when it’s on. Tap the slider button to turn the option off.

03_send_read_receipts_on


Tap “Done” in the upper-right corner of the screen.

04_send_read_receipts_off

Now you can play ignorant with your mother-in-law (or anyone else) saying you never received her message, if you don’t want to answer right away.

How to Set a Preferred Contact Method for Contacts in iOS 10

$
0
0


If you’re a fan of organizing your contacts list–like, say ditching your duplicates or grouping contacts for a cleaner list–you’ll be happy to know that iOS 10 now lets you change the default action on those blue quick connect buttons on a contact’s page.


Change the Default Action of the Blue Connect Button on a Contact Page

When you’re looking at a contact’s page, you’ll see four blue buttons under the contact’s name for quickly connecting with them by message, phone, video, or email. Here’s how those work and how you can get them to use the contact method you prefer.

Start by opening up your Contacts app and tapping the contact you want to change.

pcm_1

If you have multiple contact methods for your contact–say, several phone numbers–the very first time you press the Call button, iOS delivers you a pop-up asking you to pick which number you want to use. It will then use that as the default every time you tap the button. You can change that default by tapping and holding the button for a few seconds to open up that same pop-up where you can pick a different number.

pcm_2pcm_3

Just note that when you tap the number, you will actually initiate a call. But, your iPhone will now remember that number as the default until you change it again. After you select a number, the button gets a new label to help you remember which contact method you’ll be using. It draws this label from the contact sheet, including any custom labels you’ve created.

pcm_4

You should also note that changing the default contact method this way only affects those blue buttons on the contact sheet, and does not change the default number used if the contact is in your favorites list or the number used by Siri.


Change the Contact Method that Appears in Favorites or Get Used by Siri

When you change the default action of the blue button, it does not change the number used if you have that contact in your Favorites list. To do that, you’ll need to open up the contact sheet and tap “Add to Favorites”.

pcm_5

On the pop-up, choose the contact method you want to use–message, call, or whatever.

pcm_6

Then choose the specific number or address you want to use.

pcm_7

This adds that number or address to your Favorites list for your contact. If the contact is already in your Favorites list, this will add an additional contact method to Favorites rather than replacing the one that’s already there. To get rid of unwanted favorites, go to your Favorites list and tap “Edit” in the top right corner.

pcm_8

Tap the minus sign next to the contact you want to remove from Favorites.

pcm_9

And then tap “Delete” to remove that contact method.

pcm_10

The contact method Siri uses when you ask her to call–or message, email, or FaceTime–someone is tied into your Favorites list. If you only have one contact method in your Favorites list for a specific person and you tell Siri something like “Call Whitson Gordon,” Siri will immediately initiate the call using the contact method in Favorites.


However, if you have multiple contact methods for one person in Favorites, or if you don’t have that person in Favorites at all, Siri will always ask you to specify which contact method you want to use if multiple methods are available.

pcm_11

It may not seem like the biggest deal, but setting up your default contact methods makes things go a fair bit smoother. Also, while we’ve focused on changing the default phone numbers for contacts, you’ll use the same method for changing message, email, and video preferences.

How to Convert Your Voicemails into Text in iOS 10

$
0
0

iOS has had a visual voicemail menu since the beginning, allowing you to browse and listen to voicemails without calling a number. Now, iOS 10 enhances visual voicemail by transcribing them, so you can read your voicemails too.


NOTE: Voicemail transcription is available on iPhone 6s, iPhone 6s Plus, and iPhone SE with Siri language set to English (United States or Canada). Your carrier also needs to support visual voicemail for voicemail transcription to work.

Voicemail transcription will only apply to voicemail messages you receive after updating to iOS 10. Previous voicemails will say “Transcription not available”.

When someone leaves you a message, open the Voicemail app and tap on the new voicemail.

01_tapping_on_new_voicemail

The audio message starts playing automatically, and, if the person just left you the message, a “Transcribing” message displays while the message is being transcribed.

02_transcribing_and_playing

Once the message is transcribed, it displays in that voicemail item. Note that voicemail transcription is not always perfect. It may misunderstand some words and leave some words out. But you’ll usually have an idea of what the caller wanted to get across.

Voicemail transcription is still considered a beta feature, so you can give feedback about the usefulness of the transcription. To do so, tap either “useful” or “not useful” on the question, “Was this transcription useful or not useful?”.

03_transcription


Just as you can share or save the audio from a voicemail, you can also share or save the voicemail transcription. Select the transcription text (or any part of it) and then tap “Share” on the popup that displays.

04_selecting_text_and_tapping_text

Voicemail transcription is also useful for telling at a glance the difference between urgent calls and calls from solicitors or telemarketers or spam calls.

WinX MediaTrans Lets You Manage, Import & Export iOS Files Easily

$
0
0

When it comes to a great iPhone file transfer tool, WinX MediaTrans is worth a mention. It is designed with many useful features, allowing us to transfer files from iPhone to PC and vice versa. It helps a lot when we need to free up iPhone space, back up iPhone files, transfer files from PC to iPhone and transfer files from old iPhone to a new one, etc. Not limited to iPhone 7, previous iPhone generations like iPhone 6s, 6, 5s and 4s are supported as well. You don’t have to rely on iTunes to sync and manage iOS files any more.


Better yet, it is now under giveaway and promotion. We can choose to download a Giveaway Version with full features, or buy the Full Version with Lifetime Free Upgrade, free tech support and 30-day money back guarantee at a pretty cheap price.

Download a Free Copy of WinX MediaTrans (Giveaway)
Buy WinX MediaTrans Full License with Lifetime Free Upgrade (Huge Discount)


What Can WinX MediaTrans Do for You?

WinX MediaTrans is fully compatible with Windows 10, 8.1, 8, 7 and Vista. Currently, it is able to transfer and manage photos, music, videos, eBooks, ringtones, Voice Memos, iTunes U and podcast for any iPhone generations, as well as iPad iPod devices. It is an easy-to-use, feature-rich tool with fast loading and transferring speed. Let me show you more details.


Get photos off iPhone

Hey, your iPhone storage is full? I bet getting photos off iPhone will make much room for new files. If you’re thirsty for an easy and fast method, WinX MediaTrans is second to none. It comes with concise interface, thus any one can handle it effortlessly. Meanwhile, 8 seconds is enough to export 100 4K photos from iPhone to PC, external hard drive, flash drive and the like. You can get off photos from Camera Roll, and also those from third-party apps like Facebook, Pinterest and Instagram. Select target items and begin transferring immediately!


Transfer and manage music

If you love music, you probably love this function. Given that you’ve many songs stored in PC, now you can transfer them to iPhone for playback on the go. Also want to back up some iPhone music to PC? Just make use of WinX MediaTrans. As you can see, music transfer is a two-way function. Furthermore, it is also a music manager, featuring the ability to create or delete playlists, move a song from one playlist to another, delete unwanted music in batch, edit music metadata including title, artist, and more.


Transfer videos with two bonus features: auto-convert and auto-rotate

iPhone makes it easy to record unforgettable moments as HD and even 4K UHD videos. However, videos always take up too much space. Then, you usually choose to transfer them to PC. But how? Actually, it is a terribly simple task with WinX MediaTrans.

In turn, you can transfer videos from PC to iPhone, such as movies or videos downloaded from YouTube or ripped from DVDs. Don’t worry about video compatibility issue, because the built-in auto-convert option will be triggered when you attempt to transfer a video in an iPhone incompatible video format, for example MKV and AVCHD. It will convert the video to MP4 automatically. Another bonus feature is auto-rotate, designed to rotate the video in vertical to horizontal for full-screen playback on iPhone.


Mount iPhone as a flash drive

When your flash drive isn’t within reach, have you ever thought of taking iPhone as an alternative? Yes, with WinX MediaTrans, you can mount iPhone as a movable drive to store all kinds of files, including images, documents, apps and so on. Now, take full advantage of your iPhone storage!


Newly added: transfer and manage eBooks, ringtone, Voice Memos, iTunes U and podcast

Everything needs to be updated constantly, so does WinX MediaTrans. Recently, it has been reengineered with new features: export/import eBooks, iTunes U and podcast, make ringtone for iPhone 7, 6s or other generation, export voice memo from iPhone.


To sum up, WinX MediaTrans is worth a try when you want to transfer files between iPhone and PC. Again, it is now 100% off at iPhone iOS manager giveaway page and sold at huge discount with Lifetime Free Upgrade at this discount offer page.

Cortana Still Running in the Background Even After You Disabled It?

$
0
0

Disable Cortana, and Windows 10 will switch to using local search for everything. But, if you open the Task Manager, you’ll still see “Cortana” running in the background anyway–why is that?


Cortana Is Really Just “SearchUI.exe”

Whether you have Cortana enabled or not, open the Task Manager and you’ll see a “Cortana” process.
If you right-click Cortana in the Task Manager and select “Go to Details”, you’ll see what’s actually running: A program named “SearchUI.exe”.


If you right-clicked “SearchUI.exe” and selected “Open File Location,” you’d see where SearchUI.exe is located. It’s part of the “Microsoft.Windows.Cortana_cw5n1h2txyewy” application folder in Windows.

This application appears as “Cortana” in the list of running processes so it’s more easily understandable. But it’s actually a smaller tool named SearchUI.exe.


“SearchUI.exe” Is the Windows Search Feature

We decided to disable access to SearchUI.exe so we could check what it actually does. We ended the Cortana task from the Task Manager and then renamed the “Microsoft.Windows.Cortana_cw5n1h2txyewy” folder to something else. After we did, Cortana doesn’t appear to be running in the background–but the Windows Search feature is completely broken.

That’s right: Windows 10’s search feature completely breaks. Clicking the “Search Windows” box on the taskbar or pressing Windows+S on your keyboard does nothing. The search dialog just won’t appear. Rename the Cortana folder back to its original name and the search dialog suddenly appears normally again.


SearchUI.exe isn’t really Cortana at all, though they are intertwined. “Cortana” is both the name for Microsoft’s online assistant, and the name for all the local search tools built into Windows 10. When you disable Cortana from the registry or group policy, all the online features are disabled–but the local file search tools are left running. Those are technically part of the “Cortana” application, as that’s just how Microsoft has implemented things in Windows.


SearchUI.exe Barely Uses Any Resources, So Don’t Sweat It

“Cortana” (or SearchUI.exe) shouldn’t be using much in the way of resources if you examine it in the Task Manager. It’s not actually doing anything unless you open it.

With Cortana disabled with the registry hack, we noticed the Cortana (SearchUI.exe) process using 37.4MB of memory and 0% of our CPU.


You might wonder why Cortana is using any resources at all. That’s because it’s loaded in memory so it can instantly appear when you click the “Search Windows” box on the taskbar or press Windows+S.

When you open the search box on Windows 10, Cortana will use some CPU–but only as long as the search dialog is open.


Cortana shouldn’t appear to be using any more resources than this. It will always use a small amount of RAM in the background, and will use some CPU only when you open it.

The “Cortana” process doesn’t even handle file indexing. Windows indexes your files, examining them and the words inside them so you can quickly search them from the search tool. When Windows is indexing your files, you’ll see the processes like “Microsoft Windows Search Filter Host”, “Microsoft Windows Search Indexer”, and “Microsoft Windows Search Protocol Host” using CPU in the Task Manager.


To control indexing, open your Start menu or Control Panel and search for “Indexing Options”. Launch the Indexing Options shortcut that appears. This panel lets you choose the locations Windows indexes files in, choose the exact types of files, and exclude files you don’t want to index.


In summary, “Cortana” isn’t really running once you’ve disabled it. The basic Windows search interface, known as SearchUI.exe, remains running under the larger “Cortana” banner, even though the personal assistant really is turned off. SearchUI.exe uses a very small amount of RAM and only uses CPU when you have the search panel open, so it’s not something you should worry about.

How to Fix Android 7.0 Nougat Battery Life Problems

$
0
0
 

With every new release of Android, Google promises better battery life. Android 7.0 Nougat is no exception here with the OS now coming with a dozier Doze mode that promises to help in extending the battery life of all Android devices running it.


However, like it has always been the case with every major version of Android, Nougat has some teething issues. A majority of Nexus 6P and Nexus 5X owners have been reporting poor battery life on their handsets post the Nougat update contrary to Google’s promise of better battery life. The same is the case with plenty of other devices that have received unofficial Nougat ports.

It is likely that Google will fix the teething battery issues in Nougat with the Android 7.1 release that will reportedly arrive with the Pixel and Pixel XL smartphones next month. Until then though, we offer you some tips to help in improving the battery life of your Android device running Nougat.


Wipe cache

I have never really believed that wiping the cache of an Android device will lead to a substantial improvement in performance or battery life, but this has apparently worked for quite a few people so there is no harm in trying. To clear the cache of your Android device running Nougat, switch it off and boot it into recovery mode. From there, select the ‘Wipe cache’ option and reboot your device.


Do a factory reset

If you updated to the final version of Nougat from the Android N preview program, I will recommend you to factory reset your device to solve the battery life issues. A majority of Nexus 6P and Nexus 5X complaining about battery life seems to have upgraded directly from the Android N preview program. While doing a factory reset means you will lose all your installed apps, games, and their associated data, you are likely going to see a noticeable improvement in battery life post the reset.


Fresh start

Another painful step, but one that can help you diagnose the problem behind the poor battery life in Nougat easily. Instead of restoring all your applications at one go after doing a factory reset, install the apps that you use regularly one by one a few hours apart. This way you will be easily able to diagnose if any particular application is the reason behind the poor battery life that you are getting on Nougat.


Turn off Bluetooth

Many users have reported significant issues with Bluetooth on Android 7.0 Nougat, while others have reported that it is only when they connect a Bluetooth device to their Android device running Nougat that the battery drain increases exponentially. So, if you use Bluetooth on your Android device, try turning it off for a few days to see if you notice any improvement in battery life or not.


Roll back to Marshmallow

If the above tips do not help in improving the battery life of your Android device running Nougat, your only option is to roll back to Marshmallow or just deal with the poor battery life. Until and unless you really cannot live without a particular feature in Nougat, I will recommend you to switch back to Marshmallow. It is likely that we will see Google roll out Android 7.1 next month, along with new Pixel smartphones, that will hopefully fix all the battery issues with the latest version of Android.

How to Resolve Screen Overlay Detected Error on Android

$
0
0
IMG_9559
Starting with Android Marshmallow, there’s a curious error that sometimes shows its face, but can be hard to decipher what’s causing it. The “screen overlay detected” error won’t allow certain apps to launch, which makes it a real nuisance.


Fortunately, it’s a pretty easy fix once you know what’s causing it: a new feature found in Marshmallow and Nougat that allows apps to “draw” over other apps. For example, Facebook Messenger uses chat heads to stay in the foreground of whatever you’re doing—this is the app using the “Draw over other apps” feature. In other words, it’s a screen overlay. It’s already starting to click, isn’t it?

Unfortunately, some apps do odd things when an overlay is actively running, especially if the app in question needs to request a new permission. Android absolutely will not allow permissions to be changed when an overlay is running, thus resulting in the “Screen Overlay Detected” error.

So, if you install a new app and launch it for the first time while also having a conversation over a Facebook Chat Head, then you’ll get an error as the new app tries to request its permissions. In the example below, I’m using Twilight—a “night mode” app—which uses a screen overlay to do its thing.

Screenshot_20160913-130521

Now, sometimes when this error is generated, it will include an “Open Settings” link that will send you directly into the “Draw over other apps” menu. The rough part is that each app has to be toggled manually–just tap on an app, slide the “Permit Drawing Over Other Apps” toggle, and go back. You could disable every single one, but that’d be super time consuming, especially if you have dozens of apps installed that can apply overlays.

Screenshot_20160913-130233Screenshot_20160913-130240

Ideally, you’ll know which app caused the conflict, and you can disable just that one. So think to yourself:
  • What apps have you been using recently? As mentioned above, Facebook Messenger draws on the screen for chat heads, so if a chat head is actively running, it’s most likely your culprit.
  • What passive apps do you use that run in the background? Similarly, apps like CF.lumen and Twilight draw on the screen when enabled, so you’ll need to pause or disable those services to get rid of the screen overlay error.
That list shows all the apps that have permission to draw on the screen–but if you can figure out which one is actually drawing on the screen when you get that error, you can just disable that one and move on.

Of course, that’s not foolproof–in some instances there may be more than one app drawing on the screen, which can be incredibly frustrating. In that situation, I’d just go ahead and disallow all of them, then re-enabled them on an as-needed basis. It’s a pickle, for sure.


How to Access the “Draw Over Other Apps” Menu

So, how do you get to the “Draw over other apps” menu without first experiencing the error, which generates a quick link? Or if there is no link? That part’s pretty easy. The biggest issue is that the setting for screen overlays is found in different spots on different manufacturers’ handsets. Here’s the breakdown.


On Stock Android

On Stock Android, pull the notification shade twice and tap the cog icon.

Screenshot_20160913-130203

From there, head down to “Apps,” then tap the cog icon in the top right. Cogs everywhere! Alternatively, you can call it a gear. I really don’t care.

Screenshot_20160913-130211Screenshot_20160913-130219

In this menu, you’ll find the “Draw over other apps” menu. That’s what you’ve been looking for! Feel free to toggle things to your heart’s desire now. Just open each item to enable/disable it. Fun.

Screenshot_20160913-130225Screenshot_20160913-130233 

On Samsung Devices

First, pull down the notification shade and tap the cog icons, then scroll down to “Applications.”

Screenshot_20160913-154007Screenshot_20160913-154059


From here, tap on the “Application manager” link, then the “More” button in the top-right.

Screenshot_20160913-154107Screenshot_20160913-154113

Then, select “Apps that can appear on top.” Boom, you’re there. Samsung also make it easier by adding the toggle beside the app name, and not in a separate menu. Thanks, Samsung!

Screenshot_20160913-154119Screenshot_20160913-154132


On LG Devices

Again, pull the notification shade down at tap the cog icon, then jump into the “Apps” menu. At least that step is the same across the board, right?

Screenshot_2016-09-13-15-40-22Screenshot_2016-09-13-15-41-56


Then, tap the three-button overflow menu and select “Configure apps.”

Screenshot_2016-09-13-15-42-09Screenshot_2016-09-13-15-42-16


From here, it should be just like stock Android—just jump into “Draw over other apps.”

Screenshot_2016-09-13-15-42-29Screenshot_2016-09-13-15-42-22

If you’re not sure what’s causing the “Screen Overlay Detected” error, it can make you want to throw your phone. In fact, I’ve had more friends experience this error (and subsequently ask me about it) than any other error! So here’s the solution–you’re welcome, friends.

How to Use New Split View of Safari on the iPad in iOS 10

$
0
0

Safari’s Split View is a new feature in iOS 10 that allows you to view two Safari windows side-by-side on your iPad. It’s similar to the Split View feature that was added to iOS 9, but specifically for Safari.


NOTE: This feature only works on iPad, not iPhone, and it only works in landscape mode.

One major difference between iOS 9’s Split View and Safari’s Split View in iOS 10 is that you can’t adjust the size of the two Safari windows. Each window takes up exactly half the screen and that can’t be changed. However, Split View in Safari is still a useful feature and we’ll show you how to invoke and use it.

There are two ways you can invoke Split View in Safari. First, tap and hold on a link on a webpage and then select “Open in Split View” from the popup menu.


The second method works if you have multiple tabs open. You can drag a tab to the right until it separates from the main window. Then, lift your finger from the screen.


Using either method will result in two Safari windows, each with its own address bar, tab interface, and toolbar (at the bottom rather than the top). Each window operates separately, like two apps, but it’s still one app. For example, you can tap the tabs button on the toolbar at the bottom of one of the windows to manage the tabs in that window.


The tab view interface displays in that Safari window, and you can tap the plus icon to add a new tab, tap “Private” to convert that window to private browsing mode, close any tab, or close all tabs at once.


Once you’re in Split View mode, you can open links on one Safari window in the other window. To do this, tap and hold on a link and select “Open on Other Side” from the popup menu.


In our example, the link in the left window is opened on a new tab in the right window.


In Split View, you can move tabs between the windows by dragging a tab from one window to the other. When you move a tab from one window to the other, the tab’s history is retained, allowing you to use the forward and back buttons to navigate through the history of that tab.
NOTE: You can only drag tabs between the two Safari windows when they share the same status, meaning you can only drag tabs between two private windows or two regular windows. If you have one private window and one regular window, you cannot drag tabs between them. However, you can use the “Open on Other Side” option to open a link on a private window in the other regular window, or vice versa. The new tab opens in whichever mode the receiving window is in.


When you’re in Split View, you can go back to one Safari window in a couple of ways. You can drag tabs one at a time from one window to the other. When you drag the last open tab in one window to the other, Safari returns to single window mode automatically.


A quicker way to go back to a single Safari window is to tap and hold on the tabs button in either Safari window. Select “Merge All Tabs” from the popup menu.


All your tabs from both windows are merged into a single Safari window, and the toolbar moves back to the top.


When you go back to the Home screen from Safari, or even force close Safari, the app will remember where you left off and reopen in Split View along with all the tabs you had open in the status (private/regular) you had set.

How to Manage Apps Update Priority in iOS 10

$
0
0
 

Have you ever downloaded or updated a lot of apps at once, then suddenly realized you need to use one of those apps? iOS 10 has a new little feature you’ll like: you can now prioritize a downloading app so that it jumps to the front of the line.


If you have apps set to automatically update on your iOS device, you probably won’t have a bunch of apps updating at once very often. Still, it does happen from time to time. Maybe you’ve just updated iOS to a big new version and a lot of app updates are out at once, for example.

This feature requires an iPhone or iPad with 3D touch. If you’ve got multiple apps updating at once and realize you need to use one of them, hard press the updating app to show its context menu.

pai_1

On the context menu, tap the “Prioritize Download” option.

pai_2


The app will jump to the front of the queue for downloading and installing, moving to a position right behind any apps that have already begun the process.

pai_3

It’s a super simple feature, but one you might not stumble across if you don’t already know about it.

How to Install and Use iMessage Apps in iOS 10

$
0
0


Not only was iMessage the most heavily updated app in the iOS 10 release, but it got more than just a facelift. Now, tucked away in iMessage, is a whole app ecosystem just waiting for you to tap into it.


Apps? In iMessage?

Once upon a time, iMessage was a simple little affair. It fixed some of the shortcomings of SMS by extending message length, making it simple to send multimedia attachments, and routing the whole affair securely through Apple’s servers. With the release of iOS 10, however, the days of iMessage being a slightly better version of text messaging are long gone. Now the app is so packed with features it has morphed into something more akin to its own little social platform, like Snapchat.

Among the smaller improvements–like simple tapback message replies and an intuitive live camera preview right in iMessage–there’s a huge change: apps. iMessage now has its own mini ecosystem of apps, some intended just for iMessage and some extensions and integrations of bigger apps into the messaging platform.
These apps allow you to do a wide variety of things right within iMessage. They range from trivial (like slap stickers of your favorite video game characters on your messages) to downright practical (sending money to a friend right within the chat app).

If not for all the hoopla surrounding the change, however, it would be pretty easy to overlook it. Let’s take a look at where the apps are tucked away in iMessage and how to manage and use them.


How to Locate, Install, and Remove iMessage Apps

To get started with iMessage apps we’ll, naturally, open up iMessage. Open up (or create) a message to one of your contacts, preferably a friend who will understand if you send random App related stuff in the process of following our tutorial (sadly, you can’t putter around in the following menus on a blank “New Message” addresses to no one).

With the message open, look at the bottom of the screen for the three icons, seen below. Click on the third icon with the App Store logo. (Note: If you don’t see them and the text box is full width with the on-screen keyboard open, you need to tab the little gray arrow to expand the icon tray).


In the resulting screen, you’ll see the recently used/suggested app tools (you can see the Mario sticker we recently used hanging out in the corner). Down at the bottom you’ll find three icons. From right to left: the up arrow will expand the selection to show you more options, the middle icon indicates what app display panel you’re on (most recent, followed by dots indicating how many pages of apps you have, much like the iOS Home Screen itself), and finally, the icon we’re most interested in at the moment: the iMessage app store icon. Click on the icon that looks like four small ovals grouped together to continue.


It’s pretty empty in here. By default, iOS 10 only enabled Recents, the #images search (for all your iMessage GIF needs), and the Music iMessage app. No worries though, we’re about to liven things up in here. Tap on the “+” Store icon.


There you’ll find three navigation tabs. The featured tab, seen below, showcases the featured apps just like in the main App Store. The categories tab allows for browsing like “Games” and “Dining”. Finally the “Manage” tab allows you to manage which apps appear in iMessage. Let’s click on “Manage” now to get a head start on checking out iMessage apps.


There are a few things here you’ll want to pay attention to. First, rather than send you off searching for new apps, we brought you here to see if any of the existing apps on your iOS device already support iMessage. After all, what better place to start than with iMessage extensions of the apps you already know and love?

As you can see in the screenshot below, there are multiple apps available on my phone, including CARROT Weather and Yelp. Here you have two choices. You can manually toggle apps on and off, or you can toggle “Automatically Add Apps” on, which will ensure that in the future, when you download an app that has a companion iMessage app, it will add it automatically to iMessage.


While you can selectively toggle them, we’d recommend toggling “Automatically Add Apps” on, at least for now. As the iMessage App store is still in its infancy it makes sense to have your apps, as they update and potentially gain iMessage integration, automatically add themselves. Is this becomes a nuisance you can always return to this menu and toggle it off.

Don’t see a lot here in your existing apps queue? Don’t fret, you can pop right back into the Featured tab and browse about looking for something of interest. How about Confide, the privacy plugin for iMessage that offers hidden and disappearing messages? Search for it by name or head over to the Productivity category in the “Categories” tab and downloading it is as simple as downloading a regular app in the App Store: just click on the “Get” icon to download it.


Poke around for a bit, find a few additional apps, and then we’ll take a look at how to use them.
There’s one thing worth noting before we continue. While some iMessage apps, like the sticker packs, are completely standalone, iMessage apps that are essentially an extension of a bigger iOS application (like the Confide privacy iMessage app we just downloaded) will trigger the download of the full application. This means a tiny download for a sticker pack, but a potentially bigger download for apps like Confide, Kayak, Yelp, and others that require a full iOS app behind the iMessage app to function properly.


How to Use iMessage Apps

Using iMessage apps is pretty straightforward once you have your favorites picked out. In order to use your iMessage apps, tap the App icon from within an iMessage message. Then simply swipe back and forth between your apps until you locate one you want to use.


In this case, we’d like to share the weather forecast from the CARROT Weather iMessage app, so we click on the big “Share” icon. Every app varies slightly, but they’re all pretty intuitive: click and drag stickers, click to start a game of Words with Friends with your chat partner, etc.


In the case of CARROT, the elegant prose is entirely optional and you may delete it before sending–but who would want to?


How to Remove iMessage Apps

Removing iMessage apps is a simple affair. Open up a message again, tap on the iMessage app icon, and then again on the four ovals just as we did in the previous section. Now, instead of exploring the App Store, we’re going to press and hold on an app icon.


The app icons will begin to jiggle about, just like when you are deleting an regular app from your iOS device. Click on the X to remove them.

There’s an important note to make here: only the iMessage component is removed. In the case of a sticker pack, the sticker pack is simply removed from your device as it is an iMessage only application. In the case of iMessage apps that require iOS support (like aforementioned Confide), deleting the iMessage app does not uninstall the iOS app. It merely removes the app from iMessage and declutters your iMessage app panel. You will need to delete the host app the same way you would delete any other iOS app to complete the removal process.

Finally, if you remove the iMessage app and you want it back, you can go and locate it again in the App Store (in the case of standalone apps) or you can go back to the “Manage” tab we visited early in the tutorial–any helper iMessage app you’ve removed (but kept the host app on your iOS device) will still be there waiting for you to toggle it back on.

That’s all there is too it! If you’re happy with the current crop of iMessage Apps, then you’re off to the races. If you’re not so happy, we’d really encourage you to check back in on the state of affairs in a few months. When iOS 10 beta came out, the iMessage App store felt like a joke–there was nothing in it but a handful of dull, silly sticker packs. When iOS 10 was rolled out to the public, there were already hundreds of apps ready to go. In a matter of months, expect the little micro platform Apple is clearly carefully nurturing to explode in size and scope with an app or two for nearly everyone.

How to Fix iPhone’s Screen Keep Turning On After Update to iOS 10?

$
0
0


Ever since the iOS 10 update, you’ll notice something new about your iPhone: The screen seems to turn itself on randomly. It isn’t random, though–in fact, it’s a new feature designed to turn the screen on when you’re handling it, or when notifications come through.


The New “Raise to Wake” Feature

This feature is called “raise to wake“. It uses your iPhone’s accelerometer to detect when you raise your phone, and automatically turns its screen on when you do. This allows you to grab your phone out of your pocket or pick it up off a table and see all your notifications without pushing a single button. Press the Touch ID Home button and you can unlock your phone with your fingerprint and immediately bypass the lock screen.

Raise to Wake arrived with the iOS 10 update, so your old iPhone 6s, 6s Plus, or SE will immediately begin doing this after you update. The new iPhone 7 and 7 Plus also use Raise to Wake.

If you’d prefer not to have this feature, you can turn it off. Head to Settings > Display & Brightness and turn off the “Raise to Wake” slider. Your iPhone will begin working like it previously did, only turning on when you press its button.


Lock Screen Notifications

Your iPhone’s screen will also turn on when you receive a notification that is displayed on its lock screen. If you get a lot of notifications, the constant turning on of your screen could noticeably diminish your battery life. It can also be distracting, particularly if you’re on a dark room and you don’t want your phone’s screen constantly lighting up.

To prevent notifications from turning on your screen, you can do several things:

  • Take your iPhone and place it face down on a surface. While face down, your iPhone’s screen won’t turn on when it receives notifications.
  • Put your iPhone into “Do Not Disturb” mode by swiping up from the bottom of the screen to open the control center and tapping the moon icon. While in Do Not Disturb mode, your iPhone’s screen won’t light up when it receives a notification. Do Not Disturb mode can also automatically turn on during certain periods of time, which is intended to prevent your iPhone’s screen from turning on and bothering you while you’re sleeping. Configure Do Not Disturb mode from Settings > Do Not DIsturb.


  • Prevent an app’s notifications from appearing on your lock screen. Your screen will only turn on for a notification if that notification is set to appear on your lock screen. Head to Settings > Notifications, tap an app’s name, and disable the “Show on Lock Screen” option. You won’t see that app’s notifications on your lock screen, and the screen won’t turn on when you receive a notification from that app.


You can use any combination of those options to stop your screen from turning on so often.

How to Unsubscribe From Mailing Lists With One Tap in iOS 10?

$
0
0
00_lead_image_unsubscribing_in_mail
Over time, you’ve subscribed to all kinds of mailing lists and now your inbox is overrun with emails you don’t want anymore. The Mail app in iOS 10 has added a really easy way to unsubscribe from mailing lists.


We all do it. We sign up for newsletters to get something free, or a chance to win something. These newsletters start to clog up your inbox, making it harder to find the important emails. These emails are not technically “spam”, because they are from legitimate companies and organizations, and you may have even signed up to receive them. 

Thanks to the US CAN-SPAM act, every legitimate company or organization offers a consistent way to unsubscribe from their newsletters, which generally comes in the form of an “Unsubscribe” link at the bottom of each email you receive. However, once you click that link, you might have to click through several layers of links just to finish the process of unsubscribing. We’ll show you a much easier way to unsubscribe from newsletters in the new iOS 10 Mail app.

Open the Mail app and tap on an email newsletter you don’t want anymore to open it.

01_email_for_unsubscribe

As long as Mail can identify the email as a newsletter, there will be an “Unsubscribe” link at the top of the email. Tap this link.

02_tapping_unsubscribe

A confirmation dialog displays saying that Mail will send a message from you to unsubscribe from the mailing list. Tap “Unsubscribe” if you’re sure you want to unsubscribe from this list.

03_tapping_unsubscribe_on_dialog


Once you’re unsubscribed, the message and the link at the top of the email goes away.

04_unsubscribe_link_gone

Now, you can quickly and easily unsubscribe from mailing lists and clean up your inbox.
Viewing all 880 articles
Browse latest View live


<script src="https://jsc.adskeeper.com/r/s/rssing.com.1596347.js" async> </script>