Quantcast
Channel: Tech Support
Viewing all 880 articles
Browse latest View live

How to Get the Most Out of Your Samsung Galaxy S7

$
0
0

If you are reading this, then you either have the Samsung Galaxy S7 or are thinking of getting one, but you’re not sure what this great smartphone can do. Keep reading and you will discover what Samsung’s latest creation can really do for you.


Have you ever grabbed your S7 just to see what time it is? Or maybe you have, but every time you do that you are killing your battery. With the following tip, you will always have access to basic information such as the time on your Galaxy S7.


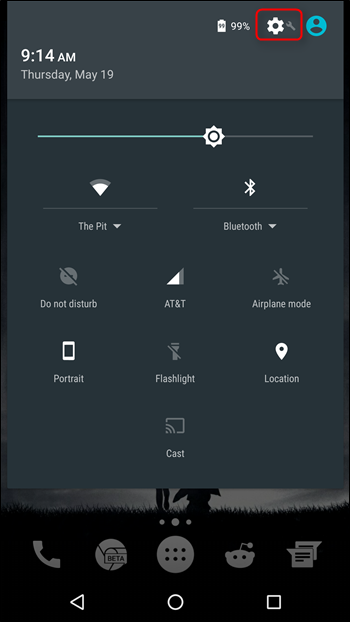
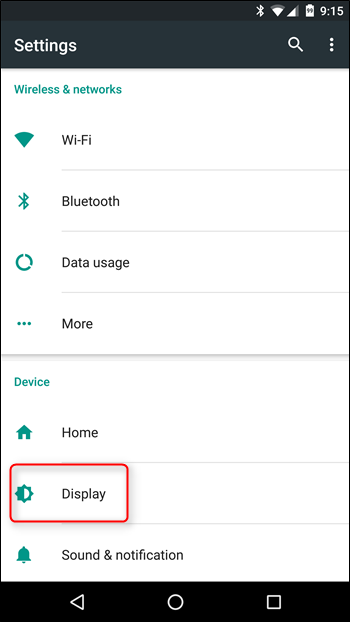
Go to “Android Settings -> Display -> Always On Display” and from there you can choose to have either the Clock, Calendar or an image. If you decide to have the clock always on, you will see that you have quite a few options, but if you are choosing an image, then I’m afraid that your options are limited there.


The ones you can choose from will be based on a black background, to avoid battery drain.
It’s something we see with every smartphone, Samsung phones included. That annoying bloatware seems to be everywhere, but with the Galaxy S7 you can eliminate some of it, but not all.


  • Open the App Drawer.
  • Select the Edit button.
  • Choose the minus symbol that apps have on the upper right-hand corner.
  • Confirm your selection when the pop-up appears.
It can be a little time-consuming looking for a particular option if you are not sure where it is exactly. With this tip you can put the settings you use the most right at the top for easy access.


Go to Settings -> Edit (in the upper right-hand corner) and choose up to nine settings by checking or unchecking the ones you want or don’t want.
1. Go to Settings
2. Select Lock Screen and Security
3. Choose Fingerprints
4. Tap on Add Fingerprint
5. Follow the instructions that you will see on your display
Removing the Flipboard briefing panel will help you save some battery life, and if you don’t use it it’s going to be a relief not seeing it anymore.


  • With two fingers, pinch the home screen
  • Swipe until you see the Briefing page
  • Touch the toggle button to deactivate it
If you have enabled it, you should see a grey half or semi-circle on your screen. To start using it, tap on the semi-circle to bring it to the top, and drag the icon from the menu to the Windows to open it.
We love big screens, but they can be a little difficult to handle with just one hand. To make managing your Galaxy S7 Edge easier give the following tip a chance.


  • Go to Advanced Features in main settings
  • Toggle on the One-handed operation
  • Triple press the home button to activate the feature in the future
Now you can control the entire display since the screen will shrink to the right, but you can slide it over to the left thanks to the arrow. In this menu you can also move the keyboard to the side to keep everything within reach.
How to create folders: Drag and drop an app on top of another, and the folder will be created automatically. To withdraw an app from a folder, long-press the app and just drag it out.

Apps in alphabetical order: Go to the Apps tray and tap on A-Z at the top. If you download new apps later on, you will need to repeat this since the new apps will be added to the end of the alphabetized apps.

Disable notifications for an app: Settings>Applications>Applications Manager>Select app of interest.

In notifications, you can disable all of the notifications for an app.
  • Go to Settings
  • Advanced Features
  • Activate Quick launch camera
  • Double tap on the physical home button


  • Settings
  • Display
  • Night Clock
The Samsung Galaxy S7 Edge is a fantastic phone that has impressed many since it is full of great features that make our lives easier. Are you enjoying your Galaxy S7 Edge or are you thinking of getting one? Let us know in the comments.


How to prevent Windows 10 from delivering web search results when using Cortana

$
0
0
 

Here's how you stop web results from showing up on every search you do on Windows 10 while improving local results for files, apps, and settings.


When you are on the look for a document you have been working on, trying to launch an app, or looking for a particular PC setting, you can quickly click the new search box in the taskbar to start a search. However, as soon as you start typing, Cortana pops up, and you'll start getting different grouped results, including (sometimes unnecessary) web data

While certain web results can be helpful, they are not always necessary, because we tend to use search in Windows to find local documents, settings, and apps, and we leave the online searches as a task for the web browser. Also, these web results powered by Bing seem to get more priority, pushing your local stuff to the bottom of the list, which makes the experience a little inconsistent.

In this Windows 10 guide, we'll show you the easy steps to prevent the operating system from serving web results when you do a search on your computer.


How to disable web results on Windows 10

  • Click to open the search box in the taskbar.
  • Click the Notebook icon.
  • Click Settings from the list of options.
    Note: On Windows 10 build 14316 and later versions the Settings button to access Cortana setting may appear outside of Notebook in the navigation pane on the left.
  • On the Settings page, turn off the Cortana can give me suggestions, ideas, reminders, alerts and more option.
  • After disabling Cortana, turn off the Search online and include web results option.


You will now notice that the search box in the taskbar no longer says "Ask me anything," instead, it reads "Search Windows," indicating that you have completed the task. Try to do a search one more time, and this time, you'll see that search results will no longer appear.

In the case you need a more advanced search experience, type your search query, and click the Search my stuff button. In the advanced search section, you can sort results by relevance or time, and you can limit the result to a particular category (e.g., Documents, Settings, apps, etc.).


If your concern is Cortana displaying Bing results, then you can use our previous guide with the instructions to force the assistant to use Google to get online results.

Keep in mind that stopping web results from showing up in the taskbar search box will also turn off Cortana in your system, which means that you'll have to make the decision of which experience is more important to you.

How to Upgrade to Windows 10 Enterprise Without Reinstalling Windows

$
0
0

Windows 10 Enterprise offers quite a few exclusive features that aren’t available in the Professional edition of Windows. You can get these features without reinstalling Windows, and without even having an Enterprise disc. In fact, you don’t even need your own Windows 10 Enterprise key to perform this upgrade.


How This Works

Why not just buy a product key for Windows 10 Enterprise? Well, Microsoft doesn’t even sell those to us mere mortals! While Microsoft offers paid upgrades to Windows 10 Professional, the Enterprise and Education editions of Windows 10 are only available through volume licensing channels. Microsoft previously offered Windows 7 Ultimate, which contained all the same features as the Enterprise versions of Windows, but there’s nothing like that for Windows 10.

According to Microsoft’s documentation, it’s possible to use the DISM /online /Set-Edition: command to change to a new edition of Windows. However, this didn’t work for us with Windows 10 and we encountered error messages. But we realized there’s a better solution.

Most people don’t know this, but you can convert your existing Windows 10 Home or Professional system to Windows 10 Enterprise in just a few minutes–no disc necessary. You won’t lose any of your installed programs or files. To do this, you’ll need a product key, but there’s a bit of a loophole here: You don’t actually need a legitimate product key to use Windows 10, Enterprise or otherwise. To upgrade, you just need a key.

This process uses a KMS key from Microsoft’s website. These publicly-available keys are normally used in organizations with Key Management Servers. Use them without a Key Management Server and Windows 10 will upgrade to Enterprise–it just won’t be truly “activated”.

And there’s the one downside to doing this: If you have a legitimate, activated Windows 10 system, the resulting Windows 10 installation won’t be activated and will show you a watermark telling you so. But that’s just about the only limitation you’ll encounter–the OS will otherwise work just fine, for as long as you like. If you have a Windows 10 virtual machine or secondary computer you want to test these Enterprise features on, this is an excellent solution.

This works even better if you do have a legitimate Windows 10 Enterprise product key through a business. Enter a legitimate product key and Windows 10 will upgrade to the Enterprise edition and become properly activated. This is a convenient solution for businesses, which can purchase computers that come with Home or Professional editions of Windows 10 and upgrade them without a reinstall.


How to Upgrade to Windows 10 Enterprise

Rather than messing with DISM, you can do this entirely from Windows 10’s Settings app. To do so, open the Settings app from your Start menu, select “Update & Security,” and select “Activation.” Click the “Change Product Key” button here.


You’ll be asked to enter a new product key. If you have a legitimate Windows 10 Enterprise product key, you can enter it now. But if you don’t, grab the KMS client setup key for Windows 10 Enterprise  and Windows 10 will automatically convert itself to a Windows 10 Enterprise system. Remember, as this isn’t an valid key for activation, the resulting Windows 10 system won’t activate with Microsoft’s activation servers online. You may not want to do this on your primary Windows system.

Here’s the key you’ll need to enter for Windows 10 Enterprise:
 
NPPR9-FWDCX-D2C8J-H872K-2YT43

The above Microsoft web page lists keys for other editions of Windows 10, so you could instead convert to Windows 10 Professional, Windows 10 Education, Windows 10 Enterprise 2015 LTSB (Long Term Servicing Branch), and other editions of Windows 10.


After a moment, Windows 10 will offer to “Upgrade your edition of Windows.” Be sure to save your open files and close applications before continuing, as your computer will restart during this process.


Windows 10 will reboot when the process is done. This process took us less than 20 minutes, even in a slower virtual machine.


After the process is complete, you can visit the Settings > Update & Security > Activation again. You’ll see that you’re now using Windows 10 Enterprise. All the Enterprise-only features will be available on your PC.
However, if you used a KMS key, your system will no longer be activated and Windows 10 will begin to inform you of this. That’s a fine trade-off for being able to try out these features in a virtual machine or on a secondary PC, but may not be convenient on your primary PC.


Does Microsoft have a problem with this this? We don’t really know, but if they did, they could fix the problem in several ways, so it’s likely this is by design. It’s a convenient tip for developers, enthusiasts, and system administrators who want see what those extra features are all about.


Manage Your Projects and Tasks Quickly With Meister Task

$
0
0

Our life is full of personal and group projects, and every project consists of multiple tasks that needed to be done. When the number of your projects and tasks have grown to an overwhelming size, you need a reliable system and tools; one that is fun and easy to use to help you manage them before they get out of control. MeisterTask is one such tool.


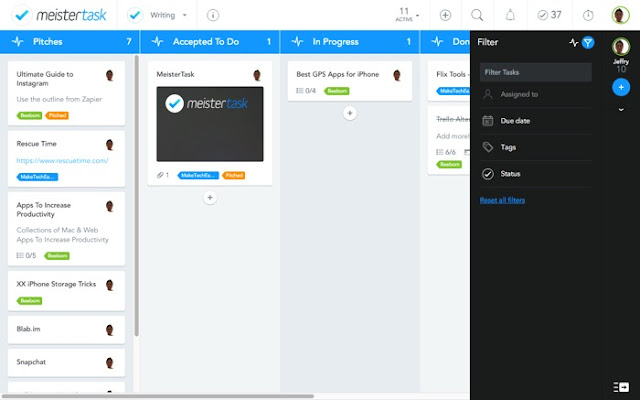
MeisterTask is a free web-based agile project and task management system. Even though it’s branded as a team collaboration tool, you can use it for personal use. MeisterTask adapts the Kanban method to manage projects and tasks where each task is represented by a card that can be dragged and dropped to different stages of the project. The method provides you (or the team) with a visual representation of the whole project.

Since MeisterTask is a web-based application, you can open it anywhere you have a web browser. All you need to do is register, and you are ready to go. In addition to the web version, MeisterTask is also available as native iPhone, iPad, Apple Watch, and Android (beta) apps. It’s also available as a native wrapper for the web apps for Mac and Windows (beta).

Another great feature of the service is the tight integrations with third-party apps such as Google Drive, Box, Dropbox, GitHub, Slack, HipChat and many others. This integration allows users to attach files from Google Drive, for example, or to create tasks from Slack conversations.


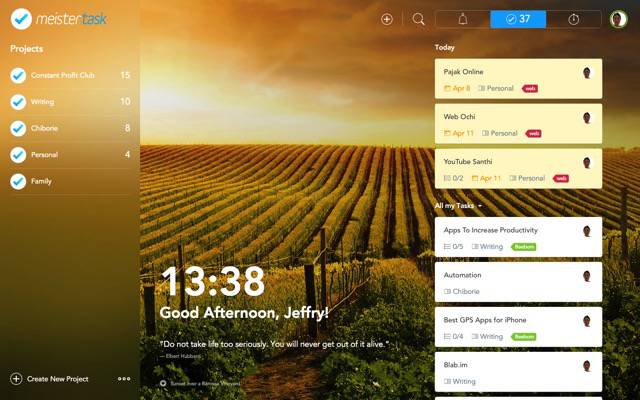
Using MeisterTask is relatively straightforward. After you register and log in, you will be greeted with the Dashboard. Here you can find quick loops at your working environment.


On the left is a list of your projects with the ability to create a new project quickly by clicking the “Plus (+)” button at the bottom-left corner of the window. The right side of the screen is occupied by your notifications, tasks, or time tracker. You can choose what to display by clicking one of the three available tabs. There’s also the search and quick task add functions.

In the middle are the desktop clock and inspirational quote that will help you start the day.

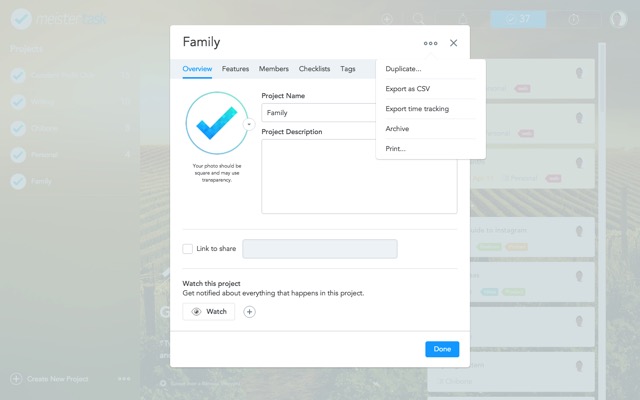
You can start using MeisterTask by adding a new project or by choosing one from the existing project list. If you create a new one, you can add information about the project, select features to turn on, add members to the team, create a checklist template, and manage tags.


Inside the project you can add sections according to your preferred workflow. For example, you can add a “To Do” section for a list of all your tasks, “Doing” sections to contain the tasks that you are currently working on and a “Done” section for all the tasks that you have finished doing. You can customize these sections the way you want.


The next step is to create tasks for the project and allocate the tasks according to the appropriate sections. You can customize the task by adding a note for the task, checklists for the subtasks, assigning tags and due date, and attaching files related to it.


With the list of tasks on your project ready, you can move them around according to the stage they are on, assign team members to the tasks, and set dependencies among tasks. If you opt to upgrade to the Pro plan, you can set automation to the tasks.

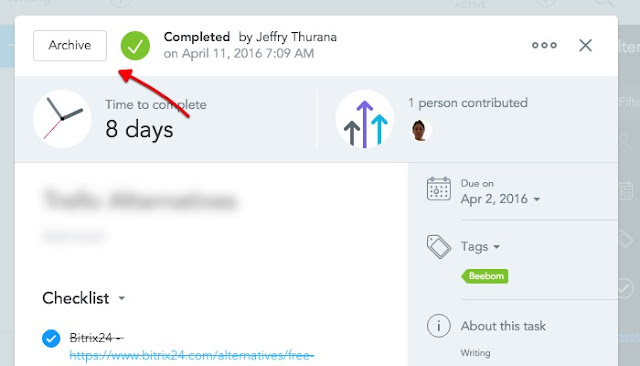
When a task is finished, click the blue “Complete Task” button (and move to the “Done” section – if you chose to create the section earlier). Then the task will appear with strikethrough so that everybody else in your team will know that there’s nothing more that should be done with it. If you want to remove the finished task completely, you can archive the completed task.


There is one more thing that you can do to make your working environment more pleasant to use. You can change the background image of the Dashboard. To do that go to the Dashboard by clicking on the MeisterTask logo at the top left of the window.

Then go to the bottom of the Dashboard; you can find the little gear Settings button under the desktop clock and daily quote.


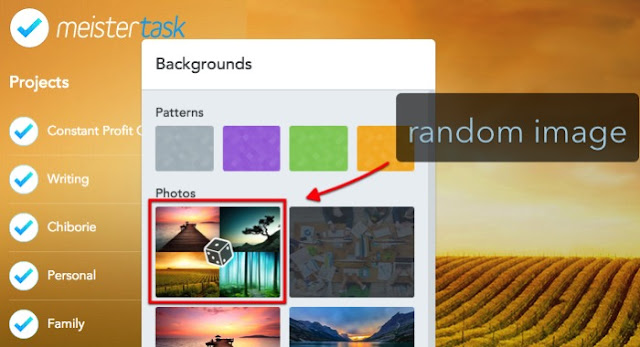
You can choose one of the patterns or pictures for the background, or you can choose to have random pictures that will change daily by clicking on the first icon.


We’ve covered the basic use of MeisterTask, and that’s enough for a quick start. But there are more valuable little nuggets waiting to be unraveled. I suggest you play around with MeisterTask to discover them and get your life more organized while doing so.


How to Use Your Smartphone as a Home Security Camera

$
0
0
 
Setting up a simple home security camera is a great way to keep tabs on your house while you’re away. A dedicated system is great, but in a pinch, you can use an old, spare smartphone that you have lying around.


You could, of course, buy an indoor security camera that’s ready to set up and actually made for such a purpose. Something like the Nest Cam is a good option, but $200 can be a little steep. Instead, if you upgrade to a new smartphone every year, it’s likely that you have an old, spare smartphone just collecting dust in a drawer somewhere. You can put it to good use by turning it into a home security camera.

This process relies on an app called Manything, which you install both on your old phone (the camera) and on your current phone (which allows you to view the camera). The app is available on iOS and Android, although the Android version is still in beta. Thankfully, it’s rather complete for being just a beta, and it should work just fine on most Android devices. Try it out first to ensure the camera functionality works on your device.

Manything is free to use for 1 camera and no cloud recording. But Manything also has paid tiers that you might be interested in. When you first sign up, you’ll get a free month of Manything’s best plan, but after that, you can either use their free plan or go with a cheaper paid plan. Here’s what Manything offers:


The $2.99/month plan isn’t a bad way to go. It provides one camera and stores your recordings for up to two days, which is plenty of time for you to view and save them.

Once you download and install the app on your spare smartphone, tap on “Register” at the bottom to get started.


Enter in your email address and create a password to use with Manything. Tap on “Register” when done.


Next, tap on “Camera”.


You might get pop-ups of the app asking permission to access your phone’s camera and microphone. Tap “OK” on these.


After that, the camera interface will pop up. You can begin right away by pressing the red record button to begin monitoring your home. From here, you can prop up your smartphone against a ledge of some sort, or get a small tripod and phone holder. Something like the Joby GripTight Micro Stand would be perfect. 

You’ll also want to make sure that the phone is plugged into a power source so that its battery doesn’t die during the day.

With that set up, download and install the Manything app on your main smartphone. The app works cross-platform, meaning that you can have an Android device set up as a camera and an iPhone as the viewer, or vice versa. When you open the app, tap “Log in” at the bottom and enter in the email address and password you signed up with.


Tap on “Viewer”.


The spare smartphone that you set up should show up in the list.


Tapping on it will bring up the viewer where you’ll get a real-time view of what’s going on. You’ll also see a list of recordings below that if motion was detected. These recordings are uploaded to the cloud (a.k.a. Manything’s servers).


Tap on the gear icon in the top-right corner to view settings.


Most of the settings are self-explanatory, but there are some that deserve some explanation.

For instance, “Stills Mode” will have the camera take continuous pictures instead of recording video, which can help on bandwidth if your Wi-Fi isn’t up to snuff.


Under “Motion Detection”, you can change the sensitivity of the camera, as well as determine which areas in the frame you want left out of detection, which can come in handy in some situations.


Under “Video Quality”, you can determine the quality of the video that gets streamed. If your Wi-Fi is kind of slow, it may be best to keep this on a low setting, but if you have a faster Wi-Fi connection, feel free to crank up the quality as you see fit.


Manything can stream and record over a cellular connection, but it’s generally a good idea to keep “Allow Cellular Data” disabled so you don’t bust through your monthly data allowance. However, you can still view the live stream and recordings from your viewer phone over a cellular connection.


Lastly, tap on “Screen Dimmer” and make sure that “Bright On Movement” is disabled. This makes sure that the screen of the phone doing the recording and monitoring doesn’t come on when it detects motion. It’s not a huge deal, but it’s a quick way to save energy.


After you have the settings the way you want, you can sit back and wait for notifications to roll in whenever the camera detects motion. It will automatically begin recording when this happens (if you have a paid subscription) and save the recordings so that you can view them later.


How to Secure Documents and PDFs with Microsoft Office Password Protect

$
0
0
 

Microsoft Office lets you encrypt your Office documents and PDF files, allowing no one to even view the file unless they have the password. Modern versions of Office use secure encryption that you can rely on–assuming you set a strong password.


The instructions below apply to Microsoft Word, PowerPoint, Excel, and Access 2016, but the process should be similar in other recent versions of Office.


How Secure Is Microsoft Office’s Password Protection?

Microsoft Office’s password-protection features have gotten a bad rap in the past. From Office 95 to Office 2003, the encryption scheme was very weak. If you have a document password-protected with Office 2003 or an earlier version, the password can be easily and quickly bypassed with widely available password cracking software.

With Office 2007, Microsoft got more serious about security. Office 2007 switched to the Advanced Encryption Standard (AES) with a 128-bit key. This is widely considered secure, and means that Office now uses real, strong encryption to protect your documents when you set a password. We tested the PDF encryption feature and found that it uses 128-bit AES encryption on Office 2016, too.

There are two big things you need to watch out for. First, only passwords that fully encrypt the document are secure. Office also allows you to set a password to “Restrict Editing” of a file–in theory, allowing people to view a file but not edit it without a password. This type of password can be easily cracked and removed, allowing people to edit the file.

Also, Office’s encryption only works well if you’re saving to modern document formats like .docx. If you save to older document formats like .doc–which are compatible with Office 2003 and earlier–Office will use the older, not-secure version of the encryption.

But, as long as you’re saving your files in modern Office formats and using the “Encrypt with Password” option instead of the “Restrict Editing” option, your documents should be secure.


How to Password Protect an Office Document

To password protect an Office document, first open it in Word, Excel, PowerPoint, or Access. Click the “File” menu at the top-left corner of the screen. On the Info pane, click the “Protect Document” button and select “Encrypt with Password.”

The button is only named “Protect Document” in Microsoft Word, but it’s named something similar in other apps. Look for “Protect Workbook” in Microsoft Excel and “Protect Presentation” in Microsoft PowerPoint. In Microsoft Access, you’ll just see a an “Encrypt with Password” button on the Info tab. The steps will otherwise work the same.

NOTE: If you only want to restrict editing of the document, you can choose “Restrict Editing” here, but as we said, that is not very secure and can easily be bypassed. You’re better off encrypting the entire document, if you can.

 
Enter the password you want to encrypt the document with. You’ll want to choose a good password here. Weak passwords can be easily guessed by cracking software if someone gains access to the document.

Warning: You’ll lose access to the document if you ever forget your password, so keep it safe! Microsoft advises you write down the name of the document and its password and keep it in a safe place.


When a document is encrypted, you’ll see the “A password is required to open this document” message on the Info screen.

The next time you open the document, you’ll see an “Enter password to open file” box. If you don’t enter the correct password, you won’t be able to view the document at all.


To remove the password protection from a document, click the “Protect Document” button and select “Encrypt with Password” again. Enter a blank password and click “OK.” Office will remove the password from the document.


How to Create a Password Protected PDF File

You can also export an Office document to a PDF file and password protect that PDF file. The PDF document will be encrypted with the password you provide. This works in Microsoft Word, Excel, and PowerPoint.

To do this, open the document, click the “File” menu button, and select “Export.” Click the “Create PDF/XPS” button to export the document as a PDF file.


Click the “Options” button at the bottom of the save dialog window that appears. At the bottom of the options window, enable the “Encrypt the document with a password” option and click “OK.”


Enter the password you want to encrypt the PDF file with and then click “OK.”

When you’re done, enter a name for the PDF file and click the “Publish” button. Office will export the document to a password-protected PDF file.

Warning: You won’t be able to view the PDF file if you forget the password. Be sure to keep track of it or you’ll lose access to your PDF file.


You’ll have to enter the PDF file’s password when you open it. For example, if you open the PDF file in Microsoft Edge–Windows 10’s default PDF viewer–you’ll be asked to enter the password before you can view it. This also works in other PDF readers.


This feature can help protect particularly sensitive documents, especially when you store them on a USB drive or in an online storage service like Microsoft OneDrive.

Full-disk encryption like Device Encryption and BitLocker on a Windows PC or FileVault on a Mac is more secure and painless for protecting all the documents on your computer, however–particularly if your computer is stolen.

How to Set a Screen Time Limit on Your iPhone or iPad With Guided Access

$
0
0

Guided Access allows you to set a screen time limit on your iPhone or iPad. This is great if you have a child–they can only play games for as long as you choose. The iPhone or iPad will be automatically locked after the time limit expires.


You could also use Guided Access this to restrict your iPhone or iPad to a specific application–like an educational app, for example–for a specific period of time. Afterwards, you can unlock the device and allow the child to use the device normally.


How to Enable Guided Access

Guided Access is included in Apple’s iOS operating system. The “time limit” feature was added to Guided Access in Apple’s iOS 8. We’ve previously covered Guided Access as a way to lock down your iPhone or iPad for children, but it’s also useful for other purposes

You’ll need to enable Guided Access first. Open the “Settings” app and go to General > Accessibility. Tap “Guided Access” under Learning.


Enable the “Guided Access” slider and tap “Passcode Settings” to set a passcode. You can use the same passcode you use to unlock your iPhone or iPad, or a different one–it’s up to you. If you have a device with a Touch ID sensor, the “Touch ID” option allows you to use your fingerprint to unlock Guided Access mode without having to type your passcode.

Tap the “Time Limits” option on the Guided Access screen to configure time limit sounds. By default, no sounds will play and Guided Access’s time limit will end silently. If you’d like an audible alert when the Guided Access time limit is up, use the Sound and Speak options here.

The Sound option allows you to select a sound that will play when the time limit is up–by default it’s “None,” but you can tap the “Sound” option and scroll through the list of alert sounds on your iPhone and choose one.

The “Speak” option will speak the remaining time aloud when you enable it–for example, it’ll say something when there are approximately 30 seconds left. A notification will appear on the screen when this happens, but Speak makes the notification audible.


Pick an App and Set a Time Limit

Once you’ve enabled and configured Guided Access, you’re good to go. Whenever you like, you can now open any app you choose (like a game). Then, quickly press the “Home” button three times in a row to enable Guided Access for that app.

Tap the “Options” button in the bottom-left corner of the Guided Access screen that appears and enable the “Time Limit” option. You can set any time limit you want in increments of one minute, from one minute to 23 hours and 59 minutes. Tap “Done” and tap the “Start” option at the top-right corner of the screen to put the device into Guided Access mode and apply your time limit.


Your iPhone or iPad will be locked to the specific application you chose. When the time limit expires, the iPhone or iPad will lock itself until you enter the PIN you provided earlier.

To leave Guided Access at any time–including before the time limit ends–just press the “Home” button three times in a row and enter your PIN. If you’ve enabled Touch ID, you can also just press the “Home” button once and leave your finger on the sensor. Tap “End” at the top-left corner of the screen if the Guided Access screen appears. Guided Access will be disabled.


While this is clearly useful for limiting gameplay time or restricting a child to an educational application, it’s not ideal for controlling device screen time. Unfortunately, Apple doesn’t provide a way to allow a child to use multiple apps on the device while setting a time limit.

How to customize notifications settings on Windows 10 to make them less annoying

$
0
0
customize notifications on Windows 10

In this Windows 10 guide, we'll be looking to the different ways in which you can easily customize notifications to make them less annoying, including on specific apps, such as Mail & Calendar and Microsoft Edge. Also, we even show you how to stop displaying badge notifications on taskbar buttons as well as on the Action Center button.


Are notifications starting to annoy you? Use this guide to reduce the number of alerts you get from apps and services on Windows 10.

Action Center is a new feature that Microsoft included in Windows 10 to collect all system and apps notifications in one central place, and keep you from missing any important event.

However, as more apps and services begin to connect with your devices, you can become overwhelmed with so many notifications, and you need a way to control all these alerts coming your way all the time.

Disclaimer: While many of the customization options we're detailing in this guide are available in the official release of Windows 10 (version 1511), some others are features part of the Anniversary Update, but they are also available in the latest Insider preview of the operating system.


How to customize notifications on Windows 10

Since Microsoft introduced notifications with Windows 8, you're able to control various aspects of how they behave, but in Windows 10, and even with the Anniversary Update, you now have even more control to make notifications less annoying on the desktop.

To customize your notification experience use these steps:
  1. Use the Windows key + I keyboard shortcut to open the Settings app.
  2. Click System.
  3. Click Notifications & actions.
Once in the notification settings page you can do the following:

Under Notifications, you can turn off various global configurations to reduce the number of alerts you receive on the desktop. For example, you can stop showing tips about Windows, and you can stop showing alarms, reminders, or incoming call on the lock screen.

If you often show PowerPoint presentations or another kind of slides, one feature you want to turn on is the "Hide notifications while presenting". (The last thing you want is to get interrupted by a toast notification in the middle of a business meeting.)

customize notifications on Windows 10

Under Show notifications from these apps, you can manually turn on or off which apps show notifications.

If you want to get more granular, you can also click an app to customize different types of notification features for a particular app.

For example, you can turn off various settings, including the ability to let the app receive notifications, but suppressing the banner, which will only make them available through Action Center. Or you can set it to only show banner while stopping notifications from appearing in Action Center.

Also, if you have an app the gets a lot of notifications, such as the Mail app, you can also choose to stop playing a sound when a new notification arrives.

Starting with the Windows 10 Anniversary Update and later, Microsoft is also adding the ability to configure the number of notifications an app can display, and you can also set their priority inside Actions center.

The default number of visible notifications per app is three, but you can set a minimum of 1 or a max of 20. For priority, you can choose between three levels, including Top, High, Normal (default).


More notification options

There are additional notification options that you can configure, but Microsoft is listing them in different sections of the Settings app, or they are built into specific apps.


How to change the time on notifications

If toast notifications are being displayed for too long for your liking, you can change how long notifications are shown by using these steps:
  1. Use the Windows key + I keyboard shortcut to open the Settings app.
  2. Click System.
  3. Click Ease of Access.
  4. Click Other options.
  5. Under Visual options, select for how long you want toast notifications are shown. The default option is 5 seconds, but you can choose up to 5 minutes.


How to change Mail & Calendar notifications

While you can customize many options through the Settings app, perhaps you only want to reduce the number of notifications from a particular email account, but you may not want to disable necessarily all notifications globally.

The following steps will show you the how to customize notifications on each email account in the Mail app:
  1. Open the Mail app.
  2. Click the Settings button.
  3. Click Notifications.


Select the account and customize whether you want to show notifications in the Action Center, show banner, and play a sound.

How to disable web notifications for specific sites on Microsoft Edge

In the Anniversary Update for Windows 10, Microsoft is introducing web notifications that also show up in Action Center. And similar to the Mail app, you can easily manage these notifications after you allowed websites to show banners and alerts.
  1. Open Microsoft Edge.
  2. Open the browser's menu and select Settings.
  3. Scroll down and click Advanced settings.
  4. Scroll down and under notifications, click Manage.

In this section, you'll see listed all the sites currently allowed to show notifications. Either turn off the site that you want to stop temporarily seeing alerts or hover over the site name and click "X" to delete the site.


How to disable badge notifications on the taskbar

Badges are a new type of notifications that appear on supported Universal Windows Platform (UWP) apps and on the Action Center button in the taskbar to notify you of any alert on a particular app.

Although they are quite useful as you don't have to open Action Center, Start, or the app to see alerts, Windows 10 is attacking you with notifications on all fronts, which can make badges in the taskbar a little too much for some people.
If you prefer to disable these notifications, then do the following:
  1. Use the Windows key + I keyboard shortcut to open the Settings app.
  2. Click Personalization.
  3. Click Taskbar.
  4. Turn off the Show badges on taskbar buttons.


The previous steps will stop badges from showing up in the taskbar, but not in the Action Center button. If you also want to disable the badge and app icons for the button, then right-click Action Center button in the right corner of the taskbar, and select Don't show app icons and Don't show number of new notifications.


It's worth pointing out that badges are new to Windows 10, but they're not unique. Apple OS X and iOS have included support for badge notifications for a long time.


Wrapping things up

Of course, remember that for those times when you need a total pause from notifications, you can always open Action Center (Windows key + A) or right-click the Action Center button in the taskbar to enable Quiet Hours.

While Windows 10 can overwhelm you with tons of notifications by default, the operating system incorporates different customization options to reduce the number of alerts you get in your devices. And as we've looked in this guide, you can control notifications globally in your computer and per app.

The Best Android Shortcuts You Should Use

$
0
0

The beauty of technology isn’t just doing more stuff–it’s doing stuff quickly. Whether you want to call a specific contact with one tap, keep your phone unlocked when you’re at home or work, launch the camera in a flash to quickly capture the perfect moment, or search for an app while in a rush, here are some of the best shortcuts built into Android that you’re probably not using.


Launch the Camera Instantly with a Double-Tap of the Power Button

We’ve all been in a situation where the perfect shot comes along, but by the time you get your phone out of your pocket, wake it up, unlock it, and launch the camera, that moment is gone. It’s a bummer, and all you end up with is a terrible picture that was taken too late and just reminds you of the moment you missed.


The good news is that it doesn’t have to be this way. If you’re running a modern Android phone with Marshmallow (Android 6.0), then you can launch the camera instantly by tapping the power button twice while the phone is asleep (it’s the home button on Samsung Galaxy phones). Seriously—go ahead and try it.

(On a few select phones, this shortcut may be different. For example on some Motorola phones, you can instead “twist” the phone in your hand twice to launch the camera.)

It should only take a split second to have the camera ready to go with this super useful little shortcut.

Quickly Search for Any App

If you have a lot of apps installed, sometimes it’s easier to just search for what you’re looking for than it is to scroll through a stupid-long list of stuff. Fortunately, Google baked a way into the Google Now Launcher—which is the stock launcher on Nexus devices, but also available for download from Google Play for all others—to quickly get access to the app drawer’s search tool.


From the home screen, just long-press the app drawer icon. That’s it! The drawer will immediately open with the “Search Apps…” bar open and the keyboard ready to go. It easily shaves a bit of time off of opening the drawer, then tapping the Search box.

Use Quick Responses to Let Callers Know Why You Can’t Answer

This feature has actually been around since Ice Cream Sandwich (Android 4.0), though I’m not sure many people realize it still exists—or new users know about it at all. Basically, it offers a quick way of letting someone know why you can’t answer the phone by sending them a quick text—all you have to do is swipe up on the incoming call screen and choose what text you want to send. There are a few pre-set selections, like “Can’t talk right now. What’s up?” and “I’ll call you right back,” but the best part is that you can actually customize these on most Android phones.


In stock Marshmallow, just jump into the dialer and tap the three-button overflow menu in the top right corner. Select “Settings,” then “Quick responses.” There you go—edit away.

On stock Lollipop (5.0+) phones, the process is basically the same, but in the dialer’s Settings menu, tap “General,” then “Quick responses” at the very bottom.


Each manufacturer may have these hidden in different spots—some of which make sense, and others that do not. For example, on Samsung’s newest software builds, you can find Quick Responses in the More > Settings > Call blocking > Call-reject messages. Yeah, it’s pretty deep.

Keep in mind that it may or may not be labeled as “Quick responses,” but the option will almost certainly be found in in the dialer app.

Unlock Your Phone Easily (and Still Keep It Secure) with Smart Lock

This one may be a little more obvious than some of the others, but if you’re not using it, then you’re doing yourself a disservice. In a nutshell, Smart Lock allows keeps your device unlocked when the right circumstances are met. For example, when you’re at home, it can use location services to make sure you never have to input your PIN, pattern, or password to unlock the phone. Or when you’re connected to a specific Bluetooth device—like a car stereo system or smartwatch—it will stay unlocked.


That’s useful, because if the user-specified criteria isn’t met, the configured lock screen security method will take over. In my situation, for example, my phone stays unlocked as long as it’s connected to my smartwatch. That way, as long as it’s nearby, I don’t have to worry about the hassle of using the security method. But if I leave it somewhere or it gets stolen, it’ll be locked up tight so prying eyes can’t access my personal data. It’s a win-win, really.

To enable Smart Lock on most devices, jump into the Settings > Security menu and set a secured Screen Lock. Then, enable Smart Lock back in the Security menu—there are several options here, like “Trusted Devices,” which is where you’ll set Bluetooth devices to keep the phone unlocked, “Trusted places,” where you can specify your home or work locations, “Trusted Face,” where you can use the phone’s front camera and your own head to unlock, “Trusted voice,” where you can use your voice to unlock, and “On-body detection,” where the device will stay unlocked while it’s on you.

The first two options make the most sense to me, but of course you should enable whichever option(s) make the most sense for your situation. Check out our full guide to Smart Lock for more.

Call or Text With One Tap Using Contact Widgets

We all have people that we contact more often than others, and there’s no easier way to keep those quick calls or texts to one tap than with the Contact Direct widgets. These are essentially 1×1 icons on your home screen that immediately call or text a specific contact with one tap.


To drop one of these icons on your home screen, just jump into your device’s widgets menu by long-pressing the home screen and tapping the “Widgets” icon. Scroll until you find the “Contacts” section, then choose whichever one you want to use: Direct dial 1×1 or Direct message 1×1. Long-press it then, drop it on the home screen. From there, you’ll select the contact you want to associate the widget with, and that’s it. You’re not just one tap away from your favorite people.


If you use Nova Launcher, you can also create swipe actions that do something similar without taking up extra space on your screen.

Use Your Voice to Do Everything Faster

This one might be the most useful, but most overlooked, feature on this list. Everyone knows about Google Voice Actions, but are you really using them as much as you could be? Probably not. There’s an insane amount of things Google Now is capable of, and all you need to do is say “OK Google”. It may feel weird talking to your phone at first, but when you realize how blazingly fast it is for certain tasks, you’ll never go back.


Before you do that, however, you’ll need to enable “OK Google detection” from any screen. To do that, jump into the Google Now app by either swiping up on the home button or long-pressing it (depending on your version of Android), heading into the menu, and choosing “Settings.” From there, select “Voice,” then “’OK Google’ detection.” You can toggle the “From any screen” setting here, and it will prompt you to set up a voice model if you haven’t already. Now you can call on Google Now from any screen.


But that’s just where this one starts. Once Google Now is listening to what you’re saying, you can ask it a huge variety of questions, such as (but not limited to):
  • When does X business close?
  • How tall is person?
  • How many quarts are in a gallon?
  • What is five percent of 99?
  • What’s the weather going to be like this weekend?
  • When is holiday?
  • When is the next sports team game?
  • What song is this? (with music playing in the background)
  • What time is it in other place?
And so much more. But again, that’s not all. You can also set reminders, send texts, or create appointments:
  • Text friend “how about lunch tomorrow?”
  • Remind me to do thing tomorrow at 11 AM.
  • Set a timer for X minutes.
  • Navigate to place of interest.
  • Call person or business.
  • Listen to Artist on Google Play Music.
  • Create a calendar event: name, date, and time.
Seriously—the more you use it, the more you’ll learn to do with it. Then you can set a reminder to kick yourself for not doing this sooner.

How to Run Any Program as a Background Service in Windows

$
0
0

If you’re like most Windows users, you have lots of great little utilities that run when you start Windows. While this works great for most apps, there are some that would be nice to start even before a user logs in to the PC. To do this, you’ll need to run the app as a Windows service.


Windows services are a special class of programs that are configured to launch and run in the background, usually without any sort of user interface and without needing a user to log in to the PC. Many gamers and power users know them as those things you used to disable to help speed up your system, though that’s really not necessary any more.

The primary advantage of running an app as a service is that you can have a program start before a user to log in. That can be particularly important with apps that provide important services you want to be available when you’re away from your computer.

A perfect example of this is Plex, a media server app that can stream local content to just about any device you own. Sure, you could let it sit in the system tray like a normal program, but what if the computer restarts due to a power outage or scheduled updates? Until you log back in on the PC, Plex wouldn’t be available. 

That’s irritating if you have to run to another room to start Plex back up while your popcorn gets cold, and super irritating if you’re out of town and trying to stream your media over the Internet. Setting up Plex as a Service would solve that problem.

Before getting started, you should be aware of a couple of important caveats to running an app as a service:

The app will not put an icon in the system tray. If you need the interface available regularly for an app, it may not be best suited to run as a service. When you need to make configuration changes or updates, you’ll need to stop the service, run the program as a regular app, do what you need to do, stop the program, and then start the service again. 

If the program is already set up to run when Windows starts, you’ll need to disable that so that you don’t end up with two instances running. Most programs have an option in the interface for toggling this setting. Others may add themselves to your Startup folder, so you can remove them there.

Ready to roll? Let’s talk about how to set it up.


Step One: Install SrvStart

To run an app as a service, you’re going to need a small, third-party utility. There are several out there, but our favorite is SrvStart. It was originally designed for Windows NT, and will work with just about any version of Windows from Windows XP on up.

To get started, head over to the SrvStart download page and grab the utility. The download contains just four files (two DLL and two EXE files). There’s no installer; instead, copy these to your computer’s C:\Windows folder these to your main Windows folder to “install” SrvStart.


We’re also going to assume that you’ve already installed and set up whatever program you’re going to turn into a service, but if you haven’t, now would be a good time to do that too.

Step Two: Create a Configuration File for the New Service

Next, you’ll want to create a configuration file that SrvStart will read to create the service. There’s a lot you can do with SrvStart, and you can read the full details on all the configuration options on the documentation page. For this example, we are only going to use two commands: startup, which specifies the program to launch, and shutdown_method, which tells SrvStart how to close the program when the respective service is stopped.

Fire up Notepad and create your configuration file using the format below. Here, we’re using Plex, but you can create a file for any program you want to run as a service. The startup command simply specifies the path where the executable file resides. For the shutdown_method command, we’re using the winmessage parameter, which causes SrvStart to send a Windows close message to any windows opened by the service.

[Plex]
startup="C:\Program Files (x86)\Plex\Plex Media Server\Plex Media Server.exe"
shutdown_method=winmessage
 
Obviously, adjust the path and name according to the program you’re launching.


Save the new configuration file wherever you like. For ease of typing at the Command Prompt, we suggest saving it temporarily right on your C drive.

Step Three: Use the Command Prompt to Create the New Service

Your next step is using the Windows Service Controller (SC) command to create the new service based on the criteria in your configuration file. Open Command Prompt by right-clicking the Start menu (or pressing Windows+X), choosing “Command Prompt (Admin)”, and then clicking Yes to allow it to run with administrative privileges.

At the Command Prompt, use the following syntax to create the new service:

SC CREATE Displayname= "" binpath= "srvstart.exe -c " start=

There are a couple of things to note in that command. First, each equal sign (=) has a space after it.

That’s required. Also, the value is entirely up to you. And, finally, for the value, you’ll want to use auto so that the service starts automatically with Windows.
So in our Plex example, the command would look like this:

SC CREATE Plex Displayname= "Plex" binpath= "srvstart.exe Plex -c C:PlexService.ini" start= auto

When you run the command, you should receive a SUCCESS message if everything goes well.


From this point on, your new service will run whenever Windows starts. If you open the Windows Services interface (just click Start and type “Services”), you can find and configure the new service just like you would any other.


And that’s all there is to it. If you have apps that start with Windows and you’d rather they start without needing a user to log in, it’s easy enough to turn any app into a service. We’ve only just touched on the basic method for creating and running a new service, but there’s a lot more you can do with SrvStart to fine tune how a service runs. Be sure to check out the documentation if you’d like to learn more.

How to use Stellar Exchange Toolkit v 7.0 for Exchange Recovery

$
0
0

In this article we will show you how to install and use new Stellar Exchange Toolkit from Stellar Data Recovery Inc.


Product Name: Stellar Exchange Toolkit v 7.0
Product Homepage:  click here
Free Trial : click here

Introduction

In this article, we will review the latest version of Stellar Exchange Toolkit, v7.0 launched in March 2016. This toolkit is designed to help Exchange administrators extract data from corrupt Exchange EDB or backup files, easily convert OST to PST files, and to reset domain account passwords.

It supports all Exchange versions since 5.5 and all it requires is a machine running Windows Vista / Server 2003 or above to install the software, plus a version of Outlook compatible with the Exchange server being used in order to perform certain export/import operations.

The Toolkit, as the name suggests, is a collection of the following tools that we will review one by one:
  • Stellar Phoenix Mailbox Exchange Recovery
  • Stellar Mailbox Extractor for Exchange Server
  • Stellar OST to PST Converter
  • Stellar Mailbox Extractor for Exchange Backup
  • Stellar Phoenix Password Recovery for MS Exchange

Installation

Installing Stellar Exchange Toolkit couldn't be easier:
  1. Double-click StellarExchangeToolkit.exe to start the installation process. Click Next to continue:

 Figure 1
  1. The License Agreement dialog box is displayed. Select I accept the agreement and click Next:
 Figure 2
  1. Specify a location where to install the app, or accept the default one, and click Next:
 Figure 3
  1. In the Select Additional Tasks dialog box, select the check boxes as per your choice and click Next:
 Figure 4
  1. Review your selections. Click Back if you want to make any changes or Install to start the installation:
 Figure 5
  1. After completion of the process, Completing the Stellar Exchange Toolkit Setup Wizard window opens. Click Finish:
 Figure 6

To launch the tool, look for the app in the Start menu or, alternatively, use the Desktop icon:

 
Figure 7


User Interface

Stellar Exchange Toolkit uses a modern and easy to use Graphical User Interface. On the main window we get quick access to all five tools that are included in the toolkit. Clicking on any of these will open a new separate window for that particular tool as we will shortly see.

 Figure 8


Phoenix Mailbox Exchange Recovery

The first tool is Mailbox Exchange Recovery which helps administrators recovering mailbox content from corrupted EDB files such as emails, attachments, contacts, calendars, tasks, etc. We can export data into a variety of formats, to a live Exchange Server or even Exchange Online.

 Figure 9

When opening the tool, we automatically get asked to select an EDB file for scanning. From here, we can locate and open an individual EDB file by clicking on Open EDB:

 Figure 10
 
Alternatively, we can select Find EDB and select a location to search for any EDB files:

 Figure 11
 
Once we select the EDB file to extract data from, we get two scanning options: a Quick Scan which is a fast mode to scan and recover a corrupt EDB file, or Extensive Scan for when we want to scan the corrupt EDB file extensively for better results:

 Figure 12

Using the Save Scan Info button, we can save this scan so at a later stage we can re-open the same EDB file without having to re-scan it. A very useful feature indeed as depending on the size of the file, an extensive scan might take a while to complete.

Figure 13

Once the scan is complete, we can preview the scanned file. The left pane displays, in a tree-like structure, all the mailboxes (and their folders) found within the EDB file. In the middle pane we have all the items contained within the selected folder, and on the right pane we get a preview of that same item (except attachments unfortunately, although other tools in this suite do support attachment preview):

 Figure 14

As we can see, the tool can recover data from virtually any mailbox folder, as well as from Public Folders:

 Figure 15

If we don’t find the item(s) we are looking for, we can use the Search Message feature:

 Figure 16

Once we click Search, all items matching our criteria are listed and just to be sure we found the correct items, we can easily preview them:

 Figure 17

Once we find the item(s) we want to recover, we can individually export it to a variety of different formats:

 Figure 18

For example, we can choose to save it as an Outlook MSG file, select where we want to recover it to, and press OK:

 Figure 19

Once the extraction is complete we are notified:

 Figure 20

We can now access the extracted email just like any other MSG file with Outlook:

 Figure 21
 
Saving entire folders or mailboxes to a PST, for example, is very easy as well. Simply select the folders or mailbox to export, right-click it and select Save As PST:

 Figure 22

Another great feature is the fact we can easily export a folder or mailbox to a live Exchange server or even to Exchange Online. When exporting to a local Exchange server, we can connect directly to a single mailbox to import the data to:

 Figure 23

Or we can get a list of all the mailboxes available:

 Figure 24
 
Once we connect to the server, all the mailboxes we have full access permissions to will be listed as Connected:

 Figure 25

We simply double-click on the mailbox we want to import data to from the EDB file and the tool does the rest. Once the process completes, we are notified:

 Figure 26

The only drawback is that there isn't an option to import the data to a new folder of our choosing, like Restore-2016 for example. Instead, items are restored to the same folder as in the EDB file, which might not be ideal in some cases. In this case, I extracted the Nuno’s Inbox folder from the EDB and imported it to Mota’s Inbox folder on the live Exchange server:

 Figure 27

All tools include a Log Report that lists actions taken like scanning an EDB file, exporting data, etc.:

Figure 28

Figure 29


Mailbox Extractor for Exchange Server

Next on the list is Stellar Mailbox Extractor for Exchange which helps us convert user mailboxes from either an offline EDB file or a live Exchange database to an Outlook PST file. It makes it easy to migrate an entire offline Exchange database to another live Exchange server or even Office 365 without technical difficulties.

The process from extracting data from an offline EDB file is identical to what we have already seen using the previous tool, so now we will focus on extracting data from a live Exchange server. We start by selecting Online Exchange and then entering the details of the Exchange server and of an account with full access permissions to the mailbox we want to export:

Figure 30
 
Once we connect to the server, all the mailboxes the account specified has full access to will be listed as Connected:

Figure 31


In this case we don’t select which mailbox we want to extract but simply select OK. All mailboxes will be listed, with the ones we do not have access to in red:

Figure 32

Once we select a mailbox, we can expand it and see all its folders and items. In the next screenshot, we can see the emails we previously recovered from Nuno’s mailbox into Mota's mailbox:

Figure 33

Exporting a folder or entire mailbox is the same as before: simply right-click and select the preferred export format:

 Figure 34

If we were extracting data from an offline EDB file we could import it directly into a live Exchange or Exchange Online. However, as we are extracting data from a live Exchange, unfortunately we cannot which would also be a useful feature.

Once we start the extraction process, in this case to a PST file, the progress status will be displayed:

Figure 35

Once completed, we get a notification and our PST file:

Figure 36
 
 Figure 37

Simple as that!

OST to PST Converter

Stellar OST to PST Converter does exactly what the name suggests: it converts an entire OST file, or items within an OST file, into a PST without changing the original content format or structuring. Despite the name, the tool can also export data to other formats.

We start by selecting or searching the OST file we want to convert and the tool will automatically scan it:

Figure 38

Once the scan is complete, the tool provides an Outlook-like user interface from where we can easily explore the OST’s contents, including searching and previewing items and attachments:

Figure 39

We can even switch between various Outlook themes:

 Figure 40

Calendars and their items can be easily previewed:

Figure 41
 
As can contacts for example:

Figure 42
 
This tool can be used to extract individual items to a variety of formats, but that is not its main purpose:

Figure 43
 
In order to convert the OST into a PST, first we select which folders we want to convert and then we click on Save Converted File:


Figure 44
 
We then choose which format we want to convert the data to:

Figure 45
 
If we choose, for example MSG format, a new folder named converted {date_time} gets created with all the OST items converted into that folder in MSG format:

Figure 46
 
If we select PST format, all the items in the selected folders will be converted and saved into a single PST file in our desired location. We can choose to simply save the PST file or, alternatively, to Compact and Save PST which gives us some additional and possibly useful options:

Figure 47
 
The third alternative is to Split and Save PST which allows us to split a PST file according to mail IDs, date and/or size:

Figure 48
 
Once complete we are notified of the PST’s name and size:

Figure 49
 
And here it is:

Figure 50
 
If we check the log file, we can see the OST and all the items we converted:

Figure 51


Mailbox Extractor for Exchange Backup

Stellar Mailbox Extractor for Exchange Backup is an advanced Exchange mailbox extractor which saves mailbox content from offline Exchange Backups Files (.bkf) or virtual machine disks (.vhdx from Hyper-V) and saves them in PST, MSG, EML, HTML, RTF, PDF or into Exchange Online.

Although BKF was mainly used with Exchange 2003, there are still a large number of organizations that have just migrated, or are in the process of migrating, from Exchange 2003. As such, some administrators might still have to work with BKF files. After all, a common issue when migrating from a version of Exchange to another is users requesting to recover deleted emails from a month ago when their mailbox has just been migrated and the backups containing those items are for the previous version of Exchange.

To start with, and similar to the previous tools, we have the option to select a file to extract data from or to search for one:

Figure 52
 
In this case, let’s search for all *.vhdx files:

Figure 53
 
Once we find the file we want to process, we click OK, select our scanning method and click OK once more:

Figure 54
 
The tool will start processing the disk file and load mailboxes from all EDB files it can find within it:

Figure 55
 
Once completed, we get access to all mailboxes present in the .vhdx file, grouped by mailbox database (in this case our database is called MDB01):

Figure 56
 
From here, the process of searching and extracting data is identical to the one we already used:

Figure 57
 
By right-clicking on an item or folder, we can easily extract it into several different formats:

Figure 58

In this case, let’s extract Nuno’s entire mailbox into a mailbox in Office 365. To do this, we select Export to Office365 Mailbox option, enter the credentials of the target mailbox and click OK. Simple as that! As before, we do not get the option to create a separate folder where to save the items to (which would be a good addition to the tool) and we cannot provide the details of an admin account, connect to Office 365, list all the mailboxes and select the one we want – we need to know and provide the credentials of the target mailbox.

Figure 59
 
Once the export/import is complete, we get notified:

Figure 60

And it is as easy as that to extract data from .bkf or .vhdx files.


Phoenix Password Recovery for Exchange

The last app in the toolkit is Password Recovery, which helps administrators reset the passwords for domain accounts. Nowadays in medium and large enterprises there are always more than one domain administrator capable of resetting another admin’s password in case he/she forgets it.

But in small organizations it is not uncommon to have a single administrator, and this is where this tool can come handy. Password Recovery can reset Windows 2000 to 2012 Server passwords. To start, we click on the app’s icon which takes us to a website to download a bootable ISO image.

Figure 61
 
For physical servers, simply burn the ISO and boot the Domain Controller (DC) using it. For virtual machines (VM), simply configure the VM to boot from the ISO.

After booting process completes, we see the first screen of Password Recovery. We select the operating system of our DC from the drop-down list (which should be automatically detected) and click Reboot:

Figure 62
 
Next, we need to pay attention to the list of steps we need to take next:

Figure 63
 
We start by removing the CD/DVD/ISO, reboot the server and press F8 (usually) to enter Advanced Boot Options. From here we select Directory Services Restore Mode and press Enter:

Figure 64
 
Directory Services Restore Mode (DSRM) is a special boot mode for repairing or recovering Active Directory (AD). We can log on to DSRM by using a special DSRM password that we set when promoting the server to a DC. If we forgot the DSRM password, we can reset it using ntdsutil, but this tool does this for us.

DSRM is rarely needed on Windows Server 2008 or above as AD can be stopped and re-started without a reboot, making DSRM unnecessary in most cases. But it is a feature that it is still available and that Password Recovery uses.

Once the server boots up again, the initial logon prompt will show the account name MyDomain\Administrator, where MyDomain is the name of the AD domain. We need to click on Switch User and manually type the name .\Administrator or ServerName\Administrator, for example, so we can login using a local account. No password is required.

Figure 65
 
Once we have logged in, we need to browse to the location where ResetPassword.exe has been copied to and double click it (by default, this executable is copied to the root of the selected operating system drive). Once the executable is run, the following screen is displayed:

Figure 66
 
We enter the domain account we want to reset, a new password as per the security policy of our domain and click Reboot. This will show us a new dialog window:


Figure 67

Click OK and when system reboots, login to the DC with the new password supplied previously!


Conclusion

Stellar Exchange Toolkit is one of those toolkits that Exchange administrators hope to never have to use, but when they have to, they are glad to have it at their disposal.

All the tools included do what they claim to do and in an easy way. With a couple of tweaks and extra features such as attachment preview and the ability to specify a new folder when importing data into a mailbox, it would be a perfect tool. As it stands, it is great!

How to Check If Your VPN Is Leaking Your Personal Information

$
0
0

Many people use Virtual Private Networks (VPNs) to mask their identity, encrypt their communications, or browse the web from a different location. All those goals can fall apart if your real information is leaking through a security hole, which is more common than you’d think. Let’s look at how to identify and patch those leaks.


How VPN Leaks Occur

The basics of VPN usage are pretty straightforward: You install a software package on your computer, device, or router (or use its built-in VPN software). This software captures all your network traffic and redirects it, through an encrypted tunnel, to a remote exit point. To the outside world, all your traffic appears to be coming from that remote point rather than your real location. 

This is great for privacy (if you’re in an oppressive country whose government is spying on you), it’s great for virtual border hopping (like watching U.S. streaming services in Australia), and it’s an overall excellent way to cloak your identity online.

However, computer security and privacy are perpetually a game of cat and mouse. No system is perfect, and over time vulnerabilities are uncovered that can compromise your security–and VPN systems are no exception. Here are the three major ways your VPN can leak your personal information.

Flawed Protocols And Bugs

In 2014, the well publicized Heartbleed bug was shown to leak the identities of VPN users. In early 2015, a web browser vulnerability was discovered that allows for a third party to issue a request to a web browser to reveals the real IP address of the user (circumventing the obfuscation the VPN service provides).


This vulnerability, part of the WebRTC communication protocol, has still not been completely patched, and it’s still possible for the web sites you connect to, even when behind the VPN, to poll your browser and get your real address. In late 2015 a less widespread (but still problematic) vulnerability was uncovered wherein users on the same VPN service could unmask other users.

These kind of vulnerabilities are the worst because they are impossible to predict, companies are slow to patch them, and you need to be an informed consumer to ensure your VPN provider is dealing with known and new threat appropriately. None the less, once they are discovered you can take steps to protect yourself (as we’ll highlight in a moment).

DNS Leaks

Even without outright bugs and security flaws, however, there’s always the matter of DNS leaking (which can arise from poor operating system default configuration choices, user error, or VPN provider error). DNS servers resolve those human-friendly addresses you use (like www.facebook.com) into machine-friendly addresses (like 173.252.89.132). If your computer uses a different DNS server than your VPN’s location, it can give away information about you.

DNS leaks are not as bad as IP leaks, but they can still give away your location. If your DNS leak shows that your DNS servers belong to a small ISP, for example, then it greatly narrows down your identity and can quickly geographically locate you.

Any system can be vulnerable to a DNS leak, but Windows has historically been one of the worst offenders, due to the way the OS handles DNS requests and resolution. In fact, Windows 10’s DNS handling with a VPN is so bad that the computer security arm of the Department of Homeland Security, the United States Computer Emergency Readiness Team, actually issued a briefing about controlling DNS requests in August of 2015.

IPv6 Leaks

Finally, the IPv6 protocol can cause leaks that can give away your location and allow third parties to track your movement across the Internet. If you’re not familiar with IPv6, check out our explainer here–it’s essentially the next generation of IP addresses, and the solution to the world running out of IP addresses as the number of people (and their internet connected products) skyrockets.

While IPv6 is great for solving that problem, it’s not so great at the moment for people worried about privacy.

Long story short: some VPN providers only handle IPv4 requests and ignore IPv6 requests. If your particular network configuration and ISP are upgraded to support IPv6 but your VPN doesn’t deal IPv6 requests, you can find yourself in a situation where a third party can make IPv6 requests that reveal your true identity (because the VPN just blindly passes them along to your local network/computer, which answers the request honestly).

Right now, IPv6 leaks are the least threatening source of leaked data. The world has been so slow to adopt IPv6 that, in most cases, your ISP dragging their feet even supporting it is actually protecting you against the problem. Nonetheless, you should be aware of the potential problem and proactively protect against it.

How to Check for Leaks

So where does all this leave you, the end user, when it comes to security? It leaves you in a position where you need to be actively vigilant about your VPN connection and frequently testing your own connection to ensure it isn’t leaking. Don’t panic, though: we’re going to walk you through the whole process of testing for and patching known vulnerabilities.

Checking for leaks is a pretty straightforward affair–though patching them up, as you’ll see in the next section, is a bit trickier. The internet is full of security-conscious folks and there is no shortage of resources available online to assist you in checking for connection vulnerabilities.

Note: While you can use these leak tests to check if your proxied web browser is leaking information, proxies are a completely different beast than VPNs and should not be considered a secure privacy tool.

Step One: Find Your Local IP

First, determine what the actual IP address of your local internet connection is. If you’re using your home connection, this would be the IP address supplied to you by your Internet Service Provider (ISP). If you’re using the Wi-Fi at an airport or hotel, for example, it would be the IP address of their ISP. Regardless, we need to figure out what a naked connection from your current location to the greater internet looks like.


You can find your real IP address by temporarily disabling your VPN. Alternatively, you can grab a device on the same network that isn’t connected to a VPN. Then, simply visit a website like WhatIsMyIP.com to see your public IP address.

Make note of this address, as this is the address you do not want to see pop up in the VPN test we’ll conduct shortly.

Step Two: Run the Baseline Leak Test

Next, disconnect your VPN and run the following leak test on your machine. That’s right, we don’t want the VPN running just yet–we need to get some baseline data first.

For our purposes, we’re going to use IPLeak.net, since it simultaneously tests for your IP address, if your IP address is leaking via WebRTC, and what DNS servers your connection is using.


In the above screenshot, our IP address and our WebRTC-leaked address are identical (even though we’ve blurred them out)–both are the IP address supplied by our local ISP per the check we performed in the first step of this section.


Further, all the DNS entries in the “DNS Address Detection” along the bottom match up with the DNS settings on our machine (we have our computer set to connect to Google’s DNS servers). So for our initial leak test, everything checks out, since we are not connected to our VPN.

As a final test, you can also check to see if your machine is leaking IPv6 addresses with IPv6Leak.com. As we mentioned earlier, while this is still a rare issue, it never hurts to be proactive.

Now it’s time to turn on the VPN and run more tests.

Step Three: Connect To Your VPN and Run the Leak Test Again

Now it’s time to connect to your VPN. Whatever routine your VPN requires to establish a connection, now is the time to run through it–start the VPN’s program, enable the VPN in your system settings, or whatever it is you normally do to connect.

Once it’s connected, it’s time to run the leak test again. This time, we should (hopefully) see totally different results. If everything is running perfectly, we’ll have a new IP address, no WebRTC leaks, and a new DNS entry. Again, we’ll use IPLeak.net:


In the above screenshot, you can see that our VPN is active (since our IP address shows we’re connected from the Netherlands instead of the United States), and both our detected IP address and the WebRTC address are the same (which means we’re not leaking our true IP address via the WebRTC vulnerability).

However, the DNS results at the bottom show the same addresses as before, coming from the United States–which means our VPN is leaking our DNS addresses.

This isn’t the end of the world from a privacy standpoint, in this particular case, since we’re using Google’s DNS servers instead of our ISP’s DNS servers. But it still identifies that we’re from the U.S. and it still indicates that our VPN is leaking DNS requests, which is not good.

NOTE: If your IP address hasn’t changed at all, then it probably isn’t a “leak”. Instead, either 1) your VPN is configured incorrectly, and isn’t connecting at all, or 2) your VPN provider has totally dropped the ball somehow, and you need to contact their support line and/or find a new VPN provider.

Also, if you ran the IPv6 test in the previous section and found that your connection responded to IPv6 requests, you should also re-run the IPv6 test again now to see how your VPN is handling the requests.
So what happens if you detect a leak? Let’s talk about how to deal with them.

How to Prevent Leaks

While it’s impossible to predict and prevent every possible security vulnerability that comes along, we can easily prevent WebRTC vulnerabilities, DNS leaks, and other issues. Here’s how to protect yourself.

Use a Reputable VPN Provider

First and foremost, you should use a reputable VPN provider that keeps its users abreast of what is going on in the security world (they’ll do the homework so you don’t have to), and acts on that information to proactively plug holes (and notify you when you need to makes changes). 

To that end, we highly recommend Private Internet Access–a great VPN provider that we’ve not only recommended before but use ourselves.

Want a quick and dirty test to see whether or not your VPN provider is remotely reputable? Run a search for their name and keywords like “WebRTC”, “leaking ports”, and “IPv6 leaks”. If your provider has no public blog posts or support documentation discussing these issues, you probably don’t want to use that VPN provider as they’re failing to address and inform their customers.

Disable WebRTC Requests

If you’re using Chrome, Firefox, or Opera as your web browser, you can disable WebRTC requests to close the WebRTC leak. Chrome users can download and install one of two Chrome extensions: WebRTC Block or ScriptSafe. Both will block WebRTC requests, but ScriptSafe has the added bonus of blocking malicious JavaScript, Java, and Flash files.

Opera users can, with a minor tweak, install Chrome extensions and use the very same extensions to protect their browsers. Firefox users can disable the WebRTC functionality from the about:config menu. Just type about:config into the Firefox address bar, click the “I’ll be careful” button, and then scroll down until you see the media.peerconnection.enabled entry. Double click on the entry to toggle it to “false”.


After applying any of the above fixes, clear the cache of your web browser and restart it.

Plug DNS and IPv6 Leaks

Plugging DNS and IPv6 leaks can either be a huge annoyance or trivially easy to fix, depending on the VPN provider you use. Best case scenario, you can simply tell your VPN provider, via the settings of your VPN, to plug the DNS and IPv6 holes, and the VPN software will handle all the heavy lifting for you.


With Private Internet Access, this option is trivial to enable. Simple open up the settings of the VPN management application and check “DNS Leak protection” and “IPv6 Leak Protection”. The software will automatically make changes to the network configuration of your device to plug the DNS leaks and IPv6 leaks.

If your VPN software doesn’t provide this option, you’ll need to manually set your DNS provider and disable IPv6 at the device level. Even if you have helpful VPN software that will do the heavy lifting for you, however, we recommend you read over the following instructions on how to manually change things, so you can double-check that your VPN software makes the correct changes.

We’ll demonstrate how to do so on a computer running Windows 10, both because Windows is a very widely used operating system and because it’s also astoundingly leaky in this regard (compared to other operating systems). The reason Windows 8 and 10 are so leaky is because of a change in how Windows handled DNS server selection.

In Windows 7 and below, Windows would simply use the DNS servers you specified in the order you specified them (or, if you didn’t, it would just use the ones specified at the router or ISP level). Starting with Windows 8, Microsoft introduced a new feature known as “Smart Multi-Homed Named Resolution”. This new feature changed the way Windows handled DNS servers. 

To be fair, it actually speeds up DNS resolution for most users, if the primary DNS servers are slow or unresponsive. For VPN users, however, it can cause DNS leakage, as Windows can fall back on DNS servers other than the VPN-assigned ones.

The most foolproof way to fix that in Windows 8, 8.1, and 10 (both Home and Pro editions), is to simply set the DNS servers manually for all interfaces.


To that end, open up the “Network Connections” via Control Panel > Network and Internet > Network Connections, and right click on each existing entry to change the settings for that network adapter.

For each network adapter, uncheck “Internet Protocol Version 6”, to protect against IPv6 leaking. Then select “Internet Protocol Version 4” and click the “Properties” button.


In the properties menu, select “Use the following DNS server addresses”.


In the “Preferred” and “Alternate” DNS boxes enter the DNS servers you wish to use. The best case scenario is that you use DNS server specifically provided by your VPN service. Private Internet Access users can, for example, use their private DNS servers 209.222.18.222 and 209.222.18.218. 

If your VPN doesn’t have DNS servers for you to use, you can instead use public DNS servers not associated with your geographic location or ISP, like OpenDNS’ servers, 208.67.222.222 and 208.67.220.220.

Repeat this process of specifying the DNS addresses for every adapter on your VPN-enabled computer in order to ensure Windows can never fall back on the wrong DNS address.

Windows 10 Pro users can also disable the entire Smart Multi-Homed Named Resolution feature via the Group Policy Editor, but we recommend also performing the above steps (in case a future update enables the feature again your computer will begin leaking DNS data).

To do so, press Windows+R to pull up the run dialog box, enter “gpedit.msc” to launch the Local Group Policy Editor and, as seen below, navigate to Administrative Templates > Network > DNS-Client. Look for the entry “Turn off smart multi-homed name resolution”.


Double click on the entry and select “Disable” and then press the “OK” button. Again, for emphasis, we recommend manually editing all your DNS entries so even if this policy change fails or is altered in the future you are still protected.


So with all these changes enacted, how does our leak test look now?


Clean as a whistle–our IP address, our WebRTC leak test, and our DNS address all comes back as belonging to our VPN exit node in the Netherlands. As far as the rest of the internet is concerned, we’re from the Lowlands.

Playing the Private Investigator game on your own connection isn’t exactly a thrilling way to spend an evening, but it’s a necessary step to ensure your VPN connection isn’t compromised and leaking your personal information. Thankfully with the help of the right tools and a good VPN, the process is painless and your IP and DNS information is kept private.

How to fix a stuck Windows logo during the Windows 10 Mobile build 14342 install

$
0
0
 

If during the installation of Windows 10 Mobile build 14342 your phone gets stuck at the Windows logo screen, then use these workarounds to fix the issue.


After Microsoft accidentally rolled out a pre-release version of Windows 10 for PC, the company is now once again aligning the version of the operating system for PC and Mobile with the release of Windows 10 Mobile build 14342 to the Fast ring.

The new update brings swipe navigation gestures for Microsoft Edge, Apps for Websites to allow certain sites to open with an app and a lot of new fixes. However, a small number of users has also been reporting that an issue where the phone may get stuck at the Windows logo screen during reboot after the installation of build 14342.

Microsoft is aware of the problem, and it's proactively investigating to find a solution for this issue. In the meantime, the company is offering two temporary solutions to get around the problem.

How to fix the install of build 14342 on Mobile

According to Microsoft, you can fix the Windows logo stuck at reboot in two different ways.

This first workaround involves being patient. The company said that if you come across the issue, then wait between 30 and 40 minutes when you see the Windows logo stuck on the screen to allow the handset to complete the data migration and installation of the operating system.

If waiting didn't fix the problem, the second workaround is to force-reboot your phone. You'll do this by holding the Power + Volume Down keys for at least 11 seconds.

Once your force the reboot, your phone will vibrate, boot again, and it should continue with the installation.

In case, your phone again stops at the Windows logo screen, don't do anything else, as it'll eventually complete the installation. However, make sure your phone is connected and charging during the process.

It's important to note that if you don't wait and try a hard reset, your Windows phone will fail, in which case you'll need to use the Windows Devices Recovery Tool to recover your handset.


Users running into this issue have been reporting that the Windows Recovery Tool successfully detected the bricked phone and the software was able to reinstall the original version of the mobile operating system.

How to Setup an Ethernet connection as metered on Windows 10

$
0
0

If you access the Internet using an Ethernet connection, and you have a limited data plan, use this guide to set your connection as metered on Windows 10. In this Windows 10 guide, we'll walk you through the steps to set your wired network connection as metered by modifying the registry.


Windows 10 is an operating system designed to take full advantage of an internet connection without any restrictions on how much bandwidth it uses to perform tasks, such as download drivers and updates, sync settings, connect with cloud services, let you get access to the World Wide Web, and everything else.

While this isn't a problem for many users, not everyone has an unlimited data plan to access the internet. Many users connect to the World Wide Web through metered internet connection plans, which most of the time have a limit on the amount of data they can send and receive.

If you have a metered internet connection, setting your network connection as metered within Windows 10 will help to reduce the amount of data you're allowed to use in a given month.

The problem is that the operating system only offers this option for Wi-Fi or cellular data connections, and it appears that Microsoft assumes that anyone connected to a network using an Ethernet connection has unlimited access to the internet. However, if you know your way around the registry, you can still set an Ethernet connection as metered to reduce the internet data usage.


How to set an Ethernet metered connection on Windows 10

Important: Before you make any changes, make sure to understand that you'll be modifying the Windows registry, which could be a dangerous game that can cause irreversible damage to your computer when changes are not done properly. It's recommended that you do a full backup of your system before proceeding.
    • Use the Windows key + R to open the Run command, type regedit, and click OK to open the Windows registry.
    • Browse the following path:
      HKEY_LOCAL_MACHINE\SOFTWARE\Microsoft\Windows NT\CurrentVersion\NetworkList\DefaultMediaCost
    • Right-click the DefaultMediaCost key and select Permissions.

      • On the Security tab, click the Advanced button.


      • Next to TrustedInstaller, click the Change link.

      • Type Administrators, and click the Check Names button to make sure you're typing the correct object.

      • Click OK.
      • On the Advanced Security Settings for DefaultMediaCost, check the "Replace owner on subcontainers and objects".

      • Click Apply.
      • Click OK.
      • On Permissions for DefaultMediaCost, select the Administrators group, and then make sure to check the allow Full Control box.


      • Click Apply.
      • Click OK.
      • On the DefaultMediaCost key, you'll find different entries, including for 3G, 4G, Default, Ethernet, and WiFi with their default data values: 1 or 2. The data value 1 means that the connection type is non-metered, and the data value of 2 means that the connection type is metered. Double-click the Ethernet DWORD (32-bit) Value key, and change the value to 2.


      • Click OK.
      • Close the registry and restart your computer to complete the process.
      Once you set a metered connection, the operating system will stop using the internet in many ways. For example:
      • Windows updates will no longer download automatically. However, priority updates will continue to download when available.
      • Apps will no longer update automatically.
      • Live Tiles on the Start menu may stop downloading updates.
      • Offline content may not sync with other devices.
      In the case you want to revert to the original settings, using the same instructions mentioned above, make sure to change the Ethernet key data value from 2 to 1.

      If you want to verify your Ethernet connection is set to metered, you can use apps, such as the desktop version of Outlook, which will detect and alert you that you are using a metered connection, as you probably won't see any "Metered network" statics on the App history tab in Task Manager.


      Obviously, you should also notice a reduced amount of data usage at the end of the month on your internet connection plan.

      While this is a handy workaround to help you to control the data usage of the operating system, remember you will still need to control how much data you personally use to browse the web, watch videos, and everything else to not go over your data cap.

      How to Update Windows 7 All at Once with Microsoft’s Convenience Rollup

      $
      0
      0

      When you install Windows 7 on a new system, you traditionally have to go through a long process of downloading years of updates and constantly rebooting. Not anymore: Microsoft now offers a “Windows 7 SP1 Convenience Rollup” that essentially functions as Windows 7 Service Pack 2. With a single download, you can install the hundreds of updates at once.


      This update package, which combines updates dating all the way back to February 2011, isn’t being made available in Windows Update. If you’re installing a Windows 7 system from scratch, you’ll need to go out of your way to download and install it. If you don’t, Windows Update will download and install the updates one by one–the slower, more tedious way.

      Here’s how to download and install the Convenience Rollup so you don’t have to do it the hard way.

      Install Service Pack 1, If You Don’t Have It Already

      The Windows 7 Service Pack 1 Convenience Rollup requires you already have Service Pack 1 installed. If you’re installing Windows 7 from scratch, you can get this in one of two days:
      • Install From an Disc or ISO That Contains Service Pack 1: Microsoft offers Windows 7 ISO images for download. These ISO images have Service Pack 1 integrated, so you’ll already have Service Pack 1 after installing from them.
      • Download and Install SP1 Separately: If you installed from an older Windows 7 disc without SP1 integrated, you’ll need to install Service Pack 1 afterwards. Launch Windows Update, check for updates, and install the “Service Pack for Microsoft Windows (KB976932)” update to install it. You can also download Service Pack 1 directly from Microsoft and install it without going through Windows Update.
      If you’re not sure whether you have Windows 7 Service Pack 1 installed, open the Start menu, type “winver” into the search box, and press Enter. If it says “Service Pack 1” in the window, you have Service Pack 1. If it doesn’t, you need to install Service Pack 1.


      Find Out Whether You’re Using a 32-bit or 64-bit Version of Windows 7

      If you’re not sure whether you’re using a 32-bit or 64-bit version of Windows 7, you’ll need to quickly find out.

      Click the “Start” button, right-click “Computer” in the Start menu, and select “Properties.” You’ll see this information displayed to the right of “System type” under the System header.


      Download and Install the April 2015 “Servicing Stack” Update

      You can’t simply install the Convenience Rollup after installing Service Pack 1. You have to first install the April 2015 Servicing Stack Update first. Don’t ask us why; ask Microsoft.

      Head to the April 2016 Servicing Stack Update download page and scroll down to the download links. Click the appropriate link to download the update for either an x86 (32-bit) or x64 (64-bit version) of Windows 7.


      Click the “Download” link on the next page to download the file, and then double-click the downloaded update file to install it.


      Download and Install the Windows 7 SP1 Convenience Rollup

      You can download the Windows 7 SP1 Convenience Rollup from Microsoft’s Update Catalog website.
      Unfortunately, this website requires ActiveX, which means it only works in Internet Explorer–you can’t use Google Chrome, Mozilla Firefox, or even Microsoft Edge on a Windows 10 PC.

      After opening the site in Internet Explorer, click the yellow information bar and select “Install This Add-on For All Users on This Computer.” You’ll have to agree to a User Account Control pop-up after installing the ActiveX control.


      You’ll see several update packages available for download:
      • Update for Windows 7 (KB3125574): Download this if you’re using a 32-bit version of Windows 7.
      • Update for Windows Server 2008 R2 x64 Edition (KB3125574): Download this if you’re using a 64-bit version of Windows Server 2008 R2.
      • Update for Windows 7 for x64-based Systems (KB3125574): Download this if you’re using a 64-bit version of Windows 7.


      To download the correct update for your system for your system, click the “Add” button to the right of it on the page.

      If you want to download more than one update–for example, if you’ll be updating both 32-bit and 64-bit Windows 7 systems and want offline copies of the patch–you can click the “Add” button for more than one update to download them at once.


      After you do, click the “View Basket” link at the top right corner of the page.


      Click the “Download” button here to download the update–or updates–you’ve selected.


      You’ll need to select a download location for the update. For example, you could select your Downloads folder or Desktop.

      Click the “Browse” button, select a folder, and then click “Continue.”


      The update will begin downloading, so wait until it does. Depending on the update you selected, the download is between 300MB and 500MB in total.


      When it’s downloaded, you can open the folder you downloaded the update to and double-click it to run it and update your Windows 7 system.

      You can also copy this update file to a USB drive or network location and run it on additional Windows 7 PCs, quickly updating them as long as they already have Service Pack 1 installed.


      This update package only installs all the updates released after Service Pack 1 and before May 16, 2016. Future updates won’t be added to it. If you’re downloading this package after that date, you’ll need to install the Convenience Rollup, then launch Windows Update to install any updates released after this package.

      Going forward, Microsoft will offer a single large update once a month with bug and stability fixes. It will also offer smaller updates for security problems, as usual. This should result in less updates to install after you’ve installed the large Convenience Rollup package.

      How to Setup Assigned Access on Windows 10 to limit users to a single app

      $
      0
      0

      Are you building a kiosk computer or you only want to restrict users to interact with a single app? Then use this guide to set up Assigned access on Windows 10. In this Windows 10 guide, we'll walk you through the steps to set up Assigned access on your computer using your administrator account and a standard account, which will be used to let users interact with a particular app.


      When you need to share your computer with family members or friends, you typically create a new Standard User account to grant them access to use apps and browse the web. However, there will be times, when you may need a more restricted environment to allow users to access only one app.

      For example, if you're setting up a kiosk computer for customers at your business to display a demo, or when hosting a party, you may want everyone to play DJ using the Groove Music app, but you don't want anybody snooping into your personal files.

      Assigned access is a feature on Windows 10 that allows you to create a lockdown environment that lets users interact with only one app when they sign into a specified account. With Assigned access, users won't be able to get to the desktop, Start menu, or any other app, including the Settings app.

      How to configure Assigned access on Windows 10

      Before using this feature, you should consider that you can only assign apps that come bundled with Windows 10 and the ones from the Store. Classic desktop apps support is only available for Windows 10 Enterprise and Education.

      Also, Assigned access can only be set up on Windows 10 Pro, Windows 10 Mobile, Education, and Enterprise.
      • Using your administrator account, create a new Standard User account. You can find the instructions on how to do this in our previous guide.
      • Use the Windows key + I to open the Settings app.
      • Click Accounts.
      • Click Family & other people.
      • Under Other users, click the Set up assigned access link. 


      • Click the Choose an account button, and select the standard account you want to assign to run a single app.


      • Click the Choose an app button, and select the supported app to run on Assigned access.


      • Restart your computer and then sign-in with account you just configured.


      Once you're done using the account, because you don't have access to the Start menu, you'll need to use the Ctrl + Alt + Del keyboard shortcut to sign out of the account. Then to completely terminate the account session, simply restart your computer by clicking the Restart button from the Power menu on the Lock screen.

      How to disable Assigned access

      When you no longer need Assigned access on your PC, follow these steps:
      • Use the Windows key + I keyboard shortcut to open the Settings app.
      • Click Accounts.
      • Click Family & other people.
      • Under Other users, click the Set up assigned access link.
      • Click the account currently setup, and click Don't use assigned access.


      Assigned access is a feature that Microsoft first introduced with Windows 8.1, but it has been improved on Windows 10. Also, while the feature is primarily designed for kiosk scenarios, anyone can use the feature to restrict users to interact with a single app.

      How to Manually Upgrade Your Nexus Phone with ADB Sideload

      $
      0
      0

      Nexus OTA updates are a bit of an enigma—they come straight from Google, but they also depend on carrier approval before they can be sent to devices on certain networks. Getting the latest OTA update meant either waiting a few weeks, or manually flashing a full factory image, which can be a bit janky. Now, however, the process is more streamlined, so you can flash the latest update with one command, no waiting necessary.


      While the old factory image method was simple in theory, it wasn’t always very reliable–sometimes Google’s script wouldn’t work, so you’d have to flash a bunch of files manually from the Command Prompt.

      Furthermore, it required an unlocked bootloader, which the new method does not.

      This new method uses the adb sideload  command to flash the latest update in one fell swoop. If you haven’t used this command before, it can be a bit daunting at first—but it’s actually pretty easy. And, on top of that, it’s faster than waiting for the OTA to hit your device.

      Step One: Get Your Computer and Device Ready

      Before you get started with this, you’ll need to have ADB and fastboot set up on your computer. For ease of use, you’ll also need to have ADB set up in your Windows System PATH. Once you’ve got that all set up, you’re ready to push some OTAs to your Nexus device. Sweet.

      Next, if you haven’t already, you’ll need to access your phone’s Developer Options menu and enable USB debugging. Again, this is simple, and once it’s done, you won’t have to do it again (unless you factory reset the device).


      With all the prep stuff out of the way, head over to Google’s OTA files page. There’s a legal agreement you have to accept before you can access the files, but it’s just the typical mumbo jumbo: these files are provided by Google, you agree to the terms, blah blah blah. Once you agree, the downloads will show up.


      Since this feature just launched, only the most recent OTA files are available for each device. I’m going to use the latest security patch update on my Nexus 6P for this tutorial—that’s build MTC19T for those following along at home.

      Once you have access to the downloads, go ahead and find the build for your device. Click the “Link” link to start the download. These are full OTA packages, so they’re still just a big as a Factory Image—the one for my 6P is a whopping 910MB.


      With the file downloaded and ADB installed, you’re ready to get started.

      Step Two: Connect Your Device and Reboot into Recovery

      Go ahead and connect the device to your computer. The first time you do this, you’ll have to approve USB debugging on this PC—if this is your personal computer (which I hope it is, since you just installed a bunch of stuff on it), then tick the “Always allow from this computer” box.


      Next, navigate to the folder where you saved that OTA file. Shift+right click in the folder, making sure that no files are selected first. Select “Open command window here.” Unsurprisingly, a command window will open.


      In the command window, make sure the computer can see the device with the following command:

      adb devices


      If it’s properly connected, you’ll see an alphanumeric identifier and the word “device.” You’re ready to go.
      Use this command to reboot the device into recovery:
       
      adb reboot recovery


      Your device should begin rebooting.

      Step Three: Sideload the OTA Update

      The device will reboot into a screen with a little Android guy and a red exclamation mark. Press the Volume Up button while holding the Power button to expose the hidden recovery menu.


      Once the menu shows up, use the Volume Down button to navigate to the “Apply update from ADB” option, then press the Power button. This will get the device ready to accept the OTA file.


      Back on the computer, type the following:
       
      adb sideload 

      …where updatefile.zip is the file name of your OTA.


      Once properly executed, the file will begin pushing to the device. A completion percentage will show up in the command prompt, giving you some sort of idea when it will be finished. It’ll take a bit, so go grab a coffee.

      When it’s finished, the recovery menu will show up again on your phone, with the “Reboot system now” option already highlighted. Hit the Power button to commence reboot.

      You can go ahead and unplug the phone from the computer while it’s rebooting. It’ll likely take a bit to boot fully, because Android has to “Optimize apps” after an update. This can take a while, depending on how many apps you have installed. (Thankfully, starting with Android N, optimization times will be dramatically improved.)

      And that’s it—you’re finished. Congrats.

      While adb sideload isn’t necessarily new, this is one of the first real, everyday uses for it—especially for non-rooted users. It’s an easier way to manually flash OTA files, especially since you don’t have to go through all the trouble of flashing a new bootloader, recovery, radios, or system files—one command, and that’s it. I like autopilot.

      How to Create Animated GIFs on Any Platform

      $
      0
      0

      Animated GIFs are everyone’s new favorite way of expressing themselves. They’ve become the moving equivalent of the emoticon, so it can be helpful to know how to create your own.


      The GIF and its animated cousin have been around for almost 30 years. GIFs, which stands for Graphics Interchange Format, are no longer widely used for still images, but the animated variant has overwhelmingly demonstrated its staying power.

      What Is an Animated GIF?

      There is a distinct difference between GIFs and animated GIFs. GIFs don’t have to move, and were at one time the standard image compression format before the superior JPEG and PNG formats came along.

      An animated GIF is really nothing more than a series of images or frames that are displayed in succession, kind of like a cartoon flipbook. For example, this GIF of a spinning globe is really just 44 individual pictures shown in rapid succession, looping endlessly to give the impression that the Earth is continuously rotating on its axis.


      If we open this image in an editor such as Preview, we can see its composition.


      Creating GIFs used to be somewhat more difficult, but with the format’s newfound popularity, there are all kinds of specialized methods to roll your own. Today, we want to show you how to do so on desktops and mobile devices.

      On the Desktop: Use a GIF-Making Website

      Probably the simplest method for creating an animated GIF on a desktop computer is to just use one of the myriad of websites that have appeared to take advantage of the animated GIF phenomenon. Perhaps the most well-known of these sites is Giphy, so we’ll use that as our example today.

      When it comes to making animated GIFs, the hard part isn’t really making the GIF, but finding a source for the GIF. You have to have some kind of video file, or a series of still photos from which to create it. That part is beyond the scope of this article, so just know that you will need to have a video file on hand, or at least have a video URL, before you can create your own animated GIF. Giphy lets you both upload video files as well point to online videos, which makes GIF creation something of a breeze.

      Assuming that you do have some sort of favorite video clip you want to use, let’s briefly describe what’s involved.

      First, any video file you upload cannot exceed 100MB. GIFs are intended to be short, so this shouldn’t be too much of a limitation. If you’re uploading something beyond 100MB, then it’s unlikely to be very effective as a GIF.

      On the Giphy website, click “Create” to get started.


      This opens the GIF Maker, which lets you upload video files or direct it to a YouTube link.


      If you want to actually create an animated GIF from a series of pictures and other GIFs, then you can employ the slideshow option.


      Giphy has two other options you can utilize including the ability to add captions to your GIFs and to edit them so as to include animated stickers and filters.

      In this example, we’re going to convert a video file to an animated GIF. We already have a video file on hand, which we drop onto the Giphy interface. You can also paste in a YouTube URL if the video is available on YouTube (though we’ll feature an even easier way to do that in the next section).


      Once you have your video file (<100mb a="" add="" adjust="" an="" and="" as="" caption.="" duration="" have="" ll="" opportunity="" p="" start="" the="" time="" to="" uploaded="" well="" you="">
      100mb>

      Add some tags and a source URL, both of which are optional, then click “Create GIF”.


      Once your GIF is created, you can share it via an assortment of social networks, or embed it on your web page or blog.


      Perhaps more usefully, the Advanced tab will let you download your GIF to your computer.


      Giphy works great if you’re using a desktop, but if you’re on a mobile phone, there are other ways to easily create animated GIFs using apps specifically designed for that purpose.

      For YouTube Videos: Convert Videos with GIF.com

      Giphy has a tool for converting YouTube videos to GIF, but Giphy isn’t ideal for mobile platforms. That doesn’t necessarily matter because converting a YouTube video to GIF is actually quite easy on any platform. Let’s use an Android device to demonstrate how this is done.

      Note, you have to use YouTube in a web browser for this to work. Don’t try to do it from the YouTube app.

      First, find a video you want to convert.


      Tap the location bar to reveal the full URL and insert “gif” in front of YouTube in the URL, as shown below. Press Enter.


      You’ll be transported to gifs.com (another GIF-making website you could use for all your GIFs if you like).
      You can now adjust the start and end time to suit when and long long you want your GIF to run. If you’re doing this on a mobile device, it might be easier to watch the video first, and note these start and end times.
      When you’re ready, tap “Create GIF”.


      You’re now going to be asked where you want your GIF to link back to, from an array of social networks. In our particular case, we want to have the actual physical GIF file, so we tap “Anonymous” and we’ll be allowed to save our file.


      Once we tap “Save” we can either copy the GIF url or download the GIF file. Press “Hold to copy” and then choose your option, which in our case is “Save link”.


      Your GIF file will now be downloaded to your device.


      That’s probably the easiest way to convert a part or section of a YouTube video to an animated GIF.

      On iPhone and Android: GIF-Making Apps Abound

      As you might assume, both iOS and Android have many GIF-making options available. On iPhone, we settled on GifBoom, while on Android, the aptly-named GIF Maker stood out from the rest.
      Let’s discuss each in brief to simply give you an idea of what these two apps offer, especially the essential basic functions we think you need to know about.

      GIF Maker on Android

      GIF Maker seems to be one of the simplest and best rated GIF making app we found for Android.


      GIF Maker provides the two essential functions we want to see in such an application: the ability to shoot a video for conversion to a GIF, as well as the ability to cobble a GIF together from files you already possess.
      In shooting a GIF, GIF Maker has a number of features you can explore including the ability to shoot manually or a selfie.


      If you want to make a GIF from pre-existing content, then you’ll be able to select a group of photos, ordering them to your liking.


      Regardless of whether you shoot a new GIF or create one, you’ll also need to edit it before you can save it.


      Once you’re done editing, GIF Maker will provide some options as to what to do with it including the ability to share it via the most popular social networks.


      GIF Maker is likely to please most people using the Android platform, and best of all it is free to use. We found it fairly easy and straightforward to quickly make GIFs in just a few minutes.

      GifBoom Pro on iPhone

      There are quite a few GIF-making titles in the App Store, but in the end, we found one (GifBoom Pro) that really fit the bill as cleanly the aforementioned GIF Maker (there is a version of GifBoom available for Android in the Play Store, but it’s not as highly rated as GIF Maker).

      There are two flavors of GifBoom available for iPhone: GifBoom and GifBoom Pro. GifBoom is more network-oriented and seems intended more for sharing. For the purposes of simply making animated GIFs, we deferred to the standalone GifBoom Pro for our purposes.

      The GifBoom Pro interface is dead simple to use. If you have any GIFs stored on your device, they’ll be displayed in the main interface.

      Along the bottom row, you’ll find four buttons to (left to right) open the camera and make a GIF, create a GIF from still media on your phone, create a GIF from videos, and the fourth option will let you take an existing GIF and edit it to your liking.


      For example, if we tap the camera icon, we get a full-featured camera with several options.


      Here, we’ve tapped on the photos option and we can now go through and select every frame in our new GIF (up to 60).


      Once you’ve selected your photos, you’ll be able to adjust things like the speed, add filters, text, and so forth.


      Finally, you can share your new creation among a plethora of social networks, or just simply save it to your device for your own private enjoyment.


      Both of these apps, GIF Maker and GifBoom Pro, are very simple to use and you should have no problem figuring all their various features and options.

      In fact, GIF-making as whole, whether it’s on a desktop computer or mobile platform has become as simple as making a meme or publishing a video on YouTube.

      Really, the only thing then that you’ve left to figure out is what you want to make.

      How to Disable Ambient Display on Android Phone

      $
      0
      0

      Back in Android 5.x Lollipop, Google released a new feature called “Ambient Display”—a tweak that shows notification information on the phone or tablet’s display when you pick it up or get a notification, without actually having to turn the display on.


      While this sounds like a neat feature, it’s not without its own set of…irritations. For example, the phone may detect movement in a pocket or purse as a “pick up,” which can result in unintentional taps on the display and execution of tasks—like pocket dials, for example. Fortunately, disabling this feature is quick and painless.

      The first thing you’ll want to do is jump into your device’s Settings menu. The easiest way to get there is to pull down the notification shade, then pull down once more to expose the Quick Settings menu. In the top-right corner, tap the gear icon.


      In the Settings menu, scroll down until you see the “Display” entry, then tap that.


      A little way down this menu, you’ll see a toggle for “Ambient Display.” Tap the slider to disable it.


      That’s literally all there is to it—one toggle, and all of your problems will go away. Well, maybe not all. But all of them pertaining to Ambient Display, anyway.


      Aside from potential “pocket taps,” Ambient Display can also be distracting if you work at a desk and get several notifications a day. For example, if you have a constant flow of email coming in, Ambient Display will activate every single time you get a new email (or any other notification), which can be incredibly annoying. It’s a good idea in theory, but in the real world I’m glad there’s an option to turn it off.

      How to Setup and Use Open365, an Open Source Alternative to Office365

      $
      0
      0

      If you use the LibreOffice suite of programs, you’ll be happy to learn about Open365. Just as LibreOffice is the free, open source alternative to Microsoft Office, Open365 is the free counterpart to the cloud-based Office 365.


      Open365, currently in beta, works a lot like Office 365. it allows you to edit documents, such as .docx, .xlsx, or .pptx, but you can also upload media files to your Open365 account. If a file format is not supported, you will be prompted to download the file so you can open it in an appropriate program. You can open and edit Microsoft Word, Excel, and PowerPoint documents (and LibreOffice Writer, Calc, and Impress documents, of course) online, as well as store them in the cloud so you can access them from anywhere. When you sign up for a free Open365 account, you get 20GB of cloud-based storage for your files, although it’s unclear at this time if that’s only available during the beta period.

      NOTE: At the time this article was published, the only new file you can create on Open365 is a Markdown file. If you want to create a new LibreOffice Writer, Calc, or Impress document, create one on your local hard drive using one of the desktop LibreOffice apps (or portable apps) and then upload the file into your Open365 library. You can also upload LibreOffice or Microsoft Office files to your Open365 account, and we’ll show you how to easily upload document files later in this article.

      How to Sign Up for an Open365 Account

      To sign up for Open365 Beta, visit this website and enter your email address.


      Enter a “Username”, which will be your email address on Open365 (example@open365.io). You will use this email address to log in to your Open365 account. Choose a password and enter it twice (once in the “Password” edit box and again in the “Repeat Password” edit box. The email you entered on the early access page is automatically entered into the “E-mail” box. Fill in the rest of the form, click the “I understand and accept the Open365 privacy policy” check box (you can read the policy by clicking the “privacy policy” link), and then click “Register”.


      The browser’s Save As dialog box automatically opens so you can download the Open365 client. The client is not necessary to use Open365, but it makes it easier to sync documents between your PC and your Open365 account.

      You don’t have to download the client installation file now, either; it can be easily downloaded later from within your Open365 account. If you want to download the client installation file now, navigate to where you want to save the file and click “Save”. Otherwise, click “Cancel”. We’ll discuss installing and using the Open365 client later in this article.


      The following screen also displays after you finish with the registration screen. Click “I’m Ready” to continue.


      On the login screen, enter your new Open365 email address in the “Username” edit box and then enter your “Password” and click “Log In”.


      If you want to get notifications from Open365, click “Allow” on the popup that displays. These notifications include messages about uploads and downloads of files completing.


      How to Open Libraries and Files

      Once you’ve signed up for Open365 and signed in, the “Hub” view displays. Initially, you have one library called “My Library” containing some sample files. You can create multiple libraries to help categorize your files. For example, maybe you want a library for personal files and one for work files.
      To access the sample files in the library, click “My Library”.


      Click one of the sample files to open it.


      If the file is in a supported format, it’s opened in the full LibreOffice program online, otherwise you are prompted to download the file.

      NOTE: It may take a bit of time for the document to load, so be patient if you see a blank page.


      Use the menus and features of the online editor to add or make changes to your document. You can save it using the Save command on the File menu, just like you would in a program locally on your computer. Again, saving your document may take a while, so be patient.


      If you’re saving a Microsoft Office document, the following warning dialog box displays telling you that your document may contain some formatting that can’t be saved in the current format. If you used any features that are exclusive to LibreOffice, they will not be saved with the file if you save it as a Microsoft Office file. To continue saving the document in Office format (Word in this example) click “Use Microsoft Word 2007-2013 XML Format”.

      NOTE: Notice this dialog box says Word 2007-2013 (as of the publication of this article). You can also work with Microsoft Office 2016 files in Open365. We tested the service using a Word 2016 file.


      To close the document, simply close the tab. The Confirm Navigation dialog box displays, warning you that you can lose work if you leave the page. If you’ve saved your document, click “Leave this Page” to close the tab.


      How to Create a New Library

      As we mentioned earlier, you can create multiple libraries in the web interface to categorize your documents. To create a new library, click the “Libraries” link above the list of documents to return to the main list of libraries.


      Then, click “New Library” on the right above the list of documents.


      The New Library dialog box displays. Enter a name for your new library in the “Name” edit box. We tested encryption on a new library created in the web interface and it is not working yet. So, do not check the “Encrypt” box. Click “Submit”.


      Click on the new library in the list of libraries to open it.


      How to Upload a Document

      Uploading documents into your Open365 account allows you to view and edit those documents anywhere you have an internet connection. To upload a document, open File Explorer (or Windows Explorer), find the document you want to upload, and drag it onto the browser window into your new library.


      You can also click the “Upload” button on the toolbar and select a file to upload using the Open dialog box.


      When the file has finished uploading, the File Upload complete popup displays at the bottom of the browser window.


      The document is available for viewing and editing in the new library.


      How to Download a Document

      So, you’ve been making changes to your document online from various locations and now you want to download the file to your laptop so you can work on it offline. Maybe you need to work on the document in a location without an internet connection for a while. You can upload it again and replace the document file online once you have internet connectivity.

      To download a document, move your mouse over the line for the desired document and click the “Download” button.


      On the Save As dialog box, navigate to where you want to save the document. The current name of the document is entered into the “File name” edit box. Change the name if you want and then click “Save”.


      How to Use the Open365 Client

      The Open365 client allows you to easily upload and download documents by creating a library from a folder on your local machine, and syncing that folder with the connected library in your Open365 account–much like Google Drive or Dropbox. If you haven’t downloaded the client yet, log into your account, and click the “Download client” link at the bottom of the screen.

      Install the client from the downloaded file, following the on-screen instructions.


      Once the client is installed, run it. In Windows 7 and 10, you can run Open365 from the Start menu. In Windows 8/8.1, search for Open365 on the Start screen to find the program and run it.


      The Choose Seafile folder screen allows you to specify which folder on your PC to which libraries will be downloaded by default. Initially, your user folder under C:\Users is selected and a Seafile subfolder will be created in that folder. To change this folder, click “Choose”.


      On the Please choose a directory dialog box, navigate to the folder to which you want to download libraries by default and click “Select Folder”.


      The full path to the selected folder is entered in the edit box. Click “Next”.


      The Add an account dialog box displays. By default, the URL of the Open365 server is entered into the “Server” edit box automatically. However, the developers of Open365 plan to release tools that will allow you to host your own server. So, unlike Office 365, you’ll have access to features similar to Office 365 without giving up control over your own data. For this example, though, we’ll use Open365’s server, so accept the default path to the server.

      In the “Email” edit box, enter the Open365 email address you created from your username and then enter your “Password”. The current name of your computer is entered automatically in the “Computer Name” edit box. Change that text if you want to use a different name. Click “Login”.


      The Open365 client opens. You can map a folder on your local hard drive to a library in your Open365 account. This allows you to simply add files to that folder to upload them and delete files from that folder to remove them from your account. You can open files from within that folder, change them, and have the changed document re-upload to your Open365 account.

      To sync a local folder with a library online, open File Explorer (or Windows Explorer), navigate to the folder you want to sync, and drag it to the “Select or Drop Folder to Sync” box at the bottom of the Open365 client window.


      On the Create a library dialog box, the path to the folder you dragged on to the client window is automatically entered into the “Path” edit box, but you can click “Choose” to change this path. Maybe you changed your mind or dragged the wrong folder on to the client window. By default, the name of the folder is entered as the name of the library. However, you can change that in the “Name” field. Encryption is not working in the Open365 client either, so do not check the “encrypted” box. Click “OK”.


      Any documents in the local folder are automatically uploaded to the new library in your Open 365 account online.


      How to Share a Library or a Document

      You can also share libraries and documents with others. To do this, move your mouse over the library in the list and click the “Share” button.


      The Share dialog box displays providing different ways of sharing the libraries. You can generate a download link to allow other people to download the library and the files in the library or you can generate an upload link which would allow others to upload files to your library. You can also share an entire library with one user or with an entire group. You may want to create groups of your colleagues, friends, or family and share a library of files with everyone in a group at once.

      When sharing documents, you can only generate a download link.

      For this example, I’m going to create a link that will allow others to download the library I have shared. To do this, make sure “Download Link” is selected on the left. If you want to add password protection to the shared library or document, check the “Add password protection” box and enter a password twice.


      When you share a library, and you’ve applied a password to it, the recipient of the link will have to enter that password on the webpage to access the files.


      If you’re sharing a document, a Direct Download Link is also available (whether or not you applied a password to the document). That allows the recipient of the link to download the document without entering a password, even if one was applied to the document.


      Open365 has apps available for iOS and Android. In Open365 on iOS, it seems like you can only open documents in other word processors on your device and creating new files doesn’t work correctly. For

      Android, there is also the LibreOffice Viewer Beta for Android, which is in the early stages of development. There is an experimental editing mode that you can enable and “use at your own risk”. We tried it and it didn’t work very well yet.

      Open365 is useful if you create and edit LibreOffice documents on a Windows, Mac, or Linux computer and want access to your documents from any machine without having to transfer your documents by “sneaker net”. Remember, it’s in beta and still in the early stages of development, so not everything works yet, and there may be some bugs, but it looks promising.
      Viewing all 880 articles
      Browse latest View live


      <script src="https://jsc.adskeeper.com/r/s/rssing.com.1596347.js" async> </script>