Active Directory migration is now a very simple and straight forward task but still few important things you need to consider before you jump into migration process of your active directory domain controllers.
• Evaluate organizational requirement for active directory migration
• Make Plan for implementation Process
• Prepare Physical / Virtual resources for Domain Controller
• Install Windows server 2019 Standard or Datacenter edition
• Install latest patches from Windows Updates
• Assign Static IP address to Domain Controller
• Install Active Directory Domain Services Role
• Migrate Application and Server Roles from the Existing Domain Controllers.
• Migrate FSMO roles to new Domain Controllers
• Demote old Active Directory domain controllers
• Raise the Domain and Forest Functional level
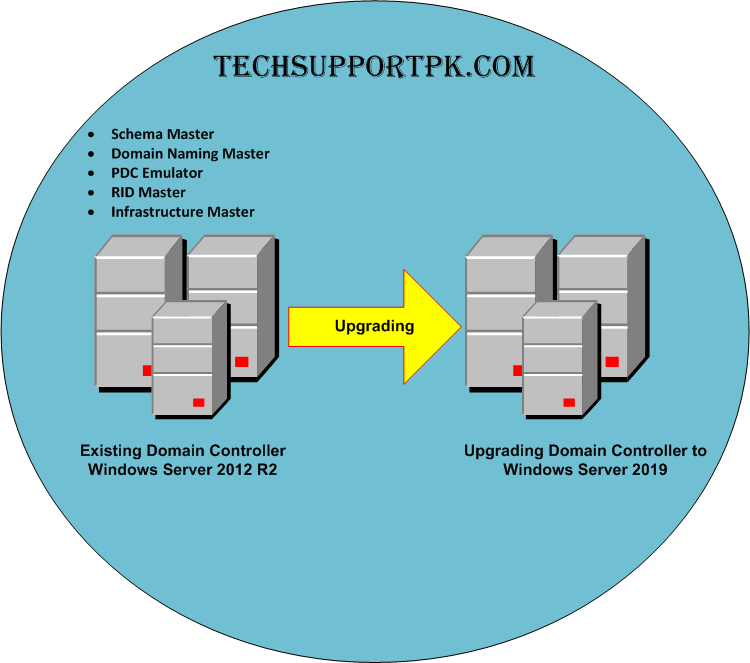
As per the below diagram techsupportpk.com domain has single domain controller with all 5 FSMO role running on Windows server 2012 R2. Domain and forest functional level currently operating at Windows server 2012 R2. We will add a new domain controller with Windows server 2019 and it will be the new FSMO role holder for the domain. once FSMO role migration completed, Domain controller running windows server 2012 R2 will be demoted. After that, forest and domain function level will be raised to the latest available version.
![]()
STEP1 - Add Windows server 2019 to the existing domain as member
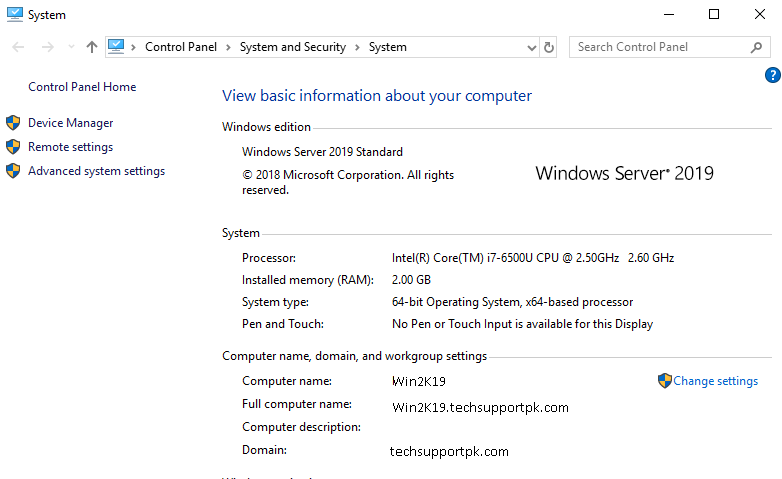
Log in to the Server 2019 as a member of local administrators group and join your server to domain. After restart, log in to the server as Enterprise Administrator.
![]()
Assign static IP address to the server. Launch the PowerShell Console as an Administrator. Install the AD DS Role using the following command:
Install-WindowsFeature –Name AD-Domain-Services -IncludeManagementTools
When above process completed then configure the new server as additional domain controller using the following command:
Install-ADDSDomainController -CreateDnsDelegation:$false -NoGlobalCatalog:$true -InstallDns:$true -DomainName "techsupportpk.com" -SiteName "Default-First-Site-Name" -ReplicationSourceDC "Win2K12R2.techsupportpk.com" -DatabasePath "C:\Windows\NTDS" -LogPath "C:\Windows\NTDS" -NoRebootOnCompletion:$true -SysvolPath "C:\Windows\SYSVOL" -Force:$true
Make sure to replace Win2K12R2.techsupportpk.com with your existing FQDN.
Once execute the command it will ask for SafeModeAdministrator Password. Please use complex password to proceed.
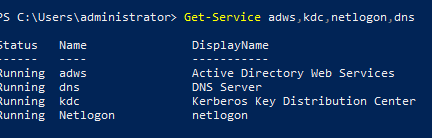
After configuration completed, restart the system and log back in as administrator to check the AD DS status using the following command:
Get-Service adws,kdc,netlogon,dns
![]()
Execute the following command to list down the domain controllers along with the IP address and Sites it belongs to.
Get-ADDomainController -Filter * | Format-Table Name, IPv4Address, Site
STEP2 - Migrate FSMO Roles
Its time to migrate all five FSMO roles to the new domain controller using the following command:
Move-ADDirectoryServerOperationMasterRole -Identity Win2K19 -OperationMasterRole SchemaMaster, DomainNamingMaster, PDCEmulator, RIDMaster, InfrastructureMaster
Make sure to replace Win2K19 with your Windows Server 2019 computer name.
Press to "A" Yes to All
Once migration process completed, you can verify the new FSMO role holder using the following command:
Netdom query fsmo
This will confirm that you are now running all 5 FSMO roles on Windows Server 2019 domain.
STEP3 - Demote Windows 2012 R2 Domain
At this point we need to demote the old windows domain controller which running with windows server 2012 R2. To do that execute the following command as enterprise administrator from the relevant DC.
Open up PowerShell on Windows 2012 R2 domain controller and execute the following command:
Uninstall-ADDSDomainController -DemoteOperationMasterRole -RemoveApplicationPartition
Once execute the above command it will ask to define password for the local administrator account.
STEP4 - Raise Domain and Forest Functional Level
The last step is to raise the domain and forest functional level to windows server 2019. To do that, execute the following commands on Windows Server 2019 domain controller:
To upgrade domain functional levels:
Set-ADDomainMode –identity techsupportpk.com -DomainMode Windows2016Domain
Make sure to replace techsupportpk.com with your domain name.
To upgrade forest function levels
Set-ADForestMode -Identity techsupportpk.com -ForestMode Windows2016Forest
Note: With windows server 2019, there is no domain or forest functional level called windows2019 so we have to keep 2016.
• Evaluate organizational requirement for active directory migration
• Make Plan for implementation Process
• Prepare Physical / Virtual resources for Domain Controller
• Install Windows server 2019 Standard or Datacenter edition
• Install latest patches from Windows Updates
• Assign Static IP address to Domain Controller
• Install Active Directory Domain Services Role
• Migrate Application and Server Roles from the Existing Domain Controllers.
• Migrate FSMO roles to new Domain Controllers
• Demote old Active Directory domain controllers
• Raise the Domain and Forest Functional level
As per the below diagram techsupportpk.com domain has single domain controller with all 5 FSMO role running on Windows server 2012 R2. Domain and forest functional level currently operating at Windows server 2012 R2. We will add a new domain controller with Windows server 2019 and it will be the new FSMO role holder for the domain. once FSMO role migration completed, Domain controller running windows server 2012 R2 will be demoted. After that, forest and domain function level will be raised to the latest available version.
In this demonstration, we are using Win2K12R2 as the domain controller hostname for windows server 2012 R2 and Win2K19 as the domain controller hostname for windows server 2019. These steps can also be applied if you are migrating from Windows server 2008 R2 to Windows Server 2019 or Windows server 2016 to Windows Server 2019.
Note: When you add a new domain controllers to the existing infrastructure it is recommended to add it to the forest root level first and then go to the domain tree levels.
STEP1 - Add Windows server 2019 to the existing domain as member
Log in to the Server 2019 as a member of local administrators group and join your server to domain. After restart, log in to the server as Enterprise Administrator.
Assign static IP address to the server. Launch the PowerShell Console as an Administrator. Install the AD DS Role using the following command:
Install-WindowsFeature –Name AD-Domain-Services -IncludeManagementTools
When above process completed then configure the new server as additional domain controller using the following command:
Install-ADDSDomainController -CreateDnsDelegation:$false -NoGlobalCatalog:$true -InstallDns:$true -DomainName "techsupportpk.com" -SiteName "Default-First-Site-Name" -ReplicationSourceDC "Win2K12R2.techsupportpk.com" -DatabasePath "C:\Windows\NTDS" -LogPath "C:\Windows\NTDS" -NoRebootOnCompletion:$true -SysvolPath "C:\Windows\SYSVOL" -Force:$true
Make sure to replace Win2K12R2.techsupportpk.com with your existing FQDN.
Once execute the command it will ask for SafeModeAdministrator Password. Please use complex password to proceed.
After configuration completed, restart the system and log back in as administrator to check the AD DS status using the following command:
Get-Service adws,kdc,netlogon,dns
Execute the following command to list down the domain controllers along with the IP address and Sites it belongs to.
Get-ADDomainController -Filter * | Format-Table Name, IPv4Address, Site
STEP2 - Migrate FSMO Roles
Its time to migrate all five FSMO roles to the new domain controller using the following command:
Move-ADDirectoryServerOperationMasterRole -Identity Win2K19 -OperationMasterRole SchemaMaster, DomainNamingMaster, PDCEmulator, RIDMaster, InfrastructureMaster
Make sure to replace Win2K19 with your Windows Server 2019 computer name.
Press to "A" Yes to All
Once migration process completed, you can verify the new FSMO role holder using the following command:
Netdom query fsmo
This will confirm that you are now running all 5 FSMO roles on Windows Server 2019 domain.
STEP3 - Demote Windows 2012 R2 Domain
At this point we need to demote the old windows domain controller which running with windows server 2012 R2. To do that execute the following command as enterprise administrator from the relevant DC.
Open up PowerShell on Windows 2012 R2 domain controller and execute the following command:
Uninstall-ADDSDomainController -DemoteOperationMasterRole -RemoveApplicationPartition
Once execute the above command it will ask to define password for the local administrator account.
STEP4 - Raise Domain and Forest Functional Level
The last step is to raise the domain and forest functional level to windows server 2019. To do that, execute the following commands on Windows Server 2019 domain controller:
To upgrade domain functional levels:
Set-ADDomainMode –identity techsupportpk.com -DomainMode Windows2016Domain
Make sure to replace techsupportpk.com with your domain name.
To upgrade forest function levels
Set-ADForestMode -Identity techsupportpk.com -ForestMode Windows2016Forest
Note: With windows server 2019, there is no domain or forest functional level called windows2019 so we have to keep 2016.
Now you have successfully completed the migration from Active Directory domain services from Windows 2012 R2 to Windows Server 2019.