Quantcast
Channel: Tech Support
Viewing all 880 articles
Browse latest View live

How To Install and Configure LibreNMS on CentOS/RHEL 8

$
0
0


LibreNMS is an auto-discovering PHP/MySQL/SNMP based network monitoring which includes support for a wide range of network hardware and operating systems including Cisco, Linux, FreeBSD, Juniper, Brocade, Foundry, HP and many more.

This guide will walk you through the steps to install and configure LibreNMS on a CentOS 8 machine. These instruction can also be applied if you are running RHEL 8 or Fedora 30. In case of Fedora, you will just need to replace yum command with dnf following packages installation.

Throughout this tutorial, we assume you are the root user. If you are not, prepend sudo to the shell commands or temporarily become a user with root privileges using sudo -s or sudo -i command.

Prerequisites

You will need one CentOS / RHEL 8 (physical or virtual) machine with minimal installed having root user privileges.

Set Timezone

You can set timezone using the following command and replace highlighted text with yours
timedatectl set-timezone Asia/Karachi

Disabling SELinux

Edit /etc/selinux/config file and change SELINUX=enforcing parameter to SELINUX=disabled like below:
vi /etc/selinux/config

SELINUX=disabled
Save and close.

Now reboot your machine by typing the following reboot command on terminal:
reboot

Installing EPEL Repository

It is recommended practice to add extra packages for enterprise linux repository before proceeding to install packages.
yum install https://dl.fedoraproject.org/pub/epel/epel-release-latest-8.noarch.rpm

ARCH=$( /bin/arch )

dnf config-manager --set-enabled PowerTools

Installing Required Dependencies

First, you need to install these important librenms dependencies
yum -y install git cronie fping ImageMagick mtr net-snmp net-snmp-utils nmap rrdtool unzip tar wget python36

Installing MariaDB

You can install MariaDB database using the following command:
yum -y install mariadb mariadb-server

Installing Apache

You can install Apache web server using the following command:
yum -y install httpd httpd-devel

Installing PHP

You can install important PHP packages using the following commands:
yum -y localinstall http://rpms.remirepo.net/enterprise/remi-release-8.rpm

yum -y install php-process php73 php73-php-cli php73-php-common php73-php-curl php73-php-gd php73-php-mbstring php73-php-process php73-php-snmp php73-php-xml php73-php-zip php73-php-memcached php73-php-mysqlnd php-json php-gd php-mbstring php-pdo php73-php-pdo-dblib php-mysqlnd php-xml

Adding User

Issue the following commands to add a librenms user:
useradd librenms -d /opt/librenms -M -r

usermod -a -G librenms apache

Cloning LibreNMS

You will need to clone librenms software from GitHub like below:
cd /opt

git clone https://github.com/librenms/librenms.git

Set Permissions

Issue the following commands to set appropriate permission:
chown -R librenms:librenms /opt/librenms

chmod 770 /opt/librenms

setfacl -d -m g::rwx /opt/librenms/rrd /opt/librenms/logs /opt/librenms/bootstrap/cache/ /opt/librenms/storage/ /opt/librenms/cache

setfacl -R -m g::rwx /opt/librenms/rrd /opt/librenms/logs /opt/librenms/bootstrap/cache/ /opt/librenms/storage/ /opt/librenms/cache

Run Composer Wrapper

Issue the following commands to run composer wrapper script:
cd /opt/librenms

curl -sS https://getcomposer.org/installer | php

su - librenms

./scripts/composer_wrapper.php install --no-dev
You will see similar to the following output while running composer wrapper script and it will take few minutes to complete.


When above process done, issue the exit command to go back to root user prompt.
exit

Securing Database

By default MariaDB installation is insecure and anyone can intrude into your database. To make it secure, run the following commands and follow the instruction to complete.
systemctl start mariadb

systemctl enable mariadb
mysql_secure_installation

NOTE: RUNNING ALL PARTS OF THIS SCRIPT IS RECOMMENDED FOR ALL MariaDB
SERVERS IN PRODUCTION USE! PLEASE READ EACH STEP CAREFULLY!

In order to log into MariaDB to secure it, we'll need the current
password for the root user. If you've just installed MariaDB, and
you haven't set the root password yet, the password will be blank,
so you should just press enter here.

Enter current password for root (
enter for none):
OK, successfully used password, moving on...

Setting the root password ensures that nobody can log into the MariaDB
root user without the proper authorisation.

Set root password? [Y/n]
y
New password:
Re-enter new password:

Password updated successfully!
Reloading privilege tables..
... Success!


By default, a MariaDB installation has an anonymous user, allowing anyone
to log into MariaDB without having to have a user account created for
them. This is intended only for testing, and to make the installation
go a bit smoother. You should remove them before moving into a
production environment.

Remove anonymous users? [Y/n]
y
... Success!

Normally, root should only be allowed to connect from 'localhost'. This
ensures that someone cannot guess at the root password from the network.

Disallow root login remotely? [Y/n]
y
... Success!

By default, MariaDB comes with a database named 'test' that anyone can
access. This is also intended only for testing, and should be removed
before moving into a production environment.

Remove test database and access to it? [Y/n]
y
- Dropping test database...
... Success!
- Removing privileges on test database...
... Success!

Reloading the privilege tables will ensure that all changes made so far
will take effect immediately.

Reload privilege tables now? [Y/n]
y
... Success!

Cleaning up...

All done! If you've completed all of the above steps, your MariaDB
installation should now be secure.

Thanks for using MariaDB!

Creating Database

Now you need to create a database and a user for librenms like below:
mysql -u root -p
CREATE DATABASE librenms CHARACTER SET utf8 COLLATE utf8_unicode_ci;

CREATE USER 'librenms'@'localhost' IDENTIFIED BY '
TypePasswordHere';

GRANT ALL PRIVILEGES ON librenms.* TO 'librenms'@'localhost';

FLUSH PRIVILEGES;

exit
vi /etc/my.cnf
Within the [mysqld] section, add following:
[mysqld]
innodb_file_per_table=1
lower_case_table_names=0
Save and close.
systemctl enable mariadb

systemctl restart mariadb

Configuring PHP

Make sure date.timezone parameter is set in php.ini to your preferred time zone. See http://php.net/manual/en/timezones.php for a list of supported timezones. Valid examples are: "America/New_York", "Australia/Brisbane", "Etc/UTC".
vi  /etc/php.ini

date.timezone =
Asia/Karachi
Save and close.

Configuring Apache

Now create the librenms.conf file under /etc/httpd/conf.d/ directory like below. Make sure you replace ServerName parameter with yours as required:
vi /etc/httpd/conf.d/librenms.conf


DocumentRoot /opt/librenms/html/
ServerName
librenms.techsupportpk.com

AllowEncodedSlashes NoDecode

Require all granted
AllowOverride All
Options FollowSymLinks MultiViews


Save and close.
systemctl start httpd

systemctl enable httpd

Allow Fping

Create the file http_fping.tt with the following contents. You can create this file anywhere, as it is a throw-away file. The last step in this install procedure will install the module in the proper location.
vi /opt/librenms/http_fping.tt
module http_fping 1.0;

require {
type httpd_t;
class capability net_raw;
class rawip_socket { getopt create setopt write read };
}

#============= httpd_t ==============
allow httpd_t self:capability net_raw;
allow httpd_t self:rawip_socket { getopt create setopt write read };
Save and close.

Type the following commands to set proper permission and load the module.
chown -R librenms:librenms /opt/librenms/http_fping.tt
checkmodule -M -m -o http_fping.mod http_fping.tt

Output
checkmodule: loading policy configuration from http_fping.tt
checkmodule: policy configuration loaded
checkmodule: writing binary representation (version 19) to http_fping.mod

semodule_package -o http_fping.pp -m http_fping.mod

semodule -i http_fping.pp
It will take a moment to return back to terminal

Adding Firewall Rules

firewall-cmd --zone public --add-service http
firewall-cmd --permanent --zone public --add-service http
firewall-cmd --reload

SNMP Settings

systemctl start snmpd
systemctl enable snmpd

curl -o /usr/bin/distro https://raw.githubusercontent.com/librenms/librenms-agent/master/snmp/distro
chmod +x /usr/bin/distro

chmod +x /usr/bin/distro

Adding Cron Job

cp /opt/librenms/librenms.nonroot.cron /etc/cron.d/librenms

Copying Logrotate

cp /opt/librenms/misc/librenms.logrotate /etc/logrotate.d/librenms

LibreNMS Web installer

Open up your favorite web browser and navigate to the web installer like http://Your_Server_Name/install.php or http://Your_Server_IP/install.php and follow the on-screen instructions.

Click Next Stage


Enter password in DB Pass box for librenms user you created earlier and click Next Stage


This will take a moment to import database, when done click Goto Add User


Enter username and password you wish to add and click Add User

Click Generate Config


Click Finish Install


Now stop on this screen.


Go back to command line terminal and perform the following to validate the installation.
cd /opt/librenms

vi /opt/librenms/config.php
Add the following parameter
### Fping6
$config['fping6'] = '/usr/sbin/fping';
This is the screenshot so don't get confuse.


Save and close.

Now type the following commands to set appropriate permission:
chown -R librenms:librenms /opt/librenms

setfacl -d -m g::rwx /opt/librenms/rrd /opt/librenms/logs /opt/librenms/bootstrap/cache/ /opt/librenms/storage/

chmod -R ug=rwX /opt/librenms/rrd /opt/librenms/logs /opt/librenms/bootstrap/cache/ /opt/librenms/storage/
Run the following script:
python3 ./scripts/github-remove -d

Output
Are you sure you want to delete all modified and untracked files? [y/N] y
Now validate the installation using the following script
./opt/librenms/validate.php
You will see similar to the following output which says all is well and you can safely ignore (devices add) warning because we are going to add devices via web interface.

In case you see any warning related to permission etc, fix them first and then move to next step.


Now go back to librenms web interface we left opened earlier and click on 'validate your install and fix any issues'


This will bring you to login page, enter username and password you created during web installer process to log in.


Once you are logged in, you will see the following screen show everything is OK.


Now we will show you how to add a device in librenms by adding localhost as our first device as an example to monitor its memory, cpu, disk utilization.

To add a device, navigate to Devices tab then Add Device


Provide your device credentials and click Add Device


This screen will confirm you whether device is added or not.

Click on device name to its result.


You can see here that librenms has started collecting localhost data.

Wrapping up

Now that you have successfully completed librenms installation and if you have any question or suggestion, please leave your thoughts in below comment box. We hope you enjoy using LibreNMS.

How To Install OpenLiteSpeed Web Server on CentOS/RHEL 8

$
0
0

OpenLiteSpeed is the Open Source edition of LiteSpeed Web Server Enterprise. OpenLiteSpeed contains all of the essential features found in LiteSpeed Enterprise, and represents its commitment to support the Open Source community.

This tutorial will show you how to install OpenLiteSpeed web server on a CentOS 8 machine. You can perform these steps if you are running rhel 8 machine.

OpenLiteSpeed Features:

OpenLiteSpeed combines speed, security, scalability, optimization and simplicity in one friendly open-source package.


  • Event-Driven Architecture: Fewer processes, less overhead, and enormous scalability. Keep your existing hardware.
  • Upgrade from Apache: OpenLiteSpeed is mod_rewrite compatible, so you can continue to use your current rewrite rules.
  • Friendly Admin Interfaces: OLS comes with a built-in WebAdmin GUI. Control panel support is available with CyberPanel.
  • Built for Speed and Security: Features Anti-DDoS connection and bandwidth throttling, ModSecurity v3 integration, and more.
  • Intelligent Cache Acceleration: Built-in full-page cache module is highly-customizable and efficient for an exceptional user experience.
  • PageSpeed Optimization: Automatically implement Google's PageSpeed optimization system with the mod_pagespeed module.
  • PHP LiteSpeed SAPI: Native SAPI for PHP allows external applications written in PHP to run up to 50% faster.
  • One-Click Installation: Install OpenLiteSpeed, MariaDB and WordPress on various operating systems with just one click.
  • WordPress Acceleration: Experience a measurable performance boost with OpenLiteSpeed and LSCache for WordPress.
  • HTTP/3 Support: LiteSpeed is the first to provide a production-ready implementation of this new Internet protocol, previously known as HTTP-over-QUIC.


Prerequisites

You will need one CentOS 8 (physical or virtual) machine with minimal installed having root user privileges.

Disabling SELinux

You should change from SELINUX=enforcing to SELINUX=disabled in /etc/selinux/config file for smooth installation of the packages:
vi /etc/selinux/config
# This file controls the state of SELinux on the system.
# SELINUX= can take one of these three values:
# enforcing - SELinux security policy is enforced.
# permissive - SELinux prints warnings instead of enforcing.
# disabled - No SELinux policy is loaded.
SELINUX=disabled
# SELINUXTYPE= can take one of these three values:
# targeted - Targeted processes are protected,
# minimum - Modification of targeted policy. Only selected processes are protected.
# mls - Multi Level Security protection.
SELINUXTYPE=targeted
Save and close.

Now reboot your machine to take changes into effect.
reboot

Adding EPEL Repository

It is recommended to install extra packages for enterprise linux repository before proceeding to install packages using yum package manager:
yum -y install https://dl.fedoraproject.org/pub/epel/epel-release-latest-8.noarch.rpm
ARCH=$( /bin/arch )
dnf config-manager --set-enabled PowerTools

Installing Dependencies

You will need to install following required dependencies prior to install openlitespeed web server:
yum -y install openssl openssl-libs libargon2 wget tar zip unzip php python36

Installing OpenLiteSpeed

OpenLiteSpeed provides a repository for its software you can use to download and install the server with CentOS’s standard yum command.
rpm --import https://rpms.litespeedtech.com/centos/RPM-GPG-KEY-litespeed
yum -y install https://rpms.litespeedtech.com/centos/litespeed-repo-1.1-1.el8.noarch.rpm
yum -y install openlitespeed lsphp73

Setting the Administrative Password

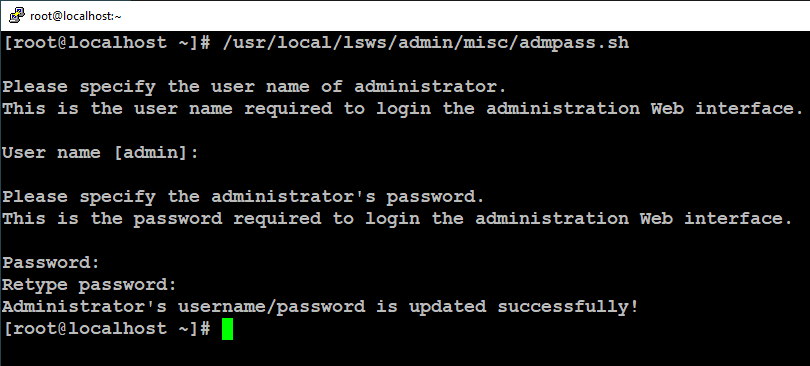
By default, the password is set to 123456, so you should change this immediately. You can do this by running a script provided by OpenLiteSpeed:
/usr/local/lsws/admin/misc/admpass.sh

Verifying Server Status

OpenLiteSpeed should have started automatically after it was installed. You can verify this using the lswsctrl command:
sudo /usr/local/lsws/bin/lswsctrl status

Output
litespeed is running with PID 9776.
If it is not started, you can start the server using lswsctrl:
sudo /usr/local/lsws/bin/lswsctrl start

Adding Firewall Rules

Now you need to allow these ports from firewall to access OpenLiteSpeed web interface.
firewall-cmd --zone=public --permanent --add-port=8088/tcp
firewall-cmd --zone=public --permanent --add-port=7080/tcp
firewall-cmd --reload

Accessing Web Interface

Open up your favorite web browser and navigate to your server's hostname or IP address, followed by :8088 to specify the port:

http://server_name_or_IP:8088

You will see the default OpenLiteSpeed web page, which looks like below:


When you are done exploring the default site, you can navigate to the administrative interface. In your web browser, using HTTPS, navigate to your server’s name or IP address followed by :7080 to specify the port:

https://server_name_or_IP:7080

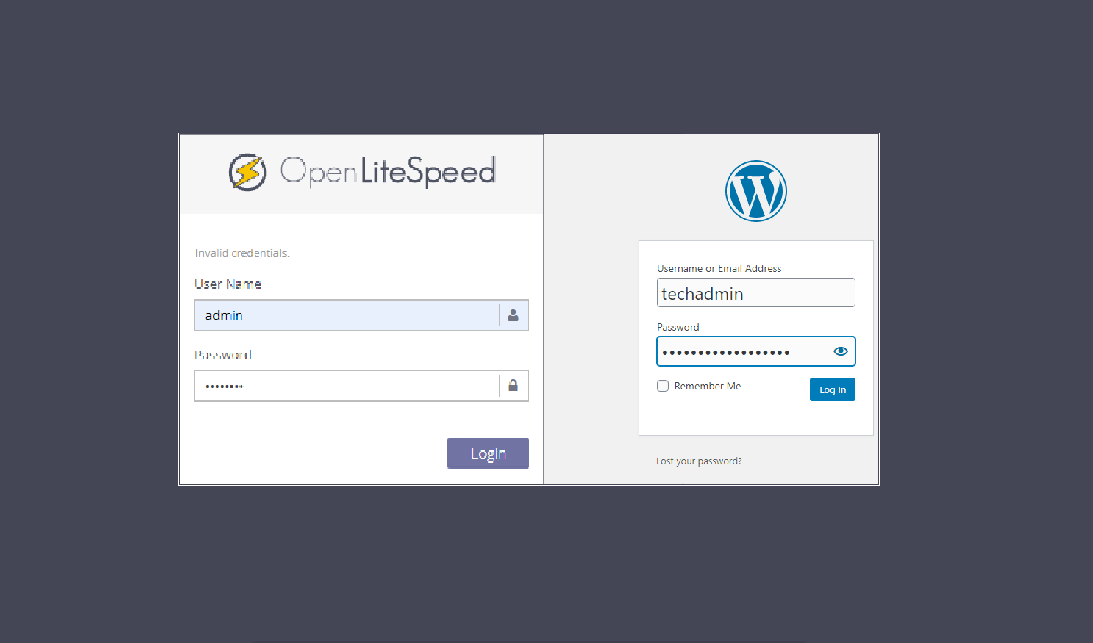
You will be prompted to enter the administrative username admin and password that you selected with the admpass.sh script in the earlier step:


Once you correctly authenticate, you will be presented with the OpenLiteSpeed administration interface:


From this administrative web console the majority of your configuration for the web server will take place.

Wrapping up

You now have a OpenLiteSpeed web server that is primarily managed through the administrative web interface.

How To Install and Configure LibreNMS with Nginx on CentOS/RHEL 8

$
0
0


LibreNMS is an auto-discovering PHP/MySQL/SNMP based network monitoring which includes support for a wide range of network hardware and operating systems including Cisco, Linux, FreeBSD, Juniper, Brocade, Foundry, HP and many more.

This guide will walk you through the steps to install and configure LibreNMS with Nginx web server on a CentOS 8 machine. These instruction can also be applied if you are running RHEL 8 or Fedora 30. In case of Fedora, you will just need to replace yum command with dnf following packages installation.

Throughout this tutorial, we assume you are the root user. If you are not, prepend sudo to the shell commands or temporarily become a user with root privileges using sudo -s or sudo -i command.

Prerequisites

You will need one CentOS / RHEL 8 (physical or virtual) machine with minimal installed having root user privileges.

Set Timezone

You can set timezone using the following command and replace highlighted text with yours
timedatectl set-timezone Asia/Karachi

Disabling SELinux

Edit /etc/selinux/config file and change SELINUX=enforcing parameter to SELINUX=disabled like below:
vi /etc/selinux/config

SELINUX=disabled
Save and close.

Now reboot your machine by typing the following reboot command on terminal:
reboot

Installing EPEL Repository

It is recommended practice to add extra packages for enterprise linux repository before proceeding to install packages.
yum install https://dl.fedoraproject.org/pub/epel/epel-release-latest-8.noarch.rpm

ARCH=$( /bin/arch )

dnf config-manager --set-enabled PowerTools

Installing Required Dependencies

First, you need to install these important librenms dependencies
yum -y install git cronie fping ImageMagick mtr net-snmp net-snmp-utils nmap rrdtool unzip tar wget python36

Installing MariaDB

You can install MariaDB database using the following command:
yum -y install mariadb mariadb-server

Installing Nginx

You can install Nginx web server using the following command:
yum -y install nginx

Installing PHP

You can install important PHP packages using the following commands:
yum -y localinstall http://rpms.remirepo.net/enterprise/remi-release-8.rpm

yum -y install php-process php73 php73-php-cli php73-php-common php73-php-curl php73-php-gd php73-php-mbstring php73-php-process php73-php-snmp php73-php-xml php73-php-zip php73-php-memcached php73-php-mysqlnd php-json php-gd php-mbstring php-pdo php73-php-pdo-dblib php-mysqlnd php-xml

Adding User

Issue the following commands to add a librenms user:
useradd librenms -d /opt/librenms -M -r

usermod -a -G librenms nginx

Cloning LibreNMS

You will need to clone librenms software from GitHub like below:
cd /opt

git clone https://github.com/librenms/librenms.git

Set Permissions

Issue the following commands to set appropriate permission:
chown -R librenms:librenms /opt/librenms

chmod 770 /opt/librenms

setfacl -d -m g::rwx /opt/librenms/rrd /opt/librenms/logs /opt/librenms/bootstrap/cache/ /opt/librenms/storage/ /opt/librenms/cache

setfacl -R -m g::rwx /opt/librenms/rrd /opt/librenms/logs /opt/librenms/bootstrap/cache/ /opt/librenms/storage/ /opt/librenms/cache

Run Composer Wrapper

Issue the following commands to run composer wrapper script:
cd /opt/librenms

curl -sS https://getcomposer.org/installer | php

su - librenms

./scripts/composer_wrapper.php install --no-dev
You will see similar to the following output while running composer wrapper script and it will take few minutes to complete.


When above process done, issue the exit command to go back to root user prompt.
exit

Securing Database

By default MariaDB installation is insecure and anyone can intrude into your database. To make it secure, run the following commands and follow the instruction to complete.
systemctl start mariadb

systemctl enable mariadb
mysql_secure_installation

NOTE: RUNNING ALL PARTS OF THIS SCRIPT IS RECOMMENDED FOR ALL MariaDB
SERVERS IN PRODUCTION USE! PLEASE READ EACH STEP CAREFULLY!

In order to log into MariaDB to secure it, we'll need the current
password for the root user. If you've just installed MariaDB, and
you haven't set the root password yet, the password will be blank,
so you should just press enter here.

Enter current password for root (
enter for none):
OK, successfully used password, moving on...

Setting the root password ensures that nobody can log into the MariaDB
root user without the proper authorisation.

Set root password? [Y/n]
y
New password:
Re-enter new password:

Password updated successfully!
Reloading privilege tables..
... Success!


By default, a MariaDB installation has an anonymous user, allowing anyone
to log into MariaDB without having to have a user account created for
them. This is intended only for testing, and to make the installation
go a bit smoother. You should remove them before moving into a
production environment.

Remove anonymous users? [Y/n]
y
... Success!

Normally, root should only be allowed to connect from 'localhost'. This
ensures that someone cannot guess at the root password from the network.

Disallow root login remotely? [Y/n]
y
... Success!

By default, MariaDB comes with a database named 'test' that anyone can
access. This is also intended only for testing, and should be removed
before moving into a production environment.

Remove test database and access to it? [Y/n]
y
- Dropping test database...
... Success!
- Removing privileges on test database...
... Success!

Reloading the privilege tables will ensure that all changes made so far
will take effect immediately.

Reload privilege tables now? [Y/n]
y
... Success!

Cleaning up...

All done! If you've completed all of the above steps, your MariaDB
installation should now be secure.

Thanks for using MariaDB!

Creating Database

Now you need to create a database and a user for librenms like below:
mysql -u root -p
CREATE DATABASE librenms CHARACTER SET utf8 COLLATE utf8_unicode_ci;

CREATE USER 'librenms'@'localhost' IDENTIFIED BY '
TypePasswordHere';

GRANT ALL PRIVILEGES ON librenms.* TO 'librenms'@'localhost';

FLUSH PRIVILEGES;

exit
vi /etc/my.cnf
Within the [mysqld] section, add following:
[mysqld]
innodb_file_per_table=1
lower_case_table_names=0
Save and close.
systemctl enable mariadb

systemctl restart mariadb

Configuring PHP

Make sure date.timezone parameter is set in php.ini to your preferred time zone. See http://php.net/manual/en/timezones.php for a list of supported timezones. Valid examples are: "America/New_York", "Australia/Brisbane", "Etc/UTC".
vi  /etc/php.ini

date.timezone =
Asia/Karachi
Save and close.
vi /etc/php-fpm.d/www.conf

;user = apache
user = nginx

group = apache ; keep group as apache

;listen = 127.0.0.1:9000
listen = /run/php-fpm/php-fpm.sock

listen.owner = nginx
listen.group = nginx
listen.mode = 0660
Save and close.
systemctl enable php-fpm

systemctl restart php-fpm

Configuring Nginx

Now create the librenms.conf file under /etc/nginx/conf.d/ directory like below. Make sure you replace server_name parameter with yours as required:
vi /etc/nginx/conf.d/librenms.conf

server {
listen 80;
server_name
librenms.techsupportpk.com;
root /opt/librenms/html;
index index.php;

charset utf-8;
gzip on;
gzip_types text/css application/javascript text/javascript application/x-javascript image/svg+xml text/plain text/xsd text/xsl text/xml image/x-icon;
location / {
try_files $uri $uri/ /index.php?$query_string;
}
location /api/v0 {
try_files $uri $uri/ /api_v0.php?$query_string;
}
location ~ \.php {
include fastcgi.conf;
fastcgi_split_path_info ^(.+\.php)(/.+)$;
fastcgi_pass unix:/run/php-fpm/php-fpm.sock;
}
location ~ /\.ht {
deny all;
}
}
Save and close.

NOTE: If this is the only site you are hosting on this server then you will need to disable the default site by removing the server section from /etc/nginx/nginx.conf file:
systemctl start nginx

systemctl enable nginx

Allow Fping

Create the file http_fping.tt with the following contents. You can create this file anywhere, as it is a throw-away file. The last step in this install procedure will install the module in the proper location.
vi /opt/librenms/http_fping.tt
module http_fping 1.0;

require {
type httpd_t;
class capability net_raw;
class rawip_socket { getopt create setopt write read };
}

#============= httpd_t ==============
allow httpd_t self:capability net_raw;
allow httpd_t self:rawip_socket { getopt create setopt write read };
Save and close.

Type the following commands to set proper permission and load the module.
chown -R librenms:librenms /opt/librenms/http_fping.tt
checkmodule -M -m -o http_fping.mod http_fping.tt

Output
checkmodule: loading policy configuration from http_fping.tt
checkmodule: policy configuration loaded
checkmodule: writing binary representation (version 19) to http_fping.mod

semodule_package -o http_fping.pp -m http_fping.mod

semodule -i http_fping.pp
It will take a moment to return back to terminal

Adding Firewall Rules

firewall-cmd --zone public --add-service http
firewall-cmd --permanent --zone public --add-service http
firewall-cmd --reload

SNMP Settings

systemctl start snmpd
systemctl enable snmpd

curl -o /usr/bin/distro https://raw.githubusercontent.com/librenms/librenms-agent/master/snmp/distro
chmod +x /usr/bin/distro

chmod +x /usr/bin/distro

Adding Cron Job

cp /opt/librenms/librenms.nonroot.cron /etc/cron.d/librenms

Copying Logrotate

cp /opt/librenms/misc/librenms.logrotate /etc/logrotate.d/librenms

LibreNMS Web installer

Open up your favorite web browser and navigate to the web installer like http://Your_Server_Name/install.php or http://Your_Server_IP/install.php and follow the on-screen instructions.

Click Next Stage


Enter password in DB Pass box for librenms user you created earlier and click Next Stage


This will take a moment to import database, when done click Goto Add User


Enter username and password you wish to add and click Add User

Click Generate Config


Click Finish Install


Now stop on this screen.


Go back to command line terminal and perform the following to validate the installation.
cd /opt/librenms

vi /opt/librenms/config.php
Add the following parameter
### Fping6
$config['fping6'] = '/usr/sbin/fping';
This is the screenshot so don't get confuse.


Save and close.

Now type the following commands to set appropriate permission:
chown -R librenms:librenms /opt/librenms

setfacl -d -m g::rwx /opt/librenms/rrd /opt/librenms/logs /opt/librenms/bootstrap/cache/ /opt/librenms/storage/

chmod -R ug=rwX /opt/librenms/rrd /opt/librenms/logs /opt/librenms/bootstrap/cache/ /opt/librenms/storage/
Run the following script:
python3 ./scripts/github-remove -d

Output
Are you sure you want to delete all modified and untracked files? [y/N] y
Now validate the installation using the following script
./opt/librenms/validate.php
You will see similar to the following output which says all is well and you can safely ignore (devices add) warning because we are going to add devices via web interface.

In case you see any warning related to permission etc, fix them first and then move to next step.


Now go back to librenms web interface we left opened earlier and click on 'validate your install and fix any issues'


This will bring you to login page, enter username and password you created during web installer process to log in.


Once you are logged in, you will see the following screen show everything is OK.


Now we will show you how to add a device in librenms by adding localhost as our first device as an example to monitor its memory, cpu, disk utilization.

To add a device, navigate to Devices tab then Add Device


Provide your device credentials and click Add Device


This screen will confirm you whether device is added or not.

Click on device name to its result.


You can see here that librenms has started collecting localhost data.

Wrapping up

Now that you have successfully completed librenms installation and if you have any question or suggestion, please leave your thoughts in below comment box. We hope you enjoy using LibreNMS.

How To Install WordPress with OpenLiteSpeed on CentOS/RHEL 7/8

$
0
0

This tutorial will show you how to install WordPress with OpenLiteSpeed web server on a CentOS or RHEL 8 machine. These instruction can also be applied if you are running an earlier version of CentOS or RHEL 7.

Prerequisites

You will need one CentOS or RHEL 8 (physical or virtual) machine with minimal installed having sudo non-root user privileges.

Disabling SELinux

You should change from SELINUX=enforcing to SELINUX=disabled in /etc/selinux/config file for smooth installation:
sudo vi /etc/selinux/config

# This file controls the state of SELinux on the system.
# SELINUX= can take one of these three values:
# enforcing - SELinux security policy is enforced.
# permissive - SELinux prints warnings instead of enforcing.
# disabled - No SELinux policy is loaded.
SELINUX=disabled
# SELINUXTYPE= can take one of these three values:
# targeted - Targeted processes are protected,
# minimum - Modification of targeted policy. Only selected processes are protected.
# mls - Multi Level Security protection.
SELINUXTYPE=targeted
Save and close file when you are finished.

Now reboot your machine to take changes into effect:
sudo reboot

Adding EPEL Repository

It is always recommended to install extra packages for enterprise Linux repository before proceeding to install packages using yum package manager:
sudo yum -y install https://dl.fedoraproject.org/pub/epel/epel-release-latest-8.noarch.rpm

sudo ARCH=$( /bin/arch )

sudo dnf config-manager --set-enabled PowerTools

Installing Dependencies

You will need to install following required dependencies prior to install openlitespeed web server:
sudo yum -y install openssl openssl-libs libargon2 wget tar zip unzip php python36

Installing OpenLiteSpeed

OpenLiteSpeed provides a repository for its software you can use to download and install the server with CentOS’s standard yum command.
sudo rpm --import https://rpms.litespeedtech.com/centos/RPM-GPG-KEY-litespeed

sudo yum -y install https://rpms.litespeedtech.com/centos/litespeed-repo-1.1-1.el8.noarch.rpm

sudo yum -y install openlitespeed lsphp73

Setting the Administrative Password

By default, the password is set to 123456, so you should change this immediately. You can do this by running a script provided by OpenLiteSpeed:
sudo /usr/local/lsws/admin/misc/admpass.sh

Verifying Server Status

OpenLiteSpeed should have started automatically after it was installed. You can verify this using the lswsctrl command:
sudo /usr/local/lsws/bin/lswsctrl status

Output
litespeed is running with PID 9776.
If it is not started, you can start the server using lswsctrl:
sudo /usr/local/lsws/bin/lswsctrl start

Adding Firewall Rules

Now you need to allow these ports from firewall to access OpenLiteSpeed web interface.
sudo firewall-cmd --zone=public --permanent --add-port=8088/tcp
sudo firewall-cmd --zone=public --permanent --add-port=7080/tcp
sudo firewall-cmd --reload

Installing MySQL

You can install MySQL database using the following command:
sudo yum -y install mysql-server

Securing MySQL

After fresh installation of MySQL database, you will need to run the following mysql_secure_installation script and follow the instruction to make it secure:
sudo systemctl start mysqld
sudo systemctl enable mysqld
sudo mysql_secure_installation
Securing the MySQL server deployment.

Connecting to MySQL using a blank password.

VALIDATE PASSWORD COMPONENT can be used to test passwords
and improve security. It checks the strength of password
and allows the users to set only those passwords which are
secure enough. Would you like to setup VALIDATE PASSWORD component?

Press y|Y for Yes, any other key for No: y

There are three levels of password validation policy:

LOW Length >= 8
MEDIUM Length >= 8, numeric, mixed case, and special characters
STRONG Length >= 8, numeric, mixed case, special characters and dictionary file

Please enter 0 = LOW, 1 = MEDIUM and 2 = STRONG: 0
Please set the password for root here.

New password:

Re-enter new password:

Estimated strength of the password: 100
Do you wish to continue with the password provided?(Press y|Y for Yes, any other key for No) : y
By default, a MySQL installation has an anonymous user,
allowing anyone to log into MySQL without having to have
a user account created for them. This is intended only for
testing, and to make the installation go a bit smoother.
You should remove them before moving into a production
environment.

Remove anonymous users? (Press y|Y for Yes, any other key for No) : y
Success.

Normally, root should only be allowed to connect from
'localhost'. This ensures that someone cannot guess at
the root password from the network.

Disallow root login remotely? (Press y|Y for Yes, any other key for No) : y
Success.

By default, MySQL comes with a database named 'test' that
anyone can access. This is also intended only for testing,
and should be removed before moving into a production
environment.


Remove test database and access to it? (Press y|Y for Yes, any other key for No) : y
- Dropping test database...
Success.

- Removing privileges on test database...
Success.

Reloading the privilege tables will ensure that all changes
made so far will take effect immediately.

Reload privilege tables now? (Press y|Y for Yes, any other key for No) : y
Success.

All done!

Creating Database for WordPress

WordPress uses MySQL to manage and store site and user information. We already have MySQL installed, but we need to create a database and a user for WordPress to use.

Log in to the root MySQL account like below
sudo mysql -u root -p
Then enter your root user’s password when prompted.

At this point, we will create and name this database and user wordpress to keep things simple and easy to remember, but you can name it whatever you’d like.

From the MySQL prompt, create a database and a user with the following commands:
CREATE DATABASE wordpress DEFAULT CHARACTER SET utf8 COLLATE utf8_unicode_ci;
CREATE USER '
wordpress'@'localhost' IDENTIFIED BY 'wordpress';
GRANT ALL PRIVILEGES ON
wordpress.* TO 'wordpress'@'localhost';
FLUSH PRIVILEGES;
exit
You’re done setting up your MySQL installation to work with WordPress.

Installing Required PHP Extensions

To install these required PHP extensions commonly used with WordPress, execute the following command:
sudo yum -y install lsphp73-common lsphp73-curl lsphp73-imagick lsphp73-imap lsphp73-json lsphp73-memcached lsphp73-mysqlnd lsphp73-opcache lsphp73-redis

Downloading WordPress

For security reasons, it is recommended that you download the latest version of WordPress directly from their website.

Change into user home directory and then download the latest release by typing:
cd ~/Downloads
curl -O https://wordpress.org/latest.tar.gz
tar xzvf latest.tar.gz
Now add a dummy .htaccess file so that it will be available for WordPress to use later:
touch ~/Downloads/wordpress/.htaccess
Next, copy over the sample configuration file to the filename that WordPress actually reads:
cp ~/Downloads/wordpress/wp-config-sample.php ~/Downloads/wordpress/wp-config.php
Also, create the upgrade directory so that WordPress won’t run into permissions issues when trying to do this on its own following an update to its software:
mkdir ~/Downloads/wordpress/wp-content/upgrade
Then, copy the entire contents of the directory into your document root. OpenLiteSpeed comes with a default virtual host named Example located in the /usr/local/lsws/ directory. The document root for the Example virtual host is the html sub-directory:
sudo cp -a ~/Downloads/wordpress/. /usr/local/lsws/Example/html/wordpress
Notice that this command includes a dot at the end of the source directory to indicate that everything within the directory should be copied, including hidden files (like the .htaccess file you created):

You’ve successfully installed WordPress onto your web server and performed some of the initial configuration steps.

Configuring WordPress

Before you begin with the web-based setup process for WordPress, you need to adjust some items in your WordPress directory.

The following commands will grant OpenLiteSpeed the ability to read and write files in the wordpress directory, allowing it to serve the website and perform automatic updates:
sudo chown -R nobody:nobody /usr/local/lsws/Example/html/wordpress

sudo find /usr/local/lsws/Example/html/wordpress/ -type d -exec chmod 750 {} \;

sudo find /usr/local/lsws/Example/html/wordpress/ -type f -exec chmod 640 {} \;
Now you will need to make some changes to the main WordPress configuration file.
curl -s https://api.wordpress.org/secret-key/1.1/salt/
You will get back unique values that look something like this:


These are configuration lines that you will paste directly into your configuration file to set secure keys. Copy the output you received to your clipboard, and then open the WordPress configuration file located in your document root:
sudo vi /usr/local/lsws/Example/html/wordpress/wp-config.php
Find the section that contains the dummy values for those settings. It will look something like this:


Delete these lines and paste in the values you copied from the command line, the file will look like below:


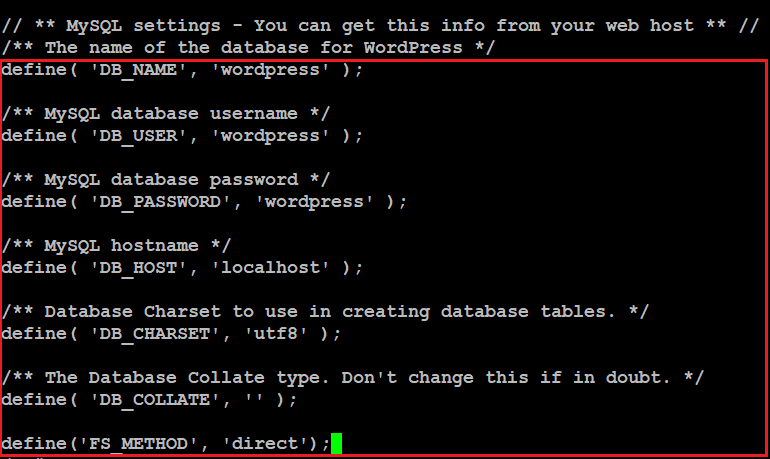
Next, modify the database connection settings at the top of the file. You need to adjust the database name, database user, and the associated password that you configured within MySQL. Lastly, add the define('FS_METHOD', 'direct'); parameter:


Save and close the file when you are finished.

Configuring OpenLiteSpeed

In this step, you’ll access the OpenLiteSpeed administrative interface and make a few changes to your server’s configuration.

Open up your favorite web browser, navigate to the OpenLiteSpeed administrative interface:

http://server_name_or_IP:7080 and log in with the username admin and password you set up with adminpass.sh script.


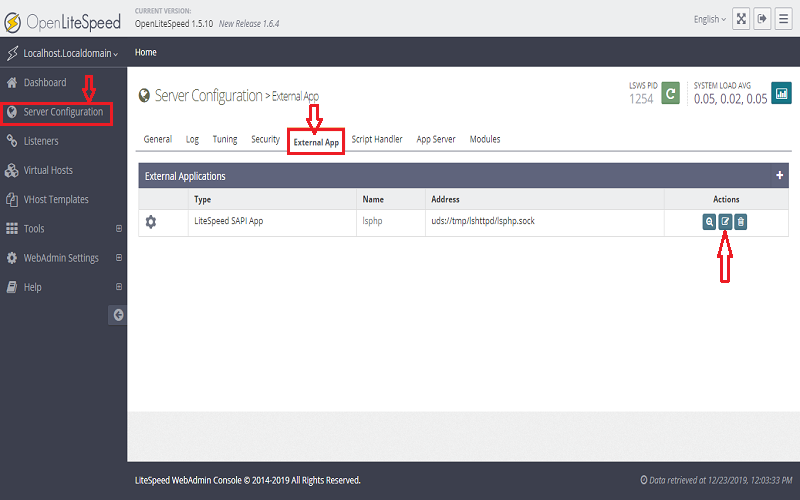
From the OpenLiteSpeed console, find and click on Server Configuration in the left-hand sidebar menu. Then navigate to the External App tab, find the row of the LiteSpeed SAPI App, and click on its Edit button:


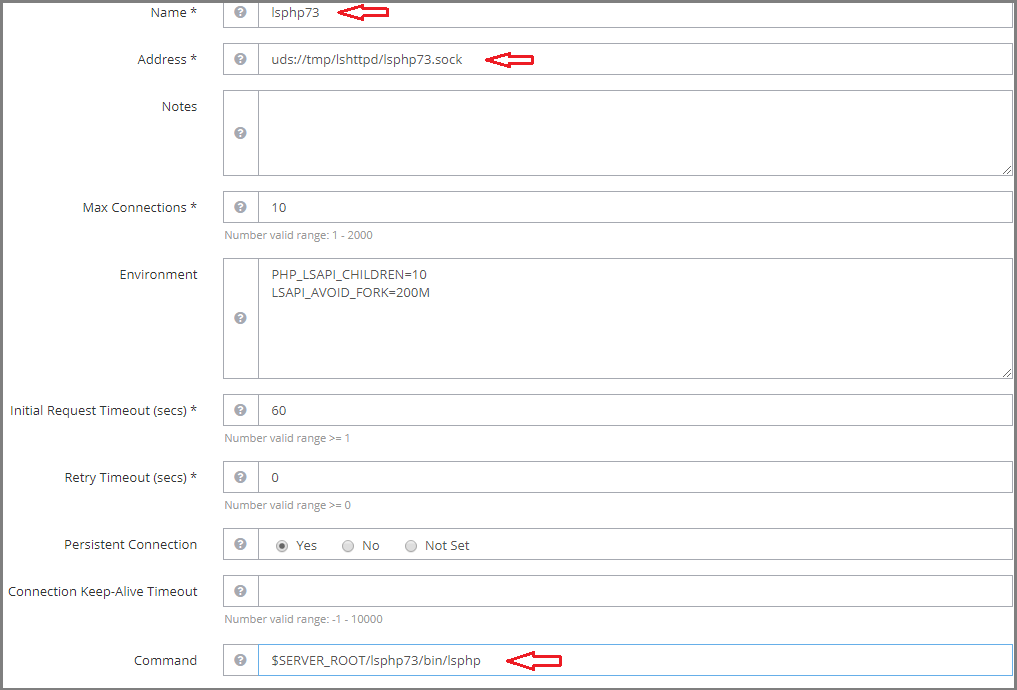
You installed the lsphp73 package, a compilation of PHP optimized to work with OpenLiteSpeed through the LiteSpeed SAPI. However, the default settings in the External App page point to lsphp rather than lsphp73. Due to this, your OpenLiteSpeed installation won’t be able to correctly execute PHP scripts.

To correct this, change the Name field to lsphp73, change the Address field to uds://tmp/lshttpd/lsphp73.sock, and change the Command field to read $SERVER_ROOT/lsphp73/bin/lsphp:


After making those changes, click on the Save icon in the upper right-hand corner of the LiteSpeed SAPI App box.

Next, click on Virtual Hosts in the left-hand menu. On the Virtual Hosts page, find the virtual host you plan to use and click on its View icon. For this guide, we’ll use the default Example virtual host:


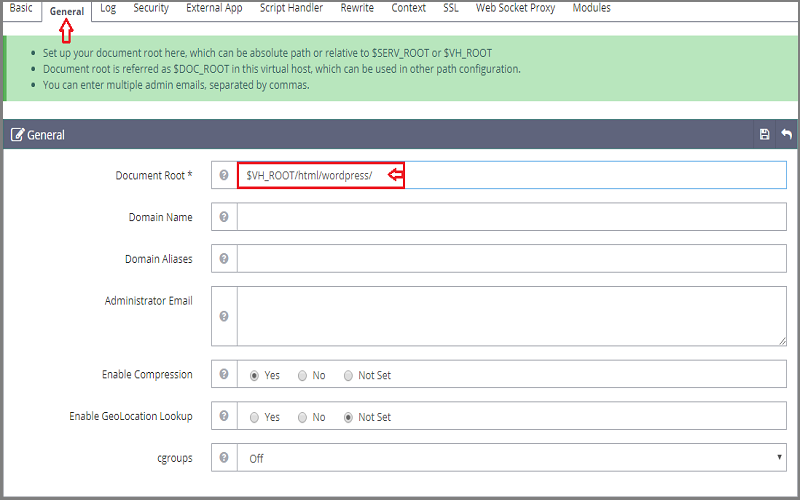
Navigate to the virtual host’s General tab. There, find the General section, and click on its Edit button:

All of your WordPress content and files are stored in the wordpress directory you created earlier, update the Document Root field to point to that directory. To do this, all you need to do is append wordpress/ to the end of the default value:


Click the Save icon to save this change.

While still in the General tab, scroll down to find the Index Files section and click on its Edit icon:

In the Index Files field, precede index.html with index.php and after updating this field, it will look like below:


Click the Save icon before continuing.

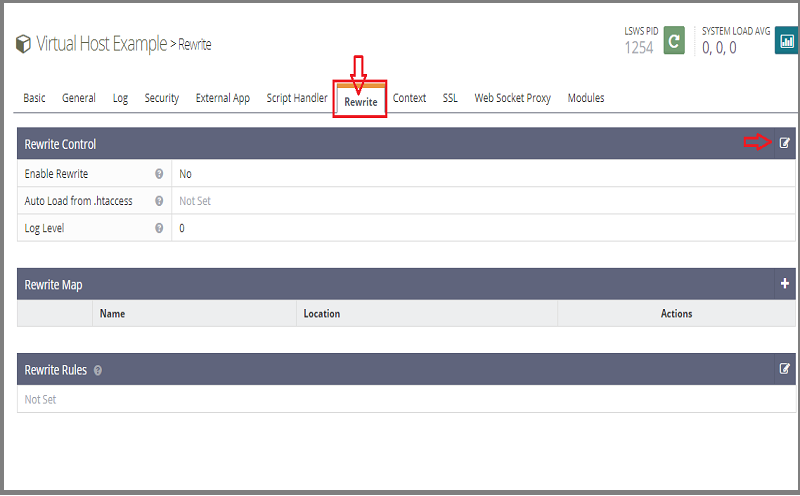
Next, navigate to the virtual host’s Rewrite tab. Find the Rewrite Control section and press the Edit button:


Set both the Enable Rewrite and Auto Load from .htaccess options to Yes by clicking the respective radial buttons. Configuring rewrite instructions in this fashion will allow you to use permalinks within your WordPress installation:


Click the Save icon after making those changes.

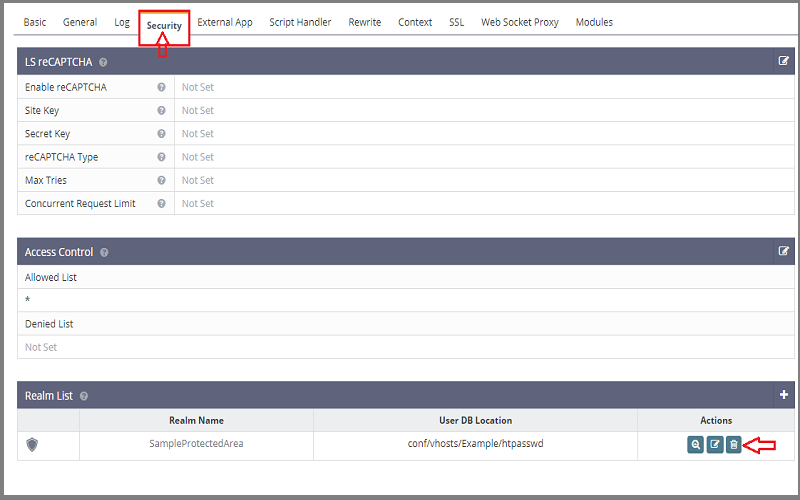
Now click on the Security tab, and then click the Delete button next to SampleProtectedArea within the Realms List table:


You will be asked to confirm the deletion. Click Delete to proceed.


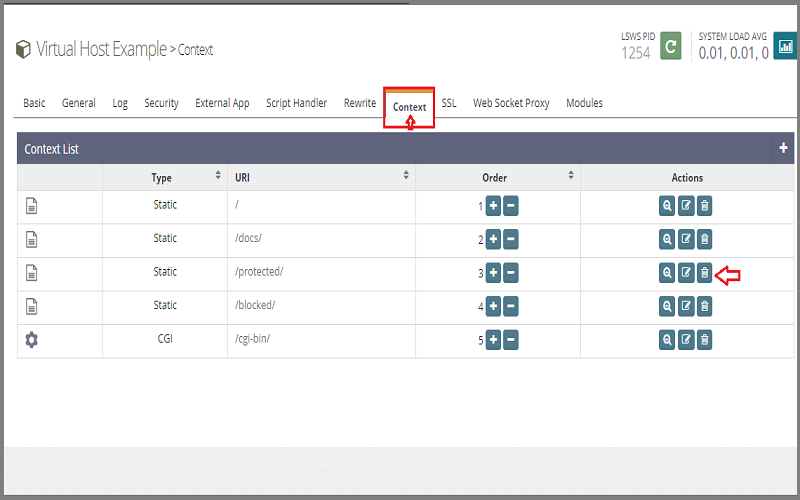
Next, click on the Context tab. In the Context List, delete the /protected/ context that was associated with the security realm you just deleted:


Again, you will have to confirm the deletion by clicking Delete.


Now, press the green Graceful Restart icon in the upper-right corner of the OpenLiteSpeed console. This will restart the OpenLiteSpeed server, taking the changes we’ve made into effect:


Now, you’re ready to setup WordPress in your browser.

Finishing the WordPress Installation

Open up your favorite i.e. Firefox, Chrome web browser, navigate to your server’s name or IP address:

http://server_name_or_IP:8088 and select the language if it ask you would like to use:

Next, you will see the main setup page. Select a name for your WordPress site and choose a username. A strong password is generated automatically. Save this password or select an alternative strong password.

Enter your email address and select whether you want to discourage search engines from indexing your site:


When ready, click the Install WordPress button. You’ll be taken to a page that prompts you to log in:


Enter your username and password to log in


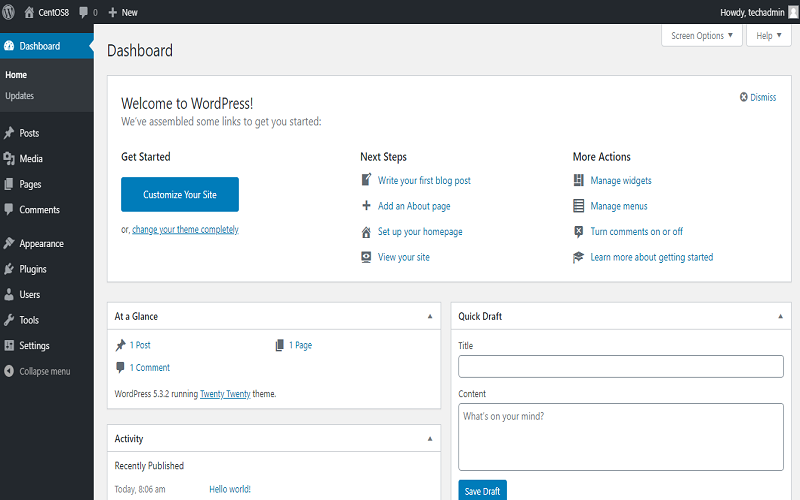
Once you log in, you will be taken to the WordPress administration dashboard:


From the dashboard, you can begin making changes to your site’s theme and publishing content.

Wrapping Up

By completing this tutorial, you installed and configured a WordPress instance on a CentOS 8 server running OpenLiteSpeed web server.

How To Install WordPress with OpenLiteSpeed on Ubuntu 18.04/19.04/19.10

$
0
0

This tutorial will show you how to install WordPress with OpenLiteSpeed on an Ubuntu 19.10 server. These instruction can also be applied if you are running an earlier release of Ubuntu 18.04 or Ubuntu 19.04 server.

Prerequisites

You will need one Ubuntu 18 or 19 (physical or virtual) server with sudo non-root user privileges.

Set Timezone

Type the following command to correct your Ubuntu server's timezone.
sudo timedatectl set-timezone Asia/Karachi

Adding OpenLiteSpeed Repository

OpenLiteSpeed provides a repository for its software you can use to download and install the server with Ubuntu’s standard apt command.
wget -qO - https://rpms.litespeedtech.com/debian/lst_repo.gpg | sudo apt-key add -

sudo add-apt-repository 'deb http://rpms.litespeedtech.com/debian/ bionic main'

Installing Ubuntu 19 Dependencies

You will need to perform this particular section only if you are running Ubuntu 19. If you are on Ubuntu 18.04, you can safely skip this and move to next step.

wget -qO - http://archive.ubuntu.com/ubuntu/project/ubuntu-archive-keyring.gpg | sudo apt-key add -

sudo add-apt-repository 'deb http://archive.ubuntu.com/ubuntu bionic main'

sudo add-apt-repository 'deb http://archive.ubuntu.com/ubuntu bionic-updates main'

wget http://ftp.br.debian.org/debian/pool/main/libz/libzip/libzip4_1.5.1-4_amd64.deb

sudo dpkg -i libzip4_1.5.1-4_amd64.deb

Installing OpenLiteSpeed

You can install OpenLiteSpeed web server by typing the following command:
sudo apt install openlitespeed lsphp73

sudo ln -sf /usr/local/lsws/lsphp73/bin/lsphp /usr/local/lsws/fcgi-bin/lsphp5

Setting the Administrative Password

By default, the password is set to 123456, so you should change this immediately. You can do this by running a script provided by OpenLiteSpeed:
sudo /usr/local/lsws/admin/misc/admpass.sh

Updating Firewall Rules

You need to open up these two ports on firewall to allow access.
sudo ufw allow 7080
sudo ufw allow 80
Now access administrative web interface and change port from 8088 to default HTTP port 80:

Open up your favorite web browser and navigate to https://server_name_or_IP:7080 and login with username and password you created with admpass.sh script in earlier step.

Click Listeners in the list of options on the left side of the interface. A list of all available listeners will load.

In the list of listeners, click the “View/Edit” button for the Default listener:


This will load a page with more details about the Default listener. Click the edit button in the top-right corner of the “Address Settings” table to modify its values:


On the next screen, change port 8088 to port 80, then click the floppy disk icon, Save:


After the modification, you will need to restart the server. Click the “reload” arrow icon to restart OpenLiteSpeed:

Installing MySQL

First, install MySQL database and afterwards run the mysql_secure_installation script and follow the on screen instruction to secure it:
sudo apt install mysql-server
sudo mysql_secure_installation
Securing the MySQL server deployment.

Connecting to MySQL using a blank password.

VALIDATE PASSWORD COMPONENT can be used to test passwords
and improve security. It checks the strength of password
and allows the users to set only those passwords which are
secure enough. Would you like to setup VALIDATE PASSWORD component?

Press y|Y for Yes, any other key for No:
y

There are three levels of password validation policy:

LOW Length >= 8
MEDIUM Length >= 8, numeric, mixed case, and special characters
STRONG Length >= 8, numeric, mixed case, special characters and dictionary file

Please enter 0 = LOW, 1 = MEDIUM and 2 = STRONG:
0
Please set the password for root here.

New password:

Re-enter new password:

Estimated strength of the password: 100
Do you wish to continue with the password provided?(Press y|Y for Yes, any other key for No) :
y

By default, a MySQL installation has an anonymous user,
allowing anyone to log into MySQL without having to have
a user account created for them. This is intended only for
testing, and to make the installation go a bit smoother.
You should remove them before moving into a production
environment.

Remove anonymous users? (Press y|Y for Yes, any other key for No) :
y
Success.

Normally, root should only be allowed to connect from
'localhost'. This ensures that someone cannot guess at
the root password from the network.

Disallow root login remotely? (Press y|Y for Yes, any other key for No) :
y
Success.

By default, MySQL comes with a database named 'test' that
anyone can access. This is also intended only for testing,
and should be removed before moving into a production
environment.

Remove test database and access to it? (Press y|Y for Yes, any other key for No) :
y
- Dropping test database...
Success.

- Removing privileges on test database...
Success.

Reloading the privilege tables will ensure that all changes
made so far will take effect immediately.

Reload privilege tables now? (Press y|Y for Yes, any other key for No) :
y
Success.

All done!

Creating Database for WordPress

Now you need to create a user and database with the following command. For this guide, we will name this database wordpress to keep things simple and easy to remember, but you can name it whatever you’d like:
sudo mysql -u root -p
CREATE DATABASE wordpress DEFAULT CHARACTER SET utf8 COLLATE utf8_unicode_ci;

CREATE USER '
wordpress'@'localhost' IDENTIFIED BY 'wordpress';

GRANT ALL PRIVILEGES ON
wordpress.* TO 'wordpress'@'localhost';

FLUSH PRIVILEGES;

exit
sudo mysql -u root -p wordpress
ALTER USER 'wordpress'@'localhost' IDENTIFIED WITH mysql_native_password BY 'wordpress';

FLUSH PRIVILEGES;

exit

Installing PHP Dependencies

You will need to install some of these additional PHP extensions commonly used with WordPress:
sudo apt install lsphp73-curl lsphp73-imagick lsphp73-imap lsphp73-memcached lsphp73-mysql lsphp73-redis

Downloading WordPress

Now that your server software is configured, you can install and set up WordPress. For security reasons in particular, it is always recommended that you get the latest version of WordPress directly from their site.

curl -O https://wordpress.org/latest.tar.gz


tar xzvf latest.tar.gz

Configuring WordPress

Before we can go through the web-based setup process for WordPress, we need to adjust some items in our WordPress directory.

touch ~/wordpress/.htaccess


cp ~/wordpress/wp-config-sample.php ~/wordpress/wp-config.php


mkdir ~/wordpress/wp-content/upgrade


sudo cp -a ~/wordpress/. /usr/local/lsws/Example/html/wordpress


sudo chown -R nobody:nogroup /usr/local/lsws/Example/html/wordpress


sudo find /usr/local/lsws/Example/html/wordpress/ -type f -exec chmod 640 {} \;


sudo find /usr/local/lsws/Example/html/wordpress/ -type d -exec chmod 750 {} \;


curl -s https://api.wordpress.org/secret-key/1.1/salt/
You will receive the output like below, copy the output you received to your clipboard,


and then open the WordPress configuration file located in your document root:
sudo nano /usr/local/lsws/Example/html/wordpress/wp-config.php
Find the section that contains the dummy values for those settings. It will look something like this:


Delete these lines and paste values you copied from the command line in the same section.


Next, modify the database connection settings at the top of the file. You need to adjust the database name, database user, and the associated password that you configured within MySQL.


The other change you must make is to set the define('FS_METHOD', 'direct'); that WordPress should use to write to the file-system. Failure to set this parameter would result in WordPress prompting for FTP credentials when you perform certain actions.

This parameter can be added below the database connection settings.

Save and close the file when you are finished.

Configuring OpenLiteSpeed

In this step, you’ll access the OpenLiteSpeed administrative interface and make a few changes to your server’s configuration.

Open up your favorite web browser, navigate to the OpenLiteSpeed administrative interface:

http://server_name_or_IP:7080 and log in with the username admin and password you set up with adminpass.sh script.


From the OpenLiteSpeed console, find and click on Server Configuration in the left-hand sidebar menu. Then navigate to the External App tab, find the row of the LiteSpeed SAPI App, and click on its Edit button:


You installed the lsphp73 package, a compilation of PHP optimized to work with OpenLiteSpeed through the LiteSpeed SAPI. However, the default settings in the External App page point to lsphp rather than lsphp73. Due to this, your OpenLiteSpeed installation won’t be able to correctly execute PHP scripts.

To correct this, change the Name field to lsphp73, change the Address field to uds://tmp/lshttpd/lsphp73.sock, and change the Command field to read $SERVER_ROOT/lsphp73/bin/lsphp:


After making those changes, click on the Save icon in the upper right-hand corner of the LiteSpeed SAPI App box.

Next, click on Virtual Hosts in the left-hand menu. On the Virtual Hosts page, find the virtual host you plan to use and click on its View icon. For this guide, we’ll use the default Example virtual host:


Navigate to the virtual host’s General tab. There, find the General section, and click on its Edit button:

All of your WordPress content and files are stored in the wordpress directory you created earlier, update the Document Root field to point to that directory. To do this, all you need to do is append wordpress/ to the end of the default value:


Click the Save icon to save this change.

While still in the General tab, scroll down to find the Index Files section and click on its Edit icon:

In the Index Files field, precede index.html with index.php and after updating this field, it will look like below:


Click the Save icon before continuing.

Next, navigate to the virtual host’s Rewrite tab. Find the Rewrite Control section and press the Edit button:


Set both the Enable Rewrite and Auto Load from .htaccess options to Yes by clicking the respective radial buttons. Configuring rewrite instructions in this fashion will allow you to use permalinks within your WordPress installation:


Click the Save icon after making those changes.

Now click on the Security tab, and then click the Delete button next to SampleProtectedArea within the Realms List table:


You will be asked to confirm the deletion. Click Delete to proceed.


Next, click on the Context tab. In the Context List, delete the /protected/ context that was associated with the security realm you just deleted:


Again, you will have to confirm the deletion by clicking Delete.


Now, press the green Graceful Restart icon in the upper-right corner of the OpenLiteSpeed console. This will restart the OpenLiteSpeed server, taking the changes we’ve made into effect:


Now, you’re ready to setup WordPress in your browser.

Finishing the WordPress Installation

Open up your favorite i.e. Firefox, Chrome web browser, navigate to your server’s name or IP address:

http://server_name_or_IP and select the language if it ask you would like to use:


Next, you will see the main setup page. Select a name for your WordPress site and choose a username. A strong password is generated automatically. Save this password or select an alternative strong password.

Enter your email address and select whether you want to discourage search engines from indexing your site:


When ready, click the Install WordPress button. You’ll be taken to a page that prompts you to log in:


Enter your username and password to log in


Once you log in, you will be taken to the WordPress administration dashboard:


From the dashboard, you can begin making changes to your site’s theme and publishing content.

Wrapping Up

By completing this tutorial, you installed and configured a WordPress instance on a Ubuntu 19.10 server running with OpenLiteSpeed web server.

How To Implement a Help Desk System using osTicket on CentOS/RHEL 8

$
0
0

osTicket is a widely-used open source support desk system. It seamlessly integrates inquiries created via email, phone and web-based forms into a simple easy-to-use multi-user web interface. Manage, organize and archive all your support requests and responses in one place while providing your customers with accountability and responsiveness they deserve. 

This tutorial will walk you through the steps to install osTicket on a CentOS 8 server. These instruction can also be applied if you are running an RHEL 8 server.

Note: With CentOS 8 release, yum command has been replaced with dnf and in near future yum package manager will be discontinued. It is now recommended to use dnf for installing packages but if you still wish to use yum you can use it.

Prerequisites

You will need one CentOS/RHEL 8 (physical or virtual) machine with root user privileges.

Disabling Selinux

It is entirely my recommendation that you should disable selinux before proceeding to install software and packages. However, you should enable it later when you are done with your installation and configuration:
sudo vi /etc/selinux/config
and change SELINUX=enforcing parameter to SELINUX=disabled
# This file controls the state of SELinux on the system.
# SELINUX= can take one of these three values:
# enforcing - SELinux security policy is enforced.
# permissive - SELinux prints warnings instead of enforcing.
# disabled - No SELinux policy is loaded.
SELINUX=disabled
# SELINUXTYPE= can take one of these three values:
# targeted - Targeted processes are protected,
# minimum - Modification of targeted policy. Only selected processes are pro
tected.
# mls - Multi Level Security protection.
SELINUXTYPE=targeted
Save and close file when your finished.

You must reboot your server now to make changes into effect:
reboot
Once reboot completed, proceed with the following steps.

Adding EPEL Repository

It is always recommended to add extra packages for enterprise Linux repository before proceeding to install any other software or packages.
dnf -y install https://dl.fedoraproject.org/pub/epel/epel-release-latest-8.noarch.rpm
ARCH=$( /bin/arch )
dnf config-manager --set-enabled PowerTools
If you are on RHEL 8 server, execute the following command as well:
subscription-manager repos --enable "codeready-builder-for-rhel-8-${ARCH}-rpms"
dnf config-manager --set-enabled PowerTools

Installing PHP

You will need to install PHP and its required extensions commonly used with osTicket.
dnf -y install https://rpms.remirepo.net/enterprise/remi-release-8.rpm
dnf -y install php php-fpm php-mysqlnd php-gd php-ldap php-odbc php-pear php-xml php-xmlrpc php-mbstring php-snmp php-apcu php-intl php-opcache php-json php72-php-imap zip unzip tar wget
Start the PHP service and make it persistent even when system reboots by typing the following commands:
systemctl start php-fpm
systemctl enable php-fpm

Installing Apache

To serve osticket web services to users and customers, you need to install either Nginx or Apache as your web server. For this guide, we are going with Apache.
dnf -y install httpd httpd-devel openssl mod_ssl

systemctl start httpd
systemctl enable httpd

Installing MySQL

You can install MySQL as your database server using the following command:
dnf -y install mysql-server

systemctl start mysqld
systemctl enable mysqld

Securing MySQL

By default MySQL database has no root password and anyone can access it from anywhere. It is important to secure your database before bringing it into production.
mysql_secure_installation
Now follow on screen instruction like below to complete it:
mysql_secure_installation
Now follow on screen instruction like below to complete it:
Securing the MySQL server deployment.

Connecting to MySQL using a blank password.

VALIDATE PASSWORD COMPONENT can be used to test passwords
and improve security. It checks the strength of password
and allows the users to set only those passwords which are
secure enough. Would you like to setup VALIDATE PASSWORD component?

Press y|Y for Yes, any other key for No: y

There are three levels of password validation policy:

LOW Length >= 8
MEDIUM Length >= 8, numeric, mixed case, and special characters
STRONG Length >= 8, numeric, mixed case, special characters and dictionary file

Please enter 0 = LOW, 1 = MEDIUM and 2 = STRONG: 0
Please set the password for root here.

New password:
Re-enter new password:


Estimated strength of the password: 100
Do you wish to continue with the password provided?(Press y|Y for Yes, any other key for No) : y
By default, a MySQL installation has an anonymous user,
allowing anyone to log into MySQL without having to have
a user account created for them. This is intended only for
testing, and to make the installation go a bit smoother.
You should remove them before moving into a production
environment.

Remove anonymous users? (Press y|Y for Yes, any other key for No) : y
Success.

Normally, root should only be allowed to connect from
'localhost'. This ensures that someone cannot guess at
the root password from the network.

Disallow root login remotely? (Press y|Y for Yes, any other key for No) : y
Success.

By default, MySQL comes with a database named 'test' that
anyone can access. This is also intended only for testing,
and should be removed before moving into a production
environment.

Remove test database and access to it? (Press y|Y for Yes, any other key for No) : y
- Dropping test database...
Success.

- Removing privileges on test database...
Success.

Reloading the privilege tables will ensure that all changes
made so far will take effect immediately.

Reload privilege tables now? (Press y|Y for Yes, any other key for No) : y
Success.

All done!

Downloading osTicket

You can download latest version of osTicket from the official website . At the time of writing this tutorial, the latest release of osTicket is 1.14.1:
wget https://github.com/osTicket/osTicket/releases/download/v1.14.1/osTicket-v1.14.1.zip
When download finished, extract it into the following directory and set the appropriate permission:
mkdir /var/www/osTicket
unzip -d /var/www/osTicket/ osTicket-*.zip
cp /var/www/osTicket/upload/include/ost-sampleconfig.php /var/www/osTicket/upload/include/ost-config.php
chown -R apache:apache /var/www/osTicket
chmod 0666 /var/www/osTicket/upload/include/ost-config.php

Creating Database

At this point, you need to create a database and a user for osticket:
mysql -u root -p
create database osticket;
create user '
osticket'@'localhost' identified by 'osticket';
grant all privileges on
osticket.* to 'osticket'@'localhost';
flush privileges;
exit

Configuring Apache

Now, you need to make osticket web directory available to Apache. Replace highlighted parameters to reflect yours.
vi /etc/httpd/conf.d/osticket.conf
<VirtualHost *:80>

ServerAdmin
webmaster@techsupportpk.com
DocumentRoot "/var/www/osTicket/upload"
ServerName
labserver.techsupportpk.com

ErrorLog "/var/log/httpd/error_log"
CustomLog "/var/log/httpd/access_log" combined

<Directory "/var/www/osTicket/upload">
DirectoryIndex index.html index.php
Options FollowSymLinks

AllowOverride All
Require all granted

</Directory>
</VirtualHost>
Save and close file when you are finished.

Now type the following command to backup Apache default index page file as we don't need it
mv /etc/httpd/conf.d/welcome.conf /etc/httpd/conf.d/bkpwelcome
Now restart Apache service to take changes into effect:
systemctl restart httpd
Updating Firewall Rules
firewall-cmd --zone=public --permanent --add-port=80/tcp
firewall-cmd --reload
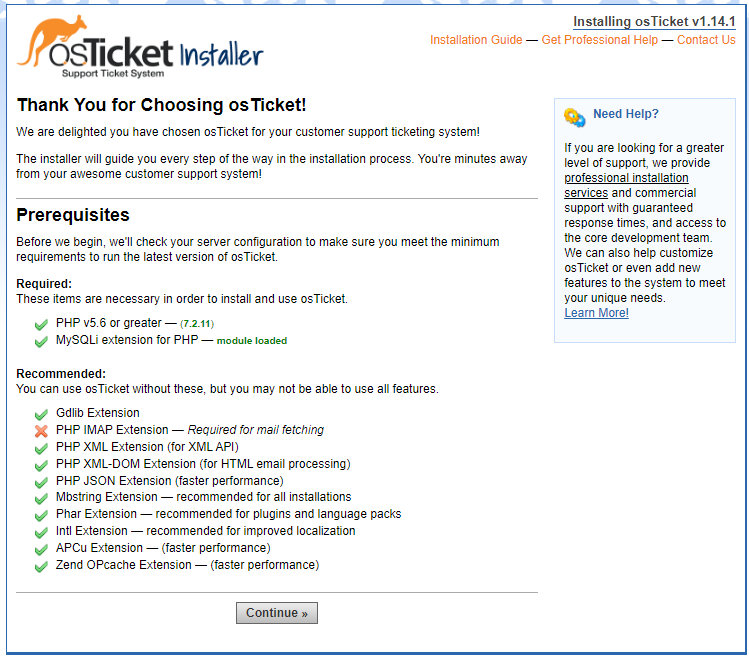
Open up your favorite web browser and navigate to http://your_server_name or http://your_server_ip and it will take you to osTicket web installer page like below:


If you encounter (PHP IMAP Extension — Required for mail fetching) is missing as you can see in the above screenshot then you will need to perform the following additional step to make it work:
find / -name imap.so
The above command will return you an absolute path to imap.so which you need to copy and make a symbolic links like below:
ln -s /opt/remi/php72/root/usr/lib64/php/modules/imap.so /usr/lib64/php/modules/imap.so
ln -s /opt/remi/php72/root/usr/lib64/php/modules/imap.so /usr/lib64/php/modules/imap.so.so
Now edit /etc/php.ini and add the extension = imap.so directive anywhere in the file:
vi /etc/php.ini

extension = imap.so
Save and close file when you are finished.

Now restart php-fpm service to take changes into effect:
systemctl restart php-fpm
Go back to your browser, refresh the osticket installer page and you will see (PHP IMAP Extension — Required for mail fetching) is now turn green.

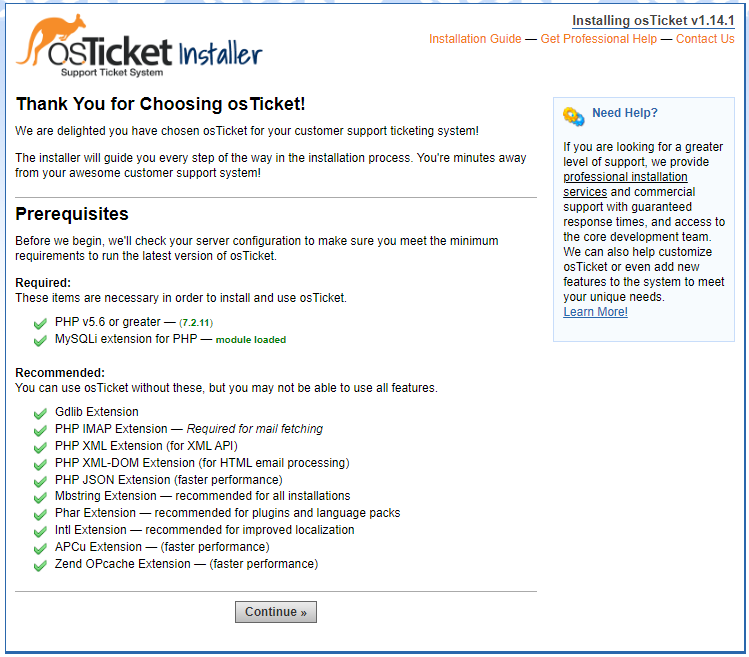
Make sure all the prerequisites are green like below before Continue


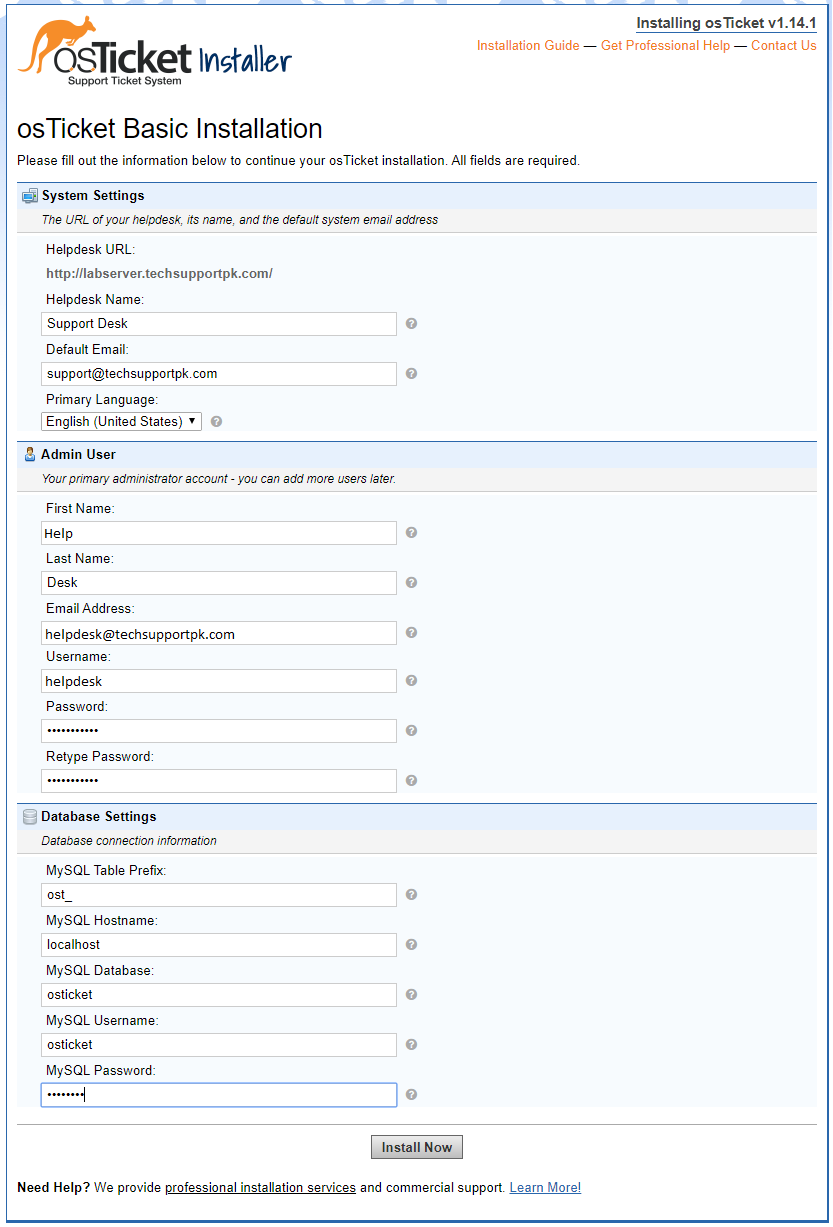
Fill out the information below with yours, make sure you provide correct credentials in database field as you have created in earlier step. Also, do not change MySQL Table Prefix and keep it default. When done, click Install Now button.


Please wait while, the installer will take few minutes to complete:


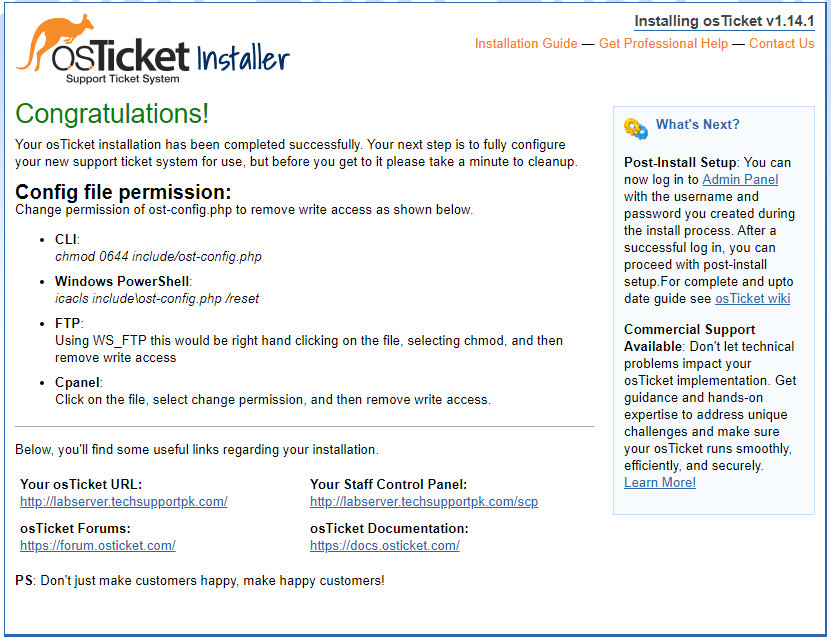
You will see the following page contains information to access osTicket administrative control panel and users/customer support link:

Write it down to remember it


Now go back to command line terminal and change permission of ost-config.php to remove write access as shown below:
chmod 0644 /var/www/osTicket/upload/include/ost-config.php
Also remove setup directory as we do not need it anymore:
rm -rf /var/www/osTicket/upload/setup
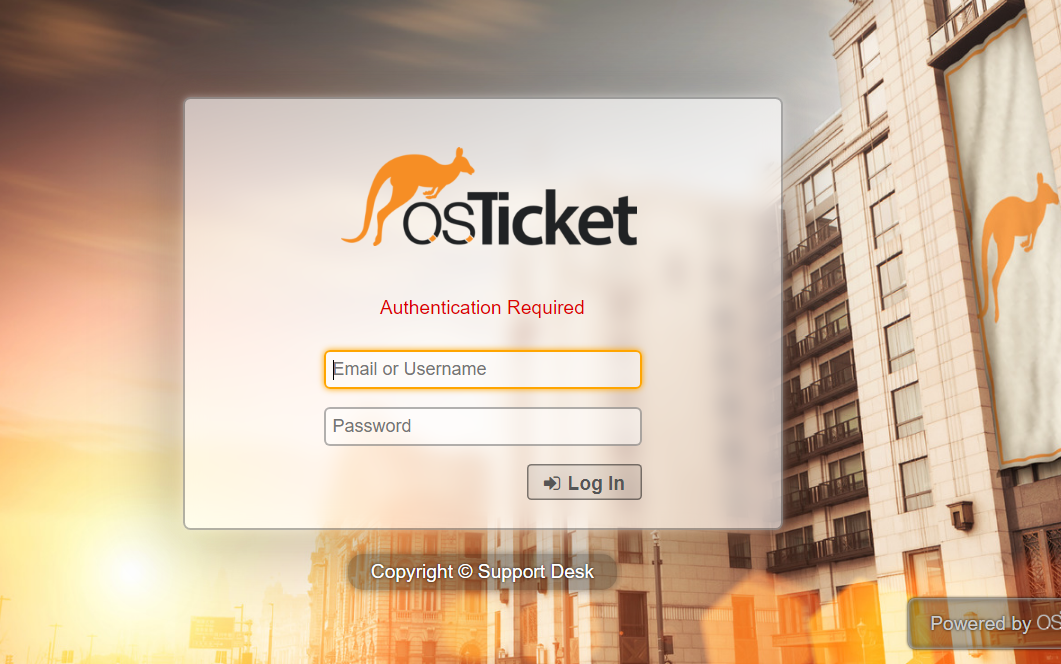
Now navigate back to http://your_server_name/scp or http://your_server_ip/scp and you will see the following login page. Login with the username and password you created in earlier web installer step.

In our case, the username is helpdesk and password also helpdesk


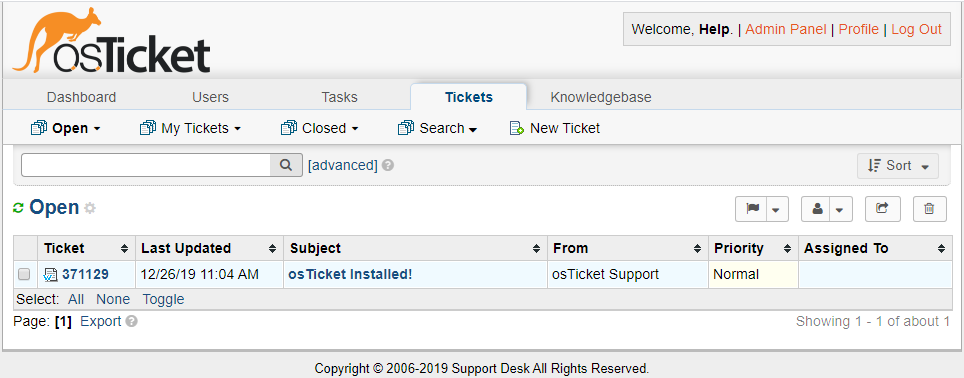
Once log in, you will see the following dashboard of admin panel. From here you can control, customize and manage your osTicket support desk according your organizational requirement. 


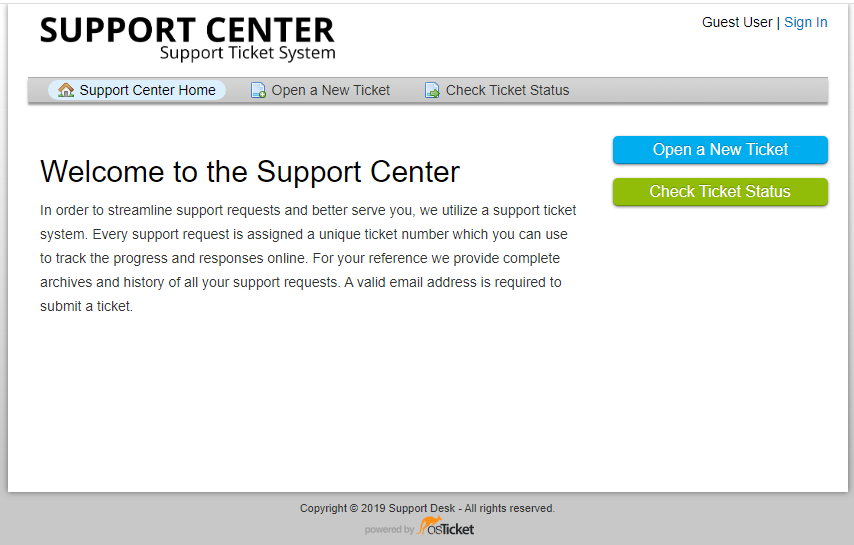
Navigate to http://your_server_name or http://your_server_ip and you will see the following support center page. From here users and customers can create support ticket, check status of already created tickets etc.


Wrapping up

Your osTicket installation has been completed successfully. Your next step is to fully configure your new support ticket system for use.

How To Implement a Help Desk System using osTicket on Ubuntu 19.10

$
0
0

osTicket is a widely-used open source support desk system. It seamlessly integrates inquiries created via email, phone and web-based forms into a simple easy-to-use multi-user web interface. Manage, organize and archive all your support requests and responses in one place while providing your customers with accountability and responsiveness they deserve.

This tutorial will walk you through the steps to install osTicket on an Ubuntu 19.10 server. These instruction can also be applied if you are running an earlier release of Ubuntu 18.04 or 19.04.

Prerequisites

You will need one Ubuntu 19.10 server installed on (physical or virtual) machine with sudo non-root user privileges.

Set Timezone

You can correct your Ubuntu server timezone using the following command, but make sure you replace Asia/Karachi with yours:
sudo timedatectl set-timezone Asia/Karachi

Installing PHP

You will need to install these important PHP dependencies commonly used with osTicket:
sudo apt -y install php php-fpm php-mysqlnd php-gd php-ldap php-odbc php-pear php-xml php-xmlrpc php-mbstring php-snmp php-apcu php-intl php-opcache php-json php-curl

Installing Apache

To make osTicket web interface available to your users and customers, you need to install Apache web server:
sudo apt -y install apache2 apache2-ssl-dev openssl apache2-dev

Installing MySQL

You can install MySQL database by executing the following command:
sudo apt -y install mysql-server

Securing MySQL

By default, MySQL root user has blank password and anyone can intrude into your database, so make it secure by executing the following script and follow on screen instruction to complete.
sudo mysql_secure_installation
Response to the following prompts on your server
Securing the MySQL server deployment.

Connecting to MySQL using a blank password.

VALIDATE PASSWORD COMPONENT can be used to test passwords
and improve security. It checks the strength of password
and allows the users to set only those passwords which are
secure enough. Would you like to setup VALIDATE PASSWORD component?

Press y|Y for Yes, any other key for No: y

There are three levels of password validation policy:

LOW Length >= 8
MEDIUM Length >= 8, numeric, mixed case, and special characters
STRONG Length >= 8, numeric, mixed case, special characters and dictionary file

Please enter 0 = LOW, 1 = MEDIUM and 2 = STRONG: 0
Please set the password for root here.

New password:

Re-enter new password:


Estimated strength of the password: 100
Do you wish to continue with the password provided?(Press y|Y for Yes, any other key for No) : y
By default, a MySQL installation has an anonymous user,
allowing anyone to log into MySQL without having to have
a user account created for them. This is intended only for
testing, and to make the installation go a bit smoother.
You should remove them before moving into a production
environment.

Remove anonymous users? (Press y|Y for Yes, any other key for No) : y
Success.

Normally, root should only be allowed to connect from
'localhost'. This ensures that someone cannot guess at
the root password from the network.

Disallow root login remotely? (Press y|Y for Yes, any other key for No) : y
Success.

By default, MySQL comes with a database named 'test' that
anyone can access. This is also intended only for testing,
and should be removed before moving into a production
environment.

Remove test database and access to it? (Press y|Y for Yes, any other key for No) : y
- Dropping test database...
Success.

- Removing privileges on test database...
Success.

Reloading the privilege tables will ensure that all changes
made so far will take effect immediately.

Reload privilege tables now? (Press y|Y for Yes, any other key for No) : y
Success.

All done!

Downloading osTicket

You can download latest version of osTicket from the official website . At the time of writing this tutorial, the latest release of osTicket is 1.14.1:
wget https://github.com/osTicket/osTicket/releases/download/v1.14.1/osTicket-v1.14.1.zip
When download finished, extract it into the following directory and set the appropriate permission:
sudo mkdir /var/www/osTicket
sudo unzip -d /var/www/osTicket/ osTicket-*.zip

sudo cp /var/www/osTicket/upload/include/ost-sampleconfig.php /var/www/osTicket/upload/include/ost-config.php

sudo chown -R www-data:www-data /var/www/osTicket
sudo chmod 0666 /var/www/osTicket/upload/include/ost-config.php

Creating Database

You can create a database for osticket using the below commands under mysql prompt and you should replace following highlighted parameter to reflect yours:
sudo mysql -u root -p
create database osticket;
create user 'osticket'@'localhost' identified by '
P@ssw0rd';
grant all privileges on osticket.* to 'osticket'@'localhost';
flush privileges;
exit
sudo mysql -u root -p osticket
alter user 'osticket'@'localhost' IDENTIFIED WITH mysql_native_password BY 'P@ssw0rd';

Configuring Apache

Now, you need to edit /etc/apache2/sites-available/000-default.conf file and change DocumentRoot directive like below:
sudo nano /etc/apache2/sites-available/000-default.conf
<VirtualHost *:80>
# The ServerName directive sets the request scheme, hostname and port that
# the server uses to identify itself. This is used when creating
# redirection URLs. In the context of virtual hosts, the ServerName
# specifies what hostname must appear in the request's Host: header to
# match this virtual host. For the default virtual host (this file) this
# value is not decisive as it is used as a last resort host regardless.
# However, you must set it for any further virtual host explicitly.
#ServerName www.example.com

ServerAdmin webmaster@localhost
DocumentRoot
/var/www/osTicket/upload

# Available loglevels: trace8, ..., trace1, debug, info, notice, warn,
# error, crit, alert, emerg.
# It is also possible to configure the loglevel for particular
# modules, e.g.
#LogLevel info ssl:warn

ErrorLog ${APACHE_LOG_DIR}/error.log
CustomLog ${APACHE_LOG_DIR}/access.log combined

# For most configuration files from conf-available/, which are
# enabled or disabled at a global level, it is possible to
# include a line for only one particular virtual host. For example the
# following line enables the CGI configuration for this host only
# after it has been globally disabled with "a2disconf".
#Include conf-available/serve-cgi-bin.conf
</VirtualHost>
Save and close file when you are finished.

Type the following commands to make PHP available for Apache:
sudo a2enmod proxy_fcgi setenvif

sudo a2enconf php7.3-fpm

sudo systemctl reload apache2
Update firewall rules to allow HTTP traffic on port 80:
ufw allow http
Now open up your preferred web browser and navigate to http://your_server_ip or http://your_server_name and you will see the below osticket installer page:


Make sure all prerequisites are green as shown in above screenshot then click Continue

Please fill out the information below and make sure you provide correct credentials in database field as you have created in earlier step. Also, do not change MySQL Table Prefix and keep it default.

When done, click Install Now button.


Wait while...let the installer complete it


You will see the below page contains information to access osTicket administrative control panel and users/customer support center:

Write it down to remember it


Now go back to command line terminal and change permission of ost-config.php to remove write access as shown below:
sudo chmod 0644 /var/www/osTicket/upload/include/ost-config.php
Also remove setup directory as we do not need it anymore:
sudo rm -rf /var/www/osTicket/upload/setup/
Now navigate back to http://your_server_name/scp or http://your_server_ip/scp and you will see the following login page. Login with the username and password you created in earlier web installer step.

In our case, the username is helpdesk and password also helpdesk


Once log in, you will see the below dashboard of admin panel. From here you can control, customize and manage your osTicket support desk according to your organizational need.


Navigate to http://your_server_name or http://your_server_ipand you will see the below support center page. From here users and customers can create support ticket, check status of already created tickets etc.


Securing osTicket

By default osTicket web interface is accessible via HTTP protocol which is not secure. In this step we will enable HTTPS to secure it.

Edit /etc/apache2/sites-available/default-ssl.conf file like below:
sudo nano /etc/apache2/sites-available/default-ssl.conf
Change DocumentRoot directive like below:
DocumentRoot /var/www/osTicket/upload
Save and close file when you are finished.

Type the following commands to activate SSL module:
sudo a2enmod ssl
sudo a2ensite default-ssl.conf

sudo systemctl restart apache2
sudo ufw allow https
sudo ufw deny http

sudo ufw reload
Now you can access your osticket web interface securely with HTTPS like https://your_server_name or https://your_server_ip 

Wrapping up

Your osTicket installation has been completed successfully. Your next step is to fully configure your new support ticket system for use.

How To Implement a Help Desk System using OTRS on Ubuntu 19.10

$
0
0

Open source ticket request system also known a help desk and IT service management system. The program is written in Perl, supports a variety of databases including (MySQL, PostgreSQL, Oracle etc.), and can integrate with LDAP/Active directory for central authentication.

This tutorial will walk you through the steps to install OTRS Community Edition on an Ubuntu 19.10 server. This will help you to receive and process requests from your users and customers using both the web interface and email.

Prerequisites

To follow this guide, you will need one Ubuntu 19.10 server installed on (physical or virtual) machine having a non-root user with sudo privileges.

Installing Apache

First, you need to install Apache web server using Ubuntu's package manager like below:
sudo apt -y install apache2 apache2-ssl-dev apache2-dev

Installing Perl Modules

Because OTRS is written in Perl, it uses a number of Perl modules. Some modules are only needed for optional functionality, such as communication with other databases or handling mail with specific character sets; others are necessary for the program to work.

To install the missing modules, type or copy the following command and paste it on your Ubuntu terminal to install:
sudo apt -y install libapache2-mod-perl2 libdbd-mysql-perl libtimedate-perl libnet-dns-perl libnet-ldap-perl libio-socket-ssl-perl libpdf-api2-perl libsoap-lite-perl libtext-csv-xs-perl libjson-xs-perl libapache-dbi-perl libxml-libxml-perl libxml-libxslt-perl libyaml-perl libarchive-zip-perl libcrypt-eksblowfish-perl libencode-hanextra-perl libmail-imapclient-perl libtemplate-perl libdatetime-perl libcrypt-ssleay-perl libdbd-odbc-perl libdbd-pg-perl libauthen-ntlm-perl

Installing MySQL

Now that you have your web server up and running, it is time to install MySQL database:
sudo apt -y install mysql-server

Securing MySQL

When the installation is complete, run a simple security script that comes pre-installed with MySQL which will remove some dangerous defaults and lock down access to your database system. Start the interactive script by running:
sudo mysql_secure_installation
Response to the following prompts on your Ubuntu server like below:
Securing the MySQL server deployment.

Connecting to MySQL using a blank password.

VALIDATE PASSWORD COMPONENT can be used to test passwords
and improve security. It checks the strength of password
and allows the users to set only those passwords which are
secure enough. Would you like to setup VALIDATE PASSWORD component?

Press y|Y for Yes, any other key for No: y

There are three levels of password validation policy:

LOW Length >= 8
MEDIUM Length >= 8, numeric, mixed case, and special characters
STRONG Length >= 8, numeric, mixed case, special characters and dictionary file

Please enter 0 = LOW, 1 = MEDIUM and 2 = STRONG: 0
Please set the password for root here.

New password:

Re-enter new password:


Estimated strength of the password: 100
Do you wish to continue with the password provided?(Press y|Y for Yes, any other key for No) : y
By default, a MySQL installation has an anonymous user,
allowing anyone to log into MySQL without having to have
a user account created for them. This is intended only for
testing, and to make the installation go a bit smoother.
You should remove them before moving into a production
environment.

Remove anonymous users? (Press y|Y for Yes, any other key for No) : y
Success.

Normally, root should only be allowed to connect from
'localhost'. This ensures that someone cannot guess at
the root password from the network.

Disallow root login remotely? (Press y|Y for Yes, any other key for No) : y
Success.

By default, MySQL comes with a database named 'test' that
anyone can access. This is also intended only for testing,
and should be removed before moving into a production
environment.

Remove test database and access to it? (Press y|Y for Yes, any other key for No) : y
- Dropping test database...
Success.

- Removing privileges on test database...
Success.

Reloading the privilege tables will ensure that all changes
made so far will take effect immediately.

Reload privilege tables now? (Press y|Y for Yes, any other key for No) : y
Success.

All done!
To configure the root account to authenticate with a password, run the following command and be sure to change password to a strong password of your choice:
sudo mysql -u root -p
Type the following on your mysql prompt but make sure you change password:
alter user 'root'@'localhost' identified with mysql_native_password by 'P@ssw0rd';
flush privileges;
exit

Downloading OTRS

OTRS is available in Ubuntu's package manager, but the official documentation suggests installing the most latest release from source.

Download the source archive with the wget command. For this guide, we will download current release 6.0.24; you can find the latest available version on the OTRS download page.
wget https://ftp.otrs.org/pub/otrs/otrs-6.0.24.zip

sudo unzip -d /opt otrs-6.0.24.zip
sudo mv /opt/otrs-6.0.24/ /opt/otrs
Now that you have OTRS and its dependencies installed on your server, you can configure OTRS to use Apache as web server and MySQL as database.

Configuring OTRS

In this section, we will create a system user for OTRS, and then configure Apache and MySQL server to work with OTRS.

Create a user name otrs to run OTRS functions with the useradd command:
sudo useradd -d /opt/otrs -c 'OTRS User' otrs
sudo usermod -G www-data otrs
OTRS comes with a default config file /opt/otrs/Kernel/Config.pm.dist, you can activate this by copying it without the .dist filename extension:
sudo cp /opt/otrs/Kernel/Config.pm.dist /opt/otrs/Kernel/Config.pm
Now run the otrs.SetPermissions.pl script. It will detect the correct user and group settings and set the file and directory permissions for OTRS.
sudo /opt/otrs/bin/otrs.SetPermissions.pl
Next, activate the Apache configuration file and make sure it is loaded after all other configurations. To do this, make a symbolic link with the zzz_ prefix:
sudo ln -s /opt/otrs/scripts/apache2-httpd.include.conf /etc/apache2/sites-enabled/zzz_otrs.conf
OTRS requires a few Apache modules to be active for optimal operation. You can activate them via the tool a2enmod. Although some of these have already been enabled, it is a good idea to check them all:
sudo a2enmod perl
sudo a2enmod headers
sudo a2enmod deflate
sudo a2enmod filter
These modules enable Apache to work with Perl, control HTTP headers, compress server output, and configure output content filters.

Restart your Apache web server to apply new configurations:
sudo systemctl restart apache2
Before you go to the next step and run the web installer, change some of the MySQL configuration settings. Open the MySQL configuration file in your preferred text editor:
sudo nano /etc/mysql/mysql.conf.d/mysqld.cnf
For max_allowed_packet and innodb_log_file_size, change the values to 64M and 512M respectively, as highlighted in the following code block:
innodb_log_file_size = 512M
max_allowed_packet = 64M
Save and close file when you are finished.

Restart MySQL service to take changes into effect:
sudo systemctl restart mysql.service
Now run below script to verify if you are missing any module required to run otrs:
sudo /opt/otrs/bin/otrs.CheckModules.pl
You will get the output similar to below which says all is well. If you see any missing module other than DBD::Oracle, you must install them before proceeding next step.


We do not need DBD::Oracle module as we are running MySQL database, so you can safely ignore it and move to next step.

Creating Database

In this step, we will create a database, user and password for OTRS like below:
sudo mysql -u root -p
Type the following on mysql prompt but make sure you change password of your choice:
create database otrs;

create user '
otrs'@'localhost' identified by 'P@ssw0rd';

grant all privileges on
otrs.* to 'otrs'@'localhost';

flush privileges;

exit
Connect to mysql prompt again to modify otrs database:
sudo mysql -u root -p otrs
Type the following on mysql prompt:
alter user 'otrs'@'localhost' identified with mysql_native_password by 'P@ssw0rd';

alter database otrs CHARACTER SET utf8 COLLATE utf8_unicode_ci;

flush privileges;

exit
Now restart MySQL service to take changes into effect:
sudo systemctl restart mysql.service
Now edit /opt/otrs/Kernel/Config.pm file and update the following parameter with your otrs database user's password:
sudo nano /opt/otrs/Kernel/Config.pm
If you have kept the database and user name "otrs" then you will only need to update below parameter with your password. If your database and username is different than "otrs", you have to update database and user parameter as well.
$Self->{DatabasePw} = 'P@ssw0rd';
Save and close file when you are finished.

Now that you have created the database and configured Apache and MySQL to work with OTRS, you are ready to use the web installer.

Accessing Web Installer

Open up your preferred web browser and navigate to http://your_server_name/otrs/installer.pl or http://your_server_ip/otrs/installer.pl and you will see a welcome screen like below.

Click Next


Accept License and Continue


Type: MySQL
Install Type: Use and existing database for OTRS

Click Next

Enter database credentials you created earlier then click Check database settings


You will see Database check successful like below.

Click Next


It will take few moments and then you will see below screen.

Click Next


Next, provide the following required system settings:

System FQDN
AdminEmail
Organization

Leave all other options at their default values:

Click Next.


Now you will land on the Mail Configuration page. In order to be able to send and receive emails using otrs, you have to configure a mail account. You can safely skip this section if you want to configure it later.


The OTRS installation is now complete; you will see a Finished page with a link to the admin panel after Start page, and the credentials of the OTRS super user after that. Make sure you write down the generated password for the root@localhost user and the URL for the Start page.


The only thing left after a successful installation is to start the OTRS daemon and activate its cronjob.

Bring up the terminal you are using to access your Ubuntu 19.10 server. The OTRS daemon is responsible for handling any asynchronous and recurring tasks in OTRS.

Start it with the otrs user:
sudo su - otrs -c "/opt/otrs/bin/otrs.Daemon.pl start"
You will see the following output:
Manage the OTRS daemon process.
Daemon started
There are two default cron files in the /opt/otrs/var/cron/ directory. Move into this directory.
cd /opt/otrs/var/cron
These cron files are used to make sure that the OTRS daemon is running. Activate them by copying them without the .dist filename extension.
sudo cp aaa_base.dist aaa_base
sudo cp otrs_daemon.dist otrs_daemon
To schedule these cron jobs, use the script Cron.sh with the otrs user:
sudo su - otrs -c "/opt/otrs/bin/Cron.sh start"
Next, we will log in to the administrator web interface by navigating https://your_server_name/otrs/index.pl or https://your_server_ip/otrs/index.pl and perform the below tasks.

Securing OTRS

Now that you have a fully functional OTRS, but it's not secure to use the super user account. We'll create a new agent. In OTRS, agents are users who have rights to the various functions of the system. In this example, we will use a single agent who has access to all functions of the system.

To get started, log in as root@localhost and the password you copied from earlier step of web installer, then click Login.


You will see the main dashboard. It contains several widgets which show different information about tickets, statistics, news, etc. You can freely rearrange them by dragging or switch their visibility in settings.


First, we will create a new agent.

To do this, follow the link by clicking on the red message in the top of the screen that reads Don't use the Superuser account to work with OTRS 6! Create new Agents and work with these accounts instead. This will bring you to the Agent Management screen.


Click the Add agent button. This will bring you to the Add Agent screen. Most of the default options are fine. Fill in the first name, last name, username, password, and email fields. Record the username and password for future login. Submit the form by clicking the Save button.

Next, change the group relations for the new agent. Because your agent will also be the administrator, you can give it full read and write access to all groups. To do this, click the checkbox next to RW all the way on the right, under Change Group Relations for Agent.


Finally, click Save and finish.

Now, log out and log back in again using the newly created account. You can find the Logout link by clicking on the avatar picture in the top left corner.


Once you have logged back in, you can customize your agent's preferences by clicking on Personal preferences in the avatar menu. There you can change your password, choose the interface language, configure setup notifications and favorite queues, change interface skins, etc.

Once you have logged in as your new agent and configured the account to your liking, the next step is to configure the inbound mail options to generate tickets from incoming emails.

Configuring OTRS Inbound Mail

Customers have two ways to forward new tickets to OTRS: via the customer front-end or by sending an email. In order to receive customer's messages you need to set up a POP or IMAP account. We will use a Gmail account as an example for OTRS configuration.

Navigate to the Admin tab by clicking on Admin in the top menu. Then find the PostMaster Mail Accounts option and click on it. Press the Add Mail Account button to set up a new mailbox.


On the Add Mail Account screen, select IMAPS for Type. For Username, type in your email address, and Password. Leave all other options as default. Click Save.

Next, send a test email from an external email account to your dedicated OTRS email account. The mail will be fetched every 10 minutes by the OTRS daemon, but you can force receipt by clicking the Fetch mail link.

As a result, you will see the new ticket.


Now you are ready to accept tickets from customers via email. Next, you will go through the process of creating a ticket through the customer front-end.

Configuring OTRS Customer Interface

The second way for a customer to create a ticket is through the OTRS front-end. In this step, you will walk through this process to make sure this ticket creation method is set up.

The customer front-end is located at http://your_server_name/otrs/customer.pl or http://your_server_ip/otrs/customer.pl. Navigate to it in a web browser. You can create a customer account there and submit a ticket using the GUI.

Use the Sign up now link to open the registration form and fill out the below form and press the Create button.


You will see a message like this:

New account created. Sent login information to username@youremail.com. Please check your email.

Check your inbox for the message from the OTRS. You will see a message with the new account credentials:

Hi example,

You or someone impersonating you has created a new OTRS account for
you.

Full name: example
User name: example@youremail.com
Password : user_password

You can log in via the following URL. We encourage you to change your password via the Preferences button after logging in.

http://your_server_name/otrs/customer.pl or http://your_server_ip/otrs/customer.pl

Now, use the provided credentials to access the customer front-end and create another ticket. All new tickets created using the customer front-end will immediately appear on the agent's dashboard:


On the agent dashboard, you can see the information on all current tickets: their status (new, opened, escalated, etc.), their age (the time elapsed from the moment when the ticket was received), and subject.

You can click on the ticket number (in the TICKET# column) to view its details. The agent can also take actions on the ticket here, like changing its priority or state, moving it to another queue, closing it, or adding a note.

You have now successfully set up your OTRS account.

Wrapping up

In this guide, you have installed and configured OTRS and created test help desk tickets. Now you can accept and process requests from your users and customers using both the web interface and email.

How To Install PHP 7.1, 7.2, 7.3, 7.4 on Ubuntu 16/17/18/19

$
0
0

This guide will show you how to install the different version of PHP on Ubuntu 16, 17, 18 and 19. For the sake of this tutorial, we are using Ubuntu 16 and PHP 7.1 as an example.

Enabling PPA

If you are on Ubuntu 16, the only version of PHP available in its default repository is 7.0 and therefor you need to add Ondrej’s PPA to get the PHP version of your choice:
sudo apt-get install software-properties-common
sudo add-apt-repository ppa:ondrej/php
sudo apt-get update

Installing PHP 7.1

Once you enabled the ondrej/php PPA, you can install PHP 7.1 using the below command:
sudo apt-get install php7.1
To install PHP7.1 including some of the most commonly used modules you can use the following command:
sudo apt-get install php7.1 php7.1-cli php7.1-common php7.1-json php7.1-opcache php7.1-mysql php7.1-mbstring php7.1-mcrypt php7.1-zip php7.1-fpm

Configuring PHP

Once the installation is completed you need to edit the php.ini file:

Find the php.ini configuration file like below:
sudo php --ini |grep Loaded
You will see the output similar to the following:

Output
Loaded Configuration File: /etc/php/7.1/cli/php.ini

Edit the file using your preferred text editor:
sudo nano /etc/php/7.1/cli/php.ini
Make the following changes:
cgi.fix_pathinfo=0
Then, restart the PHP-FPM service:
sudo systemctl restart php7.1-fpm

Wrapping up

In this guide, we installed PHP 7.1 on Ubuntu 16 to give you an example. You can install PHP 7.2, 7.3 or 7.4 using the same method.

How To Set Up LAMP Stack on CentOS/RHEL 8

$
0
0

A LAMP Stack is a group of open-source software that can be used to create websites and web applications. LAMP is a combination of Linux operating system, the Apache HTTP Server, the MySQL/MariaDB relational database management system, and the PHP programming language.

This guide will show you how to set up a LAMP Stack on your CentOS/RHEL 8 server.

Note: With CentOS 8 release, yum command has been replaced with dnf and in near future yum package manager will be discontinued. It is now recommended to use dnf for installing packages but if you still wish to use yum you can use it.

Prerequisites

You will need one CentOS/RHEL8 server installed on (physical or virtual) machine with root or sudo non-root user privileges

Set Timezone

You can correct your server timezone by typing the following command but make sure you replace Asia/Karachi with yours
sudo timedatectl set-timezone Asia/Karachi

Adding EPEL Repository

It is always recommended to add extra packages for enterprise Linux on your fresh CentOS/RHEL server:
sudo dnf -y install https://dl.fedoraproject.org/pub/epel/epel-release-latest-8.noarch.rpm
sudo dnf config-manager --set-enabled PowerTools
If you are on RHEL 8, execute the following command as well:
sudo ARCH=$( /bin/arch )
sudo subscription-manager repos --enable "codeready-builder-for-rhel-8-${ARCH}-rpms"
sudo dnf config-manager --set-enabled PowerTools

Installing PHP

You can install latest PHP and its commonly used extensions with the below command:
sudo dnf -y install https://rpms.remirepo.net/enterprise/remi-release-8.rpm
sudo dnf -y install php php-common php-process php-xmlrpc php-xml php-soap php-snmp php-recode php-bcmath php-cli php-dba php-dbg php-mbstring php-odbc php-pecl-apcu-devel php-pecl-zip php-pgsql php-pecl-apcu php-pear php-pdo php-opcache php-devel php-embedded php-enchant php-gd php-fpm php-gmp php-intl php-ldap php-json php-mysqlnd php-pdo php-gd php-mbstring zip unzip tar wget

Installing Apache

Type the following command to install Apache web server:
sudo dnf -y install httpd httpd-devel mod_ssl openssl
Now starting Apache service and making persistent even when system reboots:
sudo systemctl start httpd
sudo systemctl enable httpd

Installing MariaDB

If you would like to user MariaDB as your database, type the below command to install:
sudo dnf -y mariadb-server
Starting MariaDB service and making it persistent even when system reboots:
sudo systemctl start mariadb
sudo systemctl enable mariadb
Or if you still wish to use MySQL as your database, type the below command to install:
sudo dnf -y mysql-server mysql

Securing MariaDB/MySQL

By default MariaDB/MySQL has no root password and anyone can intrude into your database, so run the below script and follow on screen instruction to secure it:
sudo mysql_secure_installation
Response to the following prompts on your server like below:
NOTE: RUNNING ALL PARTS OF THIS SCRIPT IS RECOMMENDED FOR ALL MariaDB
SERVERS IN PRODUCTION USE! PLEASE READ EACH STEP CAREFULLY!

In order to log into MariaDB to secure it, we'll need the current
password for the root user. If you've just installed MariaDB, and
you haven't set the root password yet, the password will be blank,
so you should just press enter here.

Enter current password for root (
enter for none):
OK, successfully used password, moving on...

Setting the root password ensures that nobody can log into the MariaDB
root user without the proper authorisation.

Set root password? [Y/n] y
New password:
Re-enter new password:

Password updated successfully!
Reloading privilege tables..
... Success!


By default, a MariaDB installation has an anonymous user, allowing anyone
to log into MariaDB without having to have a user account created for
them. This is intended only for testing, and to make the installation
go a bit smoother. You should remove them before moving into a
production environment.

Remove anonymous users? [Y/n] y
... Success!

Normally, root should only be allowed to connect from 'localhost'. This
ensures that someone cannot guess at the root password from the network.

Disallow root login remotely? [Y/n] y
... Success!

By default, MariaDB comes with a database named 'test' that anyone can
access. This is also intended only for testing, and should be removed
before moving into a production environment.

Remove test database and access to it? [Y/n] y
- Dropping test database...
... Success!
- Removing privileges on test database...
... Success!

Reloading the privilege tables will ensure that all changes made so far
will take effect immediately.

Reload privilege tables now? [Y/n] y
... Success!

Cleaning up...

All done! If you've completed all of the above steps, your MariaDB
installation should now be secure.

Thanks for using MariaDB!

Testing Apache, PHP

Now create info.php page under /var/www/html to test your Apache and PHP functionality:
sudo vi /var/www/html/info.php
Add following code into it:
<?php
phpinfo();
?>
Save and close file.

Now disable default welcome page from Apache like below:
sudo mv /etc/httpd/conf.d/welcome.conf /etc/httpd/conf.d/bkpwelcome
Reload Apache to take changes into effect:
sudo systemctl reload httpd
Add firewall rules to allow HTTP traffic:
sudo firewall-cmd --zone=public --permanent --add-service=http
sudo firewall-cmd --reload
Open up your preferred web browser and navigate to http://your_server_name_or_ip/info.php


Enabling SSL

It is always recommended to access your web services over secure protocol HTTPS. As you have already installed mod_ssl while installing Apache in earlier steps, you just need to add the below firewall rules to allow HTTPS traffic over default port 443 and deny access to HTTP on port 80.
sudo firewall-cmd --zone=public --permanent --remove-service=http
sudo firewall-cmd --zone-public --permanent --add-service=https
sudo firewall-cmd --reload

Wrapping up

You have successfully set up a foundation for serving PHP websites and applications to your visitors, using Apache as web server and MariaDB/MySQL as database server.

How To Set Up PhpMyAdmin on CentOS/RHEL 8

$
0
0

phpMyAdmin is a free software tool written in PHP, intended to handle the administration of MySQL/MariaDB over the Web interface. phpMyAdmin supports a wide range of database operations including (managing databases, tables, columns, relations, indexes, users, permissions, etc) can be performed via the user interface, while you still have the ability to directly execute any SQL statement.

In this guide, we will show you how install and configure phpMyAdmin on CentOS/RHEL 8 server, which allows you to administer and manage your MySQL/MariaDB database using the web based user interface.

Note: With CentOS 8 release, yum command has been replaced with dnf and in near future yum package manager will be discontinued. It is now recommended to use dnf for installing packages but if you still wish to use yum you can use it.

Prerequisites

You will need one CentOS/RHEL8 server installed on (physical or virtual) machine with root or sudo non-root user privileges

Set Timezone

You can correct your server timezone by typing the following command but make sure you replace Asia/Karachi with yours
sudo timedatectl set-timezone Asia/Karachi

Adding EPEL Repository

It is always recommended to add extra packages for enterprise Linux on your fresh CentOS/RHEL server:
sudo dnf -y install https://dl.fedoraproject.org/pub/epel/epel-release-latest-8.noarch.rpm
sudo dnf config-manager --set-enabled PowerTools
If you are on RHEL 8, execute the following command as well:
sudo ARCH=$( /bin/arch )
sudo subscription-manager repos --enable "codeready-builder-for-rhel-8-${ARCH}-rpms"
sudo dnf config-manager --set-enabled PowerTools

Installing PHP

You can install latest PHP and its commonly used extensions with the below command:
sudo dnf -y install https://rpms.remirepo.net/enterprise/remi-release-8.rpm
sudo dnf -y install php php-common php-process php-xmlrpc php-xml php-soap php-snmp php-recode php-bcmath php-cli php-dba php-dbg php-mbstring php-odbc php-pecl-apcu-devel php-pecl-zip php-pgsql php-pecl-apcu php-pear php-pdo php-opcache php-devel php-embedded php-enchant php-gd php-fpm php-gmp php-intl php-ldap php-json php-mysqlnd php-pdo php-gd php-mbstring zip unzip tar wget

Installing Apache

Type the following command to install Apache web server:
sudo dnf -y install httpd httpd-devel mod_ssl openssl
Now starting Apache service and making persistent even when system reboots:
sudo systemctl start httpd
sudo systemctl enable httpd

Installing MariaDB

If you would like to user MariaDB as your database, type the below command to install:
sudo dnf -y mariadb-server
Starting MariaDB service and making it persistent even when system reboots:
sudo systemctl start mariadb
sudo systemctl enable mariadb
Or if you still wish to use MySQL as your database, type the below command to install:
sudo dnf -y mysql-server mysql

Securing MariaDB/MySQL

By default MariaDB/MySQL has no root password and anyone can intrude into your database, so run the below script and follow on screen instruction to secure it:
sudo mysql_secure_installation
Response to the following prompts on your server like below:
NOTE: RUNNING ALL PARTS OF THIS SCRIPT IS RECOMMENDED FOR ALL MariaDB
SERVERS IN PRODUCTION USE! PLEASE READ EACH STEP CAREFULLY!

In order to log into MariaDB to secure it, we'll need the current
password for the root user. If you've just installed MariaDB, and
you haven't set the root password yet, the password will be blank,
so you should just press enter here.

Enter current password for root (
enter for none):
OK, successfully used password, moving on...

Setting the root password ensures that nobody can log into the MariaDB
root user without the proper authorisation.

Set root password? [Y/n] y
New password:
Re-enter new password:

Password updated successfully!
Reloading privilege tables..
... Success!


By default, a MariaDB installation has an anonymous user, allowing anyone
to log into MariaDB without having to have a user account created for
them. This is intended only for testing, and to make the installation
go a bit smoother. You should remove them before moving into a
production environment.

Remove anonymous users? [Y/n] y
... Success!

Normally, root should only be allowed to connect from 'localhost'. This
ensures that someone cannot guess at the root password from the network.

Disallow root login remotely? [Y/n] y
... Success!

By default, MariaDB comes with a database named 'test' that anyone can
access. This is also intended only for testing, and should be removed
before moving into a production environment.

Remove test database and access to it? [Y/n] y
- Dropping test database...
... Success!
- Removing privileges on test database...
... Success!

Reloading the privilege tables will ensure that all changes made so far
will take effect immediately.

Reload privilege tables now? [Y/n] y
... Success!

Cleaning up...

All done! If you've completed all of the above steps, your MariaDB
installation should now be secure.

Thanks for using MariaDB!

Testing Apache, PHP

Now create info.php page under /var/www/html to test your Apache and PHP functionality:
sudo vi /var/www/html/info.php
Add following code into it:
<?php
phpinfo();
?>
Save and close file.

Now disable default welcome page from Apache like below:
sudo mv /etc/httpd/conf.d/welcome.conf /etc/httpd/conf.d/bkpwelcome
Reload Apache to take changes into effect:
sudo systemctl reload httpd
Add firewall rules to allow HTTP traffic:
sudo firewall-cmd --zone=public --permanent --add-service=http
sudo firewall-cmd --reload
Open up your preferred web browser and navigate to http://your_server_name_or_ip/info.php

If you can see the below page, then your Apache and PHP working as expected.


Enabling SSL

It is always recommended to access your web services over secure protocol HTTPS. As you have already installed mod_ssl while installing Apache in earlier steps, you just need to add the below firewall rules to allow HTTPS traffic over default port 443 and deny access to HTTP on port 80.
sudo firewall-cmd --zone=public --permanent --remove-service=http
sudo firewall-cmd --zone-public --permanent --add-service=https
sudo firewall-cmd --reload

Downloading phpMyAdmin

You can check the current release on phpMyAdmin website, then copy the downloadable link:

Set phpMyAdmin version to your CentOS/RHEL server environment variable:
export VER="5.0.0"
Now download the latest release of phpMyAdmin and extract it like below:
curl -o phpMyAdmin-5.0.0-all-languages.zip https://files.phpmyadmin.net/phpMyAdmin/5.0.0/phpMyAdmin-5.0.0-all-languages.zip
sudo unzip -q phpMyAdmin*.zip
sudo mv phpMyAdmin-5.0.0-all-languages /usr/share/phpmyadmin
Create a directory and copy configuration file into it like below:
sudo mkdir /etc/phpmyadmin/
sudo cp /usr/share/phpmyadmin/config.sample.inc.php /usr/share/phpmyadmin/config.inc.php
Now edit /etc/phpmyadmin/config.inc.php file:
sudo vi /usr/share/phpmyadmin/config.inc.php
Set a secret passphrase should be 32 chars long as well as set tmp directory like below:
$cfg['blowfish_secret'] = '$2a$07$H6V9J74bK5S5qez6CRXt7OviIqRlFwJiniEFAaBsGXoz8MCukudia'; 
$cfg['TempDir'] = '/var/lib/phpmyadmin/tmp';
Save and close file when you are finished.

Now create tmp directory and set appropriate permission like below:
sudo mkdir /var/lib/phpmyadmin
sudo mkdir /var/lib/phpmyadmin/tmp
sudo chown -R apache:apache /var/lib/phpmyadmin/tmp

Configuring Apache

At this point, you need to create phpmyadmin.conf file under Apache:
sudo vi /etc/httpd/conf.d/phpmyadmin.conf
Add below parameters into it:
Alias /phpMyAdmin /usr/share/phpmyadmin/
Alias /phpmyadmin /usr/share/phpmyadmin/

<Directory /usr/share/phpmyadmin/>
AddDefaultCharset UTF-8

<IfModule mod_authz_core.c>
# Apache 2.4
Require all granted
</IfModule>
<IfModule !mod_authz_core.c>
# Apache 2.2
Order Deny,Allow
Deny from All
Allow from
192.168.137.1
Allow from ::1
</IfModule>
</Directory>
Save and close file when you are finished

For security reason, we have restricted phpMyAdmin access to a specific IP with Allow from 192.168.137.1 parameter in above file.

Type the below commands to validate configuration, then restart Apache service to take changes into effect:
sudo apachectl configtest
sudo systemctl restart httpd

Configuring SELinux

If SELinux is in Enforcing mode on your CentOS/RHEL server, you’ll get permission denied error when you try to access phpMyAdmin page.

Type the below command to allow it pass-throw selinux:
sudo semanage fcontext -a -t httpd_sys_content_t "/usr/share/phpmyadmin(/.*)?"
sudo restorecon -Rv /usr/share/phpmyadmin
Or type just below command to disable selinux enforcing:
sudo setenforce 0

Access phpMyAdmin Web interface

Open up web browser on the host you allowed to access phpMyAdmin web interface in above Apache configuration file, then navigate to https://your_server_name_or_ip/phpmyadmin and you will see the below phpMyAdmin login page.

For the first time you can log in with database user root and password whatever you set up during mysql_secure_installation script.


Once you log in, you will see the below man page


We will create a test database, user and privileges to give you an example:


Creating user for testdb


Set the user's credentials


User created with database specific privileges


Now logout from the root user


Login with newly created database user testdb


You are log in to testdb database.


Wrapping up

You have successfully set up phpMyAdmin on your CentOS/RHEL 8 server. Now you can create, administer and manage your MariaDB/MySQL database using phpMyAdmin web interface.

How To Set Up LEMP Stack (Nginx, MariaDB, PHP) on CentOS/RHEL 8

$
0
0

A LEMP Stack is a group of open-source software that can be used to create websites and web applications. LEMP is a combination of Linux operating system, the Enginx web Server, the MySQL/MariaDB relational database management system, and the PHP programming language.

This guide will show you how to set up a LEMP Stack on your CentOS/RHEL 8 server.

Note: With CentOS 8 release, yum command has been replaced with dnf and in near future yum package manager will be discontinued. It is now recommended to use dnf for installing packages but if you still wish to use yum you can use it.

Prerequisites

You will need one CentOS/RHEL8 server installed on (physical or virtual) machine with root or sudo non-root user privileges

Set Timezone

You can correct your server timezone by typing the following command but make sure you replace Asia/Karachi with yours
sudo timedatectl set-timezone Asia/Karachi

Adding EPEL Repository

It is always recommended to add extra packages for enterprise Linux on your fresh CentOS/RHEL server:
sudo dnf -y install https://dl.fedoraproject.org/pub/epel/epel-release-latest-8.noarch.rpm
sudo dnf config-manager --set-enabled PowerTools
sudo dnf -y update
If you are on RHEL 8, execute the following command as well:
sudo ARCH=$( /bin/arch )
sudo subscription-manager repos --enable "codeready-builder-for-rhel-8-${ARCH}-rpms"
sudo dnf config-manager --set-enabled PowerTools

Installing PHP

You can install latest PHP and its commonly used extensions with the below command:
sudo dnf -y install https://rpms.remirepo.net/enterprise/remi-release-8.rpm
sudo dnf -y install php php-common php-process php-xmlrpc php-xml php-soap php-snmp php-recode php-bcmath php-cli php-dba php-dbg php-mbstring php-odbc php-pecl-apcu-devel php-pecl-zip php-pgsql php-pecl-apcu php-pear php-pdo php-opcache php-devel php-embedded php-enchant php-gd php-fpm php-gmp php-intl php-ldap php-json php-mysqlnd php-pdo php-gd php-mbstring zip unzip tar wget

Installing Nginx

Type the following command to install Nginx web server:
sudo dnf -y install nginx nginx-all-modules
Now starting Nginx service and making it persistent even when system reboots:
sudo systemctl start nginx
sudo systemctl enable nginx

Installing MariaDB

If you would like to user MariaDB as your database, type the below command to install:
sudo dnf -y install mariadb-server
Starting MariaDB service and making it persistent even when system reboots:
sudo systemctl start mariadb
sudo systemctl enable mariadb
Or if you still wish to use MySQL as your database, type the below command to install:
sudo dnf -y install mysql-server mysql

Securing MariaDB/MySQL

By default MariaDB/MySQL has no root password and anyone can intrude into your database, so run the below script and follow on screen instruction to secure it:
sudo mysql_secure_installation
Response to the following prompts on your server like below:
NOTE: RUNNING ALL PARTS OF THIS SCRIPT IS RECOMMENDED FOR ALL MariaDB
SERVERS IN PRODUCTION USE! PLEASE READ EACH STEP CAREFULLY!

In order to log into MariaDB to secure it, we'll need the current
password for the root user. If you've just installed MariaDB, and
you haven't set the root password yet, the password will be blank,
so you should just press enter here.

Enter current password for root (
enter for none):
OK, successfully used password, moving on...

Setting the root password ensures that nobody can log into the MariaDB
root user without the proper authorisation.

Set root password? [Y/n] y
New password:
Re-enter new password:

Password updated successfully!
Reloading privilege tables..
... Success!


By default, a MariaDB installation has an anonymous user, allowing anyone
to log into MariaDB without having to have a user account created for
them. This is intended only for testing, and to make the installation
go a bit smoother. You should remove them before moving into a
production environment.

Remove anonymous users? [Y/n] y
... Success!

Normally, root should only be allowed to connect from 'localhost'. This
ensures that someone cannot guess at the root password from the network.

Disallow root login remotely? [Y/n] y
... Success!

By default, MariaDB comes with a database named 'test' that anyone can
access. This is also intended only for testing, and should be removed
before moving into a production environment.

Remove test database and access to it? [Y/n] y
- Dropping test database...
... Success!
- Removing privileges on test database...
... Success!

Reloading the privilege tables will ensure that all changes made so far
will take effect immediately.

Reload privilege tables now? [Y/n] y
... Success!

Cleaning up...

All done! If you've completed all of the above steps, your MariaDB
installation should now be secure.

Thanks for using MariaDB!

Enabling SSL

We need to generate an SSL certificate for our Nginx server to enable HTTPS secure protocol:
sudo openssl req -x509 -nodes -days 3650 -newkey rsa:2048 -keyout /etc/pki/tls/certs/nginx.crt -out /etc/pki/tls/private/nginx.pki
Response to the following prompts with yours:
Generating a RSA private key
.............................+++++
...+++++
writing new private key to '/etc/pki/tls/private/nginx.key'
-----
You are about to be asked to enter information that will be incorporated
into your certificate request.
What you are about to enter is what is called a Distinguished Name or a DN.
There are quite a few fields but you can leave some blank
For some fields there will be a default value,
If you enter '.', the field will be left blank.
-----
Country Name (2 letter code) [XX]:PK
State or Province Name (full name) []:Sindh
Locality Name (eg, city) [Default City]:Karachi
Organization Name (eg, company) [Default Company Ltd]:TECH SUPPORT
Organizational Unit Name (eg, section) []:IT
Common Name (eg, your name or your server's hostname) []:localhost
Email Address []:support@techsupportpk.com
Now edit default configuration file from Nginx like below:
sudo vi /etc/nginx/nginx.conf
Uncomment the below parameters to enable HTTPS secure protocol and make sure you update ssl_certificate and ssl_certificate_key parameters with your newly generated certificate file:
# Settings for a TLS enabled server.
#
server {
listen 443 ssl http2 default_server;
listen [::]:443 ssl http2 default_server;

# server_name _;
# root /usr/share/nginx/html;
#
ssl_certificate "/etc/pki/tls/certs/nginx.crt";
ssl_certificate_key "
/etc/pki/tls/private/nginx.key";
ssl_session_cache shared:SSL:1m;
ssl_session_timeout 10m;
ssl_ciphers PROFILE=SYSTEM;
ssl_prefer_server_ciphers on;

#
# # Load configuration files for the default server block.
include /etc/nginx/default.d/*.conf;
#
location / {
}

#
error_page 404 /404.html;
location = /40x.html {
}

#
error_page 500 502 503 504 /50x.html;
location = /50x.html {
}
}


Testing Nginx, PHP

Now create info.php page under /usr/share/nginx/html to test your Apache and PHP functionality:
sudo vi /usr/share/nginx/html/info.php
Add following code into it:
<?php
phpinfo();
?>
Save and close file.

Restart Nginx to take changes into effect:
sudo systemctl restart nginx
Add firewall rules to allow HTTPS traffic:
sudo firewall-cmd --zone=public --permanent --add-service=https
sudo firewall-cmd --reload
Open up you preferred web browser and navigate to nginx default page https://your_server_name_or_ip and if you see the below page, then your nginx is working as expected


Now navigate to https://your_server_name_or_ip/info.php and if you see below page, then your Nginx and PHP working as expected.


Wrapping up

You have successfully set up a foundation for serving PHP websites and applications to your visitors, using Nginx as web server and MariaDB/MySQL as database server.

How To Set Up PhpMyAdmin with Nginx on CentOS/RHEL 8

$
0
0

phpMyAdmin is a free software tool written in PHP, intended to handle the administration of MySQL/MariaDB over the Web interface. phpMyAdmin supports a wide range of database operations including (managing databases, tables, columns, relations, indexes, users, permissions, etc) can be performed via the user interface, while you still have the ability to directly execute any SQL statement.

In this guide, we will show you how install and configure phpMyAdmin with Nginx web server on CentOS/RHEL 8.

Note: With CentOS 8 release, yum command has been replaced with dnf and in near future yum package manager will be discontinued. It is now recommended to use dnf for installing packages but if you still wish to use yum you can use it.

Prerequisites

You will need one CentOS/RHEL8 server installed on (physical or virtual) machine with root or sudo non-root user privileges

Set Timezone

You can correct your server timezone by typing the following command but make sure you replace Asia/Karachi with yours
sudo timedatectl set-timezone Asia/Karachi

Adding EPEL Repository

It is always recommended to add extra packages for enterprise Linux on your fresh CentOS/RHEL server:
sudo dnf -y install https://dl.fedoraproject.org/pub/epel/epel-release-latest-8.noarch.rpm
sudo dnf config-manager --set-enabled PowerTools
sudo dnf -y update
If you are on RHEL 8, execute the following command as well:
sudo ARCH=$( /bin/arch )
sudo subscription-manager repos --enable "codeready-builder-for-rhel-8-${ARCH}-rpms"
sudo dnf config-manager --set-enabled PowerTools

Installing PHP

You can install latest PHP and its commonly used extensions with the below command:
sudo dnf -y install https://rpms.remirepo.net/enterprise/remi-release-8.rpm
sudo dnf -y install php php-common php-process php-xmlrpc php-xml php-soap php-snmp php-recode php-bcmath php-cli php-dba php-dbg php-mbstring php-odbc php-pecl-apcu-devel php-pecl-zip php-pgsql php-pecl-apcu php-pear php-pdo php-opcache php-devel php-embedded php-enchant php-gd php-fpm php-gmp php-intl php-ldap php-json php-mysqlnd php-pdo php-gd php-mbstring zip unzip tar wget

Installing Nginx

Type the following command to install Nginx web server:
sudo dnf -y install nginx nginx-all-modules
Now starting Nginx service and making it persistent even when system reboots:
sudo systemctl start nginx
sudo systemctl enable nginx

Installing MariaDB

If you would like to user MariaDB as your database, type the below command to install:
sudo dnf -y install mariadb-server
Starting MariaDB service and making it persistent even when system reboots:
sudo systemctl start mariadb
sudo systemctl enable mariadb
Or if you still wish to use MySQL as your database, type the below command to install:
sudo dnf -y install mysql-server mysql

Securing MariaDB/MySQL

By default MariaDB/MySQL has no root password and anyone can intrude into your database, so run the below script and follow on screen instruction to secure it:
sudo mysql_secure_installation
Response to the following prompts on your server like below:
NOTE: RUNNING ALL PARTS OF THIS SCRIPT IS RECOMMENDED FOR ALL MariaDB
SERVERS IN PRODUCTION USE! PLEASE READ EACH STEP CAREFULLY!

In order to log into MariaDB to secure it, we'll need the current
password for the root user. If you've just installed MariaDB, and
you haven't set the root password yet, the password will be blank,
so you should just press enter here.

Enter current password for root (
enter for none):
OK, successfully used password, moving on...

Setting the root password ensures that nobody can log into the MariaDB
root user without the proper authorisation.

Set root password? [Y/n] y
New password:
Re-enter new password:

Password updated successfully!
Reloading privilege tables..
... Success!

By default, a MariaDB installation has an anonymous user, allowing anyone
to log into MariaDB without having to have a user account created for
them. This is intended only for testing, and to make the installation
go a bit smoother. You should remove them before moving into a
production environment.

Remove anonymous users? [Y/n] y
... Success!

Normally, root should only be allowed to connect from 'localhost'. This
ensures that someone cannot guess at the root password from the network.

Disallow root login remotely? [Y/n] y
... Success!

By default, MariaDB comes with a database named 'test' that anyone can
access. This is also intended only for testing, and should be removed
before moving into a production environment.

Remove test database and access to it? [Y/n] y
- Dropping test database...
... Success!
- Removing privileges on test database...
... Success!

Reloading the privilege tables will ensure that all changes made so far
will take effect immediately.

Reload privilege tables now? [Y/n] y
... Success!

Cleaning up...

All done! If you've completed all of the above steps, your MariaDB
installation should now be secure.

Thanks for using MariaDB!

Enabling SSL

We need to generate an SSL certificate for our Nginx server to enable HTTPS secure protocol:
sudo openssl req -x509 -nodes -days 3650 -newkey rsa:2048 -keyout /etc/pki/tls/certs/nginx.crt -out /etc/pki/tls/private/nginx.pki
Response to the following prompts with yours:
Generating a RSA private key
.............................+++++
...+++++
writing new private key to '/etc/pki/tls/private/nginx.key'
-----
You are about to be asked to enter information that will be incorporated
into your certificate request.
What you are about to enter is what is called a Distinguished Name or a DN.
There are quite a few fields but you can leave some blank
For some fields there will be a default value,
If you enter '.', the field will be left blank.
-----
Country Name (2 letter code) [XX]:PK
State or Province Name (full name) []:Sindh
Locality Name (eg, city) [Default City]:Karachi
Organization Name (eg, company) [Default Company Ltd]:TECH SUPPORT
Organizational Unit Name (eg, section) []:IT
Common Name (eg, your name or your server's hostname) []:localhost
Email Address []:support@techsupportpk.com
Now edit default configuration file from Nginx like below:
sudo vi /etc/nginx/nginx.conf
Uncomment the below parameters to enable HTTPS secure protocol and make sure you update ssl_certificate and ssl_certificate_key parameters with your newly generated certificate file:
# Settings for a TLS enabled server.
server {
listen 443 ssl http2 default_server;
listen [::]:443 ssl http2 default_server;

# server_name _;
# root /usr/share/nginx/html;
ssl_certificate "/etc/pki/tls/certs/nginx.crt";
ssl_certificate_key "
/etc/pki/tls/private/nginx.key";
ssl_session_cache shared:SSL:1m;
ssl_session_timeout 10m;
ssl_ciphers PROFILE=SYSTEM;
ssl_prefer_server_ciphers on;

include /etc/nginx/default.d/*.conf;
location / {
}

error_page 404 /404.html;
location = /40x.html {
}

error_page 500 502 503 504 /50x.html;
location = /50x.html {
}
}

Testing Nginx, PHP

Now create info.php page under /usr/share/nginx/html to test your Apache and PHP functionality:
sudo vi /usr/share/nginx/html/info.php
Add following code into it:
<?php
phpinfo();
?>
Save and close file.

Restart Nginx to take changes into effect:
sudo systemctl restart nginx
Add firewall rules to allow HTTPS traffic:
sudo firewall-cmd --zone=public --permanent --add-service=https
sudo firewall-cmd --reload
Open up you preferred web browser and navigate to nginx default page https://your_server_name_or_ip and if you see the below page, then your nginx is working as expected


Now navigate to https://your_server_name_or_ip/info.php and if you see below page, then your Nginx and PHP working as expected.


Downloading phpMyAdmin

You can check the current release on phpMyAdmin website, then copy the downloadable link:

Set phpMyAdmin version to your CentOS/RHEL server environment variable:
export VER="5.0.0"
Now download the latest release of phpMyAdmin and extract it like below:
curl -o phpMyAdmin-5.0.0-all-languages.zip https://files.phpmyadmin.net/phpMyAdmin/5.0.0/phpMyAdmin-5.0.0-all-languages.zip
sudo unzip -q phpMyAdmin*.zip
sudo mv phpMyAdmin-5.0.0-all-languages /usr/share/nginx/html/phpmyadmin
Copy sample configuration file like below:
sudo cp /usr/share/nginx/html/phpmyadmin/config.sample.inc.php  /usr/share/nginx/html/phpmyadmin/config.inc.php
Now edit config.inc.php file:
sudo vi /usr/share/nginx/html/phpmyadmin/config.inc.php
Set a secret passphrase should be 32 chars long as well as set tmp directory like below:
$cfg['blowfish_secret'] = '$2a$07$H6V9J74bK5S5qez6CRXt7OviIqRlFwJiniEFAaBsGXoz8MCukudia'; 
$cfg['TempDir'] = '/var/lib/phpmyadmin/tmp';
Save and close file when you are finished.

Now create tmp directory and set appropriate permission like below:
sudo mkdir /var/lib/phpmyadmin
sudo mkdir /var/lib/phpmyadmin/tmp
sudo chown -R nginx:nginx /var/lib/phpmyadmin/tmp
Restart Nginx service to take changes into effect:
sudo systemctl restart nginx

Configuring SELinux

If SELinux is in Enforcing mode on your CentOS/RHEL server, you’ll get permission denied error when you try to access phpMyAdmin page.

Type the below command to allow it pass-throw selinux:
sudo semanage fcontext -a -t httpd_sys_content_t "/usr/share/nginx/html/phpmyadmin(/.*)?"
sudo restorecon -Rv /usr/share/nginx/html/phpmyadmin
Or type just below command to disable selinux enforcing:
sudo setenforce 0

Access phpMyAdmin Web interface

Open up web browser on the host you allowed to access phpMyAdmin web interface in above Apache configuration file, then navigate to https://your_server_name_or_ip/phpmyadmin and you will see the below phpMyAdmin login page.

For the first time you can log in with database user root and password whatever you set up during mysql_secure_installation script.


Once you log in, you will see the below man page


We will create a test database, user and privileges to give you an example:


Creating user for testdb


Set the user's credentials


User created with database specific privileges


Now logout from the root user


Login with newly created database user testdb


You are log in to testdb database.


Wrapping up

You have successfully set up phpMyAdmin with Nginx web server on your CentOS/RHEL 8. Now you can create, administer and manage your MariaDB/MySQL database using phpMyAdmin web interface.

How To Install or Upgrade PHP Latest Version on Fedora/CentOS/RHEL

$
0
0

This guide will show you how to install or upgrade latest release of PHP on Fedora, RHEL and CentOS.

Note: On CentOS/RHEL 8, yum command has been replaced with dnf and in near future yum package manager will be discontinued. It is now recommended to use dnf for installing packages on CentOS/RHEL 8 but if you still wish to use yum you can use it.

Adding EPEL/Remi Repository

If you are on Fedora, standards repositories are enough, you can directly install or upgrade PHP version.  For (RHEL, CentOS) the Extra Packages for Enterprise Linux (EPEL) repository must be configured before proceeding to install, and on RHEL the optional channel must also be enabled.

For CentOS 8

sudo dnf -y install https://dl.fedoraproject.org/pub/epel/epel-release-latest-8.noarch.rpm
sudo dnf config-manager --set-enabled PowerTools

sudo dnf -y install https://rpms.remirepo.net/enterprise/remi-release-8.rpm
sudo dnf config-manager --set-enabled remi

For RHEL 8

sudo dnf -y install https://dl.fedoraproject.org/pub/epel/epel-release-latest-8.noarch.rpm
ARCH=$( /bin/arch )
sudo dnf config-manager --set-enabled PowerTools
subscription-manager repos --enable "codeready-builder-for-rhel-8-${ARCH}-rpms"

sudo dnf -y install https://rpms.remirepo.net/enterprise/remi-release-8.rpm
sudo dnf config-manager --set-enabled remi

For CentOS 7.6

sudo yum -y install https://dl.fedoraproject.org/pub/epel/epel-release-latest-7.noarch.rpm
sudo yum -y install https://rpms.remirepo.net/enterprise/remi-release-7.rpm

For RHEL 7.6

sudo yum -y install https://dl.fedoraproject.org/pub/epel/epel-release-latest-7.noarch.rpm
sudo yum -y install https://rpms.remirepo.net/enterprise/remi-release-7.rpm
sudo subscription-manager repos --enable=rhel-7-server-optional-rpms

For CentOS 6.10

yum -y install https://dl.fedoraproject.org/pub/epel/epel-release-latest-6.noarch.rpm
yum -y install https://rpms.remirepo.net/enterprise/remi-release-6.rpm

For RHEL 6.10

yum -y install https://dl.fedoraproject.org/pub/epel/epel-release-latest-6.noarch.rpm
yum -y install https://rpms.remirepo.net/enterprise/remi-release-6.rpm
rhn-channel --add --channel=rhel-$(uname -i)-server-optional-6

For Fedora 29

sudo dnf -y install http://rpms.remirepo.net/fedora/remi-release-29.rpm

For Fedora 28

sudo dnf -y install http://rpms.remirepo.net/fedora/remi-release-28.rpm

Installing PHP

For CentOS/RHEL 8, you can install any version of php with below command:
sudo dnf -y install php70
sudo dnf -y install php71
sudo dnf -y install php72
sudo dnf -y install php73
sudo dnf -y install php74

sudo systemctl start php-fpm
sudo systemctl enable php-fpm
For CentOS/RHEL 7, you can install any version of php with below command:
sudo yum -y install php70
sudo yum -y install php71
sudo yum -y install php72
sudo yum -y install php73
sudo yum -y install php74

sudo systemctl start php-fpm
sudo systemctl enable php-fpm
For CentOS/RHEL 6, you can install any version of php with below command:
sudo yum -y install php70
sudo yum -y install php71
sudo yum -y install php72
sudo yum -y install php73
sudo yum -y install php74
service start php-fpm
For Fedora, you can install any version of php with below command:
sudo dnf -y install dnf-plugins-core

sudo dnf -y install php70
sudo dnf -y install php71
sudo dnf -y install php72
sudo dnf -y install php73
sudo dnf -y install php74

sudo systemctl start php-fpm
sudo systemctl enable php-fpm
We hope this guide was helpful.

How To Install PostgreSQL on CentOS/RHEL 8

$
0
0

This guide will show you how to install the most latest release of PostgreSQL database on CentOS or RHEL 8 server. These instruction can also be applied if you are running Oracle Linux 8.

Note: With CentOS 8 release, yum command has been replaced with dnf and in near future yum package manager will be discontinued. It is now recommended to use dnf for installing packages but if you still wish to use yum you can use it.


Prerequisite

You will need one CentOS/RHEL 8 server installed on (physical or virtual) machine with sudo non-root user privileges.

Set Timezone

It is important to set the correct timezone on your fresh installed server before proceeding to install database:

You can find the correct timeones with below command:
sudo timedatectl list-timezones
Type below command to set the time zone, replace Asia/Karachi with yours:
sudo timedatectl set-timezone Asia/Karachi

Adding PostgreSQL/EPEL Repo

Now, we will add postgresql official repository to get the most latest version of postgresql database:
sudo dnf -y install https://download.postgresql.org/pub/repos/yum/reporpms/EL-8-x86_64/pgdg-redhat-repo-latest.noarch.rpm
We will also add EPEL repository:
sudo dnf -y install https://dl.fedoraproject.org/pub/epel/epel-release-latest-8.noarch.rpm
sudo dnf config-manager --set-enabled PowerTools

sudo dnf -y install yum-utils
sudo yum-config-manager --enable pgdg12

Installing PostgreSQL Database

At the time of writing this tutorial, the most latest release of postgresql was 12. You can install the most latest release of postgresql database with below commands:
sudo dnf -qy module disable postgresql
sudo dnf -y install postgresql12-server postgresql12
Now that the postgresql server is installed, you will perform some basic steps to prepare a new database cluster.

Creating PostgreSQL Database Cluster

A database cluster is a collection of databases that are managed by a single server instance. Creating a database cluster consists of creating the directories in which the database data will be placed, generating the shared catalog tables, and creating the template and postgres databases.

You have to create a new PostgreSQL database cluster before you can use your Postgres database.
sudo /usr/pgsql-12/bin/postgresql-12-setup initdb
You will see the output similar to below:

Initializing database ... OK

Now, start the postgresql database service with below command:
sudo systemctl start postgresql-12
sudo systemctl enable postgresql-12
Update firewall rules to allow postgresql if you need to access database from remote clients.
sudo firewall-cmd --add-service=postgresql --permanent
sudo firewall-cmd --reload
Now that PostgreSQL is up and running, you will go over roles to learn how Postgres works and how it is different from similar database management systems you may have used in the past.

Creating PostgreSQL Roles and Databases

By default, Postgres uses a concept called roles to handle in authentication and authorization. These are, in some ways, similar to regular Unix-style accounts, but Postgres does not distinguish between users and groups and instead prefers the more flexible term role.

Upon installation, Postgres is set up to use ident authentication, meaning that it associates Postgres roles with a matching Unix/Linux system account. If a role exists within Postgres, a Unix/Linux username with the same name is able to sign in as that role.

The installation procedure created a user account called postgres that is associated with the default Postgres role. In order to use Postgres, you can log in to that account.

There are several ways to use this account to access Postgres.

Switch over to the postgres account on your server by typing:
sudo -i -u postgres
Access a Postgres prompt by typing:
psql
This will log you into the PostgreSQL prompt, and from here you can interact with the database management system right away.


You can log out from the PostgreSQL prompt by typing:
postgres=# exit
This will bring you back to the original Linux sudo prompt.

Accessing a Postgres Prompt Without Switching Accounts

For instance, in the earlier example, you were instructed to get to the Postgres prompt by first switching to the postgres user and then running psql to open the Postgres prompt. You could do this in one step by running the single command psql as the postgres user with sudo, like below:
sudo -u postgres psql
This will log you directly into Postgres prompt.

Creating a New Role in Postgres

With fresh installation, you just have the postgres role configured within the database. You can create new roles using the createrole command. The --interactive flag will prompt you for the name of the new role and also ask whether it should have superuser permissions.

To create a user on the default database with prompting additional attributes:
sudo -u postgres createuser --interactive
To delete a user from the default database with prompting additional attributes:
sudo -u postgres dropuser --interactive
You will see output like below:

Enter name of role to drop: peter
Role "peter" will be permanently removed.
Are you sure? (y/n) y

Creating a New Database in PostgreSQL

If the user you created in the last section is called peter, that role will attempt to connect to a database which is also called peter by default.

You can create the appropriate database with the createdb command.
sudo -u postgres createdb peter
Now that you’ve created a new database, you will log in to it with your new role.

Opening a Postgres Prompt with the New Role

To log in with ident based authentication, you’ll need a Linux user with the same name as your Postgres role and database.

If you don’t have a matching Linux user available, you can create one with the adduser command. You will have to do this from your non-root account with sudo privileges (meaning, not logged in as the postgres user):
sudo adduser peter
Once this new account is available, you can switch over and connect to the default database by typing:
sudo -i -u peter psql -d postgres
If you want your user to connect to its own database, you can do so by specifying the database like this:
sudo -i -u peter psql -d peter

Wrapping up

We hope this guide was helpful to install and configure PostgreSQL on your CentOS or RHEL 8 server.

How To Set Up Oracle Real Application Cluster (Grid 18c, Database 18c) on CentOS/RHEL 7

$
0
0

This tutorial will walk you through the steps to set up a two nodes rac cluster using oracle grid infrastructure 18.3 as well as oracle database 18.3 on CentOS or RHEL 7 server. These instruction can also be applied if you are running Fedora or Oracle Linux 7 server.

Prerequisite

  • You will need two CentOS/RHEL 7 servers either (physical or virtual) machines with minimum 8GB of memory and two network interface.
  • Must have root user privileges.
  • A working DNS server.

Environment

You should document everything before going into actual deployment:


You need to create (HOST-A) record of your SCAN in your DNS server like below:


1. Configuring SELinux

Log in to your first node, in our case (pdbserver1) and edit /etc/selinux/config file, replace SELINUX=enforcing parameter to SELINUX=permissive
vi /etc/selinux/config
SELINUX=permissive
Save and close file when you are done.

2. Disabling Firewall

You also need to stop and disable firewalld service if it is running, with below command:
systemctl disable firewalld
systemctl stop firewalld
iptables -F

3. Set Timezone

Make sure timezone is correctly set on your servers. If it is not already, then you must set correct timezone with below command by replacing Asia/Karachi with yours:
timedatectl set-timezone Asia/Karachi
It is recommended to sync your servers clock with locally or publicly available NTP server like below:
ntpdate -u your_ntp_server_name_or_ip

4. Set Hostname

You can set hostname of your servers like below by replacing red highlighted with you actual server name.
hostnamectl set-hostname your_server_name.domain
Edit your server's /etc/hosts file and add your nodes like below:

on pdbserver1:


on pdbserver2:


5. Adding EPEL Repository

It is recommended to add extra packages for enterprise Linux repository so that you can easily find and install required packages using yum package manager:
yum -y install https://dl.fedoraproject.org/pub/epel/epel-release-latest-7.noarch.rpm

6. Adding Oracle Repository

Since, we are installing oracle grid infrastructure and database on CentOS/RHEL 7 server, we need to install some of the important packages from oracle Linux repository:
vi /etc/yum.repos.d/ol7.repo
Add below contents in it:
[ol7_latest]
name=Oracle Linux $releasever latest ($basearch)
baseurl=https://yum.oracle.com/repo/OracleLinux/OL7/latest/x86_64
gpgkey=file:///etc/pki/rpm-gpg/RPM-GPG-KEY-oracle
gpgcheck=0
enabled=1
Save and close file when you are finished.

7. Installing Prerequisites

These are the important and required packages you need to install on your Linux servers. Type the below command to install these packages all together:
yum -y install compat-libcap1 compat-libstdc++-33 compat-libstdc++-33.i686 gcc gcc-c++ glibc glibc.i686 glibc-devel glibc-devel.i686 ksh libgcc libgcc.i686 libstdc++ libstdc++.i686 libstdc++-devel libstdc++-devel.i686 libaio libaio.i686 libaio-devel libaio-devel.i686 libXext libXext.i686 libXtst libXtst.i686 libX11 libX11.i686 libXau libXau.i686 libxcb libxcb.i686 libXi libXi.i686 make sysstat unixODBC unixODBC-devel tar unzip zip wget ntpdate
You will also need to install oracleasm in order to configure your shared storage for oracle grid infrastructure:
yum -y install kmod-oracleasm oracleasm-support
yum -y install https://download.oracle.com/otn_software/asmlib/oracleasmlib-2.0.12-1.el7.x86_64.rpm
yum -y install oracle-database-preinstall-18c
Now you need to create password for oracle user like below:
passwd oracle

8. Configuring OracleASM

At this point, you need to configure oracleasm on all of the servers with root user privileges like below:
oracleasm configure -i
Enter the user oracle and group dba when it prompts like the output shown in below image


Now type the below command to load oracleasm driver:
oracleasm init
This will show you the output like below:


When you are finished from step 1 to 8 on each node in your environment, you can proceed to next step.

9. Creating Disk Group

For this guide we are using openfiler as our ISCSI shared storage and we have already configured it using iscsiadm command as well as created raw disks using fdisk on our servers.

 Now, log in to your first node (pdbserver1) with root user and create disk group like below:
oracleasm createdisk ASM_DISK1 /dev/sdc1
oracleasm createdisk ASM_DISK2 /dev/sdd1
oracleasm createdisk ASM_DISK3 /dev/sde1
Type below commands to scan disk groups:
oracleasm scandisks
oracleasm listdisks
You will see the similar output like below:


Since this the shared storage so we will just execute below command to scan disk groups on the remaining nodes, in our case (pdbserver2) with root user. If you have more then two nodes in your environment, just type below command one by one.
oracleasm scandisks

10. Configuring Shell Environment

Its time to create environment variables on all of the nodes one by one. Log in with oracle user or you can switch from root user session to oracle directly with below command:
su - oracle
Now, you need to edit default .bash_profile of oracle user like below:
vi /home/oracle/.bash_profile
Add below contents at the end of the file but make sure you replace red highlighted with yours:
# Oracle Settings
export TMP=/tmp
export TMPDIR=$TMP

export ORACLE_HOSTNAME=$HOSTNAME
export ORACLE_BASE=/u01/app/oracle
export ORACLE_HOME=$ORACLE_BASE/product/18.0.0.0.0/dbhome_1
export GRID_HOME=/u01/app/product/18.3.0.0/grid
export ORA_INVENTORY=/u01/app/oraInventory
export ORACLE_SID=
pdbrac1
export DB_NAME=
pdbrac
export DB_UNIQUE_NAME=
pdbrac
export DATA_DIR=/u01/oradata

export PATH=/usr/sbin:/usr/local/bin:$PATH
export PATH=$ORACLE_HOME/bin:$PATH

export LD_LIBRARY_PATH=$ORACLE_HOME/lib:/lib:/usr/lib
export CLASSPATH=$ORACLE_HOME/jlib:$ORACLE_HOME/rdbms/jlib

alias grid_env='. /home/oracle/grid_env'
alias db_env='. /home/oracle/db_env'
Save and close file when you are done.

Again, create grid_env file like below:
vi /home/oracle/grid_env
Add below contents in it:
export ORACLE_SID=+ASM1
export GRID_HOME=/u01/app/product/18.0.0.0.0/grid

export PATH=GRID_HOME/bin:/usr/sbin:/usr/local/bin:$PATH
export LD_LIBRARY_PATH=$ORACLE_HOME/lib:/lib:/usr/lib
export CLASSPATH=$ORACLE_HOME/jlib:$ORACLE_HOME/rdbms/jlib
Save and close file when you are finished.

Now create db_env file like below"
vi /home/oracle/db_env
Add below contents in it:
export ORACLE_SID=pdbrac1
export ORACLE_HOME=/u01/app/oracle/product/18.0.0.0.0/dbhome_1

export PATH=$ORACLE_HOME/bin:/usr/sbin:/usr/local/bin:$PATH
export LD_LIBRARY_PATH=$ORACLE_HOME/lib:/lib:/usr/lib
export CLASSPATH=$ORACLE_HOME/jlib:$ORACLE_HOME/rdbms/jlib
Save and close file when you are done.

Now, make grid_env and db_env executable with below command:
chmod u+x /home/oracle/grid_env
chmod u+x /home/oracle/db_env
Before proceeding to next step, make sure you have performed all of the above steps on each node. We are just preparing two nodes cluster, so the environment variables on our servers are as shown in image below.

bash_profile on pdbserver1


bash_profile on pdbserver2:


db_env on pdbserver1:


db_env on pdbserver2:


grid_env on pdbserver1:


grid_env on pdbserver2:


11. Creating Oracle Base

With root user privileges, create these directories under /u01 on each node and set appropriate permission like blow:
mkdir -p /u01/app/oracle
mkdir -p /u01/app/oracle/product/18.0.0.0.0/dbhome_1
mkdir -p /u01/app/product/18.0.0.0.0/grid
mkdir -p /u01/oradata
chown -R oracle:oinstall /u01
chmod -R 775 /u01
Now log in with oracle user on your first node and extract grid setup under /u01/app/product/18.0.0.0.0/grid directory like below:
unzip -q /home/oracle/grid_setup_file.zip -d /u01/app/product/18.0.0.0.0/grid
At this point, you need to install cvuqdisk rpm package from grid setup directory with root user on each node like below:
rpm -ivh /u01/app/product/18.0.0.0.0/grid/cv/rpm/cvuqdisk-1.0.10-1.rpm
When you are done installing cvuqdisk rpm package on each node, proceed to next step of grid installation.

12. Installing Oracle Grid 18c

We will run graphical installation, if you wish you can go for silent installation as well. Log in to your first node with oracle user and run grid setup like below:
DISPLAY=192.168.70.1:0.0; export DISPLAY
/u01/app/product/18.0.0.0.0/grid/gridSetup.sh
Since this our first grid infrastructure installation so keep the default on below screen click Next,


{Configure an Oracle Standalone Cluster} and click Next


Enter Cluster Name, SCAN Name and keep the SCAN Port default.

Click Next


Click Add to add second node then click SSH connectivity, enter oracle user password in OS Password box then click Setup


This will bring you screen like below which says passwordless ssh connectivity for oracle user is established successfully across the servers.

Click OK


Click Next


Ensure that it shows correct network interfaces against its use for, then click Next.


We are using iscsi shared storage as we have already configured using oracleasm earlier, so we will go for first option on below screen.


Click No then Next


Click External in Redundancy then click Change Discovery Path and enter/dev/oracleasm/disks in the box to retrieve disk groups.

Click Next.


Click {Use same password for these accounts}, Specify Password then Confirm Password click Next.


Click Next.


Click Next.


Keep the default and click Next.


Click Yes on below warning box.


Click Next


Click Next.


Click Next.


It will take a moment to check prerequisites and if you see any warning then go back and fix it first. If prerequisites checks found everything in place you will see the below summary screen.

Verify everything then click Install.


Installation progress screen will prompts you for root scripts execution.


Stop here and go back to your servers, log in with root user and execute these root scripts one by one on each node but on primary node first.


When you are done with root scripts execution on each node, come back to installation screen and click OK on root script prompt. Now, it will take few minutes to complete remaining installation stages.


Click Close.


At this stage, your oracle grid infrastructure installation is completed successfully.

13. Installing Oracle Database 18c

Log in to your first node with root user and extract database under /u01/app/oracle/product/18.0.0.0.0/dbhome_1 location like below.
unzip -q /home/oracle/database_file.zip -d /u01/app/oracle/product/18.0.0.0/dbhome_1
Again, we will run graphical installation, if you wish you can go for silent installation.

Type below command to run graphical installation of database 18c
DISPLAY=192.168.70.1:0.0; export DISPLAY
/u01/app/oracle/product/18.0.0.0.0/dbhome_1/runInstaller
Choose {Set Up Software Only} click Next.


On the below screen, select {Oracle Real Application Clusters database installation} click Next


Click Next.


Select {Enterprise Edition} click Next


Click Next.


Keep the default and click Next.


After prerequisites checks, if all goes well, setup will bring you below summary screen.

Click Install.


When it says, execute root scripts, stop right there and go back to your first node execute root scripts and then on other nodes as well. Once you are finished executing root scripts, come back to installer screen and click OK


Click Close to finish setup.


Well, at this stage your database installation has been successful.

14. Creating a Database

Type blow command to set appropriate permission on each node with root user:
chmod 6751 /u01/app/oracle/product/18.0.0.0.0/dbhome_1/bin/oracle
chmod 6751 /u01/app/product/18.0.0.0.0/grid/bin/oracle
When you are finished with the above, log in to your first node with oracle user and start database creation wizard like below:
source /home/oracle/db_env
DISPLAY=192.168.70.1:0.0; export DISPLAY
Type dbca to run database creation wizard:
dbca
Choose {Create a database} click Next


Select {Advanced configuration} click Next


Click Next


Click Next


Provide {Fast Recovery Area Size} according to your environment and click Next.


Leave un-ticked and click Next


Set {Processes} according to your requirement and click Next.


Specify the management options and click Next.


Select {Use the same administrative password for all users} and enter the password.

Click Next.


Select {Create database} then click {Generate database creation scripts} and keep the default path.

Click { All Initialization Parameters}


Make sure {db_name}, {db_unique_name},{db_domain} and {sessions} are ticked to Include in spfile

When you done, close this window screen.


Click Next.

It will take a moment to perform Prerequisites Checks.


If all goes well with prerequisites checks, you will see the below summary screen.

Click Finish to start database creation process.


Database creation process has begun.


When its done, click Close to finish the database creation wizard.

15. Verifying RAC and Database Status

At this stage, your database creation has been successful. Now log in with oracle user on your first node and type below command to verify your RAC cluster and database status.

To verify RAC (Real Application Cluster) status, type below command:
cd $GRID_HOME/bin
./crsctl stat res -t

To verify database status:
./srvctl status database -d pdbrac

Type below command to verify database configuration in rac.
./srvctl config database -d pdbrac

You can also verify from SQL prompt as well:
sqlplus / as sysdba
Type below command on SQL prompt:
SELECT inst_name FROM v$active_instances;

16. Startup and Shutdown

In this step, we will show you how to start or shutdown your cluster and database whenever you required to.

Log in to any of the node with root user and type the below command to shutdown database first:
/u01/app/product/18.0.0.0.0/grid/bin/srvctl stop database -d pdbrac
You can verify the database status whether it is stopped or not:


When the database stopped successfully, you can initiate below command to stop real application cluster:
/u01/app/product/18.0.0.0.0/grid/bin/crsctl stop cluster -all
The output similar to like below shows that real application cluster has been stopped.


Top bring back the cluster online, log to any of the node with root user and type the below command:
/u01/app/product/18.0.0.0.0/grid/bin/crsctl start cluster -all
The output similar to like below shows that cluster is now online:


Now, you can type below command to start database as well:
/u01/app/product/18.0.0.0.0/grid/bin/srvctl start database -d pdbrac

Wrapping up

In this guide, we set up two nodes Oracle Real Application Cluster 18c as well as database 18c on CentOS/RHEL 7 server.

How To Create a PostgreSQL HA Cluster using Patroni and HAProxy on Ubuntu/18/19/20

$
0
0


This tutorial will take you through the steps to set up a highly available PostgreSQL cluster using Patroni and HAProxy on an Ubuntu 19 server. These instruction can also be applied (slight changes may be required) if you are running an earlier release of Ubuntu 16/17/18 or latest release of Ubuntu 20.04.

Prerequisites

To follow the steps covered in this tutorial, you will need five (physical or virtual) machines installed with Ubuntu (18.04, 19.04/10 or 20.04) server having sudo non-root user privileges.

HOSTNAMEIP ADDRESSPURPOSE
NODE1192.168.10.1Postgresql, Patroni
NODE2192.168.10.2Postgresql, Patroni
NODE3192.168.10.3Postgresql, Patroni
NODE4192.168.10.4etcd
NODE5192.168.10.5HAProxy

Please follow the steps by steps guide to set up PostgreSQL High Availability cluster in your environment.

How To Create a Highly Available PostgreSQL Cluster using Patroni and HAProxy on CentOS/RHEL 7

$
0
0

This step by step guide will show you how to set up a highly available PostgreSQL cluster using Patroni and HAProxy on CentOS or RHEL 7 server. These instruction can also be applied (slight changes may be required) if you are running an earlier release of CentOS or RHEL 6.

Prerequisites

To follow this tutorial, you will need 4 (physical or virtual) machines with CentOS or RHEL 7 minimal installed, having sudo non-root user privileges.

We have prepared following 4 machines with CentOS Linux release 7.7.1908 for this guide. However, if you wish you can add up more machines in your cluster environment.

HOSTNAMEIP ADDRESSPURPOSE
node1192.168.10.1Postgresql, Patroni
node2192.168.10.2Postgresql, Patroni

node3192.168.10.3etcd
node4192.168.10.4HAProxy

When you are ready with the above prerequisites , follow step by step guide to set up PostgreSQL high availability cluster in your environment.

How To Set Up a Multi-node MySQL Replication Cluster on Ubuntu 18.04

$
0
0

Database clustering is particularly useful for highly active website and application. With replication, at least two or more MySQL servers act as a cluster. MySQL multi-node circular replication adds speed and redundancy. 

This tutorial is written for Ubuntu 18.04.4, 19.04, 19.10 or Debian 9 using a non-root user, which means commands that require elevated privileges are prefixed with sudo. 

We will use following three servers to configure MySQL database multi-node circular replication cluster using HAProxy and Heartbeat.

HOSTNAMEIP ADDRESSPURPOSE
dbserver1192.168.10.1MySQL
dbserver2192.168.10.2MySQL
dbserver3192.168.10.3MySQL


If you wish you can watch below video tutorial to set up your replication cluster quickly.


Prerequisites

You will need three (physical or virtual) machines with Ubuntu 18.04.4 server installed on each machine having sudo non-root user privileges. When you have prerequisites in place, please follow this step by step tutorial to set up a multi-node MySQL replication cluster for your production environment.

How To Set Up a Multi-node Hadoop Cluster on Ubuntu 18.04/19.04/19.10/20.04

$
0
0

Hadoop software library is a framework that allows for the distributed processing of large data sets across clusters of computers using simple programming models. It is designed to scale up from single servers to thousands of machines, each offering local computation and storage.

Rather than rely on hardware to deliver high-availability, the library itself is designed to detect and handle failures at the application layer, so delivering a highly-available service on top of a cluster of computers, each of which may be prone to failures.

Hadoop is an open-source Apache project that includes these modules:

  • Hadoop Common: The common utilities that support the other Hadoop modules.
  • Hadoop Distributed File System (HDFS™): A distributed file system that provides high-throughput access to application data.
  • Hadoop YARN: A framework for job scheduling and cluster resource management.
  • Hadoop MapReduce: A YARN-based system for parallel processing of large data sets.
  • Hadoop Ozone: An object store for Hadoop.

Before installing and configuring the master and worker nodes, it’s important to understand the different components of a Hadoop cluster.

A master node maintains knowledge about the distributed file system, like the inode table on an ext3 filesystem, and schedules resources allocation. For this guide, master-node will handle this role and host following two daemons:

  • NameNode manages the distributed file system and knows where stored data blocks inside the cluster are.
  • ResourceManager manages the YARN jobs and takes care of scheduling and executing processes on worker nodes.

Worker nodes store the actual data and provide processing power to run the jobs. For this guide, worker-node1 and worker-node2 will handle this role and host following two daemons:

  • DataNode manages the physical data stored on the node; it’s named, NameNode.
  • NodeManager manages execution of tasks on the node.


Prerequisites

To follow this tutorial, you will need three (physical or virtual) machines installed with Ubuntu server having sudo non-root user privileges. Please note that, this guide is specifically written for Ubuntu 18.04, 19.04, 19.10, 20.04 and Debian 9, 10.

We will use following three nodes for this guide:

NameIPPurpose
master-node192.168.10.1Master Node
worker-node1192.168.10.2Worker Node
worker-node2192.168.10.3Worker Node


Update Hosts File

For each node to communicate with each other by name, map the IP addresses of three servers against their name.

Edit the /etc/hosts file on master-node, worker-node1, worker-node2 like below:
sudo nano /etc/hosts

192.168.10.1 master-node
192.168.10.2 worker-node1
192.168.10.3 worker-node2 
Make sure you replace the ip addresses with yours, Save and close file when you are finished.


Adding Hadoop User

Type below command on all of the nodes (master-node, worker-node1, worker-node2) in our case to create a user called hadoop:
sudo adduser hadoop
This user will handle the Hadoop installation and configuration on each node.

You will see similar to below prompts where you have to create password for hadoop user

Adding user `hadoop' ...
Adding new group `hadoop' (1001) ...
Adding new user `hadoop' (1001) with group `hadoop' ...
Creating home directory `/home/hadoop' ...
Copying files from `/etc/skel' ...
Enter new UNIX password:
Retype new UNIX password:
passwd: password updated successfully
Changing the user information for hadoop
Enter the new value, or press ENTER for the default
Full Name []: Hadoop Administrator
Room Number []:
Work Phone []:
Home Phone []:
Other []:
Is the information correct? [Y/n] y

Lastly press Y and Enter to complete user creation process.

Type below command to add hadoop user to sudo group on each node:
sudo adduser hadoop sudo
You will see the output similar like below:

Adding user `hadoop' to group `sudo' ...
Adding user hadoop to group sudo
Done.


Set Up Password Less SSH Authentication

The master node will use an SSH connection to connect to other nodes with key-pair authentication. to actively manage the cluster.

For this, we need to set up key-pair ssh authentication on each node. Login to your master-node as the hadoop user, and generate an SSH key like below:
ssh-keygen
When generating this key, leave the password field blank so your Hadoop user can communicate unprompted.

Repeat the same on worker-node1, worker-node2 as the hadoop user to generate an SSH key.

On the master-node, in the /home/hadoop/.ssh directory, you should see the id_rsa.pub and authorized_keys files.

You need to copy id_rsa.pub contents to authorized_keys like below:
cat /home/hadoop/.ssh/id_rsa.pub >> /home/hadoop/.ssh/authorized_keys
Now transfer authorized_keys file from master-node to each worker node (worker-node1, worker-node2) like below:
scp /home/hadoop/.ssh/authorized_keys worker-node1:/home/hadoop/.ssh/
scp /home/hadoop/.ssh/authorized_keys worker-node2:/home/hadoop/.ssh/
This will prompt you for hadoop user password.

Once authorized_keys transferred successfully to worker nodes, ssh from master-node to worker-node1, worker-node2 to verify whether password less authentication is working for hadoop user.
ssh worker-node1
If this logged you in from master-node to worker-node1 without password, your password less authentication is working.

Next, do ssh from master-node to worker-node2 and see if password less authentication working.
ssh worker-node2
If this logged you in from master-node to worker-node2 without password, your password less authentication is working.

Next, log in as the hadoop user on worker-node1, transfer authorized_keys to master-node and worker-node2:
cat /home/hadoop/.ssh/id_rsa.pub >> /home/hadoop/.ssh/authorized_keys
scp /home/hadoop/.ssh/authorized_keys master-node:/home/hadoop/.ssh/
scp /home/hadoop/.ssh/authorized_keys worker-node2:/home/hadoop/.ssh/
Next, log in as the hadoop user on worker-node2, transfer authorized_keys to master-node and worker-node1:
cat /home/hadoop/.ssh/id_rsa.pub >> /home/hadoop/.ssh/authorized_keys
scp /home/hadoop/.ssh/authorized_keys master-node:/home/hadoop/.ssh/
scp /home/hadoop/.ssh/authorized_keys worker-node1:/home/hadoop/.ssh/
Now do ssh from each other node to verify whether password less authentication is working. If everything setup correctly, as the hadoop user you can ssh each other node with key-pair authentication without providing password.


Installing OpenJDK

You can install OpenJDK 11 on (master-node, worker-node1, worker-node2) with below command:
sudo apt -y install openjdk-11-jdk

Set Java Home Environment

Hadoop comes with code and configuration that references the JAVA_HOME environment variable. This variable points to the java binary file, allowing them to run java code.

You can set up JAVA_HOME variable on each node like below:
echo "JAVA_HOME=$(which java)" | sudo tee -a /etc/environment
Reload your system’s environment variables with below command:
source /etc/environment
Verify the variable was set correctly:
echo $JAVA_HOME
This should return the path to the java binary.


Download Hadoop

On master-node as the hadoop user, download the Hadoop tarball file, and unzip it. At the time of writing this article, hadoop 3.1.3 was the most latest available release.
cd ~
wget http://apache.cs.utah.edu/hadoop/common/current/hadoop-3.1.3.tar.gz
tar -xzf hadoop-3.1.3.tar.gz
mv hadoop-3.1.2 hadoop

Set Environment Variables

You need to manually set hadoop binaries location into system path.

Edit /home/hadoop/.profile like below:
nano /home/hadoop/.profile
add following line at the end of the file:
PATH=/home/hadoop/hadoop/bin:/home/hadoop/hadoop/sbin:$PATH
Save and close when you are finished.

Next, edit .bashrc like below:
nano /home/hadoop/.bashrc
add following lines at the end of the file:
export HADOOP_HOME=/home/hadoop/hadoop
export PATH=${PATH}:${HADOOP_HOME}/bin:${HADOOP_HOME}/sbin
Save and close.

Repeat the same on worker-node1, worker-node2 as well.


Configuring Hadoop

In this section, we'll configure hadoop on master-node first, then replicate the configuration to worker-node1, worker-node2.

On master-node, type below command to find java installation path:
update-alternatives --display java
This will return output similar to the following:

java - auto mode
link best version is /usr/lib/jvm/java-11-openjdk-amd64/bin/java
link currently points to /usr/lib/jvm/java-11-openjdk-amd64/bin/java
link java is /usr/bin/java
/usr/lib/jvm/java-11-openjdk-amd64/bin/java - priority 1111
slave java.1.gz is /usr/share/man/man1/java.1.gz
slave java.1.gz: /usr/lib/jvm/java-11-openjdk-amd64/man/man1/java.1.gz

Take the value of the (link best version is) and remove the trailing /bin/java. For example on Ubuntu or Debian, the link is /usr/lib/jvm/java-11-openjdk-amd64/bin/java, so JAVA_HOME should be /usr/lib/jvm/java-11-openjdk-amd64.

Edit ~/hadoop/etc/hadoop/hadoop-env.sh like below:
nano ~/hadoop/etc/hadoop/hadoop-env.sh
Uncomment by removing # and update JAVA_HOME line like below:
export JAVA_HOME=/usr/lib/jvm/java-11-openjdk-amd64
Save and close when you are finished.

Next, edit core-site.xml file to set the NameNode location to master-node on port 9000:
nano ~/hadoop/etc/hadoop/core-site.xml
add the following strings, make sure you replace master-node with yours:
<?xml version="1.0" encoding="UTF-8"?>
<?xml-stylesheet type="text/xsl" href="configuration.xsl"?>
<configuration>
<property>
<name>fs.default.name</name>
<value>hdfs://master-node:9000</value>
</property>
</configuration>
Save and close.

Next, edit hdfs-site.conf to resemble the following configuration:
nano ~/hadoop/etc/hadoop/hdfs-site.xml
add following strings:
<configuration>
<property>
<name>dfs.namenode.name.dir</name>
<value>/home/hadoop/data/nameNode</value>
</property>
<property>
<name>dfs.datanode.data.dir</name>
<value>/home/hadoop/data/dataNode</value>
</property>
<property>
<name>dfs.replication</name>
<value>2</value>
</property>
</configuration>
Save and close.

Note that the last property string dfs.replication, indicates how many times data is replicated in the cluster. We set 2 to have all the data duplicated on the two of our worker nodes.

If you have only one worker node, enter 1, if you have three, enter 3 but don’t enter a value higher than the actual number of worker nodes you have.

Next, edit the mapred-site.xml file, setting YARN as the default framework for MapReduce operations:
nano ~/hadoop/etc/hadoop/mapred-site.xml
add following strings:
<configuration>
<property>
<name>mapreduce.framework.name</name>
<value>yarn</value>
</property>
<property>
<name>yarn.app.mapreduce.am.env</name>
<value>HADOOP_MAPRED_HOME=$HADOOP_HOME</value>
</property>
<property>
<name>mapreduce.map.env</name>
<value>HADOOP_MAPRED_HOME=$HADOOP_HOME</value>
</property>
<property>
<name>mapreduce.reduce.env</name>
<value>HADOOP_MAPRED_HOME=$HADOOP_HOME</value>
</property>
</configuration>
Save and close.

Next, edit yarn-site.xml, which contains the configuration options for YARN.
nano ~/hadoop/etc/hadoop/yarn-site.xml
add below strings, make sure you replace 192.168.10.1 with the your master-node's ip address:
<configuration>
<property>
<name>yarn.acl.enable</name>
<value>0</value>
</property>
<property>
<name>yarn.resourcemanager.hostname</name>
<value>192.168.10.1</value>
</property>
<property>
<name>yarn.nodemanager.aux-services</name>
<value>mapreduce_shuffle</value>
</property>
</configuration>
Save and close.

Next, edit workers file to include both of the worker nodes (worker-node1, worker-node2):
nano ~/hadoop/etc/hadoop/workers
Remove localhost if exists, add your worker nodes like below:
worker-node1
worker-node2
Save and close.

The workers file is used by startup scripts to start required daemons on all nodes.

Next, edit yarn-site.xml file to set up memory allocation:
nano ~/hadoop/etc/hadoop/yarn-site.xml
add the following strings:
<property>
<name>yarn.nodemanager.resource.memory-mb</name>
<value>1536</value>
</property>
<property>
<name>yarn.scheduler.maximum-allocation-mb</name>
<value>1536</value>
</property>
<property>
<name>yarn.scheduler.minimum-allocation-mb</name>
<value>128</value>
</property>
<property>
<name>yarn.nodemanager.vmem-check-enabled</name>
<value>false</value>
</property>
Save and close.

The last property disables virtual-memory checking which can prevent containers from being allocated properly with openjdk-11 if enabled.

Note: Memory allocation can be tricky on low RAM nodes because default values are not suitable for nodes with less than 8GB of RAM. We have manually set memory allocation for MapReduce jobs, and provide a sample configuration for 2GB RAM nodes.

Next, edit mapred-site.xml file:
nano ~/hadoop/etc/hadoop/mapred-site.xml
add the following strings:
<property>
<name>yarn.app.mapreduce.am.resource.mb</name>
<value>512</value>
</property>
<property>
<name>mapreduce.map.memory.mb</name>
<value>256</value>
</property>
<property>
<name>mapreduce.reduce.memory.mb</name>
<value>256</value>
</property>
Save and close.

We have completed hadoop configuration on master-node.


Configure Worker Nodes

This section will show you how to duplicate hadoop configuration from master-node to all work nodes.

First copy the hadoop tarball file from master-node to worker nodes like below:
scp /home/hadoop/hadoop-*.tar.gz worker-node1:/home/hadoop/
scp /home/hadoop/hadoop-*.tar.gz worker-node2:/home/hadoop/
Next, login to worker-node1 as the hadoop user via SSH and unzip the hadoop archive, rename the directory then exit from worker-node1 to get back on the master-node:
ssh worker-node1
tar -xzf hadoop-3.1.2.tar.gz
mv hadoop-3.1.2 hadoop
exit
Repeat the same on worker-node2.

Next, duplicate the Hadoop configuration files from master-node to all worker nodes:
for node in worker-node1worker-node2; do
scp ~/hadoop/etc/hadoop/* $node:/home/hadoop/hadoop/etc/hadoop/;
done
Make sure you replace worker-node1, worker-node2 with your worker nodes name.


Formatting HDFS

Log in to master-node as the hadoop user, type the below command to format hadoop file system:
hdfs namenode -format
With this hdfs format, your hadoop installation is now configured and ready to run.


Starting Hadoop

This section will show you how to start, stop and monitor hadoop that everything is properly working.

Start the HDFS by running the following script on master-node:
start-dfs.sh
You will see similar to the following output:

Starting namenodes on [master-node]
Starting datanodes
worker-node2: WARNING: /home/hadoop/hadoop/logs does not exist. Creating.
worker-node1: WARNING: /home/hadoop/hadoop/logs does not exist. Creating.
Starting secondary namenodes [master-node]

This will start NameNode and SecondaryNameNode components on master-node, and DataNode on worker-node1 and worker-node2, according to the configuration in the workers config file.

Check that every process is running with the jps command on each node.

On master-node, type jps and you should see the following:

3009 SecondaryNameNode
2724 NameNode
3129 Jps

On worker-node1 and worker-node2, type jps and you should see the following:

14376 Jps
14190 DataNode

To stop HDFS, you can type below command on master-node:
stop-dfs.sh
This will stop HDFS on each node (master-node, worker-node1, worker-node2):

You can get useful information about your HDFS cluster with the below command.
hdfs dfsadmin -report
This will print information (e.g., capacity and usage) for all running DataNodes like below:

Configured Capacity: 84008173568 (78.24 GB)
Present Capacity: 67072004096 (62.47 GB)
DFS Used: 2588672 (2.47 MB)
DFS Remaining: 67069415424 (62.46 GB)
DFS Used%: 0.00%
Replicated Blocks:
Missing blocks: 0
Under replicated blocks: 0
Blocks with corrupt replicas: 0
Low redundancy blocks with highest priority to recover: 0
Missing blocks (with replication factor 1): 0
Pending deletion blocks: 0
Erasure Coded Block Groups:
Low redundancy blocks with highest priority to recover: 0
Low redundancy block groups: 0
Block groups with corrupt internal blocks: 0
Missing block groups: 0
Hostname: worker-node1
Pending deletion blocks: 0

-------------------------------------------------
Live datanodes (2):

Name: 192.168.10.2:9866 (worker-node1)
DFS Remaining: 33534689280 (31.23 GB)
Decommission Status : Normal
Configured Capacity: 42004086784 (39.12 GB)
DFS Used: 1294336 (1.23 MB)
Non DFS Used: 6304002048 (5.87 GB)
DFS Used%: 0.00%
Last contact: Fri Mar 06 12:19:30 PKT 2020
DFS Remaining%: 79.84%
Configured Cache Capacity: 0 (0 B)
Cache Used: 0 (0 B)
Cache Remaining: 0 (0 B)
Cache Used%: 100.00%
Cache Remaining%: 0.00%
Xceivers: 1
Configured Capacity: 42004086784 (39.12 GB)
Last Block Report: Fri Mar 06 11:29:35 PKT 2020
Num of Blocks: 3


Name: 192.168.10.3:9866 (worker-node2)
Hostname: worker-node2
Decommission Status : Normal
DFS Used: 1294336 (1.23 MB)
Cache Used%: 100.00%
Non DFS Used: 6303965184 (5.87 GB)
DFS Remaining: 33534726144 (31.23 GB)
DFS Used%: 0.00%
DFS Remaining%: 79.84%
Configured Cache Capacity: 0 (0 B)
Cache Used: 0 (0 B)
Cache Remaining: 0 (0 B)
Cache Remaining%: 0.00%
Num of Blocks: 3
Xceivers: 1
Last contact: Fri Mar 06 12:19:28 PKT 2020
Last Block Report: Thu Mar 05 21:22:07 PKT 2020

You can get the description of all available commands like below:
hdfs dfsadmin -help
Next, open up your preferred web browser and navigate to http://your_master_node_IP:9870, and you’ll get a user-friendly HDFS monitoring web console like below:


Testing HDFS Cluster

You can test your HDFS cluster by writing and reading using hdfs dfs command. First, manually create your home directory. All other commands will use a path relative to this default home directory:

On master-node, type below command:
hdfs dfs -mkdir -p /user/hadoop
We'll use few textbooks from the Gutenberg project as an example for this guide.

Create a books directory in HDFS. The following command will create it in the home directory, /user/hadoop/books:
hdfs dfs -mkdir books
Now download a few books from the Gutenberg project:
cd /home/hadoop
wget -O franklin.txt http://www.gutenberg.org/files/13482/13482.txt
wget -O herbert.txt http://www.gutenberg.org/files/20220/20220.txt
wget -O maria.txt http://www.gutenberg.org/files/29635/29635.txt
Next, put these three books through HDFS, in the books directory:
hdfs dfs -put franklin.txt herbert.txt maria.txt books
List the contents of the books directory:
hdfs dfs -ls books
You will see output similar to the following:

Found 3 items
-rw-r--r-- 2 hadoop supergroup 174481 2020-03-05 22:30 books/franklin.txt
-rw-r--r-- 2 hadoop supergroup 450783 2020-03-05 22:30 books/herbert.txt
-rw-r--r-- 2 hadoop supergroup 607788 2020-03-05 22:30 books/maria.txt

Next, move one of the books to the local filesystem:
hdfs dfs -get books/franklin.txt
You can also directly print the books on terminal from HDFS:
hdfs dfs -cat books/maria.txt
These are just few example of commands. However, there are many commands to manage your HDFS. For a complete list, you can look at the Apache HDFS shell documentation, or print help with:
hdfs dfs -help

Start YARN

HDFS is a distributed storage system, and doesn’t provide any services for running and scheduling tasks in the cluster. This is the role of the YARN framework. The following section is about starting, monitoring, and submitting jobs to YARN.

On master-node, you can start YARN with the below script:
start-yarn.sh
You will see the output like below:

Starting resourcemanager
Starting nodemanagers

Check that everything is running with the jps command. In addition to the previous HDFS daemon, you should see a ResourceManager on master-node, and a NodeManager on worker-node1 and worker-node2.

To stop YARN, run the following command on master-node:
stop-yarn.sh
Similarly, you can get a list of running applications with below command:
yarn application -list
To get all available parameters of the yarn command, see Apache YARN documentation.

As with HDFS, YARN provides a friendlier web UI, started by default on port 8088 of the Resource Manager. You can navigate to http://master-node-IP:8088 to browse the YARN web console:


Submit MapReduce Jobs to YARN

YARN jobs are packaged into jar files and submitted to YARN for execution with the command yarn jar. The Hadoop installation package provides sample applications that can be run to test your cluster. You’ll use them to run a word count on the three books previously uploaded to HDFS.

On master-node, submit a job with the sample jar to YARN:
yarn jar ~/hadoop/share/hadoop/mapreduce/hadoop-mapreduce-examples-3.1.3.jar wordcount "books/*" output
The last argument is where the output of the job will be saved - in HDFS.

After the job is finished, you can get the result by querying HDFS with:
hdfs dfs -ls output
If above command return success, the output will resemble:

Found 2 items

-rw-r--r-- 2 hadoop supergroup 0 2020-03-05 17:21 output/_SUCCESS
-rw-r--r-- 2 hadoop supergroup 789726 2020-03-05 17:21 output/part-r-00000

Print the result with:
hdfs dfs -cat output/part-r-00000 | less

Wrapping up

Now that you have a YARN cluster up and running, you can learn how to code your own YARN jobs with Apache documentation and install Spark on top of your YARN cluster. You may wish to consult the following resources for additional information on this topic.
Viewing all 880 articles
Browse latest View live