Quantcast
Channel: Tech Support
Viewing all 880 articles
Browse latest View live
↧

What’s New in iOS 11

$
0
0

Apple announced a number of new features and changes at WWDC 2017. From improvements to Messages and Apple Pay to powerful multitasking and file management on the iPad, following are the best new features coming in iOS 11.


iMessage Apps Are Easier to Access, and Messages Are Synced Between Devices

The Messages app has a redesigned app drawer to make iMessage apps and stickers more discoverable and easier to use. These apps were added in iOS 10, but were hidden behind a button, which was kind of annoying. The new layout makes things much more accessible.

Your messages will now be stored in iCloud, too. All of your conversations will be synchronized between your devices when you sign in with your iCloud account. That way, you can delete a message on one device and it goes away everywhere. Messages remain end-to-end encrypted, even while stored in the cloud.

This also allows Apple to optimize device storage. Since your messages are stored in the cloud, they don’t have to all remain on your device. This means more free space and smaller and faster device backups.


Pay Your Friends Over iMessage with Apple Pay

Apple Pay will now allow person-to-person payments. It’s integrated right into Messages as an iMessage app, making it easy to send money while chatting. Money you receive goes into your Apple Pay cash card and you can send it to someone else, make a purchase with Apple Pay, or transfer it to your bank account.

You’ll have to authenticate with Touch ID before sending money, just as you do when making purchases.

It’ll even try to detect when you want to use it. If you receive a message in iMessages saying you owe money, for example, the keyboard will automatically suggest Apple Pay as an option and automatically fill in the amount of money.

Lastly, 50% of US retailers will be accepting Apply Pay in the US by end of 2017, according to Apple.


Siri Gets a More Natural Voice and Other Improvements

Siri’s voice is being upgraded: Apple has used “deep learning” to create a more “natural and expressive” voice. Siri has both a male and female voice, and it can even say the same word in different ways for a more realistic conversation experience.

Apple’s virtual assistant is gaining built-in translation features as well. Siri will speak the translation aloud for you, so you know exactly how to pronounce it. It’ll support translation from English to Chinese, French, German, Italian, and Spanish initially.

In addition to suggesting apps, and when you should leave for work based on traffic, Siri will use on-device learning to understand more about topics of interest to you. Siri can suggest news topics you might be interested in, more easily respond with your location in messages, or make calendar events after you book hotel reservations in Safari on the web, for example. The keyboard will learn words you might want to use based on what you read. This is all done on your device, and not in the cloud.

Lastly, developers can now take advantage of SiriKit to integrate Siri with more types of apps, everything from task management to notes to banking. So hopefully, Siri will be able to do more as developers jump on board.


Camera Improvements Mean Videos and Photos Take Up Less Space

iOS 11 will use HEVC video encoding, which means videos you capture are up to two times smaller in storage size. Apple is also switching photo capture from JPEG to HEIF for up to two times better compression as well, so photos you take on your device will use up to two times less space. You can still share those photos with people on other devices.


Improved Memories and Live Photos

The Memories feature in the Photos app can now use machine learning to identify activities like anniversaries, memories of your children, your pets, or sporting events. It uses computer vision to identify photos and automatically pick the best videos and photos. It can also work in portrait mode as well as landscape mode, so you can watch in whatever aspect ratio you prefer.

There are improvements for live photos, too. You can now more easily edit live photos, trimming them and marking any frame of the photo as the “key photo” in the live photo. It can also turn a live photo into a seamless loop using computer vision technology.


Control Center Consolidates to One Unified, 3D Touch-Capable Page

The Control Center that appears when you swipe up from the bottom of the screen has been redesigned. It’s now a single page that includes all the features—You don’t need to swipe left and right to use them (which is sure to be less confusing for many people).

In addition, you can now 3D touch an option to access more controls. For example, you can 3D touch the music control to see more information and playback controls.


The Lock Screen and Notification Center Have Been Combined

The lock screen and notification center are now the same screen. When you swipe down from the top of the screen, you’ll see all your notifications. You can still swipe to the left to access your widgets or the right to access your camera.The lock screen and notification center are now the same screen. When you swipe down from the top of the screen, you’ll see all your notifications. You can still swipe to the left to access your widgets or the right to access your camera.


Apple Maps Improves Navigation and Adds Indoor Maps

Apple Maps is, once again, improving navigation a little bit. Apple Maps will display the speed limit and provide lane guidance to guide you into the appropriate lane while navigating.

In addition, Maps is getting indoor maps of malls and airports, with directories and a search feature. Apple is beginning with many malls and airports, but will be adding more as time goes on.


Do Not Disturb Will Auto-Enable While Driving

iOS 11 includes a new “Do Not Disturb While Driving” feature that uses Bluetooth or Wi-Fi to determine whether you’re driving.  It will automatically hide your notifications if you are (though you can tell the iPhone you’re not driving if you want notifications to show up).

The Messages app can even automatically auto-respond to people who text you, saying that you’re driving and can’t respond right now. They can text you to say it’s urgent if they need you to respond as soon as possible.


AirPlay 2 Becomes Part of HomeKit, and Brings Multi-Room Audio

HomeKit will now support speakers, so you can configure and control your speakers alongside your other smarthome devices. Apple has a new AirPlay 2 protocol that enables multi-room audio, too. You can finally play music to different speakers throughout your home from apps in iOS—no need for iTunes on the desktop.

You can now also play audio to your Apple TV from your iOS device or Mac, enabling those speakers connected to your media center to become AirPlay speakers.


Apple Music Gets Some Social Improvements

Apple Music will now show you what your friends are listening to, so you can more easily discover new music you might want to listen to. You can create a profile, make it public or private, and follow people with similar taste.

Developers will have a MusicKit for Apple Music API they can use to gain full access to Apple Music, too. For example, Shazam can automatically add songs it identifies to your Apple Music collection, and DJ apps can provide access to the entire Apple Music library.


The App Store Has Been Redesigned

The App Store is being completely redesigned to make it easier to discover new apps and games. Launch it and you’ll see a new “Today” tab that provides better app discovery. Every day there’s a new app of the day and game of the day, and you might also see how-to guides with information about apps you already use on the Today tab. You can scroll down to see older information from previous days, too.

At the bottom of the page, you’ll see that apps are now sorted into both “Games” and “Apps”, so you can easily browse either games or apps that aren’t games.


Apple Has Improved Many iOS Core Technologies

Alongside the improved Metal 2 graphics API and HEVC video encoding technology, iOS will gain machine learning and augmented reality features for developers to build on.

iOS is also making machine learning easier for developers to use with Core ML. There’s a vision API that provides developers with an easier way to recognize faces and landmarks, for example. There’s also a natural language API for understanding text. Again, this all happens on the device, not in the cloud.

Augmented reality (AR) features will be easier for developers to use. ARKit will make it easier for developers to make augmented reality features in their apps—PokĂ©mon Go used AR to show Pokemon superimposed over a video of the real world, for example. Apple showed off an improved PokĂ©mon Go app that showed PokĂ©balls bouncing more realistically over the ground.

Apple also demonstrated a developer app that allowed you to add virtual objects to a table. The app used surface detection to place the objects. Apple says this will make iPhones and iPads “the largest AR platform in the world” overnight.


The iPad Gets new Multitasking Features

There are a lot of new features in iOS 11 that make iPads more powerful. The dock at the bottom of the screen can contain many more apps, and you can now swipe up from the bottom of the screen in any app to more easily switch between apps. You can drag an app icon from the dock and position it on your screen to easily start multitasking. There’s also a new app switcher.

iPads will now support drag-and-drop for text, images, and links between apps. You can select multiple things and drag them, too. You can drag in the multitasking interface, or drag content from the dock.

In addition, the iPad’s keyboard allows you to flick on keys to access punctuation and numbers, making typing faster.


A File Management App Finally Comes to the iPad

There’s a new Files app for iPad that supports nested folders, list view, favorite, search, tags, and recent files. It supports not only iCloud, but also third-party storage providers like Dropbox, OneDrive, and Google Drive. When you search or view recent files, you’ll see all your files in one place.

You can drag-and-drop email attachments to the Files app to save them, for example. Or you can tap and hold on the Files app on the dock and then drag and drop files from the Files app into any other app.

Apple didn’t say this app wouldn’t appear on iPhone, but it was strongly implied that this app will only be for the iPad.


The iPad Gets More Markup Features for the Apple Pencil

Apple is offering more markup features throughout iOS 11, making the Apple Pencil more useful. When you take a screenshot, you can tap a thumbnail that appears and use an Apple Pencil to mark up and draw on those screenshots. Anything you mark up can be saved as a PDF. You can draw in emails, too.

Your handwritten text is now searchable, thanks to machine learning detecting what you’re writing—so you can find handwritten notes with Spotlight search.

Notes now includes a built-in document scanner that can scan paper notes. You can then mark them up with your pencil, so it’s a convenient way to digitally fill out paper forms. You can draw even in notes you’re typing in Apple Note, too.


Many More Features

Apple also mentioned a few features targeted at users in China, including a QR code reader application integrated into the main Camera app and integrated on the lock screen.

There are many other features Apple didn’t mention, too. The above slide reveals that it will contain a one-handed keyboard, Wi-Fi password sharing, screen recording, flight status information in Spotlight, and lots more.

↧

How to Change the BIOS Boot Screen Logo Image on Lenovo Laptops or Desktops

$
0
0

This step by step guide is for those who want to replace BIOS logo splash screen image on Lenovo laptops or desktops by customizing the BIOS splash screen image. Following are the quick steps on how you can do that.


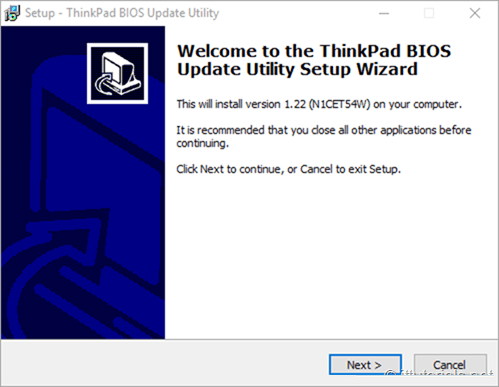
Download the BIOS Update Utility

Download the appropriate BIOS Update Utility from the Lenovo support website and extract the files:


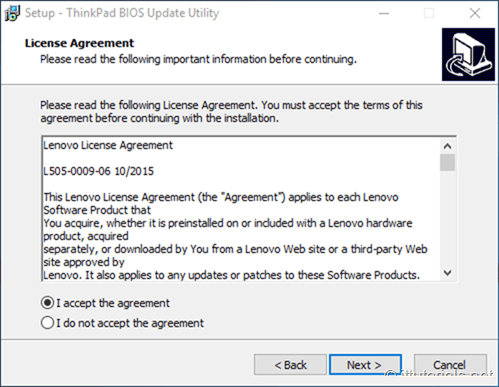
Click Next and accept the agreement:


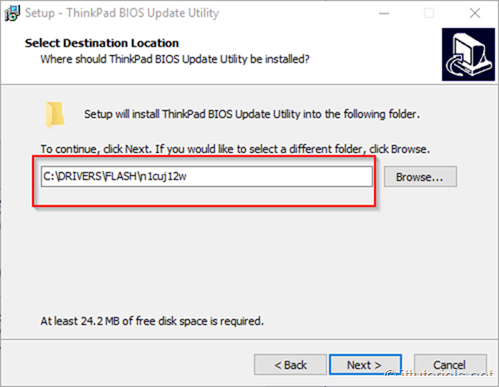
Take note of the path where the files will be extracted to:


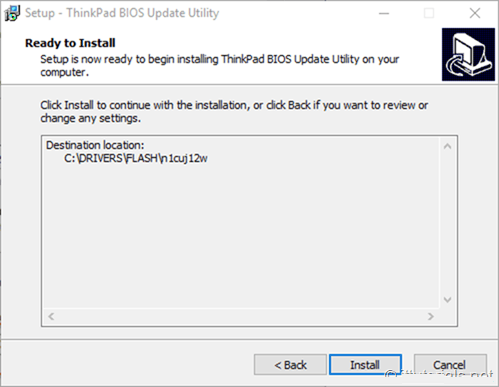
Click Next again and the click on Install:


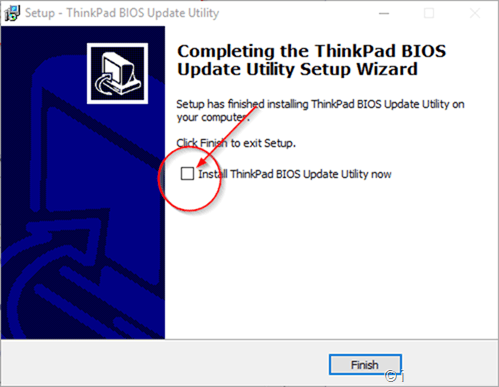
Make sure you do not click "Install ThinkPad BIOS Update Utility now" on the following screen:

Click on Finish. 


Prepare the image

guidelines for the creation of the custom image :
    • image file size are limited to 60kb
valid image formats are as follows:
    • (.bmp)  jpeg (.jpg)  gif (.gif)
    • file format image width and height should be less or equal to 40% of the built-in lcd panel resolution. (ex. if lcd panel resolution is 1920 x 1080, image width and height should be 768 x 432 or less)
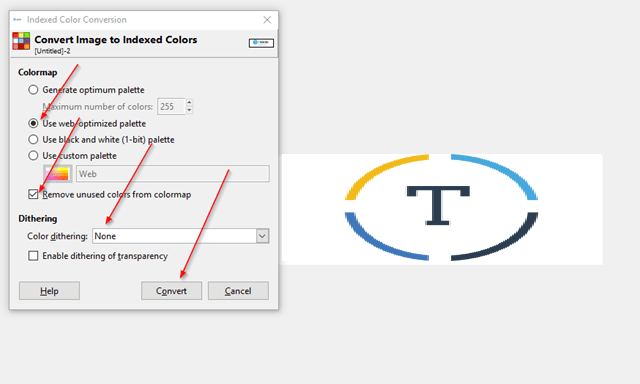
To edit the image you can use https://www.gimp.org/ that’s what I use to edit my images. I created an image size 500×150. Now we need to make this image file size smaller than 60K. that would be a challenge! The only way I found to compress the image this small in GIMP is by going to Image > Mode > indexed and then choosing “ Use-Web optimized palette:

Click on Convert and the export the image as one of the compatible formats listed above remember to name the image as “logo”

Flash the image

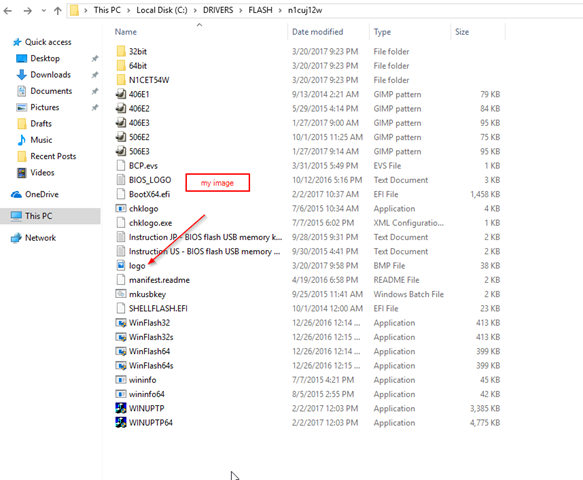
copy the image into the folder we extracted above. for example, the path of the folder I extracted is at C:\DRIVERS\FLASH\n1cuj12w ( this folder name might different for you )


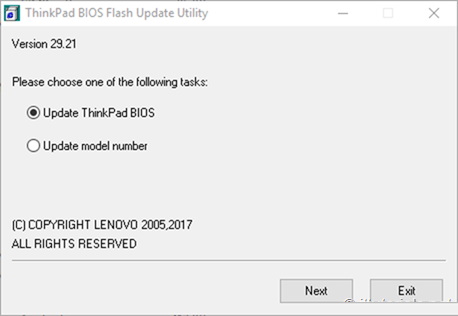
After you have copied the logo to this folder, click on the WINUPTP executable file, and the update utility should come up:


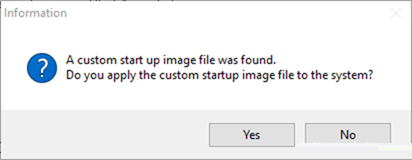
Click on Next.  it will prompt you saying that a custom startup image was found:


Click Yes
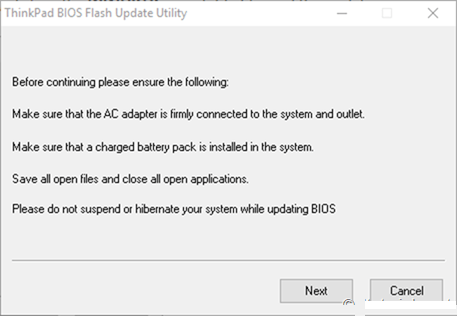
Make sure your laptop is connected to a power source ( not running on battery before doing the update) :


Click Next


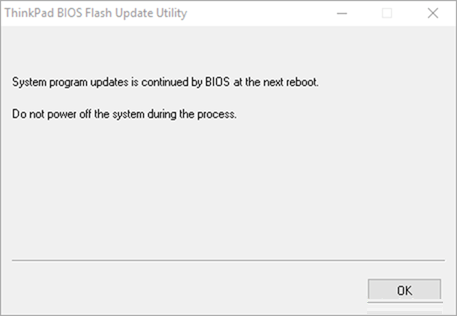
And then it should say the update will continue at next reboot


Click on OK and reboot the computer

After your computer finish with the BIOS update you should see your custom logo image at the startup screen:


You are done.
↧
↧

How to Deploy Microsoft SQL Server on Ubuntu 16.04

$
0
0

Microsoft announced its support for open-source platform and they have released SQL Server for Linux. This article will guide you through the steps to install Microsoft SQL Server on Ubuntu 16.04.


Prerequisite

  • You need one (Physical or Virtual) Ubuntu 16.04 or 16.10 machine with at least 4GB of memory


Installing SQL

Make sure your Ubuntu machine is up to date:
sudo apt-get update && sudo apt-get upgrade && sudo apt-get dist-upgrade

then add the SQL repo:
curl https://packages.microsoft.com/keys/microsoft.asc | sudo apt-key add -

Register the Microsoft Ubuntu repo:
curl https://packages.microsoft.com/config/ubuntu/16.04/mssql-server.list | sudo tee /etc/apt/sources.list.d/mssql-server.list

Update the repo:
sudo apt-get update

Install SQL:
sudo apt-get install -y mssql-server

That should start the SQL installation:


As indicated by the installer, run the setup to finish the installation:
 
sudo /opt/mssql/bin/mssql-conf setup

Accept the license term ( hey! is Microsoft )


Enter your SA password:


That should finish the installation.

Open port 1433 in Ubuntu  firewall:
 
sudo ufw allow 1433


Connecting to the server using the command line

To connect to the server using the command line you need the mssql-tools package. To install the mssql-tools package in Ubuntu do the following:

In the command line type:
curl https://packages.microsoft.com/keys/microsoft.asc | sudo apt-key add -

Register the repo with Microsoft:
curl https://packages.microsoft.com/config/ubuntu/16.04/prod.list | sudo tee /etc/apt/sources.list.d/msprod.list 

Update the source, and install the package:
sudo apt-get update && sudo apt-get install mssql-tools unixodbc-dev

Add mssql-tools to bash path:
echo'export PATH="$PATH:/opt/mssql-tools/bin"'>> ~/.bash_profile

echo'export PATH="$PATH:/opt/mssql-tools/bin"'>> ~/.bashrc source ~/.bashrc

To connect to the database, type:
sqlcmd -S localhost ( or the IP address of the server )  -U SA

It will prompt you for the SA password.

To create a database type:
CREATE DATABASE testdb;
GO

To see the databases on the server type:
SELECT Name from sys.Databases;
GO

To end the session just type QUIT . As you can see the syntax is very similar to MYSQL.


Connecting to the server using the management studio console

To manage the server from a Windows 10 computer using the Microsoft Management Studio console, download the software from here and install it:


The installation will take awhile depending on your computer speed:


Once the installation has finished, search for the Microsoft SQL Server Management Studio and open it, type the IP address  of the Ubuntu server where you installed the SQL server, and choose  SQL Server Authentication from the Authentication drop down. Type your SA login name and enter your password:


You should be able to connect:


You are done.
↧

How To BYPASS iCloud Activation on iOS 10.3 in 2 Minutes on Any iPhone

↧

Ztorg Trojan Froced Google to Remove Infected Apps From Play Store

$
0
0
As reported by Kaspersky Lab’s Threatpost, Google removed the applications Magic Browser and Noise Detector (shown in image below) after Kaspersky researchers warned the company of the threat they posed.


The threat of these applications lies in the Ztorg Trojan virus that is activated upon download and installation. According to Roman Unuchek of SecureList, the strain of Ztorg found in these apps was “a Trojan-SMS that can send Premium rate SMS and delete incoming SMS” and profit off of the high bill that results from this, as well as any sensitive data contained in other SMS messages sent to the device.

According to AVG Threat Labs states, Ztorg has the ability to log your keystrokes and passwords. This can lead to potential root access of your device and control over any Internet accounts that require login like email or bank accounts.


↧
↧

Control Multiple Computers with One Keyboard, Mouse Using Synergy

$
0
0

There are hardware solutions (KVM switches) make possible to use multiple inputs and outputs to share physical mice and keyboards. Synergy has developed a program that does the same thing over a network, is a more elegant solution, and it works with Windows, macOS, and Linux.


Download and Install Synergy

SourceForge has the latest version of Synergy available for Windows and macOS. Synergy used to be completely free software, but the code was purchased by Symless and monetized. The app is hosted on the company’s website too, but it requires an account creation and login—SourceForge is still hosting the latest combined free and commercial version of the installer, so it’s the easiest place to find the correct file.

Head to the address and download the installer to both computers. Ignore the sign-in for Synergy Pro.

On Windows PCs, double-click the installation file and follow all the on-screen instructions.


Mac users should download and open the DMG file, then drag the Synergy icon to their Applications folder.


The first time you run Synergy on a Mac, you’ll be asked to will ask to control your computer using accessibility features.


Don’t panic: this is normal for any application that wants to take control of your mouse and keyboard. Click the “Open System Preferences” button and you’ll be brought to the appropriate panel in System Preferences (Security & Privacy > Privacy). Click the lock at bottom-left and you’ll be asked for your password. After that you can check the “Synergy” box in the right-side panel.


Lastly, Linux users should avoid directly downloading the program and instead use their package manager to install Synergy. Ubuntu users can type sudo apt install synergy to install the program; if you use a different distro, search your package manager to find the program.

Configure the Client Machine

Once the installation is finished, start the program. Make sure both computers are on the same local network, and you’ll need a mouse and keyboard for both machines for the initial setup—or you can move them back and forth as needed.

You’re going to have to get information from both the client (the computer that doesn’t have a keyboard and mouse plugged in) and the server (the one that does), but at the moment, let’s just look at the former. On the client side, you’ll see the following:


Make sure that the entry “Client (use another computer’s keyboard and mouse” is checked, not “Server.” Make a note of the name of the screen name of the computer as it appears in the interface. In my case, the client PC’s name is “DESKTOP-KNUH1S0,” because I haven’t bothered to change the device name of my Surface Pro.

Now switch over to the server machine.

Configure the Server Machine

The server machine is the PC that actually has the mouse and keyboard connected to it. On that computer, make sure that the check mark next to “Server (share this computer’s mouse and keyboard)” is applied, not “Client.” Now click “Configure Server.”


Click and drag the new computer button, the monitor icon in the upper-right corner, onto the blank space that has the icon with your server PC’s name. This grid represents the physical spacing of your two computer screens: in my case my Surface sits beneath the monitor for my server, “Enterprise”, so I’ll place it below it in the grid. If your computers are side by side, place the icons in the same relative locations as the physical screens. This step will determine which edge of which screen leads to which when moving the mouse cursor.


Double-click the computer icon you just selected, and give it the name of the client machine you took note of in Step Two. Click “OK,” then “OK” again on the grid screen.


Make the Connection

Note the IP address of the server machine in the “IP addresses” field—you want the first one, in bold. Switch to the client machine and input this number (complete with periods) in the “Server IP” field.


Click the “Apply” button on Synergy on both the server and the client, then “Start” on both. Now you should be able to move your mouse cursor from one screen to the other, with the keyboard function following along.


Other Settings You May Want to Tweak

Here are some more useful settings in the free version of Synergy, available on the Server machine from the “Configure Server” button:
  • Dead corners: portions of the screen that won’t switch over to the other machine. Handy for interactive functions like the Start menu. Clients can get their own dead corners by clicking on the machine icon in the Screens and Links tab.
  • Switch: time to wait as the cursor passes over a screen border before switching over to the client or server machine. Handy if you find your main work machine constantly losing focus.
  • Use relative mouse moves: try this if the mouse cursor is significantly fast or slow on one machine.
  • Configuration save: Click File > Save configuration as to save this particular configuration on the server. Configurations can be retrieved with the “Use existing configuration” option if you’ve saved it as a local file.
Feel free to dig around the settings and see what else may be useful to you—but for now, you should be able to start using Synergy!
↧

Microsoft Releases PowerPoint Presentation Translator

$
0
0

Microsoft wants to make it easier for multilingual audiences and the hearing impaired to follow along with PowerPoint presentations.


Microsoft Garage, the software giant's experimental app unit, released Presentation Translator this week, an Office add-in for the Windows version of PowerPoint that provides real-time translation services. The software is powered by Microsoft Translator and the company's Cognitive Services slate, a collection of AI-enabled APIs.

During a presentation, the software turns spoken content into live subtitles featuring any one of the 60-plus supported text languages, similar to Skype's real-time translation feature. Ten spoken languages are supported, including Arabic, Chinese (Mandarin), English, French, German, Italian, Japanese, Portuguese, Russian and Spanish.

After installing and configuring the add-in, it will generate a QR code or five-letter conversation code in the first slide, which audience members can use to follow a presentation in their own language and on their iOS or Android devices using the Microsoft Translator app.

Up to 500 audience members can follow along and participate in multilingual Q&A sessions. Presentation Translator can also be used to translate text that appears within PowerPoint slides while preserving its original formatting, according to Microsoft.

Microsoft isn't the only tech titan that's using technology to address language barriers. Last November, Google announced an AI upgrade to its Translate service. Using the company's Neural Machine Translation technology, the company now provides more accurate and natural-sounding translations for several languages, including Chinese, English, French, German and Spanish, among others.

"At a high level, the Neural system translates whole sentences at a time, rather than just piece by piece. It uses this broader context to help it figure out the most relevant translation, which it then rearranges and adjusts to be more like a human speaking with proper grammar," Barak Turovsky, product lead at Google Translate, in a blog post. "Since it's easier to understand each sentence, translated paragraphs and articles are a lot smoother and easier to read."

Google has also incorporated the technology into its Chrome browser, enabling richer, full-page translations for select language pairs. More than 20 neural machine translation languages are now available on the popular web browser.

Apple's upcoming iOS 11 update for the iPhone, iPad and iPod Touch turns Siri, the company's virtual assistant, into a translator. "Ask Siri in English how to say something in Chinese, Spanish, French, German, or Italian, and Siri will translate the phrase," states this Apple webpage dedicated to the mobile operating system update. The translation service requires users to set Siri's language to English, according to Apple.

IBM's Bluemix cloud platform is home to the Watson-powered Language Translator services. Among the translation models supported are conversations, news and patents, the latter of which can be used to translate patent filings from Chinese, Spanish and Portuguese to English.


The contents of this article was taken from eWeek (Original Publisher).
↧

Microsoft Releases Windows Server Insider Preview Build

$
0
0

Microsoft is giving Windows Server the Insider treatment.


Last month, the software maker announced that Windows Server was moving to a semi-annual update schedule, similar to Windows 10 and Office. To test upcoming updates and gather feedback, Microsoft makes early builds of its desktop operating system and productivity software to members of the Windows Insider and Office Insider programs, respectively.

Now, Windows Insider or Windows Insider for Business users can be among the first to see what the next major update to Windows Server has in store, including a trimmer Nano Server installation option.

Windows Server preview build 16237 contains the new, container-only version of the lightweight version of Windows Server. "To optimize for containers, several features were removed that were in the Nano Server base image in Windows Server 2016, these include WMI [Windows Management Instrumentation], PowerShell, .NET Core, and the Servicing stack, which has significantly reduced the image size," blogged Dona Sarkar, a software engineer at the Microsoft Windows and Devices Group and head of Windows Insider.

According to Microsoft, ditching those components helped reduce the size of Nano Server images by more than half. Another streamlined installation option, Windows Server Core, had its size reduced by 20 percent in the latest build.

Windows Server Build 16237 also includes enhancements to container networking for improved Kubernetes support and a feature that allows Hyper-V virtual machines to use low-latency persistent memory devices. A lengthy list of new features and known issues that users may encounter is available in this blog post.

On the desktop operating system front, Microsoft also released Windows 10 preview build 16241 this week.

New to this version is Cloud Self Service Password Reset integration, enabling users to recover PINs and passwords from the lock screen. Cloud Self Service Password Reset is currently offered as a feature in Azure Active Directory Premium.

Microsoft has also revamped the GPU performance tab within the Task Manager for users who like to keep tabs on how well their graphics cards pump out pixels.

"We now default to the multi-engine view, which shows performance monitors for the four most active GPU engines," informed Sarkar in a separate blog post. "Typically you'll see charts for the 3D, Copy, Video Encode and Video Decode engines. Right-click on the chart to switch back to the single-engine view."

Other enhancements to the Windows Task Manager include labels that contain the web page title of each Edge browser tab process. Build 16241 also include labels for additional Edge-related processes, including the Chakra JIT (just-in-time) compiler.

Also new to the early Windows 10 Fall Creators Update build is support for USB-based Mixed Reality motion controllers. Bluetooth support will arrive in an upcoming release, said Sarkar. The operating system also now features improved 4K, 360-degree video streaming and a number of reliability-enhancing upgrades for headset users.


Credit: eWeek (Original Publisher)
↧

Samsung Galaxy Will Prevent Apple From Selling $1,200 iPhone

$
0
0

There’s no question that an Apple iPhone is an expensive device. The cheapest iPhone 7 will set you back $649. A fully tricked-out iPhone 7 Plus costs $969, which is really expensive for any smartphone.


But if mobile market blogger's prediction becomes reality, the iPhone 8 prices will reach a record high when it's introduced this fall, nearly doubling the price of the current entry-level iPhone.

The speculative report indicates that the iPhone 8 could sell for as much as $1,200 with prices going as high as $1,400 with premium options. Such prices could best be described as insanely expensive for most smartphone buyers today.

In one sense, it’s easy to see how such a price explosion might happen. Apparently some components of the iPhone 8 have been more difficult to produce than expected. For example, edge-to-edge OLED screen production yield rates are lower than planned. The cost of as wireless charging and fingerprint scanner components are also higher than expected.

But apparently there may be other reasons as well, such as an expected high level of demand. There, the thinking goes, the rules of supply and demand kick in, so naturally you’d price the iPhone as high as possible because the supply of parts might be limited. Besides, Apple has always continued to sell its older models at a lower price, so people can still buy iPhones, just not the latest ones.

There will still be buyers for high-end iPhone 8 models even if just a part of the rumored features are there, such as the edge-to-edge screen. However simply charging the highest possible price to maximize revenue and perhaps maintain exclusivity puts Apple in a difficult position. The reason is Samsung.

That company’s current flagship phone, the Galaxy S8, has many of the features that Apple seems to be planning, and it has a suggested retail price of $724.99. Unlike Apple, Samsung allows discounting, meaning that the S8 can be had for nearly $100 than the retail price, which puts it squarely in the price range of the current iPhone 7. It’s worth mentioning that the Galaxy S8 is already shipping, while iPhone 8 is not.

If Apple really does try to sell the new model for $1,200, then it puts itself at a huge disadvantage. While there are many really loyal Apple fans that would buy the latest iPhone even if it meant mortgaging their homes, the vast majority of iPhone buyers aren’t that loyal. While they may be happy with the iPhone, doubling the price is going to lose a lot of buyers.

For Apple, losing a lot of buyers, especially for its flagship phone, is not a trivial matter. Samsung's Android smartphones are already eating Apple’s lunch in terms of market share. To voluntarily give up more market share because some of ill-considered marketing assessments or because of erroneous technical assumptions could hurt Apple even more in the long term. This is especially the case because Apple’s primary competitor, Samsung, isn’t marking up its phone.

Considering that the price of $1,200 for the iPhone 8 is only a rumor, it may simply be that Apple has no intention of selling the iPhone 8 for that much. What may be happening is that Apple has a product and pricing strategy that makes more sense. For example, the iPhone 7S and 7S Plus could be part of that strategy.

By now it's clear that Apple tends to introduce “S” model variants every other year that adds enhancements and features to the existing phone that remains basically the same other ways. The company did this with the iPhone 6 and 6S, for example.

It would make sense for Apple to introduce an iPhone 7S and 7S Plus in September, and at the same time, introduce the iPhone 8 in honor of the iPhone's 10th anniversary.

In that case it would make sense to charge perhaps $100 to $150 more for iPhone 8 than the iPhone 7S. But those price points would still keep it competitive with the MSRP of the Galaxy S8. That might also push the price of a fully-configured iPhone 8 with cellular radios to nearly $1,200, but the starting price would be something many people could afford.


This is a more desirable outcome for Apple. It will help preserve their market share; it will give the company a flagship with some level of exclusivity; and they can sell the 7S and 7S Plus at the same prices as Apple's earlier models. While the 7S Plus and the iPhone 8 would have similar prices, they would be very different devices, and probably wouldn’t cannibalize each other’s sales too much.

Farther down the road as Apple’s supply chain gears up to meet the company’s demand for parts and as other vendors come online to provide critical components such as OLED screens, then Apple can offer more mainstream prices for the iPhone 8 while still marketing a premium flagship device.

The reality is that Apple operates in a market that is more competitive than ever. Pricing itself into oblivion won’t accomplish that.


Credit: eWeek (Original Publisher)
↧
↧

Amazon Working on ‘Anytime’ Messaging App

$
0
0

Amazon is reportedly working on its own messaging app dubbed Anytime. The messaging app will have a strong focus on group messaging and will come with usual features like encryption, video and audio calling support, and stickers.


Users will also be able to “encrypt important messages like bank account details” with a higher than usual level of security in Anytime.

The report from AFTVNews is based on a customer survey information. IT states that Anytime will not be linked to one’s mobile number. Instead, everyone has a username and will feature support for a Twitter-like reply. So, in a group message, you can refer to a person by @mentioning their username.


Other features of the app include location sharing, food ordering and bill split options, business chat, and ability to simultaneously listen to music. And it goes without saying, Anytime will also allow one to buy stuff from Amazon.

The app will let one reach all their friends by “just using their name” without knowing their phone number. It is unclear how this feature of the app will work but should help users get their friends and family onboard the app when it is first launched.

Amazon recently debuted Amazon Echo Show now offers basic video and audio calling capabilities, so it is not surprising to see the company jump on the messaging bandwagon. In fact, the Anytime messaging app from the company will allow it to integrate with its virtual assistant, Alexa, and its Echo series of devices. Anytime could be based on the same backend technology used by Chime, the business oriented messaging service unveiled by Amazon earlier this year.


With iMessage, Hangouts, Allo, WhatsApp, Skype, Telegram, Messenger, and plenty of other messaging apps already available out there, the world certainly does not need another one. However, if Amazon is able to bring some new features to the table, it might just be able to gain enough traction to survive in the competitive world of messaging apps.
↧

Automating WSUS Tasks with PowerShell Scripts

$
0
0

The scripts explained in this guide allow you to automate several Windows Server Update Services (WSUS) tasks such as synchronization, approvals, cleanups, and scheduled update installations.


Note: Partially these scripts  are not our own, we will provide link to the original sources where we have taken from.

Syncing WSUS with PowerShell and Task Scheduler

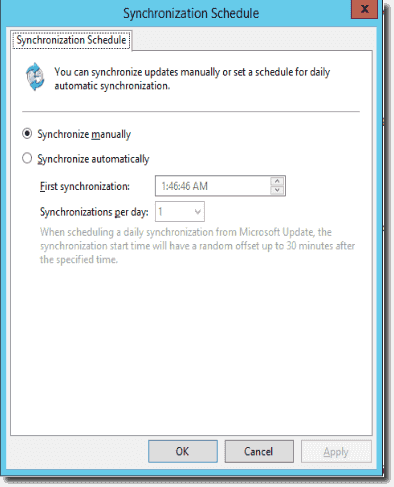
This article assume you are familiar with WSUS administration. Right after installing WSUS, you have to configure periodic synchronization. Unfortunately, as you can see in the screenshot below, the synchronization options are somewhat limited.


Since we don't need to sync every day, we select Synchronize manually and use the script below along with Task Scheduler to synchronize WSUS at the times we prefer.

$wsusserver = "wsus"
[reflection.assembly]::LoadWithPartialName("Microsoft.UpdateServices.Administration") | out-null
$wsus = [Microsoft.UpdateServices.Administration.AdminProxy]::GetUpdateServer($wsusserver, $False,8530);
$wsus.GetSubscription().StartSynchronization();


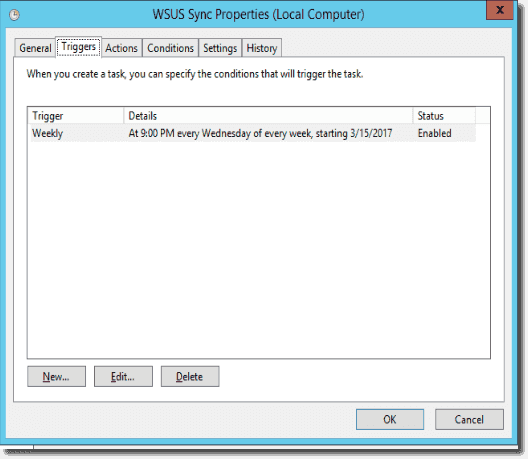
Load the .NET Update Services object into the $wsusserver variable and use the StartSynchronization() method to start manual synchronization. The screenshot below shows the Task Scheduler task we are using to launch the PowerShell script.


You will see the synchronization results in the WSUS console as if you synced manually:


Automating WSUS update approval

The next task is to automate the approval of updates. WSUS offers automatic approval. However, it is quite inflexible, so we will be using the PowerShell script below:

[string[]]$recipients = admins@contoso.com #Email address where you want to send the notification after the script completes

$wsusserver = "wsus" #WSUS server name

$log = "C:\Temp\Approved_Updates_{0:MMddyyyy_HHmm}.log" -f (Get-Date) #Log file name

new-item -path $log -type file -force #Creating log file

[void][reflection.assembly]::LoadWithPartialName ("Microsoft.UpdateServices.Administration") #Loading the WSUS .NET classes

$wsus = [Microsoft.UpdateServices.Administration.AdminProxy]::getUpdateServer($wsusserver, $False,8530) #Storing the object into the variable

$UpdateScope = New-Object Microsoft.UpdateServices.Administration.UpdateScope #Loading WSUS Update scope object into variable

$groups = "All Computers" #Setting up groups for updates approval

$Classification = $wsus.GetUpdateClassifications() | ?{$_.Title -ne 'Service Packs'‑and $_.Title -ne 'Drivers' -and $_.Title -ne 'Upgrades'} #Setting up update classifications for approval

$Categories = $wsus.GetUpdateCategories() | ? {$_.Title -notmatch "SQL" -and $_.Title -notmatch "Skype"} #Setting up update categories for approval

$UpdateScope.FromCreationDate = (get-date).AddMonths(-1) #Configuring starting date for UpdateScope interval

$UpdateScope.ToCreationDate = (get-date) #Configuring ending date for UpdateScope interval

$UpdateScope.Classifications.Clear() #Clearing classification object before assigning new value to it

$UpdateScope.Classifications.AddRange($Classification) #Assigning previously prepared classifications to the classification object

$UpdateScope.Categories.Clear() #Clearing the categories object before assigning a new value to it

$UpdateScope.Categories.AddRange($Categories) #Assigning previously prepared categories to the classification object

$updates = $wsus.GetUpdates($UpdateScope) | ? {($_.Title -notmatch "LanguageInterfacePack" -and $_.Title -notmatch "LanguagePack" -and $_.Title -notmatch "FeatureOnDemand" -and $_.Title -notmatch "Skype" -and $_.Title -notmatch "SQL" -and $_.Title -notmatch "Itanium" -and $_.PublicationState -ne "Expired" -and $_.IsDeclined -eq $False )} #Storing all updates in the previously defined UpdateScope interval to the $updates variable and filtering out those not required

foreach ($group in $groups) #Looping through groups
  {
   $wgroup = $wsus.GetComputerTargetGroups() | where {$_.Name -eq $group} #Storing the current group into the $wgroup variable
   foreach ($update in $updates) #Looping through updates
     {
      $update.Approve(“Install”,$wgroup) #Approving each update for the current group
     }
  }

$date = Get-Date #Storing the current date into the $date variable

"Aproved updates (on " + $date + "): " | Out-File $log -append #Updating the log file

"Updates have been approved for following groups: (" + $groups + ")" | Out-File $log ‑append #Updating log file

"Folowing updates have been approved:" | Out-File $log -append #Updating the log file

$updates | Select Title,ProductTitles,KnowledgebaseArticles,CreationDate | ft -Wrap | Out-File $log -append #Updating log file

Send-MailMessage -From "WSUS@contoso.com" -To $recipients -Subject "New updates have been approved" -Body "Please find the list of approved updates enclosed" -Attachments $log -SmtpServer "smtp-server" -DeliveryNotificationOption OnFailure #Sending the log file by email.


I'll just explain briefly how the script works. First I load the Windows Update Assembly, so I can use the WSUS .NET object. Then I'm preparing the variables that I need to work with the WSUS object:
  • $wsus: is the WSUS object.
  • $UpdateScope: Defines the time interval for the $wsus.GetUpdates() method.
  • $groups: Defines all WSUS groups I'd like to approve updates for.
  • $Classification: Defines updates classifications for the $wsus.GetUpdates() method. I'm filtering out service packs, drivers, and upgrades.
  • $Categories: Defines updates categories or products for the $wsus.GetUpdates() method. I'm filtering out SQL and Skype updates. SQL gets updated manually, and I don't have Skype installations in my environment.
Then I'm setting up the Update Scope interval to get only updates created within the last month. I know I'm approving my updates every month, so I only need to get recently released updates.

After that, I'm assigning the $Classification and $Categories variables to the corresponding objects. And with the help of the $wsus.GetUpdates($UpdateScope) method, I am saving all updates that match my scope to the $updates variable. Then I'm adding some filtering to remove updates such as LanguagePack, FeatureOnDemand, and Itanium from the results because I don't have these kinds of updates in my environment.

Now I have all updates I want to approve. Next, I'm looping through the WSUS groups to which I want to assign the updates. Then I loop through the updates, approving every update for every group. In this particular case, there is only one group. However, I use a loop here, just to be able to add more groups later.

After approving all updates, I only need to update the log file and send this file by email to myself. This way, I am sure I've approved the updates, and I receive brief information about them.
Like before, I'm using Task Scheduler to run the script:


Declining superseded updates

As you know, Microsoft frequently replaces single updates with packages of multiple updates. They call the replaced update a "superseded update," which is no longer needed. Thus, it makes sense to decline those updates. For this purpose, I modified the PowerShell script below, which I found here.

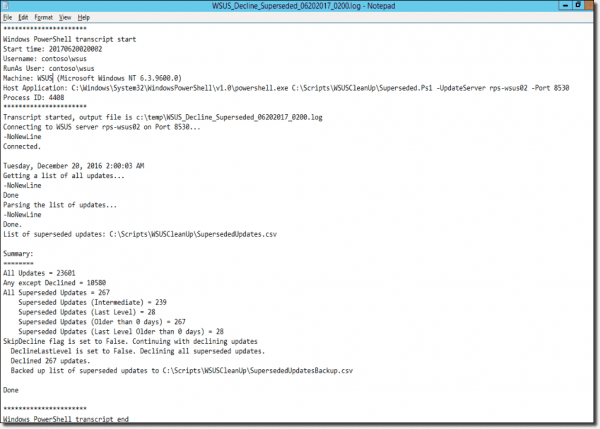
My changes are in the lines 57–59, 99–100, and 242. I added the transcript file, so when the script ran via the Task Scheduler, I could see the number of declined updates. And after I ran the script the first time, I changed the update scope. So it'll check and decline only updates within the last six months.

# ===============================================
# Script to decline superseeded updates in WSUS.
# ===============================================
# It's recommended to run the script with the -SkipDecline switch to see how many superseded updates are in WSUS and to TAKE A BACKUP OF THE SUSDB before declining the updates.
# Parameters:

# $UpdateServer             = Specify WSUS Server Name
# $UseSSL                   = Specify whether WSUS Server is configured to use SSL
# $Port                     = Specify WSUS Server Port
# $SkipDecline              = Specify this to do a test run and get a summary of how many superseded updates we have
# $DeclineLastLevelOnly     = Specify whether to decline all superseded updates or only last level superseded updates
# $ExclusionPeriod          = Specify the number of days between today and the release date for which the superseded updates must not be declined. Eg, if you want to keep superseded updates published within the last 2 months, specify a value of 60 (days)


# Supersedence chain could have multiple updates.
# For example, Update1 supersedes Update2. Update2 supersedes Update3. In this scenario, the Last Level in the supersedence chain is Update3.
# To decline only the last level updates in the supersedence chain, specify the DeclineLastLevelOnly switch

# Usage:
# =======

# To do a test run against WSUS Server without SSL
# Decline-SupersededUpdates.ps1 -UpdateServer SERVERNAME -Port 8530 -SkipDecline

# To do a test run against WSUS Server using SSL
# Decline-SupersededUpdates.ps1 -UpdateServer SERVERNAME -UseSSL -Port 8531 -SkipDecline

# To decline all superseded updates on the WSUS Server using SSL
# Decline-SupersededUpdates.ps1 -UpdateServer SERVERNAME -UseSSL -Port 8531

# To decline only Last Level superseded updates on the WSUS Server using SSL
# Decline-SupersededUpdates.ps1 -UpdateServer SERVERNAME -UseSSL -Port 8531 -DeclineLastLevelOnly

# To decline all superseded updates on the WSUS Server using SSL but keep superseded updates published within the last 2 months (60 days)
# Decline-SupersededUpdates.ps1 -UpdateServer SERVERNAME -UseSSL -Port 8531 -ExclusionPeriod 60


[CmdletBinding()]
Param(
    [Parameter(Mandatory=$True,Position=1)]
    [string] $UpdateServer,
   
    [Parameter(Mandatory=$False)]
    [switch] $UseSSL,
   
    [Parameter(Mandatory=$True, Position=2)]
    $Port,
   
    [switch] $SkipDecline,
   
    [switch] $DeclineLastLevelOnly,
   
    [Parameter(Mandatory=$False)]
    [int] $ExclusionPeriod = 0
)

$file = "c:\temp\WSUS_Decline_Superseded_{0:MMddyyyy_HHmm}.log" -f (Get-Date)

Start-Transcript -Path $file


if ($SkipDecline -and $DeclineLastLevelOnly) {
    Write-Output "Using SkipDecline and DeclineLastLevelOnly switches together is not allowed."
    Write-Output ""
    return
}

$outPath = Split-Path $script:MyInvocation.MyCommand.Path
$outSupersededList = Join-Path $outPath "SupersededUpdates.csv"
$outSupersededListBackup = Join-Path $outPath "SupersededUpdatesBackup.csv"
"UpdateID, RevisionNumber, Title, KBArticle, SecurityBulletin, LastLevel" | Out-File $outSupersededList

try {
   
    if ($UseSSL) {
        Write-Output "Connecting to WSUS server $UpdateServer on Port $Port using SSL... " -NoNewLine
    } Else {
        Write-Output "Connecting to WSUS server $UpdateServer on Port $Port... " -NoNewLine
    }
   
    [reflection.assembly]::LoadWithPartialName("Microsoft.UpdateServices.Administration") | out-null
    $wsus = [Microsoft.UpdateServices.Administration.AdminProxy]::GetUpdateServer($UpdateServer, $UseSSL, $Port);
}
catch [System.Exception]
{
    Write-Output "Failed to connect."
    Write-Output "Error:" $_.Exception.Message
    Write-Output "Please make sure that WSUS Admin Console is installed on this machine"
    Write-Output ""
    $wsus = $null
}

if ($wsus -eq $null) { return }

Write-Output "Connected."

$UpdateScope = New-Object Microsoft.UpdateServices.Administration.UpdateScope

(get-date).AddMonths(-6)
$UpdateScope.FromArrivalDate = (get-date).AddMonths(-6)
$UpdateScope.ToArrivalDate = (get-date)

$countAllUpdates = 0
$countSupersededAll = 0
$countSupersededLastLevel = 0
$countSupersededExclusionPeriod = 0
$countSupersededLastLevelExclusionPeriod = 0
$countDeclined = 0

Write-Output "Getting a list of all updates... " -NoNewLine

try {
    $allUpdates = $wsus.GetUpdates($UpdateScope)
}

catch [System.Exception]
{
    Write-Output "Failed to get updates."
    Write-Output "Error:" $_.Exception.Message
    Write-Output "If this operation timed out, please decline the superseded updates from the WSUS Console manually."
    Write-Output ""
    return
}

Write-Output "Done"

Write-Output "Parsing the list of updates... " -NoNewLine
foreach($update in $allUpdates) {
   
    $countAllUpdates++
   
    if ($update.IsDeclined) {
        $countDeclined++
    }
   
    if (!$update.IsDeclined -and $update.IsSuperseded) {
        $countSupersededAll++
       
        if (!$update.HasSupersededUpdates) {
            $countSupersededLastLevel++
        }

        if ($update.CreationDate -lt (get-date).AddDays(-$ExclusionPeriod))  {
            $countSupersededExclusionPeriod++
            if (!$update.HasSupersededUpdates) {
                $countSupersededLastLevelExclusionPeriod++
            }
        }       
       
        "$($update.Id.UpdateId.Guid), $($update.Id.RevisionNumber), $($update.Title), $($update.KnowledgeBaseArticles), $($update.SecurityBulletins), $($update.HasSupersededUpdates)" | Out-File $outSupersededList -Append      
       
    }
}

Write-Output "Done."
Write-Output "List of superseded updates: $outSupersededList"

Write-Output ""
Write-Output "Summary:"
Write-Output "========"

Write-Output "All Updates = $countAllUpdates"
$AnyExceptDeclined = $countAllUpdates - $countDeclined
Write-Output "Any except Declined = $AnyExceptDeclined"
Write-Output "All Superseded Updates = $countSupersededAll"
$SuperseededAllOutput = $countSupersededAll - $countSupersededLastLevel
Write-Output "    Superseded Updates (Intermediate) = $SuperseededAllOutput"
Write-Output "    Superseded Updates (Last Level) = $countSupersededLastLevel"
Write-Output "    Superseded Updates (Older than $ExclusionPeriod days) = $countSupersededExclusionPeriod"
Write-Output "    Superseded Updates (Last Level Older than $ExclusionPeriod days) = $countSupersededLastLevelExclusionPeriod"

$i = 0
if (!$SkipDecline) {
   
    Write-Output "SkipDecline flag is set to $SkipDecline. Continuing with declining updates"
    $updatesDeclined = 0
   
    if ($DeclineLastLevelOnly) {
        Write-Output "  DeclineLastLevel is set to True. Only declining last level superseded updates."
       
        foreach ($update in $allUpdates) {
           
            if (!$update.IsDeclined -and $update.IsSuperseded -and !$update.HasSupersededUpdates) {
              if ($update.CreationDate -lt (get-date).AddDays(-$ExclusionPeriod))  {
                $i++
                $percentComplete = "{0:N2}" -f (($updatesDeclined/$countSupersededLastLevelExclusionPeriod) * 100)
                Write-Progress -Activity "Declining Updates" -Status "Declining update #$i/$countSupersededLastLevelExclusionPeriod - $($update.Id.UpdateId.Guid)" -PercentComplete $percentComplete -CurrentOperation "$($percentComplete)% complete"
               
                try
                {
                    $update.Decline()                   
                    $updatesDeclined++
                }
                catch [System.Exception]
                {
                    Write-Output "Failed to decline update $($update.Id.UpdateId.Guid). Error:" $_.Exception.Message
                }
              }            
            }
        }       
    }
    else {
        Write-Output "  DeclineLastLevel is set to False. Declining all superseded updates."
       
        foreach ($update in $allUpdates) {
           
            if (!$update.IsDeclined -and $update.IsSuperseded) {
              if ($update.CreationDate -lt (get-date).AddDays(-$ExclusionPeriod))  {  
                 
                $i++
                $percentComplete = "{0:N2}" -f (($updatesDeclined/$countSupersededAll) * 100)
                Write-Progress -Activity "Declining Updates" -Status "Declining update #$i/$countSupersededAll - $($update.Id.UpdateId.Guid)" -PercentComplete $percentComplete -CurrentOperation "$($percentComplete)% complete"
                try
                {
                    $update.Decline()
                    $updatesDeclined++
                }
                catch [System.Exception]
                {
                    Write-Output "Failed to decline update $($update.Id.UpdateId.Guid). Error:" $_.Exception.Message
                }
              }             
            }
        }  
       
    }
   
    Write-Output "  Declined $updatesDeclined updates."
    if ($updatesDeclined -ne 0) {
        Copy-Item -Path $outSupersededList -Destination $outSupersededListBackup -Force
        Write-Output "  Backed up list of superseded updates to $outSupersededListBackup"
    }
   
}
else {
    Write-Output "SkipDecline flag is set to $SkipDecline. Skipped declining updates"
}

Write-Output ""
Write-Output "Done"
Write-Output ""

Stop-Transcript


The screenshot below shows a sample log file:


Deleting declined updates from the WSUS database

After you decline the updates, they are still residing inside the WSUS database and taking up disk space. To remove them completely, you have to run the WSUS cleanup wizard. This is another task you can automate:

$file = "c:\temp\WSUS_CleanUp_Wiz_{0:MMddyyyy_HHmm}.log" -f (Get-Date)
Start-Transcript -Path $file
$wsusserver = "wsus"
[reflection.assembly]::LoadWithPartialName("Microsoft.UpdateServices.Administration")` | out-null
$wsus = [Microsoft.UpdateServices.Administration.AdminProxy]::GetUpdateServer($wsusserver, $False,8530);
$cleanupScope = new-object Microsoft.UpdateServices.Administration.CleanupScope;
$cleanupScope.DeclineSupersededUpdates    = $true
$cleanupScope.DeclineExpiredUpdates       = $true
$cleanupScope.CleanupObsoleteUpdates      = $true
$cleanupScope.CompressUpdates             = $false
$cleanupScope.CleanupObsoleteComputers    = $true
$cleanupScope.CleanupUnneededContentFiles = $true
$cleanupManager = $wsus.GetCleanupManager();
$cleanupManager.PerformCleanup($cleanupScope);
Stop-Transcript


All I'm doing in the script above is defining a cleanup scope using the CleanUpScope object and then running CleanUpManager using the corresponding object against that scope. I'm not compressing updates because this operation takes a long time and doesn't save much space.

The script also runs as scheduled task and produces the log file you can see below:


Because all of these procedures are making many changes in the WSUS database, it is good idea to re-index the database occasionally. To do that, I'm using this SQL query from the Microsoft Script Center. You can use the sqlcmd utility you find there to run the SQL query. Just create a scheduled task and run it once a month.

Arranging the maintenance scripts

Here is how I scheduled the maintenance scripts:
  1. Synchronize WSUS every Tuesday.
  2. Decline superseded updates after every WSUS synchronization.
  3. Run the WSUS cleanup wizard script after declining superseded updates finishes.
  4. Re-index the WSUS database after WSUS cleanup.
  5. Approve updates every Wednesday. This way I know I'm approving updates after removal of all superseded, outdated, and expired updates.


Scheduling updates

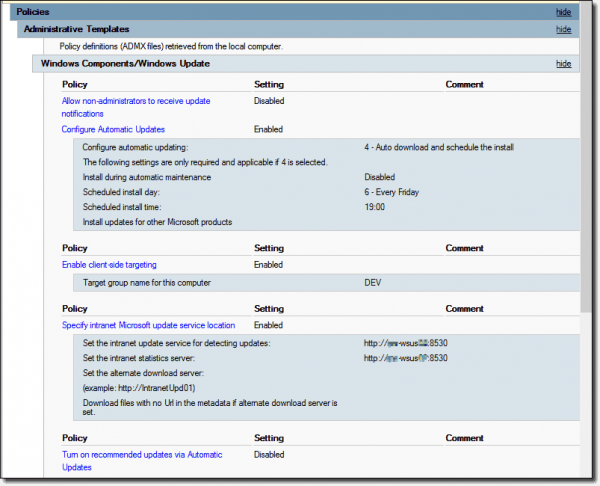
At this point I'm done with maintenance. However, I still need to install the updates. Unfortunately, WSUS also only offers poor choices when it comes to scheduling update installations. Basically, I can only pick the day of the week and the time. Of course, this is not always what you want. Because I have several environments, I created a Group Policy Object (GPO) for each of them and assigned them to the appropriate Active Directory organizational units (OUs).


As you can see, I configured this GPO to install updates every Friday at 7 p.m. The thing is, I just need to do this on a particular Friday every month. Thus, I wrote a tiny script for enabling this GPO and a second one for disabling it. Then I configured a scheduled task to run the first script a couple days before the update day and the second one after installing the updates.

Enabling GPO
$GPO = Get-GPO -Name "WSUS DEV OU - Automatic Updates"
$GPO.GpoStatus = "AllSettingsEnabled"

Disabling GPO
$GPO = Get-GPO -Name "WSUS DEV OU - Automatic Updates"
$GPO.GpoStatus = "AllSettingsDisabled"


Conclusion

After automation configuration using PowerShell scripts, you are advised to keep eyes on WSUS server every once in a while to make sure everything perfect as intended.

Credit: 4Sysops (Original Publisher) 
↧

How To Install and Configure Bro on Ubuntu 16.04

$
0
0

Bro is an open-source network analysis framework and security monitoring application. It brings together some of the best features of OSSEC and osquery into one nice package.


Bro can perform both signature- and behavior-based analysis and detection, but the bulk of what it does is behavior-based analysis and detection. Included in the long list of Bro's features are the ability to:
  • Detect brute-force attacks against network services like SSH and FTP
  • Perform HTTP traffic monitoring and analysis
  • Detect changes in installed software
  • Perform SSL/TLS certificate validation
  • Detect SQL injection attacks
  • Perform file integrity monitoring of all files
  • Send activity, summary and crash reports and alerts via email
  • Perform geolocation of IP addresses to city-level
  • Operate in standalone or distributed mode
Bro may be installed from source or via a package manager. Installation from source is more involved, but it is the only method that supports IP geolocation, if the geolocation library is installed before it's compiled.

Installing Bro makes additional commands like bro and broctl available to the system. bro can be used for analyzing trace files and also for live traffic analysis; broctl is the interactive shell and command line utility used to manage standalone or distributed Bro installations.

This article will take you through the steps to install Bro from source on Ubuntu 16.04 in standalone mode.

Prerequisites

To complete this guide, you'll need to have the following:
  • An Ubuntu 16.04 server with a firewall and non-root user account with sudo privileges configured. Because we'll be performing some tasks that require extra RAM, you'll need to spin up a server that has at least 1 GB of memory.
  • Postfix installed as a send-only mail transfer agent (MTA) on the Ubuntu server. An MTA like Postfix has to be installed for Bro to send email alerts. It will run without one, but emails will not be sent.

Installing Dependencies

Before you can install Bro from source, you need to install its dependencies.

First, update the package database. Failure to do this before installing packages can lead to package manager errors.

sudo apt-get update
Bro's dependences include a number of libraries and tools, like Libpcap, OpenSSL, and BIND8. BroControl additionally requires Python 2.6 or higher. Because we're building Bro from source, we'll need some additional dependencies, like CMake, SWIG, Bison, and a C/C++ compiler.

You can install all the necessary dependencies at once:

sudo apt-get install bison cmake flex g++ gdb make libmagic-dev libpcap-dev libgeoip-dev libssl-dev python-dev swig2.0 zlib1g-dev

After that installation has completed, the next step is to download the databases that Bro will use for IP geolocation.

Downloading a GeoIP Database

Here, we'll download a GeoIP database which Bro will depend on for IP address geolocation. We'll download two compressed files containing an IPv4 and an IPv6 database, decompress them, and then move them into the /usr/share/GeoIP directory.

Note: We're downloading a free legacy GeoIP database from MaxMind. A newer IP database format has since been released, but Bro does not have support for it yet.

Download both the IPv4 and IPv6 databases.

wget http://geolite.maxmind.com/download/geoip/database/GeoLiteCity.dat.gz
wget http://geolite.maxmind.com/download/geoip/database/GeoLiteCityv6-beta/GeoLiteCityv6.dat.gz


Decompress both files, which will place two files named GeoLiteCity.dat and GeoLiteCityv6.dat in your working directory.

gzip -d GeoLiteCity.dat.gz
gzip -d GeoLiteCityv6.dat.gz


Then move into the appropriate directory, renaming them in the process.

sudo mv GeoLiteCity.dat /usr/share/GeoIP/GeoIPCity.dat
sudo mv GeoLiteCityv6.dat /usr/share/GeoIP/GeoIPCityv6.dat


With the GeoIP database in place, we can install Bro itself in the next step.

Installing Bro From Source

To install Bro from source, we'll first have to clone the repository from GitHub.

Git is already installed by default on Ubuntu, so you can clone the repository with the following command. The files will be put into a directory named bro.

git clone --recursive git://git.bro.org/bro

Change into the project's directory.

cd bro

Run Bro's configuration, which should take less than a minute.

./configure

Then use make to build the program. This can take up to 20 minutes, depending on your server.

make

You'll see a percentage completion at the beginning of most lines of output as it runs.

Once it finishes, install Bro, which should take less than a minute.

sudo make install

Bro will be installed in the /usr/local/bro directory.

Now you need to add the /usr/local/bro/bin directory into your $PATH. To make sure it's available globally, the best approach to accomplish that is to specify the path in a file under the /etc/profile.d directory. We'll call that file 3rd-party.sh.

Create and open 3rd-party.sh with your favorite text editor.

sudo nano /etc/profile.d/3rd-party.sh

Copy and paste the following lines into it. The first line is an explanatory comment, and the second line will make sure /usr/local/bro/bin is added to the path of any user on the system.

/etc/profile.d/3rd-party.sh
# Expand PATH to include the path to Bro's binaries
export PATH=$PATH:/usr/local/bro/bin


Save and close the file, then activate the changes with source.

source /etc/profile.d/3rd-party.sh

Artifacts from old settings tend to persist, though, so you can additionally log out and log back in to make sure that your path loads properly.

Now that Bro is installed, we need to make some configuration changes for it to run properly.

Configuring Bro

In this step, we'll customize a few files to make sure Bro works properly. All the files are located in the /usr/local/bro/etc directory, and they are:
  • node.cfg, which is used to configure which nodes to monitor.
  • networks.cfg, which contains a list of networks in CIDR notation that are local to the node.
  • broctl.cfg, which is the global BroControl configuration file for mail, logging, and other settings.
Let's look at what needs to be modified in each file.

Configuring Which Nodes to Monitor

To configure the nodes Bro will monitor, we need to modify the node.cfg file.
Out of the box, Bro is configured to operate in standalone mode. Because this is a standalone installation, you shouldn't need to modify this file, but it's good to check that the values are correct.

Open the file for editing.

  • sudo nano /usr/local/bro/etc/node.cfg


Under the bro section, look for the interface parameter. It's etho0 by default, and this should match the public interface of your Ubuntu 16.04 server. If it's not, make sure to update it.
/usr/local/bro/etc/node.cfg
[bro]
type=standalone
host=localhost
interface=eth0

Save and close the file when you're finished. We'll configure the private network(s) that the node belongs to next.


Configuring the Node's Private Networks

The networks.cfg file is where you configure which IP networks the node belongs to (i.e. the IP network of any of your server's interfaces that you wish to monitor).

To start, open the file.

  • sudo nano /usr/local/bro/etc/networks.cfg


By default, the file comes with the three private IP blocks already configured as an example of how yours need to be specified.
/usr/local/bro/etc/networks.cfg
# List of local networks in CIDR notation, optionally followed by a
# descriptive tag.
# For example, "10.0.0.0/8" or "fe80::/64" are valid prefixes.

10.0.0.0/8 Private IP space
172.16.0.0/12 Private IP space
192.168.0.0/16 Private IP space

Delete the existing three entries, then add your own. You can use ip addr show to check the network addresses for your server interfaces. The final version of your networks.cfg should look similar to the following, with your network addresses substituted in:
Example /usr/local/bro/etc/networks.cfg
203.0.113.0/24          Public IP space
198.51.100.0/24 Private IP space

Save and close the file when you're finished editing it. We'll configure mail and logging settings next.


Configuring Mail and Logging Settings

The broctl.cfg file is where you configure how BroControl handles its email and logging responsibilities. Most of the defaults don't need to be changed. You'll just need to specify the target email address.

Open the file for editing.

  • sudo nano /usr/local/bro/etc/broctl.cfg


Under the Mail Options section at the top of the file, look for the MailTo parameter and change it to a valid email address that you control. All Bro email alerts will be sent to that address.
/usr/local/bro/etc/broctl.cfg
. . .
# Mail Options

# Recipient address for all emails sent out by Bro and BroControl.
MailTo = sammy@example.com
. . .

Save and close the file when you're finished editing it.

This is all the configuration Bro needs, so now you can use BroControl to start and manage Bro.

Managing Bro with BroControl

BroControl is used for managing Bro installations — starting and stopping the service, deploying Bro, and performing other management tasks. It is both a command line tool and an interactive shell.
If broctl is invoked with sudo /usr/local/bro/bin/broctl, it will launch the interactive shell:


Output

Welcome to BroControl 1.5-21

Type "help" for help.

[BroControl] >

You can exit the interactive shell with the exit command.

From the shell, you can run any valid Bro command. The same commands can also be run directly from the command line without invoking the shell. Running the commands at the command line is often a more useful approach because it allows you to pipe the output of a broctl command into a standard Linux command. For the rest of this step, we'll be invoking broctl commands at the command line.

First, use broctl deploy to start Bro and ensure that files needed by BroControl and Bro are brought up-to-date based on the configurations in Step 4.

  • sudo /usr/local/bro/bin/broctl deploy


You should also run this command whenever changes are made to the configuration files or scripts.
Note: If Bro does not start, the output of the command will hint at the cause. For example, you may see the following error message even though you have an MTA installed:

Output
bro not running (was crashed)
Error: error occurred while trying to send mail: send-mail: SENDMAIL-NOTFOUND not found
starting ...
starting bro ...

The solution is to edit the BroControl configuration file, /usr/local/bro/etc/broctl.cfg and add an entry for Sendmail at end of the Mail Options section:

/usr/local/bro/etc/broctl.cfg
. . .
# Added for Sendmail
SendMail = /usr/sbin/sendmail

###############################################
# Logging Options
. . .

Then redeploy Bro with sudo /usr/local/bro/bin/broctl deploy.

You can check Bro's status using the status command.

  • sudo /usr/local/bro/bin/broctl status


The output will look like the following. Aside from running, the status can also be crashed or  

stopped.

Output

Name Type Host Status Pid Started
bro standalone localhost running 6807 12 Apr 05:42:50

If you need to restart Bro, you can use sudo /usr/local/bro/bin/broctl restart.
 
Note: broctl restart and broctl deploy are not the same. Invoke the latter after you change the configuration settings and/or modify a script; invoke the former when you want to stop and restart the entire service.

Next, let's make the Bro service more robust setting up a cron job.

Configuring cron for Bro

Bro's cron command is enabled out of the box, but you need to install a cron job that actually triggers the script. You'll need to first add a cron package file for Bro in /etc/cron.d. Following convention, we'll call that file bro, so create and open it.

  • sudo nano /etc/cron.d/bro


The entry to copy and paste into the file is shown next. It will run Bro's cron every five minutes. If it detects that Bro has crashed, it will restart it.

/etc/cron.d/bro
*/5 * * * * root /usr/local/bro/bin/broctl cron

You can change the 5 in the command above if you want it to run more often.

Save and close the file when you're finished with it.

When the cron job is activated, you should get an email stating that a directory for the stats file has been created at /usr/local/bro/logs/stats. Be aware that Bro has to actually crash (i.e. be stopped unceremoniously) for this to work. It will not work if you stop Bro yourself gracefully using BroControl's stop.

To test that it works, you'll either have to reboot the server or kill one of the Bro processes. If you go the reboot route, Bro will be restarted five minutes after the server has completed the reboot process.

To use the other approach, first get one of Bro's process IDs.

  • ps aux | grep bro


Then kill one of the processes.

  • sudo kill -9 process_id


If you then check the status using:

  • sudo /usr/local/bro/bin/broctl status


The output will show that it has crashed.


Output

Name Type Host Status Pid Started
bro standalone localhost crashed

Invoke that same command a few minutes minutes later, and the output will show that it's running again.

With Bro working fully, you should be getting summary emails of interresting activities captured on the interface about every hour. And if it ever crashes and restarts, you'll receive an email stating that it started after a crash. In the next and final step, let's take a look at a couple of other major Bro utilities.

Using bro, bro-cut and Bro Policy Scripts

bro and bro-cut are the two other main commands that come with Bro. With bro, you can capture live traffic and analyze trace files captured using other tools. bro-cut is a custom tool for reading and getting data from Bro logs.

The command used to capture live traffic with bro are in the format sudo /usr/local/bro/bin/bro -i eth0file.... At a minimum, you have to specify which interface it should capture traffic from.file... refers to policy scripts that define what Bro processes. You don't have to specify a script or scripts, so the command can also look like sudo /usr/local/bro/bin/bro -i eth0.

Note: The scripts that Bro uses to function are located in the /usr/local/bro/share/bro directory. Site-specific scripts are in the /usr/local/bro/share/bro/site/ directory. Make sure not to customize the files in this directory other than /usr/local/bro/share/bro/site/local.bro, as your changes will be overwritten when upgrading or reinstalling Bro.

Because bro creates many files from a single capture session to the working directory, it's best to invoke a bro capture command in a directory created just for that capture session. The following, for example, shows a long listing (ls -l) of the files created during a live traffic capture session.


Output

total 152
-rw-r--r-- 1 root root 277 Apr 14 09:20 capture_loss.log
-rw-r--r-- 1 root root 4711 Apr 14 09:20 conn.log
-rw-r--r-- 1 root root 2614 Apr 14 04:49 dns.log
-rw-r--r-- 1 root root 25168 Apr 14 09:20 loaded_scripts.log
-rw-r--r-- 1 root root 253 Apr 14 09:20 packet_filter.log
-rw-r--r-- 1 root root 686 Apr 14 09:20 reporter.log
-rw-r--r-- 1 root root 708 Apr 14 04:49 ssh.log
-rw-r--r-- 1 root root 793 Apr 14 09:20 stats.log
-rw-r--r-- 1 root root 373 Apr 14 09:20 weird.log

You can try running one of the capture commands now. After letting it run for a little bit, use CTRL+C to terminate the bro capture session. You can read each with bro-cut using a command like cat ssh.log | /usr/local/bro/bin/bro-cut -C -d.


Conclusion

This article has introduced you to Bro and how to install it in standalone fashion from source. You also learned how to install the IPv4 and IPv6 GeoIP databases from MaxMind that Bro uses for geo-locating IP addresses to city level. For this standalone mode of installation, you also learned how to modify relevant aspects of its configuration files, manage it with broctrl, use bro to capture live traffic and bro-cut to output and read the resulting log files.
↧

How To Manage Office 365 Security and Compliance Lifecycle

$
0
0
This article will give you an overview of office 365 security and compliance center through which you can centrally manage your Office 365 tenant security and compliance lifecycle.


Microsoft Office 365 consists of a large application suite. If you visit the Office 365 admin center, for instance, and view a whopping 10 separate sub-admin centers:
  • Exchange: messaging
  • Skype for Business: IM and telephony/teleconferencing
  • SharePoint: collaboration
  • OneDrive: file sharing
  • Yammer: collaboration
  • PowerApps: code-free cloud application development platform
  • Flow: workflow engine
  • Azure AD: identity management
  • Intune: endpoint management
On one hand the Office 365 administrator needs to manage the different Office 365 services by using separate admin centers. On the other hand, you have (a) your users save enormous data volumes to the Office 365 tenant; and (b) compliance requirements that mean you need to secure, audit, and document the above infrastructure. Whoa—that is a lot of stuff to worry about! Fortunately, the Office 365 development teams gave us the Office 365 Security & Compliance Center.

High-level overview

From the Office 365 admin center (https://portal.office.com), open the Admin center menu and select Security & Compliance. The Security & Compliance Center opens in a separate browser tab as shown next. The direct URL to the site is https://protection.office.com.


Before I show you the specific tasks you can perform in the Security & Compliance Center, click Permissions from the navigation bar. You need to understand the following two points about this page, shown in the following screenshot:


  • The Security & Compliance Center uses a role-based access control (RBAC) authorization model just like the other Office 365 services use.
  • The roles and permissions you assign here grant users permissions only to the Security & Compliance Center.
The use case here is that you could, for example, grant select Legal team users membership to the built-in eDiscovery Manager role, and Compliance team users membership to the Compliance Administrator role. Of course, you can define your own custom roles if you wish.

Next, let me show you some of the more important tasks you can accomplish in the Security & Compliance Center. In this article I'll show you some of them; you should certainly consult the documentation for full information.

Another thing you'll want to do is navigate to Service assurance > Dashboard and give Office 365 your business' geographic location and industry. When you provide Microsoft with that data, Office 365 gives you compliance reports and trust documents customized to your business. Pretty awesome!

NOTE: You need to assign your compliance officers' Office 365 user accounts to the Service Assurance User role in Permissions for them to access the compliance reports.

Alerts

The alerting function in the Office 365 Security & Compliance Center is a huge value to administrators because it proactively informs us when particular actions occur within the tenant.
What kind of "particular actions," you wonder? Stuff like:
  • privilege escalation
  • deleted folders and files
  • deleted users and groups
  • eDiscovery activities
  • unusual external user activity
  • detected malware/phishing
The New alert policy dialog shown in the next screenshot asks you to pick (a) which activities across the Office 365 services you want to watch; (b) which users, or all users, you need to scope the alert to; and (c) to whom you want to send the alert e-mail messages.


Office 365 sends the alerts to its notification (bell) menu, targeted email addresses, as well as to the View security alerts page in the Security & Compliance Center. The following screenshot shows you what a representative email alert looks like.


Data Loss Prevention (DLP)

DLP in Office 365 combines the best parts of Active Directory Rights Management Services (AD RMS) and the Intune device management product. Whereas configuring AD RMS on premises is a giant pain in the you-know-where, configuring DLP in Office 365 is wizard driven and remarkably straightforward.

The heart of DLP is the policy, which I show you in the next screenshot. Depending on your industry and security/compliance requirements, you may need to take special actions on sensitive data like patient records, financial numbers, and so forth.


A DLP policy can cover multiple data sources, such as Exchange Online, SharePoint Online, and OneDrive for Business. You can restrict access to data the policy identifies, including (a) notifying the users of any actions they need to take on the sensitive data; and (b) preventing users from copying, forwarding, and performing other actions on that data.

You can run DLP reports from the Security & Compliance Center by navigating to the Reports > Dashboard page.

Programmatic access

There's so much to see in the Office 365 Security & Compliance Center! Let's finish up by learning how to connect to the center with PowerShell. The bad news is that the Office 365 PowerShell story is a royal, confusing mess. So many modules, so many versions—it's gross.

The good news is that we can actually use PowerShell remoting to establish a direct connection to the Office 365 Security & Compliance Center.

On your Windows 8.1 or Windows 10 administrative workstation, make sure you've temporarily relaxed the system's script execution policy:

Set-ExecutionPolicy -ExecutionPolicy Bypass -Scope Process -Force 

Next, let's store our Office 365 global admin credentials:

$cred = Get-Credential

Now we'll create the remote session, storing it in a variable:

$session = New-PSSession -ConfigurationName Microsoft.Exchange -ConnectionUri https://ps.compliance.protection.outlook.com/powershell-liveid/ -Credential $cred -Authentication Basic -AllowRedirection

Finally, we'll use implicit remoting to import the remote Office 365 session into our current runspace:

Import-PSSession $session

So now we have access to the Office 365 Security & Compliance Center PowerShell cmdlets. The exported Office 365 cmdlets are stored in a temporary module; you can then run Get-Command to see what's available:

PS C:\> Get-Command -Module tmp_huth43a3.oxz | Select-Object -Property Name | Format-Wide -Column 2

This module is pretty big (148 functions as of this writing), and you can perform most security/compliance tasks using them.


Conclusion

Overall, I found that once you get past your initial learning curve, the Office 365 Security & Compliance Center gives you excellent insight into your tenant. In my experience, managing Office 365 can sometimes feel like a bad game of "Whack a Mole" given how many moving parts there are.

We hope that the Office 365 product teams will continue the trend of unifying the Office 365 control plane because we all (Microsoft, our business, and we as individuals) are better off for it.


Credit: 4Sysops
↧
↧

Nokia 8 or Nokia 9: What Next?

$
0
0

When it comes to the Nokia 2017 flagship, there were so many leaks and rumors the past few months that we're not sure what to expect. First of all, the name has been tipped to be both Nokia 9, and Nokia 8. Second, specs have been all over the place and the only thing we know for certain is that the flagship will come with Snapdragon 835 and a dual Zeiss-branded camera.


However, everything else is a complete mystery. This, of course, allowed for so much speculation that we're not sure what to believe anymore. So, let's take a look at the different options we see as possible and give our two cents on each one.

Rumor 1: Dual Cameras For Everyone

Some time ago, our colleagues over at Nokia Power User revealed a couple of design sketches, allegedly of the Nokia 8 and Nokia 9. If they turn out to be the real deal, both of the phones will come with dual-camera setup on their backs.

The difference in design between the two handsets will be most prominent on their front – the Nokia 8 will feature slightly bigger bezels, with the bottom one holding the home button with embedded fingerprint scanner. The Nokia 9, however, will be similar to the LG G6 and Galaxy S8 – it will come with very thin top and bottom bezels, and the fingerprint scanner will be relocated under the rear camera.

That being said, if there are two phones, they won't boast the same hardware specs. The Nokia 8 will be the higher mid-range contender by HMD Global, probably featuring the new mid-range Qualcomm silicon – Snapdragon 660. On the other hand, we'll have the flagship Nokia 9 with the latest and greatest SoC – Snapdragon 835.

In terms of RAM, the Nokia 8 will most likely arrive with 4 GB, and the Nokia 9 will have two versions – one with 6 GB and one with 8 GB. The second is most likely to be Asia-exclusive, akin to the Nokia 6 that arrived in Europe with 3 GB of RAM, while having 4 GB in China. 


Rumor 2: Nokia 8 and Nokia 9 are the same device


Recent rumors suggest that there might not be a Nokia 9 at all, and the flagship will be named Nokia 8 instead. This seems to be backed by HMD's letter to the FCC in June, which requested the change of name of the then TA-1004 model to TA-1012. So, maybe the Nokia 9 name was scrapped back then in favor of Nokia 8.

If this turns out to be true, then maybe the design sketches we mentioned before were two prototype ideas for the same device, instead of two separate handsets.

This seems to be the case according to the prolific leaker Evan Blass, as yesterday he unveiled his take on the subject in the form of an allegedly official render. The leak shows a rather beautiful dual-camera handset with its clock at 8:00 AM.

A user on Twitter also pointed out that the name Nokia 8 might not be random, as the number eight looks similar in shape to a vertical dual-camera setup.

If this is the case, the Nokia 8 will come with Snapdragon 835 and two versions in terms of RAM – a 4 GB and a 6 GB one. The handset will also boast a 5.3-inch 1440 x 2560 pixels (Quad HD) display.

Other rumors suggest that the Nokia 8 phone might be unveiled on July 31, so if this theory is actually correct, we'll know soon enough.

Rumor 3: All Speculations Are Wrong

Of course, there is the possibility that we're reading the signs wrong, and HMD has decided to throw us a curve ball. If this holds to be true, the Nokia 9 will be the dual-camera flagship, and the Nokia 8 will be a regular mid-ranger with Snapdragon 660 that just hasn't appeared in leaks.

This would suggest that the only information we have regarding HMD's future mid-rangers would be about their chipsets. After all, when they were allegedly leaked, we caught our first and so far only glimpse of the entry-level Nokia 2, so it isn't impossible for the alleged Nokia 7 and 8 to also remain a secret.


Wrap-up

We have to admit that even we had a hard time going through the huge backlog of rumors, speculations, and leaks and piecing something that makes sense together.
Credit: Phonearena
↧

Vertu Luxury Smartphone Maker Announces Farewell

$
0
0

Selling expensive jewel-encrusted, high-style smartphones turned out to be unprofitable for the Vertu a British company that was founded in 1998 by Nokia.


Vertu, a British company which has been designing and selling high-end luxury smartphones starting at $6,900 for more than a decade, is being liquidated after failing to sell enough high-priced phones to pay its bills.

The demise of Vertu was revealed in a July 13 story by BBC.com, after the company was bought by a new owner in March who was unable to turn the company around. The BBC report said the company has gone into liquidation.

The company was sold in March to Hakan Uzan, a Turkish exile in Paris, the story reported. Uzan is retaining the Vertu brand, technology and licenses after the liquidation. However, the Vertu website that displays all of its smartphone models was still online as of today.

The Vertu phenomenon began with the company's original Vertu Signature luxury phones more than a decade ago. The Signature models were available in more than 25 variants using stainless steel, zirconium and other materials, starting at $16,150.

According to Wikipedia, Vertu was founded by smartphone maker Nokia in 1998. It operated Vertu until the Finnish company sold all but a 10 percent interest to a private equity firm EQT VI for an unspecified price.

In late 2014, Vertu introduced its Aster smartphone, which featured a 5.1-inch solid sapphire screen, an HD display and a titanium case. Running on Android 4.4. KitKat, the phone included a Qualcomm Snapdragon quad-core CPU, 64GB of internal memory and a 13-megapixel Hasselblad camera. Prices began at $6,900.

Not only did the company's Aster phones include quality components, but they also came with six months of Vertu's "Classic Concierge" services, which allowed users to receive 24/7 personalized help from a team of "lifestyle managers." Also included was six months' complimentary access to unlimited global WiFi at more than 13 million hotspots.

The company also had offered several models of luxury Vertu for Bentley phones, which were aimed at Bentley automobile owners to give them a smartphone to complement their hand-built luxury vehicles. Starting at $16,500 and limited to 2,000 examples, the phones even offered exclusive Bentley-themed content to their users and were swathed in the classic Bentley shade of Newmarket Tan calfskin leather.

Vertu also offered its Signature Touch smartphone line, which started at $10,800 and climbed to about $22,000, featuring a 4.7-inch HD display, a Qualcomm Snapdragon 2.3GHz quad-core CPU, and a range of five colors and eight leather and metal combinations, giving owners wide customization capabilities.

Other vendors have also tried marketing high-end smartphones, with varying levels of success. In May of 2016, Sirin Labs launched its own line of ultra-secure, luxury phones priced from $10,000 to $20,000 each. 


Credit: eWeek
↧

Huawei Developing Artificial Intelligence Chips

$
0
0

Fujitsu and Huawei would join other component makers such as Intel, Nvidia and Advanced Micro Devices in pushing out silicon for deep-learning workloads.


System makers Fujitsu and Huawei Technologies reportedly are both planning to develop processors optimized for artificial intelligence workloads, moves that will put them into competition with the likes of Intel, Google, Nvidia and Advanced Micro Devices.

Tech vendors are pushing hard to bring artificial intelligence (AI) and deep learning capabilities into their portfolios to meet the growing demand generated by a broad range of workloads, from data analytics to self-driving vehicles.


Microsoft, Google, IBM and others are creating AI business units and building out products and services that can leverage the technologies. Chip makers also are making the move.

Intel last week unveiled its latest generation Xeon server chips that, among other improvements, deliver 2.2 times the performance for deep learning training and inference tasks than their predecessors. The company also offers field-programmable gate arrays (FPGAs), which will play an increasing role in the future of AI, and has plans for “Lake Crest,” an upcoming processor aimed at deep learning codes.

Nvidia for the past couple of years has shifted much of the focus of its business towards AI and deep learning and AMD is looking to developer Radeon GPUs for AI workloads. Google has its tensor processing units (TCUs) that are designed specifically for AI workloads. Startup Graphcore is developing what it’s calling an intelligent processing unit, or IPU.

All this comes as industry analysts expect the market will expand rapidly in the coming years. Gartner analysts predict that by 2020, essentially all software and services will include AI technologies, although they noted that software makers’ desire to be seen on the leading edge of AI is causing confusion in the market over what is and what isn’t actual artificial intelligence.

Now Fujitsu and Huawei are working on their own AI-focused processors. Fujitsu engineers for the past couple of years have been working on what the company is calling a deep learning unit (DLU), but last month gave more details on the component during the International Supercomputing show.

According to a report on the Top500 site, which includes the twice-yearly list of the world’s fastest supercomputers, Fujitsu's DLU will rely on low-precision formats to drive both performance and energy efficiency. I will include the company’s Tofu interconnect, which was developed for the high-performance computing (HPC) K computer.

The chip reportedly will include 16 deep learning processing elements, with each of them housing eight single-instruction, multiple data execution units. Fujitsu is predicting that the chip will offer 10 times the performance per watt of competitors' produce.  Company officials have said that the plan is to initially release it next years as a coprocessor to a more traditional CPU, and later integrate the DLU into the CPU.

The DLU is part of a larger effort by Fujitsu to establish itself in the fast-growing AI space. Last fall, the company announced new AI services for its Human Centric AI Zinrai platform.

Reports out of Asia said that at the 2017 China Internet Conference last week, Huawei CEO Yu Chengdong announced the company is building an AI-focused processor. Not a lot of detail has been released, but the chip—which will be built by Huawei’s HiSIlicon chip-making arm—reportedly will integrate a CPU, GPU and AI features onto a single piece of silicon and will likely be based on new AI-focused chip designs introduced earlier this year by ARM at Computex.


The Cortex-A75 and Cortex-A55 systems-on-a-chip (SoCs) are based on ARM’s new DynamIQ architecture and will come with AI-specific instructions and enhanced security.

Huawei’s new chip is expected to be introduced later this year.


Credit: eWeek
↧

Twitter infiltrated by 90,000 Sex Bots

$
0
0

Nearly 90,000 Sex Bots Invaded Twitter in 'One of the Largest Malicious Campaigns Ever Recorded on a Social Network'.


Last week, Twitter’s security team purged nearly 90,000 fake accounts after outside researchers discovered a massive botnet peddling links to fake “dating” and “romance” services. The accounts had already generated more than 8.5 million posts aimed at driving users to a variety of subscription-based scam websites with promises of—you guessed it—hot internet sex.

The bullshit accounts were first identified by ZeroFOX, a Baltimore-based security firm that specializes in social-media threat detection. The researchers dubbed the botnet “SIREN” after sea-nymphs described in Greek mythology as half-bird half-woman creatures whose sweet songs often lured horny, drunken sailors to their rocky deaths.


ZeroFOX’s research into SIREN offers a rare glimpse into how efficient scammers have become at bypassing Twitter’s anti-spam techniques. Further, it demonstrates how effective these types of botnets can be: The since-deleted accounts collectively generated upwards of 30 million clicks—easily trackable since the links all used Google’s URL shortening service.

The 90,000 accounts were all created using roughly the same formula: A profile picture of a stereotypically attractive young woman whose tweets included sexually suggestive, if not poorly written remarks that invite users to “meet” with them for a “sex chat.” Millions of users apparently fell for the ruse and, presumably, a small fraction of went on to provide their payment card information to the pornographic websites they were lured to.

“The accounts either engage directly with a target by quoting one of their tweets or attracting targets to the payload visible on their profile bio or pinned tweet,” ZeroFOX reports. Roughly 20 percent of the accounts lay dormant for a year before sending their first tweets, an effort to evade Twitter’s anti-spam detection.

Here’s just a brief sample of the hilariously bad tweets generated by these obviously fake accounts:

    “I want to #fondle me?”
    “I want to take my #virgin?”
    “Came home from training, tired wildly?”
    “Meow, I want to have sex.”
    “Boys like you, my figure?”
    “Want a vulgar, young man?”

The tweets further included links to affiliate programs—web pages that typically redirect users to other adult websites. Members of these programs, which traditionally rely heavily on spam, receive payouts based on the amount of traffic they send to subscription-based porn and so-called “adult dating” websites. Likewise, many of the “dating” websites are themselves scams, chiefly comprised of fake female profiles which encourage visitors to sign up for paid subscriptions with promises of lame cybersex and nudes. (PSA: There are literally no women on the internet that want to have sex with you.)


According to ZeroFOX, two out of five of the domains tweeted by the SIREN botnet are associated with a company called Deniro Marketing. Deniro Marketing was identified earlier this year by noted security researcher Brian Krebs as being tied to a “porn-pimping spam botnet.” (Krebs also filed a report Monday regarding ZeroFOX’s discovery.) The company reportedly settled a lawsuit in 2010 for an undisclosed sum after being accused of operating an online dating service overrun with fake profiles of young women.

A Deniro Marketing employee who answered the phone at its California headquarters on Monday said that no one was available to respond to inquiries from reporters.

While it seems unlikely that Deniro Marketing created the fake accounts itself, it may have contracted a third party—likely located somewhere in Russia or Eastern Europe—to spread the links for them. A “large chunk” of the accounts’ self-declared languages were Russian, ZeroFOX reports, and approximately 12.5 percent of the bot names contained letters from the Cyrillic alphabet.

“To our knowledge, the botnet is one of the largest malicious campaigns ever recorded on a social network,” ZeroFox concludes. Luckily, none of the links tweeted by the SIREN botnet appear to contain malware, nor were any associated with phishing attempts. But with more than 30 million clicks, the discovery reveals what a threat such an operation could be if the goal were shifted slightly to include, for example, the spread of ransomware.


Credit: Gizmodo
↧
↧

Google Glass is Back From the Dead

$
0
0

Google announced a new chapter in the life of Glass for use in a variety of industries including manufacturing, logistics, field services and healthcare. The new Google Glass Enterprise Edition is designed with factory workers in mind — companies such as GE Aviation, AGCO, DHL, Dignity Health, NSF International, Sutter Health, Boeing, and Volkswagen have been using Glass over the past several years. 


The new Glass EE includes an updated camera module that bumps resolution from 5 megapixels to 8, and it has longer battery life, a better processor, an indicator for video recording and improved Wi-Fi speeds.

The difference between the original Glass and the Enterprise edition could be summarized neatly by two images. The first is the iconic photo of Brin alongside designer Diane von Furstenberg at a fashion show, both wearing the tell-tale wraparound headband with display stub. The second image is what I saw at the factory where Erickson works, just above the Iowa state line and 90 miles from Sioux Falls, South Dakota. Workers at each station on the tractor assembly line—sporting eyewear that doesn’t look much different from the safety frames required by OSHA—begin their tasks by saying, “OK, Glass, Proceed.” When they go home, they leave their glasses behind.


↧

IoT-Connected Toys Pose Security Risks

$
0
0

As more toys and recreational devices are directly or indirectly connected to the internet of things, security threats rise, the Federal Bureau of Investigation warns.


The idea that a toy presents a real security threat first came to national attention back in 1998, when a small robot disguised as a fanciful animal was banned by the National Security Agency.

This critter was known as a Furby. The Furby appeared to learn English by listening to words spoken around it and using those words to begin speaking. The government was concerned that the Furby might hear classified information and then repeat it.

While there was some debate as to whether the Furby could actually record English words, it’s since been replaced by a series of smart toys that can most assuredly listen to the conversations around them and also watch the activity around them using cameras.

Those toys, many of which seem to be intelligent dolls or other companions, connect to the internet using WiFi or through a smartphone using Bluetooth. As long as those devices are connected to the internet, there’s no way to know what they’re recording or what information is being sent back to a server somewhere on the internet.

This possibility so alarmed the FBI that the agency issued an urgent announcement on July 17 describing the vulnerability and explaining steps to take to keep the devices from being too much of a threat.

The FBI is particularly concerned because young children will tell their toys all sorts of private information, thinking they’re speaking in confidence. Such supposedly private revelations could risk the child’s safety, not to mention the safety of the entire family.

But the risks from connected devices in the home go far beyond just intelligent companions. A new presentation set for the Black Hat USA conference on July 26 covers security vulnerabilities in Segway hoverboards, which can be taken over by hijacking their Bluetooth connection. Researchers were able to control the overboard remotely and even turn it off while someone was riding it. 

Additional exploits included the ability to load the hoverboard with malware.

Both of these warnings demonstrate the common threat affecting IoT devices used in the home and in enterprises as well. After all, the NSA wasn’t worried about the Furby being used in the home, but rather when employees started bringing them into the office. That common threat is the lack of security in consumer IoT in general.

The Segway hoverboard was shipped with no real security, for example, even though there was a 
Bluetooth PIN. That PIN turned out to be cosmetic and did not prevent access. Since then, Segway has apparently instituted encryption on those devices.

The lack of security on those internet connected toys is so pervasive that the FBI provided detailed advice for taking steps that might help with security, such as using strong passwords. The most important piece of advice from the FBI, however, is to make sure the devices are turned off when they’re not actually being used, and when they are being used, to keep an eye on what’s happening through the app associated with the device.

While the FBI focuses on the risks to privacy through internet connected toys, there are actually risks that go beyond that. Because of the lack of security on such devices, it would be relatively easy to load malware that could take over cameras and microphones on internet connected toys. Once infected by malware, the connected toy could then be used for surveillance of the home or office where the toy is being used.

The resulting risk to privacy was enough, according to a report in Reuters, to cause the German government to ban the sales and ownership of a talking doll named Cayla. There the government recommended destroying the internet connected doll immediately.

It would be bad enough if those were the only IoT threats out there on the Internet, but they’re only the latest. There’s a search engine that allows users to find and view any of millions of unsecured IoT-connected video cameras world-wide. Those same video cameras were the repositories for malware that was later used in a massive Distributed Denial of Service attack last year.

Unfortunately, there’s little or no indication that there’s any serious effort on the part of device makers to secure their products. That means that it will pay big dividends to read the FBI’s list of recommendations for dealing with internet connected toys and follow them. Just because the IoT device you’re concerned about isn’t marketed as a toy doesn’t matter.

Likewise, when you read the FBI’s recommendations, remember that you can replace the word “children” with the word “employee” and the advice is still relevant. If you find that the device you’re planning to use can’t work within the FBI’s recommendations, then don’t use it.


Examples of the failings you might encounter when implemented to devices would be the inability to connect with encrypted WiFi, the inability to receive firmware or software updates or the inability to authenticate communications.

Regardless of whether the device is marketed as a toy or, a TV camera or as an industrial process controller, the risks are serious and it’s critical to pay attention to security.


Credit: eWeek

↧

Microsoft Delivers First Release Candidate For SQL Server 2017

$
0
0

SQL Server 2017 took a major step closer to its official release date this week. After a steady trickle of community technology previews, on July 17 Microsoft announced the general availability of the AI-enabled database software's first release candidate (RC1). Breaking from tradition, SQL Server 2017 runs on both Windows and Linux.


The term "release candidate" describes pre-release beta software that contains all the features that are slated to appear in the finished product. By downloading and installing release candidates, users can evaluate software products before they are commercially available. It's generally good practice to run such software on test or non-production system since it may still contain bugs.

In SQL Server 2017 RC1, early testers will be able to take a few recently-added features for a spin.

The Linux version of the database software now supports Active Directory authentication, enabling Windows or Linux client to connect to SQL Server using the Kerberos protocol and their domain credentials. In a security-enhancing move, Microsoft has also added support for Transport Layer Security (TLS) protocols (TLS 1.0, 1.1 and 1.2), enabling organizations to encrypt data as it passes from between SQL Server and client applications.

SQL Server Analysis Services (SSAS), the online analytical processing (OLAP) and data mining tool that enables business intelligence functionality, now features Dynamic Management Views that provide dependency analysis and reporting. SQL Server 2017 RC1 also contains a number of new enhancements to its Machine Learning Services modules, including an expanded set of model management capabilities for R Services on Windows Server, stated the software maker.

Users can also get a taste of performance tweaks Microsoft made to its database. According to the company, SQL Server 2017 recently set new benchmarks in the TPC-H 1TB non-clustered data warehousing and the non-clustered TPC-H 10TB data warehousing workload tests.

Instructions on downloading, installing and getting started with SQL Server 2017 RC1 are available in this TechNet post.

Another key feature in SQL Server 2017 is container support, according to Tony Petrossian, partner group program manager of the Database Systems Group at Microsoft.


"With support for containers, SQL Server can now be used in many popular DevOps scenarios.  Developers working with Continuous Integration/Continuous Deployment (CI/CD) pipelines can now include SQL Server 2017 containers as a component of their applications for an integrated build, test, and deploy experience," he wrote in a separate blog post. Packaged as a Docker container image, SQL Server can essentially run on multiple operating systems, Linux, Mac and Windows.

Microsoft is using these capabilities internally as it builds, tests and publishes new versions of SQL Server 2017, revealed Petrossian. Using Azure Container Services, the company's cloud-based container orchestration service, and a large Kubernetes cluster, his team is able to deploy "hundreds of containers" and perform "hundreds of thousands" of tests within hours after a new SQL Server build comes off the line.
↧
Viewing all 880 articles
Browse latest View live