
This guide will walk you through the simple installation steps to deploy openstack on Ubuntu 16.04. If you would like to perform openstack installation on Red Hat, CentOS or Fedora Linux, please go through the following guides.
Prerequisites
To follow the steps mentioned in this article, you will need:
- One Ubuntu 16.04 machine (bare-metal or virtual)
- 14GB of RAM is the recommended minimum.
- 100GB of hard disk space, at least.
You should have already ran sudo apt update and sudo apt upgrade on your Ubuntu 16.04 machine prior to performing openstack installation.
STEP1 - Installing OpenStack
The current version of Ubuntu OpenStack is Newton. So, that’s what we are going to.
To begin with the installation, first, we need to use the git command to clone devstack. Connect your Ubuntu machine with SSH and execute these commands.
cd /

sudo git clone https://git.openstack.org/openstack-dev/devstack -b stable/juno
Note: If you want to install the bleeding edge, omit -b stable/juno entirely. If you would like to install kilo, liberty or mitaka, simply swap out “juno” above with the release name you’d like. You can check here to see what’s available; they are listed at the top of the page.
Next, we need to copy the sample local.conf file and set a password that will be used during the automated deployment.
cd devstack/

sudo cp samples/local.conf local.conf

sudo nano local.conf
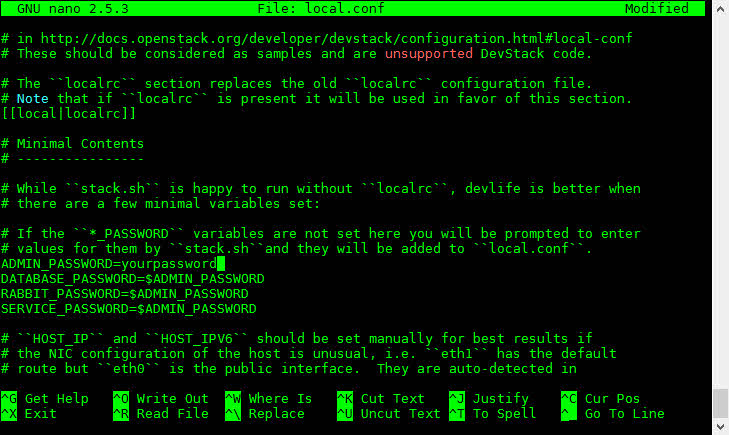
Scroll down until you see the password variables. You need to set your password after ADMIN_PASSWORD=, and change the other three to $ADMIN_PASSWORD. This makes everything use the same password during the installation.
ADMIN_PASSWORD=yourpassword

MYSQL_PASSWORD=$ADMIN_PASSWORD

RABBIT_PASSWORD=$ADMIN_PASSWORD

SERVICE_PASSWORD=$ADMIN_PASSWORD
Be sure it looks like this before saving and exiting. (Ctrl-X, Y, Enter).
Next, we’ll run a script to create a new user for OpenStack, then make that new user the owner of the devstack folder.
sudo /devstack/tools/create-stack-user.sh

sudo chown -R stack:stack /devstack
Now it’s time to kick off the installation. It’s a good time to grab some coffee or a good book.
sudo su stack

/devstack/stack.sh
After a half hour to an hour, you will eventually end up looking at something like this.

As you can see, two users have been created for you; admin and demo. Your password is the password you set earlier. These are the usernames you will use to login to the OpenStack Horizon Dashboard. Take note of the Horizon web address listed in your terminal.
Open up a browser, and put the Horizon Dashboard address in your address bar. Mine is http://192.168.0.116/dashboard
You should see a login page like this.

To start with, log in with the admin user so you can poke around. If all goes well you should be in your dashboard.

You will need to use the demo user, or create a new user, to create and deploy instances.