![](http://4.bp.blogspot.com/-ohgU0Hq2dqY/WELrzgVVDhI/AAAAAAAAMo8/nYAAVb1NaG0OAWSw6E_puLWa50Zq6Jz2wCLcB/s1600/vSphere-6.5-installation-and-configuration-2.png)
This guide will walk you through the steps to install and configure VMware vSphere 6.5 including steps to configure vCenter 6.5 and its High Availability Cluster (VCHA). We will also demonstrate how to deploy and configure a vCenter 6.5 Server Appliance.
Recently VMware has released its latest version of vSphere 6.5 with several advanced features including High Availability (HA) and Distributed Resource Scheduler (DRS).
Related Articles:
Installing vSphere 6.5
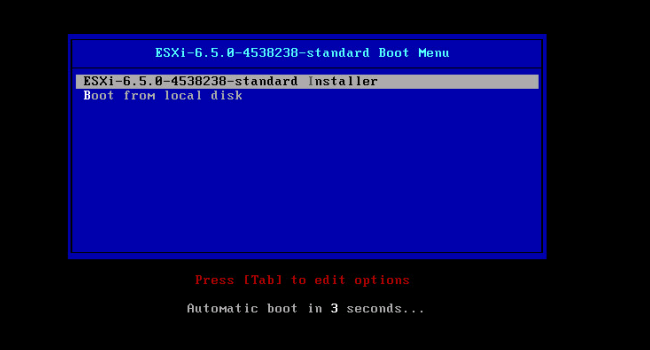
To begin, boot your Server with the vSphere 6.5 iso image file. If you have vSphere 6.5 bootable CD/USB drive. Select the vSphere 6.5.0-x-standard installer option from the boot menu as shown in image below.
![](http://4.bp.blogspot.com/-M0mzXMComIw/WEJ6vswxv1I/AAAAAAAAMh0/eY72BUmo0P0OdcTAtqjnYpljJbtJOaJYACLcB/s1600/vSphere-6.5-installation-and-configuration-1.png)
Wait while the components loading
![](http://2.bp.blogspot.com/-Wv4khY_kWrk/WEJ6ytr_qlI/AAAAAAAAMic/cjP-EcmzcYclLQ7HQD8eRAQ8nX8syw3FACLcB/s1600/vSphere-6.5-installation-and-configuration-2.png)
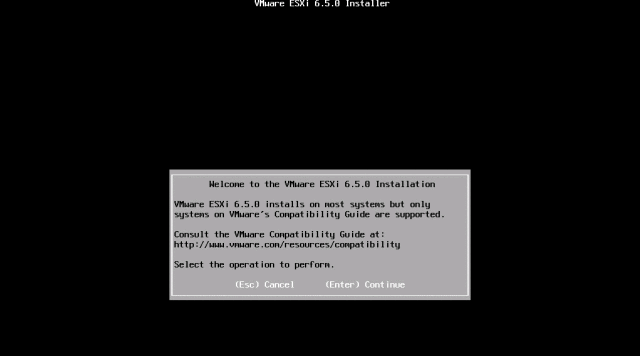
Press Enter to continue with installation
![](http://2.bp.blogspot.com/-FWBCw0H34vI/WEJ6zospqAI/AAAAAAAAMio/NOHY5n3LvKETb1_XFrwEFapHjwvQo78oQCLcB/s1600/vSphere-6.5-installation-and-configuration-3.png)
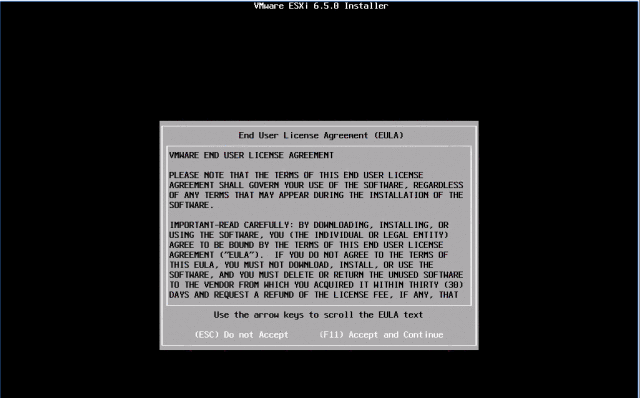
Press F11 to Accept End User License Agreement (EULA) and continue with the installation.
![](http://2.bp.blogspot.com/-K_-vKGRgaS4/WEJ6z_DTVsI/AAAAAAAAMis/bm4_0zLjN9QnystLkBSMCP6fHlmNY2EwACLcB/s1600/vSphere-6.5-installation-and-configuration-4.png)
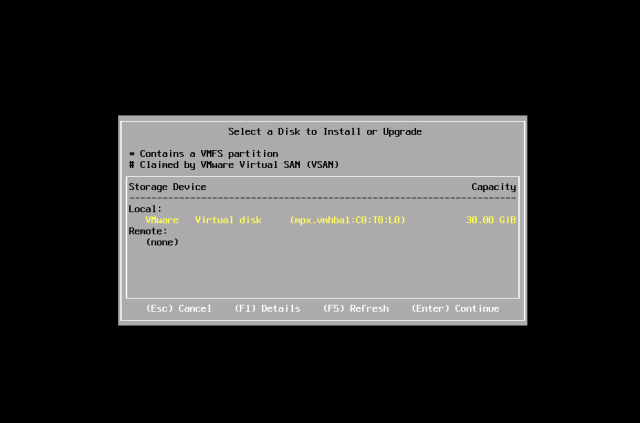
At this point, Installer will scan available devices where ESXi can be installed.
![](http://2.bp.blogspot.com/-JiHJo7xeUEY/WEJ6zyojsoI/AAAAAAAAMiw/zvk4uBBN--4qqK-boM1yrs8QZ8LYrZvQACLcB/s1600/vSphere-6.5-installation-and-configuration-5.png)
Once the process of devices discovery completed, select the appropriate disk where you want to install ESXi and Press Enter to continue.
![](http://4.bp.blogspot.com/-m7BVyDynB7U/WEJ60iCsu7I/AAAAAAAAMi8/ZyZh0FEoF1c_kmSXpdXJAFDjQUP5WbZRACLcB/s1600/vSphere-6.5-installation-and-configuration-6.png)
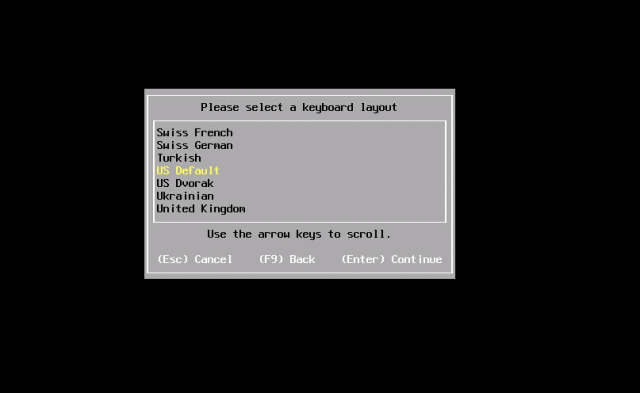
Select the keyboard layout and Press Enter to continue.
![](http://2.bp.blogspot.com/-Mg3gBkBxWd4/WEJ603plQzI/AAAAAAAAMi4/KJGu0TpAPaEoNUxlQVlu08XPk7Dxwj3fACLcB/s1600/vSphere-6.5-installation-and-configuration-7.png)
Provide root password and Press Enter to continue.
![](http://4.bp.blogspot.com/-d9g-9KkMFKQ/WEJ60kjXDYI/AAAAAAAAMi0/oOPqM2YZ9JciGFJ1vMceCV1D8yLFoUTDwCLcB/s1600/vSphere-6.5-installation-and-configuration-8.png)
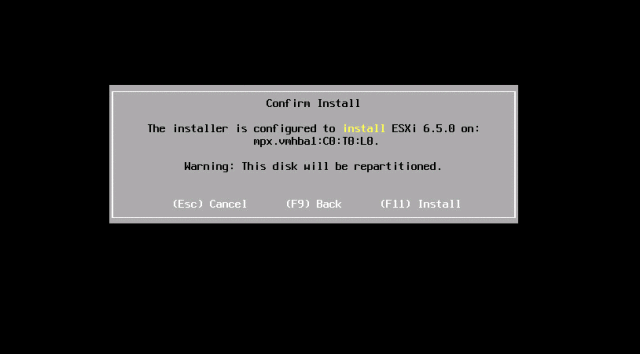
Press F11 to begin with the installation.
![](http://4.bp.blogspot.com/-oUFjlxApDLE/WEJ61WY6asI/AAAAAAAAMjA/ZuddZgxwLXw8C5BL5dOL80XAtrgoMRDogCLcB/s1600/vSphere-6.5-installation-and-configuration-9.png)
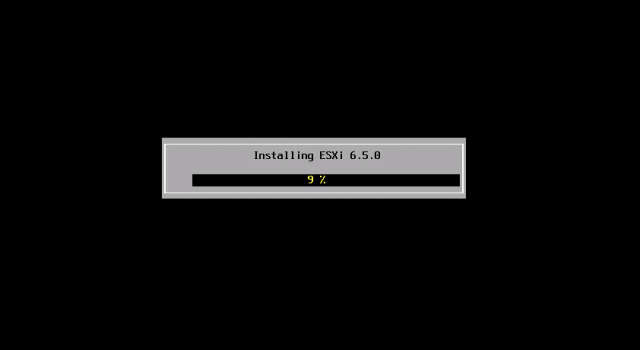
Installation process will take several minutes to complete.
![](http://1.bp.blogspot.com/-LOOZVQcZVIw/WEJ6voA8UaI/AAAAAAAAMhw/trxLFeVpcbkrazOF7cTyCY5EfpmBlcH9wCLcB/s1600/vSphere-6.5-installation-and-configuration-10.png)
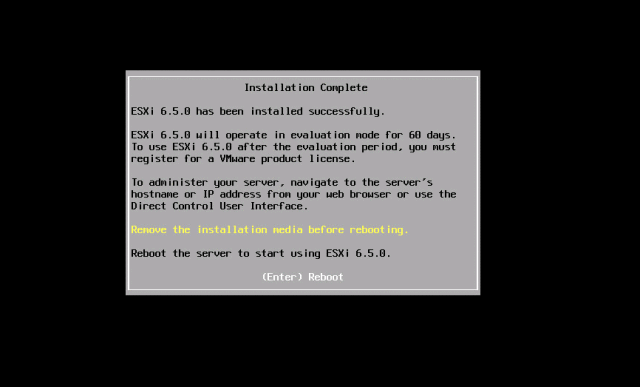
Press Enter to reboot the server to complete the installation.
![](http://4.bp.blogspot.com/-R8r4v7w264I/WEJ6v2_Io9I/AAAAAAAAMh4/7NKherXA0uEkAvrIKTDOl9wCrtrc9aHMwCLcB/s1600/vSphere-6.5-installation-and-configuration-11.png)
Wait while ESXi loading its all components.
![](http://4.bp.blogspot.com/-q35NKBaf9Qk/WEJ6waSagQI/AAAAAAAAMh8/g-E_FJb1FpEj-Kyfh6fh6iADTD-lHTwzwCLcB/s1600/vSphere-6.5-installation-and-configuration-12.png)
At this stage, Press F2 to start configuring it.
![](http://2.bp.blogspot.com/-NwDxt_58AnU/WEJ6wo3EbbI/AAAAAAAAMiA/T9G3fEebHC03P7mqLGbsHw2RwTk7nsz0wCLcB/s1600/vSphere-6.5-installation-and-configuration-13.png)
Now, we need to configure an IP Address through which ESXi host can be accessed. From the system customization menu select “Configure Management Network” and Press Enter.
![](http://1.bp.blogspot.com/-QQdC23Ua8Y0/WEJ6w6wJDcI/AAAAAAAAMiE/-3vXwutKaUI0MqJ3YKBMar5i2urXCjypwCLcB/s1600/vSphere-6.5-installation-and-configuration-14.png)
Select IPv4 Configuration and Press Enter
![](http://4.bp.blogspot.com/-4_c1nAoOtLg/WEJ6xI8qxGI/AAAAAAAAMiI/3gbITY8kP_kdqpA1cAqV9wNqer_XNv5ywCLcB/s1600/vSphere-6.5-installation-and-configuration-15.png)
Select (Set static ipv4 address and network configuration:), then set up IP, Netmask and Gateway address accordingly. Press Enter to save the IPv4 configuration.
![](http://1.bp.blogspot.com/-D_eAOC7kMyc/WEJ6xfIvHMI/AAAAAAAAMiM/73gX4Q3HS1EWWkaQskkm1WaGX_dNtCkTgCLcB/s1600/vSphere-6.5-installation-and-configuration-16.png)
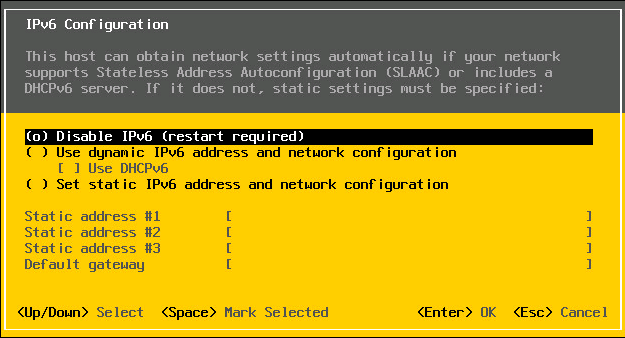
You can disable IPv6 if you are not using it in your environment. Select Disable IPv6 and Press Enter to disable it.
![](http://2.bp.blogspot.com/-zmBd7SKUSfk/WEJ6xtl_JtI/AAAAAAAAMiQ/egFI0Gp5oSsOfVq7JoJ6juMB1GeE6td8ACLcB/s1600/vSphere-6.5-installation-and-configuration-17.png)
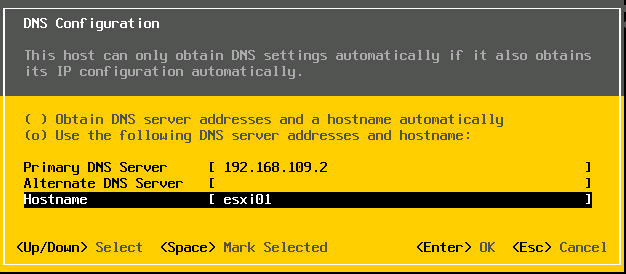
Provide the DNS Server and Hostname according to your environment, Press Enter to save
![](http://4.bp.blogspot.com/-FIBVwTEmSHQ/WEJ6yHp1NVI/AAAAAAAAMiU/ba2AtYd_jtMmGml-ubyzjh01ybwt5dwtgCLcB/s1600/vSphere-6.5-installation-and-configuration-18.png)
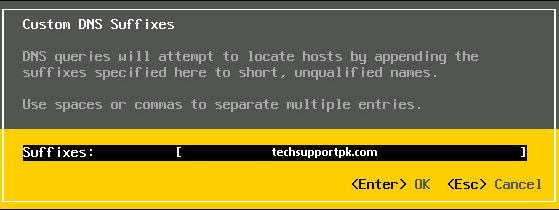
Provide DNS suffix for name resolution, press Enter to save
![](http://4.bp.blogspot.com/-FqWmSsv8x6M/WEJ6yFpVbmI/AAAAAAAAMiY/xSK16v-KWxwRcfO1Mqpg0nUOZRJ_DZX-ACLcB/s1600/vSphere-6.5-installation-and-configuration-19.png)
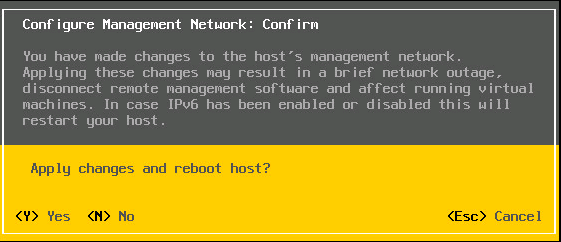
From the Configure Management Network menu, press ESC to exit the menu. It will require a host reboot to apply all the network configuration settings which we have done in above steps.
![](http://2.bp.blogspot.com/-J4IrhAROV9M/WEJ6y66RfZI/AAAAAAAAMig/X-68E7cQRPotgMzIrpbhKTfJUlb9ZQ9VACLcB/s1600/vSphere-6.5-installation-and-configuration-20.png)
Once reboot completed, you can test the management network to verify host network functionality as shown in image below.
![](http://4.bp.blogspot.com/-l9t2tCGciao/WEJ6zFVxOwI/AAAAAAAAMik/InNKybhlnYcG6NB0FUpUvXGTvpd77hckQCLcB/s1600/vSphere-6.5-installation-and-configuration-21.png)
Conclusion
We have completed vSphere 6.5 installation and its network configuration settings. In the next part of this article we'll show you how to install and configure vCenter 6.5 and its High Availability cluster (VCHA).