
In this guide, we'll walk you through the steps to build and deploy a Falcon web application using Gunicorn and Nginx on Ubuntu 16.04.
Falcon is a WSGI framework, so we'll install and use Gunicorn, a WSGI application server, to serve the app. Then we'll create a production-ready environment using Nginx as a reverse proxy server to process incoming requests before they reach Gunicorn.
Prerequisites
To deploy a falcon web application by following the steps mentioned in this guide, you will need:- Ubuntu 16.04 (physical or virtual) machine
Creating the Python Virtual Environment
Before we dive in to writing code or setting up services, we will create a Python virtual environment for our application on the server.Connect to your server as your non-root user:
- ssh sammy@your_server_ip
We'll use pip and virtualenv to set up our Falcon application.
First, install virtualenv:
- sudo apt-get install virtualenv
- mkdir falcon_app
- cd falcon_app
- virtualenv venv -p /usr/bin/python3
venv. The -p flag specifies which version of Python is used in the virtual environment.You'll see this output:
Output
Already using interpreter /usr/bin/python3
Using base prefix '/usr'
New python executable in /home/sammy/falcon_app/venv/bin/python3
Also creating executable in /home/sammy/falcon_app/venv/bin/python
Installing setuptools, pkg_resources, pip, wheel...done.
Now activate the virtual environment:
- . venv/bin/activate
- deactivate
Installing Falcon and Gunicorn with pip
We need to install thefalcon package, and since we are using Gunicorn to serve our app, we need to install that too. Both of these are available through pip, You can install Falcon one of two ways. Falcon has a binary you can install with
pip install falcon, but Falcon can get an extra speed boost when compiled with Cython. Issue the following commands to install Cython and then inform Falcon to detect it and compile itself using the system's C compiler:
- sudo apt-get install build-essential python3-dev
- pip install cython
- pip install --no-binary :all: falcon
- pip install gunicorn
Writing a Simple Web Application Using Falcon
Let's create a simple single-file Falcon application. Create the filemain.py in the falcon_app directory:
- nano main.py
/test route:main.py
import falcon

classTestResource(object):
defon_get(self, req, res):
"""Handles all GET requests."""
        res.status = falcon.HTTP_200  # This is the default status
        res.body = ('This is me, Falcon, serving a resource!')

# Create the Falcon application object
app = falcon.API()

# Instantiate the TestResource class
test_resource = TestResource()

# Add a route to serve the resource
app.add_route('/test', test_resource)
In this file, we create a class called
TestResource. This class contains an on_get method that defines the response we want to send. Then we create instances of the Falcon API and TestResource. Then we add the route /test to the API and attach the resource object test_resource to it.Whenever a
GET request is sent to the /test URL, the on_get() method of TestResource is invoked.The response status and body are set using the variables
res.status and res.body respectively.Save the file and close your editor. Let's test the application.
Serving a Falcon Application with Gunicorn
Before we go through the work of making our application production-ready by using Nginx, let's make sure our application works by serving it with Gunicorn.Make sure you are in the
falcon_app directory. Start Gunicorn with the following command:
- gunicorn -b 0.0.0.0:5000 main:app --reload
0.0.0.0 on port 5000, as you can see from its output:
Output
[2016-11-14 16:33:41 +0000] [9428] [INFO] Starting gunicorn 19.6.0
[2016-11-14 16:33:41 +0000] [9428] [INFO] Listening at: http://0.0.0.0:5000 (9428)
[2016-11-14 16:33:41 +0000] [9428] [INFO] Using worker: sync
[2016-11-14 16:33:41 +0000] [9431] [INFO] Booting worker with pid: 9431
You can use any port number you like, but make sure that it is above
1024 and it's not used by any other program.The
main:app option tells Gunicorn to invoke the application object app available in the file main.py.Gunicorn provides an optional
--reload switch that tells Gunicorn to detect any code changes on the fly.This way you can change your code without having to restart Gunicorn.
Test your application by opening your web browser on your local computer, and visiting
http://your_server_ip:5000/test in your browser. You'll see the following output from your web application:
Stop Gunicorn by pressing
CTRL+C . Let's set this up in a more production-ready way.Using Nginx to Proxy Requests to Gunicorn
We'll set up and configure Nginx to proxy all the web requests to Gunicorn instead of letting Gunicorn serve requests from the outside world directly. By doing so, all the requests of your web application are first encountered by Nginx and then routed to the application server.First, install Nginx by executing the following command:
- sudo apt-get install nginx
falcon_app.conf in the /etc/nginx/sites-available directory. This file will configure Nginx to proxy all requests coming to your server's IP address to the Gunicorn server of our Falcon application.
- sudo nano /etc/nginx/sites-available/falcon_app.conf
/etc/nginx/sites-available/falcon_app.conf
server {
listen80;
server_nameyour_server_ip_or_domain;

location / {
include proxy_params;
proxy_passhttp://localhost:5000;
    }
}
80 and proxy all the HTTP requests to http://localhost:5000, which is where Gunicorn will be listening.Activate this configuration by creating a symbolic link to this file in the
/etc/nginx/sites-enabled directory:sudo ln -s /etc/nginx/sites-available/falcon_app.conf /etc/nginx/sites-enabled/falcon_app.conf
Then disable the default Nginx configuration file by removing its symlink from the
/etc/nginx/sites-enabled directory:
- sudo rm /etc/nginx/sites-enabled/default
- sudo nginx -t
Output
nginx: the configuration file /etc/nginx/nginx.conf syntax is ok
nginx: configuration file /etc/nginx/nginx.conf test is successful
If you see any errors, fix them and test again.
Restart Nginx for the new configuration to take effect.
- sudo systemctl restart nginx
0.0.0.0 to localhost to prevent public access to Gunicorn:
- gunicorn -b localhost:5000 main:app --reload
80 through the server's firewall if you've enabled it:
- sudo ufw allow 80
https to serve your web application, make sure to allow port 443 using ufw.Finally, test out the app by visiting
http://your_server_ip/test and you'll see the same output you saw before.Notice you no longer need the port number in the URL because your requests are going through Nginx now, which runs on port
80, the default HTTP port. You'll see the following output in your browser: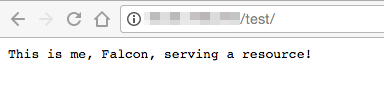
Stop the app server by pressing
CTRL+C. Let's configure our Falcon application to start automatically in the background like our other services.Managing Gunicorn with Systemd
We should make sure that our application starts automatically every time our server boots, just like Nginx. If our server was accidentally restarted or had to be rebooted for any reason, we shouldn't have to start Gunicorn manually.
To configure this, we'll create a Systemd unit file for our Gunicorn application so we can manage it.
To start, we create a file for our application inside the
/etc/systemd/system directory with a .service extension:
- sudo nano /etc/systemd/system/falcon_app.service
[Unit] section is used to specify the metadata and dependencies of our service, including a description of our service and when to start our service.Add this configuration to the file:
/etc/systemd/system/falcon_app.service
[Unit]
Description=Gunicorn instance to serve the falcon application
After=network.target
We specify that the service should start after the networking target has been reached. In other words, we only start this service after the networking services are ready.
After the
[Unit] section, we define the [Service] section where we specify how to start the service. Add this to the configuration file:/etc/systemd/system/falcon_app.service
[Service]
User=sammy
Group=www-data
PIDFile=/tmp/gunicorn.pid
Environment="PATH=/home/sammy/falcon_app/venv/bin"
WorkingDirectory=/home/sammy/falcon_app
ExecStart=/home/sammy/falcon_app/venv/bin/gunicorn --workers 3 -b localhost:5000 main:app
ExecReload=/bin/kill -s HUP $MAINPID
ExecStop=/bin/kill -s TERM $MAINPID
We first define the user and group that the service runs under. Then we define a file to store the PID (process ID) of the service; this PID is used to stop or reload the service.
Also, we specify the Python virtual environment, the application's working directory. and the command to execute to start the application. We assign the command to start Gunicorn to the
ExecStart variable. The --workers flag is used to define the number of workers that Gunicorn should start with. The Gunicorn docs suggest you set the number of workers to 2n+1 where n is the number of CPU cores. Assuming that your server has a single CPU core, we arrive at the number 3.The
ExecReload and ExecStop variables define how the service should be started and stopped. Finally, we add the
[Install] section, which looks like this:/etc/systemd/system/falcon_app.service
[Install]
WantedBy=multi-user.target
The
Install section allows you to enable and disable the service. The WantedBy directive creates a directory called multi-user.target inside /etc/systemd/system and a symbolic link of this file will be created there. Disabling this service will remove this file from the directory.Save the file, close the editor, and start the new service:
- sudo systemctl start falcon_app
- sudo systemctl enable falcon_app
http://your_server_ip/test to see your application. Both Nginx and Gunicorn are running in the background. If you need to update your Falcon application, restart the falcon_app service:
- sudo systemctl restart falcon_app
Conclusion
In this guide, we configured and deployed your first Falcon web application. We set up the Python environment and wrote your application code on the server, then served the web application with Gunicorn. Then we configured Nginx so that it passes web requests to our Gunicorn application. Finally, we wrote a Systemd Unit file and enabled the service so that web application starts when the server starts.