If you want to test Azure Stack, you can install Microsoft's hybrid cloud solution in a nested Windows Server 2016 Virtual Machine. In this article, we will walk you through the installation of Azure Stack TP2.
Contents
I also needed to create 4 VHDX fixed disks each with 250 GB of capacity and attach them to my VM. You can use the simple script below to create and attach in one step:
$DiskCount = 1..4
foreach ($a in $DiskCount)
{
New-VHD -Path H:\MAS\MAS_DISKS\VHD0$a.vhdx -Fixed -SizeBytes 250GB
Add-VMHardDiskDrive -VMName "MASTP2_NESTEDHOST" -Path "H:\MAS\MAS_DISKS\VHD0$a.vhdx"
}
Since the MAS VM host should run Hyper-V, we need to enable nested virtualization at the physical host level. The script below helps you to download the Enable-NestedVm.ps1 script from the GitHub repository, and it sets all the required configurations for the individual VMs to enable nested virtualization.
$VMName = "MASTP2_NESTEDHOST"
Stop-VM $VMName
Invoke-WebRequest https://raw.githubusercontent.com/Microsoft/Virtualization-Documentation/master/hyperv-tools/Nested/Enable-NestedVm.ps1 -OutFile ~/Enable-NestedVm.ps1
~/Enable-NestedVm.ps1 -VmName $VMName
Start-VM $VMName
Now my Virtual Machine is ready from a hardware configuration perspective.
In the deployment guide, there is a step to prepare your physical server to boot from VHDX using unattended files with following script:
.\PrepareBootFromVHD.ps1 -CloudBuilderDiskPath C:\CloudBuilder.vhdx -ApplyUnattend
But in our case, that’s not possible because the script will throw an error that the MAS host is already a VM. So, what you should do is manually specify CloudBuilder.vhdx as the boot disk for our MAS VM and boot it.
Since we don’t have unattended files, you need to do a couple of manual steps like selecting a language, providing a license key, etc.
To prevent annoying notifications, I would suggest using the AVMA keys from this TechNet page.
This test was run using the BareMetal.Tests.ps1 file in the C:\CloudDeployment\Roles\PhysicalMachines\Tests folder. Navigate to line 376 and change $false to $true.
foreach ($physicalMachine in $physicalMachines)
{
It ($BareMetalLocalizedStrings.TestNotVirtualMachine -f @($physicalMachine.ComputerName))
{
$physicalMachine.IsVirtualMachine | Should Be $true
}
}
That will ensure that your installation will only work on Virtual Machines.
C:\CloudDeployment\Configuration\Roles\Infrastructure\BareMetal\OneNodeRole.xml
C:\CloudDeployment\Configuration\Roles\Fabric\VirtualMachines\OneNodeRole.xml
That’s a good way to detect any possible errors or warnings before starting the actual deployment.
On our new Virtual Machine, we booted from CloudBuilder.vhdx. If you open PowerShell as Administrator and navigate to C:\CloudDeployment\Configuration, you will find .\InstallAzureStackPOC.ps1.
You can simply run this script and start the installation by providing an AdminPassword (will be the admin password for all created MAS management VMs) and Azure AD credentials. But there is one important decision to make before starting.
Do you have a DHCP server in your environment?
If you don’t have a DHCP server and cannot assign an IP address, GW, and DNS to the MAS-BGPNAT01 VM during the installation (around step 60.90), you will end up with external name resolution errors. So you need to provide the following parameters to the installation script:
In my case, I don’t have a running DHCP server; therefore, I need to provide additional parameters to my installation script:
.\InstallAzureStackPOC.ps1 -NatIPv4Subnet 192.168.72.0/24 -NatIPv4Address 192.168.72.223 -NatIPv4DefaultGateway 192.168.72.1 -EnvironmentDNS 192.168.72.145
You can also use the script below to store the AdminPassword and AAD credentials in variables and then provide them to the installation script:
$adminpass = ConvertTo-SecureString "" -AsPlainText -Force
$aadpass = ConvertTo-SecureString "" -AsPlainText -Force
$aadcred = New-Object System.Management.Automation.PSCredential ("", $aadpass)
.\InstallAzureStackPOC.ps1 -AdminPassword $adminpass -AADAdminCredential $aadcred -NatIPv4Subnet 192.168.72.0/24 -NatIPv4Address 192.168.72.199 -NatIPv4DefaultGateway 192.168.72.1 -EnvironmentDNS 192.168.72.145
Depending on your hardware, installation might take a couple of hours to finish.
During the installation, you may lose network connectivity from time to time, as the script will create 3 vNICs for the management host and also will join this host to the domain and restart it.
The TP2 installation and troubleshooting experience is much better than for TP1. Let’s have a look at some important points while waiting for our installation to complete.
But starting the deployment from scratch on an existing host is not possible. The script will ask you to use rerun a parameter if you want to use same host again. However, as a shortcut, you can delete the Config.xml file in the CloudDeployment folder. This is the actual file that the installation script checks every time.
- Azure Stack hardware requirements
- Preparing a nested Hyper-V VM as MAS host
- Azure Active Directory requirements
- Deployment checker
- Start deployment
- Next step
Azure Stack hardware requirements
TP2 has similar minimum hardware requirements as those of TP1:- 4 disks, each with a minimum of 140 GB of capacity (SSD or HDD); all available disks will be used.
- 12 physical CPU cores
- 96 GB of RAM
- Hyper-V enabled (with SLAT support)
Preparing a nested Hyper-V VM as MAS host
To start the installation, I created one giant VM and added 16 cores and 128 GB of RAM. An OS disk or operating system is not important at this point, as we will boot it from a .vhdx file that is provided with the MAS installation.I also needed to create 4 VHDX fixed disks each with 250 GB of capacity and attach them to my VM. You can use the simple script below to create and attach in one step:
$DiskCount = 1..4
foreach ($a in $DiskCount)
{
New-VHD -Path H:\MAS\MAS_DISKS\VHD0$a.vhdx -Fixed -SizeBytes 250GB
Add-VMHardDiskDrive -VMName "MASTP2_NESTEDHOST" -Path "H:\MAS\MAS_DISKS\VHD0$a.vhdx"
}
Since the MAS VM host should run Hyper-V, we need to enable nested virtualization at the physical host level. The script below helps you to download the Enable-NestedVm.ps1 script from the GitHub repository, and it sets all the required configurations for the individual VMs to enable nested virtualization.
$VMName = "MASTP2_NESTEDHOST"
Stop-VM $VMName
Invoke-WebRequest https://raw.githubusercontent.com/Microsoft/Virtualization-Documentation/master/hyperv-tools/Nested/Enable-NestedVm.ps1 -OutFile ~/Enable-NestedVm.ps1
~/Enable-NestedVm.ps1 -VmName $VMName
Start-VM $VMName
Now my Virtual Machine is ready from a hardware configuration perspective.
In the deployment guide, there is a step to prepare your physical server to boot from VHDX using unattended files with following script:
.\PrepareBootFromVHD.ps1 -CloudBuilderDiskPath C:\CloudBuilder.vhdx -ApplyUnattend
 |
| Unattended file for PrepareBootFromVHD.ps1 |
But in our case, that’s not possible because the script will throw an error that the MAS host is already a VM. So, what you should do is manually specify CloudBuilder.vhdx as the boot disk for our MAS VM and boot it.
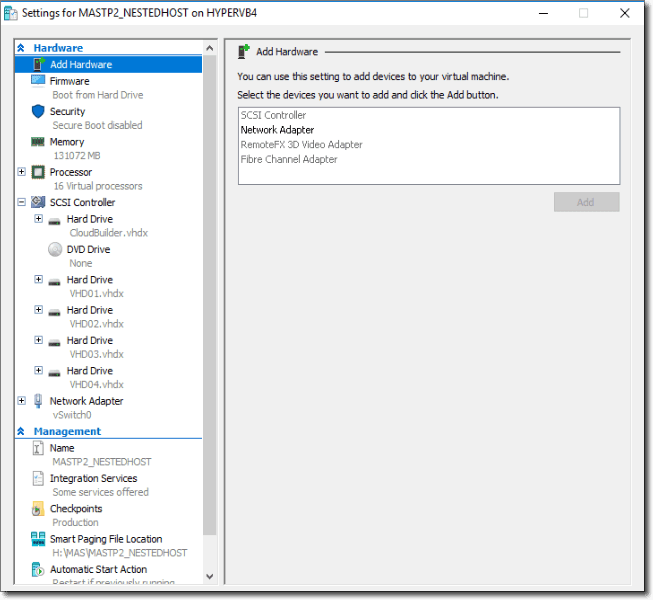 |
MAS host VM settings |
 |
Customizations after the first boot |
Now we have a new VM booted from the CloudBuilder.vhdx disk. It’s time to specify an IP address, gateway, and DNS server. These settings are mandatory to have internet access from the installation host.
The next step is to make some small changes in the configuration and script files to make installation possible on a Virtual Machine. The first mandatory change is for the BareMetal server control. By default, before starting an actual deployment, the installation process will check to see whether or not you are running a script on a physical blade. Unfortunately, I couldn’t find a simple configuration file to skip this test. So, you need to get your hands a bit dirty and find a test script to change that logic.
This test was run using the BareMetal.Tests.ps1 file in the C:\CloudDeployment\Roles\PhysicalMachines\Tests folder. Navigate to line 376 and change $false to $true.
 |
Enable installation on VM |
{
It ($BareMetalLocalizedStrings.TestNotVirtualMachine -f @($physicalMachine.ComputerName))
{
$physicalMachine.IsVirtualMachine | Should Be $true
}
}
That will ensure that your installation will only work on Virtual Machines.
As we discussed earlier, there are some hardware requirements for memory, CPU, and disk sizes. If you also want to change these settings, you can play with the XML configuration files below for physical host and VM requirements:
C:\CloudDeployment\Configuration\Roles\Infrastructure\BareMetal\OneNodeRole.xml
C:\CloudDeployment\Configuration\Roles\Fabric\VirtualMachines\OneNodeRole.xml
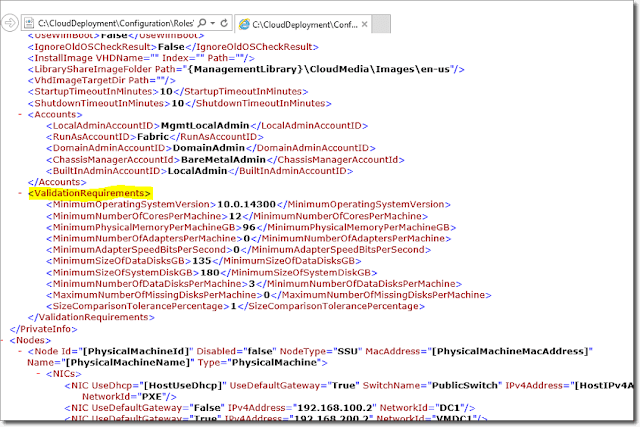 |
Configuration file for requirements |
Azure Active Directory requirements
In this release, MAS requires an internet connection during the installation because an Azure Active Directory Global Admin account will be used to delegate applications and service principals for Azure Stack services.
So you have to have an Azure Active Directory created and at least one user set as Global Admin. In my case, I’m going to use the .onmicrosoft.com directory and the “anilerduran” user name. You need to provide credentials for this account in the first phase of the deployment.
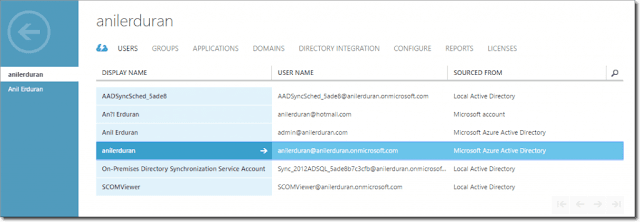 |
Azure Active Directory account |
Deployment checker
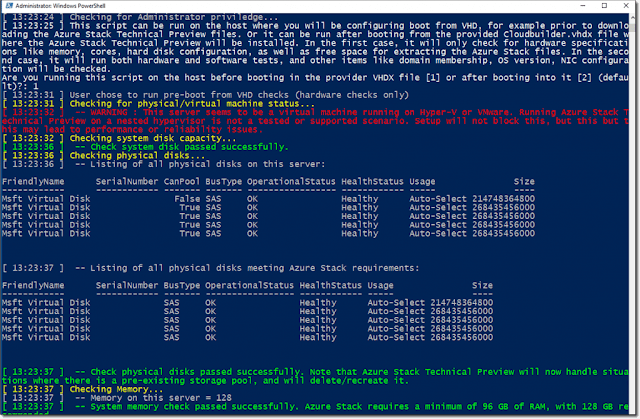
This time, Microsoft provided a deployment checker script to check whether or not the MAS host meets deployment requirements.That’s a good way to detect any possible errors or warnings before starting the actual deployment.
 |
Deployment checker script |
Start deployment
Once you have all the requirements in place and have made all configuration changes to meet the requirements, you are ready to go.On our new Virtual Machine, we booted from CloudBuilder.vhdx. If you open PowerShell as Administrator and navigate to C:\CloudDeployment\Configuration, you will find .\InstallAzureStackPOC.ps1.
You can simply run this script and start the installation by providing an AdminPassword (will be the admin password for all created MAS management VMs) and Azure AD credentials. But there is one important decision to make before starting.
Do you have a DHCP server in your environment?
If you don’t have a DHCP server and cannot assign an IP address, GW, and DNS to the MAS-BGPNAT01 VM during the installation (around step 60.90), you will end up with external name resolution errors. So you need to provide the following parameters to the installation script:
- NatIPv4Subnet
- NatIPv4Address
- NatIPv4DefaultGateway
- EnvironmentDNS
In my case, I don’t have a running DHCP server; therefore, I need to provide additional parameters to my installation script:
.\InstallAzureStackPOC.ps1 -NatIPv4Subnet 192.168.72.0/24 -NatIPv4Address 192.168.72.223 -NatIPv4DefaultGateway 192.168.72.1 -EnvironmentDNS 192.168.72.145
 |
Installation progress |
$adminpass = ConvertTo-SecureString "
$aadpass = ConvertTo-SecureString "
$aadcred = New-Object System.Management.Automation.PSCredential ("
.\InstallAzureStackPOC.ps1 -AdminPassword $adminpass -AADAdminCredential $aadcred -NatIPv4Subnet 192.168.72.0/24 -NatIPv4Address 192.168.72.199 -NatIPv4DefaultGateway 192.168.72.1 -EnvironmentDNS 192.168.72.145
Depending on your hardware, installation might take a couple of hours to finish.
During the installation, you may lose network connectivity from time to time, as the script will create 3 vNICs for the management host and also will join this host to the domain and restart it.
 |
vNICs for host machine |
- You can always check C:\CloudDeployment\Logs to see each and every action taken by the installation script, including individually executed scripts. You will also see summary.xml files when your installation finishes or fails.
- In TP2, installation is decomposed into individual steps (for instance, 60.90.81). That’s cool if you want to search online forums for your error and rerun your deployment starting from this step.
- You can rerun your deployment from a specific state. All you need to do is to import two modules and provide a step number:
- Import-Module C:\CloudDeployment\CloudDeployment.psd1 -Force
- Import-Module C:\CloudDeployment\ECEngine\EnterpriseCloudEngine.psd1 -Force
- Invoke-EceAction -RolePath Cloud -ActionType Deployment -Start 60.90.83 -Verbose
But starting the deployment from scratch on an existing host is not possible. The script will ask you to use rerun a parameter if you want to use same host again. However, as a shortcut, you can delete the Config.xml file in the CloudDeployment folder. This is the actual file that the installation script checks every time.
 |
Config.xml file location |
The first Virtual Machine created during the installation is MASDC-01. After the installation, your host machine will be joined to the domain and restarted. After the restart, you need to sign in as azurestack\AzureStackAdmin to view the deployment progress. If you sign-in using your local administrator credentials, you won’t see the PowerShell installation progress.
Here is a good page to see what happens at each step of the installation: https://azure.microsoft.com/en-us/documentation/articles/azure-stack-troubleshooting/
Next Step
Once the installation complete, you can open an RDP session to MAS-CON01 and click on the Azure Stack Portal icon to open the portal as a service administrator.