One of the common tasks that you may do on a regular basis is installing Windows Server 2012 and you want to automate it as much as possible. Using similar tools to those used with Windows Server 2008 R2, you can create an autounattend.xml file that you inject into the Windows Server 2012 installation ISO for a hands-free install.
The same set of instructions would also work for Windows 8 as well, but you will need to use the Windows 8 install.wim image, and also pay attention to whether you want to automate a 32-bit or 64-bit installation. The autounattend.xml can contain configuration data for both, so only one xml file is needed. If you want to download a pre-configured autounattend.xml file, you can find it hereon my Skydrive folder.
1. Download the Windows ADK (Assessment and Deployment Kit) from this link. Never mind that it says Windows 8, as it will work with Windows Server 2012 since they are the same code base.
2. Start the installation process and after a long download select the two options below (Deployment Tools and Windows Preinstallation Environment (Windows PE)). WinPE is technically optional, but in case you need it in the future, I’d install it anyway.
![]()
3. After the installation completes go to the Start Menu and select Windows Kits > Windows ADK > Windows System Image Manager.
4. Mount the ISO image of Windows Server 2012, go to the sources directory and copy install.wim to a local drive, such as D.
5. From the File menu click on Select Windows Image, find the install.wim you copied, then select the edition that you want to build an answer file for. I selected SERVERSTANDARD.
![]()
6. Next it will complain that a catalog cannot be found, so it will build one for you, taking a few minutes. After the catalog is built, from the file menu select New Answer File.
7. Scroll through the Components pane and select amd64_Microsoft-Windows-International-Core-WinPE-_6.2.9200.0_neutral, as shown below, right click, and add to Pass 1.
![]()
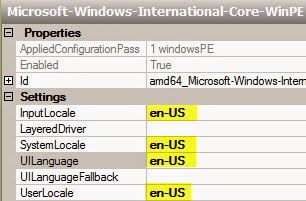
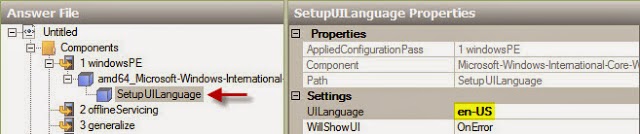
8. In the Answer File pane click on the component, and fill in the language settings as appropriate. In this case it is configured for US English. You can find a list of the codes here. You also need to configure the SetupUILanguage too.
![]()
![]()
9. Configuring the disk partitions is tedious, but required. To do that, find amd64_Microsoft-Windows-Setup_6.2.9200.0_neutral and add it to Pass 1 as well.
![]()
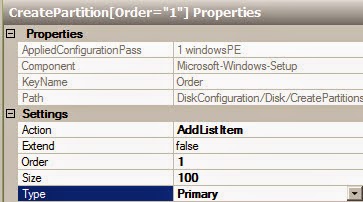
10. In the Answer File pane right click DiskConfiguration and select Insert New Disk. Right click on CreatePartitions and select Insert New CreatePartition. Configure the partition as shown below. This will create a 100MB primary boot partition. Note: The default in 2008 R2 was 100MB, but in 2012 this is now 350MB. I would suggest using 350MB instead of the 100MB in the screenshot.
![]()
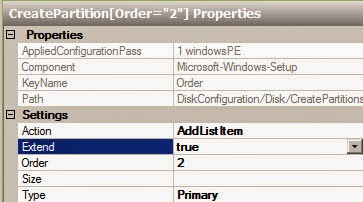
11. Create a second partition, but this time set Extend to true, and don’t configure a size. This will use the remainder of the disk size.
![]()
12. In the Answer File pane click on Disk and change the ID to 0 and WillWipeDisk to true.
![]()
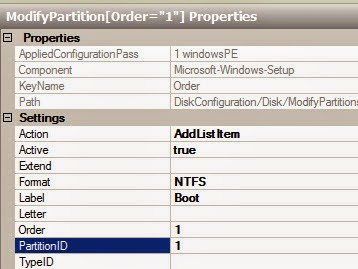
13. Right click on ModifyPartition and select Insert New ModifyPartition. Configure the partition as shown below.
![]()
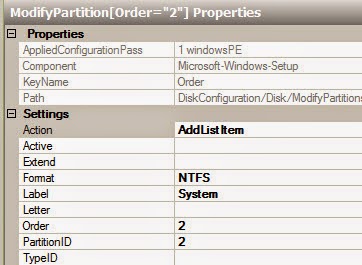
14. Add a second ModifyPartitions and configure as shown below:
![]()
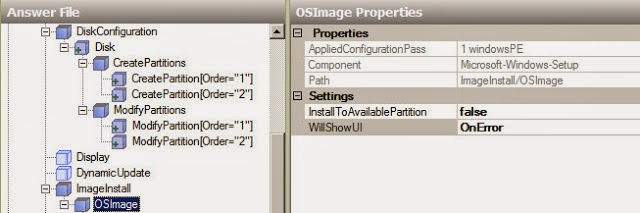
15. Drill down to the OSImage option and configure as shown below:
![]()
16. Right click InstallFrom and select Insert New Metadata. Configure the metadata as shown below. To determine the proper label just think back to when you opened the Windows image (step 5) and enter the image name exactly as it is listed.
![]()
17. Configure the InstallTo and use DiskID 0 and PartitionID 2.
![]()
18. Configure the UserData options as shown below.
![]()
19. Configure the UserDataProductKey option. The key you use will vary depending on how you are going to activate it (KMS or MAK). You should use the GVLK (generic volume license key) that Microsoft publishes here if you use a KMS server, or your MAK key.
![]()
20. Add the amd64_Microsoft-Windows-Shell-Setup_6.2.9200.0_neutral component to Pass 4 specialize.
![]()
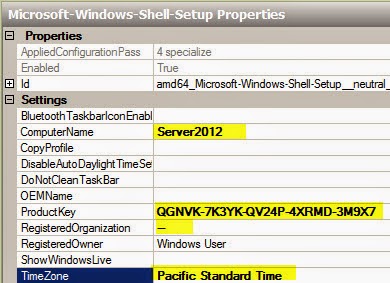
21. In the Answer File pane click on amd64_Microsoft-Windows-Shell-Setup_6.2.9200.0_neutral and configure the highlighted items below (use the same key as before). You can change the computer name, or leave it blank and it will create a random name upon installation. For a list of timezone values, click here.
![]()
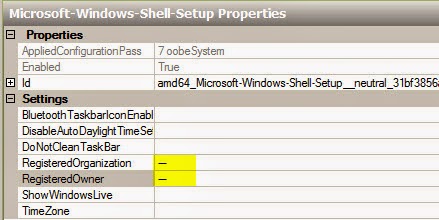
22. Add the amd64_Microsoft-Windows-Shell-Setup_6.2.9200.0_neutral component to Pass 7 oobesystem. In the Answer File pane click on amd64_Microsoft-Windows-Shell-Setup_6.2.9200.0_neutral and configure the highlighted items below.
![]()
23. Normally I configure autologon for a count of 2, so my image build process goes quicker and in case I forget the administrator password I configured in the answer file I can reset it during the first two reboots. You will also need to configure the password. Enter a password, and when the answer file is written it will be encrypted.
![]()
The same set of instructions would also work for Windows 8 as well, but you will need to use the Windows 8 install.wim image, and also pay attention to whether you want to automate a 32-bit or 64-bit installation. The autounattend.xml can contain configuration data for both, so only one xml file is needed. If you want to download a pre-configured autounattend.xml file, you can find it hereon my Skydrive folder.
1. Download the Windows ADK (Assessment and Deployment Kit) from this link. Never mind that it says Windows 8, as it will work with Windows Server 2012 since they are the same code base.
2. Start the installation process and after a long download select the two options below (Deployment Tools and Windows Preinstallation Environment (Windows PE)). WinPE is technically optional, but in case you need it in the future, I’d install it anyway.

3. After the installation completes go to the Start Menu and select Windows Kits > Windows ADK > Windows System Image Manager.
4. Mount the ISO image of Windows Server 2012, go to the sources directory and copy install.wim to a local drive, such as D.
5. From the File menu click on Select Windows Image, find the install.wim you copied, then select the edition that you want to build an answer file for. I selected SERVERSTANDARD.

6. Next it will complain that a catalog cannot be found, so it will build one for you, taking a few minutes. After the catalog is built, from the file menu select New Answer File.
7. Scroll through the Components pane and select amd64_Microsoft-Windows-International-Core-WinPE-_6.2.9200.0_neutral, as shown below, right click, and add to Pass 1.

8. In the Answer File pane click on the component, and fill in the language settings as appropriate. In this case it is configured for US English. You can find a list of the codes here. You also need to configure the SetupUILanguage too.
9. Configuring the disk partitions is tedious, but required. To do that, find amd64_Microsoft-Windows-Setup_6.2.9200.0_neutral and add it to Pass 1 as well.

10. In the Answer File pane right click DiskConfiguration and select Insert New Disk. Right click on CreatePartitions and select Insert New CreatePartition. Configure the partition as shown below. This will create a 100MB primary boot partition. Note: The default in 2008 R2 was 100MB, but in 2012 this is now 350MB. I would suggest using 350MB instead of the 100MB in the screenshot.
11. Create a second partition, but this time set Extend to true, and don’t configure a size. This will use the remainder of the disk size.
12. In the Answer File pane click on Disk and change the ID to 0 and WillWipeDisk to true.

13. Right click on ModifyPartition and select Insert New ModifyPartition. Configure the partition as shown below.
14. Add a second ModifyPartitions and configure as shown below:
15. Drill down to the OSImage option and configure as shown below:
16. Right click InstallFrom and select Insert New Metadata. Configure the metadata as shown below. To determine the proper label just think back to when you opened the Windows image (step 5) and enter the image name exactly as it is listed.

17. Configure the InstallTo and use DiskID 0 and PartitionID 2.

18. Configure the UserData options as shown below.

19. Configure the UserDataProductKey option. The key you use will vary depending on how you are going to activate it (KMS or MAK). You should use the GVLK (generic volume license key) that Microsoft publishes here if you use a KMS server, or your MAK key.

20. Add the amd64_Microsoft-Windows-Shell-Setup_6.2.9200.0_neutral component to Pass 4 specialize.

21. In the Answer File pane click on amd64_Microsoft-Windows-Shell-Setup_6.2.9200.0_neutral and configure the highlighted items below (use the same key as before). You can change the computer name, or leave it blank and it will create a random name upon installation. For a list of timezone values, click here.
22. Add the amd64_Microsoft-Windows-Shell-Setup_6.2.9200.0_neutral component to Pass 7 oobesystem. In the Answer File pane click on amd64_Microsoft-Windows-Shell-Setup_6.2.9200.0_neutral and configure the highlighted items below.
23. Normally I configure autologon for a count of 2, so my image build process goes quicker and in case I forget the administrator password I configured in the answer file I can reset it during the first two reboots. You will also need to configure the password. Enter a password, and when the answer file is written it will be encrypted.

24. Under UserAccounts, configure the AdministratorPassword with the same password you entered for the AutoLogon information.
25. Save the file as autounattend.xml and verify that no errors are shown in the validation pane. You will see a lot of warnings, but that is normal.
26. Open the Windows Server 2012 ISO image in an ISO editor, like UltraISO. Add the autounattend.xml file to the ROOT of the ISO image. Save the ISO, and then configure a VM or physical server to boot from it and verify that there are no prompts or errors during the installation process. Note that the disk configuration and data will be wiped during the installation process.