OpenDNS Umbrella is another layer of security beyond firewalls and antivirus software. Your organization can utilize it to protect networks from malware, breaches, botnets, phishing, and cryptoware at the DNS layer. In this article, we'll demonstrate how to set up and configure OpenDNS virtual appliances and make sure that DNS information is collected accurately for reporting.
By simply pointing your DNS forwarding to OpenDNS servers out of the box, there’s not much to install or configure other than your blocking policies and user accounts in order to be protected. However, while the product does go to work immediately, reporting will be lacking until you set up an internal network IP address resolution alongside Active Directory.
You’re probably already familiar with OpenDNS; the service has long been trusted with consumer-grade firewalls and Wi-Fi Access Points. OpenDNS is now owned by Cisco, and the service is relatively inexpensive at approximately $115 for a three-year, 250-license package on CDW. OpenDNS Umbrella extends that protection to your enterprise by categorizing your DNS traffic in the OpenDNS data centers, rather than relying on your own firewall’s DNS capabilities. This is especially useful if you are running pfSense firewalls, as the packaged domain blocking and reporting is minimal in several areas.
In addition to Umbrella, OpenDNS can protect your roaming devices by installing a remote client. For now, we’ll look at the default reporting and why it’s necessary to set up virtual appliances.
After pointing your internal DNS servers to OpenDNS, the service immediately begins to collect and categorize data. Running a report will produce something similar to the following screenshot, wherein only your external IP address is resolved for all traffic going in and out of your network.
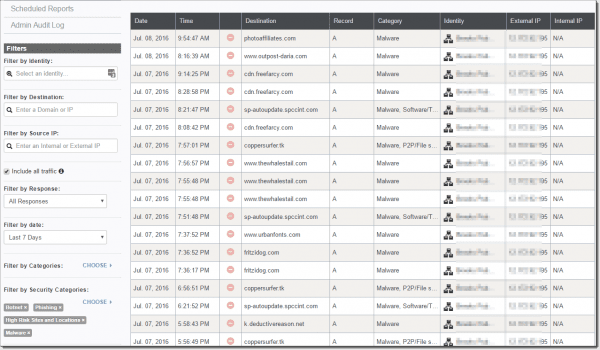
Malware activity report
Here, we can see that there are several records indicating that malware and high-risk software is running on our network. However, an obfuscated IP are only our single external IP address, and we want to know which clients on our network could be compromised.
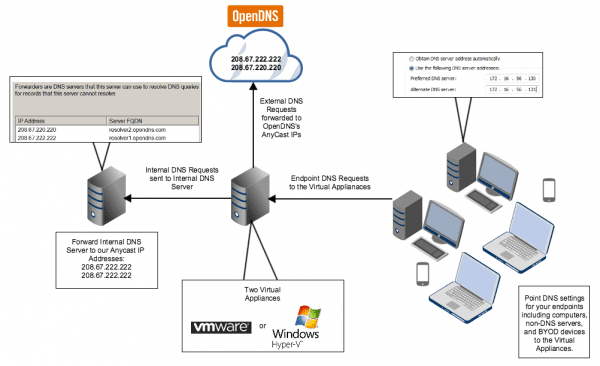
To get this information, we want two OpenDNS virtual appliances on our network to intercept the DNS requests so that the client information can be recorded and sent to OpenDNS. Below is a diagram from an OpenDNS setup guide located here that gives us a high-level overview of the virtual appliance purpose. I find the diagram is easiest to understand by looking at the endpoints first.
Virtual appliance diagram
Minimum requirements and initial setup
Here are the minimum requirements for our virtual appliances:- Generation 1 VM
- 4 CPU cores and 1.5GB RAM
- 7GB of Disk Space
- 2 virtual appliances per site for high availability
- The following open outbound ports: 53 TCP & UDP, 443 TCP & UDP, 80 TCP, 2222 TCP, 123 UDP, and 53 UDP
“DNSCrypt is a protocol that authenticates communications between a DNS client and a DNS resolver. It prevents DNS spoofing. It uses cryptographic signatures to verify that responses originate from the chosen DNS resolver and haven’t been tampered with.”
Next, after logging into OpenDNS, we download the virtual appliance VMs; VHDs and configuration files from Configuration -> System Settings -> Sites & Active Directory -> Download Components.
Here, we’ve download the zipped VAs, a Windows Domain Controller configuration file, and a Windows Service connector.
With our data downloaded and unzipped, we have the following files ready for installation:

OpenDNS virtual appliance VHDs
Because OpenDNS requires two virtual appliances on our network, we make two copies of the VHD files and name them appropriately in the default Virtual Hard Disks folder on our Hyper-V 2012 host.

Renamed VHD files
Next, we create our first VM and choose to use an existing VHD named “forwarder-VA-1” for the first hard drive. Keep in mind the minimum requirements of 4 cores and 1.5GB RAM. In the settings of the VM, we add the “dynamic-VA-1.vhd” as our second hard drive under the same IDE controller as the “forwarder-VA-1” HDD.

IDE controller second VHD
We apply the settings to the VM, connect to the VM by opening the console, start the VM, and are brought to the Forwarder Configuration.
Configuration of virtual appliance forwarder

Forwarder configuration
After a moment, we see all of the connectivity settings turn green with the exception of the AD Connector, which we have not yet setup.

Dynamic forwarder setup
On the OpenDNS configuration site, we should now find our Dynamic Forwarder listed, which it is.
OpenDNS system settings
With our initial Dynamic Forwarder complete, we can begin to set up our 2nd Dynamic Forwarder, ideally on a separate Hyper-V host.
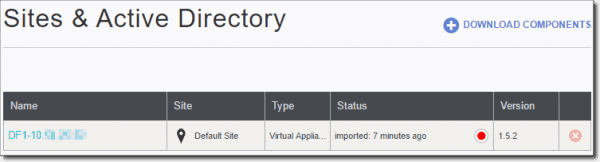
After setting up our 2nd virtual appliance, we’ll find that our status has been changed from red to green because we now have redundant VAs.

Verified redundant VAs
Configure OpenDNS Umbrella sites and domains
Next, in the OpenDNS website, we make sure that our VAs have been added to the correct site. In the System Settings -> Internal Domains, we check that all of our internal domains are listed correctly.We can now test by pointing a single client’s DNS server settings to our virtual appliances and seeing that the IP addresses are resolved. We can see below that they are now revealed. It’s also recommended we create A-Records for our new DNS Virtual appliances so that we can run “nslookup” by both name and IP address.
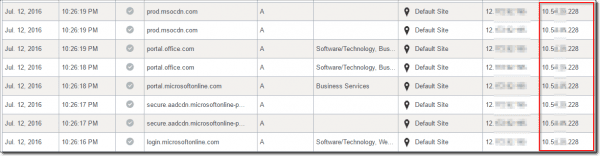
Activity report with resolution
From here, it’s possible to go on toward setting up Active Directory Services, either on a dedicated server or an existing Domain Controller. This will give us further information, down to the computer name, which helps us easily find rogue machines on our network.
Conclusion
OpenDNS has an excellent solution for locking down DNS, which we know is a scary point of vulnerability—especially for malwares that “phone home.” Although we can and often do point our DNS to 8.8.8.8, OpenDNS Umbrella gives us added protection and insight into internet traffic.