
In this article, I’ll take you through the steps required to install vCenter Server Appliance (vCSA). I’ll be referring to the latest version of vCSA which at the time of writing stands at 6.0 U1 (Build: 3018524).
What is vSCA?
There’s an alternative to deploying vCenter Server for Windows and this comes in the form of vCenter Server Appliance (vCSA), an optimized and preconfigured SUSE Linux Enterprise Server based appliance, running vCenter Server and its associated components. This deployment model reflects VMware’s recent best practice when virtualizing vCenter Server.
That said, there are schools of thought out there still advocating for deploying vCenter Server to a physical box. Admittedly, I too used to have some reservations about virtualizing vCenter on the lines of “why risk virtualizing the one thing managing my virtualized environment?”. Thankfully, I have yet to come across a single instance where I regretted virtualizing vCenter save perhaps for the day it all went south due to a networked storage outage.
I had to log in on no less than 20 ESXi hosts to find the vm running vCenter as it had failed to power up. Needless to say, dedicated management clusters soon followed. This latter kind of architecture mitigates most of the issues associated with virtualizing vCenter, or any other critical component. More so when you decouple the management cluster from your primary networked storage, say by setting up VSAN using local disks on your management ESXi hosts. This way, if your SAN/NAS decides to have an unannounced lie down – and it does happen (ex. blown power supply on your single non-redundant NetApp filer) – your vCenter Server will still be up and running making life easier during any restore operations.
Why should I go for it?
HA, load-balancing (DRS) and backups via snapshots are some of the advantages that spring to mind when going down the virtualized vCenter route. vCSA further adds to these benefits in a number of ways. Deployment is easier and speedier as the appliance is readily configured with vCenter Server, database and all. This means that you’re spared from installing and setting up dedicated Windows boxes; true, you can deploy from a template but you still have to patch and configure, join it to a domain, all extra steps regardless! On the licensing front, you have two less Microsoft licenses (Windows + SQL) to worry about.
Are there any limitations with vCSA?
Starting with vSphere 6, VMware have finally brought vCSA up to par with vCenter Server for Windows, in terms of functionality. Previous releases suffered from some serious limitations making the adoption of vCSA a hard sell. There still remain a few gotchas you must be aware of. One major hiccup is the inability to run VUM (Update Manager) on the same server running vSCA, so if you cannot live without it, you’ll still be needing a Windows box. On the database front, your options are also limited to either the embedded PostgreSQL database which supports up to 1000 hosts and 10000 virtual machines or an external Oracle DBMS. If you’re a Microsoft shop, you need to assess whether you’d be better off running vCenter Server for Windows more so if covered by a Microsoft volume licensing agreement.
If you’re not too much of a Linux aficionado, you’ll probably find that managing and troubleshooting vSCA turns out to be a tad more difficult than the Windows version. This is something else to factor for before jumping on the vCSA bandwagon.
How to install vCSA.
Enough with the chit-chat. Let’s dig in and start installing it. We first need to take care of the pre-requisites which, citing VMWare’s documentation, include;- DNS – Ensure that resolution is working for all system names via fully qualified domain name FQDN), short name (host name), and IP address (reverse lookup).
- Time – Ensure that time is synchronized across the environment.
- Passwords – vCenter Single Sign-On passwords must contain only ASCII characters; non-ASCII and extended (or high) ASCII characters are not supported.
- You also need to have a port group with port binding set to ephemeral as shown in Figure 1. It’s best to create a dedicated port group, set it to ephemeral and then move the appliance to any other port group once it’s finished installing.
 Figure 1 – Ephemeral port binding requirement
The full requirements may be viewed here.
Prior to vSphere 6.0, vCSA came packaged as an OVA which you deployed using the “Deploy OVF Template” from the vSphere client. This is no longer the case and vCSA now comes packaged as an ISO. You’ll need to carry out the steps below to kick of the installation process;
- Mount ISO
- Run /vcsa/VMware-ClientIntegrationPlugin-6.0.0.exe to install the client integration plugin
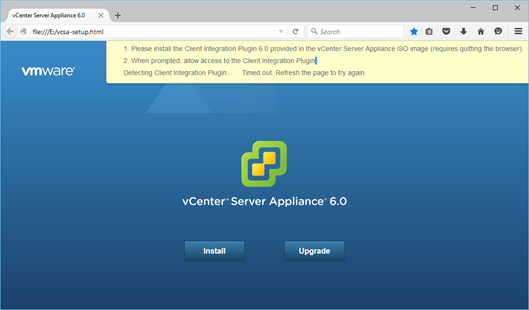
- Run the vcsa-setup.html file and click Install to begin installing vCSA (Figure 2)
Important: When using FireFox, I ran into an issue where the installer fails to connect to the ESXi host on which vCSA is being installed. The steps outlined have all been carried out using the Chrome browser.
Running the installer
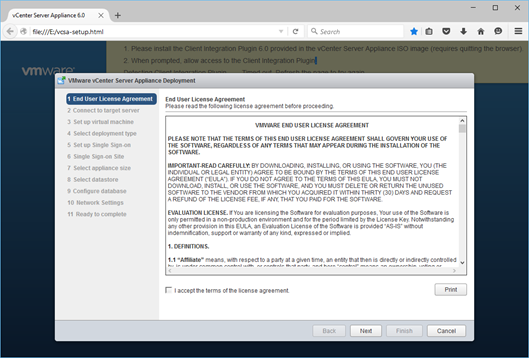
Once you’re done installing the client integration plugin and clicked Install, you are presented with a series of screens all of which are self-explanatory. Here they are listed in sequential order;- Accept the EULA by ticking on the check-box at the bottom and click Next.
- Specify the FQDN or IP address for an ESXi host or vCenter Server to which vCSA will be deployed. You also need to specify an administrative account and password. Notice the ephemeral port group requirement (boxed in red) previously mentioned. Click Next.

- Click Yes to accept the certificate thumbprint warning.

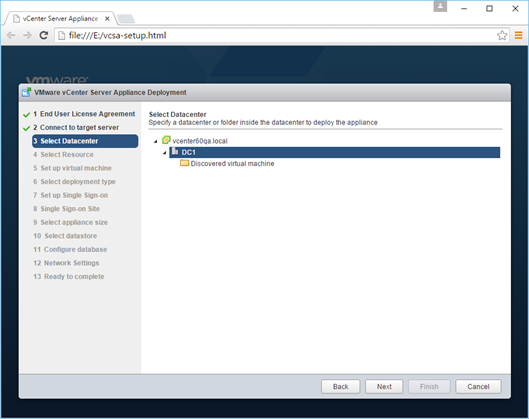
- Specify the DataCenter to which vCSA will be deployed. Click Next.
- Specify the Resource Pool to which vCSA will be deployed. Click Next.

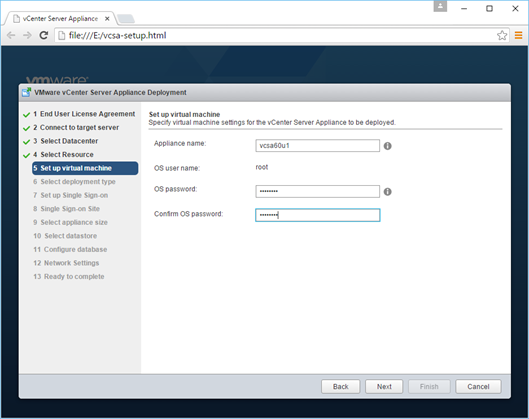
- Next, type in the chosen name for your vCSA and a password for the root account. Click Next.
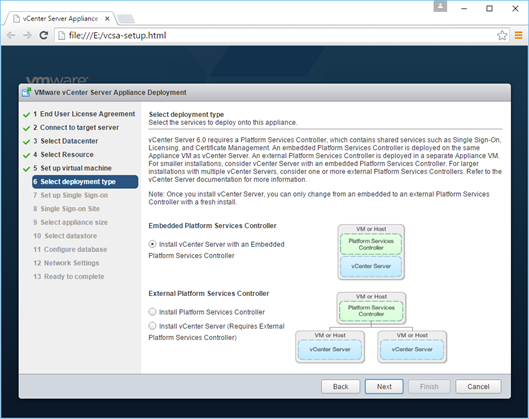
- Select the deployment model. I’ve written about vSphere’s Platform Services Controller model in another article on vCenter Server for Windows. For this example, I’ve selected an embedded PSC. Click Next.
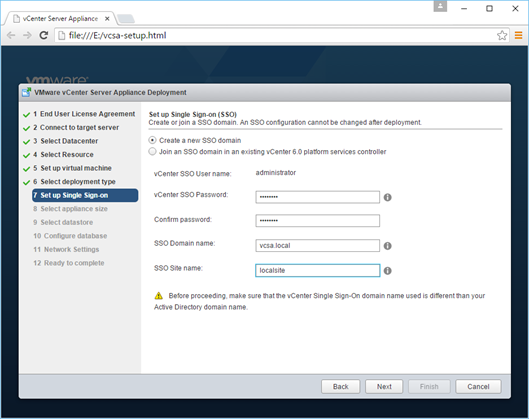
- Here you specify the details for the SSO domain. We’re creating a new SSO domain so we need to specify an SSO domain name, its site name and a password for the administrator account. If you’re using an existing PSC, you simply type in the pre-existing details. Click Next.
- Next, you specify the size of the environment vCSA will be managing. The greater the environment, the greater the resources required by vSCA. Click Next.

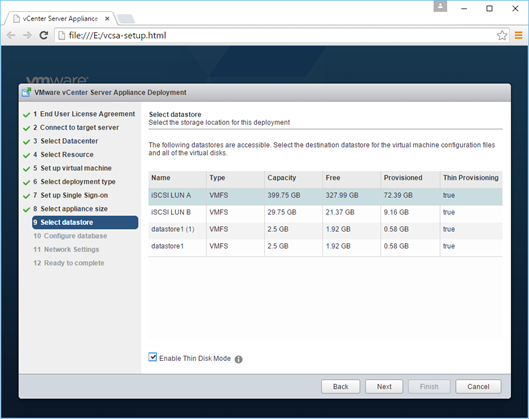
- Select the datastore where the vCSA’s configuration files and virtual disks will be stored. Check the “Enable Thin Disk Mode” at the bottom to save on disk space. Click Next.
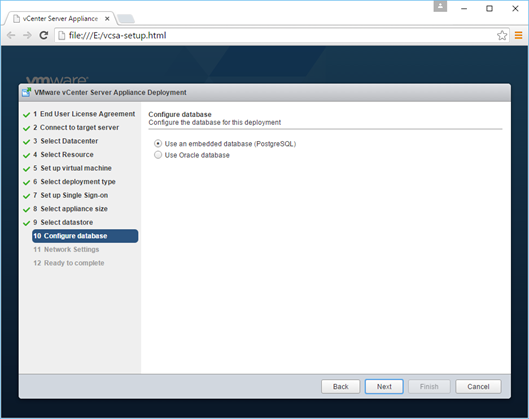
- Next, we select the database option for the deployment. I’m using the embedded PostgreSQL option. Click Next.
- Next, specify a portgroup and whether you’d like to use IPv4 or v6. The usual network settings including FQDN, IP address, DNS server, mask and gateway are mandatory if you choose “Static” under “Network Type”. I advise staying away from DHCP unless you’re using reservations. Lastly, tick “Enable SSH” if you want the protocol enabled and set the vSCA to sync time with the ESXi host or an NTP server. Click Next.

- Click Finish to finalize the settings and commence the installation.

- Figures 3 to 8, depict the installation process viewed from the vSphere Client, the browser from which the installation was triggered as well as the vCSA’s vm console window.


