Are you looking to back up your Microsoft Hyper-V virtual machines reliably, easily and affordably? Altaro VM Backup (formerly known as Altaro Hyper-V Backup) is the logical choice for Hyper-V backups. It saves you the hassle of cumbersome installs and configurations, helps you avoid unreliable virtual machine (VM) backups using basic tools and doesn’t break the bank.
Altaro VM Backup offers full support for Microsoft Hyper-V (as well as VMware) and was designed to take away the complexities of backing up Hyper-V. With an intuitive user interface, you can accomplish advanced tasks, making it easy to configure and run backup/restore jobs quickly and reliably.
Altaro VM Backup
This is the main installation which can either be installed on the Hyper-V host itself, or on a separate machine on the same LAN as your Hyper-V Hosts. If backing up VMware hosts, simply install on a separate machine on the same LAN as your VMware Hosts.It contains the code that manages the actual backup tasks. If the server where this application is installed is not running - no backup tasks will be executed.
The Altaro VM Backup install includes also the Altaro Remote Management Console as part of the installation. Once you install Altaro VM Backup on the Hyper-V host/server just run the management console from the start programs group.
If you want to manage Altaro VM Backup from a different machine then you must install the Altaro Management Tools (below).
If you want to make use of the off-site backup feature in Altaro VM Backup then you must install the Altaro Offsite Server (below) on a remote machine.
Altaro Hyper-V Host Agent
This is the agent that must run on every Hyper-V Host that contains VMs that you wish to backup. If you have installed the main Altaro VM Backup on your Hyper-V Host, then this agent will automatically be installed too. If not, then you can deploy the Altaro Hyper-V Host Agent to each of your Hyper-V Hosts from the main Altaro VM Backup application. If you wish to manually install the agent directly on the Hyper-V host, then the installation file for the Altaro Hyper-V Host Agent can be downloaded here.Altaro Remote Management Tools
This will install a remote management console which can connect to one or many remote installations of Altaro VM Backup. This is only required to be installed if you want to manage Altaro VM Backup from a different machine such as your desktop PC.The installation file for the Altaro Management Tools can be downloaded here.
Download the file and install it on the PC where you want to manage backups from.
Altaro Offsite Server
This is only required if you want to enable off-site backups. You will need to identify a machine that will host the off-site backups and install the Altaro Offsite Server on that machine. This server may be connected to the Altaro VM Backup machine via both a LAN or a WAN connection.Important! TCP Ports 35101 - 35111 are used for communication between the Altaro VM Backup software and the Altaro Offsite Server and must be allowed through.
The installation file for the Altaro Offsite Server can be downloaded here.
Download the installer file and install it on the machine that you will use for off-site backups
System requirements
Supported Hypervisors (Hosts)
Altaro VM Backup can backup VMs from the following Hypervisors (Hosts):
Microsoft Hyper-V
- Windows 2008 R2
- Windows Hyper-V Server 2008 R2 (core installation)
- Windows Server 2012
- Windows Hyper-V Server 2012 (core installation)
- Windows Server 2012 R2
- Windows Hyper-V Server 2012 R2 (core installation)
VMware
- vSphere: 5.0 / 5.1 / 5.5 / 6.0
- vCenter: 5.0 / 5.1 / 5.5 / 6.0
- ESXi: 5.0 / 5.1 / 5.5 / 6.0
Supported Operating Systems:
The Altaro VM Backup products can be installed on the following OSs:
Altaro VM Backup:
- Windows 2008 R2
- Windows Hyper-V Server 2008 R2 (core installation)
- Windows Server 2012
- Windows Hyper-V Server 2012 (core installation)
- Windows Server 2012 R2
- Windows Hyper-V Server 2012 R2 (core installation)
- Windows 7 / 8 /10 (64-Bit)
Altaro Management Tools (UI):
- Windows 2008 R2
- Windows Server 2012
- Windows Server 2012 R2
- Windows 7 / 8 /10 (64-Bit)
Altaro Offsite Server:
- Windows 2008 R2
- Windows Hyper-V Server 2008 R2 (core installation)
- Windows Server 2012
- Windows Server 2012 R2
- Windows Hyper-V Server 2012 (core installation)
- Windows 7 / 8 10 (64-Bit)
Required Hardware Specifications:
Altaro VM Backup:- 1 GB RAM
- 1 GB Hard Disk Space (for Altaro VM Backup Program and Settings) + 5 GB (for temporary files created during backup operations)
Altaro Hyper-V Host Agent:
- 500 MB RAM
Altaro Offsite Server:
- Minimum of i5 (or equivalent) processor
- 75 MB RAM + an additional 75MB for each concurrent backup/restore.
For example if running 3 concurrent backups then minimum requirement is 75MB (base) + 75MB + 75MB + 75MB = Total 300 MB RAM)
Software Pre-requisites:
- MS .NET Framework 3.5.1 on Windows Server 2008 R2
- MS .NET Framework 4.0 / 4.5 / 4.6 on Windows Server 2012 / 2012 R2
Installing Altaro VM Backup:
Launch the downloaded file: altarobackupsetup.exe. On certain Operating Systems you may receive a warning informing you that certain downloads may be unsafe. Altaro VM Backup is signed using Altaro’s digital signature and therefore this warning can be ignored.
Next you will be presented with the welcome screen of the installer. Simply click [Next].

You will now see the End User License Agreement into which you will enter with Altaro Ltd. Please read through the agreement and check the “I Accept...” checkbox. Once you have agreed to the terms and conditions in the EULA you can press [NEXT].

At this point you will be prompted for the Destination Folder of the installation. In most normal cases you should leave the installation path as default. Altaro VM Backup will be installed within your Program Files folder.

Next you will see a screen asking you for confirmation to install. Please press [Install].

- Files are being copied to the Program Files Folder.
- A Windows Service is being installed.

Finally the Altaro VM Backup Management Console will appear.
Installing Altaro VM Backup on Hyper-V Server / Server Core:
- The first step is to download the Altaro VM Backup installation setup file from www.altaro.com and then copy it onto the server core.
- To do this, simply open a Windows Explorer window and type in the Windows Share location of the Core machine, followed by the drive letter of the system drive (typically “C”), followed by the dollar sign. The format in other words is \\IPAddress\C$ or \\ServerName\C$
- This can be seen in the image below, where the IP address is used:

- As shown in the example above, choose a folder where to paste the installer (for example C:\Users\Administrator\Downloads, and click paste.
- Switch to the Server Core machine and open a command prompt.
- Using the “cd” command, change to the directory where you pasted the file in Step 2 and run the installer setup command as shown in the image below:

- The installation will begin normally as shown below:
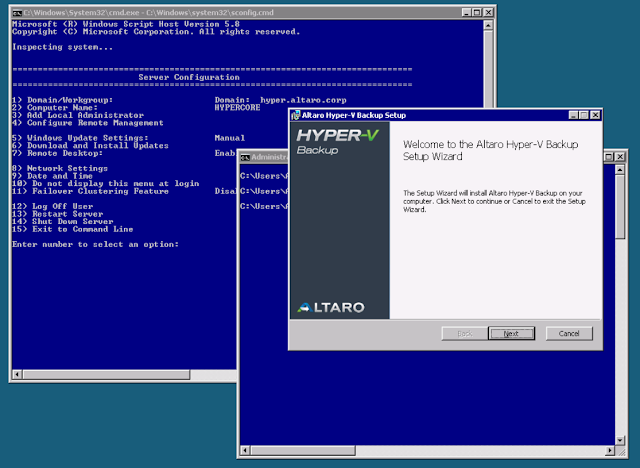
- Once installed, you can launch the application by typing in the command STARTALTARO in command prompt
Entering the License Key:
Once you order Altaro VM Backup you will receive an email containing your unique License Key. The License Key is a block of letters.To enter your license key please follow these steps:
- Open the Altaro Console and go to Setup and select the option Hosts from the left hand side main menu:
- Click the Manage License button under the Host you wish to license

- A window showing the different licenses available for purchase and a comparison of features will be shown for your information. Click the I already have a license key buttonto proceed

- Next the license key window will appear as shown below.

- Now open the email that contains your License Key. Once you select the License Key, right-click on it and select Copy.
- Go back to the License Key window, right-click on the white text box and select Paste.
- Click the button Assign License Key to apply your License Key. Once verified the license status will change to confirm that the License Key was accepted:

Configuration Guide:
Note: At any point during the evaluation you will be able to enter a License Key to activate an Altaro VM Backup Edition. If you choose not to purchase the software then you can activate the Free Edition at the end of the Evaluation period.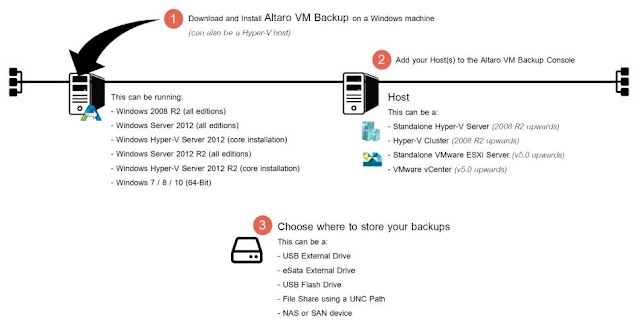
The first time that you run Altaro VM Backup the Management Console will launch into a special Quick Setup mode. This will help you to:
- Select which Guest VMs you would like to backup.
- Select which Backup Drive to back up to.
- Take your first backup

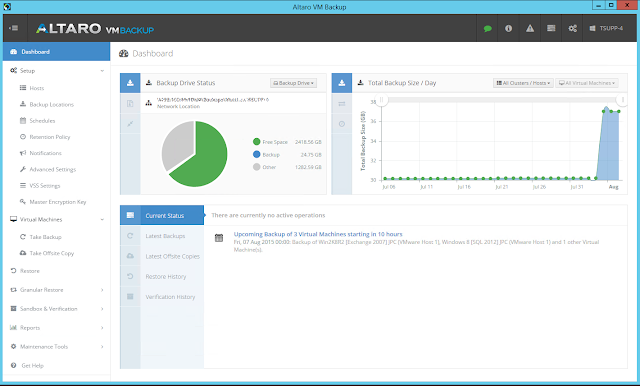
Opening the Management Console:
The Management Console is opened automatically after you first install Altaro VM Backup.
After this you can launch it easily using one of the following methods:
- Clicking on the Altaro VM Backup item within the "Start Menu > All Programs > Altaro" group.
- Launching "Altaro.ManagementConsole.exe" application from the install location. By default this is "C:\Program Files\Altaro\Altaro Backup".
- Enter the command STARTALTARO into a command prompt window. This may not work immediately after first install until you log out and in to the Server due to the Environment Variables not being refreshed.
Adding Hyper-V and VMware Hosts:
From version 5.0 upwards, you can add multiple Hosts to the Altaro VM Backup Console and manage all your hosts' configuration from one central console.If you have installed Altaro VM Backup on a Hyper-V Host directly, then that host will automatically be added and VMs will be automatically added to your list.
However if you have installed Altaro VM Backup on a separate machine, or wish to add additional Hosts, then you can do so as follows:
- Open the Altaro Console and go to Setup and select the option Hosts from the left hand side main menu:

- From this screen you can:
- Add/Remove both Hyper-V and VMware Hosts
- View the currently added Hosts. The filtering and search options at the top right will help you easily locate your host from the list
- View the number of VMs on each host
- Update host agents if necessary
- Change the licensing of each host
Adding Hosts
To add a host,Click the Add Host button, and you will be prompted with a wizard as below:
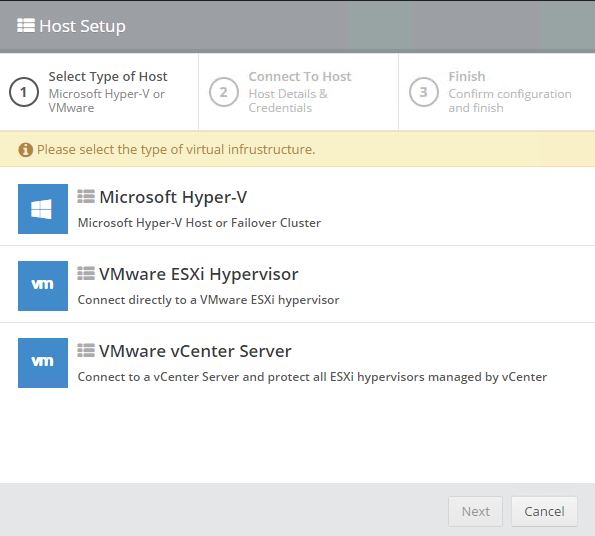
- Here, choose which type of Host you wish to add, then click Next
You'll then be prompted to enter the details of the Host you wish to add
Hyper-V Host:

VMware Host:
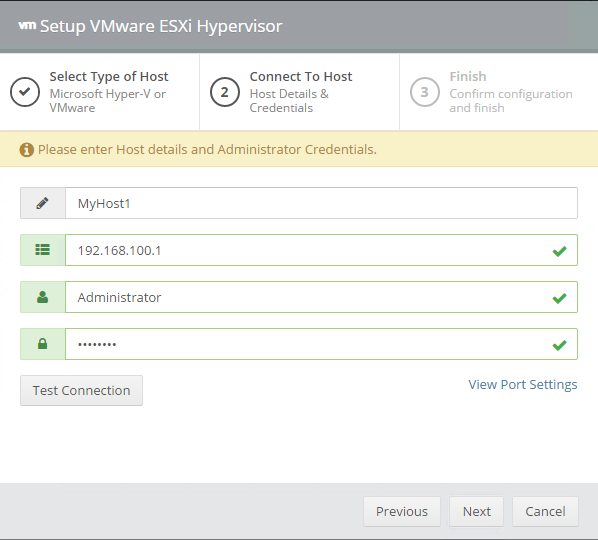
- Enter the Host details, and credentials and click Next to finish the wizard.
- The connection details and credentials will be tested and if successful the Host will be added to your list
Selecting Backup Locations:
Altaro VM Backup allows you to select one or more backup locations for your VMs. Meaning it is now possible to select a different backup location for different VMs if required.To select a drive or network path as your backup location, open the Management Console and select Setup then Backup Locations from the left hand side main menu.
You will be taken to the Backup Locations Screen, as below:

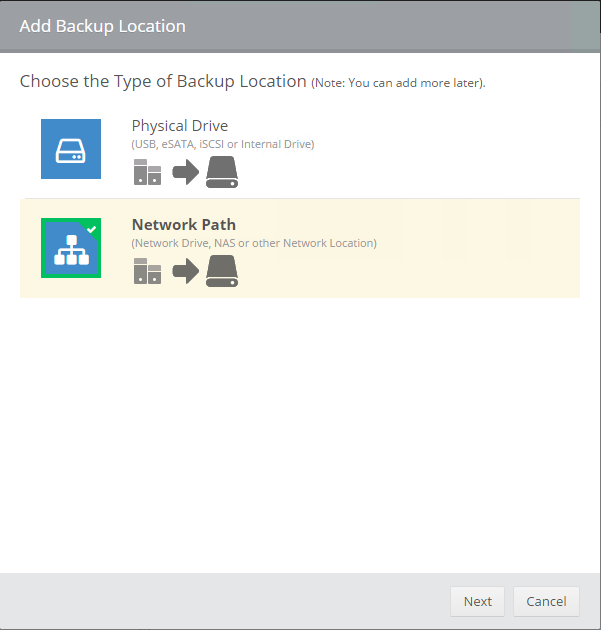
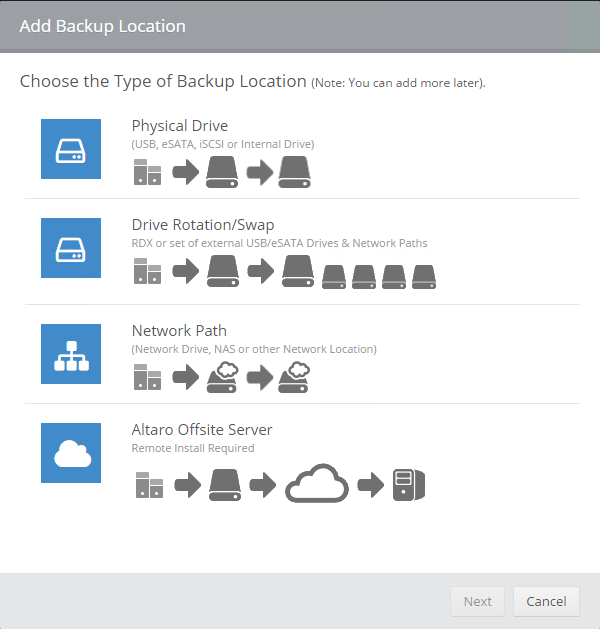
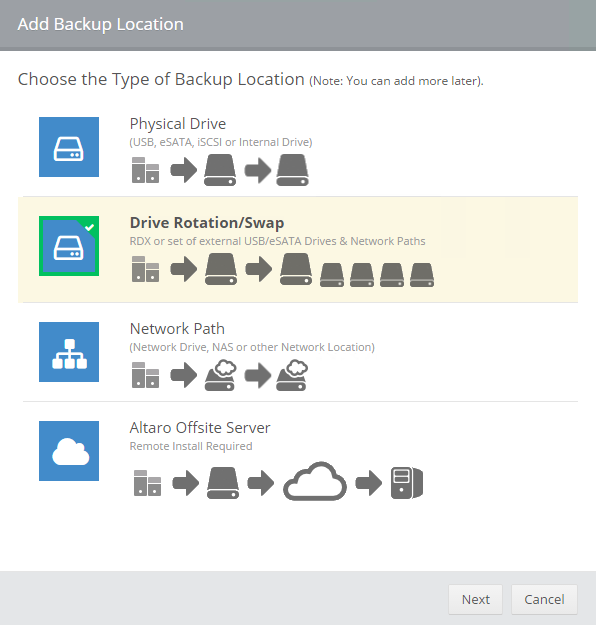
To add a Backup Location click the Add Backup Location button, and you will be prompted with a wizard to help you choose your desired location as below:

Here, choose the backup location desired and click through the wizard to complete.
Repeat the steps above if you wish to add more than one Backup Location
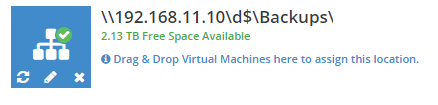
Next, proceed to drag and drop the VMs you wish to backup from the treeview on the left into the backup location you just added. The results should be something like this:

Once the selections have been made it is important to click the Save Changes button to apply your new settings.
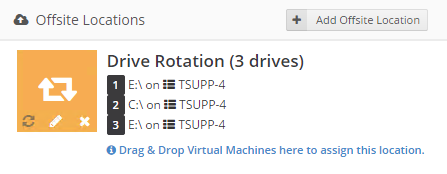
Selecting Offsite Locations:
Similar to the Backup Locations, Altaro VM Backup allows you to configure one or more Offsite Locations, which will allow you to keep a redundant copy of your backups for disaster recovery purposes. Drive Rotation can also be configured here.
To select your Offsite backup destination, open the Management Console and go to
 then select
  from the left hand side menu.
You will be taken to the Backup Locations Screen, as below:

To add an Offsite Location click the Add Offsite Location button, and you will be prompted with a wizard to help you choose your desired location as below:

Option 1: Physical Drive
Choose this option to take an offsite copy to a single, locally connected or removable disk.
Option 2: Drive Rotation
Choose this option to take an offsite copy to a set of disks which will be rotated periodically.
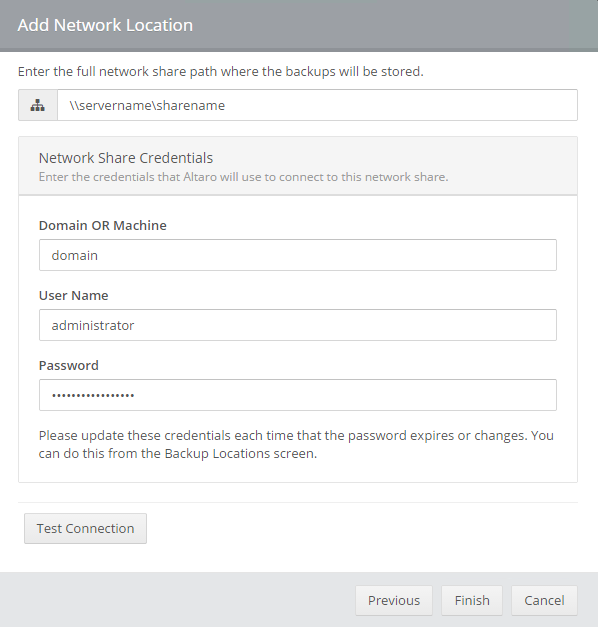
Option 3: Network Path (LAN only)
Choose this option to take an offsite copy to a UNC path to a file share or NAS on your local LAN.
You will be prompted (as below) to enter your network path, and credentials, then click Finish to add the location.
You will be prompted (as below) to enter your network path, and credentials, then click Finish to add the location.

Option 4: Altaro Offsite Server (WAN)
Choose this option to send your offsite copies to a location outside of your local network via a WAN or internet connection. Before you select this option, ensure you have already setup your Altaro Offsite Server
You will be prompted to enter the details of your Altaro Offsite Server as below:

Enter the details of your Altaro Offsite Server, then click Finish to add the location
Next, proceed to drag and drop the VMs you wish to backup to the backup location you just added.
Once the selections have been made it is important to click the Save Changes button to apply your new settings.
Note: Since all Offsite backups are encrypted by default, if you have not already configured an Encryption Key, you will be prompted to do so at this point with a screen like the one below:

Scheduling VM Backups:
To schedule automatic backups for the selected VMs you need to create a number of Schedule Groups and add the VMs to them.To do this simply open the Management Console and select Setup then Schedulesfrom the left hand side main menu.
Default Backup Schedule Groups
If you have not yet created any backup schedule groups then two default groups will be created for you. These default groups can be used as they are, edited or deleted.Adding a VM to a Schedule Group

Simply drag a VM (or multiple VMs) from the left hand side panel to the right hand side panel to add it to a Schedule Group. Once the VM is added it will be listed within the Schedule Group panel to indicate that it has been added successfully.
A single VM can be added to multiple schedule groups and a single schedule group can contain multiple VMs.
Selecting a VM on the left hand side will display a Schedule Preview of the current settings for that VM on the right hand side of the console, as shown in the example below:

You must click Save Changes at the bottom of the screen to commit changes.
Removing a VM from a Schedule Group
To remove a VM from a schedule group simply click on the X icon to the right of the VMs name in the group's VM list. The VM can be re-added at any time in the future.
You must Save Changes at the bottom of the screen to commit changes.
Editing / deleting / disabling Schedule Groups
At the bottom of each schedule group icon are three buttons:
- Edit (
![]() ) - change the schedule group backup schedule.
) - change the schedule group backup schedule. - Delete (
![]() ) - discard the schedule group. Any VMs belonging to it will be unassigned from it first.
) - discard the schedule group. Any VMs belonging to it will be unassigned from it first. - Enabled/Disabled (
![]() /
/ ![]() ) - choose whether the group is active or has been disabled. Backups will not take place for disabled schedule groups.
) - choose whether the group is active or has been disabled. Backups will not take place for disabled schedule groups.


Create a new Schedule Group
To create a new schedule group click on the Add Backup Schedule button.You will be presented by a Window which will prompt you for the schedule group settings as below:

Recurrence Pattern: whether you would like to configure a weekly or monthly recurrence.
Backup Times: settings to specify the backup times / days. This is split into two sections as shown below:
- Take a backup - take a backup of the VMs in this schedule group to the predefined Backup location.
- Follow up with an Offsite copy - take a copy of the latest backups of the VMs in this schedule group to the predefined Offsite Copy location.
- Select the weekly radio button.
- Click "Add Backup Time" to add a new backup time entry to the list.
- Configure multiple backup times. eg. 10am on Mon, Tue and Friday.
- These backup times will be repeated on a weekly basis.
Monthly Recurrence
- Select the monthly radio button.
- Choose whether you wish the backup to take place on the:
- Xth day of every month. eg: 10th day of every month.
- The Xth day of week of every month. eg: 2nd Wed of every month.
Configuring a Retention Policy:
To manage the amount of disk space used up on your backup drives and prevent it getting filled up it is important to configure a retention policy for each of your VMs backups.
To do this simply open the Management Console and select Setup then Retention Policy from the left hand side main menu.
You will then be presented with a screen as follows:

The retention policies for primary backups are shown in blue, and those for your offsite copy are shown in red.
To add a VM to a Retention Policy simply drag and drop it from the left hand side into the desired policy group for both the primary and off-site.
To create a custom Retention Policy, you can do so by clicking the 'plus' (+) sign at the top of the appropriate section.
To remove a VM from a particular retention group, simply click the X icon to the right of the VMas shown below:

Once you have configured a retention plan for all your VMs, click Save Changes to complete.
Enabling Notifications:

Simply use the checkboxes to select which notifications you would like to receive.
Once the selections have been made simply click on Save Changes to update your backup plan.

Email Notifications:
Email Notifications allow users to receive Backup / Restore Reports by email. These reports indicate:
Backup Reports
- The status of each backup and the Guest VM that was backed up.
- The date and time of each backup.
- The amount of data backed up.
- The duration of the backup.
Restore Reports
- The status of each restore operation and the Guest VM that was restored.
- The date and time of each restore operation.
- The duration of the restore operation.
Configuring Email Notifications in order to receive Backup Reports:
- Navigate to the Setup >> Notifications screen

- Now you can specify the frequency of your Email notifications. There are two options:
- Immediately after the operation has completed. (Emails will be sent a minimum of 5 minutes apart and multiple notifications may be grouped into one email).
- As a daily email digest at a specified time each day.
- Finally configure your SMTP mail server settings and the email recipients. The Send Test Email button can be used to test the SMTP settings.
- Once you've finished configuring the Email notifications click on the Save Changes button at the bottom of the screen.
Event Log Notifications:
Event Log Notifications can be viewed within the Event Viewer console on Windows Server. These are ideal for monitoring the backup and restore operations remotely from another server.
These log entries indicate the following information:
Backup Reports
- The status of each backup and the Hyper-V Guest VM that was backed up.
- The date and time of each backup.
- The amount of data backed up.
- The duration of the backup.
Restore Reports
- The status of each restore operation and the Hyper-V Guest VM that was restored.
- The date and time of each restore operation.
- The duration of the restore operation.
Configuring Event Log Notifications in order to receive Backup Reports:
- Navigate to the Setup >>Notifications screen

- Use the checkboxes to specify which notifications you would like to log:
- You can choose to receive notifications for: successful backups, backups in which one or more file was skipped, failed backups and completed restore operations.
- If you choose to receive notifications for failed backups you will also be alerted when a backup is skipped because your backup drive is not connected.
- Once you've finished configuring the Event Log notifications click on the Save Changes button at the bottom of the screen.
Advanced Settings:
Each VM in your backup plan has a few advanced settings available. These can be accessed by following these steps:
- Open the Altaro Management Console
- Navigate to Setup then Advanced Settings
- You will be presented with the following screen:

- Enable or Disable Compression of Local Backups (Default: Enabled)
- Enable or Disable Encryption of Local Backups (Default: Disabled)
- Choose whether to Exclude ISO files which are attached to the VM. (Default: Enabled)
- Choose how often to take a full copy backup version of the VM. (Default: 30)
- Choose to Exclude certain VHDs / VMDKs from a backup of a specific Guest VM. (Default: All Included)
VSS Settings:
Each VM in your backup plan has a few advanced settings available. These can be accessed by following these steps:
- Open the Altaro Management Console as described here.
- Navigate to Setup then VSS Settings
- You will be presented with the following screen:

- Choose whether to enable/disable Application Consistent Backups for each VM. (Normally used to take live backups of Non-VSS Aware Guests). (Default: Enabled)
- Choose whether to enable/disable truncation of SQL/Exchange transaction logs for VMware guest VMs (Default: Disabled)
Restoring Hyper-V Guest VMs:
Restore Clone:
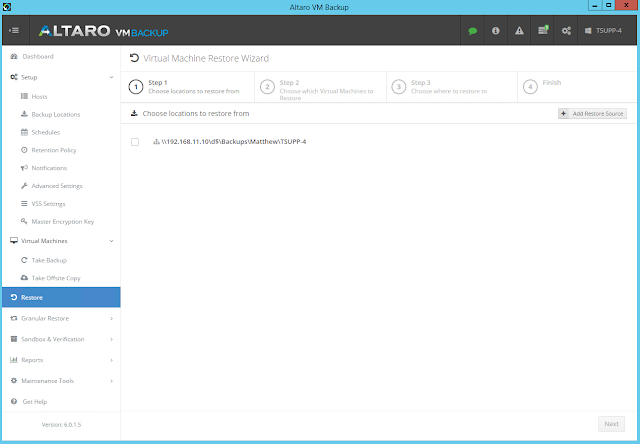
To Restore a VM backup as a Clone, first navigate to the Restore screen from the left hand side menu.
This will take you to the Virtual Machine Restore Wizard, as shown below:
- Select one or more backup locations that contain the backups of the VMs you wish to restore
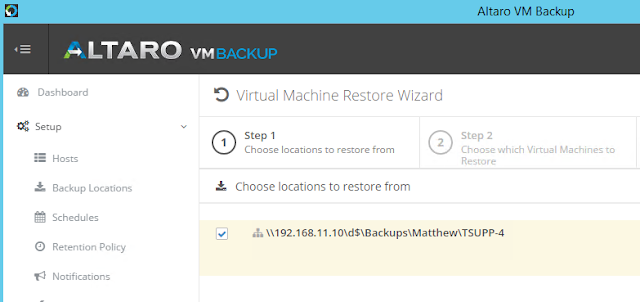
- Click the Next button
- Choose the VM(s) you wish to restore

- Click the Next button
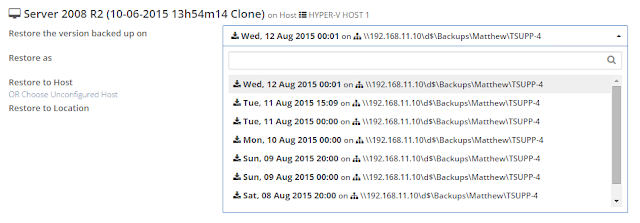
- Choose the target Host you wish to restore the VM(s) to, and the file path where you wish to store the files

- Select the backup version of the VM(s) you wish to restore from the drop down list, you may search for a version in real-time using the search field
- Type the name you wish to give to the newly restored VM (by default this will be automatically populated with the original VM name and a timestamp)
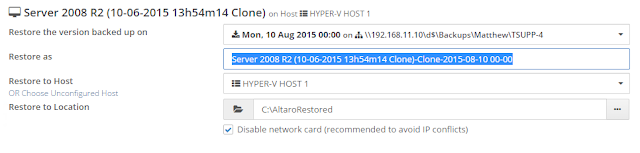
- Note: By default the cloned VM will have it's Network Card disabled by default to avoid IP conflicts. Should you want to new VM to have it's Network card enabled immediately (assuming the original VM has changed IP or no longer exists) then you can disable this option
- Once complete, click the Restore button at the bottom right of the screen
- The restore operation will begin in the background and progress can be monitored from the Dashboard
![]()
- Finally, once complete, you will see the completed restore operations in the Dashboard, and your Cloned VMs will show up on the specified Host
Email and event log notifications will also be triggered if they are enabled.

Restore to different Host:
To Restore a VM that was backed up from a different Host, first navigate to the Restore screen from the left hand side menu.
By default, this screen will populate all of the currently configured backup locations, however if you wish to restore a VM that was backed up from a different Host, then you simply need to add the path of the backup data using the Add Restore Source button:
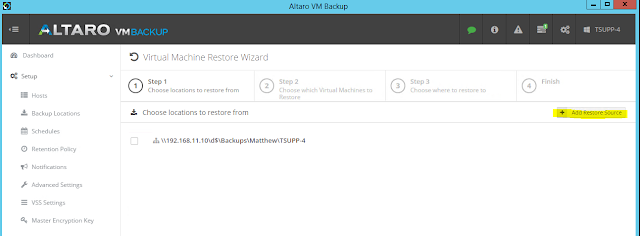
You will then be prompted with a wizard for selecting the restore source, be it a Local Drive, Network Path, or Altaro Offsite Server
Follow the on-screen instructions and click Finish to complete.
Once done, the new restore source will show up in the list of locations, and you can now simply follow through the wizard with the same steps as a regular restore to complete your restore
File Level Restore:
The File Level Restore feature allows you to explore the contents of the VHD / VHDX files of a VM backup. That way you can easily restore specific files and folders from a VM backup without having to restore and attach the entire VM.
Note: File Level Restore from Linux/Unix VMs is not yet supported.
- Open the Management Console as described here and select the File Level Restoreoption under Granular Restore from the left hand side menu.
- Select one or more backup locations that contain the backups of the VM you wish to restore from, then click Next
- Select the VM and the Backup Version you wish to restore files from, then click Next
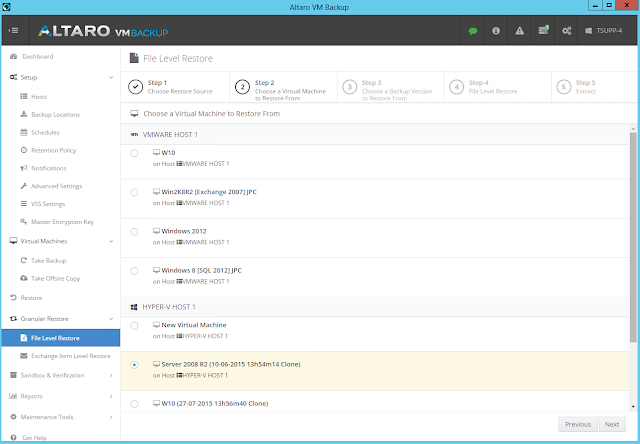
- Select the backup version of the VM you wish to restore from in the drop down list, you may search for a version in real-time using the search field

- Click the Next button
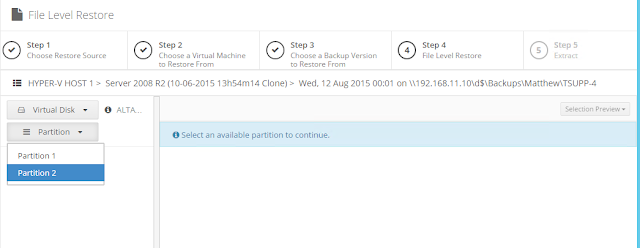
- Select the VHD/VHDX file you wish to restore from in the Virtual Disk drop -down menu:

- Select Partition you wish to restore from in the Partition drop -down menu
- Browse the backup at file level and tick the checkbox(es) next to the file(s) you wish to restore:
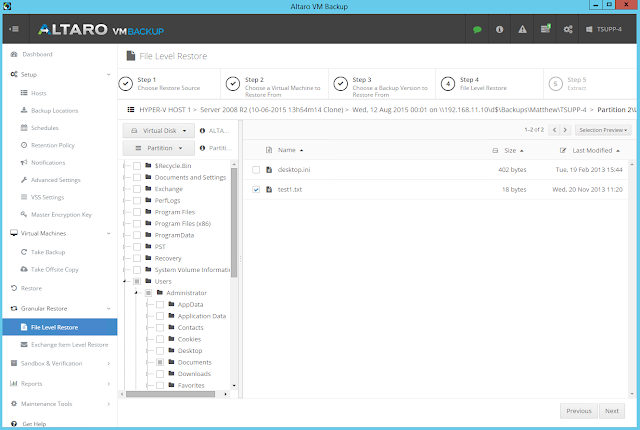
- Click the Next button
- Select the location where you wish to extract the selected files/folders to:
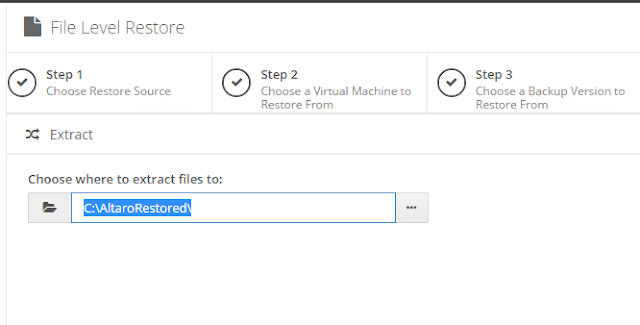
- Click Extract
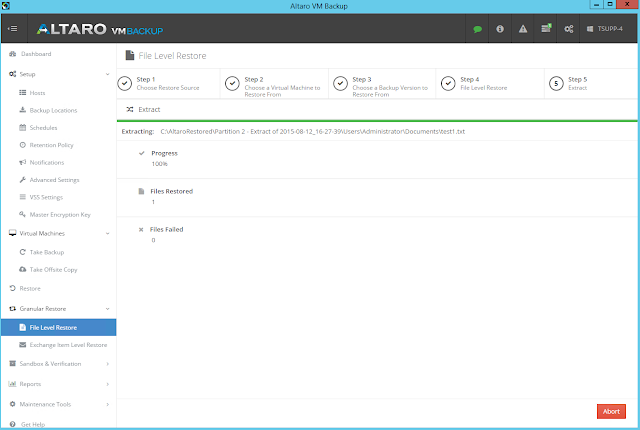
- You will then see a restore progress bar similar to the one below:
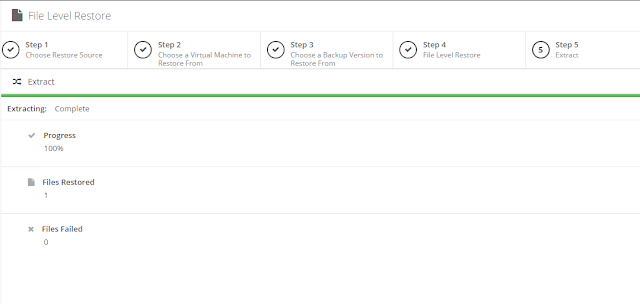
- Once the files have been successfully restored, you will be given a summary of the restored files as shown below:
Exchange Item Level Restore:
The Exchange Item Level Restore feature allows you to granularly explore and restore individual items from your Exchange Databases inside a backed up VM.Note: Altaro VM Backup supports Exchange Item Level Restores from databases from Exchange 2007 and later.To proceed with the Exchange Item level restore, please follow the instructions below:
- Open the Management Console and select the Exchange Item Level Restoreoption under Granular Restore from the left hand side menu.
- Select one or more backup locations that contain the backups of the VM you wish to restore from, then click Next
- Select the VM and the Backup Version you wish to restore files from, then click Next

- Select the backup version of the VM you wish to restore from in the drop down list, you may search for a version in real-time using the search field
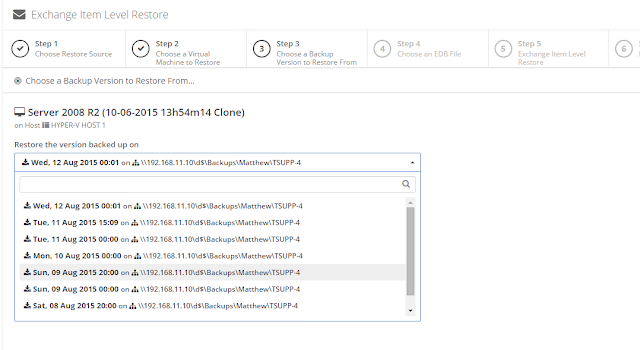
- Click the Next button
- Select the VHD/VHDX file containing the Exchange database (EDB) you wish to restore from in the Virtual Disk drop -down menu:
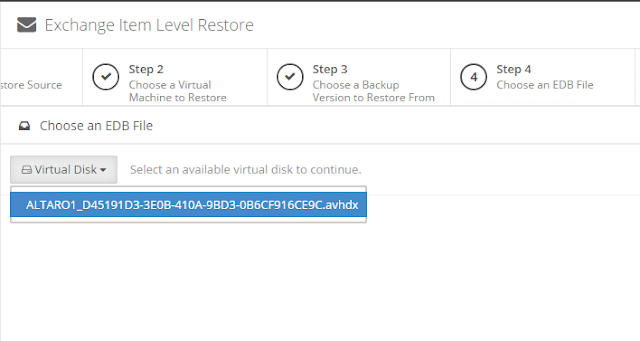
- Browse the backup at file level to locate your Exchange Database (EDB) file:

- Click the Next button
- Browse your Exchange mailboxes and locate the emails/items you wish to restore:

- Click the Next button
- Select the location where you wish to extract the selected files/folders to:

- Click Extract
- Once the Exchange Items have been successfully restored, you will be given a summary of the restored Exchange items, as shown below:
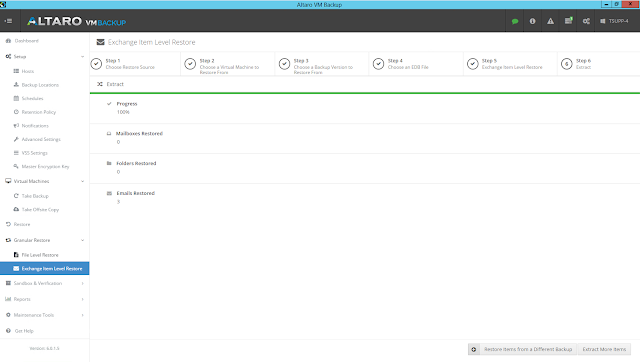
Note: The restored Exchange Items will be saved in PST format
Altaro VM Backup supports backing up to:
- USB External Drives
- eSata External Drives
- USB Flash Drives
- Network Shares using UNC Paths
- NAS devices (Network Attached Storage) using UNC Paths
- PC Internal Hard Drives (recommended only for evaluation purposes)
- RDX Cartridges
- Altaro Offsite Server
Configuring your Backup Destinations
TerminologyThere are various ways the backup locations can be configured. Please read these definitions that are used throughout the rest of this document.
Backup Location:The "Backup location" refers to your on-site backup repository to which the virtual machine files are copied directly from the host (via a shadow copy of the VM files). This location should always remain connected.
Offsite Location:The Offsite Locations refers to a secondary repository which will hold a redundant copy of the Backup Location. This will serve as a fall-back in Disaster Recovery scenarios where the data in your Backup Location is lost or becomes corrupt.
Backup data is always synchronized from the backup location to the offsite copy location, and backup data is never copied to the offsite copy location directly from the source files on the host. If the backup location is not connected, no data can be synchronized to the offsite copy location.
Note: From version 5.0 upwards, it is possible to select more than one Backup Location. Meaning you can have some VMs backing up to one location, and other VMs to a different location. The same applies to Offsite Locations too.
To configure your backup destinations, open the Management Console and go to Setup then select Backup Locations from the left hand side menu.

Here you may Add, Edit and Remove Backup and Offsite locations as necessary.
![]()
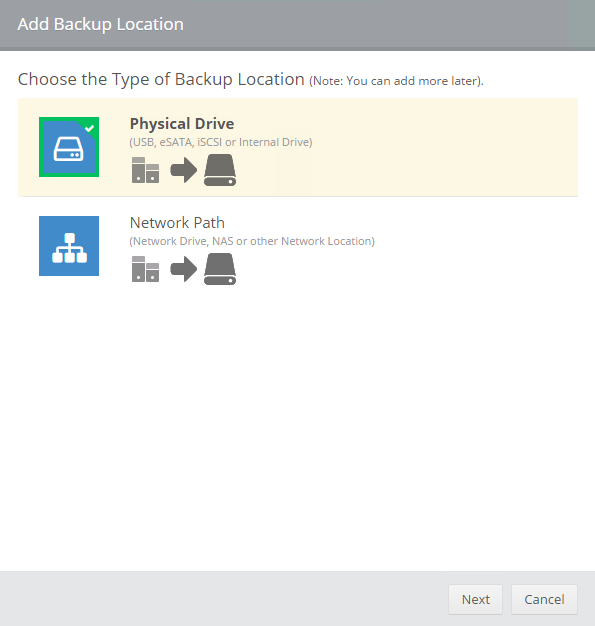
You will first be prompted to choose between a Physical Drive (locally attached) or a Network Path as below:
![]()
![]()
The available free space of each drive will be shown beneath the drive letter, and the file system of that drive will be shown on the right hand side.
![]()
- To ADD a new Backup Location click the Add Backup Location button and you will be taken to the Create Backup Location wizard
- To ADD a new Offsite Location click the Add Offsite Location and you will be taken to the Create Offsite Location wizard
- To EDIT an existing backup/offsite location, click the
![]() button beneath the icon of the respective backup/offsite location
button beneath the icon of the respective backup/offsite location - To REMOVE a backup location, click the
![]() button beneath the icon of the respective backup/offsite location
button beneath the icon of the respective backup/offsite location - To ADD A VM to your configured Backup/Offsite location, you must drag and drop the VMs into the desired backup/offsite locations as shown in the above screenshot.
- To REMOVE A VM from a configured Backup/Offsite location, you must click the
![]() button to the right of that VM as shown below:
button to the right of that VM as shown below:


Adding Locally Attached Storage as a Backup Location
The Create Backup Location Wizard will launch after clicking the Add Backup Location button.
This wizard is also used in other areas related to the backup storage options, and other sections further below will refer to this section when required.
This section will describe adding locally attached storage. If you wish to add backup locations on a network path.
After choosing the Physical Drive option, this is an example of a typical view:
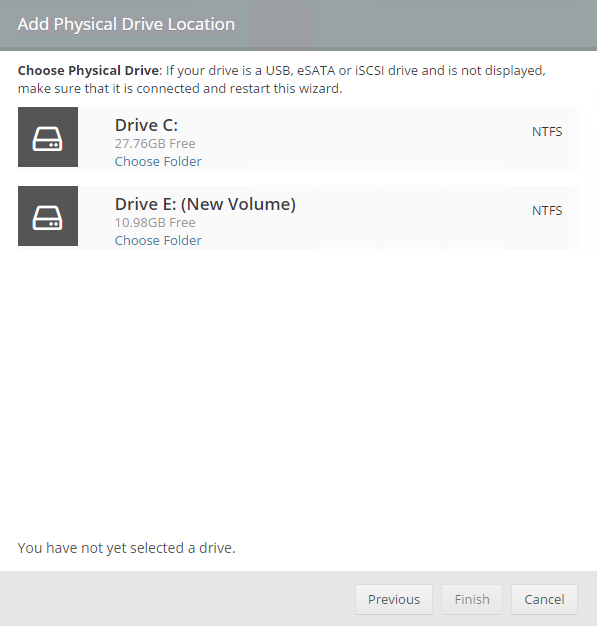
Click on a drive to select it.
The available free space of each drive will be shown beneath the drive letter, and the file system of that drive will be shown on the right hand side.
You may also click Choose Folder to specify a subfolder of that drive, which will launch the folder selector as shown below:
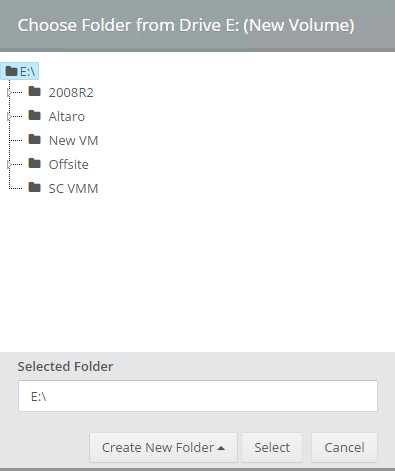
You may select an existing subfolder, or create a new folder using the Create New Folder button.
Click Finish to complete and your new Backup Location should be shown as below:
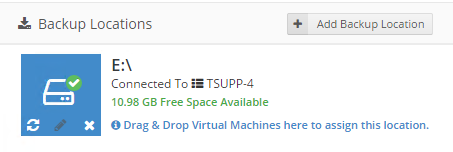
You may then proceed to add VMs to this backup location by dragging and dropping them into the blank space below.
Adding a Network Path as a Backup Location
The Create Backup Location Wizard will launch after clicking the Add Backup Location button.
This wizard is also used in other areas related to the backup storage options, and other sections further below will refer to this section when required.
This section will describe adding a network path. If you wish to add locally attached backup locations.
After choosing the Network Path option, you will be prompted to enter the UNC Path and Credentials to access the path as shown below:
Enter the details required then click Test Connection to verify the path can be accessed with the specified credentials.
Click Finish to complete and your new Backup Location should be shown as below:
You may then proceed to add VMs to this backup location by dragging and dropping them into the blank space below.
Configuring an Offsite Copy Location
With Altaro VM Backup you have the option of assigning one or many drives as redundant copy locations - aka an Offsite Copy Location.
The Create Offsite Location Wizard will launch after clicking the Add Offsite Location button:
As shown above, your Offsite Copy Locations can be either of the following:
- A single Physical Drive that is locally attached
- Multiple locally connected Physical Drives to be used in Drive Rotation. These may also beRDX cartridges.
- A Network Path which may be a NAS, SAN or Network File Share in the same LAN as your Hosts
- An offsite Altaro Offsite Server connected via LAN/WAN/VPN.
Backup data is always synchronized from the backup location to the offsite copy location, and backup data is never copied to the offsite copy location directly from the source files on the host. If the backup location is not connected, no data can be synchronized to the offsite copy location.
Offsite Copy Drive Rotation
Altaro VM Backup allows you to configure multiple drives rotation as one of your Offsite Copy locations which will allow you to rotate between these drives seamlessly after they have been configured.
As described earlier, this option requires that you have already configured a local or network path as your on-site Backup Location.
To configure drive rotation as one of your Offsite Copy Locations, please proceed as follows:
- From the Management console go to Setup then select Backup Locations from the left hand side menu
- Click the Add Offsite Location button.
- Here choose the Drive Rotation option and click Next :
- Then click the Add Physical or Network Drive to Rotation button to launch the Drive Selector
- Choose Physical or Network Path, then click Next
- Select your first drive and click OK :

7. Your selected drive will be added to the list.

- Then click the Add Physical or Network Drive to Rotation button again to add your next disk.
- Repeat until all disks required are added:

- Altaro VM Backup will take an Offsite copy to the drive that is connected which has the highest priority in this list
The currently active Offsite Copy Location is switched to another location in either of two cases:- A location with a higher assigned priority is connected.
- The currently connected location is disconnected and a location with a lower priority is available.
- .To adjust the priority of the drives you can use the
![]() buttons
buttons - Click Finish to complete and your new Backup Location should be shown as below:

Backup Drives in a Multiple Host Environment
If you have multiple hosts, then it is important that all Hosts are able to access the selected Backup Location
- If your selected drive is a network location, then the network path credentials are securely communicated to the other Hosts so that they can authenticate to and access the same backup location. The credentials are not stored on any other host, they are used and discarded. This happens each time a backup is initiated.
- Alternatively, if you have selected a locally connected drive as a backup/offsite location, then Altaro VM Backup will automatically share out the selected location to the other Hosts using Windows file sharing, so that the other Hosts will have access to the backup location.
In this case a local user account will be created on the machine where the drive is connected to. This local user credentials will be securely communicated to each Host which is configured to backup to that drive. The credentials are not stored on any other host, they are used and discarded. This happens each time a backup is initiated.
Enabling Backup Compression / Encryption
Altaro VM Backup offers the option for compressing your backup data before it is written to the backup drive.
To enable Compression, open the Altaro VM Backup Management Console and go to Setup then to Advanced Settings
Here you will notice there is a setting for each of your VMs called Compression and Encryption, as shown below:

To enable or disable Compression/Encryption, simply tick the checkboxes next to the VMs you wish to change settings for.
Once you have chosen your desired settings, click Save ChangesImportant! Changes to these settings will require you to start your next backup from scratch (i.e. will do a full backup)
Before enabling Encryption ensure that you have set your Encryption Key. You can do so as follows:
Click on the Master Encryption Key menu, enter your Encryption key twice and click Save Changes, as shown below: 
Warning! Your Encryption Key will be required to restore any data from backups which are encrypted (All Offsite Copies are also Encrypted by default).
If your key is lost, there is no way to recover these backups.
Setting up an Altaro Offsite Server
Installing the Altaro Offsite Server tool on another server outside your local network will allow you to use that server to hold a redundant offsite copy of your backups; ideal for Disaster Recovery.
Important! TCP Ports 35101 - 35105 and 35109 - 35111 are used for communication between the Altaro VM Backup software and the Altaro Offsite Server and must be allowed through.
To install and configure the Altaro Offsite Server, download and run the installer from here: http://www.altaro.com/vm-backup/download-tools.php
Once installed, launch the "Altaro Offsite Server Management Console" application from the Windows Start Menu
You will then be prompted with this screen:

Choose to connect to the local server, which will then allow you to monitor/configure your Altaro Offsite Server.

Once connected, click Configure Accounts and then Add a New Account to setup the connection account details for this Altaro Offsite Server as shown below.

Set the storage area and credentials you prefer and then click Save.
You can also monitor backups from the Dashboard section, which will show you current activity, backup/restore history and events.
Configuring the Altaro Offsite Server as your Offsite Backup location
After you have configured an Altaro Offsite Server, you will need to configure the main Altaro VM Backup application to back up to that server.
To do this, follow the instructions to configure the ‘Offsite Copy Location” to point to your Altaro Offsite Server
Configuring an Offsite Copy Location
With Altaro VM Backup you have the option of assigning one or many drives as redundant copy locations - aka an Offsite Copy Location.
The Create Offsite Location Wizard will launch after clicking the Add Offsite Location button:
As shown above, your Offsite Copy Locations can be either of the following:
- A single Physical Drive that is locally attached
- Multiple locally connected Physical Drives to be used in Drive Rotation. These may also beRDX cartridges.
- A Network Path which may be a NAS, SAN or Network File Share in the same LAN as your Hosts
- An offsite Altaro Offsite Server connected via LAN/WAN/VPN.
Manually taking an Offsite Copy
To manually start an Offsite copy, please proceed as follows:
- Go to Virtual Machines then to Take Offsite Copy on the left hand side menu.
- Select the VM(s) you wish to start an offsite copy of, then click the Take Offsite Copy button at the top of the screen as shown below:

Scheduling an Offsite Copy
To schedule Offsite Copies, please proceed as follows:
- Open the Altaro Management Console
- Go to Setupthen Schedules from the left hand side main menu.
- Either Add a new Backup Schedule or Edit (
![]() ) an existing Backup Schedule. This will take you to the Schedule details screen as shown below:
) an existing Backup Schedule. This will take you to the Schedule details screen as shown below:

- Here, tick the boxes next to the Days you wish to follow up with an Offsite Copy:

- Then click Save
- You will then see the
![]() icon appears in your Backup Schedule tile indicating that an offsite copy is configured to run along with this schedule:
icon appears in your Backup Schedule tile indicating that an offsite copy is configured to run along with this schedule:![]()
- Lastly, Drag and drop the VM(s) from the left hand column over to the Schedule group you wish to add them to, then click Save Changes
 icon appears in your Backup Schedule tile indicating that an offsite copy is configured to run along with this schedule:
Seeding
When backing up to an Altaro Offsite Server, it's likely that the bandwidth to that server may be limited, so we have introduced the option to manually take the first full backup to the Altaro Offsite Server physically, which will then allow you to run only incremental copies over the WAN connection, we call this process Seeding to disk.
The below diagram summarizes the Seeding process in 3 steps:

To do this, you will need a removable disk connected to your main Altaro VM Backup server.
Once done, Open the Management Console and go to Virtual Machines then to Take Offsite Copy on the left hand side menu.
Select the VMs you wish to transfer the backups for and click the Seed to Disk button at the top of the page as below:

Here, select the location you wish to seed to, and click Next as shown below:

The seeding will proceed in the background, and when complete you can disconnect the drive and manually take it to your Offsite Server.
Once the removable disk has been connected to your Altaro Offsite Server, launch the Altaro Offsite Server console from the Start Menu.
Here, go to Configure Accounts, then right click your account name and select Import seed from disk as shown below:

On the next screen, browse to the removable drive (and subfolder if applicable) where you exported the seed data to, select it and hit Start.
It will begin to import the seed data to the Altaro Offsite Server's backup repository and show progress as below:

Once complete, any future backups to this Altaro Offsite Server will be of incremental changes only.
Setting up Console Remote Access to Altaro VM Backup
The introduction of the remote management console means that you can now install the software on another machine and manage the software from that remote machine.
Installing the Altaro Management Tools
To install the Remote management console on another machine, you must download and run the installer from here: http://www.altaro.com/vm-backup/download-tools.php
This is only supported on 64-bit OS's, please see the full system requirements here.
Once the Altaro Management Tools are installed, you will be able to launch the following consoles:
Once the Altaro Management Tools are installed, you will be able to launch the following consoles:
- The Altaro VM Backup console - used to access the configuration and console of a remote Altaro VM Backup Installation
- The Altaro Offsite Server console - used to access the configuration and console of a single remote Altaro Offsite Server
Using the Remote Management Console
The Remote Management Backup console will allow you to connect to the configuration console of a remotely installed Altaro VM Backup machine.
Please follow the instructions below for use:
- From the Start Menu launch Altaro VM Backup
- When the remote console is opened, you will be presented with a choice to connect to a local agent or a remote machine as below:
![]()

- Here you can select the second option to connect to a remote Altaro console and manage its configuration.
- Simply enter the servers IP and credentials and click Connect
Note: Ensure that the User Account you are using to connect with is a member of the Administrators Group
Using the Altaro Offsite Server Console
The Remote Offsite Server console will allow you to connect to the configuration console of a remotely installed Altaro Offsite Server.
Please follow the instructions below for use:
- From the Start Menu launch Altaro Offsite Server Management Console
- When the remote console is opened, you will be presented with a choice to connect to a local agent or a remote machine as below:
![]()

- Here you can select the second option to connect to a remote Altaro Offsite Server console and manage its configuration.
- Simply enter the servers IP, port and credentials and click Connect.
Using the Central Monitoring Console
The Central Monitoring Console will allow you to connect to multiple installations of Altaro VM Backup and get an at-a-glance look at their status.
Please follow the instructions below for use:
- From the Start Menu launch Altaro VM Backup
- When the console is opened, you will be presented with a choice to connect to a the Management console, or the Central Monitoring Console.
Choose the second option and you will be taken to a screen similar to the below:![]()

- Here you can click the Add Altaro VM Backup Instance to start monitoring a new Altaro VM backup installation.
- Enter the details and credentials for the installation you wish to start monitoring, as shown below:
![]()
- Simply enter the servers IP and credentials and click Save
- You will then be presented with a screen similar to the below, where you can monitor backups and status of multiple Altaro VM backup installations.
![]()
You can also drill down using the Connect button to quickly connect and modify the configuration etc of each instance individually.


Note: Ensure that the User Account you are using to connect with is a member of the Administrators Group