In this article series, we'll learn about the basic need for creating a Host Group in VMM.
System Center Virtual Machine Manager, sometimes referred to as Virtual Machine Manager (VMM), is one of the complex products from Microsoft. Microsoft designed SCVMM product in such a way that it becomes easy for organizations to model the physical environment.
The idea behind developing SCVMM product is to help virtual administrators to manage virtualization hosts running in your production environment and provide options to model your physical IT environment and network connectivity.
SCVMM 2012 R2 Networking and Storage (Part 1)
In this article series, we are going to learn how SCVMM can help you manage virtualization hosts from different vendors, model physical networking connectivity, and manage storage. In the first part of this article series, we are going to learn why it is necessary to create a Host Group in VMM.
VMM Host Groups
The first obvious question is why you would need a VMM Host Group. It is important to note that before you can manage the virtualization hosts located in datacenters, you would need to add the virtualization hosts in VMM. The Host Groups can be used to group virtualization hosts based on the physical site location. For example, you have hundreds of virtualization hosts running in the IT datacenters around the world.
Without a central management console, it would be difficult to manage all aspects of the virtualization infrastructure. For example, you might want to manage the virtualization hosts located in the Dallas datacenter as well as virtualization hosts located in the Seattle datacenter.
In a heterogeneous environment, where there are virtualization hosts running from the different vendors such as vSphere and Citrix XenServer, you will need to use a different set of tools to manage these virtualization hosts. For example, if you need to deploy a virtual machine on one of the Hyper-V hosts located in Dallas datacenter, you will need to use Hyper-V Manager.
In case you need to deploy another virtual machine on an XenServer virtualization host operating in the same datacenter, you would require to use XenServer specific tools. VMM eliminates the need for using different sets of tools to manage virtualization hosts from different vendors. Using System Center Virtual Machine Manager, you can manage Hyper-V, ESXi hosts, and Citrix XenServers virtualization hosts.
But before you can manage these virtualization hosts, you would need to create Host Groups. To manage both the datacenters, you will create two Host Groups in VMM; one Host Group for Dallas datacenter and another one for Seattle datacenter. VMM also allows you to create child Host Groups in case you want to manage virtualization hosts located in each building of a datacenter.
Once the Host Groups are created, you can plan to add the virtualization hosts. All you need to do is to right click on the Host Group and then add the virtualization hosts as shown in the screenshot below.

By default, VMM provides a default Host Group called “All Hosts”. “All Hosts” Host Group is the first Host Group in the VMM. You cannot rename and delete this Host Group. It is imperative to understand that a Host Group in VMM is more than just a group. While the basic idea behind making the Host Groups available in VMM is to help you manage virtualization hosts located in datacenters, it also provides a lot of other useful options. A Host Group in VMM serves the following purposes:
- Helps you group virtualization hosts according to their physical locations.
- Provides you the ability to model physical IT datacenter into logical units.
- You can create necessary Host Groups in SCVMM, which, in turn, help you define logical networking for that particular location.
- Several settings such as storage, networking, host reserve settings, and placement rules can be configured at the Host Group.
- There are two types of Host Groups that can be created in VMM; parent and child. By default, a child Host Group inherits the settings from the Parent Group. You can always change this behaviour by modifying the property of the child Host Group.
- VMM supports delegation of Host Groups. You can create delegated Administrators and Read-Only Administrator roles in VMM and assign them to the Host Groups. For example, you can create a user role by name “SeattleAdministrator” and assign this user role to manage only virtualization hosts located in the Seattle location.
- VMM Host Groups can also be assigned to the Private Clouds. When creating a private cloud, you can select which Host Group can be part of the private cloud.
As you can see in the screenshot below, I created three Host Groups in VMM called Dallas, Seattle and Singapore.
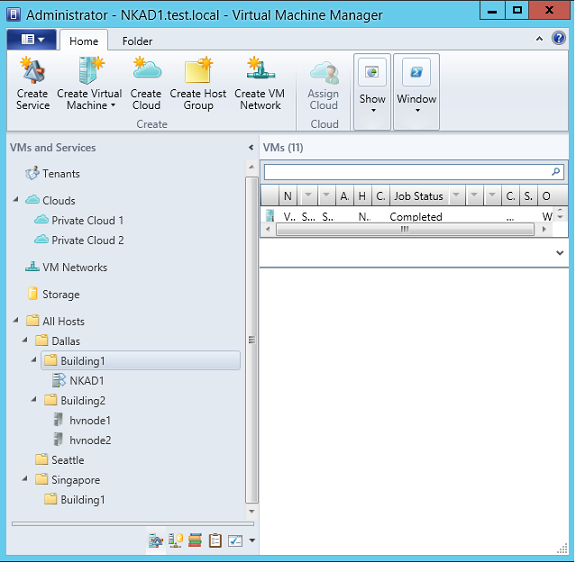
Figure 2
The Host Groups Dallas, Seattle and Singapore are my datacenter locations where all of my virtualization hosts running. These are my parent host groups. You can also see that I have created Building1 and Building2 child Host Groups underneath the Dallas parent group.
This is because I have two buildings in Dallas Datacenter. Building1 has a Hyper-V host named NKAD1 and Building2 is hosting two virtualization hosts named HVNODE1 and HVNODE2. In fact, HVNODE1 and HVNODE2 cluster nodes. You might want to create a child Host Group for several reasons. One of the reasons is that creating a child Host Group provides you the ability to define storage, networking, various host group parameters, dynamic optimization settings, host placement rules, and custom properties for that Host Group.
Summary
In the first of this article series, we learned about the basic need for creating a Host Group in VMM. Concisely, a Host Group is a basic building block before you can manage virtualization hosts and start modelling your physical networking environment into SCVMM. No matter how your physical environment looks like, you have the option to model your physical environment in SCVMM. Since VMM can be used to manage virtualization hosts from different vendors, but these can only be managed by adding them to a VMM Host Group.
In the part II of this article series, we are going to learn about the various options available on the property page of a VMM Host Group.
SCVMM 2012 R2 Networking and Storage (Part 2)
The first part of this article series explained the benefits provided by VMM host groups. As stated in the first part, VMM host groups must be created before virtualization hosts can be added under VMM management. A VMM host group serves as a management unit for configuration items such as storage, placement rules, Dynamic optimization and host reserves. In Part II, Part III and Part IV of this article series, we are going to take a look at all the configuration tabs that are available on the property page of a VMM host group and how configuring the settings help you fine tune allocation of resources to virtualization hosts located in a VMM host group. Let’s take a look at General, Placement Rules and Host Reserves Tab as part of this article.
Once Property page is opened, you have a number of configuration tabs to work with such as General, Placement rules, Host Reserves, Dynamic Optimization options, Network, Storage, and custom properties as shown in the screenshot below.

General Tab: On the General Tab, you can rename VMM host group, provide a description for the host group and change the location of the VMM host group. While you are given an option to change the location of the VMM host group that does not necessarily mean that you should do it without assessing the impact. Changing the location of a VMM host group would cause the child VMM host group to inherit settings from the parent VMM host group. It is recommended that before you change the location of a VMM host group, make sure VMM host group that is being moved do not inherit the settings from the parent VMM host group.
On the General tab, pay attention to “Allow unencrypted BITS file transfers” option. The overall purpose of enabling this setting is to provide security for the data that is being transferred over the network. There are a few basic things to take into considerations before enabling/disabling “Allow Unencrypted BITS file transfers” setting as listed below:
- In case you have implemented another form of encryption, such as IPSec, there is no reason that you should enable encrypted file transfers setting.
- For files to be transferred over an encrypted connection, the setting must be checked on both source and destination Hyper-V hosts. Similarly, the setting must be checked on both source and destination Hyper-V hosts if you need files to be transferred over an unencrypted connection.
- Since allowing unencrypted file transfers improves overall performance during virtual machine live migration, it is recommended to keep this setting unchecked.
Since unencrypted settings can be enabled\disabled per VMM host group and applies to all Hyper-V hosts residing in a VMM host group, make sure to have the same setting configured for all child VMM host groups that are going to participate in the live migration events.
Placement Rules Tab: On Placement Rules tab, you can configure the placement rules for all Hyper-V hosts located in a VMM host group as shown in the screenshot below.

By default, a child VMM host group inherits placement rules from the parent VMM host group. In case you need to define placement rules for a child VMM host group, uncheck “Use the placement settings from the parent host group” and then define the placement rules by clicking on “Add” button as shown in the screenshot above. By default, SCVMM provides 10 custom placement rules. The placement rules help you define the conditions that VMM should consider before providing a list of virtualization hosts where the virtual machine can be deployed or migrated.
The placement rules are checked when a virtual machine is live migrated to another virtualization host or when a user deploys a virtual machine via VM Templates to a virtualization host. For example, you create a custom property by name EmpType and assign the value “Permanent”. When you try to migrate or deploy a VM, virtualization host’s EmpType value that do not match the value of virtual machine, the deployment will be blocked. Similarly, when you want to deploy a new virtual machine from a VM Template, only hosts with the same value of EmpType as the VM Template will be taken into consideration.
There are four conditions provided by VMM that you can specify when configuring the placement rules as shown in the screenshot below.
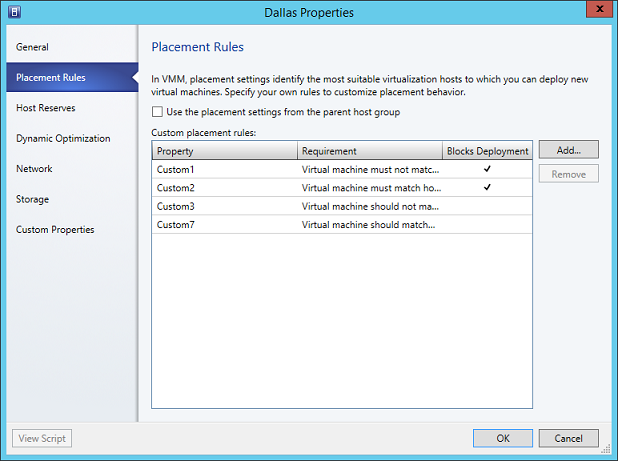
- Must Match: This indicates that the virtual machine deployment will be blocked on the destination virtualization host if virtual machine property does not match the virtualization host property. The end result is that virtual machine deployment will be blocked.
- Should Match: This condition is same as “Must Match” condition except a warning message will be shown to the user about the condition mismatch.
- Must Not Match: The deployment of virtual machines will be blocked if the property value matches with the destination virtualization hosts.
- Should Not Match: If a condition matches, placement wizard will show a warning message to users when deploying or migrating virtual machines to destination Hyper-V hosts.
The placement rules are very helpful when you want to have granular control over the deployment of virtual machines.
Host Reserves Tab: Next tab is “Host Reserves”. As the name suggests, Host Reserves allow you to keep a pool of resources such as CPU, memory, and Disk Space reserved on all virtualization hosts residing in a VMM host group as shown in the screenshot below.

Figure 4
By default, host reserve settings are inherited from the parent VMM host group. However, you can always uncheck “Use the host reserves settings from the parent host group” option to configure host reserve settings for a child VMM host group. Host reserve settings are very useful when you have a few virtual machines that need to be up and running on a particular virtualization host. Such virtual machines do not participate in live migration events and are always up and running on a particular virtualization host.
Before the virtual machines can be placed on a virtualization host, the host must be able to meet the resource requirements of virtual machines without considering the host reserves. VMM always takes host reserve settings of virtualization hosts into consideration before the virtual machine can be moved to a virtualization host.
Note:
Host reserves setting can be configured for individual VMM host groups and for individual virtualization hosts. As part of the host reserve setting, you can configure CPU, Memory, Disk Space, Disk I/O and Network I/O as shown in the screenshot above.
Host reserves setting can be configured for individual VMM host groups and for individual virtualization hosts. As part of the host reserve setting, you can configure CPU, Memory, Disk Space, Disk I/O and Network I/O as shown in the screenshot above.
Summary
In this article, we explained configuration tabs that are available on the property page of a VMM host group. We explained the use of Placement Rules that VMM uses before a virtual machine can be placed on a virtualization host. We also explained host reserve settings that are used to reserve a pool of resources on the virtualization hosts residing in a VMM host group.
In the third part of this article series, we will continue to look at the other configuration tabs such as dynamic optimization options, storage, networking, and custom properties.
CVMM 2012 R2 Networking and Storage (Part 3)
In the second part of this article series, we explained general, placement rules, and host reserves tabs. In this part, we will learn about Dynamic and Power Optimization features of VMM and different settings that you can configure at Dynamic and Power Optimization tabs.
Dynamic Optimization Tab: Dynamic optimization is a mechanism in which VMM performs load balancing within the host clusters that support live migration. The settings that you enter at Dynamic Optimization tab, as shown in the screenshot below, is used by the VMM to automatically load balance the virtual machines across a host cluster.

By default, Dynamic Optimization settings are inherited from the parent VMM host group. In case you need to configure Dynamic Optimization settings for the current VMM host group, uncheck “Use dynamic optimization settings from the parent host group” and then specify the settings under “Thresholds” configuration page. However, it is important to take a note of the points listed below before using the Dynamic Optimization feature:
- Dynamic optimization settings will work only for host clusters. If a VMM host group contains standalone hosts or host clusters that do not support live migration feature of Hyper-V, Dynamic Optimization will not be performed for those hosts.
- Virtualization hosts that are in maintenance mode will be excluded from Dynamic Optimization.
- It is also important to understand that any Hyper-V cluster that contains virtual machines that are not highly available, Dynamic Optimization will be ignored for such virtual machines.
- VMM supports Dynamic Optimization feature for Hyper-V hosts, VMware ESXi and Citrix XenServers.
The following settings can be configured at the Dynamic Optimization configuration tab:
- Aggressiveness: In Aggressiveness, you can select one of three levels; High, Medium, and Low. Aggressiveness determines the amount of load imbalance that is required before the live migration of virtual machines can be started. Before live migrating a virtual machine, VMM takes aggressiveness setting into consideration. For example, if you set the aggressiveness to High, VMM will try to achieve more virtual machine migrations to achieve a better balance of the host resources across the host cluster. The default setting for aggressiveness is set to medium which should be acceptable in most of the environment. In case you see any impacts of Dynamic Optimization, you can always increase/decrease aggressiveness.
- Automatically migrate virtual machines to balance load at this frequency (minutes): By configuring this setting, you are allowing VMM to move virtual machines automatically across a host cluster to load balance the resources on all nodes running in a host cluster. By default, the value is set to 10 minutes, which is suitable for most of the environment. So leave the frequency with its default value unless you have a reason to change it.
- Dynamic Optimization Thresholds: Although Dynamic Optimization is an automatic mechanism, but it needs to know the initial values to determine the need for optimizing the nodes running in a host cluster. VMM uses “Thresholds” configured on a VMM host group before hosts can be considered for optimization. You can configure threshold settings for CPU, Memory, Disk I/O and Network I/O as shown in the screenshot above.
Apart from configuring Dynamic Optimization settings, you can also configure Power Optimization settings for hosts located in a VMM host group. Power Optimization, a very useful feature of SCVMM, helps you conserve energy by having VMM turn off hosts when they are not needed. VMM can automatically turn hosts on when they are needed. To enable Power Optimization, all you need to do is to check “Enable power optimization” checkbox as shown in the screenshot above. Once checked, next is to define the thresholds and schedule so VMM can consider these values when executing Power Optimization functions. Click on “Settings” button to show you below configuration window.
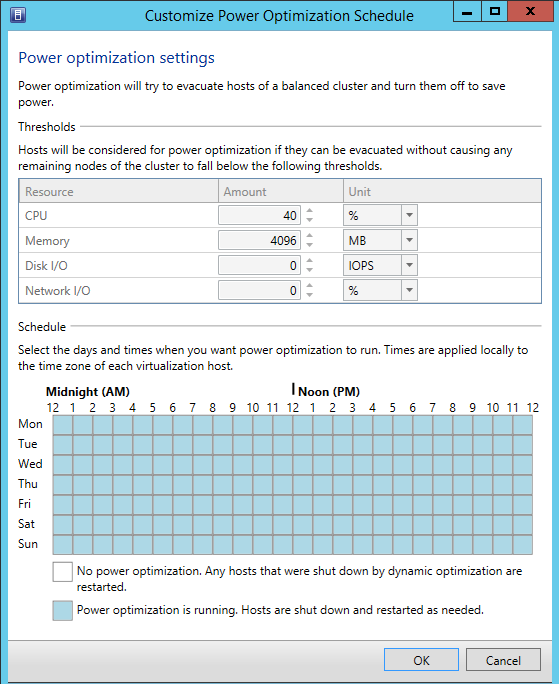
Figure 2
As stated on the Customize Power Optimization Schedule window, hosts located in a VMM host group can be considered for power optimization only if it meets the threshold values and the schedule. Similar to Dynamic Optimization, you need to define the thresholds for CPU, Memory, Disk I/O and Network I/O as shown in the screenshot above. However, before using Power Optimization feature for virtualization hosts take a note of the points listed below:
- Since resource utilization can fluctuate even in a quiet period and this may result in Power Optimization events, ensure that plenty of buffer resources are configured for virtualization hosts.
- It is important to note that you may not want Power Optimization to occur during business hours. It is because the time it takes to restart virtualization hosts may be longer. So set the schedule to exclude business hours.
- Another important thing to note is that VMM requires BMC to be configured on the property page of virtualization hosts before the virtualization hosts can be powered off. If BMC is not configured or not present, VMM will not be able to power down virtualization hosts.
- Power Optimization is only available when virtual machines are being live migrated automatically by the Dynamic Optimization feature.
Note:VMM migrates all virtual machines to the other nodes in the cluster before turning off the virtualization hosts as part of the Power Optimization event. If VMM needs a virtualization host, it turns on and then performs the dynamic optimization to balance the load within the host cluster.
Summary
In this article, we explained about Dynamic and Power Optimization features of VMM. Dynamic Optimization, an automatic mechanism built into VMM, helps you load balance host resources across host clusters. Power Optimization helps you conserve energy by turning virtualization hosts off when they are not needed and turning them on when they are needed.In the part IV of this article series, we will continue to look at the remaining configuration tabs such as Network, Storage and Custom Properties before we deep dive into VMM networking.