In this article, we are going to take a close look at all the configuration tabs that are available on the property page of a virtualization host.
SCVMM is a complex product, but it provides the capabilities to manage entire virtualization stack of an organization. SCVMM can manage Hyper-V, ESXi, and Citrix XenServers. SCVMM provides host groups as a basic management unit for resources such as network and storage. You can also configure placement rules, dynamic optimization settings on the property page of a VMM host group.
When you add virtualization hosts under VMM management, VMM agent collects all the settings that are configured on the virtualization hosts and helps you configure or maintain the settings from the central VMM management console. In other words, VMM allows you to configure virtualization hosts via VMM by means of the configuration tabs that are available on the property page of a virtualization host. By just looking at the configuration tabs, a virtual administrator can always get an idea as to what these configuration tabs are all about. However, by just looking at the configuration tabs is not going to help you unless you know how this information is useful to you before performing an action or configuring a feature.
Hyper-V Host Properties in SCVMM 2012 R2 (Part1)
There are several configuration tabs available such as General, Status, Hardware, Host Access, Virtual Machine Paths, Reserves, Storage, Virtual Switches, Migration Settings, Placement Paths, Servicing Windows, and Custom Properties as shown in the screenshot below. In this article, we are going to take a close look at General, Status, and Hardware tabs.
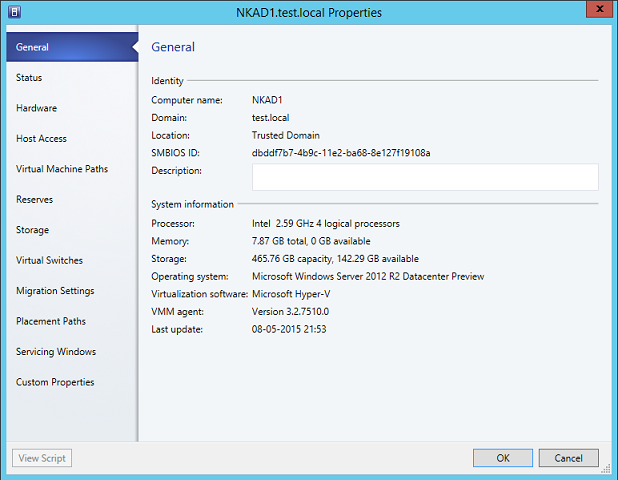
Some configuration tabs contain the information that might be helpful in some cases. For example, the General tab contains the system information associated with the virtualization host. By just looking at the General Tab, you'll know the Operating System that is installed on the Hyper-V host, VMM Agent version, total memory assigned to virtualization host and available memory. Let’s take a look at all items one by one that are available on the General Tab:
- Domain: It shows the domain name to which this Hyper-V host is joined to.
- SMBIOS ID: This is the unique ID that is discovered from the Hyper-V host and used by VMM when performing a bare-metal deployment.
- Description: In case you need to type a short description for identification purpose, you can do so by typing some text in the Description text box as shown in the screenshot above.
- Storage: Shows the total capacity and available storage on the Hyper-V host.
- Virtualization Software: Shows the virtualization software running on the destination virtualization host.
- VMM Agent: It is important to note that VMM does not notify you if a Hyper-V host is running an outdated version of the VMM agent. However, since General Tab shows the VMM Agent version that is running on the Hyper-V host, by just looking at the General Tab, you'll know if the current Hyper-V host requires an updated version of the VMM Agent. You can also design a PowerShell script that can help you get VMM Agent versions on all managed Hyper-V hosts.
- Last Update: Shows the last date when the VMM agent was updated on the Hyper-V host.
In case a VMM or Hyper-V related component is not working on the destination Hyper-V host, you are going to take a look at the Status Tab. Status Tab, that is the next tab, shows the overall status of Hyper-V and VMM related components running on the destination Hyper-V host as shown in the screenshot below.
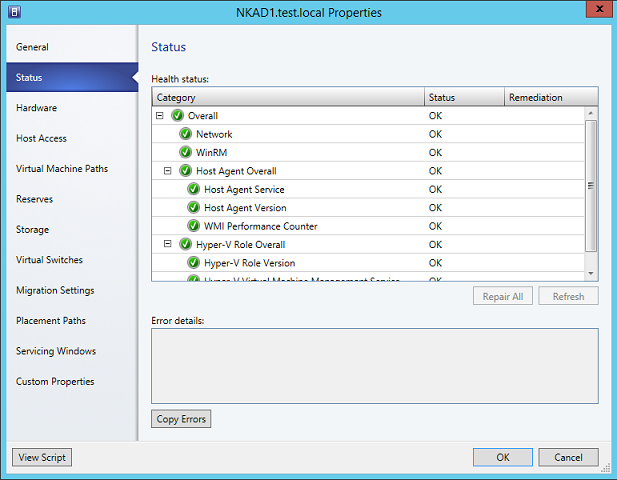
As you can see in the above screenshot, the Status Tab shows the overall status of all the components. It also shows the status of each sub-item such as WinRM component on Hyper-V host, VMM agent service status, VMM agent version and WMI performance counter. Note that there are two buttons available on the Status Tab; “Repair All” and “Refresh”.
If Hyper-V host is experiencing any issues or not able to communicate to the VMM Management Server, you can always use the “Repair All” button that might be able to rectify known issues on the destination Hyper-V host. Clicking on “Refresh” button will help you get current status for each item. If overall status shows “Critical”, it is always a good practice to repair the items by clicking the “Repair All” button. In case “Repair All” button does not solve the issues, consider rejoining Hyper-V host to VMM.
The equivalent PowerShell cmdlet for “Repair All” button is Repair-SCVMHost. For example, to execute repair function from a command line for a Hyper-V host, use the below PowerShell commands on the VMM Management Server:
- $RunAsAccount = Get-SCRunAsAccount –Name “Hyper-VAccount”
- Get-SCVMHost –ComputerName “Hyper-VHost1” | Repair-SCVMHost –Credential $RunAsAccount
There are two commands that you need to run one by one in the PowerShell command window. First command gathers the credentials for Run As Account and second command executes the repair function on Hyper-V host specified after “-ComputerName” parameter using the credentials that you specified in the first command.
Next tab that is available on the property page of a Hyper-V host is Hardware as shown in the screenshot below: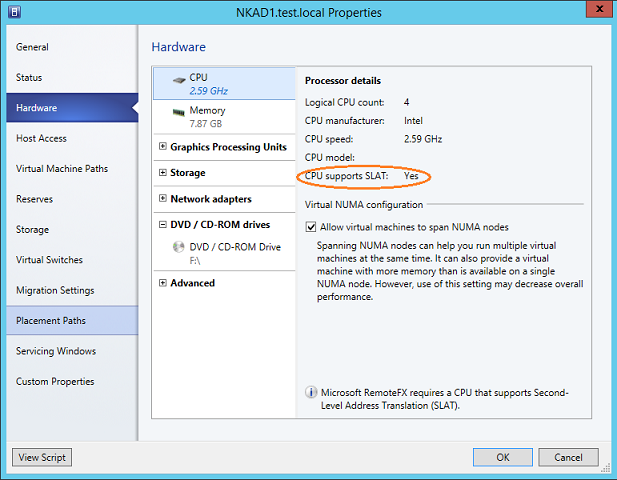
Hardware Tab shows the hardware related information for the destination Hyper-V host such as CPU, memory configured on the Hyper-V host, local storage, network adapters configured, etc. As you can see in the screenshot above, when clicking on the CPU, it shows the CPU related information for the destination Hyper-V host. This Hyper-V host has four logical CPU processors, CPU speed is 2.59 GHz and manufacturer is Intel.
- CPU Supports SLAT: The information that is provided on the hardware tab is useful in some cases. For example, before using SR-IOV feature of Hyper-V, the destination Hyper-V hardware must support Second Level Address Translation (SLAT). This is one of the requirements that must be met before using SR-IOV feature. This information is very much available on the hardware tab as shown in the red circle of the above screenshot. Therefore, before configuring the virtual machine to use SR-IOV feature, take a look at the “CPU supports SLAT” row.
- Enabling/Disabling NUMA: On the hardware tab, you also have an option to enable/disable NUMA for virtual machines. It is important to note that by default, Windows Server 2012 Hyper-V and later hosts enable NUMA spanning which, in turn, allows virtual machines to access and use memory across NUMA nodes. Whether to enable or disable NUMA spanning on a destination Hyper-V host must be considered by assessing the impact on virtual machines. Note that enabling NUMA spanning on a destination Hyper-V host will result in poor performance or virtual machine may not start if the required memory is not available in a NUMA node. As a best practice, it is recommended that you disable the NUMA spanning on destination Hyper-V hosts and enable it only if you think virtual machines will not suffer from any performance issues.
Summary
In this article, we looked at the General, Status and Hardware configuration tabs that are available on the property page of a Hyper-V host in VMM and the information that can be useful before you configure any feature. For example, hardware tab provides you necessary information before enabling SR-IOV for virtual machines. At the same tab, you can also enable/disable NUMA for Hyper-V host and use of “Repair All” button located on the Status tab helps you repair any VMM related components on the destination Hyper-V hosts.
In the second part, we will continue to look at other configuration items available on the Hardware tab.
Hyper-V Host Properties in SCVMM 2012 R2 (Part2)
In this part of the article series, we will continue from part one and explain other items that are available on the Hardware tab, but our focus is geared primarily towards storage devices attached to a Hyper-V host.
There are several configuration tabs available on the property page of a Hyper-V host in VMM. In the first part of this article series, we explained the items that are available on the Status and General Tabs. We also explained a few items that are available on the Hardware tab such as processor details, if processor supports SLAT or not, and configuring NUMA for a Hyper-V host.
When you add a Hyper-V host under VMM management, VMM Agent collects all settings configured on the Hyper-V host, including local and remote storage devices attached to a Hyper-V host. VMM Agent also collects volumes configured on the Hyper-V host. Clicking the Hardware tab and expanding the “Storage” section will provide you the list of volumes that have been created on the Hyper-V host as shown in the figure 1.0 below:

As you can see in the above screenshot, there are three volumes configured on the Hyper-V host; C:\ and E:\ and F:\. When you click on each drive letter, you will see volume label, total and available storage on the volume. It is important to note that by just looking at the “Storage” section, you cannot know if the volume is created from a local storage such as local disk connected to the Hyper-V host or from a LUN allocated from block-based storage such as Fibre Channel, iSCSI or Serial Attached SCSI (SAS).
How can I differentiate between Local and Remote Storage?
SCVMM does a great job in differentiating between local and remote storage. In case you need to see whether the volumes created on a Hyper-V host are from local or remote storage, you are going to look at the Storage Tab as shown in the figure 1.1 below:

When a Hyper-V host is added under VMM management, VMM Agent collects the volumes configured on the Hyper-V and then takes the following actions:
- All volumes created from a directly connected disk are added to “Local Storage” classification.
- All volumes created from block-based storage are added under “Remote Storage” classification.
As you can see in the above screenshot, PHYSICALDRIVE0 disk is added under the “Local Storage” classification. It is because volume C:\ is created from a local disk attached to the Hyper-V host. Figure 1.2 below shows that PHYSICALDRIVE1 is added under the “Remote Storage” classification. This is because volume E:\ is created from a block-based storage device.

There are other ways to differentiate between Local and Remote storage. You can also check Logical Unit ID of a disk. For a disk that is coming from a block-based storage will always have a unique GUID as shown in the screenshot above.
While the information provided on total capacity and available storage for each drive is useful, there is one setting that you would always want to pay attention to. The option “Available for placement”, as indicated in the red square in figure 1.0 above, is used by VMM to gather the list of storage devices that will be available for placing virtual machine files. When you deploy a virtual machine on a Hyper-V host via VMM, the Intelligent Placement feature of VMM will gather the list of storage devices available for placing the virtual machine. If VMM does not find any available storage for placing virtual machine files, you will receive an error message as shown in the figure 1.3 below.

Do I need to check “Available for Placement” option for Local Storage?
By default, local storage devices will be available for placement. In other words, “Available for Placement” option is ticked for local storage. When deciding whether to check “Available for Placement” option for local storage or not, the only thing you need to keep in mind is that if workloads require high availability, you should select remote storage or shared storage. There is no point in making local storage available for virtual machine placements if all of your workloads require high availability, but nothing is stopping you from selecting “Available for Placement” option for local drives. It completely depends on your environment. If you need to store a virtual machine on local drives on a Hyper-V host, check “Available for Placement” option for local drives also.
VMM will show you drives that are available for placement when you click Browse button to select a drive for placing the virtual machine as shown in the screenshot below.

Summary
In this article we explained the Storage section that is available on the Hardware Tab of a Hyper-V host. Expanding the storage section will show you all volumes that are configured on the Hyper-V host. When you click on a volume, you will see volume label, total and available storage on the volume. By looking at the Storage Tab, you can identify if the storage allocated to Hyper-V host is from local disks attached to the Hyper-V host or block-based storage such as Fibre Channel, iSCSI or Serial Attached SCSI (SAS).
“Available for Placement” option that is available for every volume of Hyper-V host helps you block/unblock deployment of virtual machines to specific volumes. In case a volume is not available for the placement, Intelligent Placement of VMM will show an error when you try to deploy a virtual machine.
In the next part of this article series, we will focus on the Network Adapters section found on the Hardware Tab.
Hyper-V Host Properties in SCVMM 2012 R2 (Part3)
There are several configuration tabs available on the property page of a Hyper-V host in VMM. In the first part of this article series, we explained the items that are available on the Status and General Tabs. We also explained a few items that are available on the Hardware tab such as processor details, whether the processor supports SLAT or not, and configuring NUMA for a Hyper-V host. In the second part, we explained items available on the Storage tab.
As stated earlier, when adding Hyper-V hosts under VMM management, the VMM agent collects all the configuration settings from the Hyper-V host. This also includes physical network adapters that are attached to the Hyper-V host as shown in the figure 1.0 below.

When you click on any of the physical network adapters, you will see the status of the physical network adapter, MAC Address, whether the network adapter is configured to receive TCP/IP settings from a DHCP server or not, and IP addresses assigned to the network adapters.
Configuring “Available for Placement” and “Used by Management” Options
There are two settings you can configure for each network adapter; “Available for Placement” and “Used by Management” as shown in the red square of the screenshot above. “Available for Placement” option, when checked, indicates that this network adapter is available for placement and can be used by VMM when implementing a Hyper-V cluster via VMM. “Used by Management” option, when checked, allows Hyper-V to use the network adapter for management traffic.
As part of Hyper-V deployment best practices, it is always recommended to keep management traffic separate from the virtual machine traffic. Considering this best practice item, each Hyper-V host should have at least two physical network adapters. One network adapter can be used for virtual machine traffic and the other network adapter can be used for management traffic. When configuring network adapters for destination Hyper-V host via VMM, ensure that you uncheck “Used by Management” option for the network adapter that you want to make available only for virtual machine communications. For the second network adapter that you want to make available for virtual machine management traffic, you must check “Used by Management” option.
Tip:
It is recommended that you enter the descriptive text in the description box for each network adapter. It helps you identify the role of a network adapter. For example, you can type “Management traffic” or “Virtual Machine traffic” in the description box.
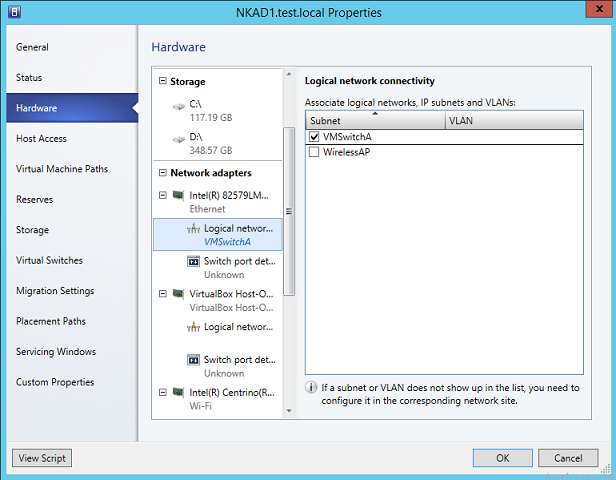
For each network adapter, you can also configure Logical Network Connectivity and Switch Ports as shown in the figure 1.1 below.

In Logical Network Connectivity, you will see the list of logical switches that this network adapter is connected to. Note that when you add Hyper-V hosts under VMM management, all Hyper-V external switches that are created on the destination Hyper-V host will be linked to the corresponding physical network adapter. As you can see in the above list, VMSwitchA is an external Hyper-V switch that was added and linked to the first physical network adapter.
Disabling Automatic Creation of Logical Networks
In case the network adapter is not associated with a logical network, a new one will be created by VMM. The automatic creation and association of Hyper-V virtual switches can be disabled by configuring the Global Network Settings in VMM. In case you do not want VMM to create logical networks automatically when you add a Hyper-V host under VMM management, uncheck “Create logical networks automatically” option as shown in the red square of the figure 1.2 below.

As shown in the figure 1.1 above, the first network adapter is configured to use logical switch by name VMSwitchA. This is the logical switch that I have created for virtual machine communications. There is another logical switch named WirelessAP that is not associated with the current network adapter. This is because the WirelessAP logical switch is used solely for Hyper-V management traffic.
Configuring Baseboard Management Controller Settings
In the network adapter advanced section, you can configure the Baseboard Management Controller (BMC) settings for the Hyper-V host as shown in the figure 1.3 below.

BMC allows you to power the host on and off by using the VMM console. BMC settings are also used by the Power Optimization feature of VMM. Before you can configure BMC settings, Hyper-V host must have a BMC installed and supports one of the following out-of-band management protocols:
- Intelligent Platform Management Interface (IPMI) versions 1.5 or 2.0
- Data Center Management Interface (DCMI) version 1.0
- System Management Architecture for Server Hardware (SMASH) version 1.0 over WS-Management (WS-Man)
- Check “This physical computer is configured for out of band (OOB) management”option.
- BMC Address: Specify the BMC IP Address.
- BMC Port: Specify the BMC port number. By default, VMM automatically populates the port number for the selected OOB management protocol. For “Intelligent Platform Management Interface (IPMI)” protocol, 623 is populated as the port number and for “System Management Architecture for Server Hardware (SMASH)” protocol, port 443 is populated.
- RunAs Account: You must also create a RunAs account that has permissions to access BMC on destination Hyper-V host.
Summary
In the third part of this article series, we explained the use of “Available for Placement” and “Used by Management” options. We also explained the Baseboard Management Controller settings that help you power the host on and off manually using VMM Console or by using Power Optimization feature of VMM.
In the next part of this article series, we will continue to look at other tabs available on the property page of a Hyper-V host. We will explain items available on the Virtual Machine Paths and Host Access Tabs.
Hyper-V Host Properties in SCVMM 2012 R2 (Part4)
In this article we'll explain Virtual Machine Paths and Host Access tabs. We also explain the process for registering the virtual machines on the destination Hyper-V host by just providing the path to virtual machine files.
In the part 3 of this article series, we explained Network Adapters associated with a Hyper-V host, and Baseboard Management Controller (BMC) settings. BMC settings, once configured for a Hyper-V host, can be used by a VMM administrator to power the host on and off manually or automatically using the Power Optimization feature of VMM. In case you need to turn a Hyper-V host on and off, right click on the Hyper-V host and then click on “Power On” or “Power Off” actions as shown in the red square of the figure 1.0 below:

This is part 4 of this article series. In this article, we will look at virtual machine paths and host access tabs available on the property page of a Hyper-V host managed by Virtual Machine Manager.
Virtual Machine Paths Tab: When a Hyper-V host is added under VMM management, V
MM gathers the list of virtual machines registered on the Hyper-V host. You can see the list of virtual machines registered with a Hyper-V host by navigating to the Virtual Machines Paths tab as shown in the figure 1.1 below.

VMM displays the virtual machines registered with the Hyper-V host under the Virtual Machines list box. As you can see, this Hyper-V host has two virtual machines registered; Gen2VM and VM1. Virtual Machines list box also shows the status, processor, memory and storage used by a virtual machine. VMM also allows you to register virtual machines with selected Hyper-V host. In case you need to register virtual machines, you need to click on the “Add” button and then select the path where virtual machine files reside.
Tip:
When registering virtual machines with the Hyper-V host, select the virtual machine folder where virtual machine files such as XML files, VHD files reside.
Host Access Tab: In the Host Access tab, you can configure the RunAs account used by the VMM to communicate with the Hyper-V host. Host Access tab also allows you to configure host placement options and remote connection port as shown in the figure 1.2 below.

To configure a new RunAs account for a Hyper-V host, click on the “Browse” button and then select a RunAs account to communicate with VMM Agent running on the Hyper-V host.
Tip:It is important to note that if the Hyper-V host is part of a Hyper-V cluster, the “Browse” button will be greyed out. In case you need to change RunAs account for Hyper-V host that is part of a Hyper-V cluster, you need to use a series of PowerShell cmdlets as listed below:
- $MyHVCluster = Get-SCVMHostCluster –Name “Hyper-VClusterName”
- $MyRunAsAccount – Get-SCRunAsAccount –Name “RunAsAccountName”
- Set-SCVMHostCluster –VMHostCluster $MyHVCluster –VMHostManagementCredential $MyRunAsAccount
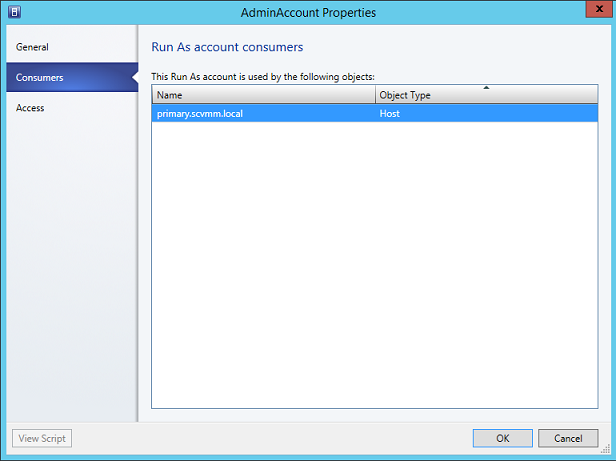
Figure 1.3: Run As Account Consumers
On the Host Access tab, you need to pay attention to one setting that is “This host is available for placement”. By default, when you add a Hyper-V host under VMM management, VMM checks “This host is available for placement” option. If you uncheck this option, the Hyper-V host will not be listed during placements and will not be available to host virtual machines deployed via VMM.
Configuring Remote Connection Port
On the Host Access tab, you can also configure Remote Connection Port. VMM connects to virtual machines running on a Hyper-V host over network port 2179. By default, when you add a Hyper-V host under VMM management, VMM configures 2179 as the network port for connecting to virtual machines registered on that Hyper-V host. You can change the port number on the Host Access Tab, but just changing the port number on the Host Access tab will not work. You might also want to configure the new port in the firewall to allow VMM to connect to virtual machines on that Hyper-V host.
Each remote connection to a virtual machine is opened using a separate VMConnect.exe connection. There are several components running in the VMMS.exe process on the Hyper-V host. One of them is “Single Port Listener for RDP”. This is what happens when you connect to a virtual machine on a Hyper-V host:
- VMM Administrator connects to a virtual machine via VMM.
- The connection request is redirected to VMMS.EXE process on the Hyper-V host.
- VMMS.EXE process receives the request and then redirects the request to “Single Port Listener for RDP” component.
- Single Port Listener for RDP receives the request and redirects the request to worker process (VMWP.EXE) of the virtual machine.
- Worker Process receives the request and enables a remote connection to the virtual machine.
Virtual Machine Connection uses the Terminal Services ActiveX control to create a connection over TCP port 2179. ActiveX control is the same component that is used by the RDP client application (MSTSC.EXE).
Summary
In the part 4 of this article series, we explained Virtual Machine Paths and Host Access tabs. We also explained the process for registering the virtual machines on the destination Hyper-V host by just providing the path to virtual machine files. You can configure a RunAs account on the Host Access tab for a Hyper-V host to allow VMM to communicate with VMM Agent running on the Hyper-V host. And, to configure RunAs account for a Hyper-V host that is part of a failover cluster, you must use the PowerShell commands as explained in this part.