This article describes the installation of Oracle Database 12c Release 2 (12.1 64-bit) RAC on Oracle Linux 7.1 64-bit using NFS to provide the shared storage.
We can use NFS to provide shared storage for a RAC installation. In a production environment we would expect the NFS server to be a NAS, but for testing it can just as easily be another server, or even one of the RAC nodes itself.
In this case, I'm doing the installations on VirtualBox VMs and the NFS shares are on the host server. If you have access to a NAS or a third server you can easily use that for the shared storage. Whichever route you take, the fundamentals of the installation are the same.
The Single Client Access Name (SCAN) should really be defined in the DNS or GNS and round-robin between one of 3 addresses, which are on the same subnet as the public and virtual IPs. You can try to use a single IP address in the "/etc/hosts" file, which it will cause the cluster verification to fail, but it allows me to complete the install without the presence of a DNS.
Assumptions. You need two machines available to act as your two RAC nodes. They can be physical or virtual. In this case I'm using two virtual machines called "ol7-121-rac1" and "ol7-121-rac2". If you want a different naming convention or different IP addresses that's fine, but make sure you stay consistent with how they are used.
Node 1.
In this article, I performed the installation using VirtualBox virtual machines, so I also configured a NAT adapter on each machine to allow access to the internet. If you are using physical machines, or virtual machines with direct access to the internet over the public network, like bridged connections, this extra adapter will not be necessary, so ignore the references to it.
It is probably worth doing a full update as well, but this is not strictly speaking necessary.
Add or amend the following lines to the "/etc/sysctl.conf" file.
Run the following command to change the current kernel parameters.
Add the following lines to the "/etc/security/limits.conf" file.
In addition to the basic OS installation, the following packages must be installed whilst logged in as the root user. This includes the 64-bit and 32-bit versions of some packages.
Create the new groups and users.
Uncomment the extra groups you require.
Perform the following steps whilst logged into the "ol7-121-rac1" virtual machine as the root user.
Set the password for the "oracle" user.
Apart form the localhost address, the "/etc/hosts" file can be left blank, but I prefer to put the addresses in for reference.
The SCAN address is commented out of the hosts file because it must be resolved using a DNS, so it can round-robin between 3 addresses on the same subnet as the public IPs.
Make sure the "/etc/resolv.conf" file includes a nameserver entry that points to the correct nameserver. Also, if the "domain" and "search" entries are both present, comment out one of them. For this installation my "/etc/resolv.conf" looked like this.
If you are doing this installation on a virtual machine and you've configured a NAT interface, you might find the changes to the "resolv.conf" will be overwritten by the network manager. For this reason, this interface should now be disabled on startup. You can enable it manually if you need to access the internet from the VMs. Edit config file associated with the NAT network adapter, in this case the "/etc/sysconfig/network-scripts/ifcfg-enp0s3" (eth0) file, making the following change. This will take effect after the next restart.
There is no need to do the restart now. You can just run the following command. Remember to amend the adapter name if yours are named differently.
At this point, the networking for the first node should look something like the following. Notice that enp0s3 (eth0), my NAT adapter, has no associated IP address because it is disabled. If you are not using a VM and only configured two network adapters, you will not see this.
With this in place and the DNS configured the SCAN address is being resolved to all three IP addresses.
Amend the "/etc/security/limits.d/20-nproc.conf" file as described below. See MOS Note [ID 1487773.1]
Change the setting of SELinux to permissive by editing the "/etc/selinux/config" file, making sure the SELINUX flag is set as follows.
If you have the Linux firewall enabled, you will need to disable it.
Either configure NTP, or make sure it is not configured so the Oracle Cluster Time Synchronization Service (ctssd) can synchronize the times of the RAC nodes. If you want to deconfigure NTP do the following, which is what I did for this installation.
If your RAC is going to be permanently connected to your main network and you want to use NTP, you must add the "-x" option into the following line in the "/etc/sysconfig/ntpd" file.
Then restart NTP.
Log in as the "oracle" user and add the following lines at the end of the "/home/oracle/.bash_profile" file.
Create a file called "/home/oracle/grid_env" with the following contents.
Once the "/home/oracle/.bash_profile" has been run, you will be able to switch between environments as follows.
We've made a lot of changes, so it's worth doing a reboot of the machines at this point to make sure all the changes have taken effect.
Add the following lines to the "/etc/exports" file.
Run the following command to export the NFS shares.
On both ol7-121-rac1 and ol7-121-rac2 create the directories in which the Oracle software will be installed.
Add the following lines to the "/etc/fstab" file.
Mount the NFS shares on both servers.
Make sure the permissions on the shared directories are correct.
Select the "Install and Configure Grid Infrastructure for a Cluster" option, then click the "Next" button.
![]()
Select the "Configure a Standard Cluster" option, then click the "Next" button.
![]()
Select the "Advanced Installation" option, then click the "Next" button.
![]()
Select the the required language support, then click the "Next" button.
![]()
Enter cluster information and uncheck the "Configure GNS" option, then click the "Next" button.
![]()
On the "Specify Node Information" screen, click the "Add" button.
![]()
Enter the details of the second node in the cluster, then click the "OK" button.
![]()
Click the "SSH Connectivity..." button and enter the password for the "oracle" user. Click the "Setup" button to configure SSH connectivity, and the "Test" button to test it once it is complete. Click the "Next" button.
![]()
Check the public and private networks are specified correctly, then click the "Next" button.
![]()
Select the "Shared File System" option, then click the "Next" button.
![]()
Select the required level of redundancy and enter the OCR File Location(s), then click the "Next" button.
![]()
Select the required level of redundancy and enter the Voting Disk File Location(s), then click the "Next" button.
![]()
Accept the default failure isolation support by clicking the "Next" button.
![]()
Don't register with Cloud Control. Click the "Next" button.
![]()
Select the preferred OS groups for each option, then click the "Next" button. Click the "Yes" button on the subsequent message dialog.
![]()
Enter "/u01/app/oracle" as the Oracle Base and "/u01/app/12.1.0.2/grid" as the software location, then click the "Next" button.
![]()
Accept the default inventory directory by clicking the "Next" button.
![]()
Ignore the root configuration, we will run the scripts manually. Click the "Next" button.
![]()
Wait while the prerequisite checks complete. If you have any issues, either fix them or check the "Ignore All" checkbox and click the "Next" button. If there are no issues, you will move directly to the summary screen.
![]()
If you are happy with the summary information, click the "Install" button.
![]()
Wait while the setup takes place.
![]()
When prompted, run the configuration scripts on each node.
![]()
The output from the "orainstRoot.sh" file should look something like that listed below.
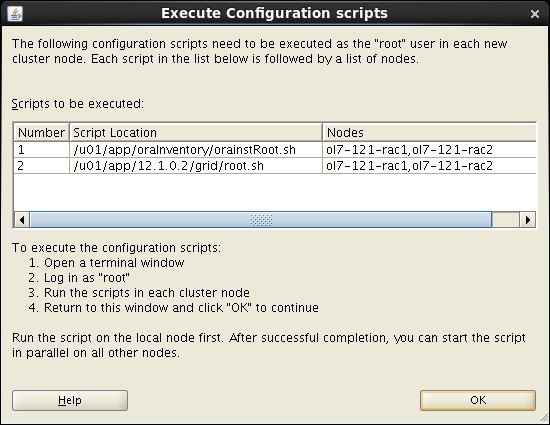
Once the scripts have completed, return to the "Execute Configuration Scripts" screen on ol7-121-rac1 and click the "OK" button.
![Grid - Execute Configuration Scripts]()
Wait for the configuration assistants to complete.
![]()
We expect the verification phase to fail with an error relating to the SCAN, assuming you are not using DNS.
Provided this is the only error, it is safe to ignore this and continue by clicking the "Next" button.
Click the "Close" button to exit the installer.
![]()
The grid infrastructure installation is now complete.
![]()
Accept the "Create and configure a database" option by clicking the "Next" button.
![]()
Accept the "Server Class" option by clicking the "Next" button.
![]()
Select the "Oracle Real Application Clusters database installation" option, then click the "Next" button.
![]()
Select the "Admin managed" option, then click the "Next" button.
![]()
Make sure both nodes are selected, then click the "Next" button.
![]()
Accept the "Typical install" option by clicking the "Next" button.
![]()
Enter "/u01/app/oracle/product/12.1.0.2/db_1" for the software location. The storage type should be set to "File System" with the file location set to "/u01/oradata". Enter the appropriate passwords and database name, in this case "cdbrac".
![]()
Wait for the prerequisite check to complete. If there are any problems either fix them, or check the "Ignore All" checkbox and click the "Next" button.
![]()
If you are happy with the summary information, click the "Install" button.
![]()
Wait while the installation takes place.
![]()
When prompted, run the configuration scripts on each node. When the scripts have been run on each node, click the "OK" button.
![]()
Once the software installation is complete the Database Configuration Assistant (DBCA) will start automatically.
![]()
Once the Database Configuration Assistant (DBCA) has finished, click the "OK" button.
![]()
Click the "Close" button to exit the installer.
![]()
The RAC database creation is now complete.
The
For the client to work we need to switch the "libodm12.so" library for the "libnfsodm12.so" library, which can be done manually or via the "make" command.
With the configuration complete, you can see the direct NFS client usage via the following views.
The Direct NFS Client supports direct I/O and asynchronous I/O by default.
- Introduction
- Download Software
- Operating System Installation
- Oracle Installation Prerequisites
- Automatic Setup
- Manual Setup
- Additional Setup
- Create Shared Disks
- Install the Grid Infrastructure
- Install the Database
- Check the Status of the RAC
- Direct NFS Client
Introduction
NFS is an abbreviation of Network File System, a platform independent technology created by Sun Microsystems that allows shared access to files stored on computers via an interface called the Virtual File System (VFS) that runs on top of TCP/IP. Computers that share files are considered NFS servers, while those that access shared files are considered NFS clients. An individual computer can be either an NFS server, a NFS client or both.We can use NFS to provide shared storage for a RAC installation. In a production environment we would expect the NFS server to be a NAS, but for testing it can just as easily be another server, or even one of the RAC nodes itself.
In this case, I'm doing the installations on VirtualBox VMs and the NFS shares are on the host server. If you have access to a NAS or a third server you can easily use that for the shared storage. Whichever route you take, the fundamentals of the installation are the same.
The Single Client Access Name (SCAN) should really be defined in the DNS or GNS and round-robin between one of 3 addresses, which are on the same subnet as the public and virtual IPs. You can try to use a single IP address in the "/etc/hosts" file, which it will cause the cluster verification to fail, but it allows me to complete the install without the presence of a DNS.
Assumptions. You need two machines available to act as your two RAC nodes. They can be physical or virtual. In this case I'm using two virtual machines called "ol7-121-rac1" and "ol7-121-rac2". If you want a different naming convention or different IP addresses that's fine, but make sure you stay consistent with how they are used.
Download Software
Download the following software.Operating System Installation
This article uses Oracle Linux 7.1. More specifically, it should be a server installation with a minimum of 2G swap (preferably 3-4G), firewall disabled and SELinux set to permissive. Oracle recommend a default server installation, but if you perform a custom installation include the following package groups.- Server with GUI
- Hardware Monitoring Utilities
- Large Systems Performance
- Network file system client
- Performance Tools
- Compatibility Libraries
- Development Tools
Node 1.
- hostname: ol7-121-rac1.localdomain
- enp0s3 (eth0): DHCP (Connect Automatically)
- enp0s8 (eth1): IP=192.168.56.101, Subnet=255.255.255.0, Gateway=192.168.56.1, DNS=192.168.56.1, Search=localdomain (Connect Automatically)
- enp0s9 (eth2): IP=192.168.1.101, Subnet=255.255.255.0, Gateway=
, DNS= , Search= (Connect Automatically)
- hostname: ol7-121-rac2.localdomain
- enp0s3 (eth0): DHCP (Connect Automatically)
- enp0s8 (eth1): IP=192.168.56.101, Subnet=255.255.255.0, Gateway=192.168.56.1, DNS=192.168.56.1, Search=localdomain (Connect Automatically)
- enp0s9 (eth2): IP=192.168.1.101, Subnet=255.255.255.0, Gateway=
, DNS= , Search= (Connect Automatically)
In this article, I performed the installation using VirtualBox virtual machines, so I also configured a NAT adapter on each machine to allow access to the internet. If you are using physical machines, or virtual machines with direct access to the internet over the public network, like bridged connections, this extra adapter will not be necessary, so ignore the references to it.
Oracle Installation Prerequisites
Perform either the Automatic Setup or the Manual Setup to complete the basic prerequisites. The Additional Setup is required for all installations.Automatic Setup
If you plan to use the "oracle-rdbms-server-12cR1-preinstall" package to perform all your prerequisite setup, issue the following command.# yum install oracle-rdbms-server-12cR1-preinstall -y
# yum install ntp -y
It is probably worth doing a full update as well, but this is not strictly speaking necessary.
# yum update -y
Manual Setup
If you have not used the "oracle-rdbms-server-12cR1-preinstall" package to perform all prerequisites, you will need to manually perform the following setup tasks.Add or amend the following lines to the "/etc/sysctl.conf" file.
fs.file-max = 6815744
kernel.sem = 250 32000 100 128
kernel.shmmni = 4096
kernel.shmall = 1073741824
kernel.shmmax = 4398046511104
net.core.rmem_default = 262144
net.core.rmem_max = 4194304
net.core.wmem_default = 262144
net.core.wmem_max = 1048576
fs.aio-max-nr = 1048576
net.ipv4.ip_local_port_range = 9000 65500
Run the following command to change the current kernel parameters.
/sbin/sysctl -p
Add the following lines to the "/etc/security/limits.conf" file.
oracle   soft   nofile    1024
oracle   hard   nofile    65536
oracle   soft   nproc    2047
oracle   hard   nproc    16384
oracle   soft   stack    10240
oracle   hard   stack    32768
In addition to the basic OS installation, the following packages must be installed whilst logged in as the root user. This includes the 64-bit and 32-bit versions of some packages.
# From Public Yum or ULN
yum install binutils -y
yum install compat-libstdc++-33 -y
yum install compat-libstdc++-33.i686 -y
yum install gcc -y
yum install gcc-c++ -y
yum install glibc -y
yum install glibc.i686 -y
yum install glibc-devel -y
yum install glibc-devel.i686 -y
yum install ksh -y
yum install libgcc -y
yum install libgcc.i686 -y
yum install libstdc++ -y
yum install libstdc++.i686 -y
yum install libstdc++-devel -y
yum install libstdc++-devel.i686 -y
yum install libaio -y
yum install libaio.i686 -y
yum install libaio-devel -y
yum install libaio-devel.i686 -y
yum install libXext -y
yum install libXext.i686 -y
yum install libXtst -y
yum install libXtst.i686 -y
yum install libX11 -y
yum install libX11.i686 -y
yum install libXau -y
yum install libXau.i686 -y
yum install libxcb -y
yum install libxcb.i686 -y
yum install libXi -y
yum install libXi.i686 -y
yum install make -y
yum install sysstat -y
yum install unixODBC -y
yum install unixODBC-devel -y
yum install zlib-devel -y
yum install zlib-devel.i686 -y
Create the new groups and users.
groupadd -g 54321 oinstall
groupadd -g 54322 dba
groupadd -g 54323 oper
#groupadd -g 54324 backupdba
#groupadd -g 54325 dgdba
#groupadd -g 54326 kmdba
#groupadd -g 54327 asmdba
#groupadd -g 54328 asmoper
#groupadd -g 54329 asmadmin

useradd -u 54321 -g oinstall -G dba,oper oracle
Uncomment the extra groups you require.
Additional Setup
The following steps must be performed, whether you did the manual or automatic setup.Perform the following steps whilst logged into the "ol7-121-rac1" virtual machine as the root user.
Set the password for the "oracle" user.
passwd oracle
Apart form the localhost address, the "/etc/hosts" file can be left blank, but I prefer to put the addresses in for reference.
127.0.0.1 localhost.localdomain localhost
# Public
192.168.56.101   ol7-121-rac1.localdomain        ol7-121-rac1
192.168.56.102   ol7-121-rac2.localdomain        ol7-121-rac2
# Private
192.168.1.101   ol7-121-rac1-priv.localdomain   ol7-121-rac1-priv
192.168.1.102   ol7-121-rac2-priv.localdomain   ol7-121-rac2-priv
# Virtual
192.168.56.103   ol7-121-rac1-vip.localdomain    ol7-121-rac1-vip
192.168.56.104   ol7-121-rac2-vip.localdomain    ol7-121-rac2-vip
# SCAN
#192.168.56.105   ol7-121-scan.localdomain ol7-121-scan
#192.168.56.106   ol7-121-scan.localdomain ol7-121-scan
#192.168.56.107   ol7-121-scan.localdomain ol7-121-scan
# NAS
192.168.56.1      nas1.localdomain nas1
The SCAN address is commented out of the hosts file because it must be resolved using a DNS, so it can round-robin between 3 addresses on the same subnet as the public IPs.
Make sure the "/etc/resolv.conf" file includes a nameserver entry that points to the correct nameserver. Also, if the "domain" and "search" entries are both present, comment out one of them. For this installation my "/etc/resolv.conf" looked like this.
#domain localdomain
search localdomain
nameserver 192.168.56.1
If you are doing this installation on a virtual machine and you've configured a NAT interface, you might find the changes to the "resolv.conf" will be overwritten by the network manager. For this reason, this interface should now be disabled on startup. You can enable it manually if you need to access the internet from the VMs. Edit config file associated with the NAT network adapter, in this case the "/etc/sysconfig/network-scripts/ifcfg-enp0s3" (eth0) file, making the following change. This will take effect after the next restart.
ONBOOT=no
There is no need to do the restart now. You can just run the following command. Remember to amend the adapter name if yours are named differently.
# ifdown enp0s3
# #ifdown eth0
At this point, the networking for the first node should look something like the following. Notice that enp0s3 (eth0), my NAT adapter, has no associated IP address because it is disabled. If you are not using a VM and only configured two network adapters, you will not see this.
# ifconfig -a
enp0s3: flags=4163mtu 1500
ether 08:00:27:eb:72:86 txqueuelen 1000 (Ethernet)
RX packets 10 bytes 1716 (1.6 KiB)
RX errors 0 dropped 0 overruns 0 frame 0
TX packets 55 bytes 8308 (8.1 KiB)
TX errors 0 dropped 0 overruns 0 carrier 0 collisions 0
enp0s8: flags=4163mtu 1500
inet 192.168.56.101 netmask 255.255.255.0 broadcast 192.168.56.255
inet6 fe80::a00:27ff:fe84:31f5 prefixlen 64 scopeid 0x20
ether 08:00:27:84:31:f5 txqueuelen 1000 (Ethernet)
RX packets 342 bytes 33597 (32.8 KiB)
RX errors 0 dropped 0 overruns 0 frame 0
TX packets 302 bytes 43228 (42.2 KiB)
TX errors 0 dropped 0 overruns 0 carrier 0 collisions 0
enp0s9: flags=4163mtu 1500
inet 192.168.1.101 netmask 255.255.255.0 broadcast 192.168.1.255
inet6 fe80::a00:27ff:fe0d:9dd9 prefixlen 64 scopeid 0x20
ether 08:00:27:0d:9d:d9 txqueuelen 1000 (Ethernet)
RX packets 0 bytes 0 (0.0 B)
RX errors 0 dropped 0 overruns 0 frame 0
TX packets 28 bytes 3941 (3.8 KiB)
TX errors 0 dropped 0 overruns 0 carrier 0 collisions 0
lo: flags=73mtu 65536
inet 127.0.0.1 netmask 255.0.0.0
inet6 ::1 prefixlen 128 scopeid 0x10
loop txqueuelen 0 (Local Loopback)
RX packets 16 bytes 1708 (1.6 KiB)
RX errors 0 dropped 0 overruns 0 frame 0
TX packets 16 bytes 1708 (1.6 KiB)
TX errors 0 dropped 0 overruns 0 carrier 0 collisions 0
#
With this in place and the DNS configured the SCAN address is being resolved to all three IP addresses.
# nslookup ol7-121-scan
Server:		192.168.56.1
Address:	192.168.56.1#53

Name:	ol7-121-scan.localdomain
Address: 192.168.56.105
Name:	ol7-121-scan.localdomain
Address: 192.168.56.106
Name:	ol7-121-scan.localdomain
Address: 192.168.56.107

#
Amend the "/etc/security/limits.d/20-nproc.conf" file as described below. See MOS Note [ID 1487773.1]
# Change this
*          soft    nproc    4096

# To this
* - nproc 16384
Change the setting of SELinux to permissive by editing the "/etc/selinux/config" file, making sure the SELINUX flag is set as follows.
SELINUX=permissive
If you have the Linux firewall enabled, you will need to disable it.
# systemctl stop firewalld
# systemctl disable firewalld
Either configure NTP, or make sure it is not configured so the Oracle Cluster Time Synchronization Service (ctssd) can synchronize the times of the RAC nodes. If you want to deconfigure NTP do the following, which is what I did for this installation.
# systemctl stop ntpd
Shutting down ntpd:                                        [  OK  ]
# systemctl disable ntpd
# mv /etc/ntp.conf /etc/ntp.conf.orig
# rm /var/run/ntpd.pid
If your RAC is going to be permanently connected to your main network and you want to use NTP, you must add the "-x" option into the following line in the "/etc/sysconfig/ntpd" file.
OPTIONS="-x -u ntp:ntp -p /var/run/ntpd.pid"
Then restart NTP.
# systemctl restart ntpd
Log in as the "oracle" user and add the following lines at the end of the "/home/oracle/.bash_profile" file.
Remember to set the hostnames and ORACLE_SID values correctly in the following scripts. Node 2 will use ol7-121-rac2 and cdbrac2.
# Oracle Settings
export TMP=/tmp
export TMPDIR=$TMP

export ORACLE_HOSTNAME=ol7-121-rac1.localdomain
export ORACLE_UNQNAME=CDBRAC
export ORACLE_BASE=/u01/app/oracle
export GRID_HOME=/u01/app/12.1.0.2/grid
export DB_HOME=$ORACLE_BASE/product/12.1.0.2/db_1
export ORACLE_HOME=$DB_HOME
export ORACLE_SID=cdbrac1
export ORACLE_TERM=xterm
export BASE_PATH=/usr/sbin:$PATH
export PATH=$ORACLE_HOME/bin:$BASE_PATH

export LD_LIBRARY_PATH=$ORACLE_HOME/lib:/lib:/usr/lib
export CLASSPATH=$ORACLE_HOME/JRE:$ORACLE_HOME/jlib:$ORACLE_HOME/rdbms/jlib

if [ $USER = "oracle" ]; then
  if [ $SHELL = "/bin/ksh" ]; then
    ulimit -p 16384
    ulimit -n 65536
  else
    ulimit -u 16384 -n 65536
  fi
fi

alias grid_env='. /home/oracle/grid_env'
alias db_env='. /home/oracle/db_env'
Create a file called "/home/oracle/grid_env" with the following contents.
export ORACLE_HOME=$GRID_HOMECreate a file called "/home/oracle/db_env" with the following contents.
export PATH=$ORACLE_HOME/bin:$BASE_PATH
export LD_LIBRARY_PATH=$ORACLE_HOME/lib:/lib:/usr/lib
export CLASSPATH=$ORACLE_HOME/JRE:$ORACLE_HOME/jlib:$ORACLE_HOME/rdbms/jlib
export ORACLE_SID=cdbrac1
export ORACLE_HOME=$DB_HOME
export PATH=$ORACLE_HOME/bin:$BASE_PATH

export LD_LIBRARY_PATH=$ORACLE_HOME/lib:/lib:/usr/lib
export CLASSPATH=$ORACLE_HOME/JRE:$ORACLE_HOME/jlib:$ORACLE_HOME/rdbms/jlib
Once the "/home/oracle/.bash_profile" has been run, you will be able to switch between environments as follows.
$ grid_env
$ echo $ORACLE_HOME
/u01/app/12.1.0.2/grid
$ db_env
$ echo $ORACLE_HOME
/u01/app/oracle/product/12.1.0.2/db_1
$
We've made a lot of changes, so it's worth doing a reboot of the machines at this point to make sure all the changes have taken effect.
# shutdown -r now
Create Shared Disks
First we need to set up some NFS shares. In this case we will do on the host machine, but you can do the on a NAS or a third server if you have one available. Create the following directories.mkdir /shared_config
mkdir /shared_grid
mkdir /shared_home
mkdir /shared_data
Add the following lines to the "/etc/exports" file.
/shared_config               *(rw,sync,no_wdelay,insecure_locks,no_root_squash)
/shared_grid                 *(rw,sync,no_wdelay,insecure_locks,no_root_squash)
/shared_home                 *(rw,sync,no_wdelay,insecure_locks,no_root_squash)
/shared_data                 *(rw,sync,no_wdelay,insecure_locks,no_root_squash)
Run the following command to export the NFS shares.
chkconfig nfs on
service nfs restart
On both ol7-121-rac1 and ol7-121-rac2 create the directories in which the Oracle software will be installed.
mkdir -p /u01/app/12.1.0.2/grid
mkdir -p /u01/app/oracle/product/12.1.0.2/db_1
mkdir -p /u01/oradata
mkdir -p /u01/shared_config
chown -R oracle:oinstall /u01/app /u01/app/oracle /u01/oradata /u01/shared_config
chmod -R 775 /u01/app /u01/app/oracle /u01/oradata /u01/shared_config
Add the following lines to the "/etc/fstab" file.
nas1:/shared_config /u01/shared_config  nfs  rw,bg,hard,nointr,tcp,vers=3,timeo=600,rsize=32768,wsize=32768,actimeo=0  0 0
nas1:/shared_grid   /u01/app/12.1.0.2/grid  nfs  rw,bg,hard,nointr,tcp,vers=3,timeo=600,rsize=32768,wsize=32768,actimeo=0  0 0
nas1:/shared_home   /u01/app/oracle/product/12.1.0.2/db_1  nfs  rw,bg,hard,nointr,tcp,vers=3,timeo=600,rsize=32768,wsize=32768,actimeo=0  0 0
nas1:/shared_data   /u01/oradata  nfs  rw,bg,hard,nointr,tcp,vers=3,timeo=600,rsize=32768,wsize=32768,actimeo=0  0 0
Mount the NFS shares on both servers.
mount /u01/shared_config
mount /u01/app/12.1.0.2/grid
mount /u01/app/oracle/product/12.1.0.2/db_1
mount /u01/oradata
Make sure the permissions on the shared directories are correct.
chown -R oracle:oinstall /u01/shared_config
chown -R oracle:oinstall /u01/app/12.1.0.2/grid
chown -R oracle:oinstall /u01/app/oracle/product/12.1.0.2/db_1
chown -R oracle:oinstall /u01/oradata
Install the Grid Infrastructure
Start both RAC nodes, login to ol7-121-rac1 as the oracle user and start the Oracle installer../runInstaller
Select the "Install and Configure Grid Infrastructure for a Cluster" option, then click the "Next" button.

Select the "Configure a Standard Cluster" option, then click the "Next" button.

Select the "Advanced Installation" option, then click the "Next" button.

Select the the required language support, then click the "Next" button.

Enter cluster information and uncheck the "Configure GNS" option, then click the "Next" button.

On the "Specify Node Information" screen, click the "Add" button.

Enter the details of the second node in the cluster, then click the "OK" button.

Click the "SSH Connectivity..." button and enter the password for the "oracle" user. Click the "Setup" button to configure SSH connectivity, and the "Test" button to test it once it is complete. Click the "Next" button.

Check the public and private networks are specified correctly, then click the "Next" button.

Select the "Shared File System" option, then click the "Next" button.

Select the required level of redundancy and enter the OCR File Location(s), then click the "Next" button.

Select the required level of redundancy and enter the Voting Disk File Location(s), then click the "Next" button.

Accept the default failure isolation support by clicking the "Next" button.

Don't register with Cloud Control. Click the "Next" button.

Select the preferred OS groups for each option, then click the "Next" button. Click the "Yes" button on the subsequent message dialog.

Enter "/u01/app/oracle" as the Oracle Base and "/u01/app/12.1.0.2/grid" as the software location, then click the "Next" button.

Accept the default inventory directory by clicking the "Next" button.

Ignore the root configuration, we will run the scripts manually. Click the "Next" button.

Wait while the prerequisite checks complete. If you have any issues, either fix them or check the "Ignore All" checkbox and click the "Next" button. If there are no issues, you will move directly to the summary screen.

If you are happy with the summary information, click the "Install" button.

Wait while the setup takes place.

When prompted, run the configuration scripts on each node.

The output from the "orainstRoot.sh" file should look something like that listed below.
# /u01/app/oraInventory/orainstRoot.sh
Changing permissions of /u01/app/oraInventory.
Adding read,write permissions for group.
Removing read,write,execute permissions for world.

Changing groupname of /u01/app/oraInventory to oinstall.
The execution of the script is complete.
#
Once the scripts have completed, return to the "Execute Configuration Scripts" screen on ol7-121-rac1 and click the "OK" button.
Wait for the configuration assistants to complete.

We expect the verification phase to fail with an error relating to the SCAN, assuming you are not using DNS.
INFO: Checking Single Client Access Name (SCAN)...
INFO: Checking name resolution setup for "rac-scan.localdomain"...
INFO: ERROR:
INFO: PRVF-4664 : Found inconsistent name resolution entries for SCAN name "rac-scan.localdomain"
INFO: ERROR:
INFO: PRVF-4657 : Name resolution setup check for "rac-scan.localdomain" (IP address: 192.168.2.201) failed
INFO: ERROR:
INFO: PRVF-4664 : Found inconsistent name resolution entries for SCAN name "rac-scan.localdomain"
INFO: Verification of SCAN VIP and Listener setup failed
Provided this is the only error, it is safe to ignore this and continue by clicking the "Next" button.
Click the "Close" button to exit the installer.

The grid infrastructure installation is now complete.
Install the Database
Start all the RAC nodes, login to ol7-121-rac1 as the oracle user and start the Oracle installer../runInstaller
Uncheck the security updates checkbox and click the "Next" button.

Accept the "Create and configure a database" option by clicking the "Next" button.

Accept the "Server Class" option by clicking the "Next" button.

Select the "Oracle Real Application Clusters database installation" option, then click the "Next" button.

Select the "Admin managed" option, then click the "Next" button.

Make sure both nodes are selected, then click the "Next" button.

Accept the "Typical install" option by clicking the "Next" button.

Enter "/u01/app/oracle/product/12.1.0.2/db_1" for the software location. The storage type should be set to "File System" with the file location set to "/u01/oradata". Enter the appropriate passwords and database name, in this case "cdbrac".

Wait for the prerequisite check to complete. If there are any problems either fix them, or check the "Ignore All" checkbox and click the "Next" button.

If you are happy with the summary information, click the "Install" button.

Wait while the installation takes place.

When prompted, run the configuration scripts on each node. When the scripts have been run on each node, click the "OK" button.

Once the software installation is complete the Database Configuration Assistant (DBCA) will start automatically.

Once the Database Configuration Assistant (DBCA) has finished, click the "OK" button.

Click the "Close" button to exit the installer.

The RAC database creation is now complete.
Check the Status of the RAC
There are several ways to check the status of the RAC. Thesrvctl utility shows the current configuration and status of the RAC database.$ srvctl config database -d cdbrac
Database unique name: cdbrac
Database name: cdbrac
Oracle home: /u01/app/oracle/product/12.1.0.2/db_1
Oracle user: oracle
Spfile: /u01/oradata/cdbrac/spfilecdbrac.ora
Password file: /u01/oradata/cdbrac/orapwcdbrac
Domain:
Start options: open
Stop options: immediate
Database role: PRIMARY
Management policy: AUTOMATIC
Server pools:
Disk Groups:
Mount point paths:
Services:
Type: RAC
Start concurrency:
Stop concurrency:
OSDBA group: dba
OSOPER group: dba
Database instances: cdbrac1,cdbrac2
Configured nodes: ol7-121-rac1,ol7-121-rac2
Database is administrator managed
$
$ srvctl status database -d cdbrac
Instance cdbrac1 is running on node ol7-121-rac1
Instance cdbrac2 is running on node ol7-121-rac2
$
The
V$ACTIVE_INSTANCES view can also display the current status of the instances.$ sqlplus / as sysdba
SQL*Plus: Release 12.1.0.2.0 Production on Mon Sep 28 17:32:56 2015
Copyright (c) 1982, 2014, Oracle. All rights reserved.
Connected to:
Oracle Database 12c Enterprise Edition Release 12.1.0.2.0 - 64bit Production
With the Partitioning, Real Application Clusters, OLAP, Advanced Analytics
and Real Application Testing options
SQL> SELECT inst_Name FROM v$active_instances;
INST_NAME
------------------------------------------------------------
ol7-121-rac1.localdomain:cdbrac1
ol7-121-rac2.localdomain:cdbrac2
SQL>
Direct NFS Client
The Direct NFS Client should be used for CRS-related files, so it is important to have separate NFS mounts for the different types of files, rather than trying to compact them into a single NFS share.
For improved NFS performance, Oracle recommend using the Direct NFS Client shipped with Oracle 12c. The direct NFS client looks for NFS details in the following locations.- $ORACLE_HOME/dbs/oranfstab
- /etc/oranfstab
- /etc/mtab
For the client to work we need to switch the "libodm12.so" library for the "libnfsodm12.so" library, which can be done manually or via the "make" command.
srvctl stop database -d cdbrac

# manual method
cd $ORACLE_HOME/lib
mv libodm12.so libodm12.so_stub
ln -s libnfsodm12.so libodm12.so

# make method
$ cd $ORACLE_HOME/rdbms/lib
$ make -f ins_rdbms.mk dnfs_on

srvctl start database -d vdbrac
With the configuration complete, you can see the direct NFS client usage via the following views.
- v$dnfs_servers
- v$dnfs_files
- v$dnfs_channels
- v$dnfs_stats
SQL> SELECT svrname, dirname FROM v$dnfs_servers;

SVRNAME        DIRNAME
-------------  -----------------
nas1           /shared_data

SQL>
The Direct NFS Client supports direct I/O and asynchronous I/O by default.


