Quantcast
Channel: Tech Support
Viewing all 880 articles
Browse latest View live

How To Set Up Point-To-Point VPN with WireGuard on Ubuntu 16.04

$
0
0

This step by step guide will walk you through the steps to establish a point-to-point VPN connection with WireGuard using two Ubuntu 16.04 machines. First, we will begin installing the software and then generating cryptographic key pairs for each node. Afterwards, we will create a short configuration file to define the peer's connection information. Once we start up the interface, we will be able to send secure messages between the servers over the WireGuard interface.


Why WireGuard?

WireGuard is a modern, high-performance VPN designed to be easy to use while providing robust security. WireGuard focuses only on providing a secure connection between parties over a network interface encrypted with public key authentication. This means that, unlike most VPNs, no topology is enforced so different configurations can be achieved by manipulating the surrounding networking configuration. This model offers great power and flexibility that can be applied according to your individual needs.

One of the simplest topologies that WireGuard can use is a point-to-point connection. This establishes a secure link between two machines without mediation by a central server. This type of connection can also be used between more than two members to establish a mesh VPN topology, where each individual server can talk to its peers directly. Because each host is on equal footing, these two topologies are best suited for establishing secure messaging between servers as opposed to using a single server as a gateway to route traffic through.


Prerequisites

This tutorial assume you have two Ubuntu 16.04 servers either physical or virtual machines. On each server, you will need to create a non-root user with sudo privileges to perform administrative actions.

If everything is in place, you are ready to continue, log into each server with your sudo user.


Installing the WireGuard Software

The WireGuard project provides a PPA with up-to-date packages for Ubuntu systems. We will need to install WireGuard on both of our machines before we can continue. On each server, perform the following steps.

First, add the WireGuard PPA to the system to configure access to the project's packages:

sudo add-apt-repository ppa:wireguard/wireguard

Press ENTER when prompted to add the new package source to your apt configuration. Once the PPA has been added, update the local package index to load information about the newly available packages and then install the WireGuard kernel module and userland components:

sudo apt-get update
sudo apt-get install wireguard-dkms wireguard-tools

Next, we can begin configuring WireGuard on each of our servers.


Creating a Private Key

Each participant in a WireGuard VPN authenticates to its peers using public keys cryptography. Connections between new peers can be established by exchanging public keys and performing minimal configuration.

To generate a private key and write it directly to a WireGuard configuration file, run the following on each server:

(umask 077 && printf "[Interface]\nPrivateKey = " | sudo tee /etc/wireguard/wg0.conf > /dev/null)

wg genkey | sudo tee -a /etc/wireguard/wg0.conf | wg pubkey | sudo tee /etc/wireguard/publickey

The first command writes the initial contents of a configuration file to /etc/wireguard/wg0.conf. The umask value in a sub-shell so that we create the file with restricted permissions without affecting our regular environment.

The second command generates a private key using WireGuard's wg command and writes it directly to our restricted configuration file. We also pipe the key back into the wg pubkey command to derive the associated public key, which we write to a file called /etc/wireguard/publickey for easy reference. We will need to exchange the key in this file with the second server as we define our configuration.


Creating an Initial Configuration File

Next, we will open the configuration file in an editor to set up a few other details:

sudo nano /etc/wireguard/wg0.conf

You can see your generated private key defined in a section called [Interface]. This section contains the configuration for the local side of the connection.

We need to define the VPN IP address, this node will use and the port that it will listen on for connections from peers. Start by adding ListenPort and SaveConfig lines so that your file will look similar to like below:

/etc/wireguard/wg0.conf
[Interface]
PrivateKey = generated_private_key
ListenPort = 6666
SaveConfig = true

This set up the port that WireGuard will listen on. This can be any free, bindable port, but in this lab we will set up our VPN on port 6666 for both servers. Set the ListenPort on each host to the port you've selected:

We also set SaveConfig to true. This will tell the wg-quick service to automatically save its active configuration to this file at shutdown.

Note: When SaveConfig is enabled, the wg-quick service will overwrite the contents of the /etc/wireguard/wg0.conf file whenever the service shuts down. If you need to modify the WireGuard configuration, either shut down the wg-quick service prior to editing the /etc/wireguard/wg0.conf file or make the changes to the running service using the wg command (these will be be saved in the file when the service shuts down). Any changes made to the configuration file while the service is running will be overwritten when wg-quick stores its active configuration.

Next, add a unique Address definition to each server so that the wg-quick service can set the network information when it brings up the WireGuard interface. We will use the 10.0.0.0/24 subnet as the address space for our VPN. For each node, you will need to pick a unique address within this range (10.0.0.1 to 10.0.0.254) and specify the address and subnet using CIDR notation.

We will give our first node an address of 10.0.0.1, which is represented as 10.0.0.1/24 in CIDR notation:


/etc/wireguard/wg0.conf on first server
[Interface]
PrivateKey = generated_private_key
ListenPort = 6666
SaveConfig = true
Address = 10.0.0.1/24

On our second node, we will define the address as 10.0.0.2, which give us a CIDR representation of 10.0.0.2/24:


/etc/wireguard/wg0.conf on second server
[Interface]
PrivateKey = generated_private_key
ListenPort = 6666
SaveConfig = true
Address = 10.0.0.2/24

This is the end of the [Interface] section.

We can enter the information about the server's peers either within the configuration file or manually using the wg command later on. As mentioned earlier, the wg-quick service with the SaveConfig option set to true will mean that the peer information will eventually be written to the file with either method.

To demonstrate both ways of defining peer identities, we will create a [Peer] section in the second node's configuration file but not the first. You can save and close the configuration file for the first node (the one defining the 10.0.0.1 address) now.


Defining the Peer Section

In the configuration file that's still open, create a section called [Peer] below the entries in the [Interface] section.

Begin by setting the PublicKey to the value of the first node's public key. You can find this value by typing cat /etc/wireguard/publickey on the opposite server. We will also set AllowedIPs to the IP addresses that are valid inside the tunnel. Since we know the specific IP address that the first server is using, we can input that directly, ending with /32 to indicate a range that contains single IP value:

sudo nano /etc/wireguard/wg0.conf on second server

[Interface]
[Peer]
PublicKey = public_key_of_first_server
AllowedIPs = 10.0.0.1/32

Finally, we can set the Endpoint to the first server's public IP address and the WireGuard listening port (we used port 6666 in this example). WireGuard will update this value if it receives legitimate traffic from this peer on another address, allowing the VPN to adapt to roaming conditions. We set the initial value so that this server can initiate contact:

sudo nano /etc/wireguard/wg0.conf on second server

[Interface]
[Peer]
PublicKey = public_key_of_first_server
AllowedIPs = 10.0.0.1/32
Endpoint = public_IP_of_first_server:6666

When you are finished, save and close the file to return to the command prompt.


Starting the VPN and Connecting to Peers

We're now ready to start WireGuard on each node and configure the connection between our two peers. First, open up the WireGuard port in the firewall on each server:

sudo ufw allow 6666

Now, start the wg-quick service using the wg0 interface file we defined:

sudo systemctl start wg-quick@wg0

This will start of the wg0 network interface on the machine. We can confirm this by typing:

ip addr show wg0

Output on first server
6: wg0: mtu 1420 qdisc noqueue state UNKNOWN group default qlen 1
    link/none 
    inet 10.0.0.1/24 scope global wg0
       valid_lft forever preferred_lft forever

We can use the wg tool to view information about the active configuration of the VPN:

sudo wg

On the server without a peer definition, the display will look something like this:

Output on first server
interface: wg0
  public key: public_key_of_this_server
  private key: (hidden)
  listening port: 6666

On the server with a peer configuration already defined, the output will also contain that information:

Output on second server
interface: wg0
  public key: public_key_of_this_server
  private key: (hidden)
  listening port: 6666

peer: public_key_of_first_server
  endpoint: public_IP_of_first_server:6666
  allowed ips: 10.0.0.1/32

To complete the connection, we now need to add the second server's peering information to the first server using the wg command.

On the first server (the one that doesn't display peer information), enter the peering information manually using the following format. The second server's public key can be found in the output of sudo wg from the second server:

sudo wg set wg0 peer public_key_of_second_server endpoint public_IP_of_second_server:6666 allowed-ips 10.0.0.2/32

You can confirm that the information is now in the active configuration by typing sudo wg again on the first server:

sudo wg

Output on first server
interface: wg0
  public key: public_key_of_this_server
  private key: (hidden)
  listening port: 6666

peer: public_key_of_second_server
  endpoint: public_IP_of_second_server:6666
  allowed ips: 10.0.0.2/32

Our point-to-point connection should now be available. Try pinging the VPN address of the second server from the first:

ping -c 4 10.0.0.2

Output on first server
PING 10.0.0.2 (10.0.0.2) 56(84) bytes of data.
64 bytes from 10.0.0.2: icmp_seq=1 ttl=64 time=0.635 ms
64 bytes from 10.0.0.2: icmp_seq=2 ttl=64 time=0.615 ms
64 bytes from 10.0.0.2: icmp_seq=3 ttl=64 time=0.841 ms
64 bytes from 10.0.0.2: icmp_seq=3 ttl=64 time=0.821 ms

--- 10.0.0.2 ping statistics ---
4 packets transmitted, 4 received, 0% packet loss, time 2820ms
rtt min/avg/max/mdev = 0.615/0.697/0.841/0.102 ms

If everything is working correctly, you can save the configuration on the first server back to the /etc/wireguard/wg0.conf file by restarting the service:

sudo systemctl restart wg-quick@wg0

If you want to start the tunnel at boot, you can enable the service on each machine by typing:

sudo systemctl enable wg-quick@wg0

The VPN tunnel should now be automatically started whenever the machine boots.


Conclusion

WireGuard is a great vpn for many use cases due to its flexibility, light-weight implementation, and modern cryptography. In this tutorial, we installed WireGuard on two Ubuntu 16.04 servers and configured each node as a server with a point-to-point connection to its peer. This topology is ideal for establishing server-to-server communication with peers where each side is an equal participant or where hosts might have to establish ad-hoc connections to other servers.

How to Restore Linux Backup on Dissimilar Hardware

$
0
0

This step by step guide will walk you through the steps to take backup of your linux servers and restore even on dissimilar hardware. Whether you are migrating from old hardware to new or shifting from bare-metal to virtualization, this method will solves you problem.


Please follow the steps mentioned in this guide to take backup images of your linux servers and restore them on same or dissimilar hardware in case of disk failure or you are in a situation of disaster recovery.

How To Set Up an OpenVPN Server on Ubuntu 17.10

$
0
0

OpenVPN is a full-featured open source Secure Socket Layer (SSL) VPN solution that accommodates a wide range of configurations. In this guide, we'll set up an OpenVPN server on a Ubuntu machine and then configure access to it from Windows, OS X, iOS and Android.


Prerequisites

You only need one Ubuntu 17.10 machine (physical or virtual) installed and running.


Install and Configure OpenVPN's Server

Before we install any packages, first we'll update Ubuntu's repository lists.

sudo apt-get update

Then we can install OpenVPN and Easy-RSA.

sudo apt-get install openvpn easy-rsa

The example VPN server configuration file needs to be extracted to /etc/openvpn so we can incorporate it into our setup. This can be done with one command:

sudo gunzip -c /usr/share/doc/openvpn/examples/sample-config-files/server.conf.gz > /etc/openvpn/server.conf

Once extracted, open server.conf in a text editor. This guide will use Vim but you can use whichever editor you prefer.

sudo vim /etc/openvpn/server.conf

There are several changes to make in this file. You will see a section looking like this:

# Diffie hellman parameters.
# Generate your own with:
#   openssl dhparam -out dh1024.pem 1024
# Substitute 2048 for 1024 if you are using
# 2048 bit keys.
dh dh1024.pem

Replace dh1024.pem to:

dh2048.pem

This will double the RSA key length used when generating server and client keys.

Still in server.conf, now look for this section:

# If enabled, this directive will configure
# all clients to redirect their default
# network gateway through the VPN, causing
# all IP traffic such as web browsing and
# and DNS lookups to go through the VPN
# (The OpenVPN server machine may need to NAT
# or bridge the TUN/TAP interface to the internet
# in order for this to work properly).
;push "redirect-gateway def1 bypass-dhcp"

Uncomment push "redirect-gateway def1 bypass-dhcp" so the VPN server passes on clients' web traffic to its destination. It should look like this when done:

push "redirect-gateway def1 bypass-dhcp"

The next edit to make is in this area:

# Certain Windows-specific network settings
# can be pushed to clients, such as DNS
# or WINS server addresses.  CAVEAT:
# http://openvpn.net/faq.html#dhcpcaveats
# The addresses below refer to the public
# DNS servers provided by opendns.com.
;push "dhcp-option DNS 208.67.222.222"
;push "dhcp-option DNS 208.67.220.220"

Uncomment push "dhcp-option DNS 208.67.222.222" and push "dhcp-option DNS 208.67.220.220". It should look like this when done:

push "dhcp-option DNS 208.67.222.222"
push "dhcp-option DNS 208.67.220.220"

This tells the server to push OpenDNS to connected clients for DNS resolution where possible. This can help prevent DNS requests from leaking outside the VPN connection. However, it's important to specify desired DNS resolvers in client devices as well. Though OpenDNS is the default used by OpenVPN, you can use whichever DNS services you prefer.

The last area to change in server.conf is here:

# You can uncomment this out on
# non-Windows systems.
;user nobody
;group nogroup

Uncomment both user nobody and group nogroup. It should look like this when done:

user nobody
group nogroup

By default, OpenVPN runs as the root user and thus has full root access to the system. We'll instead confine OpenVPN to the user nobody and group nogroup. This is an unprivileged user with no default login capabilities, often reserved for running untrusted applications like web-facing servers.
Now save your changes and exit Vim.


Enable Packet Forwarding

This is a sysctl setting which tells the server's kernel to forward traffic from client devices out to the Internet. Otherwise, the traffic will stop at the server. Enable packet forwarding during runtime by executing this command:

sudo echo 1 > /proc/sys/net/ipv4/ip_forward

We need to make this permanent so the server still forwards traffic after rebooting.

sudo vim /etc/sysctl.conf

Near the top of the sysctl file, you will see:

# Uncomment the next line to enable packet forwarding for IPv4
#net.ipv4.ip_forward=1

Uncomment net.ipv4.ip_forward. It should look like this when done:

# Uncomment the next line to enable packet forwarding for IPv4
net.ipv4.ip_forward=1

Save your changes and exit.


Apply Firewall Rules

ufw is a front-end for iptables and setting up ufw in Ubuntu is not that hard. It's included by default in Ubuntu 17.10, so we only need to make a few rules and configuration edits, then switch the firewall on.

First set ufw to allow SSH. In the terminal prompt, type:

sudo ufw allow ssh

This guide will use OpenVPN over UDP, so ufw must also allow UDP traffic over port 1194.

sudo ufw allow 1194/udp

The ufw forwarding policy needs to be set as well. We'll do this in ufw's primary configuration file.

sudo vim /etc/default/ufw

Look for DEFAULT_FORWARD_POLICY="DROP". This must be changed from DROP to ACCEPT. It should look like this when done:

DEFAULT_FORWARD_POLICY="ACCEPT"

Next we will add additional ufw rules for network address translation and IP masquerading of connected clients.

sudo vim /etc/ufw/before.rules

Make the top of your before.rules file look like below. The area in red for OPENVPN RULES must be added:

#
# rules.before
#
# Rules that should be run before the ufw command line added rules. Custom
# rules should be added to one of these chains:
#   ufw-before-input
#   ufw-before-output
#   ufw-before-forward
#

# START OPENVPN RULES
# NAT table rules
*nat
:POSTROUTING ACCEPT [0:0] 
# Allow traffic from OpenVPN client to eth0
-A POSTROUTING -s 10.8.0.0/8 -o eth0 -j MASQUERADE
COMMIT
# END OPENVPN RULES

# Don't delete these required lines, otherwise there will be errors
*filter

With the changes made to ufw, we can now enable it. Enter into the command prompt:

sudo ufw enable

Enabling ufw will return the following prompt:

Command may disrupt existing ssh connections. Proceed with operation (y|n)?

Answer y. The result will be this output:

Firewall is active and enabled on system startup

To check ufw's primary firewall rules:

sudo ufw status

The status command should return these entries:

Status: active

To                         Action      From
--                         ------      ----
22                         ALLOW       Anywhere
1194/udp                   ALLOW       Anywhere
22 (v6)                    ALLOW       Anywhere (v6)
1194/udp (v6)              ALLOW       Anywhere (v6)


Creating a Certificate Authority and Server-Side Certificate & Key

It is now time to set up our own Certificate Authority (CA) and generate a certificate and key for the OpenVPN server. OpenVPN supports bidirectional authentication based on certificates, meaning that the client must authenticate the server certificate and the server must authenticate the client certificate before mutual trust is established.

First copy over the Easy-RSA generation scripts.

sudo cp -r /usr/share/easy-rsa/ /etc/openvpn

Then make the key storage directory.

sudo mkdir /etc/openvpn/easy-rsa/keys

Easy-RSA has a variables file we can edit to create certificates exclusive to our person, business, or whatever entity we choose. This information is copied to the certificates and keys, and will help identify the keys later.

sudo vim /etc/openvpn/easy-rsa/vars

The variables below marked in red should be changed according to your preference.

export KEY_COUNTRY="PK"
export KEY_PROVINCE="TX"
export KEY_CITY="KHI"
export KEY_ORG="TECHNOCRACY"
export KEY_EMAIL="username@example.com"
export KEY_OU="IT"

In the same vars file, also edit this one line shown below. For simplicity, we will use server as the key name. If you want to use a different name, you would also need to update the OpenVPN configuration files that reference server.key and server.crt.

export KEY_NAME="server"

We need to generate the Diffie-Hellman parameters; this can take several minutes.

sudo openssl dhparam -out /etc/openvpn/dh2048.pem 2048

Now let's change directories so that we're working directly out of where we moved Easy-RSA's scripts to earlier in Step 2.

cd /etc/openvpn/easy-rsa

Initialize the PKI (Public Key Infrastructure). Pay attention to the dot (.) and space in front of ./vars command. That signifies the current working directory (source).

sudo . ./vars

The output from the above command is shown below. Since we haven't generated anything in the keys directory yet, the warning is nothing to be concerned about.

NOTE: If you run ./clean-all, It will be doing a rm -rf on /etc/openvpn/easy-rsa/keys

Now we'll clear the working directory of any possible old or example keys to make way for our new ones.

sudo ./clean-all

This final command builds the certificate authority (CA) by invoking an interactive OpenSSL command. The output will prompt you to confirm the Distinguished Name variables that were entered earlier into the Easy-RSA's variable file (country name, organization, etc.).

sudo ./build-ca

Simply press ENTER to pass through each prompt. If something must be changed, you can do that from within the prompt.


Generate a Certificate and Key for the Server

Still working from /etc/openvpn/easy-rsa, now enter the command to build the server's key. Where you see server marked in red is the export KEY_NAME variable we set in Easy-RSA's vars file earlier in Step 2.

sudo ./build-key-server server

Similar output is generated as when we ran ./build-ca, and you can again press ENTER to confirm each line of the Distinguished Name. However, this time there are two additional prompts:

Please enter the following 'extra' attributes
to be sent with your certificate request
A challenge password []:
An optional company name []:

Both should be left blank, so just press ENTER to pass through each one.

Two additional queries at the end require a positive (y) response:

Sign the certificate? [y/n]
1 out of 1 certificate requests certified, commit? [y/n]

The last prompt above should complete with:

Write out database with 1 new entries
Data Base Updated


Move the Server Certificates and Keys

OpenVPN expects to see the server's CA, certificate and key in /etc/openvpn. Let's copy them into the proper location.

sudo cp /etc/openvpn/easy-rsa/keys/{server.crt,server.key,ca.crt} /etc/openvpn

You can verify the copy was successful with:

ls /etc/openvpn

You should see the certificate and key files for the server.

At this point, the OpenVPN server is ready to go. Start it and check the status.

sudo service openvpn start
sudo service openvpn status

The status command should return:

VPN 'server' is running

Congratulations! Your OpenVPN server is operational. If the status message says the VPN is not running, then take a look at the /var/log/syslog file for errors such as:

Options error: --key fails with 'server.key': No such file or directory

That error indicates server.key was not copied to /etc/openvpn correctly. Re-copy the file and try again.


Generate Certificates and Keys for Clients

So far we've installed and configured the OpenVPN server, created a Certificate Authority, and created the server's own certificate and key. In this step, we use the server's CA to generate certificates and keys for each client device which will be connecting to the VPN. These files will later be installed onto the client devices such as a laptop or smartphone.

It's ideal for each client connecting to the VPN to have its own unique certificate and key. This is preferable to generating one general certificate and key to use among all client devices.

Note: By default, OpenVPN does not allow simultaneous connections to the server from clients using the same certificate and key. (See duplicate-cn in /etc/openvpn/server.conf.)

To create separate authentication credentials for each device you intend to connect to the VPN, you should complete this step for each device, but change the name client1 below to something different such as client2 or iphone2. With separate credentials per device, they can later be deactivated at the server individually, if need be. The remaining examples in this tutorial will use client1 as our example client device's name.

As we did with the server's key, now we build one for our client1 example. You should still be working out of /etc/openvpn/easy-rsa.

sudo ./build-key client1

Once again, you'll be asked to change or confirm the Distinguished Name variables and these two prompts which should be left blank. Press ENTER to accept the defaults.

Please enter the following 'extra' attributes
to be sent with your certificate request
A challenge password []:
An optional company name []:

As before, these two confirmations at the end of the build process require a (y) response:

Sign the certificate? [y/n]
1 out of 1 certificate requests certified, commit? [y/n]

If the key build was successful, the output will again be:

Write out database with 1 new entries
Data Base Updated

The example client configuration file should be copied to the Easy-RSA key directory too. We'll use it as a template which will be downloaded to client devices for editing. In the copy process, we are changing the name of the example file from client.conf to client.ovpn because the .ovpn file extension is what the clients will expect to use.

sudo cp /usr/share/doc/openvpn/examples/sample-config-files/client.conf /etc/openvpn/easy-rsa/keys/client.ovpn

You can repeat this section again for each client, replacing client1 with the appropriate client name throughout.


Transferring Certificates and Keys to Client Devices

Recall from the steps above that we created the client certificates and keys, and that they are stored on the OpenVPN server in the /etc/openvpn/easy-rsa/keys directory.

For each client we need to transfer the client certificate, key, and profile template files to a folder on our local computer or another client device.

In this example, our client1 device requires its certificate and key, located on the server in:

/etc/openvpn/easy-rsa/keys/client1.crt
/etc/openvpn/easy-rsa/keys/client1.key

The ca.crt and client.ovpn files are the same for all clients. Download these two files as well; note that the ca.crt file is in a different directory than the others.

/etc/openvpn/easy-rsa/keys/client.ovpn
/etc/openvpn/ca.crt

While the exact applications used to accomplish this transfer will depend on your choice and device's operating system, you want the application to use SFTP (SSH file transfer protocol) or SCP (Secure Copy) on the backend. This will transport your client's VPN authentication files over an encrypted connection.

Here is an example SCP command using our client1 example. It places the file client1.key into the Downloads directory on the local computer.

sudo scp root@your-server-ip:/etc/openvpn/easy-rsa/keys/client1.key Downloads/

At the end of this section, make sure you have these four files on your client device:

client1.crt
client1.key
client.ovpn
ca.crt


Creating a Unified OpenVPN Profile for Client Devices

There are several methods for managing the client files but the easiest uses a unified profile. This is created by modifying the client.ovpn template file to include the server's Certificate Authority, and the client's certificate and its key. Once merged, only the single client.ovpn profile needs to be imported into the client's OpenVPN application.

We will create a single profile for our client1 device on the local computer we downloaded all the client files to. This local computer could itself be an intended client or just a temporary work area to merge the authentication files. The original client.ovpn template file should be duplicated and renamed. How you do this will depend on the operating system of your local computer.

Note: The name of your duplicated client.ovpn doesn't need to be related to the client device. The client-side OpenVPN application will use the file name as an identifier for the VPN connection itself. Instead, you should duplicate client.ovpn to whatever you want the VPN's nametag to be in your operating system. For example: work.ovpn will be identified as work, school.ovpn as school, etc.

In this guide, we'll name the VPN connection TSPKVPNCONN so TSPKVPNCONN.ovpn will be the file name referenced from this point on. Once named, we then must open TSPKVPNCONN.ovpn in a text editor; you can use whichever editor you prefer.

The first area of attention will be for the IP address of your machine. Near the top of the file, change my-server-1 to reflect your VPN's IP.

# The hostname/IP and port of the server.
# You can have multiple remote entries
# to load balance between the servers.
remote my-server-1 1194

Next, find the area shown below and uncomment user nobody and group nogroup, just like we did in server.conf in Step 1. Note: This doesn't apply to Windows so you can skip it. It should look like this when done:

# Downgrade privileges after initialization (non-Windows only)
user nobody
group nogroup

The area given below needs the three lines shown to be commented out so we can instead include the certificate and key directly in the TSPKVPNCONN.ovpn file. It should look like this when done:

# SSL/TLS parms.
# . . .
#ca ca.crt
#cert client.crt
#key client.key

To merge the individual files into the one unified profile, the contents of the ca.crt, client1.crt, and client1.key files are pasted directly into the .ovpn profile using a basic XML-like syntax. The XML at the end of the file should take this form:

<ca>
(insert ca.crt here)
</ca>
<cert>
(insert client1.crt here)
</cert>
<key>
(insert client1.key here)
</key>

When finished, the end of the file should be similar to this abbreviated example:

<ca>
-----BEGIN CERTIFICATE-----
. . .
-----END CERTIFICATE-----
</ca>

<cert>

Certificate:
. . .
-----END CERTIFICATE-----
. . .
-----END CERTIFICATE-----
</cert>

<key>
-----BEGIN PRIVATE KEY-----
. . .
-----END PRIVATE KEY-----
</key>

The client1.crt file has some extra information in it; it's fine to just include the whole file.

Save the changes and exit. We now have a unified OpenVPN client profile to configure our client1.


Installing the Client Profile

Now we'll demonstrate installing a client VPN profile on Windows, OS X, iOS, and Android. None of these client instructions are dependent on each other so you can skip to whichever is applicable to you.

Remember that the connection will be called whatever you named the .ovpn file. In our example, since the file was named TSPKVPNCONN.ovpn, the connection will be named TSPKVPNCONN.


Windows

The OpenVPN client application for Windows can be found on OpenVPN's Downloads page. Choose the appropriate installer version for your version of Windows.

Note: OpenVPN needs administrative privileges to install.

After installing OpenVPN, copy the unified TSPKVPNCONN.ovpn profile to:

C:\Program Files\OpenVPN\config

When you launch OpenVPN, it will automatically see the profile and makes it available.

OpenVPN must be run as an administrator each time it's used, even by administrative accounts. To do this without having to right-click and select Run as administrator every time you use the VPN, you can preset this but it must be done from an administrative account. This also means that standard users will need to enter the administrator's password to use OpenVPN. On the other hand, standard users can't properly connect to the server unless OpenVPN on the client has admin rights, so the elevated privileges are necessary.

To set the OpenVPN application to always run as an administrator, right-click on its shortcut icon and go to Properties. At the bottom of the Compatibility tab, click the button to Change settings for all users. In the new window, check Run this program as an administrator.

Each time you launch the OpenVPN GUI, Windows will ask if you want to allow the program to make changes to your computer. Click Yes. Launching the OpenVPN client application only puts the applet in the system tray so the the VPN can be connected and disconnected as needed; it does not actually make the VPN connection.

Once OpenVPN is started, initiate a connection by going into the system tray applet and right-clicking on the OpenVPN applet icon. This opens the context menu. Select TSPKVPNCONN at the top of the menu (that's our TSPKVPNCONN.ovpn profile) and choose Connect.

A status window will open showing the log output while the connection is established, and a message will show once the client is connected.

Disconnect from the VPN the same way: Go into the system tray applet, right-click the OpenVPN applet icon, select the client profile and click Disconnect.


Mac OS X

Tunnelblick is a free, open source OpenVPN client for Mac OS X. You can download the latest disk image from the Tunnelblick Downloads page. Double-click the downloaded .dmg file and follow the prompts to install.

Towards the end of the installation process, Tunnelblick will ask if you have any configuration files. It can be easier to answer No and let Tunnelblick finish. Open a Finder window and double-click TSPKVPNCONN.ovpn. Tunnelblick will install the client profile. Administrative privileges are required.

Launch Tunnelblick by double-clicking Tunnelblick in the Applications folder. Once Tunnelblick has been launched, there will be a Tunnelblick icon in the menu bar at the top right of the screen for controlling connections. Click on the icon, and then the Connect menu item to initiate the VPN connection. Select the TSPKVPNCONN connection.


iOS (iPhone, iPad)

From the iTunes App Store, search for and install OpenVPN Connect, the official iOS OpenVPN client application. To transfer your iOS client profile onto the device, connect it directly to a computer.

Completing the transfer with iTunes will be outlined here. Open iTunes on the computer and click on iPhone > apps. Scroll down to the bottom to the File Sharing section and click the OpenVPN app. The blank window to the right, OpenVPN Documents, is for sharing files. Drag the .ovpn file to the OpenVPN Documents window.


Now launch the OpenVPN app on the iPhone. There will be a notification that a new profile is ready to import. Tap the green plus sign to import it.


OpenVPN is now ready to use with the new profile. Start the connection by sliding the Connect button to the On position. Disconnect by sliding the same button to Off.

Note: The VPN switch under Settings cannot be used to connect to the VPN. If you try, you will receive a notice to only connect using the OpenVPN app.


Android

Open the Google Play Store. Search for and install Android OpenVPN Connect, the official Android OpenVPN client application.

The .ovpn profile can be transferred by connecting the Android device to your computer by USB and copying the file over. Alternatively, if you have an SD card reader, you can remove the device's SD card, copy the profile onto it and then insert the card back into the Android device.

Start the OpenVPN app and tap the menu to import the profile.


Then navigate to the location of the saved profile (the screenshot uses /sdcard/Download/) and select the file. The app will make a note that the profile was imported.


To connect, simply tap the Connect button. You'll be asked if you trust the OpenVPN application. Choose OK to initiate the connection. To disconnect from the VPN, go back to the the OpenVPN app and choose Disconnect.


Testing Your VPN Connection

Once everything is installed, a simple check confirms everything is working properly. Without having a VPN connection enabled, open a browser and go to https://www.dnsleaktest.com.

The site will return the IP address assigned by your internet service provider and as you appear to the rest of the world. To check your DNS settings through the same website, click on Extended Test and it will tell you which DNS servers you are using.

Now connect the OpenVPN client to your Ubuntu VPN Server and refresh the browser. The completely different IP address of your VPN server should now appear. That is now how you appear to the world. Again, DNSLeakTest's Extended Test will check your DNS settings and confirm you are now using the DNS resolvers pushed by your VPN.

Basic Server Setup with Ubuntu 17.10 64bit

$
0
0

This step by step guide will walk you through the steps to install and configure your first Ubuntu Server 17.10.


Prerequisites:

  • Ubuntu 17.10 Server 64bit or 32bit
  • One (Physical or Virtual) machine with enough memory and storage.


Installing Ubuntu 17.10 64bit Server

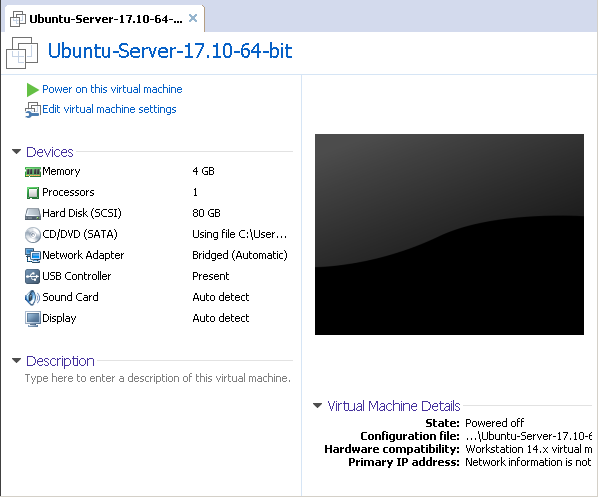
We will install our first Ubuntu 17.10 64bit Server on a virtual machine with 4GB of memory and 80GB of disk space as show in image below. 


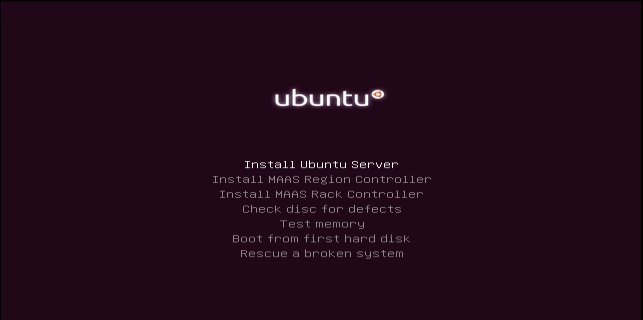
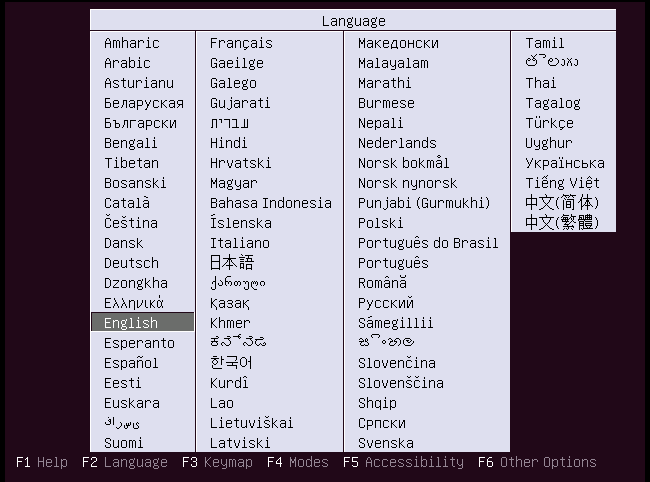
Start booting from CD/DVD or USB bootable media of Ubuntu Server and select your preferred language


From the selection screen, choose Install Ubuntu Server and press ENTER


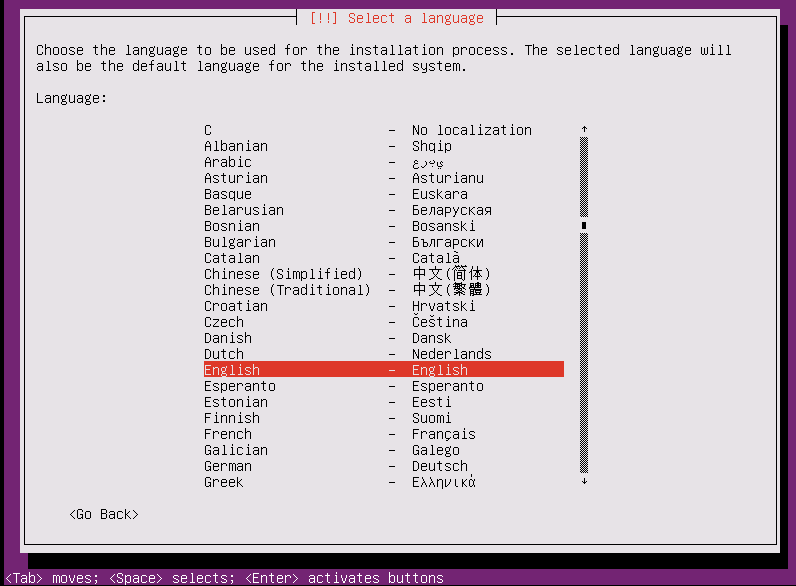
Select your preferred language and press ENTER to continue


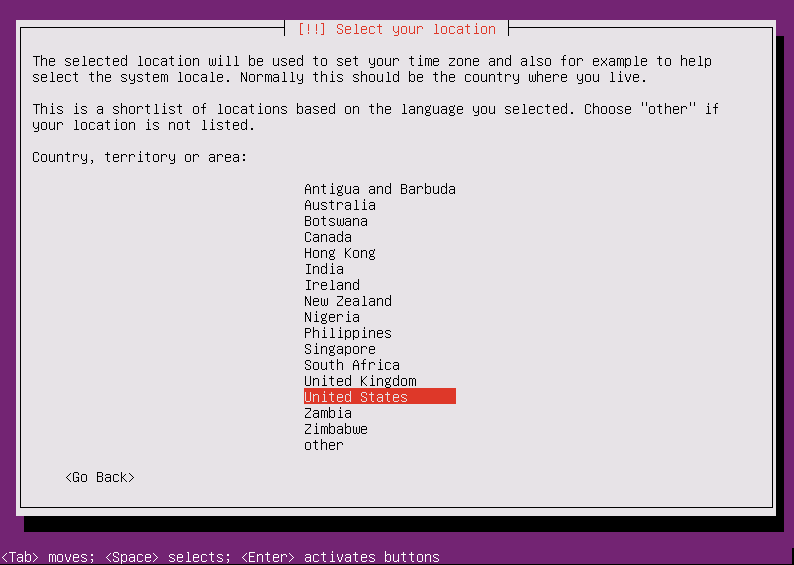
Select your Country and press enter to continue


No need to detect keyboard layout so select No and press ENTER


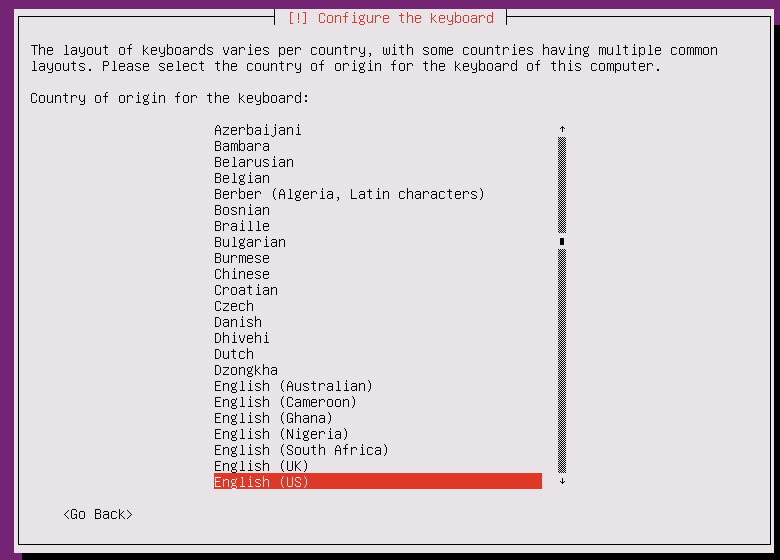
Select your preferred origin for the keyboard and press ENTER


Select you preferred Keyboad Layout and press ENTER


Process begin


Type Hostname for your Ubuntu machine and Press Continue


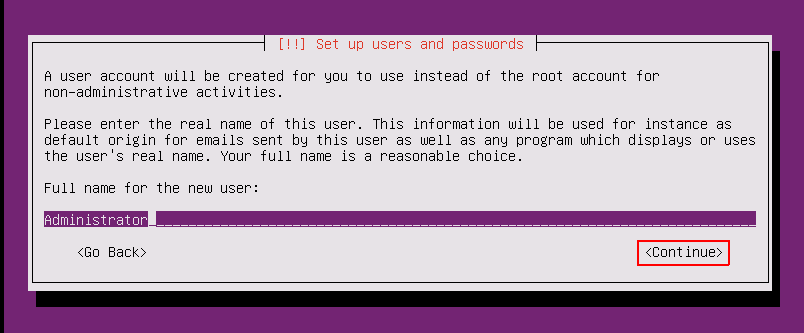
Type Full name for new username and press Continue


Type Username and press Continue


Type Password for new user and press Continue


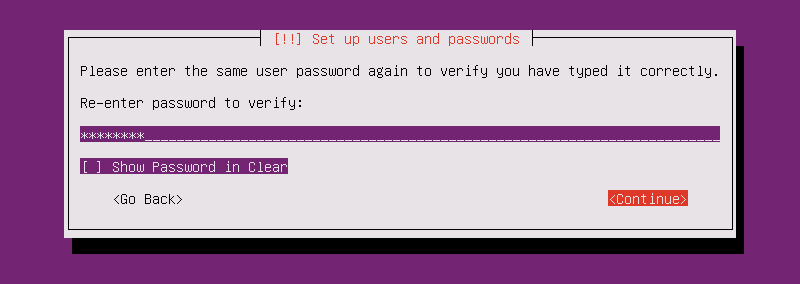
Type your password again to confirm and press Continue


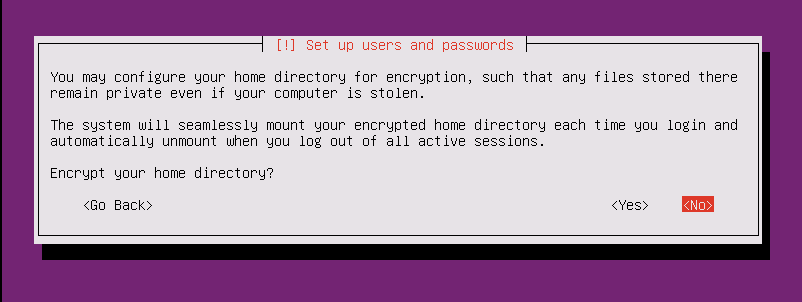
Choose No and press ENTER


It will automatically detect and set up your timezone. If you want set up manually, press Cancel


If you are okay with automatically detected time zone then press Yes


Hardware detection process begin


We will use first option for disk partitioning. Here you can choose your preferred disk partitioning  method.


If you have more than one disk installed in your system then choose appropriate disk for partitioning.


Choose Yes and press ENTER


Partitioning process begin


If you have internet proxy in your environment, enter details here or leave blank and press continue


Wait for completion


Choose appropriate update option for your Ubuntu machine and press ENTER


Installation process begin.


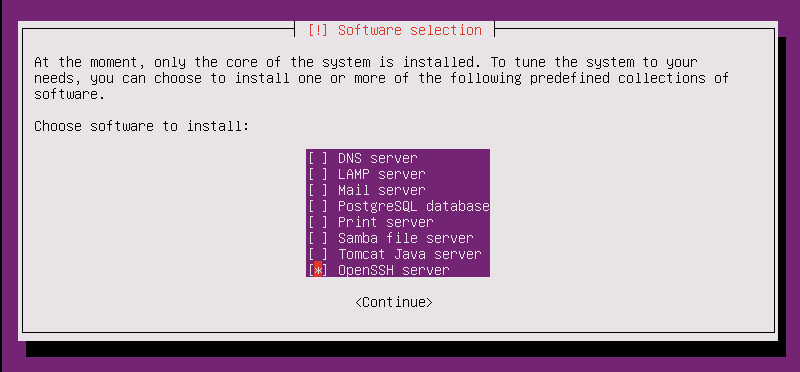
Select appropriate Software to install and leave it blank for basic installation and press Continue


Software installing process begin


Press ENTER to Yes


Installing grub boot loader


Press Continue to finish the installation


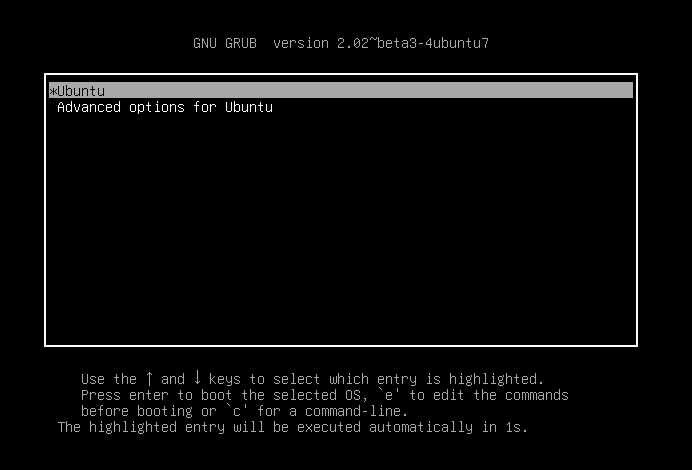
This is the first screen of your Ubuntu 17.10 Server booting first time

Press ENTER


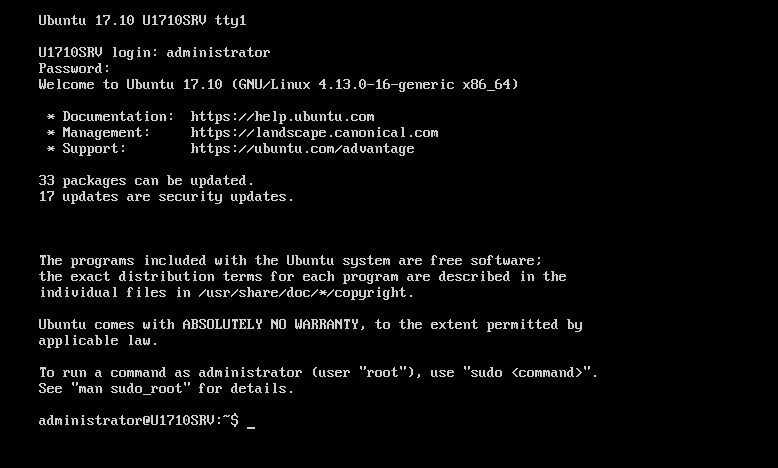
Here you can login with the username and password you created during installation


Here you go


We are done installing our first Ubuntu 17.10 Server.

How To Resolve "Out of Memory" Errors on Ubuntu 17.10

$
0
0


Swap is an area on a disk drive that has been created as a place where the operating system can temporarily store data that it can no longer hold in Memory. The easiest way of increasing the performance of your Ubuntu server and guarding against out of memory errors in applications is to increase some swap space.


This step by step guide will walk you through the steps to create and add a swap file on an Ubuntu 17.10 server. If you ran into out of memory error on an earlier version of Ubuntu, this method is compatible with earlier release as well.


Check the System for Swap Information

Before we begin, we will take a look at our operating system to see if we already have some swap space available. We can have multiple swap files or swap partitions, but generally one should be enough.

We can see if the system has any configured swap by typing:


sudo swapon -s

Filename                Type        Size    Used    Priority

If you only get back the header of the table, as I've shown above, you do not currently have any swap space enabled.

Another, more familiar way of checking for swap space is with the free utility, which shows us system memory usage. We can see our current memory and swap usage in Megabytes by typing:

free -m
             total       used       free     shared    buffers     cached
Mem:          3953        154       3799          0          8         83
-/+ buffers/cache:         62       3890
Swap:            0          0          0

As you can see above, our total swap space in the system is "0". This matches what we saw with the previous command.


Check Available Space on the Hard Drive Partition

The typical way of allocating space for swap is to use a separate partition devoted to the task. However, altering the partitioning scheme is not always possible. We can just as easily create a swap file that resides on an existing partition.

Before we do this, we should be aware of our current disk usage. We can get this information by typing:

df -h
Filesystem      Size  Used Avail Use% Mounted on
/dev/sda         70G  5.3G   64G   4% /
none            4.0K     0  4.0K   0% /sys/fs/cgroup
udev            2.0G   12K  2.0G   1% /dev
tmpfs           396M  312K  396M   1% /run
none            5.0M     0  5.0M   0% /run/lock
none            2.0G     0  2.0G   0% /run/shm
none            100M     0  100M   0% /run/user

As you can see on the first line, our hard drive partition has 70 Gigabytes available, so we have a huge amount of space to work with.

Although there are many opinions about the appropriate size of a swap space, it really depends on your personal preferences and your application requirements. Generally, an amount equal to or double the amount of RAM on your system is a good starting point.

Since our system has 8 Gigabytes of RAM, so we will create a swap space of 8 Gigabytes to match my system's RAM.


Create a Swap File

Now that we know our available hard drive space, we can go about creating a swap file within our filesystem.

We will create a file called swapfile in our root (/) directory. The file must allocate the amount of space we want for our swap file. There are two main methods of doing this:


The Slower Method

Traditionally, we would create a file with preallocated space by using the dd command. This versatile disk utility writes from one location to another location.

We can use this to write zeros to the file from a special device in Linux systems located at /dev/zero that just spits out as many zeros as requested.

We specify the file size by using a combination of bs for block size and count for the number of blocks. What we assign to each parameter is almost entirely arbitrary. What matters is what the product of multiplying them turns out to be.

For instance, in our example, we're looking to create a 4 Gigabyte file. We can do this by specifying a block size of 1 Gigabyte and a count of 4:

sudo dd if=/dev/zero of=/swapfile bs=1G count=8
8+0 records in
8+0 records out
8589934592 bytes (8.3 GB) copied, 18.6227 s, 231 MB/s

Check your command before pressing ENTER because this has the potential to destroy data if you point the of (which stands for output file) to the wrong location.

We can see that 8 Gigabytes have been allocated by typing:

ls -lh /swapfile
-rw-r--r-- 1 root root 8.0G Nov 22 10:08 /swapfile

If you've completed the command above, you may notice that it took quite a while. In fact, you can see in the output that it took my system 36 seconds to create the file. That is because it has to write 8 Gigabytes of zeros to the disk.

If you want to learn how to create the file faster, remove the file and follow along below:

sudo rm /swapfile


The Faster Method

The quicker way of getting the same file is by using the fallocate program. This command creates a file of a preallocated size instantly, without actually having to write dummy contents.

We can create a 8 Gigabyte file by typing:

sudo fallocate -l 8G /swapfile

The prompt will be returned to you almost immediately. We can verify that the correct amount of space was reserved by typing:

ls -lh /swapfile
-rw-r--r-- 1 root root 8.0G Nov 22 10:10 /swapfile

As you can see, our file is created with the correct amount of space set aside.


Enabling the Swap File

Right now, our file is created, but our system does not know that this is supposed to be used for swap. We need to tell our system to format this file as swap and then enable it.

Before we do that though, we need to adjust the permissions on our file so that it isn't readable by anyone besides root. Allowing other users to read or write to this file would be a huge security risk. We can lock down the permissions by typing:

sudo chmod 600 /swapfile

Verify that the file has the correct permissions by typing:

ls -lh /swapfile
-rw------- 1 root root 8.0G Nov 22 10:11 /swapfile

As you can see, only the columns for the root user have the read and write flags enabled.

Now that our file is more secure, we can tell our system to set up the swap space by typing:

sudo mkswap /swapfile
Setting up swapspace version 1, size = 8388600 KiB
no label, UUID=e3f2e7cf-b0a9-4cd4-b9ab-814b8a7d6933

Our file is now ready to be used as a swap space. We can enable this by typing:

sudo swapon /swapfile

We can verify that the procedure was successful by checking whether our system reports swap space now:

sudo swapon -s
Filename                Type        Size    Used    Priority
/swapfile               file        8388600 0       -1

We have a new swap file here. We can use the free utility again to corroborate our findings:

free -m
             total       used       free     shared    buffers     cached
Mem:          7906        202       7704          0          5         30
-/+ buffers/cache:         66       7446
Swap:         8190          0       8190

Our swap has been set up successfully and our operating system will begin to use it as necessary.


Make the Swap File Permanent

We have our swap file enabled, but when we reboot, the server will not automatically enable the file. We can change that though by modifying the fstab file.

Edit the file with root privileges in your text editor:

sudo nano /etc/fstab

At the bottom of the file, you need to add a line that will tell the operating system to automatically use the file you created:

/swapfile   none    swap    sw    0   0

Save and close the file when you are finished.


Swap Settings

There are a few options that you can configure that will have an impact on your system's performance when dealing with swap.

The swappiness parameter configures how often your system swaps data out of RAM to the swap space. This is a value between 0 and 100 that represents a percentage.

With values close to zero, the kernel will not swap data to the disk unless absolutely necessary. Remember, interactions with the swap file are "expensive" in that they take a lot longer than interactions with RAM and they can cause a significant reduction in performance. Telling the system not to rely on the swap much will generally make your system faster.

Values that are closer to 100 will try to put more data into swap in an effort to keep more RAM space free. Depending on your applications' memory profile or what you are using your server for, this might be better in some cases.

We can see the current swappiness value by typing:

cat /proc/sys/vm/swappiness
60

For a Desktop, a swappiness setting of 60 is not a bad value. For a Server, we'd probably want to move it closer to 0.

We can set the swappiness to a different value by using the sysctl command.

For instance, to set the swappiness to 10, we could type:

sudo sysctl vm.swappiness=10
vm.swappiness = 10

This setting will persist until the next reboot. We can set this value automatically at restart by adding the line to our /etc/sysctl.conf file:

sudo nano /etc/sysctl.conf

At the bottom, you can add:

vm.swappiness=10

Save and close the file when you are finished.

Another related value that you might want to modify is the vfs_cache_pressure. This setting configures how much the system will choose to cache inode and dentry information over other data.

Basically, this is access data about the filesystem. This is generally very costly to look up and very frequently requested, so it's an excellent thing for your system to cache. You can see the current value by querying the proc filesystem again:

cat /proc/sys/vm/vfs_cache_pressure
100

As it is currently configured, our system removes inode information from the cache too quickly. We can set this to a more conservative setting like 50 by typing:

sudo sysctl vm.vfs_cache_pressure=50
vm.vfs_cache_pressure = 50

Again, this is only valid for our current session. We can change that by adding it to our configuration file like we did with our swappiness setting:

sudo nano /etc/sysctl.conf

At the bottom, add the line that specifies your new value:

vm.vfs_cache_pressure = 50

Save and close the file when you are finished.


Conclusion

If you are running into OOM (out of memory) errors, or if you find that your system is unable to use the applications you need, the best solution is to optimize your application configurations or upgrade your server. Configuring swap space, however, can give you more flexibility and can help buy you time on a less powerful server.

How To Set Up Apache Web Server on Ubuntu 17.10

$
0
0


The Apache web server is the most popular way of serving web content on the internet. Apache distributes its functionality and components into individual units that can be customized and configured independently. The basic unit that describes an individual site or domain is called a virtual host.


These capabilities allow the administrator to use one server to host multiple domains or sites off of a single interface or IP by using a matching mechanism. This is relevant to anyone looking to host more than one site off of a single server.

Each domain that is configured will direct the visitor to a specific directory holding that site's information, never indicating that the same server is also responsible for other sites. This scheme is expandable without any software limit as long as your server can handle the load.

This step by step guide will walk you through how to set up Apache web server and virtual hosts on an Ubuntu 17.10 Server. During this process, you'll learn how to serve different content to different visitors depending on which domains they are requesting. This tutorial also applies on earlier release of Ubuntu.

Prerequisites


  • One Ubuntu 17.10 machine with a non-root user.
  • You will also need to have Apache installed in order to work through these steps. If you haven't already done so, you can get Apache installed on your server through apt-get:


sudo apt-get update
sudo apt-get install apache2

After these steps are complete, we can get started.

For the sake of this guide, my configuration will make a virtual host for sample.com and another for example.com. These will be referenced throughout the tutorial, but you should consider your own domains or values while following along.

If you do not have domains available to test with, you can use dummy values. We will show how to edit your local hosts file later on to test the configuration if you are using dummy values. This will allow you to test your configuration from your personal computer, even though your content won't be available through the domain name to other visitors.

Create the Directory Structure

The first step that we are going to take is to make a directory structure that will hold the site data that we will be serving to visitors.

Our document root (the top-level directory that Apache looks at to find content to serve) will be set to individual directories under the /var/www directory. We will create a directory here for both of the virtual hosts we plan on making.

Within each of these directories, we will create a public folder that will hold our actual files. This gives us some flexibility in our hosting.

For instance, for our sites, we're going to make our directories like this:

sudo mkdir -p /var/www/sample.com/public
sudo mkdir -p /var/www/example.com/public

The portions in red represent the domain names that we are wanting to serve from our Server.

Grant Permissions

Now we have the directory structure for our files, but they are owned by our root user. If we want our regular user to be able to modify files in our web directories, we can change the ownership by doing this:

sudo chown -R $USER:$USER /var/www/sample.com/public
sudo chown -R $USER:$USER /var/www/example.com/public

The $USER variable will take the value of the user you are currently logged in as when you press "ENTER". By doing this, our regular user now owns the public subdirectories where we will be storing our content.

We should also modify our permissions a little bit to ensure that read access is permitted to the general web directory and all of the files and folders it contains so that pages can be served correctly:

sudo chmod -R 755 /var/www

Your web server should now have the permissions it needs to serve content, and your user should be able to create content within the necessary folders.

Create Demo Pages for Each Virtual Host

We have our directory structure in place. Let's create some content to serve.

We're just going for a demonstration, so our pages will be very simple. We're just going to make an index.html page for each site.

Let's start with sample.com. We can open up an index.html file in our editor by typing:

nano /var/www/sample.com/public/index.html

In this file, create a simple HTML document that indicates the site it is connected to. My file looks like this:

<html>
  <head>
    <title>Welcome to Sample.com!</title>
  </head>
  <body>
    <h1>Success!  The sample.com virtual host is working!</h1>
  </body>
</html>

Save and close the file when you are finished.

We can copy this file to use as the basis for our second site by typing:

cp /var/www/sample.com/public/index.html /var/www/example.com/public/index.html

We can then open the file and modify the relevant pieces of information:

nano /var/www/example.com/public/index.html
<html>
  <head>
    <title>Welcome to Example.com!</title>
  </head>
  <body>
    <h1>Success!  The example.com virtual host is working!</h1>
  </body>
</html>

Save and close this file as well. You now have the pages necessary to test the virtual host configuration.

Create New Virtual Host Files

Virtual host files are the files that specify the actual configuration of our virtual hosts and dictate how the Apache web server will respond to various domain requests.

Apache comes with a default virtual host file called 000-default.conf that we can use as a jumping off point. We are going to copy it over to create a virtual host file for each of our domains.

We will start with one domain, configure it, copy it for our second domain, and then make the few further adjustments needed. The default Ubuntu configuration requires that each virtual host file end in .conf.

Create the First Virtual Host File

Start by copying the file for the first domain:

sudo cp /etc/apache2/sites-available/000-default.conf /etc/apache2/sites-available/sample.com.conf

Open the new file in your editor with root privileges:

sudo nano /etc/apache2/sites-available/sample.com.conf

The file will look something like this (I've removed the comments here to make the file more readable):

<VirtualHost *:80>
    ServerAdmin webmaster@localhost
    DocumentRoot /var/www/html
    ErrorLog ${APACHE_LOG_DIR}/error.log
    CustomLog ${APACHE_LOG_DIR}/access.log combined
</VirtualHost>


As you can see, there's not much here. We will customize the items here for our first domain and add some additional directives. This virtual host section matches any requests that are made on port 80, the default HTTP port.

First, we need to change the ServerAdmin directive to an email that the site administrator can receive emails through.

ServerAdmin admin@sample.com

After this, we need to add two directives. The first, called ServerName, establishes the base domain that should match for this virtual host definition. This will most likely be your domain. The second, called ServerAlias, defines further names that should match as if they were the base name. This is useful for matching hosts you defined, like www:

ServerName sample.com
ServerAlias www.sample.com

The only other thing we need to change for a basic virtual host file is the location of the document root for this domain. We already created the directory we need, so we just need to alter the DocumentRoot directive to reflect the directory we created:

DocumentRoot /var/www/sample.com/public

In total, our virtualhost file should look like this:

<VirtualHost *:80>
    ServerAdmin admin@sample.com
    ServerName sample.com
    ServerAlias www.sample.com
    DocumentRoot /var/www/sample.com/public
    ErrorLog ${APACHE_LOG_DIR}/error.log
    CustomLog ${APACHE_LOG_DIR}/access.log combined
</VirtualHost>

Save and close the file.

Copy First Virtual Host and Customize for Second Domain

Now that we have our first virtual host file established, we can create our second one by copying that file and adjusting it as needed.

Start by copying it:

sudo cp /etc/apache2/sites-available/sample.com.conf /etc/apache2/sites-available/example.com.conf

Open the new file with root privileges in your editor:

sudo nano /etc/apache2/sites-available/example.com.conf

You now need to modify all of the pieces of information to reference your second domain. When you are finished, it may look something like this:

<VirtualHost *:80>
    ServerAdmin admin@example.com
    ServerName example.com
    ServerAlias www.example.com
    DocumentRoot /var/www/test.com/public
    ErrorLog ${APACHE_LOG_DIR}/error.log
    CustomLog ${APACHE_LOG_DIR}/access.log combined
</VirtualHost>

Save and close the file when you are finished.

Enable the New Virtual Host Files

Now that we have created our virtual host files, we must enable them. Apache includes some tools that allow us to do this.

We can use the a2ensite tool to enable each of our sites like this:

sudo a2ensite sample.com.conf
sudo a2ensite example.com.conf

When you are finished, you need to restart Apache to make these changes take effect:

sudo systemctl restart apache2

You will most likely receive a message saying something similar to:

* Restarting web server apache2
AH00558: apache2: Could not reliably determine the server's fully qualified domain name, using 127.0.0.1. Set the 'ServerName' directive globally to suppress this message

This is a harmless message that does not affect our site.

Set Up Local Hosts File (Optional)

If you haven't been using actual domain names that you own to test this procedure and have been using some example domains instead, you can at least test the functionality of this process by temporarily modifying the hosts file on your local computer.

This will intercept any requests for the domains that you configured and point them to your Ubuntu server, just as the DNS system would do if you were using registered domains. This will only work from your computer though, and is simply useful for testing purposes.

Make sure you are operating on your local computer for these steps and not your Ubunut server. You will need to know the computer's administrative password or otherwise be a member of the administrative group.

If you are on a Mac or Linux computer, edit your local file with administrative privileges by typing:

sudo nano /etc/hosts

If you are on a Windows machine, you can find instructions on altering your hosts file here.

The details that you need to add are the IP address of your Ubuntu server followed by the domain you want to use.

For the domains that we used in this tutorial, assuming that my Ubuntu IP address is 172.22.10.10, we could add the following lines to the bottom of hosts file:

127.0.0.1   localhost
172.22.10.10 sample.com
172.22.10.10 example.com

This will direct any requests for sample.com and example.com on our computer and send them to our server at 172.22.10.10. This is what we want if we are not actually the owners of these domains in order to test our virtual hosts.

Save and close the file.

Test Web Server Results

Now that you have your virtual hosts configured, you can test your setup easily by going to the domains that you configured in your web browser:

http://sample.com

You should see a page that looks like this:


Likewise, if you can visit your second page:

http://example.com

You will see the file you created for your second site:


If both of these sites work well, you've successfully configured two virtual hosts on the same Ubuntu server.

If you adjusted your home computer's hosts file, you may want to delete the lines you added now that you verified that your configuration works. This will prevent your hosts file from being filled with entries that are not actually necessary.

Conclusion

You should now have a single server handling two separate domain names. You can expand this process by following the steps we mentioned above to make additional virtual hosts. There is no software limit on the number of domain names Apache can handle, so feel free to make as many as your server is capable of handling.

The disastrous effect of advanced technology

$
0
0

Perhaps the most fundamental and direct impact that technology has on the everyday life of most people is economic in nature.
The issue of jobs and unemployment is one that strikes a chord of concern in just about every person. While competition between machinery and human labor has long existed in the realm of physical tasks, it has only recently been introduced into the domain of mental work.


Much as heavy machinery has eliminated the need for physical exertion on the part of humans, so too does modern technology, in the form of microchips and computers, bring with it the potential to eliminate mental drudgery. Does this mean, however, that humans will no longer have any purpose to serve in the world?

To gain some perspective on the issue, we can take a look at the past. At the beginning of the 20th century, jobs in factories and agriculture were disappearing at a rapid rate. But with the loss of those jobs came the potential for millions of new jobs and economic development in new industries.

Today, new manufacturing technologies, such as Robots, Autonomous Cars and Artificial Intelligence techniques are rapidly reducing the number of production jobs. The advent of new technology is projected to rapidly decrease the demand for clerical workers and other such semiskilled and unskilled workers.


The development of more advanced technology affects our economy because it is not bound to provide economic growth. Making it possible for technology to truly replace humanity would be disastrous.

Computers, Smartphones and Tablets, which have revolutionized the workplace, are similarly infiltrating society. They have brought about innumerable advances in education and personal communication.

Slowly but surely, Smartphones have begun to infiltrate the classroom. Though not yet optimized for education, the smartphone or tablet has much potential in this arena. Wireless networks can allow for the easy sharing of courseware, submissions by students of papers, exams, courseware responses, and other creations. The networking of information can provide students with instant access to vast amounts of information and knowledge.

The realm of communications has likewise seen immense change. We are provided with new ways to communicate with each other, such as email, instant messaging and most importantly social media. Documents placed on the internet are sources of information for the rest of the world. Vast databases allow for the easy storage of information. Global positioning satellites allow us to track our exact location and find our way to various destinations.

But what social problems will arise with such progress? Will we become increasingly dependent on our smartphones to the point of social breakdown? The technology is a more powerful social force than the aspiration for freedom, while technological progress AS A WHOLE continually narrows our sphere of freedom, each new technical advance CONSIDERED BY ITSELF appears to be desirable.

The potential applications of technology to warfare are well known but the question is, are these applications positive or negative?

One might argue that the military application of science is undoubtedly negative in that it has led to the creation of the atomic bomb and other such weapons of mass destruction. Technology has made the complete destruction of humanity possible. That capacity continues to grow, as more nations develop nuclear technology and the proliferation of nuclear warheads continues.

On the other hand, it is also possible to argue that science has made it possible for the more accurate destruction of enemy targets and, in doing so, has lessened unintended damage to civilian populations. Smart bombs and cruise missiles have lessened the human component of war at least to some degree.

But what will the effect of future more advanced technology be? Will technology be so ingrained in society as to destroy it and imprison humanity? Will it lessen the amount of destruction and death? Or will it be our ultimate undoing?


Artificial Intelligence (Technology of Mass Destruction)


How To Secure Apache with Let's Encrypt on Ubuntu 17.10

$
0
0


SSL certificates are used within web servers to encrypt the traffic between the server and client, providing extra layer of security for users accessing your applications. Let’s Encrypt provides an easy way to obtain and install trusted certificates free of cost.

This guide will walk you through the steps, how to set up a TLS/SSL certificate from Let’s Encrypt on an Ubuntu 17.10 running Apache as a web server. The steps outlined in this tutorial also applies on earlier release of Ubuntu.


Prerequisites


  • One Ubuntu 17.10 server with a non-root sudo user
  • Apache web server installed with one or more domain names properly configured


If you are done with above prerequisites, you are ready to begin by log into your server using sudo-enabled user account.


Install the Let’s Encrypt Client

The first step to using Let's Encrypt to obtain an SSL certificate is to install the certbot software on your server. The Certbot developers maintain their own Ubuntu software repository with up-to-date versions of the software. Because Certbot is in such active development it's worth using this repository to install a newer Certbot than provided by Ubuntu.

First, add the repository:

sudo add-apt-repository ppa:certbot/certbot

You'll need to press ENTER to accept. Afterwards, update the package list to pick up the new repository's package information:

sudo apt-get update

And finally, install Certbot from the new repository with apt-get:

sudo apt-get install python-certbot-apache

The certbot Let's Encrypt client is now ready to use.


Set Up the SSL Certificate

Generating the SSL Certificate for Apache using the certbot Let’s Encrypt client is pretty straightforward. The client will automatically obtain and install a new SSL certificate that is valid for the domains provided as parameters.

To execute the interactive installation and obtain a certificate that covers only a single domain, run the certbot command with:

sudo certbot --apache -d yourdomain.com

If you want to install a single certificate that is valid for multiple domains or subdomains, you can pass them as additional parameters to the command. The first domain name in the list of parameters will be the base domain used by Let’s Encrypt to create the certificate, and for that reason we recommend that you pass the bare top-level domain name as first in the list, followed by any additional subdomains or aliases:

sudo certbot --apache -d yourdomain.com -d www.yourdomain.com

For this example, the base domain will be yourdomain.com.

You will be prompted to provide an email address for lost key recovery and notices, and you will be need to agree to the Let's Encrypt terms of service. You'll then be asked to choose between enabling both http and https access or force all requests to redirect to https.

When the installation is finished, you should be able to find the generated certificate files at /etc/letsencrypt/live. You can verify the status of your SSL certificate with the following link (don’t forget to replace yourdomain.com with your base domain):

https://www.ssllabs.com/ssltest/analyze.html?d=yourdomain.com&latest

You should now be able to access your website using a https prefix.


Verify Certbot Auto-Renewal

Let’s Encrypt certificates only last for 90 days. However, the certbot package we installed takes care of this for us by running certbot renew twice a day via a systemd timer. On non-systemd distributions this functionality is provided by a cron script placed in /etc/cron.d. The task runs twice daily and will renew any certificate that's within thirty days of expiration.

To test the renewal process, you can do a dry run with certbot:

sudo certbot renew --dry-run

If you see no errors, you're all set. When necessary, Certbot will renew your certificates and reload Apache to pick up the changes. If the automated renewal process ever fails, Let’s Encrypt will send a message to the email you specified, warning you when your certificate is about to expire.


Conclusion

In this tutorial, we demonstrated how to install a free SSL certificate from Let’s Encrypt in order to secure a website hosted with Apache Web Server.

Microsoft Announces Azure Migrate Service for VMware Workloads

$
0
0

Azure Migrate service will guide VMware users on how to quickly and cost-effectively move their workloads to Microsoft's cloud.


Microsoft is smoothing out migration process, at least for organizations that have invested in the VMware ecosystem, with a new service called Azure Migrate. Azure Migrate will help users to assess their on-premises VMware environments and make the move in a guided and semi-automated manner. 

The service's discovery tool can be used to visualize the dependencies in applications comprised of multiple virtual machines and detect CPU, memory, storage and network utilization, data that is then used to inform its cost and virtual machine sizing guidance.

After this process is completed, Azure Migrate enlists Microsoft's cloud-based disaster recovery solution to transfer VMware workloads.

Azure Site Recovery (ASR) enables customers to migrate VMware-virtualized Windows Server and Linux workloads with minimal downtime. ASR offers application-centric migration, allowing you to sequence your application servers as they migrate, explained Corey Sanders, director of Compute at Microsoft Azure, in a blog post.

How To Install Linux, Apache, MySQL, PHP (LAMP) Stack on Ubuntu 17.10

$
0
0


LAMP Stack is a group of open source software that is typically installed together to enable a server to host dynamic websites and web apps. This term is actually an acronym which represents the Linux operating system, with the Apache web server. The site data is stored in a MySQL database, and dynamic content is processed by PHP.


In this tutorial, we will walk you through the steps to set up LAMP Stack on an Ubuntu 17.10 Server.


Prerequisites

Before you begin with this tutorial, you should have a non-root user account with sudo privileges created on your Ubuntu Server.


Install Apache Web Server

The Apache web server is among the most popular web servers in the world.

We can install Apache easily using Ubuntu's package manager, apt. A package manager allows us to install most software pain-free from a repository maintained by Ubuntu.

sudo apt-get update
sudo apt-get install apache2

Since we are using a sudo command, these operations get executed with root privileges. It will ask you for your regular user's password to verify your intentions.

Once you've entered your password, apt will tell you which packages it plans to install and how much extra disk space they'll take up. Press Y and hit Enter to continue, and the installation will proceed.


Set Global ServerName

Now, we will add a single line to the /etc/apache2/apache2.conf file to suppress a warning message. If you wish not set ServerName globally, you will receive the following warning when checking your Apache configuration for syntax errors:

sudo apache2ctl configtest

Output
AH00558: apache2: Could not reliably determine the server's fully qualified domain name, using 127.0.1.1. Set the 'ServerName' directive globally to suppress this message
Syntax OK

Open up the main configuration file with your text edit:

sudo nano /etc/apache2/apache2.conf

Inside, at the bottom of the file, add a ServerName directive, pointing to your primary domain name. If you do not have a domain name associated with your server, you can use your server's IP address:

ServerName server_domain_or_IP

Save and close the file when you are finished.

Next, check for syntax errors by typing:

sudo apache2ctl configtest

Since we added the global ServerName directive, all you should see is:

Output
Syntax OK

Restart Apache to implement your changes:

sudo systemctl restart apache2

You can now begin configuring the firewall.


Configure the UFW Firewall to Allow Web Traffic

Make sure that your firewall allows HTTP and HTTPS traffic. You can make sure that UFW has an application profile for Apache like so:

sudo ufw app list

Output
Available applications:
  Apache
  Apache Full
  Apache Secure
  OpenSSH

If you look at the Apache Full profile, it should show that it enables traffic to ports 80 and 443:

sudo ufw app info "Apache Full"

Output
Profile: Apache Full
Title: Web Server (HTTP,HTTPS)
Description: Apache v2 is the next generation of the omnipresent Apache web
server.

Ports:
  80,443/tcp

Allow incoming traffic for this profile:

sudo ufw allow in "Apache Full"

You can do a spot check right away to verify that everything went as planned by visiting your server's IP address in your web browser.

http://your_server_IP_address

You will see the default Ubuntu 17.10 Apache web page, which is there for informational and testing purposes. It should look something like this:


If you see this page, then your web server is now correctly installed and accessible through your firewall.


Install MySQL

Now that we have our web server up and running, it is time to install MySQL. MySQL is a database management system. Basically, it will organize and provide access to databases where our site can store information.

Again, we can use apt to acquire and install our software. This time, we'll also install some other "helper" packages that will assist us in getting our components to communicate with each other:

sudo apt-get install mysql-server

Again, you will be shown a list of the packages that will be installed, along with the amount of disk space they'll take up. Enter Y to continue.

During the installation, your server will ask you to select and confirm a password for the MySQL "root" user. This is an administrative account in MySQL that has increased privileges. Think of it as being similar to the root account for the server itself (the one you are configuring now is a MySQL-specific account, however). Make sure this is a strong, unique password, and do not leave it blank.

When the installation is complete, we want to run a simple security script that will remove some dangerous defaults and lock down access to our database system a little bit. Start the interactive script by running:

mysql_secure_installation

You will be asked to enter the password you set for the MySQL root account. Next, you will be asked if you want to configure the VALIDATE PASSWORD PLUGIN.

Answer y for yes, or anything else to continue without enabling.

VALIDATE PASSWORD PLUGIN can be used to test passwords
and improve security. It checks the strength of password
and allows the users to set only those passwords which are
secure enough. Would you like to setup VALIDATE PASSWORD plugin?

Press y|Y for Yes, any other key for No:

You'll be asked to select a level of password validation. Keep in mind that if you enter 2, for the strongest level, you will receive errors when attempting to set any password which does not contain numbers, upper and lowercase letters, and special characters, or which is based on common dictionary words.

There are three levels of password validation policy:

LOW    Length >= 8
MEDIUM Length >= 8, numeric, mixed case, and special characters
STRONG Length >= 8, numeric, mixed case, special characters and dictionary                  file

Please enter 0 = LOW, 1 = MEDIUM and 2 = STRONG: 1

If you enabled password validation, you'll be shown a password strength for the existing root password, and asked you if you want to change that password. If you are happy with your current password, enter n for "no" at the prompt:

Using existing password for root.
Estimated strength of the password: 100
Change the password for root ? ((Press y|Y for Yes, any other key for No) : n

For the rest of the questions, you should press Y and hit the Enter key at each prompt. This will remove some anonymous users and the test database, disable remote root logins, and load these new rules so that MySQL immediately respects the changes we have made.

Remove anonymous users? (Press y|Y for Yes, any other key for No) : y
Success.

Normally, root should only be allowed to connect from
'localhost'. This ensures that someone cannot guess at
the root password from the network.

Disallow root login remotely? (Press y|Y for Yes, any other key for No) : y
Success.

By default, MySQL comes with a database named 'test' that
anyone can access. This is also intended only for testing,
and should be removed before moving into a production
environment.

Remove test database and access to it? (Press y|Y for Yes, any other key for No) : y
 - Dropping test database...
Success.

 - Removing privileges on test database...
Success.

Reloading the privilege tables will ensure that all changes
made so far will take effect immediately.

Reload privilege tables now? (Press y|Y for Yes, any other key for No) : y
Success.

All done!


At this point, your database system is now set up and we can move on.


Install PHP

PHP is the component of our setup that will process code to display dynamic content. It can run scripts, connect to our MySQL databases to get information, and hand the processed content over to our web server to display.

We can once again leverage the apt system to install our components. We're going to include some helper packages as well, so that PHP code can run under the Apache server and talk to our MySQL database:

sudo apt-get install php libapache2-mod-php php-mcrypt php-mysql

This should install PHP without any problems. We'll test this in a moment.

In most cases, we'll want to modify the way that Apache serves files when a directory is requested. Currently, if a user requests a directory from the server, Apache will first look for a file called index.html. We want to tell our web server to prefer PHP files, so we'll make Apache look for an index.php file first.

To do this, type this command to open the dir.conf file in a text editor with root privileges:

sudo nano /etc/apache2/mods-enabled/dir.conf

It will look like this:

<IfModule mod_dir.c>
    DirectoryIndex index.html index.cgi index.pl index.php index.xhtml index.htm
</IfModule>

We want to move the PHP index file highlighted above to the first position after the DirectoryIndex specification, like this:


When you are finished, save and close the file by pressing Ctrl-X. You'll have to confirm the save by typing Y and then hit Enter to confirm the file save location.

After this, we need to restart the Apache web server in order for our changes to be recognized. You can do this by typing this:

sudo systemctl restart apache2

We can also check on the status of the apache2 service using systemctl:

sudo systemctl status apache2


Install PHP Modules

To enhance the functionality of PHP, we can optionally install some additional modules.

To see the available options for PHP modules and libraries, you can pipe the results of apt-cache search into less, a pager which lets you scroll through the output of other commands:

apt-cache search php- | less

Use the arrow keys to scroll up and down, and q to quit.

The results are all optional components that you can install. It will give you a short description for each:

libnet-libidn-perl - Perl bindings for GNU Libidn
php-all-dev - package depending on all supported PHP development packages
php-cgi - server-side, HTML-embedded scripting language (CGI binary) (default)
php-cli - command-line interpreter for the PHP scripting language (default)
php-common - Common files for PHP packages
php-curl - CURL module for PHP [default]
php-dev - Files for PHP module development (default)
php-gd - GD module for PHP [default]
php-gmp - GMP module for PHP [default]
php-ldap - LDAP module for PHP [default]
php-mysql - MySQL module for PHP [default]
php-odbc - ODBC module for PHP [default]
php-pear - PEAR Base System
php-pgsql - PostgreSQL module for PHP [default]
php-pspell - pspell module for PHP [default]
php-recode - recode module for PHP [default]
php-snmp - SNMP module for PHP [default]
php-sqlite3 - SQLite3 module for PHP [default]
php-tidy - tidy module for PHP [default]
php-xmlrpc - XMLRPC-EPI module for PHP [default]
php7.1-cgi - server-side, HTML-embedded scripting language (CGI binary)
php7.1-cli - command-line interpreter for the PHP scripting language
php7.1-common - documentation, examples and common module for PHP
php7.1-curl - CURL module for PHP
php7.1-gd - GD module for PHP
php7.1-gmp - GMP module for PHP
php7.1-json - JSON module for PHP
php7.1-ldap - LDAP module for PHP
php7.1-mysql - MySQL module for PHP
php7.1-odbc - ODBC module for PHP
php7.1-opcache - Zend OpCache module for PHP
php7.1-pgsql - PostgreSQL module for PHP
php7.1-pspell - pspell module for PHP
php7.1-readline - readline module for PHP
php7.1-recode - recode module for PHP
:

To get more information about what each module does, you can either search the internet, or you can look at the long description of the package by typing:

apt-cache show package_name

There will be a lot of output, with one field called Description-en which will have a longer explanation of the functionality that the module provides.

For example, to find out what the php-cli module does, we could type this:

apt-cache show php-cli

Along with a large amount of other information, you'll find something that looks like this:

Output
Package: php-cli
Architecture: all
Version: 1:7.1+54ubuntu1
Priority: optional
Section: php
Source: php-defaults (54ubuntu1)
Origin: Ubuntu
Maintainer: Ubuntu Developers <ubuntu-devel-discuss@lists.ubuntu.com>
Original-Maintainer: Debian PHP Maintainers <pkg-php-maint@lists.alioth.debian.org>
Bugs: https://bugs.launchpad.net/ubuntu/+filebug
Installed-Size: 12
Depends: php7.1-cli
Filename: pool/main/p/php-defaults/php-cli_7.1+54ubuntu1_all.deb
Size: 3128
MD5sum: 705f7d7989ad7271615f83aa5faedcf6
SHA1: 7f047acac164baa649a31d31148003e8232ee484
SHA256: 5c4598fbe64cf84471abd5f6fd8ba6233b3d703343595a4bf6600fa0e8581656
Description-en: command-line interpreter for the PHP scripting language (default)
 This package provides the /usr/bin/php command interpreter, useful for
 testing PHP scripts from a shell or performing general shell scripting tasks.
 .
 PHP (recursive acronym for PHP: Hypertext Preprocessor) is a widely-used
 open source general-purpose scripting language that is especially suited
 for web development and can be embedded into HTML.
 .
 This package is a dependency package, which depends on Ubuntu's default
 PHP version (currently 7.1).
Description-md5: db5be8a4c70505a3d8cd5d4ff85fe26e
Supported: 9m

If, after researching, you decide you would like to install a package, you can do so by using the apt-get install command like we have been doing for our other software.

If we decided that php-cli is something that we need, we could type:

sudo apt-get install php-cli

If you want to install more than one module, you can do that by listing each one, separated by a space, following the apt-get install command, like this:

sudo apt-get install package1package2package3

At this point, your LAMP stack is installed and configured. We should still test out our PHP though.


Test PHP Processing on your Web Server

In order to test that our system is configured properly for PHP, we can create a very basic PHP script.

We will call this script websrvinfo.php. In order for Apache to find the file and serve it correctly, it must be saved to a very specific directory, which is called the "web root".

In Ubuntu 17.10, this directory is located at /var/www/html/. We can create the file at that location by typing:

sudo nano /var/www/html/websrvinfo.php

This will open a blank file. We want to put the following text, which is valid PHP code, inside the file:

<?php
phpinfo();
?>

When you are finished, save and close the file.

Now we can test whether our web server can correctly display content generated by a PHP script. To try this out, we just have to visit this page in our web browser. You'll need your server's IP address again.

The address you want to visit will be:

http://your_server_IP_address/websrvinfo.php

The page that you come to should look something like this:


This page basically gives you information about your server from the perspective of PHP. It is useful for debugging and to ensure that your settings are being applied correctly.

If this was successful, then your PHP is working as expected.

You probably want to remove this file after this test because it could actually give information about your server to unauthorized users. To do this, you can type this:

sudo rm /var/www/html/websrvinfo.php

You can always recreate this page if you need to access the information again later.


Conclusion

You have a LAMP Stack installed, that will allow you to install most kinds of websites and web software on your server. Before proceeding further, you should ensure that connections to your web server are secured, by serving them via HTTPS. The easiest option here is to use Let's Encrypt to secure your site with a free TLS/SSL certificate.

How to Set Up DNS Servers with BIND on Ubuntu 17.10

$
0
0


BIND (Berkeley Internet Name Domain) is the most wanted DNS software over the Internet. The BIND package is available for all Linux distributions including Ubuntu, which makes the installation simple and straightforward.


In this tutorial, we will show you how to install, configure and administer BIND 9 as a private DNS server on a Ubuntu 17.10. For the purpose of this guide, we will use the 172.22.10.0/24 subnet.


Prerequisites:


  • Two Ubunutu Servers (nsrv1 and nsrv2) connected to a private network
  • A DNS clients (Windows, Linux, Unix) machine that will connect to your DNS servers


Install BIND on Both Servers

If you are done with above prerequisites, you are ready to begin installing the packages on both servers:

sudo apt-get update
sudo apt-get install bind9 bind9utils

Sample Output
Reading package lists... Done
Building dependency tree       
Reading state information... Done
The following additional packages will be installed:
  libirs141
Suggested packages:
  bind9-doc resolvconf
The following NEW packages will be installed:
  bind9 bind9utils libirs141
0 upgraded, 3 newly installed, 0 to remove and 17 not upgraded.
Need to get 604 kB of archives.
After this operation, 2,996 kB of additional disk space will be used.
Do you want to continue? [Y/n] y
Get:1 http://us.archive.ubuntu.com/ubuntu artful/main amd64 libirs141 amd64 1:9.10.3.dfsg.P4-12.6ubuntu1 [18.3 kB]
Get:2 http://us.archive.ubuntu.com/ubuntu artful/main amd64 bind9utils amd64 1:9.10.3.dfsg.P4-12.6ubuntu1 [206 kB]
Get:3 http://us.archive.ubuntu.com/ubuntu artful/main amd64 bind9 amd64 1:9.10.3.dfsg.P4-12.6ubuntu1 [380 kB]
Fetched 604 kB in 3s (187 kB/s)
Preconfiguring packages ...
Selecting previously unselected package libirs141:amd64.
(Reading database ... 110883 files and directories currently installed.)
Preparing to unpack .../libirs141_1%3a9.10.3.dfsg.P4-12.6ubuntu1_amd64.deb ...
Unpacking libirs141:amd64 (1:9.10.3.dfsg.P4-12.6ubuntu1) ...
Selecting previously unselected package bind9utils.
Preparing to unpack .../bind9utils_1%3a9.10.3.dfsg.P4-12.6ubuntu1_amd64.deb ...
Unpacking bind9utils (1:9.10.3.dfsg.P4-12.6ubuntu1) ...
Selecting previously unselected package bind9.
Preparing to unpack .../bind9_1%3a9.10.3.dfsg.P4-12.6ubuntu1_amd64.deb ...
Unpacking bind9 (1:9.10.3.dfsg.P4-12.6ubuntu1) ...
Setting up bind9utils (1:9.10.3.dfsg.P4-12.6ubuntu1) ...
Processing triggers for ufw (0.35-5) ...
Rules updated for profile 'Apache Full'

Processing triggers for ureadahead (0.100.0-20) ...
Setting up libirs141:amd64 (1:9.10.3.dfsg.P4-12.6ubuntu1) ...
Processing triggers for libc-bin (2.26-0ubuntu2) ...
Processing triggers for systemd (234-2ubuntu12.1) ...
Processing triggers for man-db (2.7.6.1-2) ...
Setting up bind9 (1:9.10.3.dfsg.P4-12.6ubuntu1) ...
Adding group `bind' (GID 119) ...
Done.
Adding system user `bind' (UID 114) ...
Adding new user `bind' (UID 114) with group `bind' ...
Not creating home directory `/var/cache/bind'.
wrote key file "/etc/bind/rndc.key"
#
Created symlink /etc/systemd/system/multi-user.target.wants/bind9.service → /lib/systemd/system/bind9.service.
Processing triggers for systemd (234-2ubuntu12.1) ...
Processing triggers for ureadahead (0.100.0-20) ...
Processing triggers for ufw (0.35-5) ...
Rules updated for profile 'Apache Full'

To set BIND to IPv4 mode, you will do that by editing the “/etc/default/bind9” file on both servers and adding “-4” to the OPTIONS variable:

sudo nano /etc/default/bind9

The edited file should look something like this:

# run resolvconf?
RESOLVCONF=no

# startup options for the server
OPTIONS="-4 -u bind"

Save and exit the file.


Configure the Primary DNS Server

You need to edit the named.conf.options file:

sudo nano /etc/bind/named.conf.options

On top of the options block, add a new block called trusted.This list will allow the clients specified in it to send recursive DNS queries to our primary server. We will also add a couple of configuration settings to enable recursive queries on our nsrv1 and to have the server listen on our private network, add the configuration settings under the directory “/var/cache/bind” directive like in the example below:

acl "trusted" {
172.22.10.100;
172.22.10.200;
172.22.10.210;
172.22.10.220;
};
options {
directory "/var/cache/bind";
recursion yes;
        allow-recursion { trusted; };
        listen-on { 172.22.10.100; };
        allow-transfer { none; };

forwarders {
8.8.8.8;
8.8.4.4;
};
};

If the “listen-on-v6” directive is present in the named.conf.options file, delete it as we want BIND to listen only on IPv4.

When you are finished, Save and close the file

Now on nsrv1, open the named.conf.local file for editing:

sudo nano /etc/bind/named.conf.local

zone "example.com" {
    type master;
    file "/etc/bind/zones/db.example.com";
    allow-transfer { 172.22.10.200; };
};

zone "10.22.172.in-addr.arpa" {
    type master;
    file "/etc/bind/zones/db.172.22.10";
    allow-transfer { 172.22.10.200; };
};

If your servers are in multiple private subnets in the same physical location, you need to specify a zone and create a separate zone file for each subnet.

When you are finished, save and close the file.

Now we’ll create the directory where we will store our zone files in:

sudo mkdir /etc/bind/zones

We will use the sample db.local file to make our forward zone file, let’s copy the file first:

cd /etc/bind/zones
sudo cp ../db.local ./db.example.com

Now edit the forward zone file we just copied:

sudo nano /etc/bind/zones/db.example.com

Replace localhost with your nsrv1 server’s FQDN, then replace “root.localhost” with “admin.example.com”.Every time you edit the zone file, increment the serial value before you restart named otherwise BIND won’t apply the change to the zone, we will increment the value to “3”. Add the nameserver records at the end of the file. After that add the A records for the hosts that need to be in this zone. That means any server whose name we want to end with “.example.com”:

The db.example.com file should look something like the following:

$TTL604800
@INSOAnsrv1.example.com. admin.example.com. (
      3; Serial
604800; Refresh
  86400; Retry
2419200; Expire
604800 ); Negative Cache TTL

; name servers - NS records
IN NSnsrv1.example.com.
IN NSnsrv2.example.com.

; name servers - A records
nsrv1.example.com.INA172.22.10.100
nsrv2.example.comINA172.22.10.200

; 172.22.10.0/24 - A records
anyhost1.example.comINA172.22.10.210
anyhost2.example.comINA172.22.10.220

When you are done, save and close the file


Create the Reverse Zone File

We specify the PTR records for reverse DNS lookups in the reverse zone files. When the DNS server receives a PTR lookup query for an example for IP: “172.22.10.220”, it will check the reverse zone file to retrieve the FQDN of the IP address, in our case that would be “anyhost2.example.com”.

We will create a reverse zone file for every single reverse zone specified in the named.conf.local file we created on nsrv1. We will use the sample db.127 zone file to create our reverse zone file:

cd /etc/bind/zones
sudo cp ../db.127 ./db.172.22.10

Edit the reverse zone file so it matches the reverse zone defined in named.conf.local:

sudo nano /etc/bind/zones/db.172.22.10

You should modify the SOA record and increment the serial value. Add the nameserver records at the end of the file. Add the PTR records for all hosts that are on the same subnet in the zone file you created. This consists of our hosts that are on the 172.22.10.0/24 subnet. In the first column we reverse the order of the last two octets from the IP address of the host we want to add:

The “/etc/bind/zones/db.172.22.10” reverse zone file should look something like this:

$TTL604800
@INSOAnsrv1.example.com. admin.example.com. (
      2; Serial
604800; Refresh
  86400; Retry
2419200; Expire
604800 ); Negative Cache TTL
; name servers - NS records
INNSnsrv1.example.com.
INNSnsrv2.example.com.
; PTR records
100.10INPTRnsrv1.example.com.;172.22.10.100
200.10INPTRnsrv2.example.com.;172.22.10.200
210.10INPTRanyhost1.example.com.;172.22.10.210
220.10INPTRanyhost2.example.com.;172.22.10.220

Save and exit the reverse zone file.


Verify the Configuration Files

Use the following command to check the configuration syntax of all the named.conf files that we configured:

sudo named-checkconf

If your configuration files don’t have any syntax problems, the output will not contain any error messages. However if you do have problems with your configuration files, compare the settings in the “Configuring the Primary DNS Server” section with the files you have errors in and make the correct adjustment, then you can try executing the named-checkconf command again.

The named-checkzone can be used to check the proper configuration of your zone files.You can use the following command to check the forward zone “example.com”:

sudo named-checkzone example.com db.example.com

And if you want to check the reverse zone configuration, execute the following command:

sudo named-checkzone 10.22.172.in-addr.arpa /etc/bind/zones/db.172.22.10

Once you have properly configured all the configuration and zone files, restart the BIND service:

sudo systemctl restart bind9
sudo systemctl status bind9

Sample output
bind9.service - BIND Domain Name Server
   Loaded: loaded (/lib/systemd/system/bind9.service; enabled; vendor preset: enabled)
   Active: active (running) since Thu 2017-11-23 10:58:29 PKT; 29min ago
     Docs: man:named(8)
  Process: 108624 ExecStop=/usr/sbin/rndc stop (code=exited, status=0/SUCCESS)
 Main PID: 108627 (named)
    Tasks: 4 (limit: 19660)
   Memory: 9.4M
      CPU: 16ms
   CGroup: /system.slice/bind9.service
           └─108627 /usr/sbin/named -f -4 -u bind

Nov 23 10:58:30 nsrv1.example.com named[108627]: zone 0.in-addr.arpa/IN: loaded serial 1
Nov 23 10:58:30 nsrv1.example.com named[108627]: zone localhost/IN: loaded serial 2
Nov 23 10:58:30 nsrv1.example.com named[108627]: zone example.com/IN: NS 'nsrv2.example.com' has no address records (A or AAAA)
Nov 23 10:58:30 nsrv1.example.com named[108627]: zone example.com/IN: not loaded due to errors.
Nov 23 10:58:30 nsrv1.example.com named[108627]: zone 255.in-addr.arpa/IN: loaded serial 1
Nov 23 10:58:30 nsrv1.example.com named[108627]: zone 127.in-addr.arpa/IN: loaded serial 1
Nov 23 10:58:30 nsrv1.example.com named[108627]: zone 10.22.172.in-addr.arpa/IN: loaded serial 1
Nov 23 10:58:30 nsrv1.example.com named[108627]: all zones loaded
Nov 23 10:58:30 nsrv1.example.com named[108627]: running
Nov 23 10:58:30 nsrv1.example.com named[108627]: zone 10.22.172.in-addr.arpa/IN: sending notifies (serial 1)


Configure the Secondary DNS Server

Setting up a secondary DNS server is always a good idea as it will serve as a failover and will respond to queries if the primary server is unresponsive.

On nsrv2, edit the named.conf.options file:

sudo nano /etc/bind/named.conf.options

At the top of the file, add the ACL with the private IP addresses for all your trusted servers:

acl "trusted" {
        172.22.10.100;
        172.22.10.200;
        172.22.10.210;
        172.22.10.220;
};
options {
recursion yes;
        allow-recursion { trusted; };
        listen-on { 172.22.10.100; };
        allow-transfer { none; };

        forwarders {
                8.8.8.8;
                8.8.4.4;
        };

Save and exit the file.

Now open the named.conf.local file for editing:

sudo nano /etc/bind/named.conf.local

Now you should specify slave zones that match the master zones on the nsrv1 DNS server. The masters directive should be set to the nsrv1 DNS server’s private IP address:

zone "example.com" {
    type slave;
    file "slaves/db.example.com";
    masters { 172.22.10.100; };
};

zone "10.22.172.in-addr.arpa" {
    type slave;
    file "slaves/db.172.22.10";
    masters { 172.22.10.100; };
};

Save and exit the file.

Use the following command to check the syntax of the configuration files:

sudo named-checkconf

Then restart the BIND service:

sudo systemctl restart bind9


Configure the DNS Clients

We will now configure the hosts in our 172.22.10.0/24 subnet to use the nsrv1 and nsrv2 servers as their primary and secondary DNS servers. This greatly depends on the OS the hosts are running but for most Linux distributions the settings that need to be changed reside in the /etc/resolv.conf file.

Generally on the Ubuntu, Debian and CentOS distributions just edit the /etc/resolv.conf file, execute the following command as root:

nano /etc/resolv.conf

Then replace the existing nameservers with:

nameserver 172.22.10.100 #nsrv1
nameserver 172.22.10.200 #nsrv2

Save and exit the file

Now, test if your clients can send queries to the DNS servers you just configured:

nslookup anyhost1.example.com

Sample Output:
Server:     172.22.10.100
Address:    172.22.10.100#53

Name:   anyhost1.example.com
Address: 172.22.10.210

You can also test the reverse lookup by querying the DNS server with the IP address of the host:

nslookup 172.22.10.210

Sample Output:
Server:     172.22.10.100
Address:    172.22.10.100#53

210.10.22.172.in-addr.arpa   name = anyhost1.example.com.

Check if all of the hosts resolve correctly using the commands above, if they do that means that you’ve configured everything properly.

Initial Server Setup with Ubuntu 17.10

$
0
0

When you first install a new Ubuntu 17.10 server, there are a few post installation steps that you should take under consideration as part of the basic server setup. This will enhance the security and usability of your server and will provide you a solid foundation for subsequent actions.

These guidelines are also applicable to earlier release of Ubuntu.


Root Login

To log into your Ubuntu server, you will need to know your server's IP address. You will also need the password or, if you installed an SSH key for authentication, the private key for the "root" user's account.

If you are not already connected to your server, go ahead and log in as the root user using the following command (replace the highlighted word with your server's IP address):
ssh root@your_server_ip
Note: If you are accessing your server from Windows machine, use Putty, SecureCRT or any other ssh client of your choice.

Complete the login process by accepting the warning about host authenticity, if it appears, then providing your root authentication (password or private key). If it is your first time logging into the server with a password, you will also be prompted to change the root password.

The next step is to set up an alternative user account with a reduced scope of influence for day-to-day work. We'll show you how to gain increased privileges during the times when you need them.


Create a New User

Once you are logged in as root, you're ready to add the new user account that can be used to log in from now on.

This example creates a new user called "peter", but you should replace it with a username that you like:
adduser peter
You will be asked a few questions, starting with the account password.

Enter a strong password and, optionally, fill in any of the additional information if you would like. This is not required and you can just press ENTER in any field you wish to skip.


Root Privileges

Now, you have a new user account with regular account privileges. However, you may sometimes need to do administrative tasks.

To avoid having to log out of our normal user and log back in as the root account, you can set up what is known as "superuser" or root privileges for our normal account. This will allow your normal user to run commands with administrative privileges by putting the word sudo before each command.

To add these privileges to new user, you need to add the new user to the "sudo" group. By default, on Ubuntu 17.10, users who belong to the "sudo" group are allowed to use the sudo command.

As root, run this command to add your new user to the sudo group (replace the highlighted word with your new user):

usermod -aG sudo peter
Now your user can run commands with superuser privileges!

If you want to enhance the security of your server, follow the rest of the steps in this guide.


Add Public Key Authentication

The next step in securing your server is to set up public key authentication for your new user. Setting this up will increase the security of your server by requiring a private SSH key to log in.

If you do not already have an SSH key pair, which consists of a public and private key, you need to generate one. If you already have a key that you want to use, skip to the Copy the Public Key step.

To generate a new key pair, enter the following command at the terminal of your local machine (ie. your computer):
ssh-keygen
Assuming your local user is called "administrator", you will see output that looks like the following:

ssh-keygen output

Generating public/private rsa key pair.
Enter file in which to save the key (/Users/
administrator/.ssh/id_rsa):
Press ENTER to accept this file name and path (or enter a new name).

Next, you will be prompted for a passphrase to secure the key with. You may either enter a passphrase or leave the passphrase blank.

Note: If you leave the passphrase blank, you will be able to use the private key for authentication without entering a passphrase. If you enter a passphrase, you will need both the private key and the passphrase to log in. Securing your keys with passphrases is more secure, but both methods have their uses and are more secure than basic password authentication.

This generates a private key, id_rsa, and a public key, id_rsa.pub, in the .ssh directory of the administrator's home directory. Remember that the private key should not be shared with anyone who should not have access to your servers!


Copy the Public Key

After generating an SSH key pair, you will want to copy your public key to your new server. We will cover two easy ways to do this.

Option 1: Use ssh-copy-id
If your local machine has the ssh-copy-id script installed, you can use it to install your public key to any user that you have login credentials for.

Run the ssh-copy-id script by specifying the user and IP address of the server that you want to install the key on, like this:
ssh-copy-id peter@your_server_ip
After providing your password at the prompt, your public key will be added to the remote user's .ssh/authorized_keys file. The corresponding private key can now be used to log into the server.


Option 2: Manually Install the Key
Assuming you generated an SSH key pair using the previous step, use the following command at the terminal of your local machine to print your public key (id_rsa.pub):
cat ~/.ssh/id_rsa.pub
This should print your public SSH key, which should look something like the following:

id_rsa.pub contents

ssh-rsa AAAAB3NzaC1yc2EAAAADAQABAAABAQDBGTO0tsVejssuaYR5R3Y/i73SppJAhme1dH7W2c47d4gOqB4izP0+fRLfvbz/tnXFz4iOP/H6eCV05hqUhF+KYRxt9Y8tVMrpDZR2l75o6+xSbUOMu6xN+uVF0T9XzKcxmzTmnV7Na5up3QM3DoSRYX/EP3utr2+zAqpJIfKPLdA74w7g56oYWI9blpnpzxkEd3edVJOivUkpZ4JoenWManvIaSdMTJXMy3MtlQhva+j9CgguyVbUkdzK9KKEuah+pFZvaugtebsU+bllPTB0nlXGIJk98Ie9ZtxuY3nCKneB+KjKiXrAvXUPCI9mWkYS/1rggpFmu3HbXBnWSUdf administrator@hostname
Select the public key, and copy it to your clipboard.

To enable the use of SSH key to authenticate as the new remote user, you must add the public key to a special file in the user's home directory.

On the server, as the root user, enter the following command to temporarily switch to the new user (replace highlighted with your own):
su - peter
Now you will be in your new user's home directory.

Create a new directory called .ssh and restrict its permissions with the following commands:
mkdir ~/.ssh
chmod 700 ~/.ssh
Now open a file in .ssh called authorized_keys with a text editor.
nano ~/.ssh/authorized_keys
Now insert your public key (which should be in your clipboard) by pasting it into the editor.

Press CTRL-x to exit the file, then y to save the changes that you made, then ENTER to confirm the file name.

Now restrict the permissions of the authorized_keys file with this command:
chmod 600 ~/.ssh/authorized_keys
Type this command once to return to the root user:
exit
Now your public key is installed, and you can use SSH keys to log in as your user.

Next, we'll show you how to increase your server's security by disabling password authentication.


Disable Password Authentication

Now that your new user can use SSH keys to log in, you can increase your server's security by disabling password-only authentication. Doing so will restrict SSH access to your server to public key authentication only. That is, the only way to log in to your server (aside from the console) is to possess the private key that pairs with the public key that was installed.

Note: Only disable password authentication if you installed a public key to your user as recommended in the above step. Otherwise, you will lock yourself out of your server!

To disable password authentication on your server, follow these steps.

As root or your new sudo user, open the SSH daemon configuration:
sudo nano /etc/ssh/sshd_config
Find the line that specifies PasswordAuthentication, uncomment it by deleting the preceding #, then change its value to "no". It should look like this after you have made the change:
PasswordAuthentication no
Here are two other settings that are important for key-only authentication and are set by default. If you haven't modified this file before, you do not need to change these settings:
PubkeyAuthentication yes
ChallengeResponseAuthentication no
When you are finished making your changes, save and close the file using the method we went over earlier (CTRL-X, then Y, then ENTER).

Type this to reload the SSH daemon:
sudo systemctl reload sshd
Password authentication is now disabled. Your server is now only accessible with SSH key authentication.


Verify Log in

Now, before you log out of the server, you should test your new configuration. Do not disconnect until you confirm that you can successfully log in via SSH.

In a new terminal on your local machine, log in to your server using the new account that we created. To do so, use this command (replace your username and server IP address):
sshpeter@your_server_ip
If you added public key authentication to your user, as described in steps four and five, your private key will be used as authentication. Otherwise, you will be prompted for your user's password.

Once authentication is provided to the server, you will be logged in as your new user.

Remember, if you need to run a command with root privileges, type "sudo" before it.


Set Up a Basic Firewall

Ubuntu 17.10 servers can use the UFW firewall to make sure only connections to certain services are allowed. You can set up a basic firewall very easily using this application.

Different applications can register their profiles with UFW upon installation. These profiles allow UFW to manage these applications by name. OpenSSH, the service allowing us to connect to our server now, has a profile registered with UFW.

You can see this by typing:
sudo ufw app list

Output

Available applications:
OpenSSH
We need to make sure that the firewall allows SSH connections so that we can log back in next time. We can allow these connections by typing:
sudo ufw allow OpenSSH
Afterwards, we can enable the firewall by typing:
sudo ufw enable
Type "y" and press ENTER to proceed. You can see that SSH connections are still allowed by typing:
sudo ufw status

Output

Status: active

To Action From
-- ------ ----
OpenSSH ALLOW Anywhere
OpenSSH (v6) ALLOW Anywhere (v6)
If you install and configure additional services, you will need to adjust the firewall settings to allow acceptable traffic in.


Conclusion

At this point, you have completed a post installation setup of your Ubuntu 17.10 server. You can install any of the software you need on your server now.

How To Install and Use TensorFlow on Ubuntu 17.10

$
0
0


TensorFlow is an open-source machine learning software built by Google to train neural networks. TensorFlow's neural networks are expressed in the form of stateful dataflow graphs. Each node in the graph represents the operations performed by neural networks on multi-dimensional arrays. These multi-dimensional arrays are commonly known as "tensors", hence the name TensorFlow.

TensorFlow is a deep learning software system. It works well for information retrieval, as demonstrated by Google in how they do search ranking in their machine-learning artificial intelligence system, RankBrain. TensorFlow can perform image recognition, as shown in Google's Inception, as well as human language audio recognition. It's also useful in solving other problems not specific to machine learning, such as partial differential equations.

The TensorFlow architecture allows for deployment on multiple CPUs or GPUs within a desktop, server or mobile device. There are also extensions for integration with CUDA, a parallel computing platform from Nvidia. This gives users who are deploying on a GPU direct access to the virtual instruction set and other elements of the GPU that are necessary for parallel computational tasks.

In this guide, we'll install TensorFlow's "CPU support only" version. This set up is ideal for people looking to install and use TensorFlow, but who don't have an Nvidia graphics card or don't need to run performance-critical applications.

These steps can also be performed on earlier release of Ubuntu.

You can install TensorFlow several ways. Each method has a different use case and development environment:


  • Python and Virtualenv: In this procedure, you install TensorFlow and all of the packages required to use TensorFlow in a Python virtual environment. This isolates your TensorFlow environemnt from other Python programs on the same machine.
  • Native pip: In this method, you install TensorFlow on your system globally. This is recommended for people who want to make TensorFlow available to everyone on a multi-user system. This method of installation does not isolate TensorFlow in a contained environment and may interfere with other Python installations or libraries.
  • Docker: Docker is a container runtime environment and completely isolates its contents from preexisting packages on your system. In this method, you use a Docker container that contains TensorFlow and all of its dependencies. This method is ideal for incorporating TensorFlow into a larger application architecture already using Docker. However, the size of the Docker image will be quite large.

We'll install TensorFlow in a Python virtual environment with virtualenv. This method isolates the TensorFlow installation and gets things up and running quickly. Once you complete the installation, you'll validate your installation by running a short TensorFlow program and then use TensorFlow to perform image recognition.


Prerequisites

Before you begin this guide, you'll need the following:


  • One Ubuntu 17.10 server with at least 1GB of RAM set up by following the Ubuntu 17.10 initial server setup guide, including a sudo non-root user and a firewall. 
  • Python 3.x or higher and virtualenv installed.
  • Git installed.


Setting Up Python 3

Ubuntu 17.10 comes with both Python 3 and Python 2 pre-installed. To make sure that your releases are up-to-date, let’s update and upgrade the system with apt-get:

sudo apt-get update
sudo apt-get -y upgrade

Once the process is complete, we can check the version of Python 3 that is installed in the system by typing:

python3 -V

Output
Python 3.6.3

To manage software packages for Python, let’s install pip:

sudo apt-get install -y python3-pip

A tool for use with Python, pip installs and manages programming packages we may want to use in our development projects. You can install Python packages by typing:

pip3 install package_name

Here, package_name can refer to any Python package or library, such as Django for web development or NumPy for scientific computing. So if you would like to install NumPy, you can do so with the command pip3 install numpy.

There are a few more packages and development tools to install to ensure that we have a robust set-up for our programming environment:

sudo apt-get install build-essential libssl-dev libffi-dev python-dev

Once Python is set up, and pip and other tools are installed, we can set up a virtual environment for our development projects.


Setting Up a Virtual Environment

Virtual environments enable you to have an isolated space on your computer for Python projects, ensuring that each of your projects can have its own set of dependencies that won’t disrupt any of your other projects.

You can set up as many Python programming environments as you want. Each environment is basically a directory or folder in your computer that has a few scripts in it to make it act as an environment.

We need to first install the venv module, part of the standard Python 3 library, so that we can create virtual environments. Let’s install venv by typing:

sudo apt-get install -y python3-venv

With this installed, we are ready to create environments. Let’s choose which directory we would like to put our Python programming environments in, or we can create a new directory with mkdir, as in:

mkdir environments
cd environments

Once you are in the directory where you would like the environments to live, you can create an environment by running the following command:

python3 -m venv my_env

Essentially, this sets up a new directory that contains a few items which we can view with the ls command:

ls my_env

Output
bin include lib lib64 pyvenv.cfg share

To use this environment, you need to activate it, which you can do by typing the following command that calls the activate script:

source my_env/bin/activate

Your prompt will now be prefixed with the name of your environment, in this case it is called my_env. Your prefix may look somewhat different, but the name of your environment in parentheses should be the first thing you see on your line:

(my_env) username@hostname:~/environments$

This prefix lets us know that the environment my_env is currently active, meaning that when we create programs here they will use only this particular environment’s settings and packages.

Note: Within the virtual environment, you can use the command python instead of python3, and pip instead of pip3 if you would prefer. If you use Python 3 on your machine outside of an environment, you will need to use the python3 and pip3 commands exclusively. 

After following these steps, your virtual environment is ready to use.


Creating a Simple Program

Now that we have our virtual environment set up, let’s create a simple “Hello, World!” program. This will make sure that our environment is working and gives us the opportunity to become more familiar with Python if we aren’t already.

To do this, we’ll open up a command-line text editor such as nano and create a new file:

nano hello.py

Once the text file opens up in the terminal window we’ll type out our program:

print("Hello, World!")

Exit nano by typing the control and x keys, and when prompted to save the file press y.

Once you exit out of nano and return to your shell, let’s run the program:

python hello.py

The hello.py program that you just created should cause your terminal to produce the following output:

Output
Hello, World!

To leave the environment, simply type the command deactivate and you will return to your original directory.

Congratulations! At this point you have a Python 3 programming environment set up on your local Ubuntu machine and can begin with the following!


Installing Git

You can use the apt package management tools to update your local package index. Afterwards, you can download and install the program:

sudo apt-get update
sudo apt-get install git

This will download and install git to your system.


Set Up Git

Now that you have git installed, you need to do a few things so that the commit messages that will be generated for you will contain your correct information.

The easiest way of doing this is through the git config command. Specifically, we need to provide our name and email address because git embeds this information into each commit we do. We can go ahead and add this information by typing:

git config --global user.name "Your Name"
git config --global user.email "youremail@domain.com"

We can see all of the configuration items that have been set by typing:

git config --list

user.name=Your Name
user.email=youremail@domain.com

As you can see, this has a slightly different format. The information is stored in your git configuration file, which you can optionally edit by hand with your text editor like this:

nano ~/.gitconfig

[user]
    name = Your Name
    email = youremail@domain.com

There are many other options that you can set, but these are the two essential ones needed. If you skip this step, you'll likely see warnings when you commit to git that are similar to this:

Output when git username and email not set
[master 0d9d21d] initial project version
 Committer: root 
Your name and email address were configured automatically based
on your username and hostname. Please check that they are accurate.
You can suppress this message by setting them explicitly:

    git config --global user.name "Your Name"
    git config --global user.email you@example.com

After doing this, you may fix the identity used for this commit with:

    git commit --amend --reset-author

This makes more work for you because you will then have to revise the commits you have done with the corrected information.

You should now have git installed and ready to use on your Ubuntu system.


Installing TensorFlow

In this step we are going to create a virtual environment and install TensorFlow.

First, create a project directory called tf-setup:

mkdir ~/tf-setup

Navigate to your newly created tf-demo directory:

cd ~/tf-setup

Then create a new virtual environment called tensorflow-dev. Run the following command to create the environment:

python3 -m venv tensorflow-dev

This creates a new tensorflow-dev directory which will contain all of the packages that you install while this environment is activated. It also includes pip and a standalone version of Python.

Now activate your virtual environment:

source tensorflow-dev/bin/activate

Once activated, you will see something similar to this in your terminal:

(tensorflow-dev)username@hostname:~/tf-setup $

Now you can install TensorFlow in your virtual environment.

Run the following command to install and upgrade to the newest version of TensorFlow available in PyPi:

pip3 install --upgrade tensorflow

TensorFlow will install:

Output
Collecting tensorflow
  Downloading tensorflow-1.4.0-cp36-cp36m-macosx_10_11_x86_64.whl (39.3MB)
    100% |████████████████████████████████| 39.3MB 35kB/s

...

Successfully installed bleach-1.5.0 enum34-1.1.6 html5lib-0.9999999 markdown-2.6.9 numpy-1.13.3 protobuf-3.5.0.post1 setuptools-38.2.3 six-1.11.0 tensorflow-1.4.0 tensorflow-tensorboard-0.4.0rc3 werkzeug-0.12.2 wheel-0.30.0

If you'd like to deactivate your virtual environment at any time, the command is:

deactivate

To reactivate the environment later, navigate to your project directory and run source tensorflow-dev/bin/activate.

Now, that you have installed TensorFlow, let's make sure the TensorFlow installation works.


Validating Installation

To validate the installation of TensorFlow, we are going to run a simple program in TensorFlow as a non-root user. We will use the canonical beginner's example of "Hello, world!" as a form of validation. Rather than creating a Python file, we'll create this program using Python's interactive console.

To write the program, start up your Python interpreter:

python

You will see the following prompt appear in your terminal

>>>

This is the prompt for the Python interpreter, and it indicates that it's ready for you to start entering some Python statements.

First, type this line to import the TensorFlow package and make it available as the local variable tf. Press ENTER after typing in the line of code:

import tensorflow as tf

Next, add this line of code to set the message "Hello, world!":

hello = tf.constant("Hello, world!")

Then create a new TensorFlow session and assign it to the variable sess:

sess = tf.Session()

Note: Depending on your environment, you might see this output:

Output
2017-11-04 16:22:45.956946: M tensorflow/core/platform/cpu_feature_guard.cc:45] The TensorFlow library wasn't compiled to use SSE4.1 instructions, but these are available on your machine and could speed up CPU computations.
2017-11-04 16:22:45.957158: M tensorflow/core/platform/cpu_feature_guard.cc:45] The TensorFlow library wasn't compiled to use SSE4.2 instructions, but these are available on your machine and could speed up CPU computations.
2017-11-04 16:22:45.957282: M tensorflow/core/platform/cpu_feature_guard.cc:45] The TensorFlow library wasn't compiled to use AVX instructions, but these are available on your machine and could speed up CPU computations.
2017-11-04 16:22:45.957404: M tensorflow/core/platform/cpu_feature_guard.cc:45] The TensorFlow library wasn't compiled to use AVX2 instructions, but these are available on your machine and could speed up CPU computations.
2017-11-04 09:30:50.757527: M tensorflow/core/platform/cpu_feature_guard.cc:45] 

The TensorFlow library wasn't compiled to use FMA instructions, but these are available on your machine and could speed up CPU computations.

This tells you that that you have an instruction set that has the potential to be optimized for better performance with TensorFlow. If you see this, you can safely ignore it and continue.

Finally, enter this line of code to print out the result of running the hello TensorFlow session you've constructed in your previous lines of code:

print(sess.run(hello))

You'll see this output in your console:

Output
Hello, world!

This indicates that everything is working and that you can start using TensorFlow to do something more interesting.

Exit the Python interactive console by pressing CTRL+D.

Now let's use TensorFlow's image recognition API to get more familiar with TensorFlow.


Using TensorFlow for Image Recognition

Now that TensorFlow is installed and you've validated it by running a simple program, let's look at TensorFlow's image recognition capabilities.

In order to classify an image you need to train a model. Then you need to write some code to use the model.

TensorFlow provides a repository of models and examples, including code and a trained model for classifying images.

Use Git to clone the TensorFlow models repository from GitHub into your project directory:

git clone https://github.com/tensorflow/models.git

You will see the following output as Git checks out the repository into a new folder called models:

Output
Cloning into 'models'...
remote: Counting objects: 8785, done.
remote: Total 8785 (delta 0), reused 0 (delta 0), pack-reused 8785
Receiving objects: 100% (8785/8785), 203.16 MiB | 24.16 MiB/s, done.
Resolving deltas: 100% (4942/4942), done.
Checking connectivity... done.

Switch to the models/tutorials/image/imagenet directory:

cd models/tutorials/image/imagenet

This directory contains the classify_image.py file which uses TensorFlow to recognize images. This program downloads a trained model from tensorflow.org on its first run. Downloading this model requires that you have 200MB of free space available on disk.

In this example, we will classify a pre-supplied image of a Panda. Execute this command to run the image classifier program:

python classify_image.py

You'll see output similar to this:

Output
giant panda, panda, panda bear, coon bear, Ailuropoda melanoleuca (score = 0.89107)
indri, indris, Indri indri, Indri brevicaudatus (score = 0.00779)
lesser panda, red panda, panda, bear cat, cat bear, Ailurus fulgens (score = 0.00296)
custard apple (score = 0.00147)
earthstar (score = 0.00117)

You have classified your first image using the image recognition capabilities of TensorFlow.

If you'd like to use another image, you can do this by adding the -- image_file argument to your python3 classify_image.py command. For the argument, you'd pass in the absolute path of the image file.


Conclusion

You've installed TensorFlow in a Python virtual environment and validated that TensorFlow works by running a couple of examples.

How To Install Grafana on Ubuntu 17.10

$
0
0

Grafana is an open source data visualization and monitoring tool. It offers support for Graphite, Elasticsearch, Included, Prometheus, and many more databases. The Grafana suite comes with a informative dashboard and metric analytics, allows you to manage and create your own dashboard for your apps or infrastructure performance monitoring.


In this guide, we'll show you how to install and configure Grafana on Ubuntu 17.10 server. These steps can also be performed on earlier release of Ubunut.


Prerequisites


  • Ubuntu Server 17.10 with root privileges


Install Grafana

Grafana provides two methods for installation - using the downloaded Debian package and using the apt repository. For this guide, we will use apt repository installation.

To begin, connect to the Ubuntu server using ssh protocol.

ssh root@your_ubuntu_server_ip

Add new Grafana repository to the 'sources.list.d' directory and then add the repository gpg key using the following commands.

echo 'deb https://packagecloud.io/grafana/stable/debian/ jessie main'> /etc/apt/sources.list.d/grafana.list

curl https://packagecloud.io/gpg.key | sudo apt-key add -

Now, update repository and install Grafana using the following apt commands.

sudo apt update
sudo apt install grafana

After the Grafana installation, you need to reload systemd manager configuration, in order to start Grafana service.

systemctl daemon-reload

Start Grafana and enable it to run automatically at system boot everytime.

systemctl start grafana-server
systemctl enable grafana-server

By default, Grafana will use port 3000. Check it using the netstat command and make sure that the port 3000 is on the 'LISTEN' state list.

netstat -plntu

If you have the UFW firewall installed on the server, open the ssh service port, grafana port 3000, and then start the firewall using the following commands.

ufw allow ssh
ufw allow 3000/tcp
ufw enable

Type 'y' to continue to start and add UFW to run automatically at boot time.

To see the firewall status, run the command below.

ufw status

Grafana has been installed and running on Ubuntu 17.10 server.


Change Grafana Default Password

After Grafana is  installed on your server, open up web-browser and type the grafana server IP address with port 3000.

http://your_ubuntu_server_ip:3000/

Log in to the Grafana Dashboard using default user 'admin' and password 'admin'.


You will see Grafana Dashboard as shown below.


To change the default username and password for Grafana, click on the Grafana logo on the top left and then click the 'Admin' menu, then choose the 'Global Users'.


You will see the list of users. Click on 'Edit' menu to edit the username and password. Type your new username and password, click on the green 'Update' button to confirm.


Install Grafana plugins

Following are the Grafana plugins:

1.Panel plugins - allow new data visualization to be added to Grafana.
2.Data Source - Grafana Data Source plugins.
3.App - bundles of panels, data source, dashboard with new UI.

For plugin installation, Grafana provides a command line tool called 'grafana-cli'. Run it to see the instruction.

grafana-cli

To get a list of all available plugins in the repository, use the following command.

grafana-cli plugins list-remote

To install a plugin, use 'plugins install' option as shown below.

grafana-cli plugins install grafana-clock-panel

After the plugin installed, restart the Grafana service.

systemctl restart grafana-server

To get a list of all installed plugins on your system, use the following command.

grafana-cli plugins ls

And if you want to remove a plugin, use 'plugins remove' option as below.

grafana-cli plugins remove grafana-clock-panel


Conclusion

We have completed Grafana installation on Ubuntu 17.10 server including its plugins installation. Now you can proceed adding the data sources.

How To Install Apache CouchDB on CentOS 7 Server

$
0
0

Apache CouchDB is an open source, document-oriented NoSQL database software that's focused on scalable architecture. Each database is a collection of independent documents, and does not store data and relationships in tables.


In this guide, we will demonstrate the installation and configuration of Apache CouchDB on a CentOS 7 server.


Prerequisites


  • CentOS 7 server with root privileges


Add EPEL Repository

Before installing Apache CouchDB on a CentOS 7 server, we need to add a new EPEL repository (Extra Package for Enterprise Linux).

Add EPEL repository using the following yum command.

yum -y install epel-release


Install Apache CouchDB

Apache CouchDB provides rpm packages for installation on Redhat Linux. So in this step, we will install CouchDB from the Apache repository.

Go to the '/etc/yum.repos.d' directory and create a new repo file 'apache-couchdb.repo' using the vim editor.

cd /etc/yum.repos.d/
vim apache-couchdb.repo

Add the following lines.

[bintray--apache-couchdb-rpm]
 name=bintray--apache-couchdb-rpm
 baseurl=http://apache.bintray.com/couchdb-rpm/el$releasever/$basearch/
 gpgcheck=0
 repo_gpgcheck=0
 enabled=1

Save the change, and exit the editor.

Now install Apache CouchDB using the following command.

yum -y install couchdb

After the installation is complete, start the service and enable it to launch at system boot.

systemctl start couchdb
systemctl enable couchdb

Now check the service.

systemctl status couchdb

And you should get a result similar to the one shown below.

Now check the server port.

netstat -plntu

Apache CouchDB has been successfully installed on the CentOS 7 server, and is running under default port 5984.


Enable Apache CouchDB HTTP server

Apache CouchDB provides the HTTP server for admin access on default port 5984. And has an admin panel Web UI named 'Fauxton'.

Now, we will enable the CouchDB HTTP server for admin panel access. So to begin with, go to the apache couchdb installation directory '/opt/couchdb', and edit the 'default.ini' configuration file under 'etc/' directory.

cd /opt/couchdb
vim etc/default.ini

Now go to the '[chttpd]' configuration line and change the bind_address value with your IP address.

[chttpd]
 port = 5984
 bind_address = 0.0.0.0

Save and exit.

Restart the couchdb service using the following systemctl command.

systemctl restart couchdb

Next, open up web browser and type your server IP address as shown below.

http://your_server_ip:5984/_utils/

And you should get the following Fauxton web UI page.


If you have firewalld running on your server, open the couchdb port 5984 using the firewall-cmd command, as shown below.

firewall-cmd --add-port=5984/tcp --permanent
firewall-cmd --reload


Configure CouchDB

By default, the fresh Apache CouchDB installation has an 'Admin Party'. So anyone who connects to CouchDB server can do anything, including create, delete, add new user etc. To add new admin account for the CouchDB, you will need to create that admin account from the admin panel.

Open up web browser and access the following server IP address on port 5984.

http://your_server_ip:5984/_utils/

Now click on the 'Admin Party' tab, type the admin user and password for couchdb, and then click the 'Create Admin' button.


New admin user for couchdb has been created.

Now, if you want to login to the admin panel Fauxton again, you will have to enter the login details.


Type your admin user and password to get access to the admin panel.


Basic usage Apache CouchDB

Apache CouchDB provides an API for managing the CouchDB system. And we will be using the 'curl' command utility for managing the CouchDB system.

In this step, we will discuss basic management. We will try to create the new database, show database list, delete the database etc using curl command.

To get information about the installed couchdb server, we can use the 'GET' parameter as shown below.

curl -X GET http://localhost:5984/

To create a new database, we need admin privileges. And for this action, we will be using the 'PUT' parameter.

We will create a new database named 'test_db'.

curl -X PUT http://username:password@localhost:5984/test_db

To get information about the database, we must use the 'GET' parameter.

Run the command below to get the database list on the server.

curl -X GET http://username:password@localhost:5984/_all_dbs

And you should get the 'test_db' as part of the retrieved list.

Next, get 'test_db' info using the command below.

curl -X GET http://username:password@localhost:5984/test_db

And the output should contains information related to the database.

For deleting the database on the CouchDB server, you need to use 'DELETE' parameter. Delete the 'test_db' database using the following command.

curl -X DELETE http://username:password@localhost:5984/test_db

Now check again the database list on the CouchDB server.

curl -X GET http://username:password@localhost:5984/_all_dbs

And you'll find that the 'test_db' database is deleted.


Conclusion

The installation and configuration for Apache CouchDB on CentOS 7 has been successful.

How to Block Advertisements at the DNS Level using Pi-hole and OpenVPN

$
0
0

Online ads are not only irritating but also potential sources of malware on your devices. While there are plugins designed to block ads on a per-application/per-device basis. However, stopping advertisements at the DNS level provides a much more complete solution across all of your applications and devices at once.


Pi-hole — a DNS server originally created to filters out requests to ad-serving domains, blocking ads and improving network performance. With Pi-hole, you can actively monitor every DNS request made on your network and block requests on the fly. This functionality also extends beyond web browsers, allowing you to filter out ads within other applications by targeting the appropriate DNS query.

In this guide, we will install and configure OpenVPN and Pi-hole on an Ubuntu 17.10 server to act as your own private, network-wide, DNS-based, ad-blocking filter for all of the devices connected to your network.

Note: For this set up, we will use network information i.e. ip addresses, hostnames according to our environment. You will need to replace these information accordingly.


Prerequisites

To complete this guide, you will need:


Gathering Network Information

Before we begin installation, you need to gather the network information Pi-hole uses to communicate with the VPN. As Pi-hole's installation process takes over your terminal session, having this information on hand before you start will make the whole process go much more smoothly.

First, use the ip command with the addr and show subcommands to identify the IP address of tun0, the network interface that your VPN tunnel is active on.

sudo ip addr show tun0

The output provides in-depth information about the interface.

Output from ip addr show tun0
1: tun0: mtu 1500 qdisc pfifo_fast state UNKNOWN group default qlen 100
    link/none
    inet 10.8.0.1 peer 10.8.0.2/32 scope global tun0
       valid_lft forever preferred_lft forever

Make note of the IP address following inet, as this is the address of your VPN server. You will need to know this when installing Pi-hole.

In addition to your VPN server's IP address, Pi-hole also needs to know the gateway to use for IPv4 traffic. You can think of a gateway as an access point between different networks.

Use the ip command again, this time with the route and show subcommands, to get your server's routing table information. Pipe the routing table information to grep which will parse and search the output for the string, default. default indicates the default gateway used by the server.

sudo ip route show | grep default

In the following example, the output tells you that the default gateway's IP address is 192.168.10.1, that the gateway is reachable on the eth0 interface, and that the gateway's onlink option is turned on, which is the default with tunneled connections.

Output from ip addr | grep default
default via 198.51.100.1 dev eth0 onlink

Make note of the IP address following via, as this is your server's default gateway address. You will need to know this when installing Pi-hole.

With the network information in hand, you're ready to download and install Pi-hole.


Downloading Pi-hole

As per the official installation instructions, use Git to clone the Pi-hole repository on GitHub into ~/Pi-hole, a directory that will automatically be created during the cloning process. Use the --depth 1 option to create a clone with a history truncated to the last revision; this will give you the latest version of Pi-hole without all the extra historical revisions.

Change to your home directory and clone the repository.

cd ~
sudo git clone --depth 1 https://github.com/pi-hole/pi-hole.git Pi-hole

The output confirms the location you're cloning into and then provides a real-time report of the process, including a count of the objects Git expected to copy as well as the number it actually did copy.

Output from git clone
Cloning into 'Pi-hole'...
remote: Counting objects: 65, done.
remote: Compressing objects: 100% (56/56), done.
remote: Total 65 (delta 5), reused 26 (delta 1), pack-reused 0
Unpacking objects: 100% (65/65), done.
Checking connectivity... done.

Now, go into to the newly created Pi-hole/automated\ install/ directory where you'll find Pi-hole's installation script.

cd Pi-hole/automated\ install/

Open the installation script to make sure that you're comfortable with what it does or modify it as necessary.

sudo nano basic-install.sh

Save and close the file to continue.

You now have a copy of the most up-to-date version of Pi-hole, and you've examined the automated installation script for potential problems. It's time to install and configure Pi-hole.


Executing the Installation Script

Pi-hole installation and configuration takes place with the help of a terminal-based wizard. Start the wizard with the following command:

bash basic-install.sh

First, the installation script tells you that it's Installing packages and that it's retrieving additional files needed for installation.


The next screen is a message from the Pi-hole automated installer informing you that you are installing a network-wide ad blocker.

Press ENTER to proceed.


Next, the installation wizard tells you that Pi-hole is Free and open source and lets you know how you can donate to the Pi-hole project.

Press ENTER to continue the installation.


The installation script will then inform you that a Static IP Address is required for the service to function properly.

Again, press ENTER to continue.


The next screen asks you to Choose An Interface for Pi-hole to listen on. Because you need Pi-hole to monitor the VPN's network interface, use the arrow keys on your keyboard to highlight tun0 and then press SPACE to make the selection. Next, press TAB to jump to the options at the bottom of screen. With highlighted, press ENTER to save the settings and continue.


The wizard now asks you to specify the Upstream DNS Provider. This is the service Pi-hole will use to resolve domain names. For simplicity's sake, you can leave this set to the default value, Google.

Press TAB to jump to the bottom of the screen, then press ENTER when is highlighted.


On the following screen, Pi-hole prompts you to select which internet protocols to filter. Protocols — like IPv4 and IPv6 — specify the technical format of packets and the addressing scheme for computers to communicate over a network. IPv4 is the most widely adopted internet protocol for connecting devices to a network.

Filtering of both IPv4 and IPv6 is needed for Pi-hole to perform effectively, so leave both protocols selected and press TAB to jump to the options at the bottom of the screen. Select and then press ENTER.


Pi-hole now asks if you want to use the current network settings as the Static IP Address. Because you need Pi-hole to make use of the VPN, you'll enter this information manually on the next screen.

Use your arrow keys to select and then press ENTER.


Pi-hole will now prompt you for an IPv4 address. Enter your VPN server's address here. This is the IP address that came after inet in the output you received the first time you ran the ip command.

Select and press ENTER to continue.


The next screen requires you to enter the IPv4 gateway (router) that Pi-hole should use to access the internet. Enter the IP address of your server's default gateway here. This is the IP address that came after via in the output you received the second time you ran the ip command.

Select and press ENTER after you've entered the information.


On the next screen, confirm that the IP address and Gateway are correct before they are applied to Pi-hole's configuration. If you need to make a change, select and press ENTER. Otherwise, select and press ENTER to continue with the installation.


In addition to a command-line interface, you can also manage Pi-hole through its web admin interface. One of the web interface's main advantages is its ability to view live DNS queries and blocking statistics.

By default, the web admin interface is set to On.

Use TAB to select and then press ENTER.

In order to make use of the web admin interface's ability to view live DNS queries and blocking statistics, you have to configure Pi-hole to log queries.

This is both the default and recommended setting, so use TAB to select and then press ENTER. 


At this stage, Pi-hole will download and install the remaining dependencies along with the default data for the block- and blacklist. From there, Pi-hole will apply all of the network configuration settings you entered in the previous screens.

During this step, Pi-hole will tell you that there is a Firewall in use and then the installer will prompt you to accept the firewall settings required for the service to function properly.

Use TAB to select and then press ENTER.


From here, Pi-hole will continue with the installation on its own. When finished, the dialogue title will change to, Installation Complete!, and Pi-hole will start automatically and begin filtering all DNS queries on the network.

Press ENTER to exit the installation wizard.


Pi-hole is now installed and configured, but before moving on, let's test that everything is working as expected.


Testing DNS Filtering

When both OpenVPN and Pi-hole are completely set up and working together, every DNS request made on your network will get forwarded to Pi-hole, which will then check to see whether the requested domain matched any other domain in either the block lists or blacklist. If so, the filter will drop the domain altogether; if not, the filter will allow the domain to pass through.

Even though Pi-hole isn't yet configured to work with OpenVPN, you can still verify the current installation by testing Pi-hole's ability to filter ad-serving domains right from your server.

To perform the test, use the host command to do a DNS lookup on google.com, specifying the default gateway, 10.8.0.1, as the name server to query. This will cause the request to pass through Pi-hole's filters.

host google.com 10.8.0.1

Because the output includes the domain's public IP address, you know that google.com did not match any domains on the block lists or blacklist.

Output from host google.com 10.8.0.1
google.com has address 216.58.194.174

Now, try the host command again, this time passing it pagead2.googlesyndication.com, a known ad-serving domain.

host pagead2.googlesyndication.com 10.8.0.1

Rather than the domain's public IP address, this time you get back the default gateway's address. This means that Pi-hole successfully identified the ad-serving domain and then responded by dropping the request.
Output from host pagead2.googlesyndication.com 10.8.0.1

pagead2.googlesyndication.com has address 10.8.0.1


If you don't see the default gateway's address in the output, double check that you've included 10.8.0.1 as the name server to query and then review the terminal for messages indicating there was a problem either installing or starting Pi-hole.

Pi-hole is now correctly installed and filtering requests, so it's time to configure OpenVPN to point DNS requests to Pi-hole.


Configuring OpenVPN

OpenVPN is currently configured to direct all DNS traffic to the DNS server you specified during installation in the Prerequisites. To make use of Pi-hole as an ad-blocker, you now need to reconfigure OpenVPN to point DNS traffic to Pi-hole instead.

First, open OpenVPN's main configuration file for editing.

sudo nano /etc/openvpn/server.conf

Find the following lines:

;push "dhcp-option DNS 208.67.222.222"
;push "dhcp-option DNS 208.67.220.220"

These settings allow you to push DHCP options — including DNS settings — to clients connected to the VPN.

As the two dhcp-option settings included in server.conf are commented out by default, leave them in place in case you need to refer to them again in the future.

Now, add the new setting telling OpenVPN to direct clients to use Pi-hole, located at 10.8.0.1, for all DNS requests.

;push "dhcp-option DNS 208.67.222.222"
;push "dhcp-option DNS 208.67.220.220"
push "dhcp-option DNS 10.8.0.1"

Save and close the file to continue.

To apply the changes, reload OpenVPN.

sudo systemctl restart openvpn@server

Finally, test that OpenVPN successfully started back up.

sudo systemctl status openvpn@server

If everything worked, the output will tell you that OpenVPN is active (running).

Output from systmctl
Active: active (running) since Mon 2017-12-04 22:08:43 UTC; 1 day 23h ago

If the service failed to start, retrace the previous steps to resolve the problem.

OpenVPN is now configured to direct DNS requests to Pi-hole, but you still have to adjust the firewall to make everything work.


Adjusting Firewall Rules

Now that Pi-hole and OpenVPN are both configured and running, open port 53 to allow DNS requests that passed Pi-hole's filters to continue on to the upstream DNS server.

sudo ufw allow 53

For web browsing to work correctly, open up the firewall for HTTP and HTTPS traffic.

sudo ufw allow http
sudo ufw allow https

Next, tell UFW to allow all udp and tcp transmissions originating in the 10.8.0.0/24 to 10.8.0.1 IP range on port 53. This will allow DNS queries from the VPN's IP range to pass to Pi-hole for filtering.

sudo ufw allow proto udp from 10.8.0.0/24 to 10.8.0.1 port 53
sudo ufw allow proto tcp from 10.8.0.0/24 to 10.8.0.1 port 53

Similarly, allow web traffic originating in the 10.8.0.0/24 IP range to pass through the VPN server at 10.8.0.1 on port 80.

sudo ufw allow proto tcp from 10.8.0.0/24 to 10.8.0.1 port 80

To apply the changes, reload UFW.

sudo ufw reload

If successful, the output will read:

Output from ufw reload
Firewall reloaded

If you run into a problem, follow the on-screen messages to resolve the issue.

Now that the firewall is configured for OpenVPN and Pi-hole, you can log into the web admin interface to explore Pi-hole's filtering capabilities.


Filtering with Block Lists

Pi-hole ships with a set of default block lists that are maintained by the project's development team; however, these lists alone are not always sufficient. Ideally, you should tailor the block lists to fit your specific browsing habits and the applications you use. You can manage block lists and more with Pi-hole's admin web interface.

To manage Pi-hole through its web interface, you need to connect to your OpenVPN network first. Once you're connected, navigate your web browser to the web interface's default homepage at http://10.8.0.1/admin.

You'll be greeted by a screen that includes widgets reporting the number of Queries Blocked Last 24 Hours, number of Queries Last 24 Hours, percent of Queries Blocked Last 24 Hours, and number of Domains on Blocklists. You'll also see a chart of the Queries over last 24 hours, a Pi-hole Status indicator, and navigation options for the Dashboard, Login screen, and Donate page on PayPal.


Click Login to access the full interface. When prompted, enter the password you received on the final Pi-hole installation screen in above step.

After you've logged in, the interface's general layout will remain the same, but it will now include more menu options on the left-hand side of the screen and additional widgets for Query Types over Time and Forward Destinations over Time.


Before adding additional block lists to Pi-hole, you should first update the official block list data from the project's maintainers, as it's possible that the most recent update includes some or all of the data sources you're about to add manually.

On the left-hand side of the screen, click Tools to expand the navigation menu and then select Update Lists.

On the next screen, click the blue Update Lists button in the middle of the screen to fetch the latest version of official block list sources.


As Pi-hole performs the update, it will show you the sources it's pulling the list data from, whether the sources have been modified since your last update, and whether any data was imported into your installation. When complete, the green bar at the top of the screen will read, Success!.


With the official block list data updated, you're ready to add your own additional block lists.

Click Settings in the navigation menu on the left-hand side of the screen for Pi-hole's main configuration options.

On the next screen, click the + symbol in the box labeled Pi-Hole's Block Lists to view the current block list data.


By default, Pi-hole uses the following block lists for filtering:

https://raw.githubusercontent.com/StevenBlack/hosts/master/hosts
https://mirror1.malwaredomains.com/files/justdomains
http://sysctl.org/cameleon/hosts
https://zeustracker.abuse.ch/blocklist.php?download=domainblocklist
https://s3.amazonaws.com/lists.disconnect.me/simple_tracking.txt
https://s3.amazonaws.com/lists.disconnect.me/simple_ad.txt
https://hosts-file.net/ad_servers.txt

To add a new list to your installation, enter the list's source URL in the input field at the bottom of the pane, then press the Save and Update button to save your addition and re-run the Update Lists function. This will automatically pull in the data associated with the new block list source.

For additional block lists broken down into categories, like Suspicious Lists, Advertising Lists, and Tracking & Telemetry Lists, see The Big Blocklist Collection here.

Now that you've updated the default block lists and learned how to manually add more, let's take a look at filtertering requests with black- and whitelists.


Filtering with Blacklists and Whitelists

Alongside the block lists that Pi-hole uses to filter DNS requests, you can also target individual domains with blacklists. Blacklists automatically drop outgoing and incoming requests to and from specific domains. This can be particularly useful to businesses and other organizations who need to block domains that contain content that isn't appropriate for work or are known for hosting viruses and other malware.

To blacklist a domain, click Blacklist in the main navigation on the left-hand side of the screen.

On the next screen, you can either add exact or wildcard blocking to a domain.


With exact blocking, only those domains that perfectly match the values you enter in the Add a domain input field will be blocked. In other words, if you enter example.com in the input field, then requests made to and from example.com will be blocked, but requests made to and from www.example.com will not.

With wildcard blocking, both the domain you enter and any related subdomains will be blocked. In this case, that means both example.com and www.example.com will be blocked.

Test the blacklist functionality by entering pi-hole.net into the Add a domain input field, then click on the Add (exact) button. pi-hole.net is now listed under Exact blocking on the Blacklist screen.


Any request made to or from pi-hole.net will now be blocked by Pi-hole's blacklist filter. Try navigating your web browser to https://pi-hole.net. Although the error message differs from browser to browser, you will no longer be able to reach this address.

To remove pi-hole.net from Exact blocking, click the red button with the white trashcan icon to the right of the domain.

At the opposite end of the spectrum, the whitelist tells Pi-hole to always allow all requests to and from specific domains to pass through its filters. Whitelisting can be useful when legitmate domains end up in a block list you're using or when you want to allow traffic to and from domains that contain a mix of ad-based and non-ad content.

To whitelist a domain, click Whitelist in the main navigation on the left-hand side of the screen.

On the next screen, you can add new domains to be whitelisted and see which domains already are whitelisted.


Even though you haven't yet whitelisted any domains yourself, by default, Pi-hole whitelists the domains it uses for updating block lists. This is to prevent one block list from blocking another block list.

Additionally, notice the Note that explains you cannot whitelist a subdomain of a wildcard-blocked domain. This means that if you already have a wildcard block on example.com, whitelisting www.example.com still won't give you access to the subdomain. In order to blacklist example.com but whitelist www.example.com, you need to apply an exact block to example.com instead.

To whitelist a domain, enter the domain in the Add a domain input field and then press the Add button. Pi-hole will briefly flash one message that says, Adding to the Whitelist ..., followed by a second message saying, Success! The list will refresh. Both messages will then disappear and the list of whitelisted domains will contain the domain you just entered.

To remove a domain from the whitelist, click the red button with the white trashcan icon to the right of the domain you no longer want whitelisted.

Finally, to test your installation's black- and whitelisting abilities, see Pi-hole's official list of pages to test your setup's ad-blocking performance.


Conclusion

You now have a simple yet effective way of filtering any DNS request on your network, but keep in mind that you might need to customize your block lists a bit to suit your environment.

How To Install SoftHSM on an Ubuntu 16.04 Server

$
0
0

SoftHSM is basically an implementation of a cryptographic store accessible through a PKCS #11 interface. The PKCS#11 interface is used to communicate or access the cryptographic devices such as HSM (Hardware Security Modules) and smart cards. The primary purpose of HSM devices is to generate cryptographic keys and sign/encrypt information without revealing the private key to the others.


To make it more easy to understand, it was not possible for OpenDNSSEC users to buy new hardware token for the storage of cryptographic keys. So, to counter this issue, OpenDNSSEC started providing "SoftHSM", a software implementation of a generic cryptographic device with a PKCS#11 interface. SoftHSM is designed to meet the requirements of OpenDNSSEC and also work with other cryptographic products. 

Dependencies

Botan or OpenSSL cryptographic libraries can be used with the SoftHSM project.  If Botan is used with SoftHSM, then make sure that it has support for GNU MP (--with-gnump), something which will improve the performance during public key operations. 


Installing SoftHSM

SoftHSM is available from the OpenDNSSEC website, and it can be download using the wget command in the following way.

sudo apt-get install openssl-dev
sudo wget https://dist.opendnssec.org/source/softhsm-2.3.0.tar.gz

When download complete, extract the package using the tar command:

sudo tar -xzf softhsm-2.3.0.tar.gz

Now, run the configure script to check dependencies of the SoftHSM software.

sudo ./configure

Run the make command to compile the source code of SoftHSM.

sudo make

Next, run "make install command" to install the SoftHSM tool.

sudo make install


Configure SoftHSM

The default location of the config file is /etc/softhsm2.conf which can be changed by setting the SOFTHSM2_CONF environment variable.

export SOFTHSM2_CONF=Path_of_SoftHSM_Conf_file


Initialize Soft Token

The very first step to use SoftHSM is to use initialize it. We can use the "softhsm2-util" or the "PKCS#11" interface to initialize the device. The following snapshot shows the initialization of the SoftHSM device.

sudo softhsm2-util --init-token --slot 0 --label "Token-1"

The Security Officer (SO) PIN is used to re-initialize the token and the user PIN is handed out to the application so it can interact with the token (like usage with Mozilla Firefox). That's why, set both SO and user PIN. Once a token has been initialized, more slots will be added automatically to a new uninitialized token. Initialized tokens will be reassigned to another slot based on the token serial number. It is recommended to find and interact with the token by searching for the token label or serial number in the slot list/token info.


Backup

All tokens and their objects are stored in the location given by softhsm2.conf. Backup can thus be done as a regular file copy.


SoftHSM with OpenSC Utilities

In this tutorial, PKCS11 utilities of the OpenSC project are used to access the SoftHSM device.

sudo apt-get install opensc
sudo pkcs11-tool --module /usr/local/lib/softhsm/libsofthsm2.so -l -t

The "-t" switch is used to test the mechanism of SoftHSM.


You are done.

How To Set Up a Complete Web Hosting Server on an Ubuntu 16.04

$
0
0
This tutorial will walk you through the steps to set up an Ubuntu 16.04 a complete web hosting server with Apache2, Postfix, Dovecot, Bind and PureFTPD to make it ready for the of ISPConfig 3.1 setup. This entire setup will serve a Web, Mail, Mailinglist, DNS and FTP Services.

ISPConfig 3 is a web hosting control panel that allows you to configure the following services through a web browser: Apache or nginx web server, Postfix mail server, Courier or Dovecot IMAP/POP3 server, MySQL, BIND or MyDNS nameserver, PureFTPd, SpamAssassin, ClamAV, and many more. This setup covers the installation of Apache (instead of Nginx), BIND (instead of MyDNS), and Dovecot (instead of Courier).

Throughout this guide, we will use the hostname labsrv.example.com with the IP address 192.168.1.100 and the gateway 192.168.1.1. Before proceeding this tutorial, you need to have a basic minimal installation of Ubuntu 16.04 with root or a non-root user account that has root privileges.


Update Source List

You need to edit /etc/apt/sources.list. Comment out or remove the installation CD from the file and make sure that the universe and multiverse repositories are enabled:

nano /etc/apt/sources.list

It should look like this when changes done:


#
# deb cdrom:[Ubuntu-Server 16.04 LTS _Xenial Xerus_ - Release amd64 (20160420)]/ xenial main restricted

#deb cdrom:[Ubuntu-Server 16.04 LTS _Xenial Xerus_ - Release amd64 (20160420)]/ xenial main restricted

# See http://help.ubuntu.com/community/UpgradeNotes for how to upgrade to
# newer versions of the distribution.
deb http://de.archive.ubuntu.com/ubuntu/ xenial main restricted
# deb-src http://de.archive.ubuntu.com/ubuntu/ xenial main restricted

## Major bug fix updates produced after the final release of the
## distribution.
deb http://de.archive.ubuntu.com/ubuntu/ xenial-updates main restricted
# deb-src http://de.archive.ubuntu.com/ubuntu/ xenial-updates main restricted

## N.B. software from this repository is ENTIRELY UNSUPPORTED by the Ubuntu
## team, and may not be under a free licence. Please satisfy yourself as to
## your rights to use the software. Also, please note that software in
## universe WILL NOT receive any review or updates from the Ubuntu security
## team.
deb http://de.archive.ubuntu.com/ubuntu/ xenial universe
# deb-src http://de.archive.ubuntu.com/ubuntu/ xenial universe
deb http://de.archive.ubuntu.com/ubuntu/ xenial-updates universe
# deb-src http://de.archive.ubuntu.com/ubuntu/ xenial-updates universe

## N.B. software from this repository is ENTIRELY UNSUPPORTED by the Ubuntu
## team, and may not be under a free licence. Please satisfy yourself as to
## your rights to use the software. Also, please note that software in
## multiverse WILL NOT receive any review or updates from the Ubuntu
## security team.
deb http://de.archive.ubuntu.com/ubuntu/ xenial multiverse
# deb-src http://de.archive.ubuntu.com/ubuntu/ xenial multiverse
deb http://de.archive.ubuntu.com/ubuntu/ xenial-updates multiverse
# deb-src http://de.archive.ubuntu.com/ubuntu/ xenial-updates multiverse

## N.B. software from this repository may not have been tested as
## extensively as that contained in the main release, although it includes
## newer versions of some applications which may provide useful features.
## Also, please note that software in backports WILL NOT receive any review
## or updates from the Ubuntu security team.
deb http://de.archive.ubuntu.com/ubuntu/ xenial-backports main restricted universe multiverse
# deb-src http://de.archive.ubuntu.com/ubuntu/ xenial-backports main restricted universe multiverse
## Uncomment the following two lines to add software from Canonical's
## 'partner' repository.
## This software is not part of Ubuntu, but is offered by Canonical and the
## respective vendors as a service to Ubuntu users.
# deb http://archive.canonical.com/ubuntu xenial partner
# deb-src http://archive.canonical.com/ubuntu xenial partner

deb http://security.ubuntu.com/ubuntu xenial-security main restricted
# deb-src http://security.ubuntu.com/ubuntu xenial-security main restricted
deb http://security.ubuntu.com/ubuntu xenial-security universe
# deb-src http://security.ubuntu.com/ubuntu xenial-security universe
deb http://security.ubuntu.com/ubuntu xenial-security multiverse
# deb-src http://security.ubuntu.com/ubuntu xenial-security multiverse

Now, you need to run the following:

apt-get update
apt-get upgrade

If you see that a new kernel gets installed as part of the updates, you should reboot the system afterwards:

reboot


Change the Default Shell

By default in Ubuntu 16.04 /bin/sh is a symlink to /bin/dash, however we need /bin/bash, not /bin/dash. Therefore, we do this:

dpkg-reconfigure dash

If you don't do this, the ISPConfig installation will fail.


Disable AppArmor

AppArmor is a security extension (similar to SELinux) that should provide extended security. You must disable it if you want to install ISPConfig.

service apparmor stop
update-rc.d -f apparmor remove 
apt-get remove apparmor apparmor-utils


Synchronize the System Clock

It is a good idea to synchronize the system clock with an NTP (network time protocol) server over the Internet when you run a physical server.

apt-get -y install ntp ntpdate


Install Postfix, Dovecot, MariaDB, rkhunter and binutils

For installing postfix, we need to ensure that sendmail is not installed and running. To stop and remove sendmail run this command:

service sendmail stop; update-rc.d -f sendmail remove

The error message:
Failed to stop sendmail.service: Unit sendmail.service not loaded.

This means that sendmail was not installed, so there was nothing to be removed.

Now we can install Postfix, Dovecot, MariaDB (as MySQL replacement), rkhunter, and binutils with a single command:

apt-get install postfix postfix-mysql postfix-doc mariadb-client mariadb-server openssl getmail4 rkhunter binutils dovecot-imapd dovecot-pop3d dovecot-mysql dovecot-sieve dovecot-lmtpd sudo

You will be asked the following questions:

General type of mail configuration: example.com
System mail name: labsrv.example.com

Next, open the TLS/SSL and submission ports in Postfix:

nano /etc/postfix/master.cf

Uncomment the submission and smtps sections as follows - add the line -o smtpd_client_restrictions=permit_sasl_authenticated,reject to both sections and leave everything thereafter commented:

[...]
submission inet n       -       -       -       -       smtpd
  -o syslog_name=postfix/submission
  -o smtpd_tls_security_level=encrypt
  -o smtpd_sasl_auth_enable=yes
  -o smtpd_client_restrictions=permit_sasl_authenticated,reject
#  -o smtpd_reject_unlisted_recipient=no
#  -o smtpd_client_restrictions=$mua_client_restrictions
#  -o smtpd_helo_restrictions=$mua_helo_restrictions
#  -o smtpd_sender_restrictions=$mua_sender_restrictions
#  -o smtpd_recipient_restrictions=permit_sasl_authenticated,reject
#  -o milter_macro_daemon_name=ORIGINATING
smtps     inet  n       -       -       -       -       smtpd
  -o syslog_name=postfix/smtps
  -o smtpd_tls_wrappermode=yes
  -o smtpd_sasl_auth_enable=yes
  -o smtpd_client_restrictions=permit_sasl_authenticated,reject
#  -o smtpd_reject_unlisted_recipient=no
#  -o smtpd_client_restrictions=$mua_client_restrictions
#  -o smtpd_helo_restrictions=$mua_helo_restrictions
#  -o smtpd_sender_restrictions=$mua_sender_restrictions
#  -o smtpd_recipient_restrictions=permit_sasl_authenticated,reject
#  -o milter_macro_daemon_name=ORIGINATING
[...]

NOTE: The whitespaces in front of the "-o .... " lines are important!

Restart Postfix afterward:

service postfix restart

We want MySQL to listen on all interfaces, not just localhost. Therefore, we edit /etc/mysql/mariadb.conf.d/50-server.cnf and comment out the line bind-address = 127.0.0.1:

nano /etc/mysql/mariadb.conf.d/50-server.cnf

# Instead of skip-networking the default is now to listen only on
# localhost which is more compatible and is not less secure.
#bind-address           = 127.0.0.1

Now we set a root password in MariaDB. Run:

mysql_secure_installation

You will be asked these questions:

Enter current password for root (enter for none): Press enter
Set root password? [Y/n] y
New password: Enter the new MariaDB root password here
Re-enter new password: Repeat the password
Remove anonymous users? [Y/n] y
Disallow root login remotely? [Y/n] y
Reload privilege tables now? [Y/n] y

Then we restart MariaDB:

service mysql restart

Now check that networking is enabled. Run

netstat -tap | grep mysql

The output should look like this:
tcp6 0 0 [::]:mysql [::]:* LISTEN 5230/mysqld


Install Amavisd-new, SpamAssassin, and Clamav

To install amavisd-new, SpamAssassin, and ClamAV, run the following:

apt-get install amavisd-new spamassassin clamav clamav-daemon zoo unzip bzip2 arj nomarch lzop cabextract apt-listchanges libnet-ldap-perl libauthen-sasl-perl clamav-docs daemon libio-string-perl libio-socket-ssl-perl libnet-ident-perl zip libnet-dns-perl postgrey

The ISPConfig 3 setup uses amavisd which loads the SpamAssassin filter library internally, so we can stop SpamAssassin to free up some RAM:

service spamassassin stop 
update-rc.d -f spamassassin remove

Edit the clamd configuration file:

nano /etc/clamav/clamd.conf

and change the line:

AllowSupplementaryGroups false

to:

AllowSupplementaryGroups true 

And save the file. To start ClamAV use:

freshclam
service clamav-daemon start

The following warning can be ignored on the first run of freshclam as we start the ClamAV daemn after we updated the database.

WARNING: Clamd was NOT notified: Can't connect to clamd through /var/run/clamav/clamd.ctl: No such file or directory


Install Metronome XMPP Server

The Metronome XMPP Server provides an XMPP chat server. This step is optional, if you do not need a chat server, then you can skip this step. No other ISPConfig functions depend on this software.

Install the following packages with apt.

apt-get install git lua5.1 liblua5.1-0-dev lua-filesystem libidn11-dev libssl-dev lua-zlib lua-expat lua-event lua-bitop lua-socket lua-sec luarocks luarocks

luarocks install lpc

Add a shell user for Metronome.

adduser --no-create-home --disabled-login --gecos 'Metronome' metronome

Download Metronome to the /opt directory and compile it.

cd /opt; git clone https://github.com/maranda/metronome.git metronome
cd ./metronome; ./configure --ostype=debian --prefix=/usr
make
make install

Metronome has now be installed to /opt/metronome.


Install Apache, PHP, phpMyAdmin, FCGI, SuExec, Pear, and mcrypt

To install these packages, run the following:

apt-get install apache2 apache2-doc apache2-utils libapache2-mod-php php7.0 php7.0-common php7.0-gd php7.0-mysql php7.0-imap phpmyadmin php7.0-cli php7.0-cgi libapache2-mod-fcgid apache2-suexec-pristine php-pear php-auth php7.0-mcrypt mcrypt  imagemagick libruby libapache2-mod-python php7.0-curl php7.0-intl php7.0-pspell php7.0-recode php7.0-sqlite3 php7.0-tidy php7.0-xmlrpc php7.0-xsl memcached php-memcache php-imagick php-gettext php7.0-zip php7.0-mbstring

You will see the following question:

Web server to reconfigure automatically: apache2
Configure database for phpmyadmin with dbconfig-common? Yes
MySQL application password for phpmyadmin: Press enter

Then run the following command to enable the Apache modules suexec, rewrite, ssl, actions, and include (plus dav, dav_fs, and auth_digest if you want to use WebDAV):

a2enmod suexec rewrite ssl actions include cgi
a2enmod dav_fs dav auth_digest headers

To ensure that the server can not be attacked trough the HTTPOXY vulnerability, I will disable the HTTP_PROXY header in apache globally.

sudo nano /etc/apache2/conf-available/httpoxy.conf

Paste this content to the file:

RequestHeader unset Proxy early

Enable the config file by running:

a2enconf httpoxy

Restart Apache afterward:

service apache2 restart

If you want to host Ruby files with the extension .rb on your web sites created through ISPConfig, you must comment out the line application/x-ruby rb in /etc/mime.types:

nano /etc/mime.types

#application/x-ruby                             rb

(This is needed only for .rb files; Ruby files with the extension .rbx work out of the box.)

Restart Apache afterwards:

service apache2 restart


PHP Opcode cache

APCu is a free PHP opcode cacher for caching and optimizing PHP intermediate code. It is strongly recommended to have one of these installed to speed up your PHP page.

APCu can be installed as follows:

apt-get install php7.0-opcache php-apcu

Now restart Apache:

service apache2 restart


PHP-FPM

To use PHP-FPM with Apache, we need the mod_fastcgi Apache module (please don't mix this up with mod_fcgid - they are very similar, but you cannot use PHP-FPM with mod_fcgid).

We can install PHP-FPM and mod_fastcgi as follows:

apt-get install libapache2-mod-fastcgi php7.0-fpm

Make sure you enable the module and restart Apache:

a2enmod actions fastcgi alias 
service apache2 restart


Install HHVM (HipHop Virtual Machine)

In this step we will install HHVM with apt. HHVM is a fast PHP engine developed by Facebook.

apt-get -y install software-properties-common
apt-key adv --recv-keys --keyserver hkp://keyserver.ubuntu.com:80 0x5a16e7281be7a449
add-apt-repository "deb http://dl.hhvm.com/ubuntu xenial main"
apt-get update
apt-get -y install hhvm


Install Let's Encrypt

ISPConfig 3.1  has builtin support for the free SSL Certificate Authority Let's encrypt. The Let's Encrypt function allows you to create free SSL Certificates for your website in ISPConfig.

Now we will add support for Let's encrypt.

apt-get -y install letsencrypt


Install Mailman

ISPConfig allows you to manage (create/modify/delete) Mailman mailing lists. If you want to make use of this feature, install Mailman as follows:

apt-get install mailman

Select at least one language, e.g.:
Languages to support: en (English) 
Missing site list Ok

Before we can start Mailman, a first mailing list called mailman must be created:

newlist mailman

Enter the email of the person running the list: admin@example.com 
Initial mailman password: (admin password for the mailman list) 
To finish creating your mailing list, you must edit your /etc/aliases (or 
equivalent) file by adding the following lines, and possibly running the 
`newaliases' program: 

## mailman mailing list 
mailman:              "|/var/lib/mailman/mail/mailman post mailman" 
mailman-admin:        "|/var/lib/mailman/mail/mailman admin mailman" 
mailman-bounces:      "|/var/lib/mailman/mail/mailman bounces mailman" 
mailman-confirm:      "|/var/lib/mailman/mail/mailman confirm mailman" 
mailman-join:         "|/var/lib/mailman/mail/mailman join mailman" 
mailman-leave:        "|/var/lib/mailman/mail/mailman leave mailman" 
mailman-owner:        "|/var/lib/mailman/mail/mailman owner mailman" 
mailman-request:      "|/var/lib/mailman/mail/mailman request mailman" 
mailman-subscribe:    "|/var/lib/mailman/mail/mailman subscribe mailman" 
mailman-unsubscribe:  "|/var/lib/mailman/mail/mailman unsubscribe mailman" 

Hit enter to notify mailman owner... ENTER

Open /etc/aliases afterwards...

nano /etc/aliases

and add the following lines:

## mailman mailing list
mailman:              "|/var/lib/mailman/mail/mailman post mailman"
mailman-admin:        "|/var/lib/mailman/mail/mailman admin mailman"
mailman-bounces:      "|/var/lib/mailman/mail/mailman bounces mailman"
mailman-confirm:      "|/var/lib/mailman/mail/mailman confirm mailman"
mailman-join:         "|/var/lib/mailman/mail/mailman join mailman"
mailman-leave:        "|/var/lib/mailman/mail/mailman leave mailman"
mailman-owner:        "|/var/lib/mailman/mail/mailman owner mailman"
mailman-request:      "|/var/lib/mailman/mail/mailman request mailman"
mailman-subscribe:    "|/var/lib/mailman/mail/mailman subscribe mailman"
mailman-unsubscribe:  "|/var/lib/mailman/mail/mailman unsubscribe mailman"

Now run following:

newaliases

and restart Postfix:

service postfix restart

Finally we must enable the Mailman Apache configuration:

ln -s /etc/mailman/apache.conf /etc/apache2/conf-available/mailman.conf

This defines the alias /cgi-bin/mailman/ for all Apache vhosts, which means you can access the Mailman admin interface for a list at http:///cgi-bin/mailman/admin/, and the web page for users of a mailing list can be found at http:///cgi-bin/mailman/listinfo/.

Under http:///pipermail you can find the mailing list archives.

Restart Apache afterwards:

service apache2 restart

Then start the Mailman daemon:

service mailman start


Install PureFTPd and Quota

PureFTPd and quota can be installed with the following command:

apt-get install pure-ftpd-common pure-ftpd-mysql quota quotatool

Edit the file /etc/default/pure-ftpd-common

nano /etc/default/pure-ftpd-common

and make sure that the start mode is set to standalone and set VIRTUALCHROOT=true:

STANDALONE_OR_INETD=standalone
VIRTUALCHROOT=true

Now we configure PureFTPd to allow FTP and TLS sessions. FTP is a very insecure protocol because all passwords and all data are transferred in clear text. By using TLS, the whole communication can be encrypted, thus making FTP much more secure.

If you want to allow FTP and TLS sessions, run

echo 1 > /etc/pure-ftpd/conf/TLS

In order to use TLS, we must create an SSL certificate. I create it in /etc/ssl/private/, therefore I create that directory first:

mkdir -p /etc/ssl/private/

Afterwards, we can generate the SSL certificate as follows:

openssl req -x509 -nodes -days 7300 -newkey rsa:2048 -keyout /etc/ssl/private/pure-ftpd.pem -out /etc/ssl/private/pure-ftpd.pem

Country Name (2 letter code) [AU]:US
State or Province Name (full name) [Some-State]:Boston
Locality Name (eg, city) []:Boston
Organization Name (eg, company) [Internet Widgits Pty Ltd]:Example
Organizational Unit Name (eg, section) []:IT
Common Name (eg, YOUR name) []:labsrv.example.com
Email Address []:admin@example.com

Change the permissions of the SSL certificate:

chmod 600 /etc/ssl/private/pure-ftpd.pem

Then restart PureFTPd:

service pure-ftpd-mysql restart

Edit /etc/fstab. Mine looks like this (I added ,usrjquota=quota.user,grpjquota=quota.group,jqfmt=vfsv0 to the partition with the mount point /):

nano /etc/fstab

# /etc/fstab: static file system information.
#
# Use 'blkid' to print the universally unique identifier for a
# device; this may be used with UUID= as a more robust way to name devices
# that works even if disks are added and removed. See fstab(5).
#
#
/dev/mapper/labsrv--vg-root / ext4 errors=remount-ro,usrjquota=quota.user,grpjquota=quota.group,jqfmt=vfsv0 0 1


To enable quota, run these commands:

mount -o remount /

quotacheck -avugm

Which will show the following output:

quotacheck: Scanning /dev/mapper/server1--vg-root [/] done
quotacheck: Cannot stat old user quota file //quota.user: No such file or directory. Usage will not be subtracted.
quotacheck: Cannot stat old group quota file //quota.group: No such file or directory. Usage will not be subtracted.
quotacheck: Cannot stat old user quota file //quota.user: No such file or directory. Usage will not be subtracted.
quotacheck: Cannot stat old group quota file //quota.group: No such file or directory. Usage will not be subtracted.
quotacheck: Checked 11642 directories and 81307 files
quotacheck: Old file not found.

Now run the following command

quotaon -avug

Output of above command
---
/dev/mapper/labsrv--vg-root [/]: group quotas turned on
/dev/mapper/labsrv--vg-root [/]: user quotas turned on


Install BIND DNS Server

BIND can be installed as follows:

apt-get install bind9 dnsutils haveged


Install Vlogger, Webalizer, and AWstats

Vlogger, webalizer, and AWstats can be installed as follows:

apt-get install vlogger webalizer awstats geoip-database libclass-dbi-mysql-perl

Open /etc/cron.d/awstats afterwards

nano /etc/cron.d/awstats

and comment out everything in that file:

#MAILTO=root

#*/10 * * * * www-data [ -x /usr/share/awstats/tools/update.sh ] && /usr/share/awstats/tools/update.sh

# Generate static reports:
#10 03 * * * www-data [ -x /usr/share/awstats/tools/buildstatic.sh ] && /usr/share/awstats/tools/buildstatic.sh


Install Jailkit

Jailkit is needed only if you want to chroot SSH users. It can be installed as follows:

apt-get install build-essential autoconf automake1.11 libtool flex bison debhelper binutils

cd /tmp

wget http://olivier.sessink.nl/jailkit/jailkit-2.19.tar.gz

tar xvfz jailkit-2.19.tar.gz

cd jailkit-2.19

./debian/rules binary

You can now install the Jailkit .deb package as follows:

cd ..
dpkg -i jailkit_2.19-1_*.deb
rm -rf jailkit-2.19*


Install fail2ban and UFW

This is optional but recommended, because the ISPConfig monitor tries to show the log:

apt-get install fail2ban

To make fail2ban monitor PureFTPd and Dovecot, create the file /etc/fail2ban/jail.local:

nano /etc/fail2ban/jail.local

[pureftpd]
enabled  = true
port     = ftp
filter   = pureftpd
logpath  = /var/log/syslog
maxretry = 3

[dovecot-pop3imap]
enabled = true
filter = dovecot-pop3imap
action = iptables-multiport[name=dovecot-pop3imap, port="pop3,pop3s,imap,imaps", protocol=tcp]
logpath = /var/log/mail.log
maxretry = 5

[postfix-sasl]
enabled  = true
port     = smtp
filter   = postfix-sasl
logpath  = /var/log/mail.log
maxretry = 3

Then create the following two filter files:

nano /etc/fail2ban/filter.d/pureftpd.conf

[Definition]
failregex = .*pure-ftpd: \(.*@\) \[WARNING\] Authentication failed for user.*
ignoreregex =

nano /etc/fail2ban/filter.d/dovecot-pop3imap.conf

[Definition]
failregex = (?: pop3-login|imap-login): .*(?:Authentication failure|Aborted login \(auth failed|Aborted login \(tried to use disabled|Disconnected \(auth failed|Aborted login \(\d+ authentication attempts).*rip=(?P\S*),.*
ignoreregex =

Add the missing ignoreregex line in the postfix-sasl file:

echo "ignoreregex =">> /etc/fail2ban/filter.d/postfix-sasl.conf

Restart fail2ban afterwards:

service fail2ban restart

To install the UFW firewall, run this apt command:

apt-get install ufw


Install Roundcube Webmail

To install Roundcube Webmail, run:

apt-get install roundcube roundcube-core roundcube-mysql roundcube-plugins roundcube-plugins-extra javascript-common libjs-jquery-mousewheel php-net-sieve tinymce

The installer will ask the following questions:

Configure database for roundcube with dbconfig-common? Yes
MySQL application password for roundcube: Press enter

Then edit the RoundCube apache configuration file.

nano /etc/apache2/conf-enabled/roundcube.conf

and remove the # in front of the first 2 alias lines, add the two other "Alias" statements and add the line "AddType application/x-httpd-php .php" right after the "" line:

# Those aliases do not work properly with several hosts on your apache server
# Uncomment them to use it or adapt them to your configuration
Alias /roundcube /var/lib/roundcube
AddType application/x-httpd-php .php

And restart apache

service apache2 restart

Then edit the RoundCube config.inc.php configuration file:

nano /etc/roundcube/config.inc.php

and change the default host to localhost:

$config['default_host'] = 'localhost';

This prevents that Roundcube will show server name input field in the login form.


Install ISPConfig 3

To install ISPConfig 3 from the latest released version, do this:

cd /tmp

wget -O ispconfig.tar.gz https://git.ispconfig.org/ispconfig/ispconfig3/repository/archive.tar.gz?ref=stable-3.1
tar xfz ispconfig.tar.gz

cd ispconfig3*/install/

The next step is to run

php -q install.php

This will start the ISPConfig 3 installer. The installer will configure all services like Postfix, Dovecot, etc. for you.


--------------------------------------------------------------------------------
_____ ___________ _____ __ _ ____
|_ _/ ___| ___ \ / __ \ / _(_) /__ \
| | \ `--.| |_/ / | / \/ ___ _ __ | |_ _ __ _ _/ /
| | `--. \ __/ | | / _ \| '_ \| _| |/ _` | |_ |
_| |_/\__/ / | | \__/\ (_) | | | | | | | (_| | ___\ \
\___/\____/\_| \____/\___/|_| |_|_| |_|\__, | \____/
__/ |
|___/
--------------------------------------------------------------------------------

>> Initial configuration
Operating System: Debian 8.0 (Jessie) or compatible
Following will be a few questions for primary configuration so be careful.
Default values are in [brackets] and can be accepted with .
Tap in "quit" (without the quotes) to stop the installer.

Select language (en,de) [en]: Hit Enter
Installation mode (standard,expert) [standard]: Hit Enter
Full qualified hostname (FQDN) of the server, eg server1.domain.tld [server1.canomi.com]: localhostMySQL server port [3306]: Hit Enter
MySQL root username [root]: Hit Enter MySQL root password []:  Enter your MySQL root password
MySQL database to create [dbispconfig]: Hit Enter
MySQL charset [utf8]: Hit Enter
Configuring Postgrey
Configuring Postfix
Generating a 4096 bit RSA private key
.......................................................................++
........................................................................................................................................++
writing new private key to 'smtpd.key'
-----
You are about to be asked to enter information that will be incorporated
into your certificate request.
What you are about to enter is what is called a Distinguished Name or a DN.
There are quite a few fields but you can leave some blank
For some fields there will be a default value,
If you enter '.', the field will be left blank.
-----
Country Name (2 letter code) [AU]: US
State or Province Name (full name) [Some-State]: Example
Locality Name (eg, city) []: Boston
Organization Name (eg, company) [Internet Widgits Pty Ltd]: Example
-->
Organizational Unit Name (eg, section) []: Hit Enter
Common Name (e.g. server FQDN or YOUR name) []: labsrv.example.com
Email Address []: Hit Enter
Configuring Mailman
Configuring Dovecot
Configuring Spamassassin
Configuring Amavisd
Configuring Getmail
Configuring BIND
Configuring Jailkit
Configuring Pureftpd
Configuring Apache
Configuring vlogger
Configuring Metronome XMPP Server
writing new private key to 'localhost.key'
-----
Country Name (2 letter code) [AU]: US
-->
Locality Name (eg, city) []: Boston
Organization Name (eg, company) [Internet Widgits Pty Ltd]: Example
Organizational Unit Name (eg, section) []: Hit Enter
Common Name (e.g. server FQDN or YOUR name) [server1.canomi.com]: labsrv.example.com Email Address []: Hit Enter
Configuring Ubuntu Firewall
Configuring Fail2ban
[INFO] service OpenVZ not detected
Configuring Apps vhost
Installing ISPConfig
ISPConfig Port [8080]:
Admin password [admin]:
Do you want a secure (SSL) connection to the ISPConfig web interface (y,n) [y]: Hit Enter
Generating RSA private key, 4096 bit long modulus
.......................++
................................................................................................................................++
e is 65537 (0x10001)
You are about to be asked to enter information that will be incorporated
into your certificate request.
What you are about to enter is what is called a Distinguished Name or a DN.
There are quite a few fields but you can leave some blank
For some fields there will be a default value,
If you enter '.', the field will be left blank.
-----
Country Name (2 letter code) [AU]: US
State or Province Name (full name) [Some-State]: Example
Locality Name (eg, city) []: Boston
Organization Name (eg, company) [Internet Widgits Pty Ltd]: Example
Organizational Unit Name (eg, section) []: Hit Enter
Common Name (e.g. server FQDN or YOUR name) []: labsrv.example.com Email Address []: Hit Enter
Please enter the following 'extra' attributes
to be sent with your certificate request
A challenge password []: Hit Enter
An optional company name []: Hit Enter
writing RSA key

Configuring DBServer
Installing ISPConfig crontab
no crontab for root
no crontab for getmail
Detect IP addresses
Restarting services ...
Installation completed.


The installer automatically configures all underlying services, so there is no manual configuration needed.
-->
Afterward you can access ISPConfig 3 under http(s)://labsrv.example.com:8080/ or http(s)://192.168.1.100:8080/ (HTTP or HTTPS depends on what you chose during installation). Log in with the username admin and the password admin (you should change the default password after your first login):


Fix MySQL Login for roundcube

MariaDB enables a plugin called "unix_socket" for the root user by default, this plugin prevents that the root user can log in to PHPMyAdmin and that TCP connections to MySQL are working for the root user. Therefore, I'll deactivate that plugin with the following command:

echo "update user set plugin='' where User='root';" | mysql -root -p mysql 

Enter the MySQL / MariaDB root password when requested.


Conclusion

Your server is now ready to be used.

How To Set Up a Complete Web Hosting Solution on an Debian 9 Server

$
0
0

This tutorial walks you through the steps to set up a complete web hosting solution on an Debian 9 server with ISPConfig 3.

The web hosting control panel ISPConfig 3 allows you to configure the following services through a web browser: Apache or nginx web server, Postfix mail server, Courier or Dovecot IMAP/POP3 server, MySQL, BIND or MyDNS nameserver, PureFTPd, SpamAssassin, ClamAV, and lots more.

In this tutorial, we will use the hostname labserver.example.com with the IP address 192.168.1.100 and the gateway 192.168.1.1. Before proceeding this guide, you need to have a minimal installation of Debian 9.


Install the OpenSSH server

If you did not install the OpenSSH server during the system installation, you can install it now by running the following:

apt-get install ssh openssh-server

Now you can use an SSH client such as PuTTY and connect from your workstation to your Debian 9 server and follow the remaining steps from this guide.


Configure the Hostname

The hostname of your server should be a subdomain like "labserver.example.com". Do not use a domain name without subdomain part like "example.com" as hostname as this will cause problems later with your mail setup. First, you should check the hostname in /etc/hosts and change it when necessary. The line should be: "IP Address - space - full hostname incl. domain - space - subdomain part". For our hostname labserver.example.com, the file should look like this:

nano /etc/hosts

127.0.0.1       localhost.localdomain   localhost
192.168.1.100   labserver.example.comlabserver

Then edit the /etc/hostname file:

nano /etc/hostname

It should contain only the hostname without domain.name

labserver

Save and close

Finally, reboot the server to apply the change:

reboot

Log in again and check if the hostname is correct now with these commands:

hostname
hostname -f


Update Debian Installation

First, make sure that your /etc/apt/sources.list contains the stretch/updates repository (this makes sure you always get the newest security updates), and that the contrib and non-free repositories are enabled as some required packages are not in the main repository.

nano /etc/apt/sources.list

deb http://ftp.us.debian.org/debian/ stretch main contrib non-free
deb-src http://ftp.us.debian.org/debian/ stretch main contrib non-free

deb http://security.debian.org/debian-security stretch/updates main contrib non-free
deb-src http://security.debian.org/debian-security stretch/updates main contrib non-free

Save and close

Now run the following to update the apt package database:

apt-get update
apt-get upgrade


Change the default Shell

/bin/sh is a symlink to /bin/dash, however we need /bin/bash, not /bin/dash. Therefore we do this:

dpkg-reconfigure dash
Use dash as the default system shell (/bin/sh)? no

If you don't do this, the ISPConfig installation will fail.


Install Postfix, Dovecot, MySQL, rkhunter, and Binutils

We can install Postfix, Dovecot, MySQL, rkhunter, and Binutils with a single command:

apt-get install postfix postfix-mysql postfix-doc mariadb-client mariadb-server openssl getmail4 rkhunter binutils dovecot-imapd dovecot-pop3d dovecot-mysql dovecot-sieve dovecot-lmtpd sudo

When you prefer MySQL over MariaDB, replace the packages "mariadb-client mariadb-server" in the above command with "mysql-client mysql-server".

You will be asked the following questions:

General type of mail configuration: example.com
System mail name: labserver.example.com

To secure the MariaDB / MySQL installation and to disable the test database, run this command:

mysql_secure_installation

Answer the questions as follows:

Change the root password? [Y/n] y
New password:******
Re-enter new password: ******
Remove anonymous users? [Y/n] y
Disallow root login remotely? [Y/n] y
Remove test database and access to it? [Y/n] y
Reload privilege tables now? [Y/n] y

Next, open the TLS/SSL and submission ports in Postfix:

nano /etc/postfix/master.cf

Uncomment the submission and smtps sections as follows and add lines where necessary so that this section of the master.cf file looks exactly like the one below.

submission inet n - - - - smtpd
 -o syslog_name=postfix/submission
 -o smtpd_tls_security_level=encrypt
 -o smtpd_sasl_auth_enable=yes
 -o smtpd_client_restrictions=permit_sasl_authenticated,reject
# -o smtpd_reject_unlisted_recipient=no
# -o smtpd_client_restrictions=$mua_client_restrictions
# -o smtpd_helo_restrictions=$mua_helo_restrictions
# -o smtpd_sender_restrictions=$mua_sender_restrictions
# -o smtpd_recipient_restrictions=
# -o smtpd_relay_restrictions=permit_sasl_authenticated,reject
# -o milter_macro_daemon_name=ORIGINATING
smtps inet n - - - - smtpd
 -o syslog_name=postfix/smtps
 -o smtpd_tls_wrappermode=yes
 -o smtpd_sasl_auth_enable=yes
 -o smtpd_client_restrictions=permit_sasl_authenticated,reject
# -o smtpd_reject_unlisted_recipient=no
# -o smtpd_client_restrictions=$mua_client_restrictions
# -o smtpd_helo_restrictions=$mua_helo_restrictions
# -o smtpd_sender_restrictions=$mua_sender_restrictions
# -o smtpd_recipient_restrictions=
# -o smtpd_relay_restrictions=permit_sasl_authenticated,reject
# -o milter_macro_daemon_name=ORIGINATING


Now restart Postfix to take changes effect:

service postfix restart

We want MySQL to listen on all interfaces, not just localhost. Therefore, we edit /etc/mysql/mariadb.conf.d/50-server.cnf and comment out the line bind-address = 127.0.0.1 and add the line sql-mode="NO_ENGINE_SUBSTITUTION":

nano /etc/mysql/mariadb.conf.d/50-server.cnf

# Instead of skip-networking the default is now to listen only on
# localhost which is more compatible and is not less secure.
#bind-address           = 127.0.0.1

sql-mode="NO_ENGINE_SUBSTITUTION"

Set the password authentication method in MariaDB to native so we can use PHPMyAdmin later to connect as root user:

echo "update mysql.user set plugin = 'mysql_native_password' where user='root';" | mysql -u root

Edit the file /etc/mysql/debian.cnf and set the MYSQL / MariaDB root password there twice in the rows that start with password.

nano /etc/mysql/debian.cnf

The MySQL root password that needs to be added is shown in red, in this example the password is "password".

# Automatically generated for Debian scripts. DO NOT TOUCH!
[client]
host = localhost
user = root
password = password
socket = /var/run/mysqld/mysqld.sock
[mysql_upgrade]
host = localhost
user = root
password = password
socket = /var/run/mysqld/mysqld.sock
basedir = /usr

Then restart MariaDB:

service mysql restart

Now check that networking is enabled. Run

netstat -tap | grep mysql

The output should look like this:

tcp6 0 0 [::]:mysql [::]:* LISTEN 17776/mysqld


Install Amavisd-new, SpamAssassin, and ClamAV

To install amavisd-new, SpamAssassin and ClamAV, we run

apt-get install amavisd-new spamassassin clamav clamav-daemon zoo unzip bzip2 arj nomarch lzop cabextract apt-listchanges libnet-ldap-perl libauthen-sasl-perl clamav-docs daemon libio-string-perl libio-socket-ssl-perl libnet-ident-perl zip libnet-dns-perl libdbd-mysql-perl postgrey

The ISPConfig 3 setup uses amavisd which loads the SpamAssassin filter library internally, so we can stop SpamAssassin to free up some RAM:

service spamassassin stop
systemctl disable spamassassin


Install Metronome XMPP Server

This step installs the Metronome XMPP Server which provides a chat server that is compatible with the XMPP protocol. This step is optional, if you do not need a chat server, then you can skip this step. No other ISPConfig functions depend on this software.

Add the Prosody package repository in Debian.

echo "deb http://packages.prosody.im/debian stretch main"> /etc/apt/sources.list.d/metronome.list
wget http://prosody.im/files/prosody-debian-packages.key -O - | sudo apt-key add -

Update the package list:

apt-get update

and install the packages with apt.

apt-get install git lua5.1 liblua5.1-0-dev lua-filesystem libidn11-dev libssl-dev lua-zlib lua-expat lua-event lua-bitop lua-socket lua-sec luarocks luarocks

luarocks install lpc

Add a shell user for Metronome.

adduser --no-create-home --disabled-login --gecos 'Metronome' metronome

Download Metronome to the /opt directory and compile it.

cd /opt; git clone https://github.com/maranda/metronome.git metronome
cd ./metronome; ./configure --ostype=debian --prefix=/usr
make
make install

Metronome has now be installed to /opt/metronome.


Install Apache2, PHP, FCGI, suExec, Pear, phpMyAdmin, and mcrypt

Apache2, PHP5, phpMyAdmin, FCGI, suExec, Pear, and mcrypt can be installed as follows:

apt-get -y install apache2 apache2-doc apache2-utils libapache2-mod-php php7.0 php7.0-common php7.0-gd php7.0-mysql php7.0-imap phpmyadmin php7.0-cli php7.0-cgi libapache2-mod-fcgid apache2-suexec-pristine php-pear php7.0-mcrypt mcrypt  imagemagick libruby libapache2-mod-python php7.0-curl php7.0-intl php7.0-pspell php7.0-recode php7.0-sqlite3 php7.0-tidy php7.0-xmlrpc php7.0-xsl memcached php-memcache php-imagick php-gettext php7.0-zip php7.0-mbstring memcached libapache2-mod-passenger php7.0-soap

You will see the following questions:

Web server to reconfigure automatically: apache2
Configure database for phpmyadmin with dbconfig-common? yes
Enter the phpmyadmin application password? Hit Enter
Enter the password of the administrative user? (rootmysqlpassword)

Then run the following command to enable the Apache modules suexec, rewrite, ssl, actions, and include (plus dav, dav_fs, and auth_digest if you want to use WebDAV):

a2enmod suexec rewrite ssl actions include dav_fs dav auth_digest cgi headers

To ensure that the server can not be attacked trough the HTTPOXY vulnerability, we will disable the HTTP_PROXY header in apache globally by adding the configuration file /etc/apache2/conf-available/httpoxy.conf.

nano /etc/apache2/conf-available/httpoxy.conf

Enter the following content to the file:


    RequestHeader unset Proxy early


And enable the module by running:

a2enconf httpoxy
service apache2 restart


Install Let's Encrypt

ISPConfig 3.1  has support for the free SSL Certificate authority Let's encrypt. The Let's Encrypt function allows you to create free SSL certificates for your website from within ISPConfig.

Now we will add support for Let's encrypt.

apt-get install certbot

There are no further steps required than installing LE. The website SSL certificates are created by ISPConfig when you add the web sites.


Install PHP-FPM

To use PHP-FPM with Apache, we need the mod_proxy_fcgi Apache module, which is installed by default and needs just be enabled. We can install PHP-FPM and as follows:

apt-get -y install php7.0-fpm

Make sure you enable the modules and restart Apache:

a2enmod actions proxy_fcgi alias 
service apache2 restart


Install PHP Opcode Cache

Opcache is a free PHP opcode cacher for caching and optimizing PHP intermediate code. APCu is a compatibility module which provides APC compatible functions for Opcache which is used by many CMS caching systems.  It is recommended to have these PHP extensions installed to speed up your PHP page.

APCu can be installed as follows:

apt-get -y install php7.0-opcache php-apcu

Now restart Apache:

service apache2 restart


Install Mailman

ISPConfig allows you to manage (create/modify/delete) Mailman mailing lists. If you want to make use of this feature, install Mailman as follows:

apt-get install mailman

Select at least one language, e.g.:

Languages to support: en (English)
Missing site list: Ok

Before we can start Mailman, a first mailing list called mailman must be created:

newlist mailman

Enter the email of the person running the list: admin@example.com
Initial mailman password: ******
To finish creating your mailing list, you must edit your /etc/aliases (or
equivalent) file by adding the following lines, and possibly running the
`newaliases' program:

## mailman mailing list
mailman:              "|/var/lib/mailman/mail/mailman post mailman"
mailman-admin:        "|/var/lib/mailman/mail/mailman admin mailman"
mailman-bounces:      "|/var/lib/mailman/mail/mailman bounces mailman"
mailman-confirm:      "|/var/lib/mailman/mail/mailman confirm mailman"
mailman-join:         "|/var/lib/mailman/mail/mailman join mailman"
mailman-leave:        "|/var/lib/mailman/mail/mailman leave mailman"
mailman-owner:        "|/var/lib/mailman/mail/mailman owner mailman"
mailman-request:      "|/var/lib/mailman/mail/mailman request mailman"
mailman-subscribe:    "|/var/lib/mailman/mail/mailman subscribe mailman"
mailman-unsubscribe:  "|/var/lib/mailman/mail/mailman unsubscribe mailman"

Hit enter to notify mailman owner. ENTER

Now edit /etc/aliases file:

nano /etc/aliases

and add the following lines:

## mailman mailing list
mailman:              "|/var/lib/mailman/mail/mailman post mailman"
mailman-admin:        "|/var/lib/mailman/mail/mailman admin mailman"
mailman-bounces:      "|/var/lib/mailman/mail/mailman bounces mailman"
mailman-confirm:      "|/var/lib/mailman/mail/mailman confirm mailman"
mailman-join:         "|/var/lib/mailman/mail/mailman join mailman"
mailman-leave:        "|/var/lib/mailman/mail/mailman leave mailman"
mailman-owner:        "|/var/lib/mailman/mail/mailman owner mailman"
mailman-request:      "|/var/lib/mailman/mail/mailman request mailman"
mailman-subscribe:    "|/var/lib/mailman/mail/mailman subscribe mailman"
mailman-unsubscribe:  "|/var/lib/mailman/mail/mailman unsubscribe mailman"

Run the following command:

newaliases

and restart Postfix:

service postfix restart

Finally, we must enable the Mailman Apache configuration:

ln -s /etc/mailman/apache.conf /etc/apache2/conf-enabled/mailman.conf

This defines the alias /cgi-bin/mailman/ for all Apache vhosts, which means you can access the Mailman admin interface for a list at http://labserver.example.com/cgi-bin/mailman/admin/, and the web page for users of a mailing list can be found at http://labserver.example.com/cgi-bin/mailman/listinfo/.

Under http://labserver.example.com/pipermail you can find the mailing list archives.

Restart Apache afterwards:

service apache2 restart

Then start the Mailman daemon:

service mailman start


Install PureFTPd and Quota

PureFTPd and quota can be installed with the following command:

apt-get install pure-ftpd-common pure-ftpd-mysql quota quotatool

Edit the file /etc/default/pure-ftpd-common

nano /etc/default/pure-ftpd-common

and make sure that the start mode is set to standalone and set VIRTUALCHROOT=true:

STANDALONE_OR_INETD=standalone
VIRTUALCHROOT=true

Save and close

Now we configure PureFTPd to allow FTP and TLS sessions. FTP is a very insecure protocol because all passwords and all data are transferred in clear text. By using TLS, the whole communication can be encrypted, thus making FTP much more secure.

If you want to allow FTP and TLS sessions, run

echo 1 > /etc/pure-ftpd/conf/TLS

In order to use TLS, we must create an SSL certificate. I create it in /etc/ssl/private/, therefore I create that directory first:

mkdir -p /etc/ssl/private/

Afterwards, we can generate the SSL certificate as follows:

openssl req -x509 -nodes -days 7300 -newkey rsa:2048 -keyout /etc/ssl/private/pure-ftpd.pem -out /etc/ssl/private/pure-ftpd.pem

Country Name (2 letter code) [AU]: PK
State or Province Name (full name) [Some-State]: SINDH
Locality Name (eg, city) []: Karachi
Organization Name (eg, company) [Internet Widgits Pty Ltd]: TECHNOCRACY
Organizational Unit Name (eg, section) []: IT
Common Name (eg, YOUR name) []: labserver.example.com
Email Address []: manager@example.com

Change the permissions of the SSL certificate:

chmod 600 /etc/ssl/private/pure-ftpd.pem

Then restart PureFTPd:

service pure-ftpd-mysql restart

Edit /etc/fstab. Mine looks like this (I added ,usrjquota=quota.user,grpjquota=quota.group,jqfmt=vfsv0 to the partition with the mount point /):

nano /etc/fstab

UUID=f539c5cb-624f-4c27-a149-1446a251a453 / ext4 errors=remount-ro,usrjquota=quota.user,grpjquota=quota.group,jqfmt=vfsv0 0 1
UUID=8d3194e7-edb5-4492-937d-d066b4994baf none swap sw 0 0 /dev/sr0 /media/cdrom0 udf,iso9660 user,noauto 0 0

To enable quota, run these commands:

mount -o remount /

quotacheck -avugm
quotaon -avug


Install BIND DNS Server

BIND can be installed as follows:

apt-get install bind9 dnsutils

If your server is a virtual machine, then it is highly recommended to install the haveged daemon to get a higher entropy for DNSSEC signing. You can install haveged on nonvirtual servers as well, it should not hurt.

apt-get install haveged


Install Webalizer and AWStats

Webalizer and AWStats can be installed as follows:

apt-get install webalizer awstats geoip-database libclass-dbi-mysql-perl libtimedate-perl

Open /etc/cron.d/awstats afterwards

nano /etc/cron.d/awstats

and comment out everything in that file:

#MAILTO=root
#*/10 * * * * www-data [ -x /usr/share/awstats/tools/update.sh ] && /usr/share/awstats/tools/update.sh
# Generate static reports:
#10 03 * * * www-data [ -x /usr/share/awstats/tools/buildstatic.sh ] && /usr/share/awstats/tools/buildstatic.sh


Install Jailkit

Jailkit is needed only if you want to chroot SSH users. It can be installed as follows:

apt-get install build-essential autoconf automake libtool flex bison debhelper binutils

cd /tmp
wget http://olivier.sessink.nl/jailkit/jailkit-2.19.tar.gz
tar xvfz jailkit-2.19.tar.gz
cd jailkit-2.19
echo 5 > debian/compat
./debian/rules binary

You can now install the Jailkit .deb package as follows:

cd ..
dpkg -i jailkit_2.19-1_*.deb
rm -rf jailkit-2.19*


Install fail2ban and UFW Firewall

This is optional but recommended, because the ISPConfig monitor tries to show the log:

apt-get install fail2ban

To make fail2ban monitor PureFTPd and Dovecot, create the file /etc/fail2ban/jail.local:

nano /etc/fail2ban/jail.local

And add the following configuration to it.

[pure-ftpd]
enabled = true
port = ftp
filter = pure-ftpd
logpath = /var/log/syslog
maxretry = 3

[dovecot]
enabled = true
filter = dovecot
logpath = /var/log/mail.log
maxretry = 5

[postfix-sasl]
enabled = true
port = smtp
filter = postfix-sasl
logpath = /var/log/mail.log
maxretry = 3

Restart fail2ban afterwards:

service fail2ban restart

To install the UFW firewall, run this apt command:

apt-get install ufw


Install RoundCube

Install RoundCube with this command:

apt-get install roundcube roundcube-core roundcube-mysql roundcube-plugins

The installer will ask the following questions:

Configure database for roundcube with dbconfig.common? yes
MySQL application password for roundcube: Hit Enter
Password of the databases administrative user: (mysqlrootpassword)

Then edit the RoundCube /etc/roundcube/config.inc.php file and adjust a few settings:

nano /etc/roundcube/config.inc.php

Set the default_host and smtp_server to localhost.

$config['default_host'] = 'localhost';
$config['smtp_server'] = 'localhost';

Then edit the Apache roundcube configuration file /etc/apache2/conf-enabled/roundcube.conf:

nano /etc/apache2/conf-enabled/roundcube.conf

And add an alias line for the apache /webmail alias, you can add the line right at the beginning of the file. NOTE: Do not use /mail as alias or the ispconfig email module will stop working!

Alias /webmail /var/lib/roundcube

Then reload Apache:

service apache2 reload

Now you can access RoundCube as follows:

http://192.168.1.100/webmail
http://www.example.com/webmail
http://labserver.example.com:8080/webmail (after you have installed ISPConfig, see the next chapter)


Install ISPConfig 3

You can install ISPConfig 3 from the latest released version using the following:

cd /tmp
wget http://www.ispconfig.org/downloads/ISPConfig-3-stable.tar.gz
tar xfz ISPConfig-3-stable.tar.gz
cd ispconfig3_install/install/

The next step is to run the ISPConfig installer.

php -q install.php

This will start the ISPConfig 3 installer. The installer will configure all services like Postfix, Dovecot, etc.


--------------------------------------------------------------------------------
_____ ___________ _____ __ _ ____
|_ _/ ___| ___ \ / __ \ / _(_) /__ \
| | \ `--.| |_/ / | / \/ ___ _ __ | |_ _ __ _ _/ /
| | `--. \ __/ | | / _ \| '_ \| _| |/ _` | |_ |
_| |_/\__/ / | | \__/\ (_) | | | | | | | (_| | ___\ \
\___/\____/\_| \____/\___/|_| |_|_| |_|\__, | \____/
__/ |
|___/
--------------------------------------------------------------------------------


>> Initial configuration

Operating System: Debian 9.0 (Stretch) or compatible

Following will be a few questions for primary configuration so be careful.
Default values are in [brackets] and can be accepted with .
Tap in "quit" (without the quotes) to stop the installer.


Select language (en,de) [en]: Hit Enter
Installation mode (standard,expert) [standard]: Hit Enter
Full qualified hostname (FQDN) of the server, eg server1.domain.tld [server1.canomi.com]: Hit Enter
MySQL server hostname [localhost]: Hit Enter
MySQL server port [3306]: Hit Enter
MySQL root username [root]: Hit Enter
MySQL root password []: Enter your MySQL root password
MySQL database to create [dbispconfig]: Hit Enter
MySQL charset [utf8]: Hit Enter

Configuring Postgrey
Configuring Postfix
Generating a 4096 bit RSA private key
.......................................................................++
........................................................................................................................................++
writing new private key to 'smtpd.key'
-----
You are about to be asked to enter information that will be incorporated
into your certificate request.
What you are about to enter is what is called a Distinguished Name or a DN.
There are quite a few fields but you can leave some blank
For some fields there will be a default value,
If you enter '.', the field will be left blank.
-----

Country Name (2 letter code) [AU]: PK
State or Province Name (full name) [Some-State]: SINDH
Locality Name (eg, city) []: Karachi
Organization Name (eg, company) [Internet Widgits Pty Ltd]: TECHNOCRACY
Organizational Unit Name (eg, section) []: Hit Enter
Common Name (e.g. server FQDN or YOUR name) []: labserver.example.com
Email Address []: Hit Enter

Configuring Mailman
Configuring Dovecot
Configuring Spamassassin
Configuring Amavisd
Configuring Getmail
Configuring BIND
Configuring Jailkit
Configuring Pureftpd
Configuring Apache
Configuring vlogger
Configuring Metronome XMPP Server
writing new private key to 'localhost.key'
-----

Country Name (2 letter code) [AU]: PK
State or Province Name (full name) [Some-State]: SINDH
Locality Name (eg, city) []: Karachi
Organization Name (eg, company) [Internet Widgits Pty Ltd]: TECHNOCRACY
Organizational Unit Name (eg, section) []: Hit Enter
Common Name (e.g. server FQDN or YOUR name) []: labserver.example.com
Email Address []: Hit Enter

Configuring Ubuntu Firewall
Configuring Fail2ban
[INFO] service OpenVZ not detected
Configuring Apps vhost
Installing ISPConfig
ISPConfig Port [8080]:

Admin password [admin]:

Do you want a secure (SSL) connection to the ISPConfig web interface (y,n) [y]: Hit Enter

Generating RSA private key, 4096 bit long modulus
.......................++
................................................................................................................................++
e is 65537 (0x10001)
You are about to be asked to enter information that will be incorporated
into your certificate request.
What you are about to enter is what is called a Distinguished Name or a DN.
There are quite a few fields but you can leave some blank
For some fields there will be a default value,
If you enter '.', the field will be left blank.
-----

Country Name (2 letter code) [AU]: PK
State or Province Name (full name) [Some-State]: SINDH
Locality Name (eg, city) []: Karachi
Organization Name (eg, company) [Internet Widgits Pty Ltd]: TECHNOCRACY
Organizational Unit Name (eg, section) []: Hit Enter
Common Name (e.g. server FQDN or YOUR name) []: labserver.example.com
Email Address []: Hit Enter

Please enter the following 'extra' attributes
to be sent with your certificate request
A challenge password []: Hit Enter
An optional company name []: Hit Enter
writing RSA key

Configuring DBServer
Installing ISPConfig crontab
no crontab for root
no crontab for getmail
Detect IP addresses
Restarting services ...
Installation completed.

The installer automatically configures all underlying services, so no manual configuration is needed.

Now you can access ISPConfig 3 under http(s)://labserver.example.com:8080/ or http(s)://192.168.1.100:8080/ ( http or https depends on what you chose during installation). Log in with the username admin and the password admin (you should change the default password after your first login):


Conclusion

Now you have a complete web hosting solution and is ready to be used.

Boost Your Computer Performance with TuneUp Utilities 2014

$
0
0
 

TuneUp Utilities 2014 takes PC optimization to the next level to keep your Windows® PC, laptop, and tablet in top shape. New features in version 2014 include: You can download fully functional version from the link below.

Installation instruction:
  1. Unpack rar archive
  2. Run the setup
  3. Use the given serial key to activate
  4. Open in notepad C:\WINDOWS\System32\drivers\etc\hosts
Copy and past the following at the end of your Windows hosts file:

127.0.0.1 secure.tune-up.com
127.0.0.1 www.order.tune-up.com
127.0.0.1 www.tune-up.com
127.0.0.1 www.tune-up.com/order
127.0.0.1 www.registertuneup.com
127.0.0.1 www.tuneup.de

Save and close

Never update or you will loose its registration!


https://www.dropbox.com/s/vu5kl8dzcq8gloa/TuneUp%20Utilities%202014%2014.0.1000.rar


 You can see my laptop optimization as shown in image below


Windows compatibility:
It is compatible with all Windows version including Windows 10
Viewing all 880 articles
Browse latest View live


<script src="https://jsc.adskeeper.com/r/s/rssing.com.1596347.js" async> </script>