
Hadoop software library is a framework that allows for the distributed processing of large data sets across clusters of computers using simple programming models. It is designed to scale up from single servers to thousands of machines, each offering local computation and storage.
Rather than rely on hardware to deliver high-availability, the library itself is designed to detect and handle failures at the application layer, so delivering a highly-available service on top of a cluster of computers, each of which may be prone to failures.
- Hadoop Common: The common utilities that support the other Hadoop modules.
- Hadoop Distributed File System (HDFS™): A distributed file system that provides high-throughput access to application data.
- Hadoop YARN: A framework for job scheduling and cluster resource management.
- Hadoop MapReduce: A YARN-based system for parallel processing of large data sets.
- Hadoop Ozone: An object store for Hadoop.
Before installing and configuring the master and worker nodes, it’s important to understand the different components of a Hadoop cluster.
A master node maintains knowledge about the distributed file system, like the inode table on an ext3 filesystem, and schedules resources allocation. For this guide, master-node will handle this role and host following two daemons:
- NameNode manages the distributed file system and knows where stored data blocks inside the cluster are.
- ResourceManager manages the YARN jobs and takes care of scheduling and executing processes on worker nodes.
Worker nodes store the actual data and provide processing power to run the jobs. For this guide, worker-node1 and worker-node2 will handle this role and host following two daemons:
- DataNode manages the physical data stored on the node; it’s named, NameNode.
- NodeManager manages execution of tasks on the node.
Prerequisites
To follow this tutorial, you will need three (physical or virtual) machines installed with Ubuntu server having sudo non-root user privileges. Please note that, this guide is specifically written for Ubuntu 18.04, 19.04, 19.10, 20.04 and Debian 9, 10.
We will use following three nodes for this guide:
We will use following three nodes for this guide:
| Name | IP | Purpose |
| master-node | 192.168.10.1 | Master Node |
| worker-node1 | 192.168.10.2 | Worker Node |
| worker-node2 | 192.168.10.3 | Worker Node |
Update Hosts File
For each node to communicate with each other by name, map the IP addresses of three servers against their name.
Make sure you replace the ip addresses with yours, Save and close file when you are finished.
Adding Hadoop User
Type below command on all of the nodes (master-node, worker-node1, worker-node2) in our case to create a user called hadoop:
This user will handle the Hadoop installation and configuration on each node.You will see similar to below prompts where you have to create password for hadoop user
Adding user `hadoop' ...
Adding new group `hadoop' (1001) ...
Adding new user `hadoop' (1001) with group `hadoop' ...
Creating home directory `/home/hadoop' ...
Copying files from `/etc/skel' ...
Enter new UNIX password:
Retype new UNIX password:
passwd: password updated successfully
Changing the user information for hadoop
Enter the new value, or press ENTER for the default
        Full Name []: Hadoop Administrator
        Room Number []:
        Work Phone []:
        Home Phone []:
        Other []:
Is the information correct? [Y/n] y
Lastly press Y and Enter to complete user creation process.
Type below command to add hadoop user to sudo group on each node:
You will see the output similar like below:
Adding user `hadoop' to group `sudo' ...
Adding user hadoop to group sudo
Done.
Set Up Password Less SSH Authentication
The master node will use an SSH connection to connect to other nodes with key-pair authentication. to actively manage the cluster.
For this, we need to set up key-pair ssh authentication on each node. Login to your master-node as the hadoop user, and generate an SSH key like below:
When generating this key, leave the password field blank so your Hadoop user can communicate unprompted.
On the master-node, in the /home/hadoop/.ssh directory, you should see the id_rsa.pub and authorized_keys files.
Now transfer authorized_keys file from master-node to each worker node (worker-node1, worker-node2) like below:
This will prompt you for hadoop user password.Once authorized_keys transferred successfully to worker nodes, ssh from master-node to worker-node1, worker-node2 to verify whether password less authentication is working for hadoop user.
If this logged you in from master-node to worker-node1 without password, your password less authentication is working.
Next, do ssh from master-node to worker-node2 and see if password less authentication working.
If this logged you in from master-node to worker-node2 without password, your password less authentication is working.
Next, log in as the hadoop user on worker-node1, transfer authorized_keys to master-node and worker-node2:
Next, log in as the hadoop user on worker-node2, transfer authorized_keys to master-node and worker-node1:Now do ssh from each other node to verify whether password less authentication is working. If everything setup correctly, as the hadoop user you can ssh each other node with key-pair authentication without providing password.
Installing OpenJDK
You can install OpenJDK 11 on (master-node, worker-node1, worker-node2) with below command:
Set Java Home Environment
Hadoop comes with code and configuration that references the JAVA_HOME environment variable. This variable points to the java binary file, allowing them to run java code.
You can set up JAVA_HOME variable on each node like below:
Reload your system’s environment variables with below command:
Verify the variable was set correctly:
This should return the path to the java binary.
Download Hadoop
On master-node as the hadoop user, download the Hadoop tarball file, and unzip it. At the time of writing this article, hadoop 3.1.3 was the most latest available release.
Set Environment Variables
You need to manually set hadoop binaries location into system path.
Edit /home/hadoop/.profile like below:
add following line at the end of the file:
Save and close when you are finished.
Next, edit .bashrc like below:
add following lines at the end of the file:
Save and close.Repeat the same on worker-node1, worker-node2 as well.
Configuring Hadoop
In this section, we'll configure hadoop on master-node first, then replicate the configuration to worker-node1, worker-node2.
On master-node, type below command to find java installation path:
This will return output similar to the following:
java - auto mode
link best version is /usr/lib/jvm/java-11-openjdk-amd64/bin/java
link currently points to /usr/lib/jvm/java-11-openjdk-amd64/bin/java
link java is /usr/bin/java
/usr/lib/jvm/java-11-openjdk-amd64/bin/java - priority 1111
slave java.1.gz is /usr/share/man/man1/java.1.gz
slave java.1.gz: /usr/lib/jvm/java-11-openjdk-amd64/man/man1/java.1.gz
Take the value of the (link best version is) and remove the trailing /bin/java. For example on Ubuntu or Debian, the link is /usr/lib/jvm/java-11-openjdk-amd64/bin/java, so JAVA_HOME should be /usr/lib/jvm/java-11-openjdk-amd64.
Edit ~/hadoop/etc/hadoop/hadoop-env.sh like below:
Uncomment by removing # and update JAVA_HOME line like below:
Save and close when you are finished.
Next, edit core-site.xml file to set the NameNode location to master-node on port 9000:
add the following strings, make sure you replace master-node with yours:
Save and close.
Next, edit hdfs-site.conf to resemble the following configuration:
add following strings:
Save and close.
Note that the last property string dfs.replication, indicates how many times data is replicated in the cluster. We set 2 to have all the data duplicated on the two of our worker nodes.
If you have only one worker node, enter 1, if you have three, enter 3 but don’t enter a value higher than the actual number of worker nodes you have.
Next, edit the mapred-site.xml file, setting YARN as the default framework for MapReduce operations:
add following strings:Save and close.
Next, edit yarn-site.xml, which contains the configuration options for YARN.
add below strings, make sure you replace 192.168.10.1 with the your master-node's ip address:
Save and close.Next, edit workers file to include both of the worker nodes (worker-node1, worker-node2):
Remove localhost if exists, add your worker nodes like below:
Save and close.
The workers file is used by startup scripts to start required daemons on all nodes.
Next, edit yarn-site.xml file to set up memory allocation:
add the following strings:
Save and close.
The last property disables virtual-memory checking which can prevent containers from being allocated properly with openjdk-11 if enabled.
Note: Memory allocation can be tricky on low RAM nodes because default values are not suitable for nodes with less than 8GB of RAM. We have manually set memory allocation for MapReduce jobs, and provide a sample configuration for 2GB RAM nodes.
Next, edit mapred-site.xml file:
add the following strings:
Save and close.
We have completed hadoop configuration on master-node.
Configure Worker Nodes
This section will show you how to duplicate hadoop configuration from master-node to all work nodes.
First copy the hadoop tarball file from master-node to worker nodes like below:
Next, login to worker-node1 as the hadoop user via SSH and unzip the hadoop archive, rename the directory then exit from worker-node1 to get back on the master-node:
Repeat the same on worker-node2.
Next, duplicate the Hadoop configuration files from master-node to all worker nodes:
Make sure you replace worker-node1, worker-node2 with your worker nodes name.
Formatting HDFS
Log in to master-node as the hadoop user, type the below command to format hadoop file system:
With this hdfs format, your hadoop installation is now configured and ready to run.
Starting Hadoop
This section will show you how to start, stop and monitor hadoop that everything is properly working.
Start the HDFS by running the following script on master-node:
You will see similar to the following output:
Starting namenodes on [master-node]Starting datanodesworker-node2: WARNING: /home/hadoop/hadoop/logs does not exist. Creating.worker-node1: WARNING: /home/hadoop/hadoop/logs does not exist. Creating.Starting secondary namenodes [master-node]
This will start NameNode and SecondaryNameNode components on master-node, and DataNode on worker-node1 and worker-node2, according to the configuration in the workers config file.
Check that every process is running with the jps command on each node.
On master-node, type jps and you should see the following:
3009 SecondaryNameNode2724 NameNode3129 Jps
On worker-node1 and worker-node2, type jps and you should see the following:
14376 Jps
To stop HDFS, you can type below command on master-node:
This will stop HDFS on each node (master-node, worker-node1, worker-node2):
You can get useful information about your HDFS cluster with the below command.
This will print information (e.g., capacity and usage) for all running DataNodes like below:
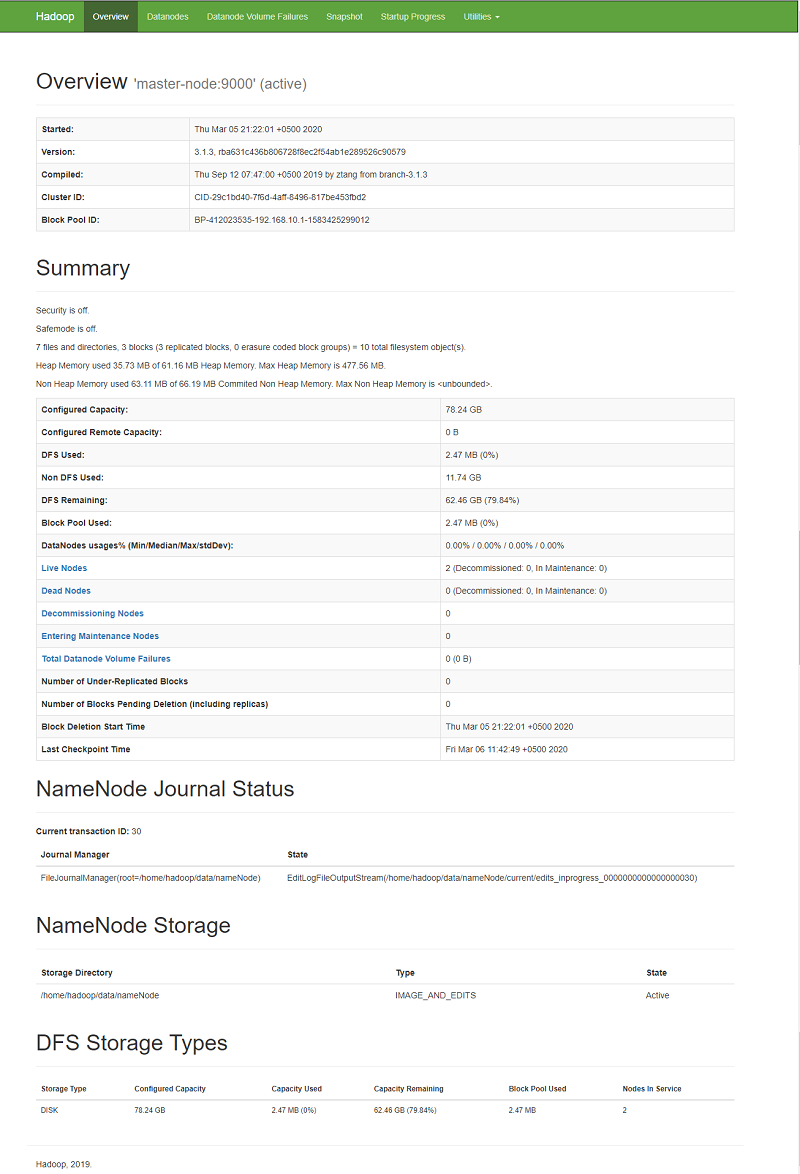
Configured Capacity: 84008173568 (78.24 GB)Present Capacity: 67072004096 (62.47 GB)DFS Used: 2588672 (2.47 MB)DFS Remaining: 67069415424 (62.46 GB)
DFS Used%: 0.00%
Replicated Blocks:Missing blocks: 0Under replicated blocks: 0
Blocks with corrupt replicas: 0Low redundancy blocks with highest priority to recover: 0Missing blocks (with replication factor 1): 0
Pending deletion blocks: 0
Erasure Coded Block Groups:Low redundancy blocks with highest priority to recover: 0Low redundancy block groups: 0
Block groups with corrupt internal blocks: 0
Missing block groups: 0Hostname: worker-node1Pending deletion blocks: 0
-------------------------------------------------
Live datanodes (2):
Name: 192.168.10.2:9866 (worker-node1)DFS Remaining: 33534689280 (31.23 GB)Decommission Status : Normal
Configured Capacity: 42004086784 (39.12 GB)
DFS Used: 1294336 (1.23 MB)
Non DFS Used: 6304002048 (5.87 GB)
DFS Used%: 0.00%Last contact: Fri Mar 06 12:19:30 PKT 2020DFS Remaining%: 79.84%
Configured Cache Capacity: 0 (0 B)
Cache Used: 0 (0 B)
Cache Remaining: 0 (0 B)
Cache Used%: 100.00%
Cache Remaining%: 0.00%
Xceivers: 1Configured Capacity: 42004086784 (39.12 GB)Last Block Report: Fri Mar 06 11:29:35 PKT 2020
Num of Blocks: 3
Name: 192.168.10.3:9866 (worker-node2)
Hostname: worker-node2
Decommission Status : Normal
DFS Used: 1294336 (1.23 MB)Cache Used%: 100.00%Non DFS Used: 6303965184 (5.87 GB)
DFS Remaining: 33534726144 (31.23 GB)
DFS Used%: 0.00%
DFS Remaining%: 79.84%
Configured Cache Capacity: 0 (0 B)
Cache Used: 0 (0 B)
Cache Remaining: 0 (0 B)
Cache Remaining%: 0.00%Num of Blocks: 3Xceivers: 1
Last contact: Fri Mar 06 12:19:28 PKT 2020Last Block Report: Thu Mar 05 21:22:07 PKT 2020
You can get the description of all available commands like below:
Next, open up your preferred web browser and navigate to http://your_master_node_IP:9870, and you’ll get a user-friendly HDFS monitoring web console like below:
Testing HDFS Cluster
You can test your HDFS cluster by writing and reading using hdfs dfs command. First, manually create your home directory. All other commands will use a path relative to this default home directory:
On master-node, type below command:
We'll use few textbooks from the Gutenberg project as an example for this guide.
Create a books directory in HDFS. The following command will create it in the home directory, /user/hadoop/books:
Now download a few books from the Gutenberg project:
Next, put these three books through HDFS, in the books directory:
List the contents of the books directory:
You will see output similar to the following:
Found 3 items
Next, move one of the books to the local filesystem:
You can also directly print the books on terminal from HDFS:
These are just few example of commands. However, there are many commands to manage your HDFS. For a complete list, you can look at the Apache HDFS shell documentation, or print help with:
Start YARN
HDFS is a distributed storage system, and doesn’t provide any services for running and scheduling tasks in the cluster. This is the role of the YARN framework. The following section is about starting, monitoring, and submitting jobs to YARN.
On master-node, you can start YARN with the below script:
You will see the output like below:
Starting resourcemanager
Check that everything is running with the jps command. In addition to the previous HDFS daemon, you should see a ResourceManager on master-node, and a NodeManager on worker-node1 and worker-node2.
To stop YARN, run the following command on master-node:
Similarly, you can get a list of running applications with below command:
To get all available parameters of the yarn command, see Apache YARN documentation.
As with HDFS, YARN provides a friendlier web UI, started by default on port 8088 of the Resource Manager. You can navigate to http://master-node-IP:8088 to browse the YARN web console:
Submit MapReduce Jobs to YARN
YARN jobs are packaged into jar files and submitted to YARN for execution with the command yarn jar. The Hadoop installation package provides sample applications that can be run to test your cluster. You’ll use them to run a word count on the three books previously uploaded to HDFS.
On master-node, submit a job with the sample jar to YARN:
The last argument is where the output of the job will be saved - in HDFS.
After the job is finished, you can get the result by querying HDFS with:
If above command return success, the output will resemble:
Found 2 items
Print the result with:
Wrapping up
Now that you have a YARN cluster up and running, you can learn how to code your own YARN jobs with Apache documentation and install Spark on top of your YARN cluster. You may wish to consult the following resources for additional information on this topic.