Open source ticket request system also known a help desk and IT service management system. The OTRS is written in Perl, supports a variety of databases including (MySQL, PostgreSQL, Oracle etc.), and can integrate with LDAP/Active directory for central authentication.
This guide will take you through the steps to install OTRS Community Edition on an Ubuntu 18.04 server and set up a simple help desk system, which will help you to receive and process requests from your customers using both the web interface and email.
Prerequisites
To follow this guide, you will need one Ubuntu 18.04 server having a non-root user with sudo privileges. You will also need to create an A record with yourdomain.com and www.yourdomain.com pointing to your server's IP address in your private or public DNS.
Installing Apache
First you need to install Apache using Ubuntu's package manager like below:
sudo apt update
sudo apt -y install apache2
Installing MySQL
Now that you have your web server up and running, it is time to install MySQL. Type following apt command to install:
sudo apt -y install mysql-server
When the installation is complete, run a simple security script that comes pre-installed with MySQL which will remove some dangerous defaults and lock down access to your database system. Start the interactive script by running:
sudo mysql_secure_installation
This will ask if you want to configure the VALIDATE PASSWORD PLUGIN.
Answer Y for yes, or anything else to continue without enabling.
VALIDATE PASSWORD PLUGIN can be used to test passwords
and improve security. It checks the strength of password
and allows the users to set only those passwords which are
secure enough. Would you like to setup VALIDATE PASSWORD plugin?
Press y|Y for Yes, any other key for No:
If you answer “yes”, you'll be asked to select a level of password validation. Keep in mind that if you enter 2 for the strongest level, you will receive errors when attempting to set any password which does not contain numbers, upper and lowercase letters, and special characters, or which is based on common dictionary words.
There are three levels of password validation policy:
LOW Length >= 8
MEDIUM Length >= 8, numeric, mixed case, and special characters
STRONG Length >= 8, numeric, mixed case, special characters and dictionary file
Please enter 0 = LOW, 1 = MEDIUM and 2 = STRONG: 1
Regardless of whether you chose to set up the VALIDATE PASSWORD PLUGIN, your server will next ask you to select and confirm a password for the MySQL root user. This is an administrative account in MySQL that has increased privileges.
If you enabled password validation, you'll be shown the password strength for the root password you just entered and your server will ask if you want to change that password. If you are happy with your current password, enter N for "no" at the prompt:
Using existing password for root.
Estimated strength of the password: 100
Change the password for root ? ((Press y|Y for Yes, any other key for No) : n
For the rest of the questions, press Y and hit the ENTER key at each prompt. This will remove some anonymous users and the test database, disable remote root logins, and load these new rules so that MySQL immediately respects the changes you have made.
If you prefer to use a password when connecting to MySQL as root, you will need to switch its authentication method from auth_socket to mysql_native_password. To do this, open up the MySQL prompt from your terminal:
sudo mysql
Next, check which authentication method each of your MySQL user accounts use with the following command:
SELECT user,authentication_string,plugin,host FROM mysql.user;
Output
+------------------+-------------------------------------------+-----------------------+-----------+
| user | authentication_string | plugin | host |
+------------------+-------------------------------------------+-----------------------+-----------+
| root | | auth_socket | localhost |
| mysql.session | *THISISNOTAVALIDPASSWORDTHATCANBEUSEDHERE | mysql_native_password | localhost |
| mysql.sys | *THISISNOTAVALIDPASSWORDTHATCANBEUSEDHERE | mysql_native_password | localhost |
| debian-sys-maint | *CC744277A401A7D25BE1CA89AFF17BF607F876FF | mysql_native_password | localhost |
+------------------+-------------------------------------------+-----------------------+-----------+
4 rows in set (0.00 sec)
In above output, you can see that the root user does in fact authenticate using the auth_socket plugin. To configure the root account to authenticate with a password, run the following ALTER USER command. Be sure to change password to a strong password of your choosing:
ALTER USER 'root'@'localhost' IDENTIFIED WITH mysql_native_password BY 'your_password';
Then, run FLUSH PRIVILEGES which tells the server to reload the grant tables and put your new changes into effect:
FLUSH PRIVILEGES;
Check the authentication methods employed by each of your users again to confirm that root no longer authenticates using the auth_socket plugin:
SELECT user,authentication_string,plugin,host FROM mysql.user;
Output
+------------------+-------------------------------------------+-----------------------+-----------+
| user | authentication_string | plugin | host |
+------------------+-------------------------------------------+-----------------------+-----------+
| root | *3636DACC8616D997782ADD0839F92C1571D6D78F | mysql_native_password | localhost |
| mysql.session | *THISISNOTAVALIDPASSWORDTHATCANBEUSEDHERE | mysql_native_password | localhost |
| mysql.sys | *THISISNOTAVALIDPASSWORDTHATCANBEUSEDHERE | mysql_native_password | localhost |
| debian-sys-maint | *CC744277A401A7D25BE1CA89AFF17BF607F876FF | mysql_native_password | localhost |
+------------------+-------------------------------------------+-----------------------+-----------+
4 rows in set (0.00 sec)
You can see in above output that the root MySQL user now authenticates using a password. Once you confirm this on your own server, you can exit the MySQL shell:
exit
Installing the OTRS
In this step, you will install OTRS and a set of Perl modules that will increase the system's functionality. OTRS is available in Ubuntu's package manager, but the official documentation suggests installing OTRS from source.
Download the source archive with the wget command. For this guide, we will download version 6.0.19; you can find the latest available version on the OTRS download page.
cd ~
wget http://ftp.otrs.org/pub/otrs/otrs-6.0.19.tar.gz
tar xzf otrs-6.0.19.tar.gz
sudo mv otrs-6.0.19 /opt/otrs
Installing Perl Modules
Because OTRS is written in Perl, it uses a number of Perl modules. Check for missing modules by using the CheckModules.pl script included with OTRS:
sudo /opt/otrs/bin/otrs.CheckModules.pl
You'll see output like below, listing which modules you already have downloaded and which you are missing:
Output
o Apache::DBI......................FAILED! Not all prerequisites for this module correctly installed.
o Apache2::Reload..................ok (v0.13)
. . .
o XML::LibXML......................Not installed! Use: 'apt-get install -y libxml-libxml-perl' (required - Required for XML processing.)
o XML::LibXSLT.....................Not installed! Use: 'apt-get install -y libxml-libxslt-perl' (optional - Required for Generic Interface XSLT mapping module.)
o XML::Parser......................Not installed! Use: 'apt-get install -y libxml-parser-perl' (optional - Recommended for XML processing.)
o YAML::XS.........................Not installed! Use: 'apt-get install -y libyaml-libyaml-perl' (required - Required for fast YAML processing.)
Some modules are only needed for optional functionality, such as communication with other databases or handling mail with specific character sets; others are necessary for the program to work.
To install the missing modules, type or copy the following command and paste it on your terminal to install:
sudo apt install libapache2-mod-perl2 libdbd-mysql-perl libtimedate-perl libnet-dns-perl libnet-ldap-perl libio-socket-ssl-perl libpdf-api2-perl libsoap-lite-perl libtext-csv-xs-perl libjson-xs-perl libapache-dbi-perl libxml-libxml-perl libxml-libxslt-perl libyaml-perl libarchive-zip-perl libcrypt-eksblowfish-perl libencode-hanextra-perl libmail-imapclient-perl libtemplate-perl libdatetime-perl
Whenever you're done installing these modules, rerun the script to make sure that all the required modules have been installed:
sudo /opt/otrs/bin/otrs.CheckModules.pl
Your output will now show all the installed modules:
Output
o Text::CSV_XS.....................ok (v1.34)
o Time::HiRes......................ok (v1.9741)
o XML::LibXML......................ok (v2.0128)
o XML::LibXSLT.....................ok (v1.95)
o XML::Parser......................ok (v2.44)
o YAML::XS.........................ok (v0.69)
Now that you have OTRS and its dependencies installed on your server, you can configure OTRS to use Apache and MySQL.
Configuring OTRS
In this section, we will create a system user for OTRS, and then configure Apache and MySQL server to work with OTRS.
Create a user named otrs to run OTRS functions with the useradd command:
sudo useradd -d /opt/otrs -c 'OTRS user' otrs
Next, add otrs to the webserver group:
sudo usermod -G www-data otrs
OTRS comes with a default config file /opt/otrs/Kernel/Config.pm.dist. Activate this by copying it without the .dist filename extension:
sudo cp /opt/otrs/Kernel/Config.pm.dist /opt/otrs/Kernel/Config.pm
Now, navigate to the /opt/otrs directory:
cd /opt/otrs
From here, run the otrs.SetPermissions.pl script. It will detect the correct user and group settings and set the file and directory permissions for OTRS.
sudo bin/otrs.SetPermissions.pl
This will yield the following output:
Output
Setting permissions on /opt/otrs
The correct permissions are now set.
Next, activate the apache2 configuration file and make sure it is loaded after all other configurations. To do this, make a symbolic link with the zzz_ prefix:
sudo ln -s /opt/otrs/scripts/apache2-httpd.include.conf /etc/apache2/sites-enabled/zzz_otrs.conf
OTRS requires a few Apache modules to be active for optimal operation. You can activate them via the tool a2enmod. Although some of these have already been enabled, it is a good idea to check them all:
sudo a2enmod perl
sudo a2enmod headers
sudo a2enmod deflate
sudo a2enmod filter
These modules enable Apache to work with Perl, control HTTP headers, compress server output, and configure output content filters.
Restart your web server to apply new configurations:
sudo systemctl restart apache2
Before you go to the next step and run the web installer, change some of the MySQL configuration settings. Open the MySQL configuration file in your preferred text editor:
sudo nano /etc/mysql/mysql.conf.d/mysqld.cnf
Look for the following options under the [mysqld] section. For max_allowed_packet and query_cache_size, change the values to 64M and 32M respectively, as highlighted in the following code block:
max_allowed_packet = 64M
thread_stack = 192K
thread_cache_size = 8
# This replaces the startup script and checks MyISAM tables if needed
# the first time they are touched
myisam-recover-options = BACKUP
#max_connections = 100
#table_open_cache = 64
#thread_concurrency = 10
#
# * Query Cache Configuration
#
query_cache_limit = 1M
query_cache_size = 32M
This adjusts the maximum allowed packet size and the query cache size so that MySQL can interface with OTRS.
Then add the following highlighted additional options under the [mysqld] section, at the end of the file:
# ssl-cert=/etc/mysql/server-cert.pem
# ssl-key=/etc/mysql/server-ikey.pem
innodb_log_file_size = 256M
collation-server = utf8_unicode_ci
init-connect='SET NAMES utf8'
character-set-server = utf8
This sets the database logfile size, determines the character set and collation, and creates an init_connect string to set the character set upon starting the MySQL server.
Save and close mysqld.cnf by pressing CTRL + X, followed by Y and then ENTER. Then, restart your MySQL server to apply the new parameters:
sudo systemctl restart mysql.service
Now that you have created the otrs user and configured Apache and MySQL to work with OTRS, you are ready to use the web installer.
Configuring Database using the Web Installer
In this step, you will configure OTRS's database settings in a web browser and start the OTRS daemon process on the command line.
Open https://yourdomain.com/otrs/installer.pl or https://your_server_ip/otrs/installer.pl in your favorite web browser, replacing yourdomain.com or your_server_ip with your domain name or ip address of the server. You will find a welcome screen with the message Welcome to OTRS 6 and information about the OTRS offices.

Click Next.
The next page will have the license for OTRS, which is the GNU General Public License common to open source programs. Accept by clicking Accept license and continue.
On the next page, you will be prompted to select a database type. The defaults (MySQL and Create a new database for OTRS) are fine for your setup, so click Next to proceed.

On the next page, enter the MySQL credentials that you set up during the MySQL server installation. Use root for the User field, then enter the password you created. Leave the default host value.
Click Check database settings to make sure it works. The installer will generate credentials for the new database. There is no need to remember this generated password.
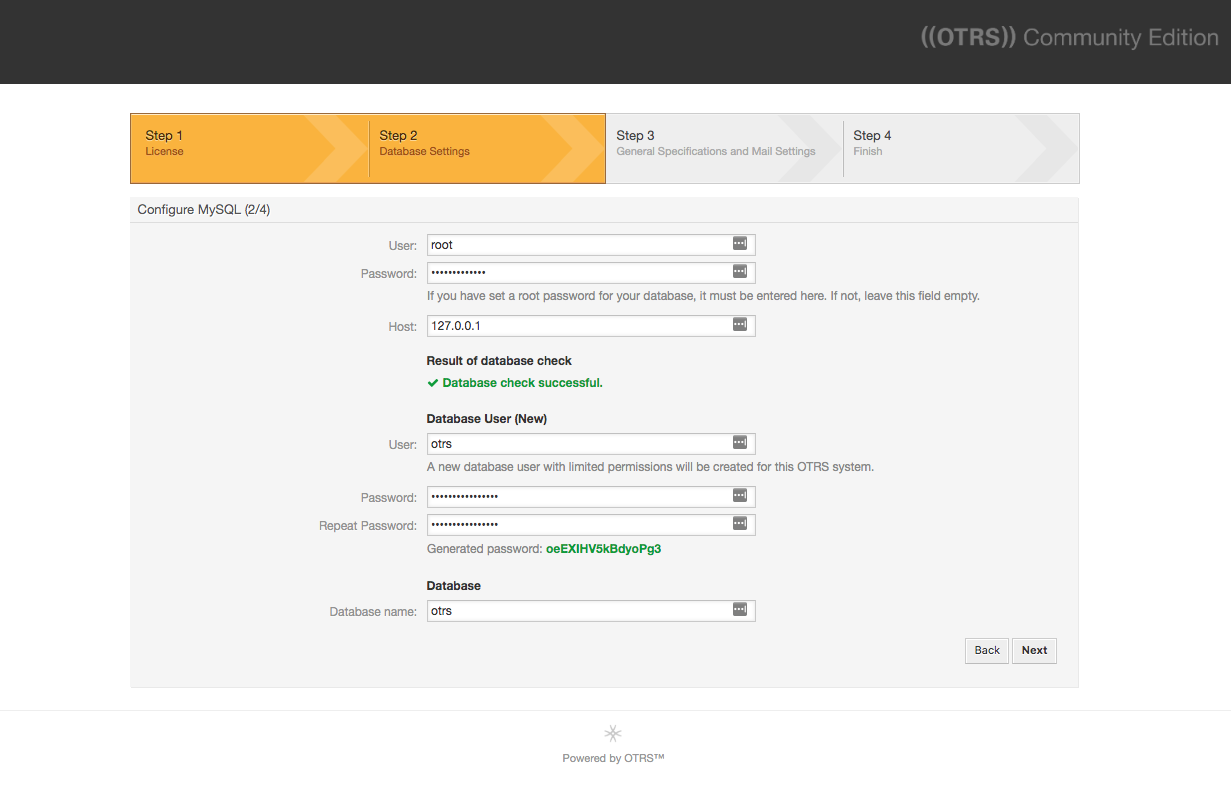
Click Next to proceed.
The database will be created and you will see the successful result:
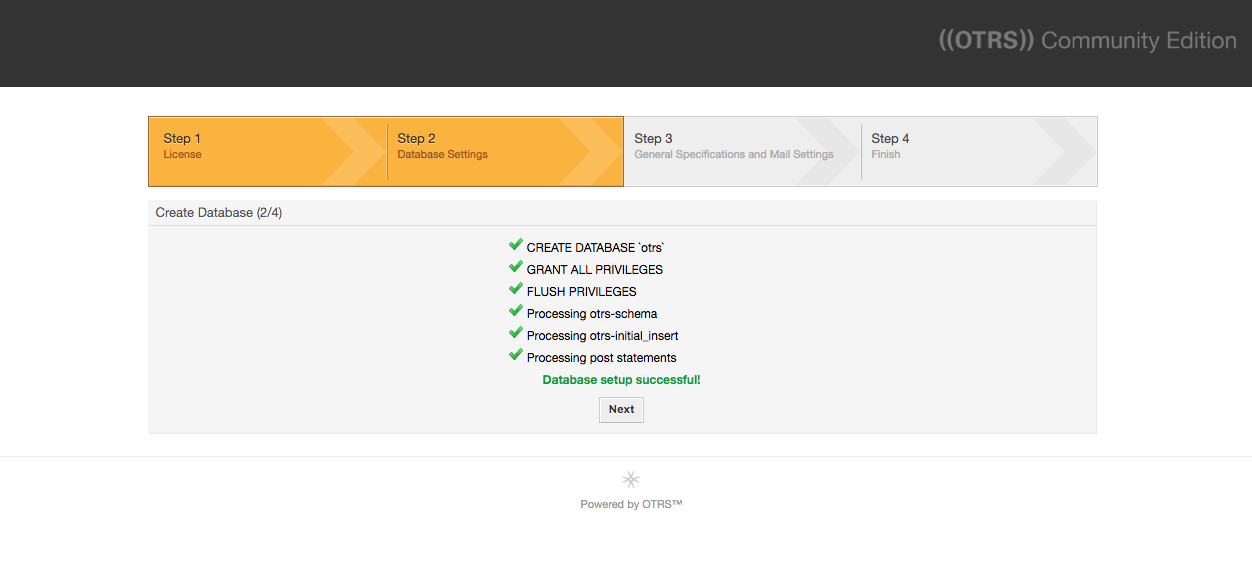
Click Next.
Next, provide the following required system settings:
System FQDN: A fully qualified domain name. Replace yourdomain.com with your own domain name.
AdminEmail: The email address of your system administrator. Emails about errors with OTRS will go here.
Organization: Your organization's name.
Leave all other options at their default values:
Click Next.

Now you will land on the Mail Configuration page. In order to be able to send and receive emails, you have to configure a mail account. We will set up this later step, so click Skip this for now.
The OTRS installation is now complete; you will see a Finished page with a link to the admin panel after Start page, and the credentials of the OTRS super user after that. Make sure you write down the generated password for the root@localhost user and the URL for the Start page.
The only thing left after a successful installation is to start the OTRS daemon and activate its cronjob.
Bring up the terminal you are using to access your Ubuntu 18.04 server. The OTRS daemon is responsible for handling any asynchronous and recurring tasks in OTRS. Start it with the otrs user:
sudo su - otrs -c "/opt/otrs/bin/otrs.Daemon.pl start"
You will see the following output:
Output
Manage the OTRS daemon process.
Daemon started
There are two default cron files in the /opt/otrs/var/cron/ directory. Move into this directory.
cd /opt/otrs/var/cron
These cron files are used to make sure that the OTRS daemon is running. Activate them by copying them without the .dist filename extension.
sudo cp aaa_base.dist aaa_base
sudo cp otrs_daemon.dist otrs_daemon
To schedule these cron jobs, use the script Cron.sh with the otrs user:
sudo su - otrs -c "/opt/otrs/bin/Cron.sh start"
Next, we will log in to the administrator web interface and secure OTRS.
Securing OTRS
We have a fully functional OTRS, but it's not secure to use the super user account. Instead, we'll create a new agent. In OTRS, agents are users who have rights to the various functions of the system. In this example, we will use a single agent who has access to all functions of the system.
To get started, log in as root@localhost. Open the Start page link which you received in the previous step. Enter root@localhost for the username and the password you copied from earlier step of web installer, then click Login.
You will see the main dashboard. It contains several widgets which show different information about tickets, statistics, news, etc. You can freely rearrange them by dragging or switch their visibility in settings.
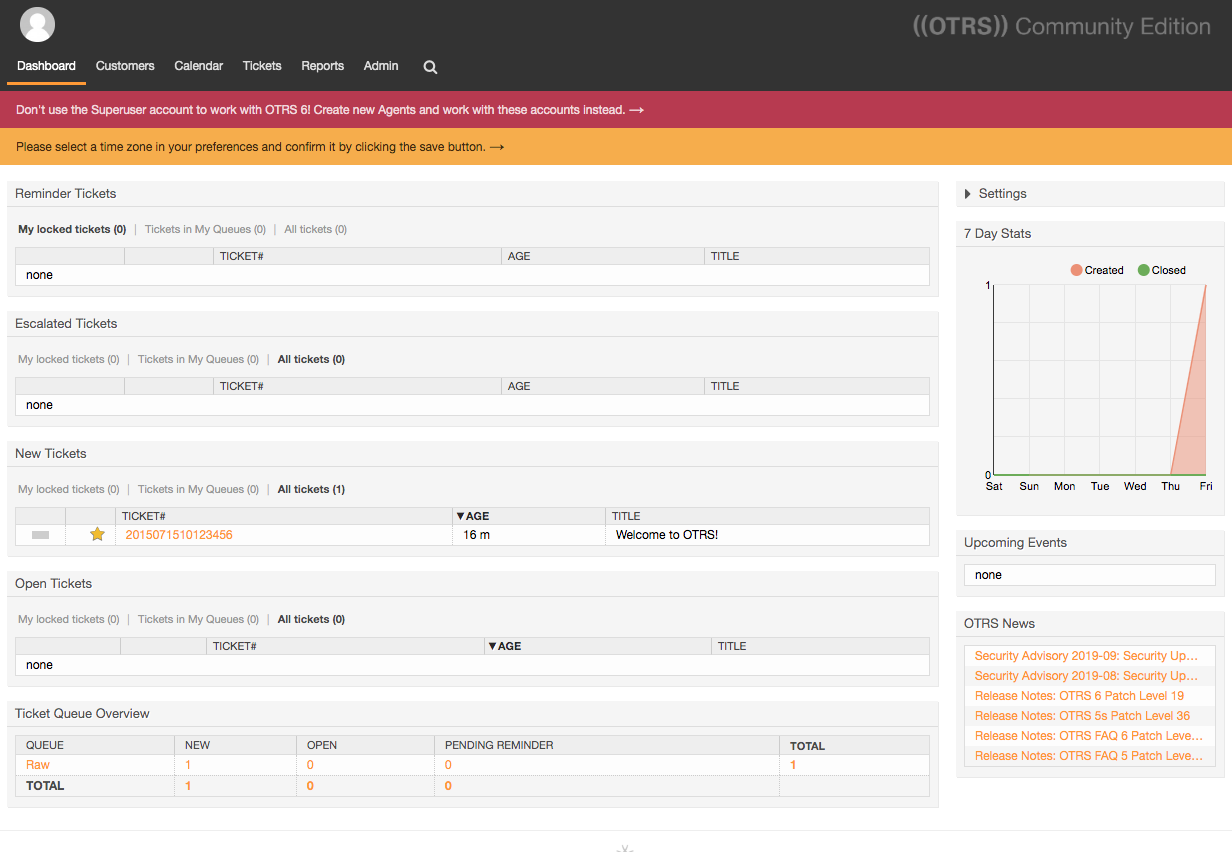
First, create a new agent. To do this, follow the link by clicking on the red message in the top of the screen that reads Don't use the Superuser account to work with OTRS 6! Create new Agents and work with these accounts instead. This will bring you to the Agent Management screen.
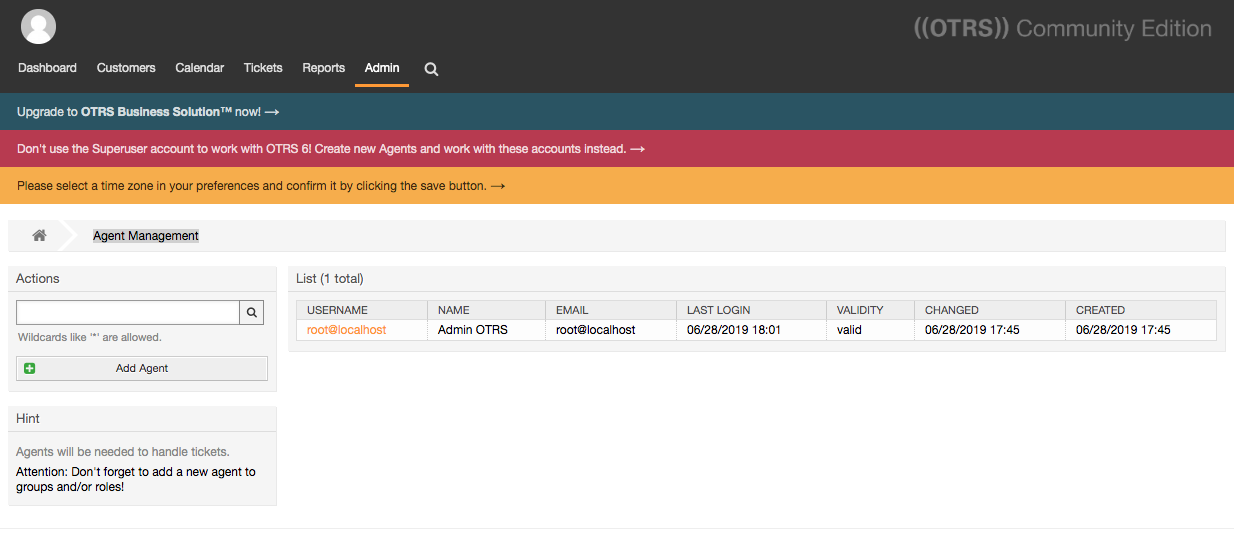
Click the Add agent button. This will bring you to the Add Agent screen. Most of the default options are fine. Fill in the first name, last name, username, password, and email fields. Record the username and password for future login. Submit the form by clicking the Save button.
Next, change the group relations for the new agent. Because your agent will also be the administrator, you can give it full read and write access to all groups. To do this, click the checkbox next to RW all the way on the right, under Change Group Relations for Agent.
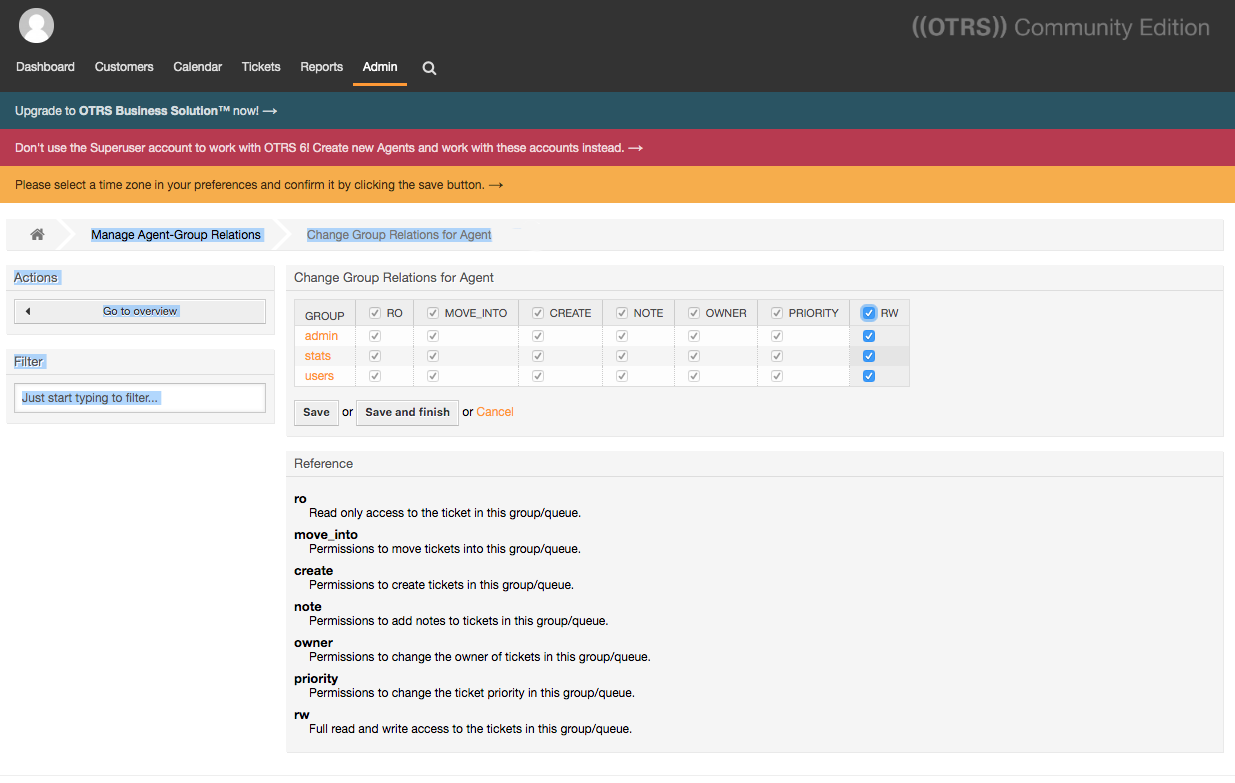
Finally, click Save and finish.
Now, log out and log back in again using the newly created account. You can find the Logout link by clicking on the avatar picture in the top left corner.
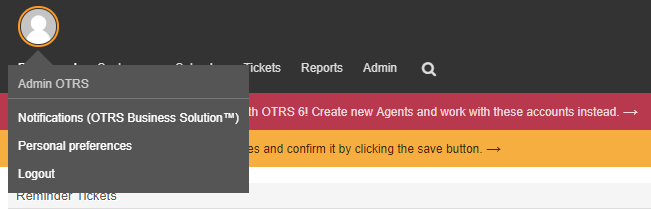
Once you have logged back in, you can customize your agent's preferences by clicking on Personal preferences in the avatar menu. There you can change your password, choose the interface language, configure setup notifications and favorite queues, change interface skins, etc.
Once you have logged in as your new agent and configured the account to your liking, the next step is to configure the inbound mail options to generate tickets from incoming emails.
Configuring OTRS Inbound Mail
Customers have two ways to forward new tickets to OTRS: via the customer front-end or by sending an email. In order to receive customer's messages you need to set up a POP or IMAP account. We will use a Gmail account as an example for OTRS configuration.
Navigate to the Admin tab by clicking on Admin in the top menu. Then find the PostMaster Mail Accounts option and click on it. Press the Add Mail Account button to set up a new mailbox.
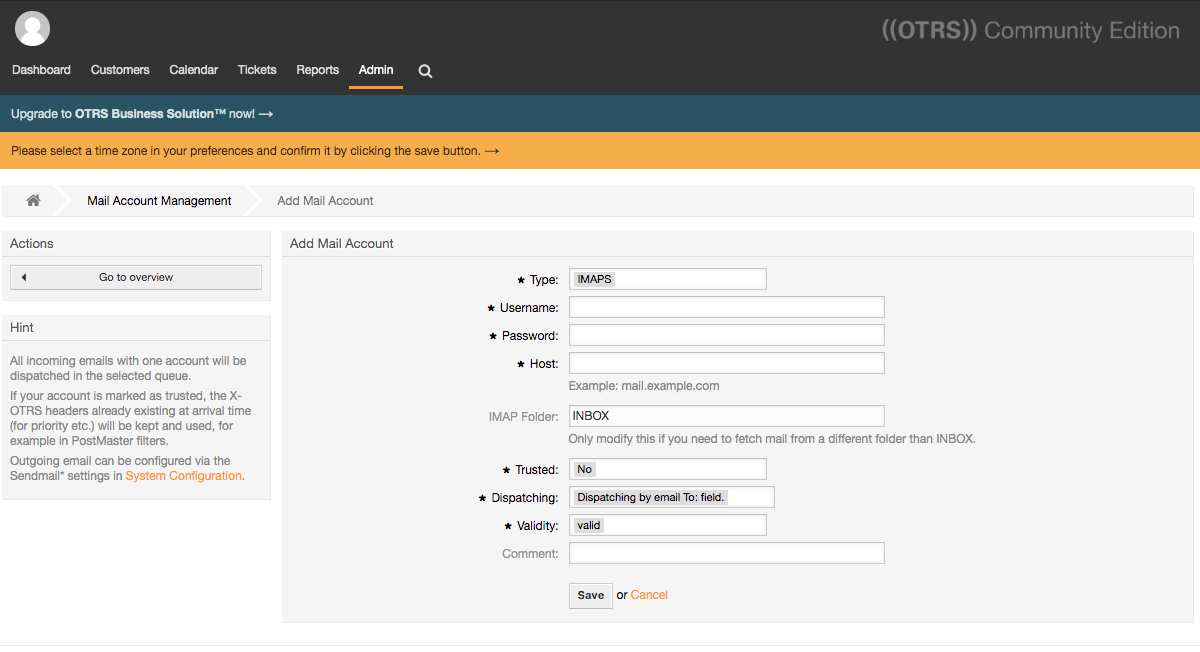
On the Add Mail Account screen, select IMAPS for Type. For Username, type in your email address, and Password. Leave all other options as default. Click Save.
Next, send a test email from an external email account to your dedicated OTRS email account. The mail will be fetched every 10 minutes by the OTRS daemon, but you can force receipt by clicking the Fetch mail link.
As a result, you will see the new ticket.

Now you are ready to accept tickets from customers via email. Next, you will go through the process of creating a ticket through the customer front-end.
Configuring OTRS Customer Interface
The second way for a customer to create a ticket is through the OTRS front-end. In this step, you will walk through this process to make sure this ticket creation method is set up.
The customer front-end is located at https://yourdomain.com/otrs/customer.pl or https://your_server_ip/otrs/customer.pl. Navigate to it in a web browser. You can create a customer account there and submit a ticket using the GUI.
Use the Sign up now link to open the registration form.

Fill out the form and press the Create button.
You will see a message like this:
New account created. Sent login information to username@youremail.com. Please check your email.
Check your inbox for the message from the OTRS. You will see a message with the new account credentials:
Hi example,
You or someone impersonating you has created a new OTRS account for
you.
Full name: example
User name: example@youremail.com
Password : user_password
You can log in via the following URL. We encourage you to change your password
via the Preferences button after logging in.
http://yourdomain.com/otrs/customer.pl
Now, use the provided credentials to access the customer front-end and create another ticket. All new tickets created using the customer front-end will immediately appear on the agent's dashboard:

On the agent dashboard, you can see the information on all current tickets: their status (new, opened, escalated, etc.), their age (the time elapsed from the moment when the ticket was received), and subject.
You can click on the ticket number (in the TICKET# column) to view its details. The agent can also take actions on the ticket here, like changing its priority or state, moving it to another queue, closing it, or adding a note.
You have now successfully set up your OTRS account.
Wrapping up
In this guide, you have configured OTRS and created test help desk tickets. Now you can accept and process requests from your users using both the web interface and email.


