ISPConfig is an open source web hosting control panel let's you configure the following services through its browser based interface:
Manage multiple servers from one control panel
Web server management (Apache2 and nginx)
Mail server management (with virtual mail users)
DNS server management (BIND and MyDNS)
Virtualization (OpenVZ)
Administrator, reseller and client login
Configuration mirroring and clusters
Open Source software (BSD license)
Prerequisites
To follow this tutorial, you will need one Ubuntu 18.04 server installed either on a (Physical or Virtual) machine with a non-root user having sudo privileges.
Setting Timezone and Hostname
sudo timedatectl set-timezone Asia/Karachi
sudo hostnamectl set-hostname labserver.layloyar.com
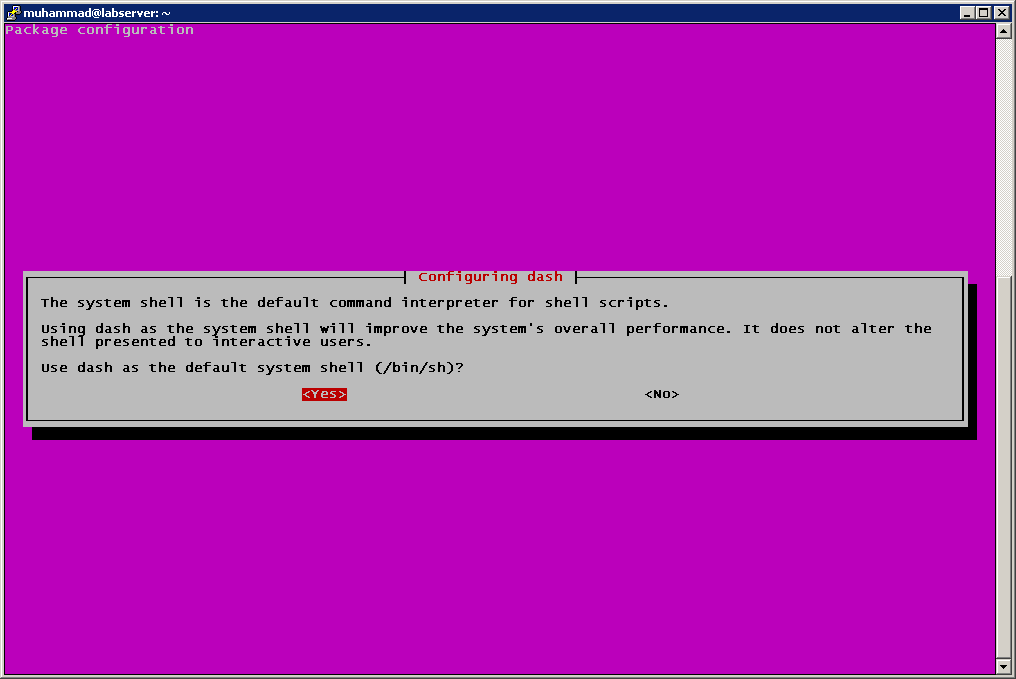
Set Up Default Shell
sudo dpkg-reconfigure dash
Uninstall Apparmor
sudo service apparmor stop
sudo apt autoremove apparmor apparmor-utils
Output
Reading package lists... Done
Building dependency tree
Reading state information... Done
Package 'apparmor-utils' is not installed, so not removed
The following packages will be REMOVED:
apparmor snapd
0 upgraded, 0 newly installed, 2 to remove and 87 not upgraded.
After this operation, 69.4 MB disk space will be freed.
Do you want to continue? [Y/n] y
(Reading database ... 66906 files and directories currently installed.)
Removing snapd (2.37.1.1+18.04) ...
Removing apparmor (2.12-4ubuntu5.1) ...
Processing triggers for mime-support (3.60ubuntu1) ...
Processing triggers for man-db (2.8.3-2ubuntu0.1) ...
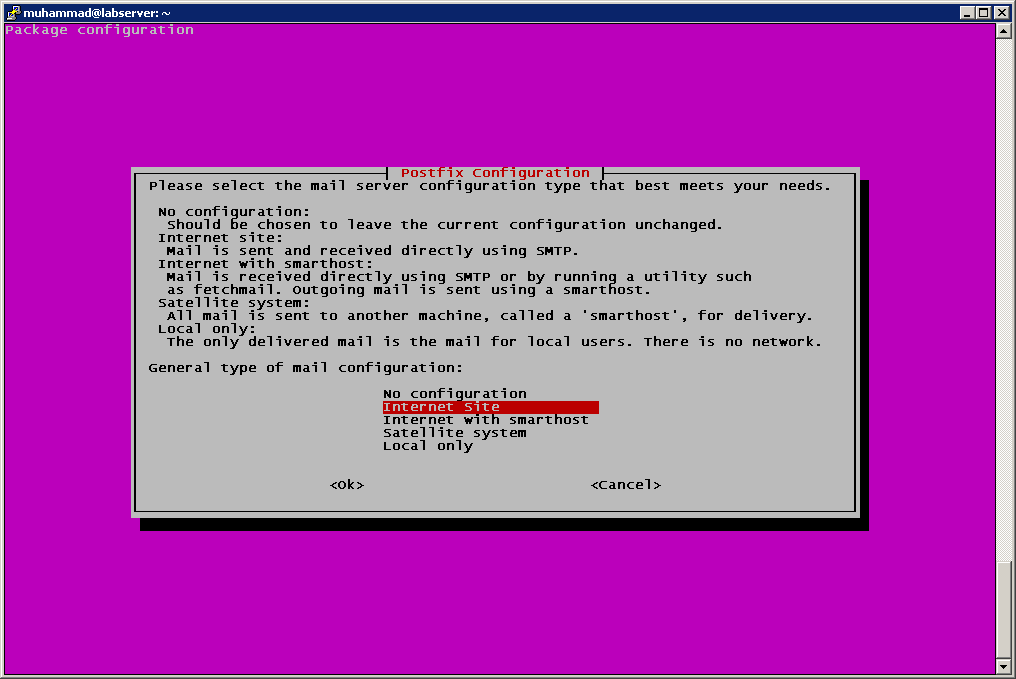
Installing Postfix and Database
sudo apt -y install postfix postfix-mysql postfix-doc mariadb-client mariadb-server openssl getmail4 rkhunter binutils dovecot-imapd dovecot-pop3d dovecot-mysql dovecot-sieve dovecot-lmtpd
During installation postfix will present you following screen, choose Internet Site and press OK
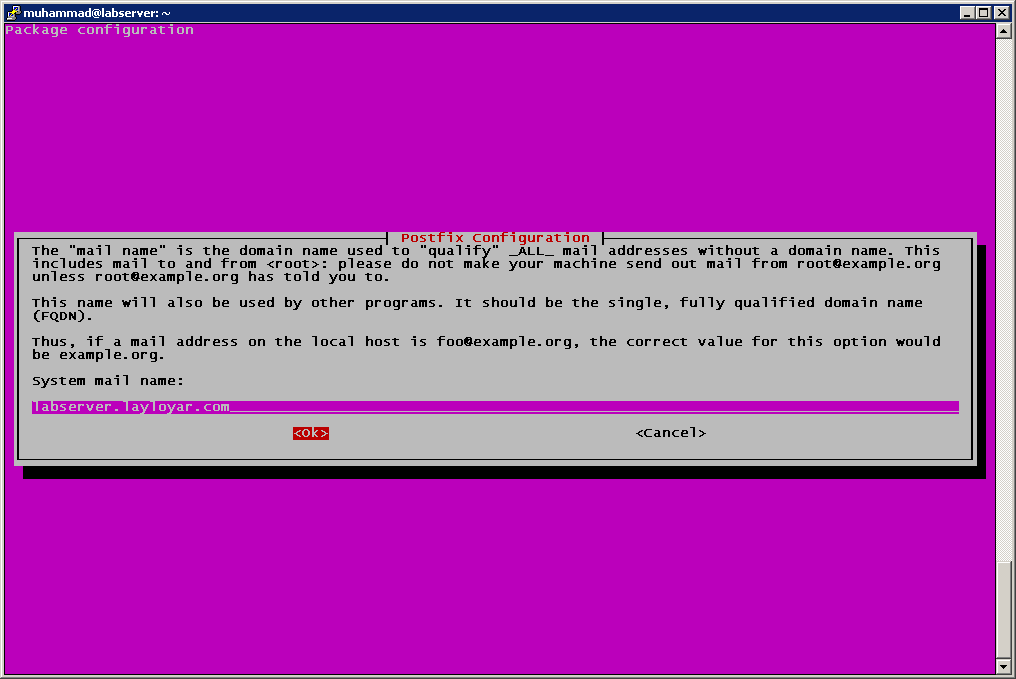
Enter you FQDN on this screen and press OK
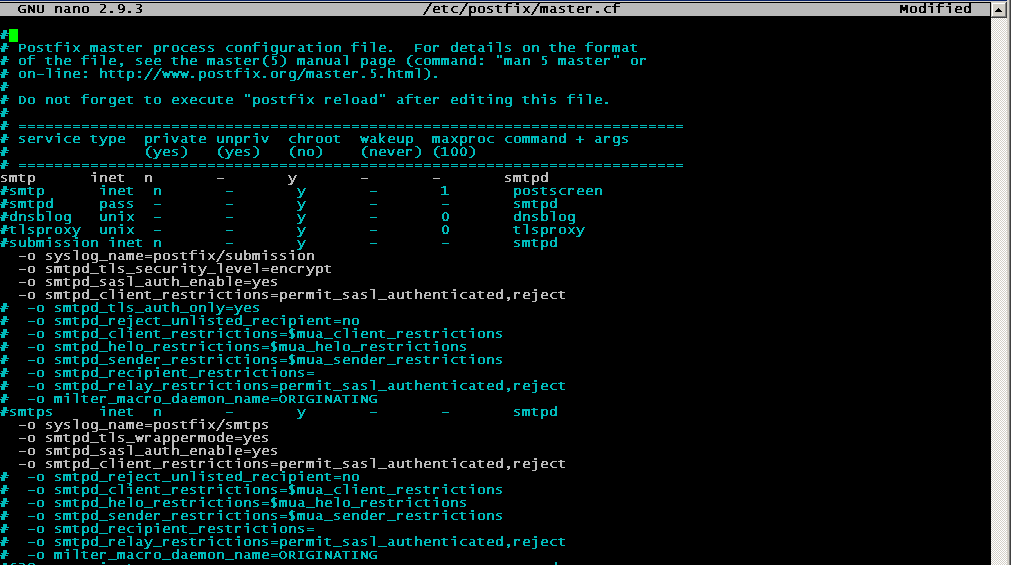
Edit master.cf file and add or replace the following contents:
sudo nano /etc/postfix/master.cf
Change this:
#submission inet n - y - - smtpd
# -o syslog_name=postfix/submission
# -o smtpd_tls_security_level=encrypt
# -o smtpd_sasl_auth_enable=yes
# -o smtpd_tls_auth_only=yes
# -o smtpd_reject_unlisted_recipient=no
# -o smtpd_client_restrictions=$mua_client_restrictions
# -o smtpd_helo_restrictions=$mua_helo_restrictions
# -o smtpd_sender_restrictions=$mua_sender_restrictions
# -o smtpd_recipient_restrictions=
# -o smtpd_relay_restrictions=permit_sasl_authenticated,reject
# -o milter_macro_daemon_name=ORIGINATING
#smtps inet n - y - - smtpd
# -o syslog_name=postfix/smtps
# -o smtpd_tls_wrappermode=yes
# -o smtpd_sasl_auth_enable=yes
# -o smtpd_reject_unlisted_recipient=no
# -o smtpd_client_restrictions=$mua_client_restrictions
# -o smtpd_helo_restrictions=$mua_helo_restrictions
# -o smtpd_sender_restrictions=$mua_sender_restrictions
# -o smtpd_recipient_restrictions=
# -o smtpd_relay_restrictions=permit_sasl_authenticated,reject
# -o milter_macro_daemon_name=ORIGINATING
to this:
#submission inet n - y - - smtpd
-o syslog_name=postfix/submission
-o smtpd_tls_security_level=encrypt
-o smtpd_sasl_auth_enable=yes
-o smtpd_client_restrictions=permit_sasl_authenticated,reject
# -o smtpd_tls_auth_only=yes
# -o smtpd_reject_unlisted_recipient=no
# -o smtpd_client_restrictions=$mua_client_restrictions
# -o smtpd_helo_restrictions=$mua_helo_restrictions
# -o smtpd_sender_restrictions=$mua_sender_restrictions
# -o smtpd_recipient_restrictions=
# -o smtpd_relay_restrictions=permit_sasl_authenticated,reject
# -o milter_macro_daemon_name=ORIGINATING
#smtps inet n - y - - smtpd
-o syslog_name=postfix/smtps
-o smtpd_tls_wrappermode=yes
-o smtpd_sasl_auth_enable=yes
-o smtpd_client_restrictions=permit_sasl_authenticated,reject
# -o smtpd_reject_unlisted_recipient=no
# -o smtpd_client_restrictions=$mua_client_restrictions
# -o smtpd_helo_restrictions=$mua_helo_restrictions
# -o smtpd_sender_restrictions=$mua_sender_restrictions
# -o smtpd_recipient_restrictions=
# -o smtpd_relay_restrictions=permit_sasl_authenticated,reject
# -o milter_macro_daemon_name=ORIGINATING
Save and close.
This will look smiliar to like below.
Now restart postfix service to take changes into effect
sudo systemctl restart postfix
Output:
● postfix.service - Postfix Mail Transport Agent
Loaded: loaded (/lib/systemd/system/postfix.service; enabled; vendor preset: enabled)
Active: active (exited) since Mon 2019-04-29 10:11:55 PKT; 14s ago
Process: 27934 ExecStart=/bin/true (code=exited, status=0/SUCCESS)
Main PID: 27934 (code=exited, status=0/SUCCESS)
Apr 29 10:11:55 labserver systemd[1]: Starting Postfix Mail Transport Agent...
Apr 29 10:11:55 labserver systemd[1]: Started Postfix Mail Transport Agent.
Now edit 50-server.cnf file and replace the following
sudo nano /etc/mysql/mariadb.conf.d/50-server.cnf
Change this:
bind-address = 127.0.0.1
to this:
#bind-address = 127.0.0.1
Save and close.
This will look similiar to like below

Securing MySQL
sudo mysql_secure_installation
Output:
NOTE: RUNNING ALL PARTS OF THIS SCRIPT IS RECOMMENDED FOR ALL MariaDB
SERVERS IN PRODUCTION USE! PLEASE READ EACH STEP CAREFULLY!
In order to log into MariaDB to secure it, we'll need the current
password for the root user. If you've just installed MariaDB, and
you haven't set the root password yet, the password will be blank,
so you should just press enter here.
Enter current password for root (enter for none):
OK, successfully used password, moving on...
Setting the root password ensures that nobody can log into the MariaDB
root user without the proper authorisation.
You already have a root password set, so you can safely answer 'n'.
Change the root password? [Y/n] y
New password:
Re-enter new password:
Password updated successfully!
Reloading privilege tables..
... Success!
By default, a MariaDB installation has an anonymous user, allowing anyone
to log into MariaDB without having to have a user account created for
them. This is intended only for testing, and to make the installation
go a bit smoother. You should remove them before moving into a
production environment.
Remove anonymous users? [Y/n] y
... Success!
Normally, root should only be allowed to connect from 'localhost'. This
ensures that someone cannot guess at the root password from the network.
Disallow root login remotely? [Y/n] y
... Success!
By default, MariaDB comes with a database named 'test' that anyone can
access. This is also intended only for testing, and should be removed
before moving into a production environment.
Remove test database and access to it? [Y/n] y
- Dropping test database...
... Success!
- Removing privileges on test database...
... Success!
Reloading the privilege tables will ensure that all changes made so far
will take effect immediately.
Reload privilege tables now? [Y/n] y
... Success!
Cleaning up...
All done! If you've completed all of the above steps, your MariaDB
installation should now be secure.
Thanks for using MariaDB!
Login to mysql prompt and execute the following.
sudo mysql -u root -p
update mysql.user set plugin = 'mysql_native_password' where user='root';
Output:
Query OK, 1 row affected (0.00 sec)
Rows matched: 1 Changed: 1 Warnings: 0
exit

Edit debian.cnf file and update the following.
sudo nano /etc/mysql/debian.cnf
Change this:
# Automatically generated for Debian scripts. DO NOT TOUCH!
[client]
host = localhost
user = root
password =
socket = /var/run/mysqld/mysqld.sock
[mysql_upgrade]
host = localhost
user = root
password =
socket = /var/run/mysqld/mysqld.sock
basedir = /usr
to this:
# Automatically generated for Debian scripts. DO NOT TOUCH!
[client]
host = localhost
user = root
password = TypePasswordHere
socket = /var/run/mysqld/mysqld.sock
[mysql_upgrade]
host = localhost
user = root
password = TypePasswordHere
socket = /var/run/mysqld/mysqld.sock
basedir = /usr
Save and close.
This will look smiliar to like below.

Restart database service to take changes into effect.
sudo systemctl restart mysql
Installing SpamAssassin
sudo apt -y install amavisd-new spamassassin clamav clamav-daemon unzip bzip2 arj nomarch lzop cabextract apt-listchanges libnet-ldap-perl libauthen-sasl-perl clamav-docs daemon libio-string-perl libio-socket-ssl-perl libnet-ident-perl zip libnet-dns-perl postgrey
sudo freshclam
Ignore these errors
ERROR: /var/log/clamav/freshclam.log is locked by another process
ERROR: Problem with internal logger (UpdateLogFile = /var/log/clamav/freshclam.log).
sudo systemctl start clamav-daemon
sudo wget https://git.ispconfig.org/ispconfig/ispconfig3/raw/stable-3.1/helper_scripts/ubuntu-amavisd-new-2.11.patch --directory-prefix=/tmp
sudo cp -pf /usr/sbin/amavisd-new /usr/sbin/amavisd-new-orignal
sudo patch < /tmp/ubuntu-amavisd-new-2.11.patch
Output:
patching file amavisd-new
Hunk #2 succeeded at 34363 (offset 1 line).
Installing Metronome XMPP Server
sudo apt -y install git lua5.1 liblua5.1-0-dev lua-filesystem libidn11-dev libssl-dev lua-zlib lua-expat lua-event lua-bitop lua-socket lua-sec luarocks luarocks
sudo luarocks install lpc
Output:
Installing https://luarocks.org/lpc-1.0.0-2.src.rock
gcc -O2 -fPIC -I/usr/include/lua5.1 -c lpc.c -o lpc.o
gcc -shared -o lpc.so lpc.o
install -d /usr/local/lib/luarocks/rocks/lpc/1.0.0-2/lib
install lpc.so /usr/local/lib/luarocks/rocks/lpc/1.0.0-2/lib
lpc 1.0.0-2 is now installed in /usr/local (license: MIT/X11)
sudo adduser --no-create-home --disabled-login --gecos 'Metronome' metronome
Output:
Adding user `metronome' ...
Adding new group `metronome' (1001) ...
Adding new user `metronome' (1001) with group `metronome' ...
Not creating home directory `/home/metronome'.
sudo git clone https://github.com/maranda/metronome.git /opt/metronome
Output:
Cloning into '/opt/metronome'...
remote: Enumerating objects: 185, done.
remote: Counting objects: 100% (185/185), done.
remote: Compressing objects: 100% (132/132), done.
remote: Total 13177 (delta 96), reused 122 (delta 49), pack-reused 12992
Receiving objects: 100% (13177/13177), 4.08 MiB | 404.00 KiB/s, done.
Resolving deltas: 100% (7646/7646), done.
cd /opt/metronome
sudo ./configure --ostype=debian --prefix=/usr
Output:
Looking for Lua... lua5.1 found in $PATH: /usr/bin
Checking Lua includes... lua.h found in /usr/include/lua5.1/lua.h
Writing configuration...
Installation prefix: /usr
Metronome configuration directory: /etc/metronome
Using Lua from: /usr
Done. You can now run 'make' to build.
sudo make
sudo make install
Installing Apache, PHP, phpMyAdmin
sudo apt -y install apache2 apache2-doc apache2-utils libapache2-mod-php php7.2 php7.2-common php7.2-gd php7.2-mysql php7.2-imap phpmyadmin php7.2-cli php7.2-cgi libapache2-mod-fcgid apache2-suexec-pristine php-pear mcrypt imagemagick libruby libapache2-mod-python php7.2-curl php7.2-intl php7.2-pspell php7.2-recode php7.2-sqlite3 php7.2-tidy php7.2-xmlrpc php7.2-xsl memcached php-memcache php-imagick php-gettext php7.2-zip php7.2-mbstring php-soap php7.2-soap
Select apache2 and press Ok

Press Yes
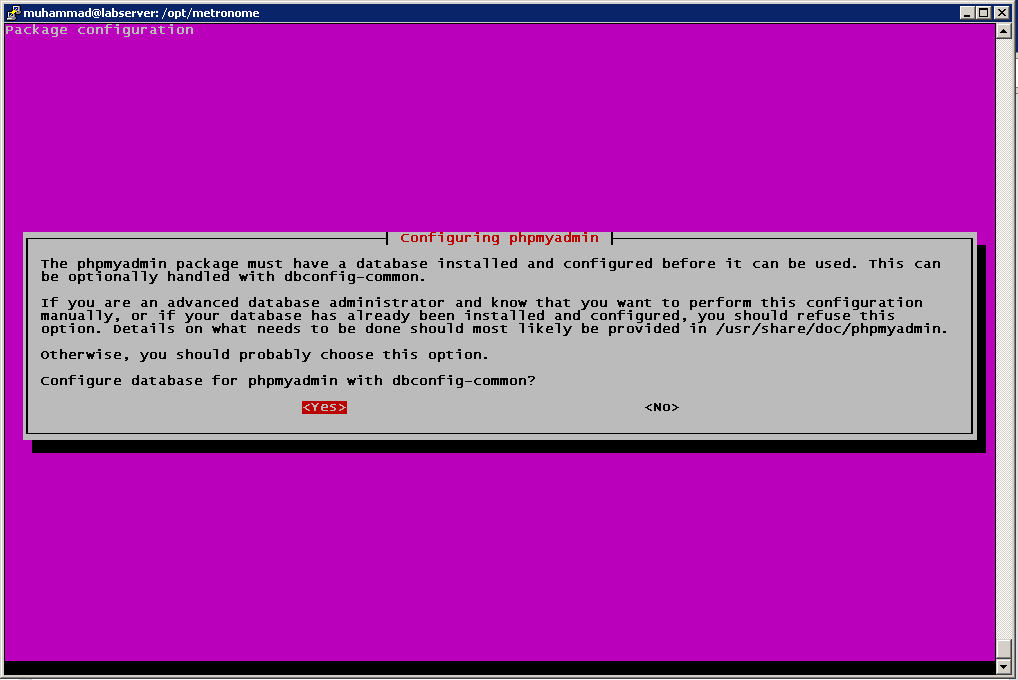
Type your desired password here and press Ok.
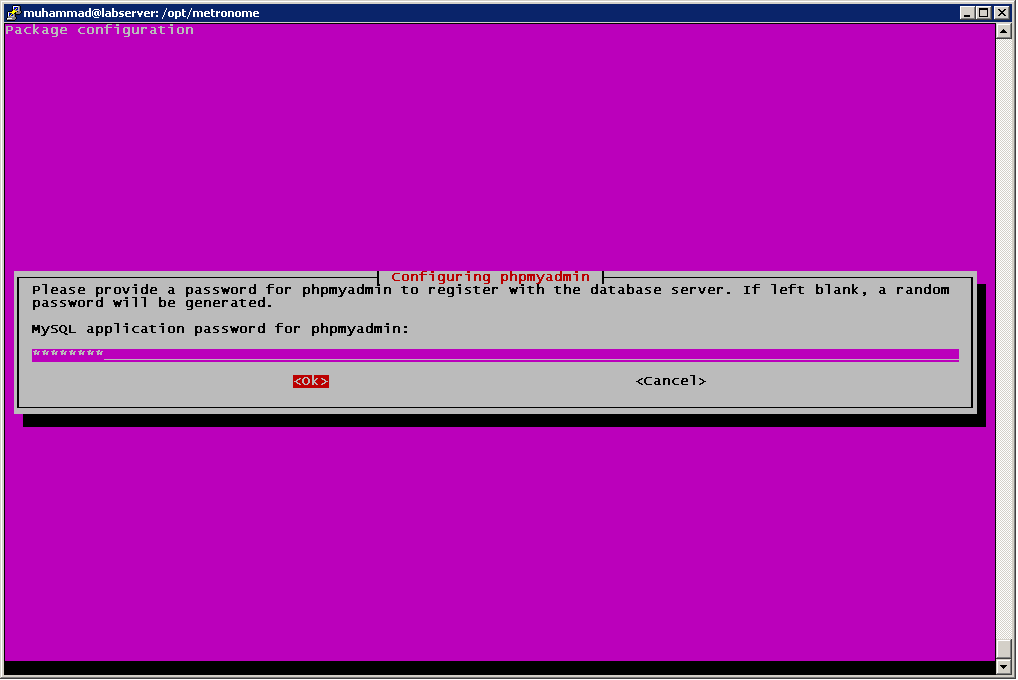
Type confirm password and press Ok.

sudo a2enmod suexec rewrite ssl actions include cgi
Output:
Enabling module suexec.
Enabling module rewrite.
Considering dependency setenvif for ssl:
Module setenvif already enabled
Considering dependency mime for ssl:
Module mime already enabled
Considering dependency socache_shmcb for ssl:
Enabling module socache_shmcb.
Enabling module ssl.
See /usr/share/doc/apache2/README.Debian.gz on how to configure SSL and create self-signed certificates.
Enabling module actions.
Considering dependency mime for include:
Module mime already enabled
Enabling module include.
Enabling module cgi.
To activate the new configuration, you need to run:
systemctl restart apache2
sudo a2enmod dav_fs dav auth_digest headers
Output:
Considering dependency dav for dav_fs:
Enabling module dav.
Enabling module dav_fs.
Module dav already enabled
Considering dependency authn_core for auth_digest:
Module authn_core already enabled
Enabling module auth_digest.
Enabling module headers.
To activate the new configuration, you need to run:
systemctl restart apache2
Keeping security into consideration we need to disable HTTP_PROXY header.
sudo nano /etc/apache2/conf-available/httpoxy.conf
<IfModule mod_headers.c>
RequestHeader unset Proxy early
</IfModule>
Save adn close.

Enable the config file by running:
sudo a2enconf httpoxy
Output:
Enabling conf httpoxy.
To activate the new configuration, you need to run:
systemctl reload apache2
Installing PHP Opcode cache
sudo apt -y install php7.2-opcache php-apcu
sudo systemctl restart apache2
Installing PHP-FPM
sudo apt -y install php7.2-fpm
sudo a2enmod actions proxy_fcgi alias
Output:
Module actions already enabled
Considering dependency proxy for proxy_fcgi:
Enabling module proxy.
Enabling module proxy_fcgi.
Module alias already enabled
To activate the new configuration, you need to run:
systemctl restart apache2
Installing HHVM
sudo apt -y install hhvm
Installing Let's Encrypt
sudo apt -y install certbot
Installing Mailman
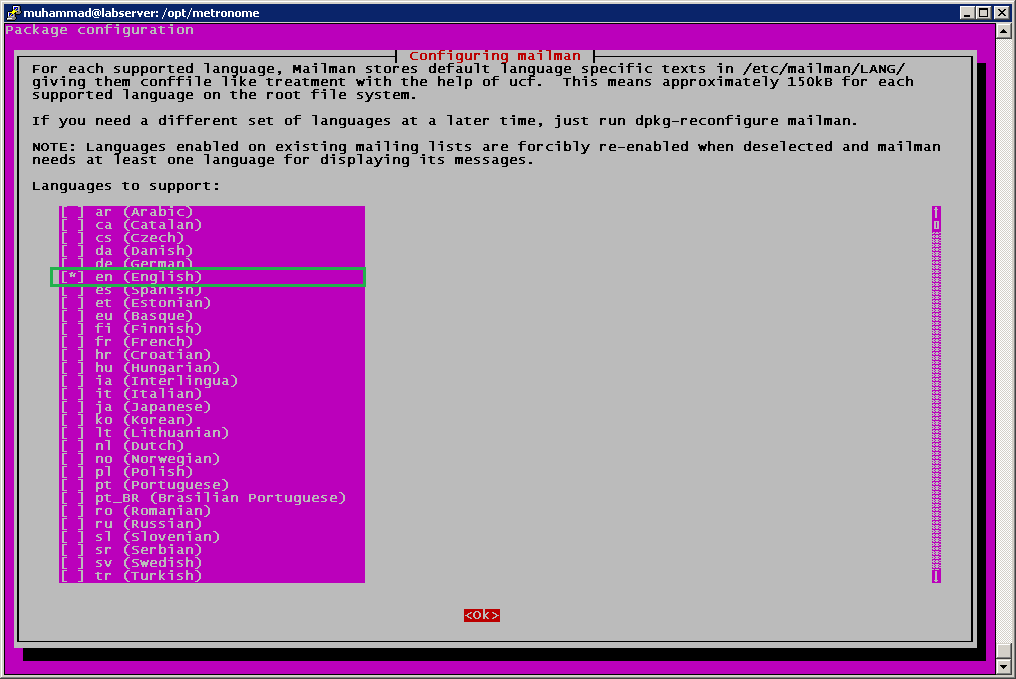
sudo apt -y install mailman
Select your desired language and press Ok.
Press Ok.
Type following command and respond to the following highlited
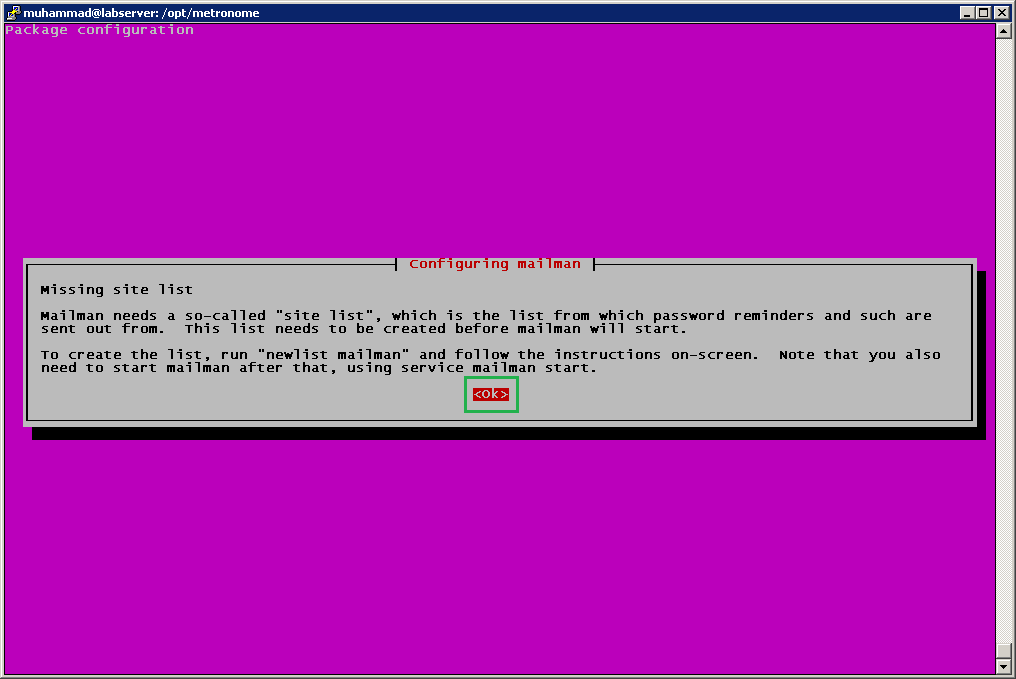
sudo newlist mailman
Enter the email of the person running the list: support@layloyar.com
Initial mailman password:TypePasswordHere
To finish creating your mailing list, you must edit your /etc/aliases (or
equivalent) file by adding the following lines, and possibly running the
`newaliases' program:
## mailman mailing list
mailman: "|/var/lib/mailman/mail/mailman post mailman"
mailman-admin: "|/var/lib/mailman/mail/mailman admin mailman"
mailman-bounces: "|/var/lib/mailman/mail/mailman bounces mailman"
mailman-confirm: "|/var/lib/mailman/mail/mailman confirm mailman"
mailman-join: "|/var/lib/mailman/mail/mailman join mailman"
mailman-leave: "|/var/lib/mailman/mail/mailman leave mailman"
mailman-owner: "|/var/lib/mailman/mail/mailman owner mailman"
mailman-request: "|/var/lib/mailman/mail/mailman request mailman"
mailman-subscribe: "|/var/lib/mailman/mail/mailman subscribe mailman"
mailman-unsubscribe: "|/var/lib/mailman/mail/mailman unsubscribe mailman"
Hit enter to notify mailman owner...
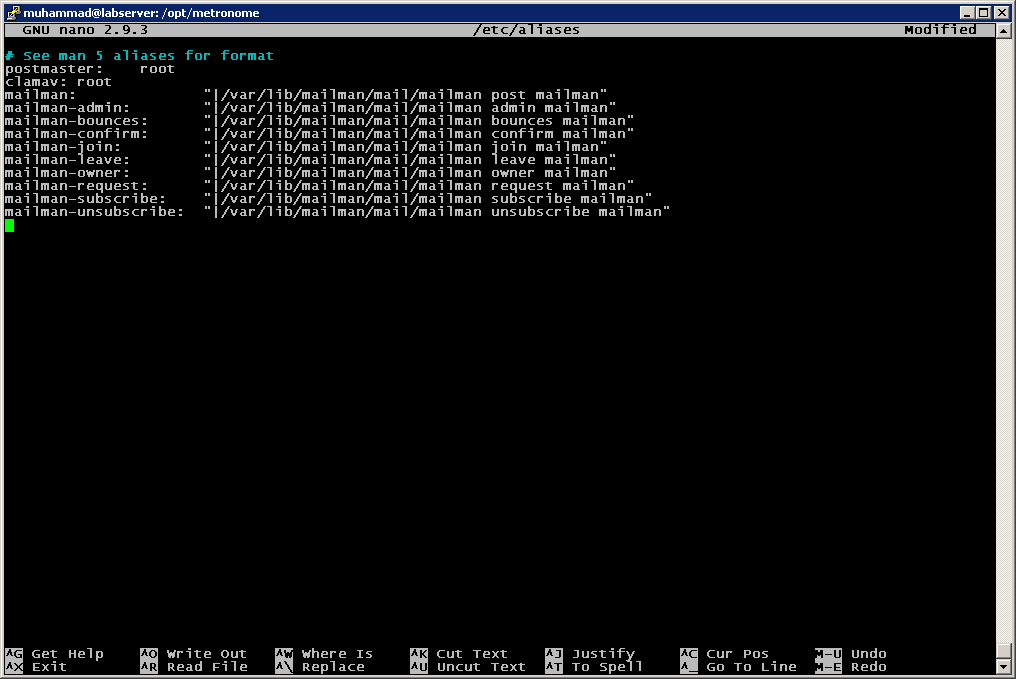
sudo nano /etc/aliases
Add the following contents into the file:
mailman: "|/var/lib/mailman/mail/mailman post mailman"
mailman-admin: "|/var/lib/mailman/mail/mailman admin mailman"
mailman-bounces: "|/var/lib/mailman/mail/mailman bounces mailman"
mailman-confirm: "|/var/lib/mailman/mail/mailman confirm mailman"
mailman-join: "|/var/lib/mailman/mail/mailman join mailman"
mailman-leave: "|/var/lib/mailman/mail/mailman leave mailman"
mailman-owner: "|/var/lib/mailman/mail/mailman owner mailman"
mailman-request: "|/var/lib/mailman/mail/mailman request mailman"
mailman-subscribe: "|/var/lib/mailman/mail/mailman subscribe mailman"
mailman-unsubscribe: "|/var/lib/mailman/mail/mailman unsubscribe mailman"
Save and close.
sudo newaliases
sudo systemctl restart postfix
sudo ln -s /etc/mailman/apache.conf /etc/apache2/conf-available/mailman.conf
sudo a2enconf mailman
Output:
Enabling conf mailman.
To activate the new configuration, you need to run:
systemctl reload apache2
Restart Apache services to take changes into effect
sudo systemctl restart apache2
sudo systemctl start mailman
Installing PureFTPd
sudo apt -y install pure-ftpd-common pure-ftpd-mysql quota quotatool
sudo nano /etc/default/pure-ftpd-common
Change following from false to true:
VIRTUALCHROOT=true
Save and close.

Now generate an ssl certificate to secure PureFTPD communication
sudo openssl req -x509 -nodes -days 3650 -newkey rsa:2048 -keyout /etc/ssl/private/pure-ftpd.pem -out /etc/ssl/private/pure-ftpd.pem
Output:
Generating a 2048 bit RSA private key
..................................................................................................+++
......+++
writing new private key to '/etc/ssl/private/pure-ftpd.pem'
-----
You are about to be asked to enter information that will be incorporated
into your certificate request.
What you are about to enter is what is called a Distinguished Name or a DN.
There are quite a few fields but you can leave some blank
For some fields there will be a default value,
If you enter '.', the field will be left blank.
-----
Country Name (2 letter code) [AU]:PK
State or Province Name (full name) [Some-State]:Sindh
Locality Name (eg, city) []:Karachi
Organization Name (eg, company) [Internet Widgits Pty Ltd]:Laying
Organizational Unit Name (eg, section) []:Services
Common Name (e.g. server FQDN or YOUR name) []:labserver.layloyar.com
Email Address []:support@layloyar.com
sudo chmod 600 /etc/ssl/private/pure-ftpd.pem
sudo systemctl restart pure-ftpd-mysql
Set Up PureFTPd Qouta
sudo nano /etc/fstab
apend the following line:
UUID=cf9de5a1-9a14-4ce4-bae6-1fa672a45f2b / ext4 errors=remount-ro,usrjquota=quota.user,grpjquota=quota.group,jq
fmt=vfsv0 0 1
Save and close.
sudo mount -o remount /
sudo quotacheck -avugm
Output:
quotacheck: Scanning /dev/sda2 [/] done
quotacheck: Cannot stat old user quota file //quota.user: No such file or directory. Usage will not be subtracted.
quotacheck: Cannot stat old group quota file //quota.group: No such file or directory. Usage will not be subtracted.
quotacheck: Cannot stat old user quota file //quota.user: No such file or directory. Usage will not be subtracted.
quotacheck: Cannot stat old group quota file //quota.group: No such file or directory. Usage will not be subtracted.
quotacheck: Checked 13608 directories and 95629 files
quotacheck: Old file not found.
quotacheck: Old file not found.
sudo quotaon -avug
Output:
/dev/sda2 [/]: group quotas turned on
/dev/sda2 [/]: user quotas turned on
Installing BIND DNS Server
sudo apt -y install bind9 dnsutils haveged
sudo systemctl enable haveged
Output:
Synchronizing state of haveged.service with SysV service script with /lib/systemd/systemd-sysv-install.
Executing: /lib/systemd/systemd-sysv-install enable haveged
sudo systemctl start haveged
Installing Vlogger, Webalizer, and AWStats
sudo apt -y install vlogger webalizer awstats geoip-database libclass-dbi-mysql-perl
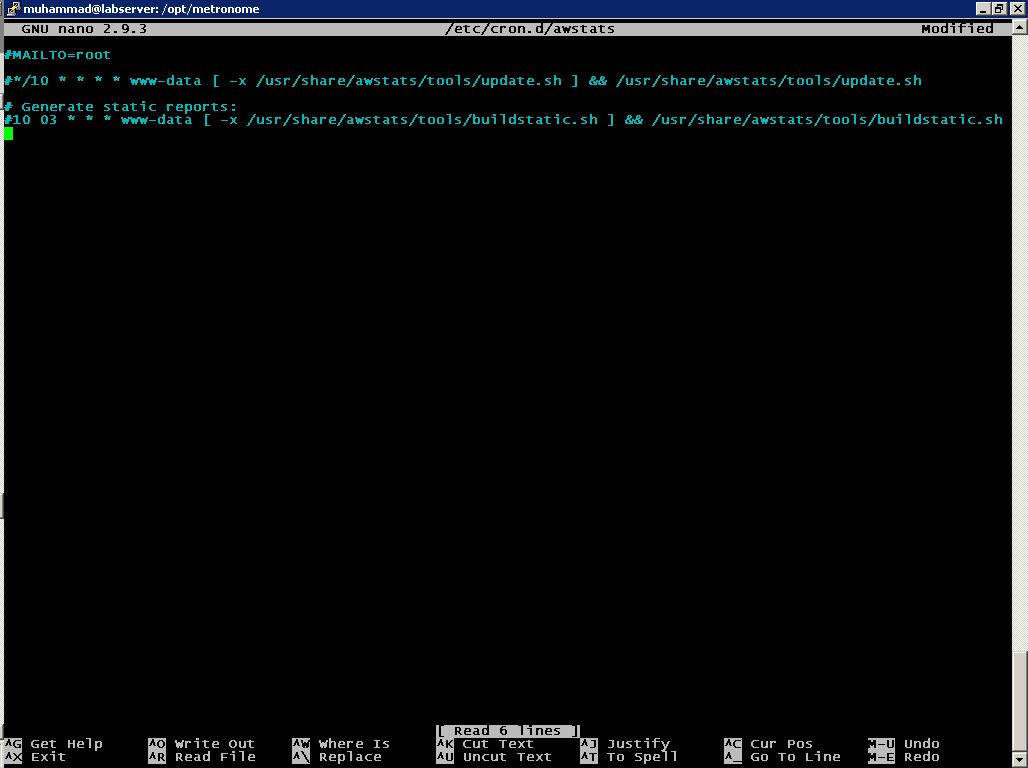
sudo nano /etc/cron.d/awstats
Change this:
MAILTO=root
*/10 * * * * www-data [ -x /usr/share/awstats/tools/update.sh ] && /usr/share/awstats/tools/update.sh
# Generate static reports:
10 03 * * * www-data [ -x /usr/share/awstats/tools/buildstatic.sh ] && /usr/share/awstats/tools/buildstatic.sh
to this:
#MAILTO=root
#*/10 * * * * www-data [ -x /usr/share/awstats/tools/update.sh ] && /usr/share/awstats/tools/update.sh
# Generate static reports:
#10 03 * * * www-data [ -x /usr/share/awstats/tools/buildstatic.sh ] && /usr/share/awstats/tools/buildstatic.sh
Save and close.
Installing Jailkit
sudo apt -y install build-essential autoconf automake1.11 libtool flex bison debhelper binutils
wget http://olivier.sessink.nl/jailkit/jailkit-2.19.tar.gz --directory-prefix=/tmp
cd /tmp
sudo tar xvfz /tmp/jailkit-2.19.tar.gz
sudo echo 5 > /tmp/jailkit-2.19/debian/compat
cd /tmp/jailkit-2.19
sudo ./debian/rules binary
sudo dpkg -i /tmp/jailkit*.deb
Output:
Selecting previously unselected package jailkit.
(Reading database ... 99559 files and directories currently installed.)
Preparing to unpack /tmp/jailkit_2.19-1_amd64.deb ...
Unpacking jailkit (2.19-1) ...
Setting up jailkit (2.19-1) ...
Processing triggers for ureadahead (0.100.0-20) ...
Processing triggers for systemd (237-3ubuntu10.12) ...
Processing triggers for man-db (2.8.3-2ubuntu0.1) ...
Installing fail2ban
sudo apt -y install fail2ban
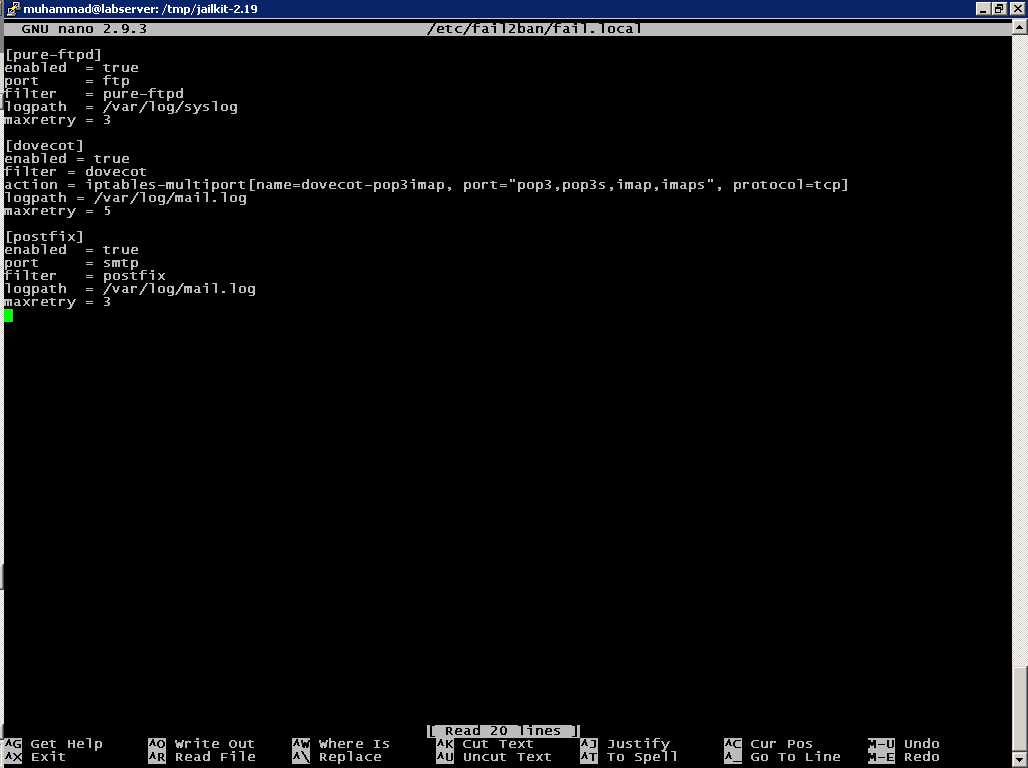
sudo nano /etc/fail2ban/fail.local
Add following contents into file:
[pure-ftpd]
enabled = true
port = ftp
filter = pure-ftpd
logpath = /var/log/syslog
maxretry = 3
[dovecot]
enabled = true
filter = dovecot
action = iptables-multiport[name=dovecot-pop3imap, port="pop3,pop3s,imap,imaps", protocol=tcp]
logpath = /var/log/mail.log
maxretry = 5
[postfix]
enabled = true
port = smtp
filter = postfix
logpath = /var/log/mail.log
maxretry = 3
Save and close.
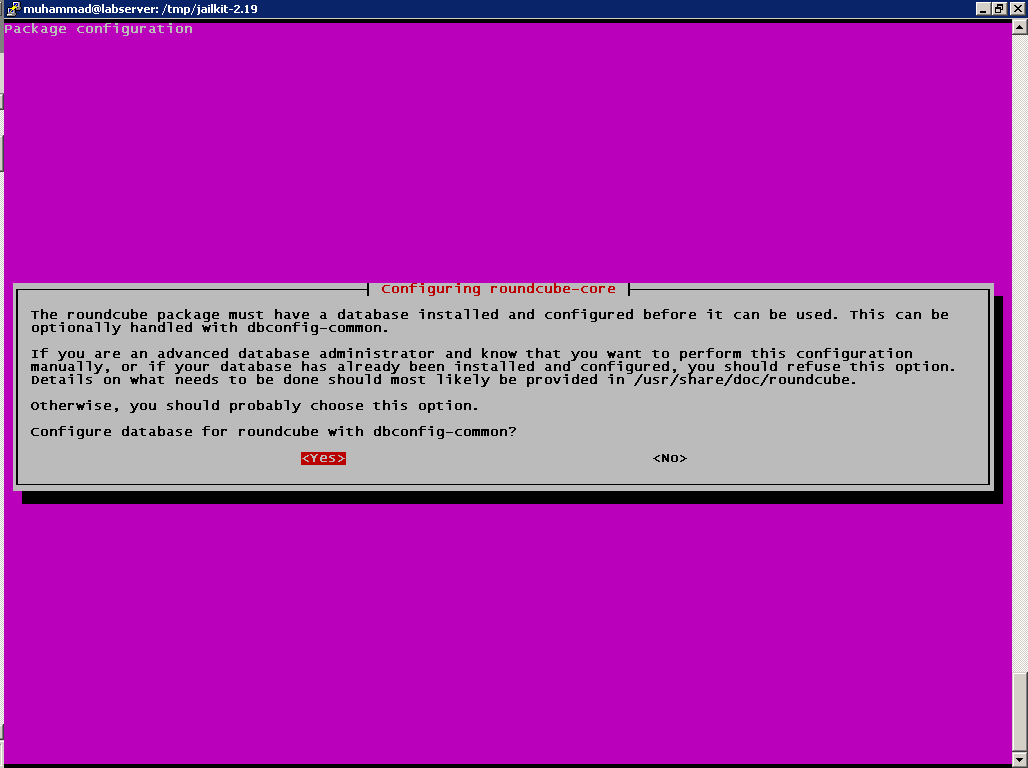
Installing Roundcube Webmail
sudo apt -y install roundcube roundcube-core roundcube-mysql roundcube-plugins javascript-common libjs-jquery-mousewheel php-net-sieve tinymce
Press Yes.
Type your desired password here and press Ok.
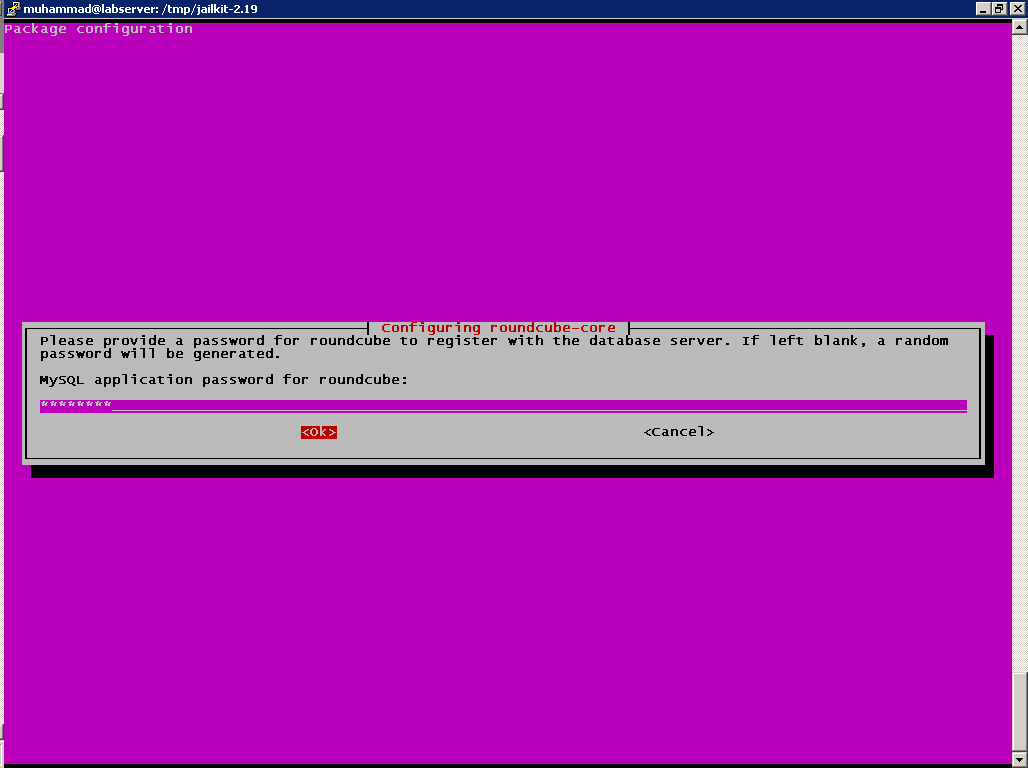
Type confirm password and press Ok.

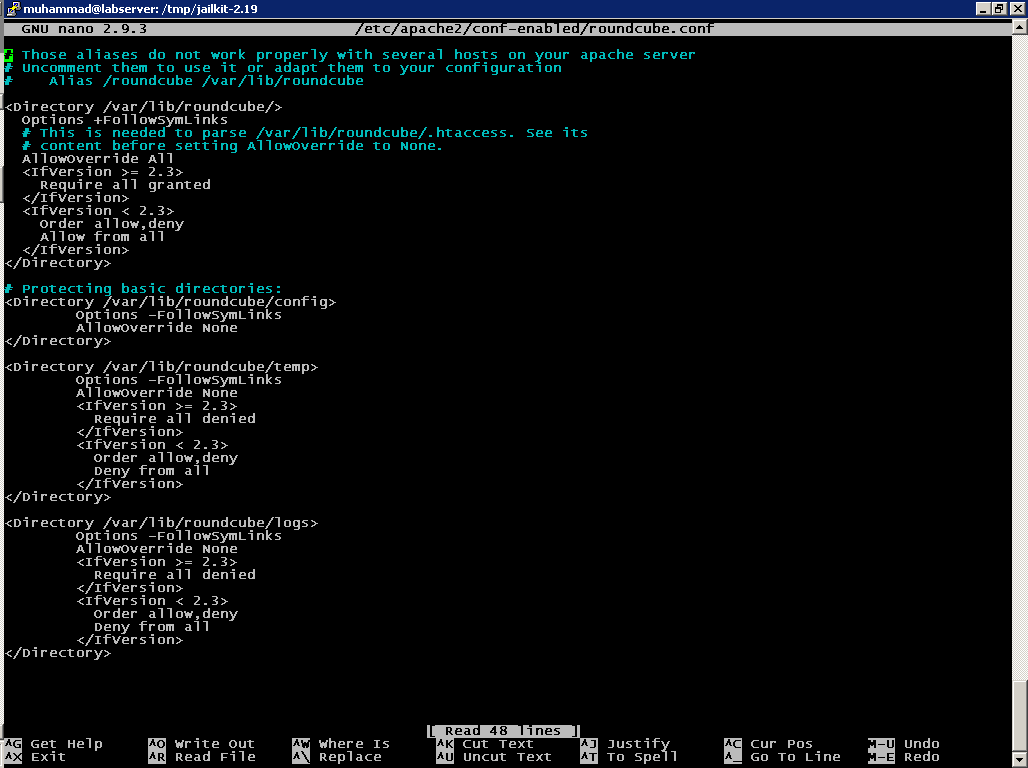
sudo nano /etc/apache2/conf-enabled/roundcube.conf
Change this:
# Those aliases do not work properly with several hosts on your apache server
# Uncomment them to use it or adapt them to your configuration
# Alias /roundcube /var/lib/roundcube
<Directory /var/lib/roundcube/>
Options +FollowSymLinks
# This is needed to parse /var/lib/roundcube/.htaccess. See its
# content before setting AllowOverride to None.
AllowOverride All
<IfVersion >= 2.3>
Require all granted
</IfVersion>
<IfVersion < 2.3>
Order allow,deny
Allow from all
</IfVersion>
</Directory>
# Protecting basic directories:
<Directory /var/lib/roundcube/config>
Options -FollowSymLinks
AllowOverride None
</Directory>
<Directory /var/lib/roundcube/temp>
Options -FollowSymLinks
AllowOverride None
<IfVersion >= 2.3>
Require all denied
</IfVersion>
<IfVersion < 2.3>
Order allow,deny
Deny from all
</IfVersion>
</Directory>
<Directory /var/lib/roundcube/logs>
Options -FollowSymLinks
AllowOverride None
<IfVersion >= 2.3>
Require all denied
</IfVersion>
<IfVersion < 2.3>
Order allow,deny
Deny from all
</IfVersion>
</Directory>
to this:
# Those aliases do not work properly with several hosts on your apache server
# Uncomment them to use it or adapt them to your configuration
Alias /roundcube /var/lib/roundcube
Alias /webmail /var/lib/roundcube
<Directory /var/lib/roundcube/>
AddType application/x-httpd-php .php
Options +FollowSymLinks
# This is needed to parse /var/lib/roundcube/.htaccess. See its
# content before setting AllowOverride to None.
AllowOverride All
<IfVersion >= 2.3>
Require all granted
</IfVersion>
<IfVersion < 2.3>
Order allow,deny
Allow from all
</IfVersion>
</Directory>
# Protecting basic directories:
<Directory /var/lib/roundcube/config>
Options -FollowSymLinks
AllowOverride None
</Directory>
<Directory /var/lib/roundcube/temp>
Options -FollowSymLinks
AllowOverride None
<IfVersion >= 2.3>
Require all denied
</IfVersion>
<IfVersion < 2.3>
Order allow,deny
Deny from all
</IfVersion>
</Directory>
<Directory /var/lib/roundcube/logs>
Options -FollowSymLinks
AllowOverride None
<IfVersion >= 2.3>
Require all denied
</IfVersion>
<IfVersion < 2.3>
Order allow,deny
Deny from all
</IfVersion>
</Directory>
Save and close.
Restart apache service to take changes into effect.
sudo systemctl restart apache2
sudo nano /etc/roundcube/config.inc.php
change this:
$config['default_host'] = '';
to this:
$config['default_host'] = 'localhost';
Save and close.
Installing ISPConfig 3.1
sudo git clone https://git.ispconfig.org/ispconfig/ispconfig3.git /opt/ispconfig3
Output:
Cloning into '/opt/ispconfig3'...
remote: Enumerating objects: 114299, done.
remote: Counting objects: 100% (114299/114299), done.
remote: Compressing objects: 100% (24666/24666), done.
remote: Total 114299 (delta 89363), reused 113481 (delta 88785)
Receiving objects: 100% (114299/114299), 28.88 MiB | 691.00 KiB/s, done.
Resolving deltas: 100% (89363/89363), done.
sudo php -q /opt/ispconfig3/install/install.php
--------------------------------------------------------------------------------
_____ ___________ _____ __ _ ____
|_ _/ ___| ___ \ / __ \ / _(_) /__ \
| | \ `--.| |_/ / | / \/ ___ _ __ | |_ _ __ _ _/ /
| | `--. \ __/ | | / _ \| '_ \| _| |/ _` | |_ |
_| |_/\__/ / | | \__/\ (_) | | | | | | | (_| | ___\ \
\___/\____/\_| \____/\___/|_| |_|_| |_|\__, | \____/
__/ |
|___/
--------------------------------------------------------------------------------
>> Initial configuration
Operating System: Ubuntu 18.04.2 LTS (Bionic Beaver)
Following will be a few questions for primary configuration so be careful.
Default values are in [brackets] and can be accepted with <ENTER>.
Tap in "quit" (without the quotes) to stop the installer.
Select language (en,de) [en]:ENTER
Installation mode (standard,expert) [standard]:ENTER
Full qualified hostname (FQDN) of the server, eg server1.domain.tld [labserver.layloyar.com]:ENTER
MySQL server hostname [localhost]:ENTER
MySQL server port [3306]:ENTER
MySQL root username [root]:ENTER
MySQL root password []: TypePasswordHere
MySQL database to create [dbispconfig]:ENTER
MySQL charset [utf8]:ENTER
Configuring Postgrey
Configuring Postfix
Generating a 4096 bit RSA private key
.......................++
............................................................................++
writing new private key to 'smtpd.key'
-----
You are about to be asked to enter information that will be incorporated
into your certificate request.
What you are about to enter is what is called a Distinguished Name or a DN.
There are quite a few fields but you can leave some blank
For some fields there will be a default value,
If you enter '.', the field will be left blank.
-----
Country Name (2 letter code) [AU]:PK
State or Province Name (full name) [Some-State]:Sindh
Locality Name (eg, city) []:Karachi
Organization Name (eg, company) [Internet Widgits Pty Ltd]:Laying
Organizational Unit Name (eg, section) []:Services
Common Name (e.g. server FQDN or YOUR name) []:labserver.layloyar.com
Email Address []:support@layloyar.com
postconf: warning: unmatched request: "maildrop.unix"
Configuring Dovecot
Configuring Spamassassin
Configuring Amavisd
[INFO] service Rspamd not detected
Configuring Getmail
Configuring Jailkit
Configuring Pureftpd
Configuring BIND
Configuring Apache
Configuring vlogger
Configuring Ubuntu Firewall
Configuring Fail2ban
Configuring Apps vhost
Installing ISPConfig
ISPConfig Port [8080]:ENTER
Admin password [a2f2180d]: TypePasswordHere
Re-enter admin password []: TypePasswordHere
Do you want a secure (SSL) connection to the ISPConfig web interface (y,n) [y]:ENTER
Generating RSA private key, 4096 bit long modulus
..........++
................................++
e is 65537 (0x010001)
You are about to be asked to enter information that will be incorporated
into your certificate request.
What you are about to enter is what is called a Distinguished Name or a DN.
There are quite a few fields but you can leave some blank
For some fields there will be a default value,
If you enter '.', the field will be left blank.
-----
Country Name (2 letter code) [AU]:PK
State or Province Name (full name) [Some-State]:Sindh
Locality Name (eg, city) []:Karachi
Organization Name (eg, company) [Internet Widgits Pty Ltd]:Laying
Organizational Unit Name (eg, section) []:Services
Common Name (e.g. server FQDN or YOUR name) []:labserver.layloyar.com
Email Address []:support@techsupportpk.com
Please enter the following 'extra' attributes
to be sent with your certificate request
A challenge password []:ENTER
An optional company name []:ENTER
writing RSA key
Symlink ISPConfig LE SSL certs to postfix? (y,n) [y]:ENTER
Symlink ISPConfig LE SSL certs to pureftpd? Creating dhparam file takes some times. (y,n) [y]:ENTER
Generating DH parameters, 4096 bit long safe prime, generator 2
This is going to take a long time
............................................................................
Configuring DBServer
Installing ISPConfig crontab
no crontab for root
no crontab for getmail
Detect IP addresses
Restarting services ...
Testing 2 seconds throughput of /dev/random ... 1081519 bytes OK
Installation completed.
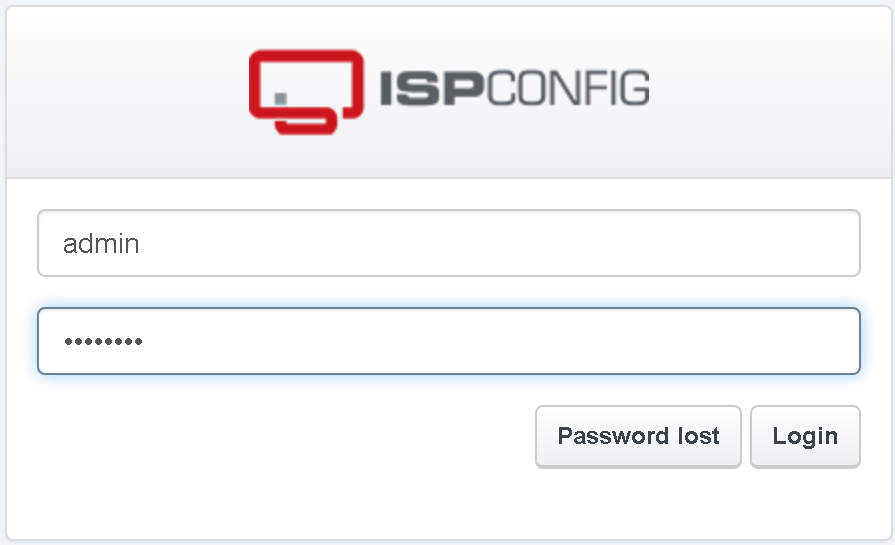
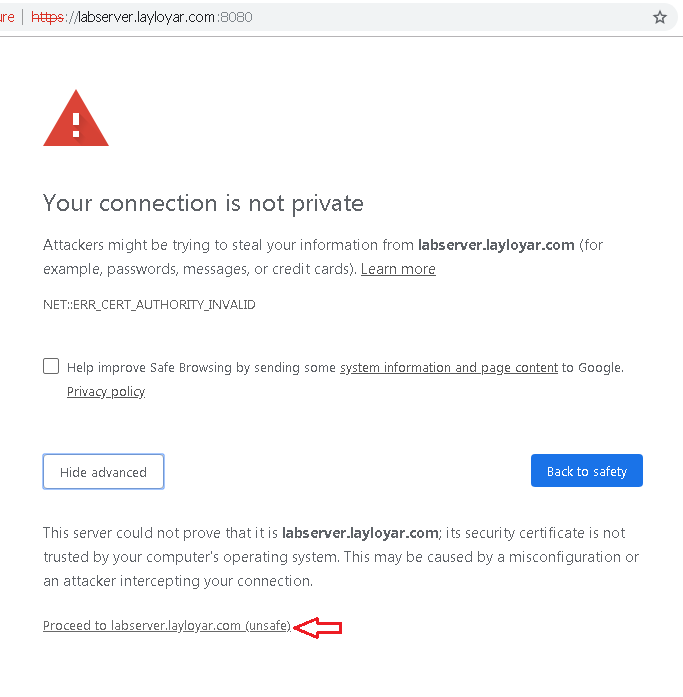
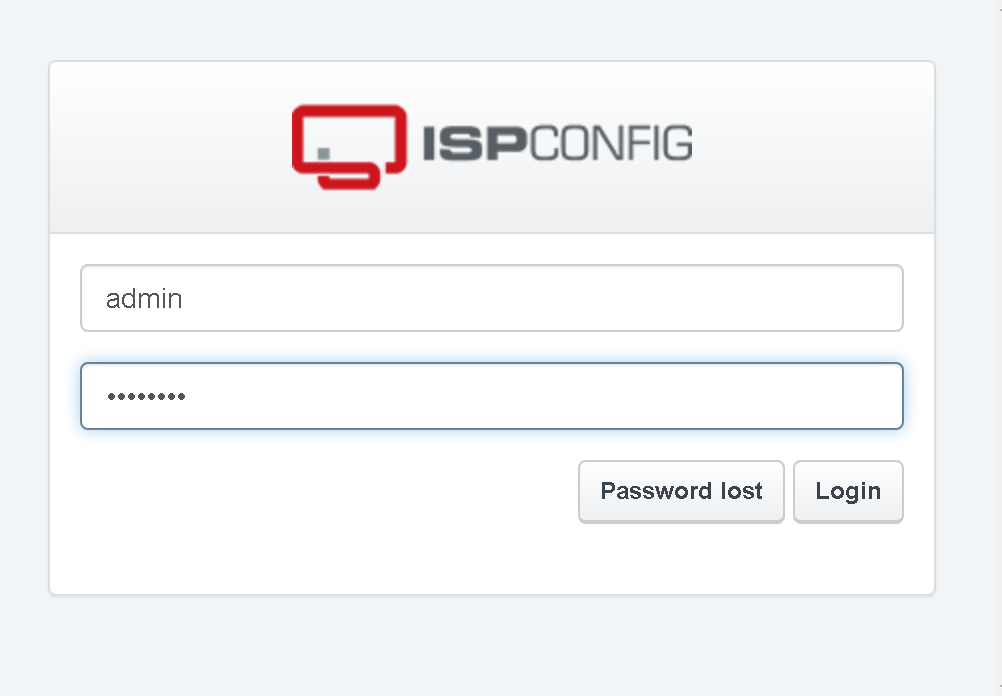
When you are finished with the above, you can access ISPConfig 3 web control panel by accessing https://labserver.layloyar.com:8080 or https://ip_address:8080 and you will be presented following login screen.
Since we are using self signed certificate therefore we have to ignore this warnning by clicking Advanced

Click proceed to (unsafe)
Enter usernmae admin and password you have created earlier
This is your ispcong dashboard.
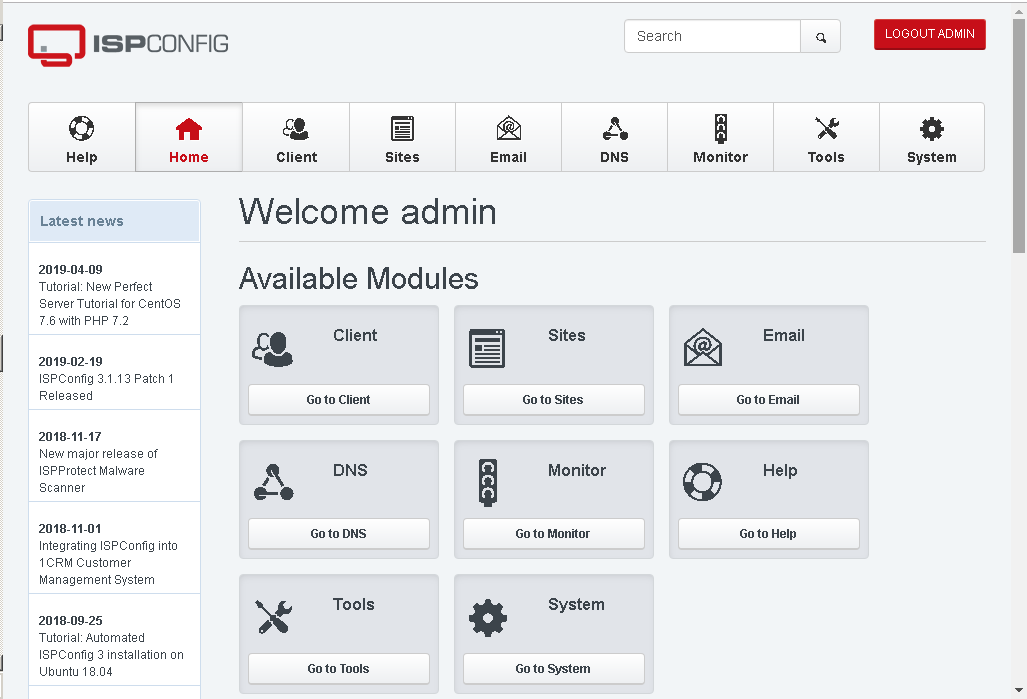
Wrapping up
You have successfully deployed your first ispconfig 3 on your Ubuntu 18.04 server.


