
OctoberCMS is a free, open-source, self-hosted CMS platform based on the Laravel PHP Framework. There are two ways you can install OctoberCMS, either using the Wizard installer or Command-line installation instructions. Before you proceed, you should check that your Ubuntu 18.04 server meets the prerequisites.
This guide will show you through the steps to install and configure OctoberCMS on an Ubuntu 18.04 server using the wizard installer.
Prerequisites
To follow this guide, you will need a Ubuntu 18.04 server with a regular user having sudo privileges. You will need to replace red highlighted text throughout this tutorial to meet your environment needs.
Installing Dependencies
First, you need to install number of dependencies on your Ubuntu 18.04 server by executing the following command:
sudo timedatectl set-timezone Asia/Karachi
sudo apt -y install vim wget curl git socat unzip bash-completion
sudo apt -y install php-cli php-fpm php-pdo php-common php-mysqlnd php-curl php-json php-zip php-gd php-xml php-mbstring
Starting PHP Service
Once you are finished installing dependencies, execute the following commands to start php service and enable it on boot.
sudo systemctl start php7.2-fpm
sudo systemctl enable php7.2-fpm
Output
Synchronizing state of php7.2-fpm.service with SysV service script with /lib/systemd/systemd-sysv-install.
Executing: /lib/systemd/systemd-sysv-install enable php7.2-fpm
Now edit the following two php files and set the timezone according to your location:
sudo vi /etc/php/7.2/fpm/php.ini
date.timezone = Asia/Karachi
Save and close.
sudo vi /etc/php/7.2/fpm/php.ini
date.timezone = Asia/Karachi
Save and close.
Restart the PHP-FPM service:
sudo systemctl restart php7.2-fpm
Installing Database
To meet octobercms database requirement, we need to install mariadb server using the following command:
sudo apt -y install mariadb-server
Once you are done with mariadb installation, execute the following commands to start its service and enable it on boot.
sudo systemctl start mariadb
sudo systemctl enable mariadb
Securing Database
We need to execute following command to make our database secure
sudo mysql_secure_installation
Output
NOTE: RUNNING ALL PARTS OF THIS SCRIPT IS RECOMMENDED FOR ALL MariaDB
SERVERS IN PRODUCTION USE! PLEASE READ EACH STEP CAREFULLY!
In order to log into MariaDB to secure it, we'll need the current
password for the root user. If you've just installed MariaDB, and
you haven't set the root password yet, the password will be blank,
so you should just press enter here.
Enter current password for root (enter for none):
OK, successfully used password, moving on...
Setting the root password ensures that nobody can log into the MariaDB
root user without the proper authorisation.
You already have a root password set, so you can safely answer 'n'.
Change the root password? [Y/n] n
... skipping.
By default, a MariaDB installation has an anonymous user, allowing anyone
to log into MariaDB without having to have a user account created for
them. This is intended only for testing, and to make the installation
go a bit smoother. You should remove them before moving into a
production environment.
Remove anonymous users? [Y/n] y
... Success!
Normally, root should only be allowed to connect from 'localhost'. This
ensures that someone cannot guess at the root password from the network.
Disallow root login remotely? [Y/n] y
... Success!
By default, MariaDB comes with a database named 'test' that anyone can
access. This is also intended only for testing, and should be removed
before moving into a production environment.
Remove test database and access to it? [Y/n] y
- Dropping test database...
... Success!
- Removing privileges on test database...
... Success!
Reloading the privilege tables will ensure that all changes made so far
will take effect immediately.
Reload privilege tables now? [Y/n] y
... Success!
Cleaning up...
All done!
If you've completed all of the above steps, your MariaDB
installation should now be secure.
Thanks for using MariaDB!
Creating Database
At this point, we need to create a database to meet octobercms requirement using the following commands:
sudo mysql -u root -p
create database octobercms;
grant all on octobercms.* to 'ocmsadmin'@'localhost' identified by 'yourpassword';
flush privileges;
quit;
Creating SSL Certificate
To make OctoberCMS web access safe and secure, we need to generate a self-signed ssl certificate using openssl:
sudo mkdir -p /etc/sslcerts
sudo openssl req -x509 -nodes -days 1825 -newkey rsa:2048 -keyout /etc/sslcerts/example.com.key -out /etc/sslcerts/example.com.crt
Output
Generating a RSA private key
..........................+++++
........................................+++++
writing new private key to '/etc/sslcerts/example.com.key'
-----
You are about to be asked to enter information that will be incorporated
into your certificate request.
What you are about to enter is what is called a Distinguished Name or a DN.
There are quite a few fields but you can leave some blank
For some fields there will be a default value,
If you enter '.', the field will be left blank.
-----
Country Name (2 letter code) [AU]:PK
State or Province Name (full name) [Some-State]:Sindh
Locality Name (eg, city) []:Karachi
Organization Name (eg, company) [Internet Widgits Pty Ltd]:Example
Organizational Unit Name (eg, section) []:Example
Common Name (e.g. server FQDN or YOUR name) []:labserver.example.com
Email Address []:support@example.com
Installing Nginx
To host October CMS and make its web services available to users, we need to install either Nginx or Apache:
sudo apt -y install nginx-full
When you are done with installation, execute following commands to start nginx service and enable it on boot.
sudo systemctl start nginx
sudo systemctl enable nginx
Output
Synchronizing state of nginx.service with SysV service script with /lib/systemd/systemd-sysv-install.
Executing: /lib/systemd/systemd-sysv-install enable nginx
Now create octobercms.conf file under /etc/nginx/conf.d directory and insert the following contents:
sudo nano /etc/nginx/conf.d/octobercms.conf
server {
listen [::]:443 ssl;
listen 443 ssl;
listen [::]:80;
listen 80;
server_name example.com;
index index.php index.html;
root /var/www;
ssl_certificate /etc/sslcerts/example.com.crt;
ssl_certificate_key /etc/sslcerts/example.com.key;
location / {
try_files $uri /index.php$is_args$args;
}
location ~ \.php$ {
include fastcgi_params;
fastcgi_pass unix:/run/php/php7.2-fpm.sock;
fastcgi_param SCRIPT_FILENAME $document_root$fastcgi_script_name;
fastcgi_read_timeout 120s;
}
rewrite ^themes/.*/(layouts|pages|partials)/.*.htm /index.php break;
rewrite ^bootstrap/.* /index.php break;
rewrite ^config/.* /index.php break;
rewrite ^vendor/.* /index.php break;
rewrite ^storage/cms/.* /index.php break;
rewrite ^storage/logs/.* /index.php break;
rewrite ^storage/framework/.* /index.php break;
rewrite ^storage/temp/protected/.* /index.php break;
rewrite ^storage/app/uploads/protected/.* /index.php break;
}
Save and close file
Verify nginx configuration using the following command:
sudo nginx -t
Output
nginx: the configuration file /etc/nginx/nginx.conf syntax is ok
nginx: configuration file /etc/nginx/nginx.conf test is successful
If you see any error in the above output then go back to configuration file and fix the errors.
When done, type the following command to reload nginx service to take changes into effect
sudo systemctl reload nginx
Cloning October CMS
We need to clone octobercms on our local Ubuntu machine from github using the following command:
sudo mkdir -p /var/www/octobercms
sudo chown -R $USER:$USER /var/www/octobercms
sudo chmod -R go+rwx /var/www/octobercms
cd /var/www/octobercms
sudo git clone https://github.com/octobercms/install.git
sudo mv install/* /var/www/octobercms
Installing October CMS
Open up web browser on any client machine you can access your Ubuntu server like https://example.com/octobercms/install.php and follow the installation instructions to complete.
I am on Windows 7 client machine so i have to adjust example.com entry against Ubuntu server's ip address in C:\Windows\System32\drivers\hosts file to access octobercms web services through it.

I am using chrome web browser on my windows 7 client machine.
We are using self signed ssl certificate for our test environemnt so we have to ignore this certificate warning and Click Advanced to continue


Remember, we have created a database, username and password earlier? Provide those database credentials here and click on Administrator

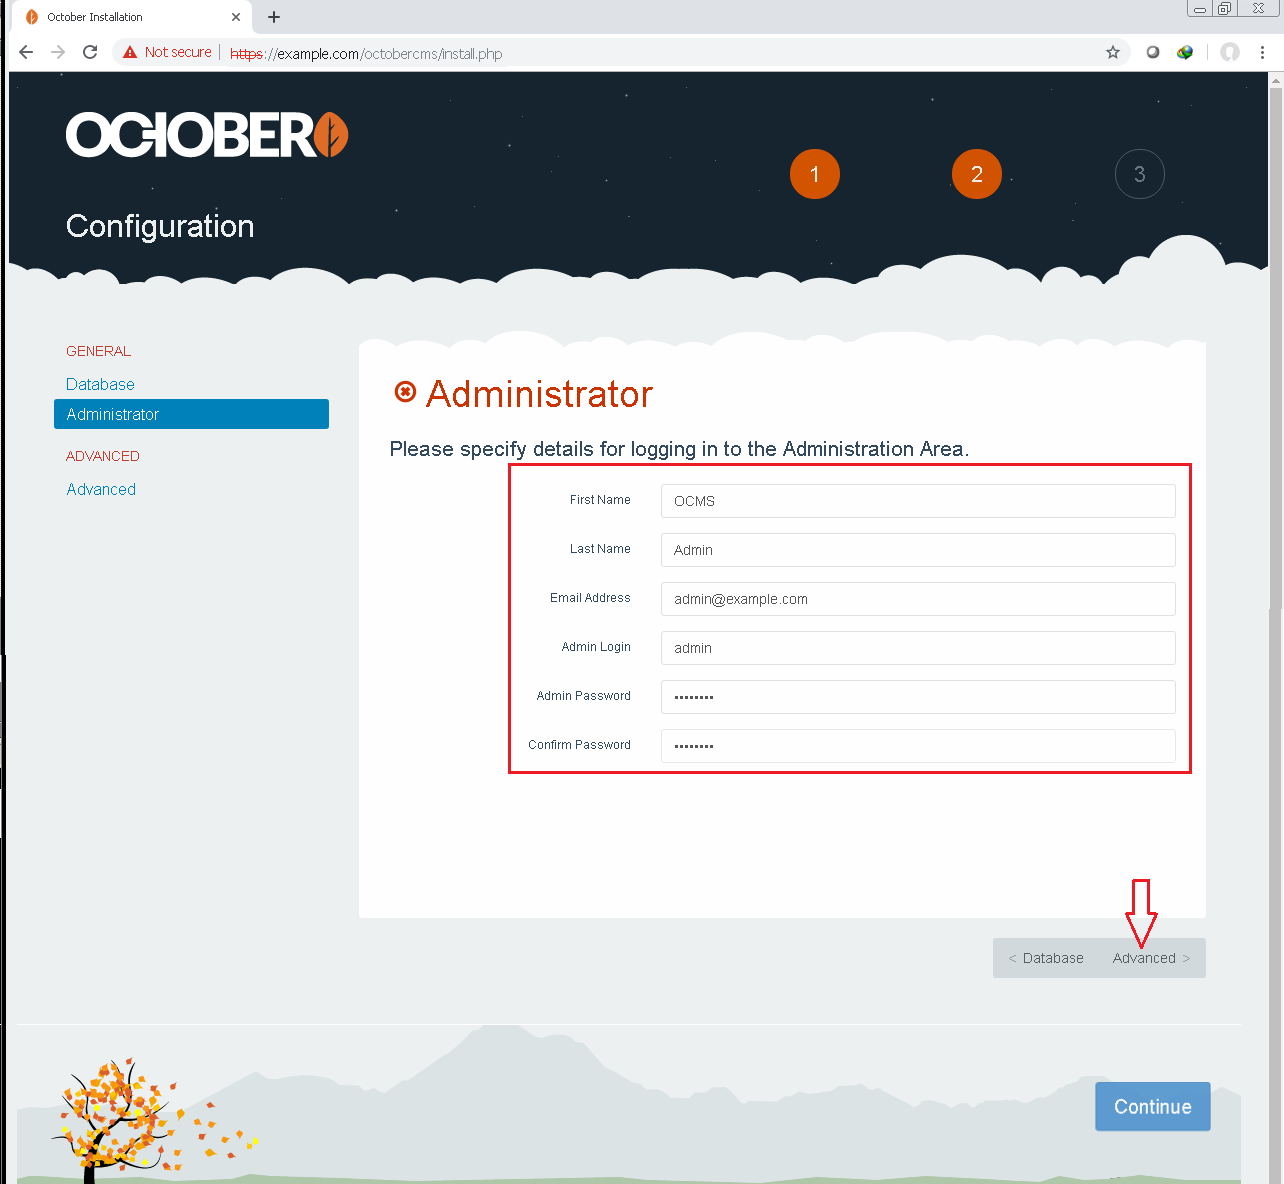
On this screen, you need to create a user account for your October CMS administrative access. When you are done, click Advanced
Keep the information default on this page and click Continue

On this page you have three option to go with. I am going with Start from scratch

Let the installation progress complete.

Almost done.

If you see error like below then click Try again to fix it

This screen will show you two different links:
1. Website Address - you can access, your blog, website etc through this link
2. Administration Area - You can administer and manage October CMS through this link.

Wrapping up
You can now navigate to https://example.com/octobercms where you should see your latest installation of OctoberCMS. To log in the aministration area at https://example.com/octobercms/backend (by default), you can use the same username and password you have created earlier.


