Windows Server Core installation option is good enough such that Windows administrators should standardize all of their servers to run as Core. It makes sense that the fewer operating systems you have present, the better your performance and the smaller your system attack surface. As of the 1709 update,Windows Server 2016 (semi-annual update channel) no longer allows you to add the GUI layer to a Server Core installation.
In this tutorial, we'll guide you how to manage your Windows Server 2019 using Admin Center, PowerShell Core and sconfig utility.
Sconfig Utility
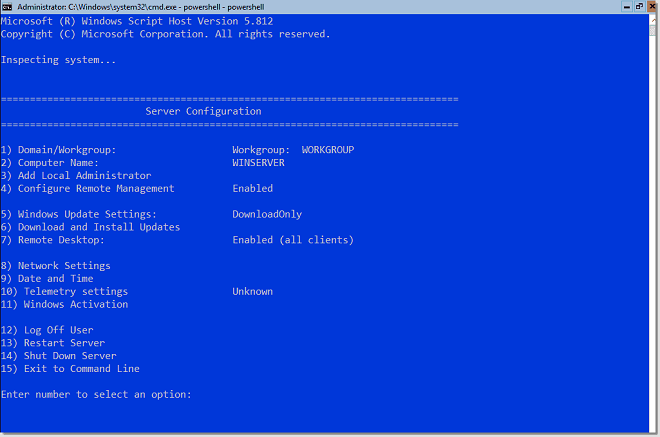
Windows 2019 Server Core does not have a Desktop GUI, so you need to navigate using command-line tools. After you log into the server, type sconfig to open the sconfig.cmd configuration utility, as shown in image below.
![]()
With sconfig, you use the numbered menu to configure the most important server properties, including:
Hostname
Time, time zone, and date
Domain membership
IP addressing
Remote access
While we're at it, we should ensure WinRM-based PowerShell remoting is enabled. Type 15 to exit to a command line, type powershell to start PowerShell, and run the following command:
Enable-PSRemoting -SkipNetworkProfileCheck -Force
Install PowerShell Core
On your Windows 10 administrative workstation, open up an administrative PowerShell console and run the following command to ensure we can perform remote management of our Windows 2019 Server Core:
Set-Item -Path WSMan:\localhost\Client\TrustedHosts -Value * -Force
Download the latest x64 PowerShell Core release from Microsoft's GitHub releases page. Next, let's define a persistent PowerShell remoting session with the Server Core box (substituting your own server's IPv4 address) and copy the .msi to the root of its drive C:
$session = New-PSSession -ComputerName 192.168.17.13 -Credential (Get-Credential)
Copy-Item PowerShell-6.1.0-preview.1-win-x64.msi C:\ -ToSession $session
To install PowerShell Core, run the following commands directly on the Windows Server 2019 server:
cmd
msiexec /i C:\ PowerShell-6.1.0-preview.1-win-x64.msi
exit
Install Windows Admin Center
Windows Admin Center, formerly called Project Honolulu, has been a long time coming in Windows Server. We'll install Windows Admin Center in Desktop mode on our Windows 10 administrative workstation.
Download the software, run the .msi installer, and select a management port.
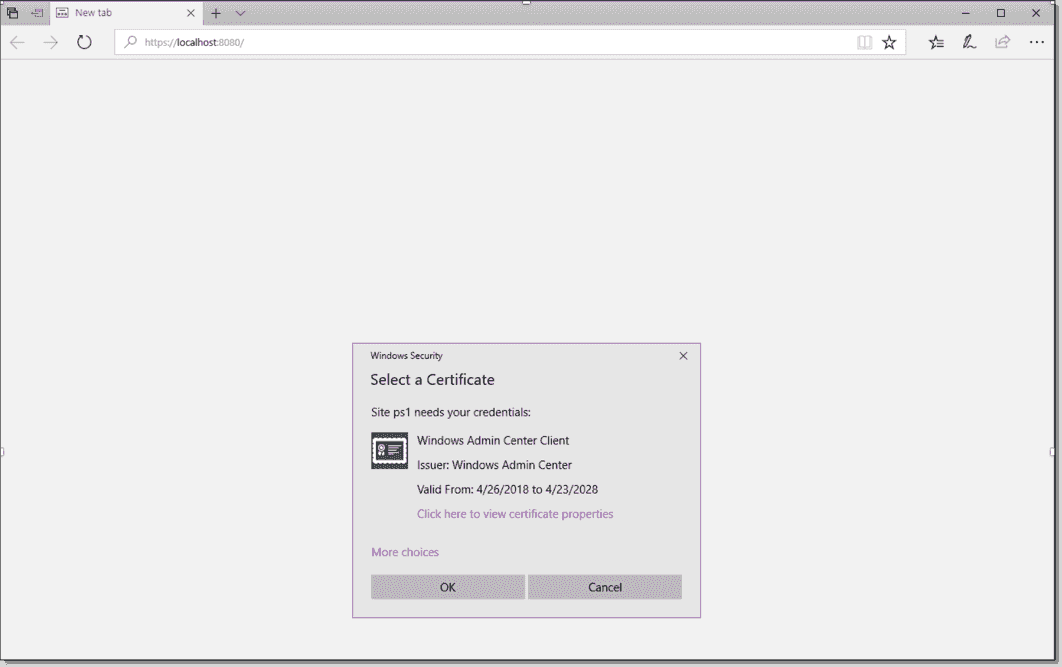
Windows Admin Center can manage Windows Server 2019, Windows Server 2016, Windows Server 2012 R2, and Windows 10 hosts from a central web console. On first launch, be sure to accept the self-signed management certificate as shown in the image below.
![]()
Logging in takes you to the All Connections list by default. Windows Admin is a modular web application comes with the following features:
Server Manager (to manage Windows Servers)
Computer Management (to manage Windows 10 hosts)
Failover Cluster Manager
Hyper-Converged Cluster Manager
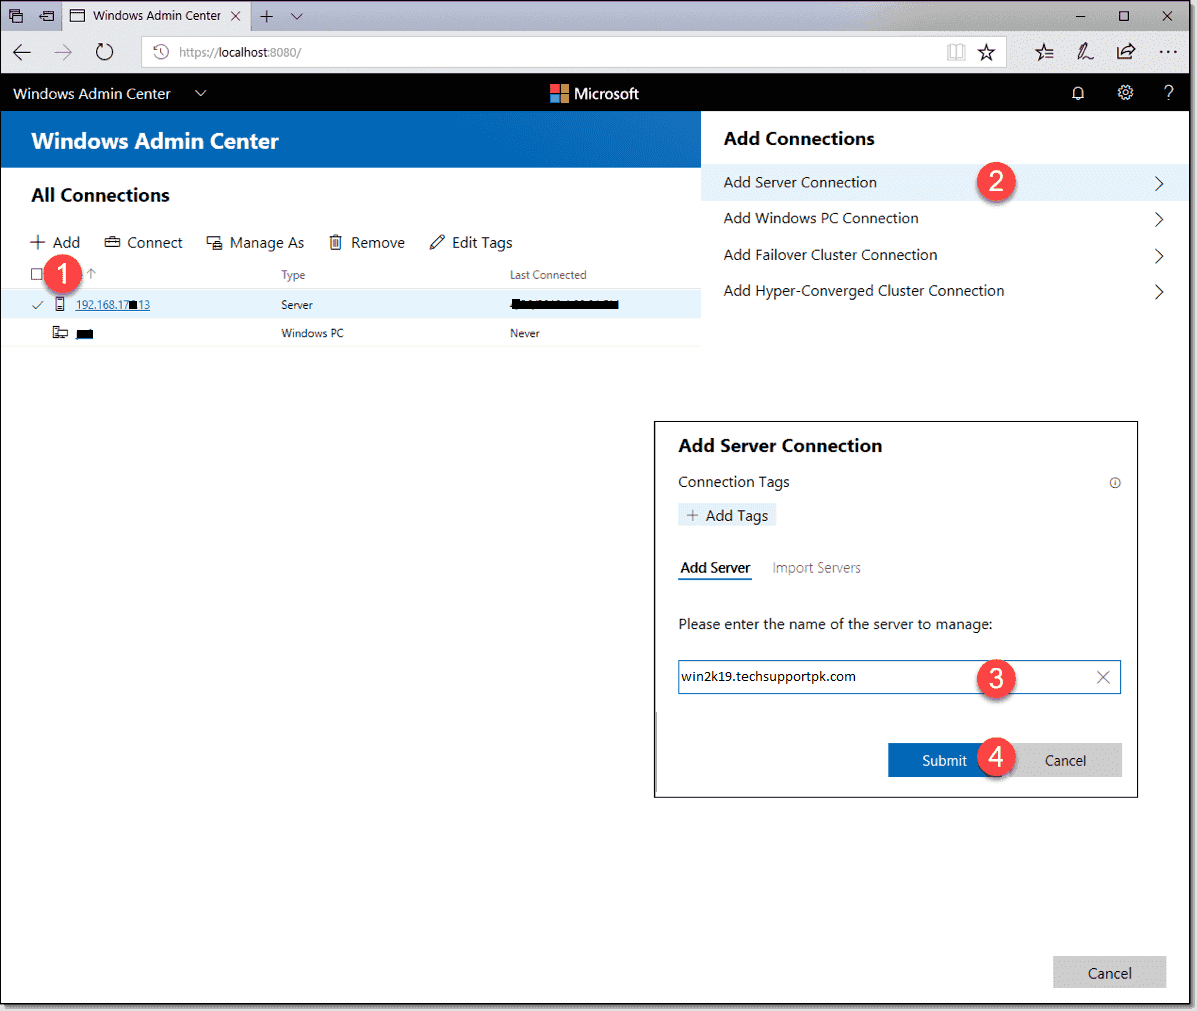
Click Add, select Add Server Connection, specify the DNS name or IP address of your new Windows Server 2019 host, and click Submit.
![]()
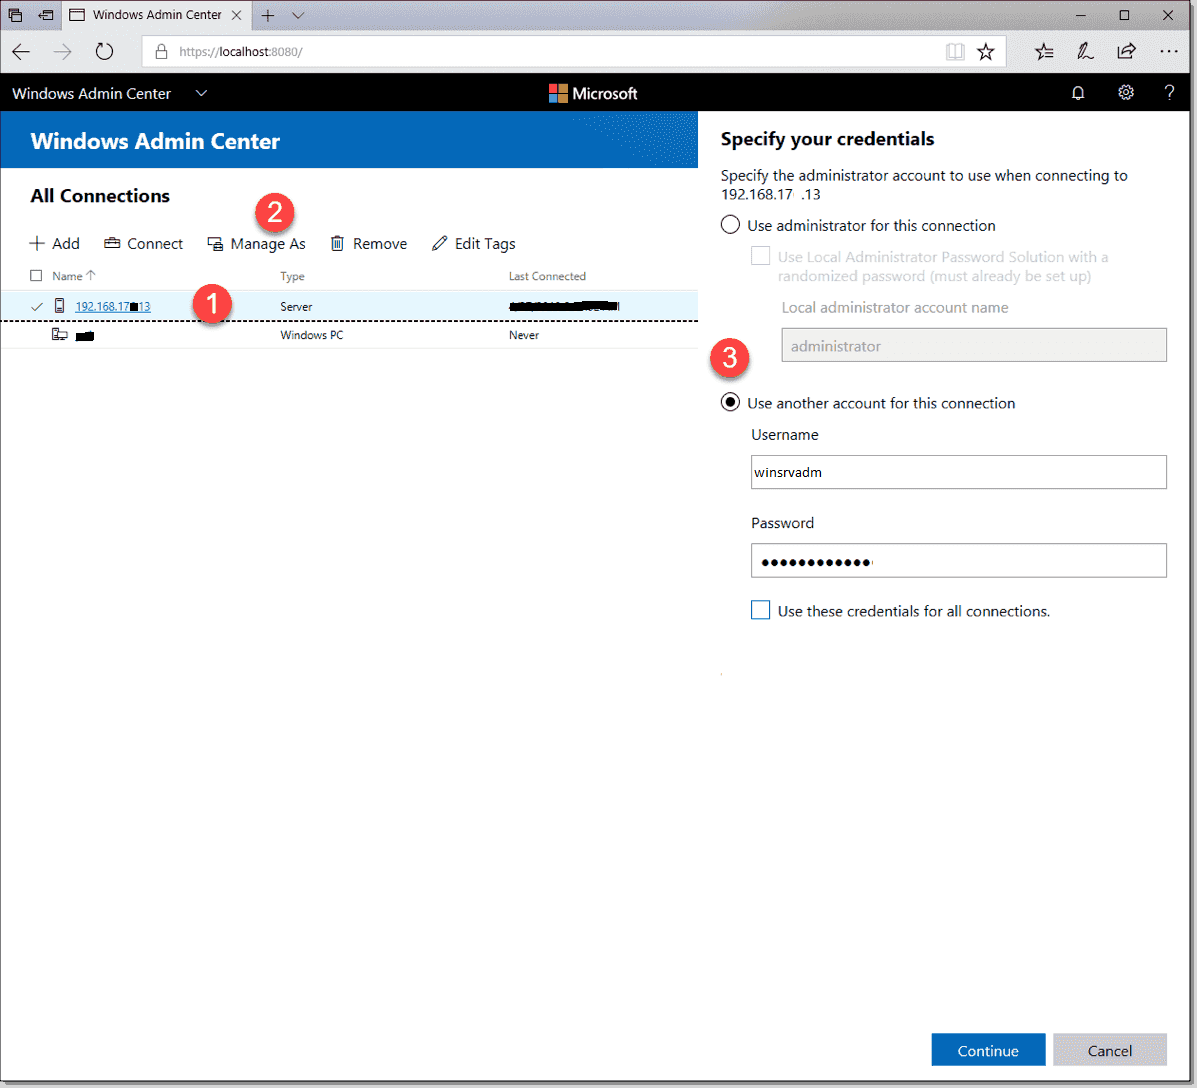
Click Connect to authenticate to the remote server, your options include:
Your current credentials, with or without Local Administrator Password Solution (LAPS)
Alternate credentials
![]()
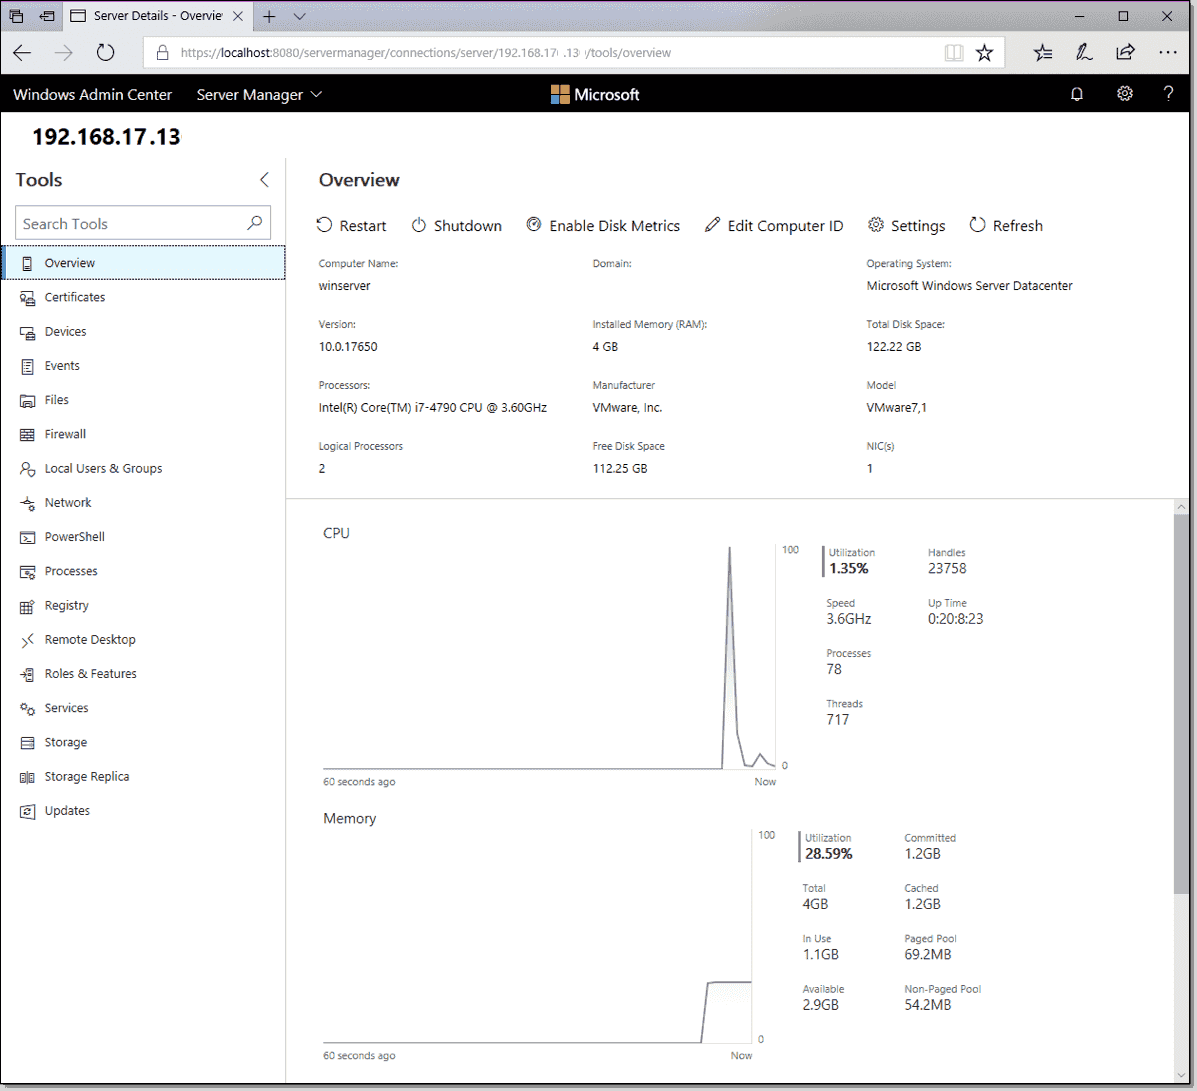
Finally, you reach the Server Manager installed solution as shown in image below.
![]()
Wrapping up
I am sure, once you go-ahead with browser based Windows Admin Center, you will never use the Desktop GUI with Windows Server ever again.
In this tutorial, we'll guide you how to manage your Windows Server 2019 using Admin Center, PowerShell Core and sconfig utility.
Sconfig Utility
Windows 2019 Server Core does not have a Desktop GUI, so you need to navigate using command-line tools. After you log into the server, type sconfig to open the sconfig.cmd configuration utility, as shown in image below.
With sconfig, you use the numbered menu to configure the most important server properties, including:
Hostname
Time, time zone, and date
Domain membership
IP addressing
Remote access
While we're at it, we should ensure WinRM-based PowerShell remoting is enabled. Type 15 to exit to a command line, type powershell to start PowerShell, and run the following command:
Enable-PSRemoting -SkipNetworkProfileCheck -Force
Install PowerShell Core
On your Windows 10 administrative workstation, open up an administrative PowerShell console and run the following command to ensure we can perform remote management of our Windows 2019 Server Core:
Set-Item -Path WSMan:\localhost\Client\TrustedHosts -Value * -Force
Download the latest x64 PowerShell Core release from Microsoft's GitHub releases page. Next, let's define a persistent PowerShell remoting session with the Server Core box (substituting your own server's IPv4 address) and copy the .msi to the root of its drive C:
$session = New-PSSession -ComputerName 192.168.17.13 -Credential (Get-Credential)
Copy-Item PowerShell-6.1.0-preview.1-win-x64.msi C:\ -ToSession $session
To install PowerShell Core, run the following commands directly on the Windows Server 2019 server:
cmd
msiexec /i C:\ PowerShell-6.1.0-preview.1-win-x64.msi
exit
Install Windows Admin Center
Windows Admin Center, formerly called Project Honolulu, has been a long time coming in Windows Server. We'll install Windows Admin Center in Desktop mode on our Windows 10 administrative workstation.
Download the software, run the .msi installer, and select a management port.
Windows Admin Center can manage Windows Server 2019, Windows Server 2016, Windows Server 2012 R2, and Windows 10 hosts from a central web console. On first launch, be sure to accept the self-signed management certificate as shown in the image below.
Logging in takes you to the All Connections list by default. Windows Admin is a modular web application comes with the following features:
Server Manager (to manage Windows Servers)
Computer Management (to manage Windows 10 hosts)
Failover Cluster Manager
Hyper-Converged Cluster Manager
Click Add, select Add Server Connection, specify the DNS name or IP address of your new Windows Server 2019 host, and click Submit.
Click Connect to authenticate to the remote server, your options include:
Your current credentials, with or without Local Administrator Password Solution (LAPS)
Alternate credentials
Finally, you reach the Server Manager installed solution as shown in image below.
Wrapping up
I am sure, once you go-ahead with browser based Windows Admin Center, you will never use the Desktop GUI with Windows Server ever again.