LibreNMS is an open source autodiscovering PHP/MySQL/SNMP based network monitoring which includes support for a wide range of network hardware and operating systems including Cisco, Linux, FreeBSD, Juniper, Brocade, Foundry, HP and many more.
Features
Automatic discovery: Automatically discover your entire network using CDP, FDP, LLDP, OSPF, BGP, SNMP and ARP.Customisable alerting: Highly flexible alerting system, notify via email, irc, slack and more.
API Access: A full API to manage, graph and retrieve data from your install.
Billing system: Generate bandwidth bills for ports on your network based on usage or transfer.
Automatic Updates: Stay upto date automatically with bug fixes, new features and more.
Distributed Polling: Horizontal scaling to grow with your network.
iPhone App: Native iPhone App is available which provides core functionality.
Android App: Native Android App is available which provides core functionality.
Authentication methods:
MySQLHTTP
LDAP
Radius
Active Directory
In this tutorial, we will show you how to install and configure LibreNMS on RHEL/CentOS 7 with Nginx as webserver and MariaDB as database.
This tutorial assume you are the root user. If you are not, prepend sudo to the shell commands (the ones that aren't at mysql> prompts) or temporarily become a user with root privileges with sudo -s or sudo -i.
Install Required Packages
yum install epel-release
rpm -Uvh https://mirror.webtatic.com/yum/el7/webtatic-release.rpm
yum install cronie fping git ImageMagick jwhois mariadb mariadb-server mtr MySQL-python net-snmp net-snmp-utils nginx nmap php71w php71w-cli php71w-common php71w-curl php71w-fpm php71w-gd php71w-mcrypt php71w-mysql php71w-process php71w-snmp php71w-xml php71w-zip python-memcached rrdtool
Add librenms user
useradd librenms -d /opt/librenms -M -r
usermod -a -G librenms nginx
Download LibreNMS
cd /opt
git clone https://github.com/librenms/librenms.git librenms
Configure MySQL
systemctl start mariadb
mysql -u root
Run mariadb queries below to create a new database and user, and grant all privileges on the database to the new user.
NOTE: Please change the 'passw0rd' below to something secure.
CREATE DATABASE librenms CHARACTER SET utf8 COLLATE utf8_unicode_ci;
CREATE USER 'librenms'@'localhost' IDENTIFIED BY 'passw0rd';
GRANT ALL PRIVILEGES ON librenms.* TO 'librenms'@'localhost';
FLUSH PRIVILEGES;
exit
vi /etc/my.cnf
NOTE: Whilst we are working on ensuring LibreNMS is compatible with MySQL strict mode, for now, please disable this after mysql is installed.
Within the [mysqld] section please add:
innodb_file_per_table=1
sql-mode=""
lower_case_table_names=0
Save and close.
systemctl enable mariadb
systemctl restart mariadb
Configure and Start PHP-FPM
Ensure date.timezone is set in php.ini to your preferred time zone. See http://php.net/manual/en/timezones.php for a list of supported timezones. Valid examples are: "America/New_York", "Australia/Brisbane", "Etc/UTC".
vi /etc/php.ini
Uncomment the 'date.time' line and change the value with your system timezone.
date.time = Asia/Pakistan
Save and close.
Now you need to edit /etc/php-fpm.d/www.conf and make these changes:
vi /etc/php-fpm.d/www.conf
;user = apache
user = nginx
group = apache ; keep group as apache
;listen = 127.0.0.1:9000
listen = /var/run/php-fpm/php7.1-fpm.sock
listen.owner = nginx
listen.group = nginx
listen.mode = 0660
Save and close
systemctl enable php-fpm
systemctl restart php-fpm
Configure NGINX
vi /etc/nginx/conf.d/librenms.conf
Add the following config, edit server_name as required:
server {
listen 80;
server_name labserver.techsupportpk.com;
root /opt/librenms/html;
index index.php;
charset utf-8;
gzip on;
gzip_types text/css application/javascript text/javascript application/x-javascript image/svg+xml text/plain text/xsd text/xsl text/xml image/x-icon;
location / {
try_files $uri $uri/ /index.php?$query_string;
}
location /api/v0 {
try_files $uri $uri/ /api_v0.php?$query_string;
}
location ~ \.php {
include fastcgi.conf;
fastcgi_split_path_info ^(.+\.php)(/.+)$;
fastcgi_pass unix:/var/run/php-fpm/php7.1-fpm.sock;
}
location ~ /\.ht {
deny all;
}
}
Save and close.
NOTE: If this is the only site you are hosting on this server (it should be :)) then you will need to disable the default site. Delete the server section from /etc/nginx/nginx.conf
systemctl enable nginx
systemctl restart nginx
Configure SELinux
Install the policy tool for SELinux:
yum install policycoreutils-python
Configure the contexts needed by LibreNMS:
semanage fcontext -a -t httpd_sys_content_t '/opt/librenms/logs(/.*)?'
semanage fcontext -a -t httpd_sys_rw_content_t '/opt/librenms/logs(/.*)?'
restorecon -RFvv /opt/librenms/logs/
semanage fcontext -a -t httpd_sys_content_t '/opt/librenms/rrd(/.*)?'
semanage fcontext -a -t httpd_sys_rw_content_t '/opt/librenms/rrd(/.*)?'
restorecon -RFvv /opt/librenms/rrd/
setsebool -P httpd_can_sendmail=1
setsebool -P httpd_execmem 1
To allow fping, create the file http_fping.tt with the following contents:
module http_fping 1.0;
require {
type httpd_t;
class capability net_raw;
class rawip_socket { getopt create setopt write read };
}
#============= httpd_t ==============
allow httpd_t self:capability net_raw;
allow httpd_t self:rawip_socket { getopt create setopt write read };
Then run these commands
checkmodule -M -m -o http_fping.mod http_fping.tt
semodule_package -o http_fping.pp -m http_fping.mod
semodule -i http_fping.pp
Allow access through firewall
firewall-cmd --zone public --add-service http
firewall-cmd --permanent --zone public --add-service http
firewall-cmd --zone public --add-service https
firewall-cmd --permanent --zone public --add-service https
Configure SNMPD
cp /opt/librenms/snmpd.conf.example /etc/snmp/snmpd.conf
vi /etc/snmp/snmpd.conf
Edit the text which says RANDOMSTRINGGOESHERE and set your own community string.
com2sec readonly default technocracy
Save and close.
curl -o /usr/bin/distro https://raw.githubusercontent.com/librenms/librenms-agent/master/snmp/distro
chmod +x /usr/bin/distro
systemctl enable snmpd
Copy Cron job
cp /opt/librenms/librenms.nonroot.cron /etc/cron.d/librenms
Copy logrotate config
LibreNMS keeps logs in /opt/librenms/logs. Over time these can become large and be rotated out. To rotate out the old logs you can use the provided logrotate config file:
cp /opt/librenms/misc/librenms.logrotate /etc/logrotate.d/librenms
Set permissions
chown -R librenms:librenms /opt/librenms
setfacl -d -m g::rwx /opt/librenms/rrd /opt/librenms/logs
setfacl -R -m g::rwx /opt/librenms/rrd /opt/librenms/logs
systemctl restart snmpd
LibreNMS Web installer
Now head to the web installer and follow the on-screen instructions. http://labserver.techsupportpk.com/install.php or http://labserver_ip_address/install.php
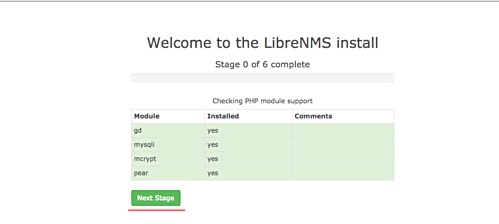
Make sure all status is green as shown below.
Click 'Next Stage' to continue.
Fill all the database info with your own db.
DB User: librenms
DB Pass: passw0rd
DB Name: librenms
Click Next Stage

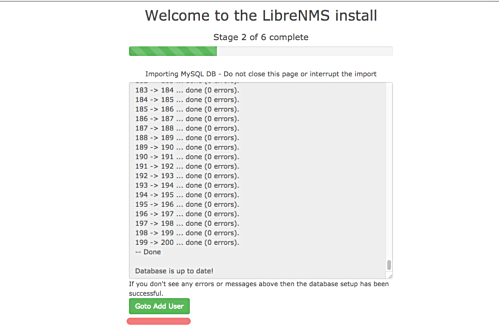
Wait for the installer script to import sample of database to our database - do not close the browser tab during this process.
Once done, click 'Goto Add User'.
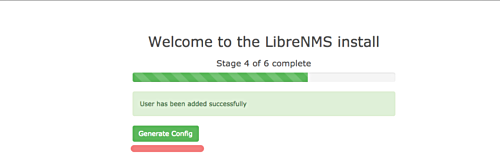
Type your admin user, email, and password.
Click 'Add User'.

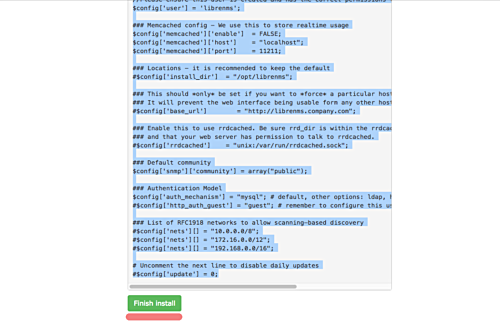
Click the 'Generate Config' button.
And you will get a config file similar to the one shown below.
Copy the php config script, and return back to your terminal session. Goto the '/opt/librenms' directory and create the 'config.php' file manually.
cd /etc/librenms/
vi config.php
Paste the configuration there, and change the ownership of the file to librenms user and group.
chown librenms:librenms config.php
Return back to your web browser and click the 'Finish Install' button.
You are reached to last page from the librenms web installer as shown below.
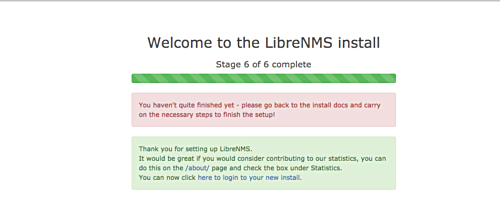
We now suggest that you add localhost as your first device from within the WebUI.
If you ever have issues with your install, run validate.php as root in the librenms directory:
cd /opt/librenms
./validate.php
You are done.