Pico is an open source Content Management System. It is a flat file CMS, which means that there is no administration backend or database to deal with. You simply create markdown files in the content folder and those files become your pages. There’s much more to Pico than that though.
Prerequisites
One Ubuntu 16.04 server installed either on bare-metal hardware or on a virtual machine with non-root user with sudo privileges.Install PHP and NGINX
Pico runs on Nginx web server with PHP support. So we will need to install Nginx and PHP our system. By default, the latest version of the Nginx is not available in Ubuntu 16.04 default repository. So you will need to add the Nginx repository to your system. You can do this by running the following command:sudo add-apt-repository ppa:nginx/stable
Next, update your repository with the following command:
sudo apt-get update -y
Lets install Nginx, PHP and other required libraries with the following command:
sudo apt-get install nginx php7.0 php7.0-fpm php7.0-cli php7.0-json php7.0-curl php7.0-gd php7.0-zip -y
Once all the required packages are installed, start Nginx and PHP-FPM service and enable them to start on boot with the following command:
sudo systemctl start nginx
sudo systemctl enable nginx
sudo systemctl start php7.0-fpm
sudo systemctl enable php7.0-fpm
Download Pico CMS
Next, you will need to download the latest version of the Pico CMS from Git repository. You can easily download it using the git clone command:cd /var/www/html
sudo git clone https://github.com/picocms/Pico.git
We will also need to install Composer to our system. Composer is a dependency manager for PHP that is used to install all the required libraries for your project. You can install Composer by using the curl command as shown below:
cd /usr/local/bin/
sudo curl -sS https://getcomposer.org/installer | php
Next, install all the libraries required by PHP using the following command:
cd /var/www/html/Pico
sudo composer install
Next, set proper permission to the Nginx web root directory:
sudo chown -R www-data:www-data /var/www/html/Pico
Configure Nginx
Now we need to create an Nginx server block for Pico CMS. You can do this by creating pico.conf file inside /etc/nginx/sites-available/ directory.
sudo nano /etc/nginx/sites-available/pico.conf
Add the following lines:
server {
listen 80;
labserver.example.com;
root /var/www/html/Pico;
index index.php index.html index.htm;
location / {
try_files $uri $uri/ /index.php;
}
access_log /var/log/nginx/pico.access.log;
error_log /var/log/nginx/pico.error.log;
location ~ \.php$ {
fastcgi_split_path_info ^(.+\.php)(/.+)$;
fastcgi_pass unix:/var/run/php/php7.0-fpm.sock;
fastcgi_index index.php;
include fastcgi_params;
fastcgi_param SCRIPT_FILENAME $document_root$fastcgi_script_name;
fastcgi_buffer_size 16k;
fastcgi_buffers 4 16k;
}
}
Save and close the file when you are done.
Activate the server block by creating a symbolic link:
sudo ln -s /etc/nginx/sites-available/pico.conf /etc/nginx/sites-enabled/
Next, test the Nginx configuration and restart Nginx and PHP-FPM service with the following command:
sudo nginx -t
sudo systemctl restart nginx
sudo systemctl restart php7.0-fpm
Access Pico Web Interface
To access the Pico CMS Web Interface, you will need to allow HTTP service through UFW firewall. By default UFW is disabled on your system, so you need to enable it first. You can enable it with the following command:sudo ufw enable
sudo ufw allow http
sudo ufw reload
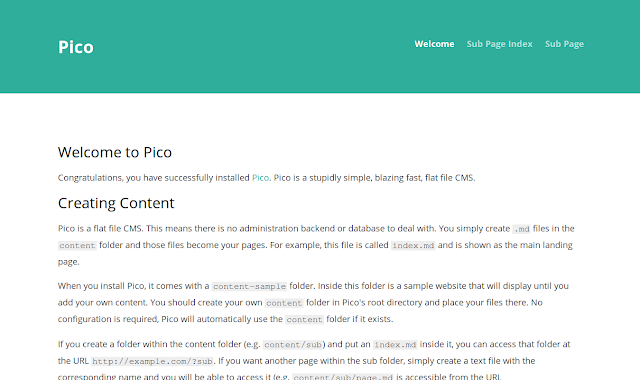
Now, Open up your web browser and access the URL http://labserver.example.com or http://labserver_ip. You should see the Pico CMS default web page as shown in image below.