The Oracle Solaris 11 Automated Installer provides administrators with a secure, automated, network-based, hands-off method for installing client systems in the data center. Having a fast deployment framework is critical for reliably and repeatedly getting systems online with secure end-to-end application provisioning.
With the Automated Installer, client systems securely boot over the network, find the location of the Automated Installer service, and get matched to a specific set of installation instructions called an Automated Installer manifest. An Automated Installer manifest details how systems—including target disks and their layout, software, and virtualized environments—should get installed. Once matched, a client system then contacts an Oracle Solaris Image Packaging System package repository and installs itself appropriately based on the configuration provided in the Automated Installer manifest, as illustrated in Figure 1.
Figure 1. Illustration of how a client system is installed by the Automated Installer
This article covers a recent addition in Oracle Solaris 11.2 that enables administrators to use an interactive wizard—called the AI Manifest Wizard—to create common Automated Installer manifests for the client systems in their data center and associate the manifests with the Automated Installer install service.
In this article, we will set up an Automated Installer service based on an Oracle Solaris 11.2 image. We will then create a new Automated Installer manifest using the interactive wizard and associate the manifest with the Automated Installer service that we created.
Note: If you have an existing Automated Installer service set up, you do not need to do this step.
A few things happened during the process shown in Listing 1. We created a
Let's use the
Now, confirm that the service is running by going to
You can launch the AI Manifest Wizard directly using the
We are now ready to create our Automated Installer manifest.
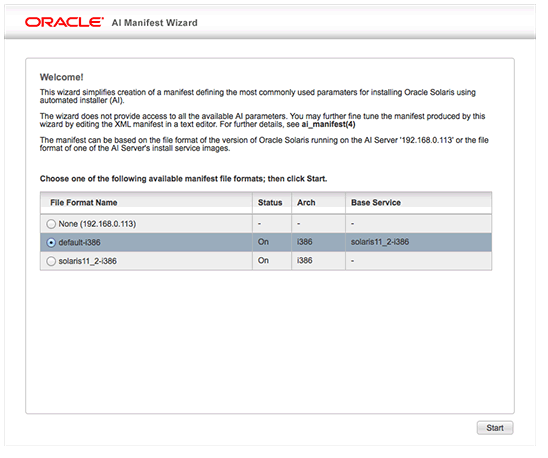
In the first screen, shown in Figure 2, we are presented with a choice of which services we'd like to create a manifest for. For now, let's choose the
Figure 2. AI Manifest Wizard's Welcome screen
Next, the Introduction screen gives us an opportunity to name the Automated Installer manifest and decide whether it's to be used for a bare-metal installation (global zone) or within a virtualized environment (in this case, a non-global zone). If we were going to install an Oracle Solaris kernel zone, we'd choose the manifest for a global zone. Let's choose to keep
![]()
Figure 3. Screen for naming the manifest and selecting the type of zone
In the Root Pool screen, shown in Figure 4, we can determine what primary ZFS storage pool will be used for booting the system. By default, our root pool is called
Figure 4. Root Pool screen
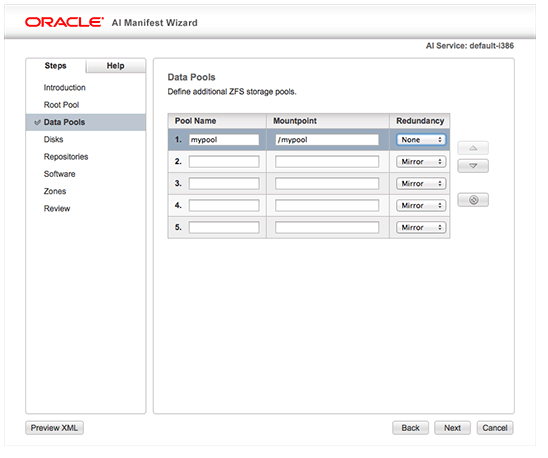
In the Data Pools screen we can designate that additional ZFS zpools be created. As an example, let's create a zpool called
Figure 5. Data Pools screen
In the Disks screen, shown in Figure 6, we can determine the target devices on which we will install Oracle Solaris 11. Here, we can explicitly target the boot device (as specified in the boot parameters when we boot a system) for
Figure 6. Disks screen
In the Repositories screen, we can configure the Image Packaging System package repositories and publishers from which software will be installed. Here, we are presented with two choices for either the Oracle Solaris 11 release repository or support repository, but we can also choose to define our own repository. As shown in Figure 7, in this example, we'll instead be using an Image Packaging System package repository hosted at
Figure 7. Repositories screen
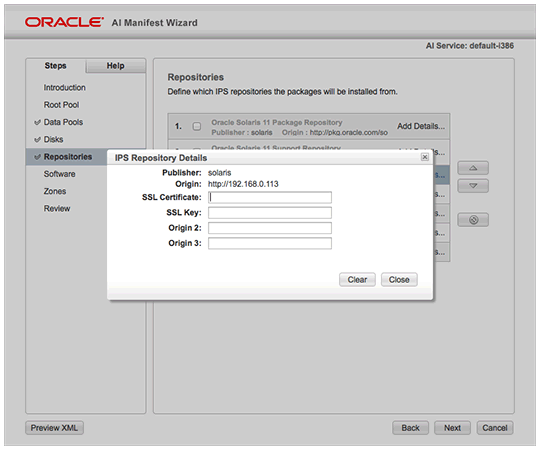
If we had a repository that was hosted behind HTTPS, we would need to provide our SSL certificates and keys for accessing the repository securely. This can be done by clicking Add Details and providing the location of these files. See Figure 8. The SSL certificates and keys for Oracle's hosted Image Packaging System repositories can be downloaded from pkg-register.oracle.com, or they can be generated for local repositories, as detailed in "Configuring HTTPS Repository Access."
Figure 8. IPS Repository Details screen
In the Software screen, shown in Figure 9, we can define what software should be installed on our system. Usually, software configurations are provided using package groups that define what collections of packages should be installed. These package groups correspond to the following Image Packaging System group packages:
Let's install the
Figure 9. Software screen
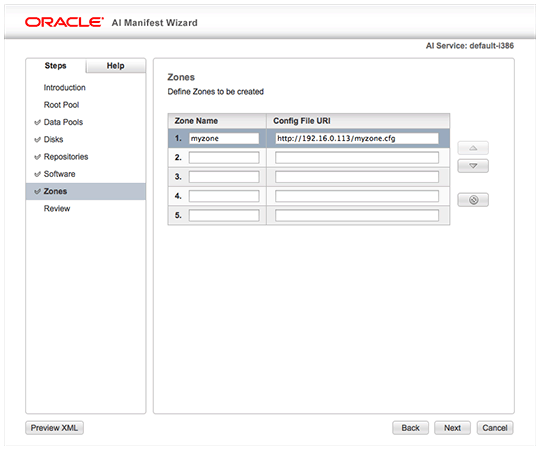
The Zones screen allows us to automatically create virtualized environments as part of the installation, which is a unique differentiator for the Automated Installer. As shown in Figure 10, we can provide a zone name and the location of a zone configuration file. This zone configuration file can either be created by hand or exported from an existing zone configuration using the
Figure 10. Zones screen
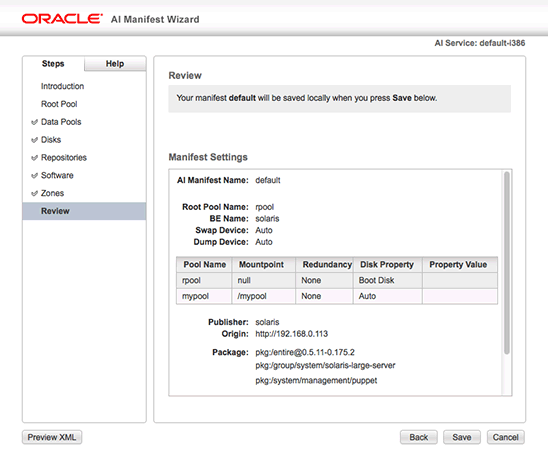
In the final screen, shown in Figure 11, we can review the information that we have provided to the wizard and double-check that everything is correct. If we notice a mistake at any stage, we can simply click the Back button to return to the screen that we need to fix.
Figure 11. Review screen
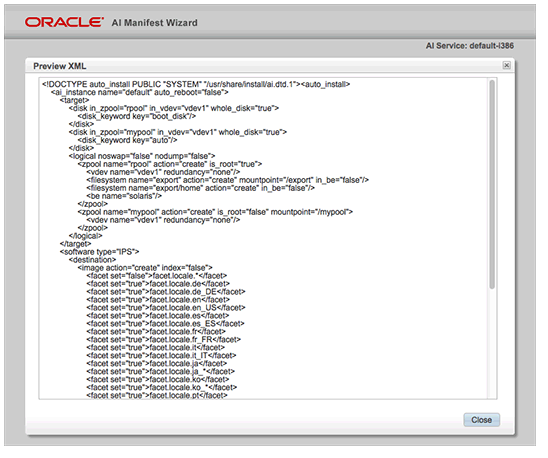
If desired, we can also preview the XML code (see Figure 12) that will be used for the Automated Installer manifest by clicking the Preview XML button. This feature is especially useful if you're trying to debug an existing manifest that you might have edited by hand previously. You'll notice that the XML code also includes a number of additional parameters that aren't available through the graphical interface. If you are an experienced administrator, you might wish to modify the XML code by hand later if you want to fine-tune your manifest.
Figure 12. Previewing the XML code
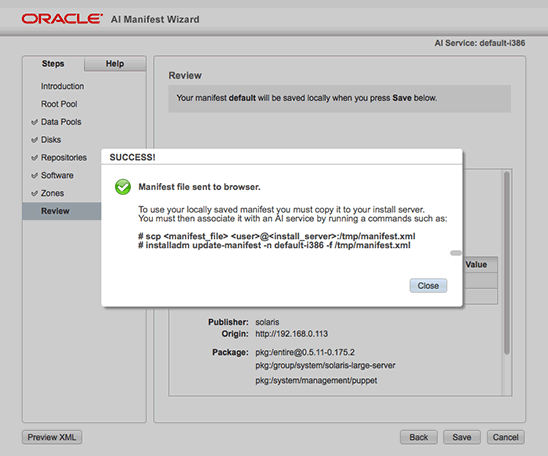
Once we are happy with our manifest, we can click the Save button. By default, the Automated Installer manifest will be saved to the browser's download folder. After saving the file, you need to copy it to the Automated Installer server and associate the manifest with the install service. See Figure 13.
Figure 13. Saving the manifest file
For convenience, the AI Manifest Wizard also allows you to save the file directly to the
Depending on how your Automated Installer service is set up, you might execute the next steps differently. In our case, let's check to see what manifests are associated with our install services using the
In Listing 4, we can see that there's a default manifest called
Let's check the status of our install services and manifests using the
And finally, let's also export our manifest and see whether it matches the manifest that we have created, as shown in Listing 7.
Automated Installer manifests cover the configuration of the disk target and its layout, software selection, and virtualized environments. Additional system configuration (for users, network configuration, timezones, and so on) can be done using system configuration profiles. These are not managed by the AI Manifest Wizard; instead, they can be created by using the
With the Automated Installer, client systems securely boot over the network, find the location of the Automated Installer service, and get matched to a specific set of installation instructions called an Automated Installer manifest. An Automated Installer manifest details how systems—including target disks and their layout, software, and virtualized environments—should get installed. Once matched, a client system then contacts an Oracle Solaris Image Packaging System package repository and installs itself appropriately based on the configuration provided in the Automated Installer manifest, as illustrated in Figure 1.
Figure 1. Illustration of how a client system is installed by the Automated Installer
This article covers a recent addition in Oracle Solaris 11.2 that enables administrators to use an interactive wizard—called the AI Manifest Wizard—to create common Automated Installer manifests for the client systems in their data center and associate the manifests with the Automated Installer install service.
In this article, we will set up an Automated Installer service based on an Oracle Solaris 11.2 image. We will then create a new Automated Installer manifest using the interactive wizard and associate the manifest with the Automated Installer service that we created.
Creating an Automated Installer Service
To start, let's create an Automated Installer service using theinstalladm create-service command, as shown in Listing 1.Note: If you have an existing Automated Installer service set up, you do not need to do this step.
root@solaris:~# installadm create-serviceListing 1
OK to use subdir of /export/auto_install to store image? [y|N]: y
0% : Service svc:/network/dns/multicast:default is not online. Installation services will not be advertised via multicast DNS.
0% : Creating service from: pkg:/install-image/solaris-auto-install
0% : Using publisher(s):
0% : solaris: http://pkg.oracle.com/solaris/release
5% : Refreshing Publisher(s)
7% : Startup Phase
15% : Planning Phase
61% : Download Phase
90% : Actions Phase
91% : Finalize Phase
91% : Creating i386 service: solaris11_2-i386
91% : Image path: /export/auto_install/solaris11_2-i386
91% : Setting "solaris" publisher URL in default manifest to:
91% : http://pkg.oracle.com/solaris/release
91% : DHCP is not being managed by install server.
91% : SMF Service 'svc:/system/install/server:default' will be enabled
91% : SMF Service 'svc:/network/tftp/udp6:default' will be enabled
91% : Creating default-i386 alias
91% : Setting "solaris" publisher URL in default manifest to:
91% : http://pkg.oracle.com/solaris/release
91% : DHCP is not being managed by install server.
91% : No local DHCP configuration found. This service is the default
91% : alias for all PXE clients. If not already in place, the following should
91% : be added to the DHCP configuration:
91% : Boot server IP: 10.0.0.5
91% : Boot file(s):
91% : bios clients (arch 00:00): default-i386/boot/grub/pxegrub2
91% : uefi clients (arch 00:07): default-i386/boot/grub/grub2netx64.efi
91% :
91% : Note: There is more than one IP address configured for use with AI. Please ensure the above 'Boot server IP' is correct.
91% : SMF Service 'svc:/system/install/server:default' will be enabled
91% : SMF Service 'svc:/network/tftp/udp6:default' will be enabled
100% : Created Service: 'solaris11_2-i386'
100% : Refreshing SMF service svc:/network/tftp/udp6:default
100% : Refreshing SMF service svc:/system/install/server:default
100% : Enabling SMF service svc:/system/install/server:default
100% : Enabling SMF service svc:/network/tftp/udp6:default
100% : Warning: mDNS registry of service 'solaris11_2-i386' could not be verified.
100% : Warning: mDNS registry of service 'default-i386' could not be verified.
A few things happened during the process shown in Listing 1. We created a
/export/auto_install directory in which to store boot images and other configuration information for our Automated Installer service, we downloaded a boot image from the Image Packaging System package repository to use for this service, and we enabled some services. This Automated Installer service is currently using the default Automated Installer manifest that installs the solaris-large-server package grouping with default setup options.Verifying the Service Management Facility Service Is Running
The AI Manifest Wizard is a browser-based, interactive editor that allows administrators to easily create Automated Installer manifests without having to edit XML code. The wizard is made available through thesvc:/system/install/server:default Service Management Facility service, and is served up from a web server on port 5555 as long as there are Automated Installer services running.Let's use the
svcs command to verify that the Service Management Facility service is enabled, as shown in Listing 2:root@solaris:~# svcs install/serverListing 2
STATE STIME FMRI
online 11:19:42 svc:/system/install/server:default
Now, confirm that the service is running by going to
http://192.168.0.113:5555 (the IP address of our Automated Installer server) in your browser.You can launch the AI Manifest Wizard directly using the
/usr/bin/ai-wizard command if you are logged directly into the AI server or you are connected through an SSH session.We are now ready to create our Automated Installer manifest.
Creating an Automated Installer Manifest
The AI Manifest Wizard itself consists of eight screens that take an administrator through the most frequently modified Automated Installer manifest parameters, such as disk installation, ZFS datasets, Image Packaging System repository configuration, and software selection.In the first screen, shown in Figure 2, we are presented with a choice of which services we'd like to create a manifest for. For now, let's choose the
default-i386 service, which we can see has an alias that corresponds to the service that was created for us named solaris11_2-i386.Figure 2. AI Manifest Wizard's Welcome screen
Next, the Introduction screen gives us an opportunity to name the Automated Installer manifest and decide whether it's to be used for a bare-metal installation (global zone) or within a virtualized environment (in this case, a non-global zone). If we were going to install an Oracle Solaris kernel zone, we'd choose the manifest for a global zone. Let's choose to keep
default as our manifest name and create a manifest for a bare-metal installation, as shown in Figure 3.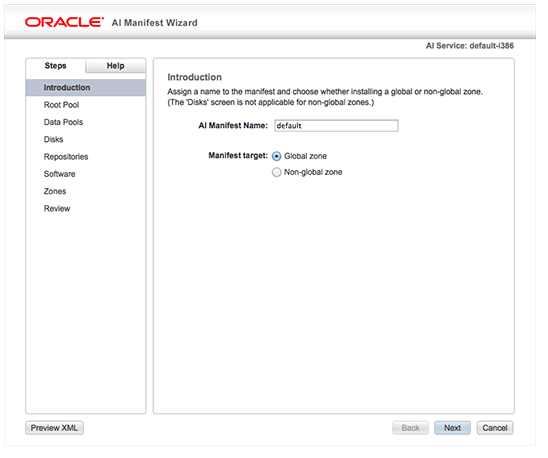
Figure 3. Screen for naming the manifest and selecting the type of zone
In the Root Pool screen, shown in Figure 4, we can determine what primary ZFS storage pool will be used for booting the system. By default, our root pool is called
rpool and we'll create a boot environment called solaris. The Automated Installer manifest wizard will pick up the configuration based on the install service we've chosen. Because we picked the default-i386 service, we see a lot of the default configuration for a vanilla Oracle Solaris 11 installation. We can also configure the size of the swap and dump devices for our installation, but let's keep the default configuration for now.Figure 4. Root Pool screen
In the Data Pools screen we can designate that additional ZFS zpools be created. As an example, let's create a zpool called
mypool and mount it at /mypool, as shown in Figure 5. We could also choose to mirror this zpool or provide a higher level of redundancy through software-level RAID for ZFS.Figure 5. Data Pools screen
In the Disks screen, shown in Figure 6, we can determine the target devices on which we will install Oracle Solaris 11. Here, we can explicitly target the boot device (as specified in the boot parameters when we boot a system) for
rpool and define other additional characteristics for matching a target device, if required. For example, we might want to ensure that mypool is created only on a disk of a specific size, from a specific vendor, or at a specific device path (for example, in the case of using some shared storage).Figure 6. Disks screen
In the Repositories screen, we can configure the Image Packaging System package repositories and publishers from which software will be installed. Here, we are presented with two choices for either the Oracle Solaris 11 release repository or support repository, but we can also choose to define our own repository. As shown in Figure 7, in this example, we'll instead be using an Image Packaging System package repository hosted at
http://192.168.0.113 (the address of our Automated Installer server), which we created—this is typical of a data center environment where access to Oracle's publicly hosted repositories might be restricted.Figure 7. Repositories screen
If we had a repository that was hosted behind HTTPS, we would need to provide our SSL certificates and keys for accessing the repository securely. This can be done by clicking Add Details and providing the location of these files. See Figure 8. The SSL certificates and keys for Oracle's hosted Image Packaging System repositories can be downloaded from pkg-register.oracle.com, or they can be generated for local repositories, as detailed in "Configuring HTTPS Repository Access."
Figure 8. IPS Repository Details screen
In the Software screen, shown in Figure 9, we can define what software should be installed on our system. Usually, software configurations are provided using package groups that define what collections of packages should be installed. These package groups correspond to the following Image Packaging System group packages:
solaris-large-server (the default for Interactive Text Installer and Automated Installer installations), solaris-small-server (the default for non-global zone installations), and solaris-desktop (the default for Live Media installations). However, we can also choose to install additional packages that might not be included in these group packages.Let's install the
pkg:/system/management/puppet package so that we can control the configuration of our client systems from a centralized Puppet master.Figure 9. Software screen
The Zones screen allows us to automatically create virtualized environments as part of the installation, which is a unique differentiator for the Automated Installer. As shown in Figure 10, we can provide a zone name and the location of a zone configuration file. This zone configuration file can either be created by hand or exported from an existing zone configuration using the
zonecfg export command.Figure 10. Zones screen
In the final screen, shown in Figure 11, we can review the information that we have provided to the wizard and double-check that everything is correct. If we notice a mistake at any stage, we can simply click the Back button to return to the screen that we need to fix.
Figure 11. Review screen
If desired, we can also preview the XML code (see Figure 12) that will be used for the Automated Installer manifest by clicking the Preview XML button. This feature is especially useful if you're trying to debug an existing manifest that you might have edited by hand previously. You'll notice that the XML code also includes a number of additional parameters that aren't available through the graphical interface. If you are an experienced administrator, you might wish to modify the XML code by hand later if you want to fine-tune your manifest.
Figure 12. Previewing the XML code
Once we are happy with our manifest, we can click the Save button. By default, the Automated Installer manifest will be saved to the browser's download folder. After saving the file, you need to copy it to the Automated Installer server and associate the manifest with the install service. See Figure 13.
Figure 13. Saving the manifest file
For convenience, the AI Manifest Wizard also allows you to save the file directly to the
/var/ai/wizard-manifest folder on the Automated Installer server, but this capability is disabled by default. You can use the installadm list command with the -sv option to see the "Wizard Saves to Server?" property, and then you can enable the property using the installadm set-server command with the -z option, as shown in Listing 3.root@solaris:~# installadm list -svListing 3
AI Server Parameter Value
------------------- -----
Hostname ............... solaris
Architecture ........... i386
Active Networks ........ 10.0.0.5
192.168.0.113
Http Port .............. 5555
Secure Port ............ 5556
Image Path Base Dir .... /export/auto_install
Multi-Homed? ........... yes
Managing DHCP? ......... yes (unconfigured)
DHCP IP Range .......... none
Boot Server ............ none
Web UI Enabled? ........ yes
Wizard Saves to Server? no
Security Enabled? ...... no
Security Key? .......... no
Security Cert .......... none
CA Certificates ........ none
FW Encr Key (AES) ...... none
FW HMAC Key (SHA1) ..... none
Def Client Sec Key? .... no
Def Client Sec Cert .... none
Def Client CA Certs .... none
Def Client FW Encr Key . none
Def Client FW HMAC Key . none
Number of Services ..... 2
Number of Clients ...... 0
Number of Manifests .... 2
Number of Profiles ..... 0
root@solaris:~# installadm set-server -z
Changed Server
Refreshing SMF service svc:/system/install/server:default
root@solaris:~# installadm list -sv
AI Server Parameter Value
------------------- -----
Hostname ............... solaris
Architecture ........... i386
Active Networks ........ 10.0.0.5
192.168.0.113
Http Port .............. 5555
Secure Port ............ 5556
Image Path Base Dir .... /export/auto_install
Multi-Homed? ........... yes
Managing DHCP? ......... yes (unconfigured)
DHCP IP Range .......... none
Boot Server ............ none
Web UI Enabled? ........ yes
Wizard Saves to Server? yes
Security Enabled? ...... no
Security Key? .......... no
Security Cert .......... none
CA Certificates ........ none
FW Encr Key (AES) ...... none
FW HMAC Key (SHA1) ..... none
Def Client Sec Key? .... no
Def Client Sec Cert .... none
Def Client CA Certs .... none
Def Client FW Encr Key . none
Def Client FW HMAC Key . none
Number of Services ..... 2
Number of Clients ...... 0
Number of Manifests .... 2
Number of Profiles ..... 0
Depending on how your Automated Installer service is set up, you might execute the next steps differently. In our case, let's check to see what manifests are associated with our install services using the
installadm list command, as shown in Listing 4:root@solaris:~# installadm list -mListing 4
Service Name Manifest Name Type Status Criteria
------------ ------------- ---- ------ --------
default-i386 orig_default derived default none
solaris11_2-i386 orig_default derived default none
In Listing 4, we can see that there's a default manifest called
orig_default associated with the Automated Installer service we created. We can change this by using the installadm create-manifest command to associate a new manifest (our generated manifest) for this service and then set it as the default by using the -d option, as shown in Listing 5:root@solaris:~# installadm create-manifest -d -f /tmp/manifest.xml -m default -n default-i386Listing 5
Created Manifest: 'default'
Let's check the status of our install services and manifests using the
installadm list command, as shown in Listing 6:root@solaris:~# installadm listListing 6
Service Name Status Arch Type Secure Alias Aliases Clients Profiles Manifests
------------ ------ ---- ---- ------ ----- ------- ------- -------- ---------
default-i386 on i386 pkg no yes 0 0 0 2
solaris11_2-i386 on i386 pkg no no 1 0 0 1
root@solaris:~# installadm list -m
Service Name Manifest Name Type Status Criteria
------------ ------------- ---- ------ --------
default-i386 default xml default none
orig_default derived inactive none
solaris11_2-i386 orig_default derived default none
And finally, let's also export our manifest and see whether it matches the manifest that we have created, as shown in Listing 7.
root@solaris:~# installadm export -n default-i386 -m defaultListing 7
---------------------------- manifest: default ----------------------------facet.locale.* facet.locale.de facet.locale.de_DE facet.locale.en facet.locale.en_US facet.locale.es facet.locale.es_ES facet.locale.fr facet.locale.fr_FR facet.locale.it facet.locale.it_IT facet.locale.ja facet.locale.ja_* facet.locale.ko facet.locale.ko_* facet.locale.pt facet.locale.pt_BR facet.locale.zh facet.locale.zh_CN facet.locale.zh_TW pkg:/entire@0.5.11-0.175.2 pkg:/group/system/solaris-large-server pkg:/system/management/puppet
Automated Installer manifests cover the configuration of the disk target and its layout, software selection, and virtualized environments. Additional system configuration (for users, network configuration, timezones, and so on) can be done using system configuration profiles. These are not managed by the AI Manifest Wizard; instead, they can be created by using the
sysconfig tool and then associated to a given installation service.
