
One of the great things about the Hyper-V virtual switch is that it can be used to very effectively isolate your virtual machines from the physical network. This grants them a layer of protection that’s nearly unparalleled. Like any security measure, this can be a double-edged sword. Oftentimes, these isolated guests still need some measure of access to the outside world, or they at least need to have access to a system that can perform such access on their behalf.
There are a few ways to facilitate this sort of connection. The biggest buzzword-friendly solution today is network virtualization, but that currently requires additional software (usually System Center VMM) and a not-unsubstantial degree of additional know-how. For most small, and even many medium-sized organizations, this is an unwelcome burden not only in terms of financial expense, but also in training/education and maintenance.
A simpler solution that’s more suited to smaller and less complicated networks is software routing. Because we’re talking about isolation using a Hyper-V internal or private switch, such software would need to be inside a virtual machine on the same Hyper-V host as the isolated guests.

External and Private Switch
The routing VM would be represented in that image as the Dual-Presence VM.
Choosing a Software Router
There are major commercial software routing solutions available, such as Vyatta. There are free routing software packages available, such as VyOS, the community fork for Vyatta. These are all Linux-based, and as such, are not within my scope of expertise. However, it should be possible to deploy them as Hyper-V guests.What we’re going to look at in this article is Microsoft’s Routing and Remote Access Service. It’s an included component of Windows Server, and it’s highly recommended that an RRAS system perform no other functions. If you have a spare virtualization right, then this environment is free for you. Otherwise, you’ll need to purchase an additional Windows Server license.
Do not enable RRAS in Hyper-V’s management operating system! Doing so does not absolve you of the requirement to provide a virtualization right and networking performance of both the management operating system and RAS will be degraded. It’s also an unsupported configuration. To make matters worse, the performance will be unpredictable.
Step 1: Build the Virtual Machine
Sizing a software router depends heavily upon the quantity of traffic that it’s going to be dealing with. However, systems administrators that don’t work with physical routers very often are usually surprised at just how few hardware resources are in even some of the major physical devices. My starting recommendation for the routing virtual machine is as follows:- vCPUs: 2
- Dynamic Memory: 512MB Startup
- Dynamic Memory: 256MB Minimum
- Dynamic Memory: 2GB Maximum
- Disk: 1 VHDX, Dynamically Expanding, 80GB (expect < 20 GB use, fairly stagnant growth)
- vNIC: 1 to connect to the external switch
- vNIC: 1 per private subnet per private/internal switch (wait on this during initial build)
- OS: latest Windows Server that you are licensed for
- This VM won’t necessarily need to be a member of your domain. If it’s going to be sitting in the perimeter, then you might consider leaving it out. Another option is to leave it in the domain but with higher-than-usual security settings. A great thing to do for machines such as this is disable cached credentials, whether it’s left in the domain or not.
During VM setup, I would only create a single virtual adapter to start, and place it on the external virtual switch. Then use PowerShell to rename that adapter:
Get-VMNetworkAdapter –VMName svrras | Rename-VMNetworkAdapter –NewName External
Before proceeding, ensure you have added all virtual adapters necessary, one for each switch. The virtual adapter connected to the external virtual switch is the only one that requires complete IP information. It should have a default gateway pointing to the next external hop and it should know about DNS servers. It can use any IP on that network that you have available. It only needs a memorable IP if other systems will need to be able to send traffic directly to hosts on the isolated network.
All other adapters require only an IP and a subnet mask. The IP that you choose will be used as the default gateway for all other systems on that switch, so you’ll probably want it to be something easy to remember. If you’re using the router’s operating system as a domain member or in some other situation in which it will be able to register its IP addresses in DNS, make sure that you disable DNS registration for all adapters other than the one that’s in the primary network.
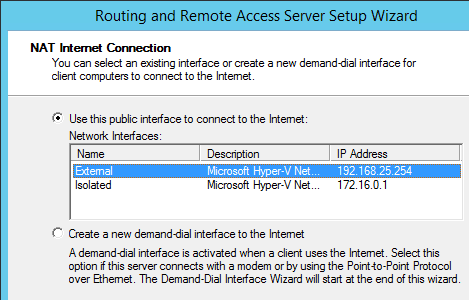
For reference, my test configuration is as follows:
- System name: SVRRAS
- “External” adapter: IP: 192.168.25.254, Mask: 255.255.255.0, GW 192.168.25.1
- “Isolated” adapter: IP: 172.16.0.1, Mask: 255.255.0.0, GW: None
In order for this to work, you’ll need to make some adjustments to the Windows Firewall. If you want, you can just turn it off entirely. However, it is a moderately effective barrier and better than nothing. We’ll follow up on the firewall after the RRAS configuration explanation.
Step 2: Installing and Configuring RRAS
Once Windows is installed and you have all the necessary network adapters connected to their respective virtual switches, the next thing to do is install RRAS. This is done through the Add Roles and Features wizard, just like any other Windows Server role. Choose Remote Access on the Roles screen: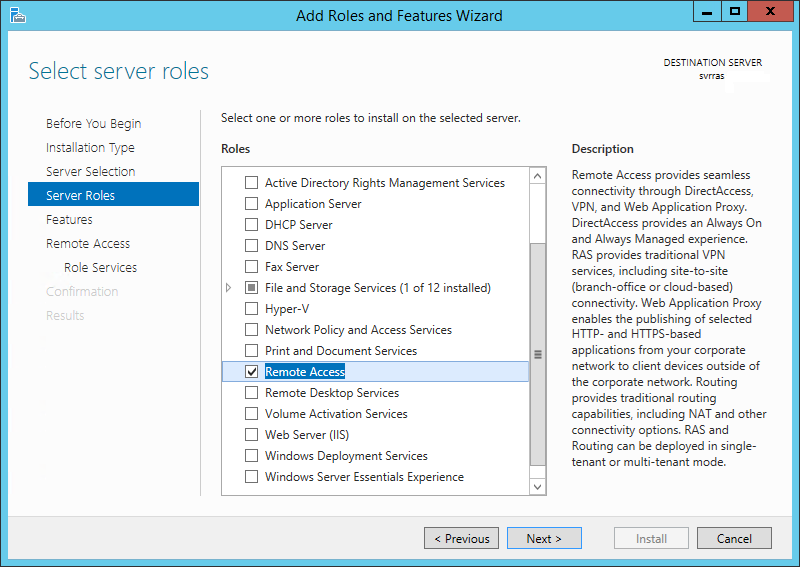
RRAS Server Role
On the Role Services screen, check the box for Routing. You’ll be prompted to add several other items in order to fully enable routing, which will include DirectAcccess and VPN (RAS) on the same screen:
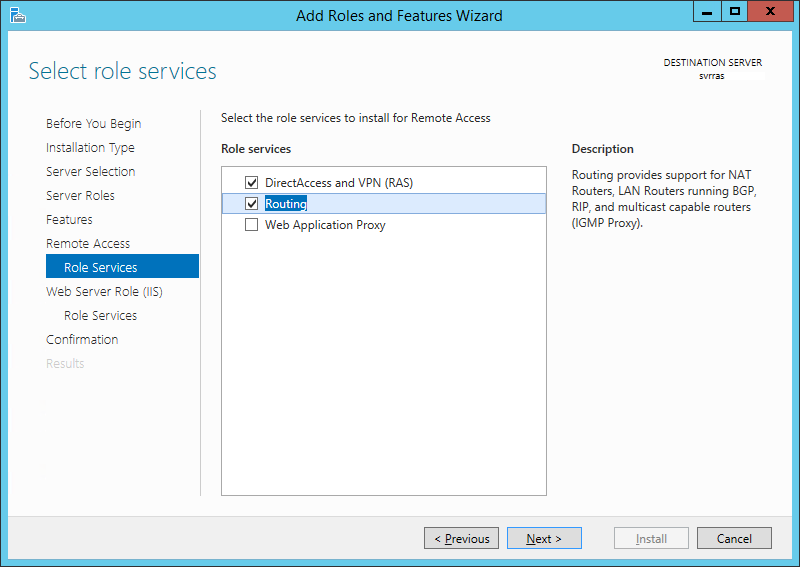
After this, just proceed through, accepting the suggested settings.
Once the installation is complete, a reboot is unnecessary. You just need to configure the router. Open up the Start menu, and find the Routing and Remote Access snap-in. Open that up, and you’ll find something similar to the following screenshot. Right-click on your server’s name and click Configure and Enable Routing and Remote Access.

On the next screen, you have one of two choices for our purposes. The first is Network Address Translation (NAT). This mode works like a home Internet router does. All the virtual machines behind the router will appear to have the same IP address. This is a great solution for isolation purposes. It’s also useful when you haven’t got a hardware router available and want to connect your virtual machines into another network, such as the Internet. Your second choice is to select Custom configuration. This mode allows you to build a standard router, in which the virtual machines on the private network can be reached from other virtual machines by using their IP addresses. I won’t be illustrating this method as it doesn’t do a great deal for isolation.
On the next screen, you’ll tell the routing system which of the adapters is connected to the external network:
On the next screen, you’ll choose how addressing is handled on the private networks. The first option will set up your RRAS system to perform DHCP services for them and forward their DNS requests out to the DNS server(s) you specified for the external network. If you choose the second option, you can build your own addressing services as desired. I’m just going to work with the first option for the sake of ease (and a quicker article):

Once this wizard completes, you’ll be returned to the main RRAS screen where the server should now show online (with a small upward pointing green arrow). That’s really all it takes to configure RRAS inside a Hyper-V guest.
Step 3: Configure the Virtual Machines
This is probably the best part: there is no necessary configuration at all. Just attach the virtual machines to the private switch and leave them in the default networking configuration. Here’s a screenshot from a Windows 7 virtual machine I connected to my test isolated switch: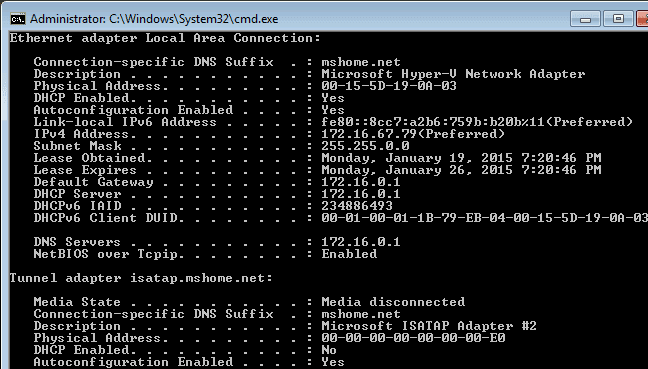
You’ll see that it’s using the IP information of SVRRAS’s adapter on the isolated switch for DHCP, gateway, and DNS information. As long as the firewall is down or properly set on the RRAS system, it will be able to communicate as expected.
Windows Firewall on the RRAS System
The easiest thing to do with the Windows Firewall is to just turn it off. If you’re using it at the perimeter, that’s a pretty bad idea. While it may not be the best firewall available, it does pretty well for a software firewall and seems to have the fewest negative side effects in that genre.For many, a build of this kind exposes them to a completely new configuration style, one that many hardware firewall administrators have dealt with for a very long time. In a traditional software firewall build running on a single system, you usually only have to worry about inbound and outbound traffic on a single adapter. Now, you have to worry about it on at least two adapters. This is a visualization:

When configuring Windows Firewall, you have to be mindful of how this will work. In order to allow guests on the private network to access web sites on the external network, you’ll need to open port 80 INBOUND on the adapter connected to the private network. This kind of management can get tedious, but it’s very effective if you want to further isolate those guests.
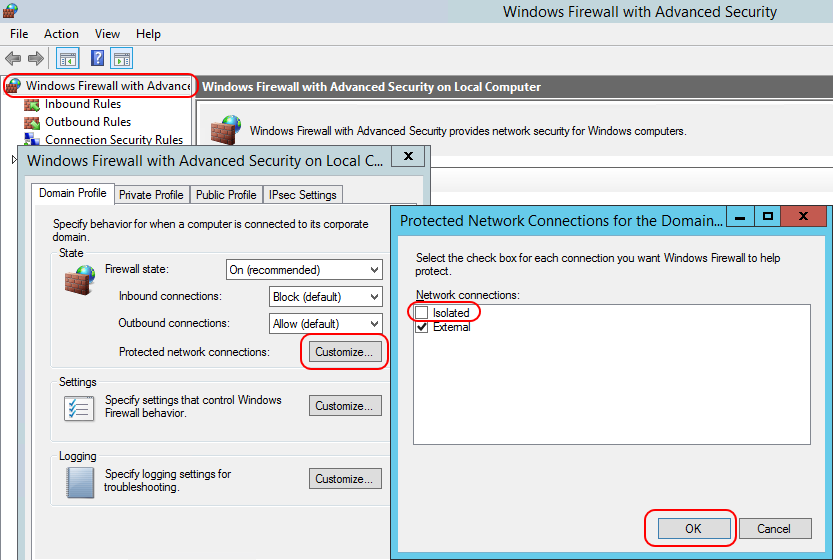
What you might want to do instead is leave the firewall on that connects to the external network but disable it for the private network. Then, your private guests will have receive the default levels of protection from the router VM’s firewall. You could then turn off the firewalls in the guests, if you like. In order to do this, open up Windows Firewall with Advanced Security on the router VM (or target the MMC from a remote computer). In the center pane, click Windows Firewall Properties or, in the left pane, right-click Windows Firewall with Advanced Security and click Properties. Next to Protected network connections, click Customize. In the dialog that appears, uncheck the box that represents the network adapter on the private switch. Click OK all the way out. I’ve renamed my adapters to “Isolated” and “External for the following screenshot:
DMZs and Port Forwarding in RRAS
You might want to selectively expose some of your guests on the private network to inbound traffic from the external network. Personally, I don’t see much value in using the DMZ mode. It’s functionally equivalent and less computationally expensive to just connect a “DMZ” virtual machine directly to the external switch and not have it go through a routing VM at all. Port forwarding (sometimes called “pincushioning”), on the other hand, does have its uses.Open the Routing and Remote Access console. Expand your server, then expand the IP version (IPv4 or IPv6) that you want to configure forwarding for. Click NAT. In the center pane, locate the interface that is connected to the external switch. Right-click it and click Properties.
If you wish to configure one or more “DMZ” virtual machines, the Address Pool tab is where this is done. First, you create a pool that contains the IP address(es) that you want to map to the private VM(s). For instance, if you want to make 192.168.25.78 the IP address of a private VM, then you would enter that IP address with a subnet mask of 255.255.255.255. Once you have your range(s) configured, you use the Reservations button to map the external address(es) to the private VMs address(es).
For port forwarding, go to the Services and Ports tab. If you check one of the existing boxes, it will present you with a prefilled dialog where all you need to enter is the IP address of the private VM for which you wish to forward traffic:

In this screenshot, the On this address pool entry field is unavailable. That’s because I did not add any other IP addresses on the Address Pool tab. If you do that, then the external adapter will have multiple IPs assigned to it. If you don’t use those additional IPs for DMZ purposes, then you can use them here. The reason for doing so is so that multiple private virtual machines can have port forwarding for the same service. One use case for doing so is if you have two or more virtual machines on your private switch serving web pages and you want to make them all visible to computers on the external network.
VLANs and RRAS
This is a topic that comes up often. If you’ve read our networking series, then hopefully you already know how this works. VLANs are a layer 2 concept while routing is layer 3. Therefore, VLAN assignments for virtual machines on your private virtual switch will have no relation to any other VLANs anywhere else. Using VLANs on the private switch is probably not useful unless you need to isolate them from each other. If that’s the case, then you’ll need to make a distinct virtual adapter inside the routing virtual machine for each of those VLANs, or it won’t be able to communicate with the other guests on that VLAN.Easy Routing
That’s really all there is to getting routing working through a Hyper-V virtual machine. This is a great solution for isolating virtual machines and for test labs.Do remember that it’s not as efficient or as robust as using a true hardware router.