This article will guide you through the steps to install and configure Skype for business server 2015. The first step is to download the product, for this guide we will download the evaluation from here. The next step is to install Windows Server 2012 R2 or Windows Server 2012 Standard or Datacenter edition to support Skype for Business Server 2015. Make sure that a Windows Update was run and all updates are in place.
Unfortunately, you can not install Skype for business 2015 on the latest Windows Server 2016 and it is not yet supported.
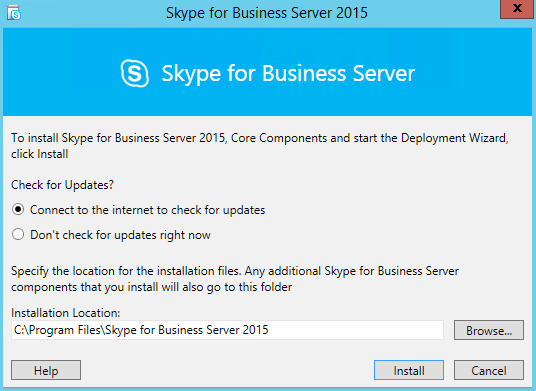
The setup will install automatically the Microsoft Visual C++ 2013 which is a requirement for the installation process, and after that a location on the local disk must be defined to store the installation files, by default this location is C:\Program Files\Skype for Business Server 2015 folder.
Click on Install, the process will require acceptance of the license terms and after that a connection with the Internet to check the latest updates will be performed, wait for the completion and click on Next when the button becomes available.
![]()
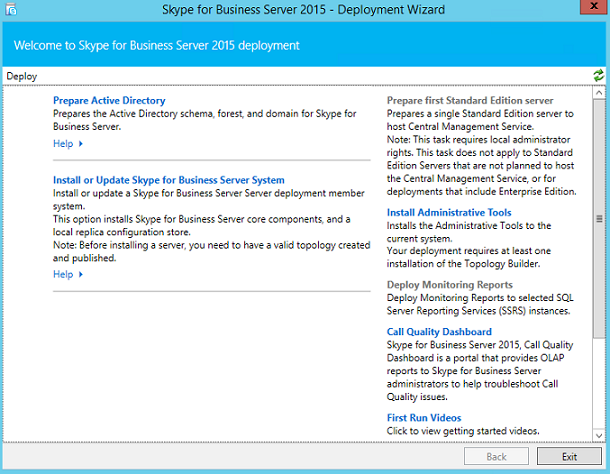
The entire process to install Skype for Business Server 2015 is using the Deployment Wizard which is a wizard that has step by step how to deploy the entire solution, and it tracks the progress as we move forward with the product installation.
![]()
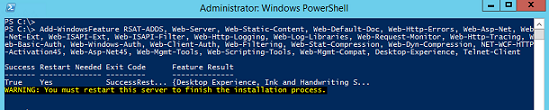
Before starting the Deployment Wizard, the server where the first Skype for Business Server (Front End role) will be installed will require a series of features, the best way to accomplish that is opening PowerShell as administrator and run the following cmdlet. After the completion, restart the server and then we can continue with the Skype for Business Server deployment process.
Add-WindowsFeature RSAT-ADDS, Web-Server, Web-Static-Content, Web-Default-Doc, Web-Http-Errors, Web-Asp-Net, Web-Net-Ext, Web-ISAPI-Ext, Web-ISAPI-Filter, Web-Http-Logging, Web-Log-Libraries, Web-Request-Monitor, Web-Http-Tracing, Web-Basic-Auth, Web-Windows-Auth, Web-Client-Auth, Web-Filtering, Web-Stat-Compression, Web-Dyn-Compression, NET-WCF-HTTP-Activation45, Web-Asp-Net45, Web-Mgmt-Tools, Web-Scripting-Tools, Web-Mgmt-Compat, Desktop-Experience, Telnet-Client
![]()
To continue the deployment process after the server restart, open up C:\Program Files\Skype for Business Server \Deployment and click on Deploy. The Deployment wizard will determine the deployment state and that may take a few seconds during the initial start.
This operation will modify the current Active Directory, then the best practices requires to have replication in place and running smoothly, and a proper backup before starting this process. Also, you should have all FSMO up and running, we can check these servers by running netdom query fsmo.
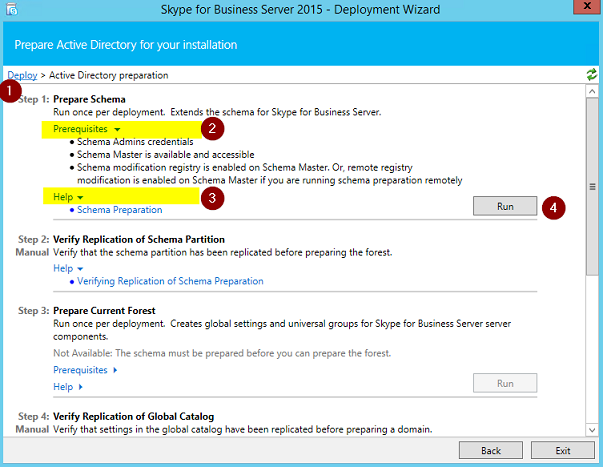
The Deployment Wizard will list all steps in the proper order and they are numbered from Step 1 to Step 7 (Item 1), for each step we will have the Prerequisites and Help explaining the process (items 2 and 3), and finally the administrator can run the process using the graphical user interface (item 4). Keep in mind that in order to prepare Step 3, we must complete steps 1 and 2 otherwise the button will be grayed out.
![]()
The Prepare Schema (Steps 1 and 2), requires Schema Admins credentials to be performed, we can find that out by checking the Active Directory Users and Computers or running net user /domain and check if the Schema Admins has the current user as member.
After clicking on Run, a small wizard will be displayed, just click Next and then wait for the completion of the process (it may take a few minutes) and the last page of the wizard allows the administrator to check the logs of the operation.
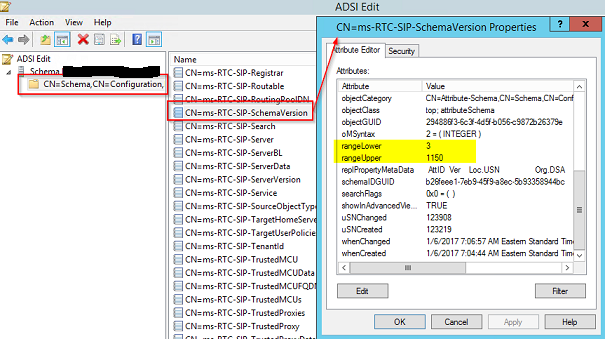
If we want to be a little more thorough, we can open ADSIEdit.msc, connect to the Schema, search for CN=ms-RTC-SIP-SchemaVersion and check the attributes rangeLower and rangeUpper, they should have the values 3 and 1150 respectively.
![]()
The Prepare Current Forest (steps 3 and 4) requires Enterprise Admins privileges, and in this step the Skype for Business Server groups will be created in Active Directory (they all start with CS or RTC on their names). In order to prepare the forest, click on run and leave default settings to complete the preparation.
In order to check if the process was successful, check the Users container in Active Directory Users and Computers, and several groups related to Skype for Business should be listed. Make sure to give enough time for Active Directory replication to take place in larger environments.
![]()
The Prepare Current Domain (steps 5 and 6) will configure the proper permission for the groups created in the previous step, just click on Run and leave default settings to complete the wizard.
In order to check what was done during this process, we can look at the Security tab of the Active Directory domain object, and we will see at least four (4) entries for the RTC groups.
![]()
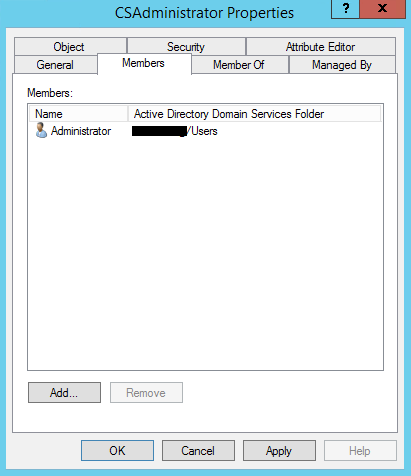
The final step of this preparation process is to add the future Skype for Business Administrators as part of the group CSAdministrator, by default that group is created empty.
![]()
Since we have prepared Active Directory to support Skype for Business Server 2015, we will continue the installation process in next step.
![]()
The first tasks (Install Administrative Tools) is a straight forward process, just leave default values and the installation process will add the basic tools to manage a Skype for Business Server environment, which are:
• Skype for Business Server Control Panel
• Skype for Business Deployment Wizard
• Skype for Business Server Management Shell
• Skype for Business Server Topology Builder
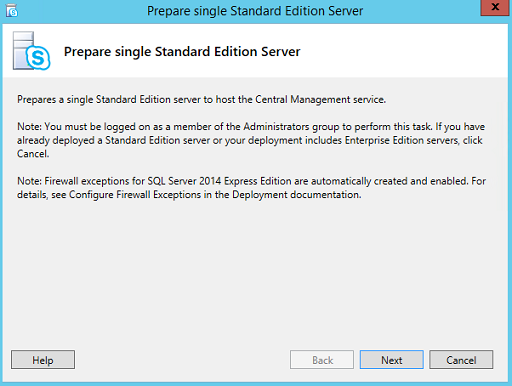
The second step is key to build the foundation for Skype for Business Server in your environment. The Prepare First Standard Edition server prepares the Standard Edition Server that we are going to use to host the CMS (Central Management Store).
The CMS is the central repository in Skype for Business Server solution, and it is around since Lync Server 2010. In that repository we will find the topology, configuration and policies in place on the environment. The CMS is protected and the only way to interact with it is through Topology Builder, Skype for Business Server Management Shell and Skype for Business Control Panel.
The process to prepare the CMS may take a little bit of time because involves SQL Server 2014 Express Edition installation and configuration, the preparation process will also create the Firewall exceptions to support SQL Server 2014.
![]()
![]()
However, if the domain used by the SMTP/SIP is different from the Active Directory FQDN, then we need to decide how to configure the DNS, then we have a couple of options:
• Split-brain in this scenario, we create the zone internally and assign internal names for the Skype for Business services. For example: if the AD zone is techsupportpk.local and the SMTP/SIP is techsupportpk.com, we will create thetechsupportpk.com internally and all entries that are being used for the internal clients on the techsupportpk.com must be recreated internally.
• Automatic Configuration using Group Policies (GPOs) This method does not require DNS modifications, however, works only for domain joined machines.
• Pin-Point Internal Zones, using this method we create a dedicated zone for each record required in the DNS without creating a complete zone. Basically, the client would be able to resolve only the entries that we added, anything other than those zones will not be resolved by the DNS server.
The most elegant solution, in my humble opinion, is using the split-brain because it is easy to troubleshoot, you can use for different applications, such as Microsoft Exchange using Public Certificates, Office Online Server and etc.
The manual configuration consists of creating a zone for your SIP/SMTP domain in your internal DNS and add these following A records pointing out to the IP of the Skype for Business Server (our domain in this article will be techsupportpk.com):
• Admin.techsupportpk.com
• Dialin.techsupportpk.com
• Meet.techsupportpk.com
• Lyncdiscoverinternal.techsupportpk.com
• Scheduler.techsupportpk.com
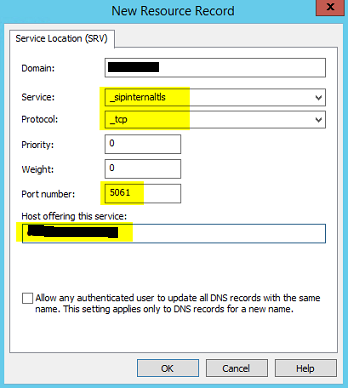
The creation of the A records is straight forward, the tricky one is the SRV record, and in the picture below we can see the details required to be configured.
![]()
The Skype for Business Client will search these following entries when locating the service based on the SIP domain of the user entered:
1. Lyndiscoverinternal.techsupportpk.com (A Host), used by internal clients
2. Lyncdiscover.techsupportpk.com (A Host), used by external clients
3. _sipinternaltls._tcp.techsupportpk.com (SRV Record), used by internal clients
4. _sip._tls.techsupportpk.com (SRV record), used by external clients
5. Sipinternal.techsupportpk.com (A Host), used by internal clients
6. Sip.techsupportpk.com (A Host), used by internal clients
7. Sipexternal.techsupportpk.com (A Host), used by external clients
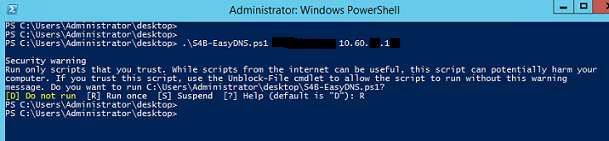
If you want to save time in this process, you can use the S4B-EasyDNS.ps1 script that was created to automate this process, basically you just need to run the script and pass the domain and the IP of the Skype for Business Server, and the DNS zone (if it does not exist) and all A and SRV records will be created automatically.
Note: This script must be executed on the DNS server.
# This script will create all entries required for Skype for Business Server 2015
#
#
$tmpDomain = $args[0]
$tmpIP = $args[1]
$tmpZone = get-dnsserverzone $tmpDomain -ErrorAction:Silent
If (($tmpzone).ZoneName -eq $null) {
write-host 'Creating the Forward Zone' $tmpDomain
Add-DnsServerPrimaryZone $tmpDomain -ReplicationScope Forest -DynamicUpdate None
}
#Adding the DNS entries..
Add-DnsServerResourceRecord -ZoneName $tmpDomain -IPv4Address $tmpIP -A admin
Add-DnsServerResourceRecord -ZoneName $tmpDomain -IPv4Address $tmpIP -A dialin
Add-DnsServerResourceRecord -ZoneName $tmpDomain -IPv4Address $tmpIP -A meet
Add-DnsServerResourceRecord -ZoneName $tmpDomain -IPv4Address $tmpIP -A scheduler
Add-DnsServerResourceRecord -ZoneName $tmpDomain -IPv4Address $tmpIP -A lyncdiscoverinternal
Add-DnsServerResourceRecord -ZoneName $tmpDomain -IPv4Address $tmpIP -A sip
Add-DnsServerResourceRecord -ZoneName $tmpDomain -Srv -Name _sipinternaltls._tcp -DomainName ("sip." + $tmpDomain) -Port 5061 -Priority 0 -Weight 0
![]()
Preparing the Server
The first step is to prepare the server to set up the Skype for Business Server 2015, the setup process can be initiated by running Y:\Setup\amd64\setup.exe (where Y: is the drive letter where the ISO was mounted).The setup will install automatically the Microsoft Visual C++ 2013 which is a requirement for the installation process, and after that a location on the local disk must be defined to store the installation files, by default this location is C:\Program Files\Skype for Business Server 2015 folder.
Click on Install, the process will require acceptance of the license terms and after that a connection with the Internet to check the latest updates will be performed, wait for the completion and click on Next when the button becomes available.
The entire process to install Skype for Business Server 2015 is using the Deployment Wizard which is a wizard that has step by step how to deploy the entire solution, and it tracks the progress as we move forward with the product installation.
Before starting the Deployment Wizard, the server where the first Skype for Business Server (Front End role) will be installed will require a series of features, the best way to accomplish that is opening PowerShell as administrator and run the following cmdlet. After the completion, restart the server and then we can continue with the Skype for Business Server deployment process.
Add-WindowsFeature RSAT-ADDS, Web-Server, Web-Static-Content, Web-Default-Doc, Web-Http-Errors, Web-Asp-Net, Web-Net-Ext, Web-ISAPI-Ext, Web-ISAPI-Filter, Web-Http-Logging, Web-Log-Libraries, Web-Request-Monitor, Web-Http-Tracing, Web-Basic-Auth, Web-Windows-Auth, Web-Client-Auth, Web-Filtering, Web-Stat-Compression, Web-Dyn-Compression, NET-WCF-HTTP-Activation45, Web-Asp-Net45, Web-Mgmt-Tools, Web-Scripting-Tools, Web-Mgmt-Compat, Desktop-Experience, Telnet-Client
To continue the deployment process after the server restart, open up C:\Program Files\Skype for Business Server \Deployment and click on Deploy. The Deployment wizard will determine the deployment state and that may take a few seconds during the initial start.
Preparing Active Directory
The Active Directory preparation is composed of seven (7) steps altogether, but only three are preparation of the Active Directory and the other are checking and the last one is managing accounts to be administrator of the Skype for Business Server 2015 environment.This operation will modify the current Active Directory, then the best practices requires to have replication in place and running smoothly, and a proper backup before starting this process. Also, you should have all FSMO up and running, we can check these servers by running netdom query fsmo.
The Deployment Wizard will list all steps in the proper order and they are numbered from Step 1 to Step 7 (Item 1), for each step we will have the Prerequisites and Help explaining the process (items 2 and 3), and finally the administrator can run the process using the graphical user interface (item 4). Keep in mind that in order to prepare Step 3, we must complete steps 1 and 2 otherwise the button will be grayed out.
The Prepare Schema (Steps 1 and 2), requires Schema Admins credentials to be performed, we can find that out by checking the Active Directory Users and Computers or running net user
After clicking on Run, a small wizard will be displayed, just click Next and then wait for the completion of the process (it may take a few minutes) and the last page of the wizard allows the administrator to check the logs of the operation.
If we want to be a little more thorough, we can open ADSIEdit.msc, connect to the Schema, search for CN=ms-RTC-SIP-SchemaVersion and check the attributes rangeLower and rangeUpper, they should have the values 3 and 1150 respectively.
The Prepare Current Forest (steps 3 and 4) requires Enterprise Admins privileges, and in this step the Skype for Business Server groups will be created in Active Directory (they all start with CS or RTC on their names). In order to prepare the forest, click on run and leave default settings to complete the preparation.
In order to check if the process was successful, check the Users container in Active Directory Users and Computers, and several groups related to Skype for Business should be listed. Make sure to give enough time for Active Directory replication to take place in larger environments.

The Prepare Current Domain (steps 5 and 6) will configure the proper permission for the groups created in the previous step, just click on Run and leave default settings to complete the wizard.
In order to check what was done during this process, we can look at the Security tab of the Active Directory domain object, and we will see at least four (4) entries for the RTC groups.

The final step of this preparation process is to add the future Skype for Business Administrators as part of the group CSAdministrator, by default that group is created empty.
Since we have prepared Active Directory to support Skype for Business Server 2015, we will continue the installation process in next step.
Preparing the environment
Preparing the environment to support the first Skype for Business Server deployment which includes DNS, Shared Folder and Central Management Store installation. Through the Deployment Wizard, we will perform two tasks:- Install Administrative Tools and Prepare first Standard Edition Server
- Prepare the DNS to support Skype for Business and create a shared folder for the new deployment.

The first tasks (Install Administrative Tools) is a straight forward process, just leave default values and the installation process will add the basic tools to manage a Skype for Business Server environment, which are:
• Skype for Business Server Control Panel
• Skype for Business Deployment Wizard
• Skype for Business Server Management Shell
• Skype for Business Server Topology Builder
The second step is key to build the foundation for Skype for Business Server in your environment. The Prepare First Standard Edition server prepares the Standard Edition Server that we are going to use to host the CMS (Central Management Store).
The CMS is the central repository in Skype for Business Server solution, and it is around since Lync Server 2010. In that repository we will find the topology, configuration and policies in place on the environment. The CMS is protected and the only way to interact with it is through Topology Builder, Skype for Business Server Management Shell and Skype for Business Control Panel.
The process to prepare the CMS may take a little bit of time because involves SQL Server 2014 Express Edition installation and configuration, the preparation process will also create the Firewall exceptions to support SQL Server 2014.
Creating the Skype for Business Server share
During the initial topology creation, a shared folder will be required. We will use the same Skype for Business Server to host the shared folder. The Shared Folder requires only the local administrator group with Full Access permissions. In this article, we are using S4BShare as the name of the folder and share.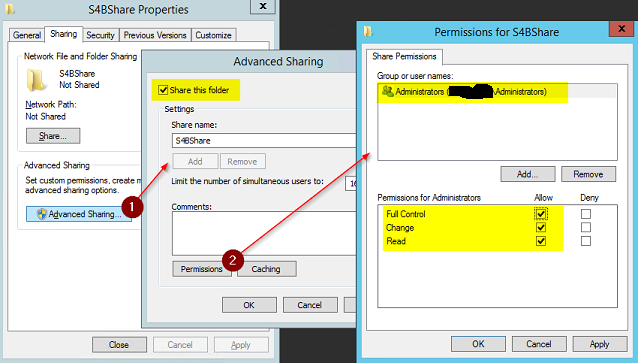
Configuring DNS Server to support Skype for Business Server
The DNS plays a key role when implementing Skype for Business Server, if the SIP domain that will be assigned to the future Skype for Business clients (usually the same as the SMTP address) is the same FQDN (Full Qualified Domain Name) of your Active Directory, then it is a piece of cake, your work will be just adding entries in the existent zone and we are good to go to the next phase. An example, my Active Directory FQDN is techsupportpk.com and my SMTP/SIP will be support@techsupportpk.com, that means that when I look at the DNS console I will have a zone called techsupportpk.com.However, if the domain used by the SMTP/SIP is different from the Active Directory FQDN, then we need to decide how to configure the DNS, then we have a couple of options:
• Split-brain in this scenario, we create the zone internally and assign internal names for the Skype for Business services. For example: if the AD zone is techsupportpk.local and the SMTP/SIP is techsupportpk.com, we will create thetechsupportpk.com internally and all entries that are being used for the internal clients on the techsupportpk.com must be recreated internally.
• Automatic Configuration using Group Policies (GPOs) This method does not require DNS modifications, however, works only for domain joined machines.
• Pin-Point Internal Zones, using this method we create a dedicated zone for each record required in the DNS without creating a complete zone. Basically, the client would be able to resolve only the entries that we added, anything other than those zones will not be resolved by the DNS server.
The most elegant solution, in my humble opinion, is using the split-brain because it is easy to troubleshoot, you can use for different applications, such as Microsoft Exchange using Public Certificates, Office Online Server and etc.
The manual configuration consists of creating a zone for your SIP/SMTP domain in your internal DNS and add these following A records pointing out to the IP of the Skype for Business Server (our domain in this article will be techsupportpk.com):
• Admin.techsupportpk.com
• Dialin.techsupportpk.com
• Meet.techsupportpk.com
• Lyncdiscoverinternal.techsupportpk.com
• Scheduler.techsupportpk.com
The creation of the A records is straight forward, the tricky one is the SRV record, and in the picture below we can see the details required to be configured.
The Skype for Business Client will search these following entries when locating the service based on the SIP domain of the user entered:
1. Lyndiscoverinternal.techsupportpk.com (A Host), used by internal clients
2. Lyncdiscover.techsupportpk.com (A Host), used by external clients
3. _sipinternaltls._tcp.techsupportpk.com (SRV Record), used by internal clients
4. _sip._tls.techsupportpk.com (SRV record), used by external clients
5. Sipinternal.techsupportpk.com (A Host), used by internal clients
6. Sip.techsupportpk.com (A Host), used by internal clients
7. Sipexternal.techsupportpk.com (A Host), used by external clients
If you want to save time in this process, you can use the S4B-EasyDNS.ps1 script that was created to automate this process, basically you just need to run the script and pass the domain and the IP of the Skype for Business Server, and the DNS zone (if it does not exist) and all A and SRV records will be created automatically.
Note: This script must be executed on the DNS server.
# This script will create all entries required for Skype for Business Server 2015
#
#
$tmpDomain = $args[0]
$tmpIP = $args[1]
$tmpZone = get-dnsserverzone $tmpDomain -ErrorAction:Silent
If (($tmpzone).ZoneName -eq $null) {
write-host 'Creating the Forward Zone' $tmpDomain
Add-DnsServerPrimaryZone $tmpDomain -ReplicationScope Forest -DynamicUpdate None
}
#Adding the DNS entries..
Add-DnsServerResourceRecord -ZoneName $tmpDomain -IPv4Address $tmpIP -A admin
Add-DnsServerResourceRecord -ZoneName $tmpDomain -IPv4Address $tmpIP -A dialin
Add-DnsServerResourceRecord -ZoneName $tmpDomain -IPv4Address $tmpIP -A meet
Add-DnsServerResourceRecord -ZoneName $tmpDomain -IPv4Address $tmpIP -A scheduler
Add-DnsServerResourceRecord -ZoneName $tmpDomain -IPv4Address $tmpIP -A lyncdiscoverinternal
Add-DnsServerResourceRecord -ZoneName $tmpDomain -IPv4Address $tmpIP -A sip
Add-DnsServerResourceRecord -ZoneName $tmpDomain -Srv -Name _sipinternaltls._tcp -DomainName ("sip." + $tmpDomain) -Port 5061 -Priority 0 -Weight 0