![](http://1.bp.blogspot.com/-tJSvucJZZwA/WFol1glwdbI/AAAAAAAANkQ/XXoZ-9dIQPg1px_lrXNq5rLk5_eO6RM3QCLcB/s1600/Active-Directory-Certificate-Services-Windows-Server-2016.png)
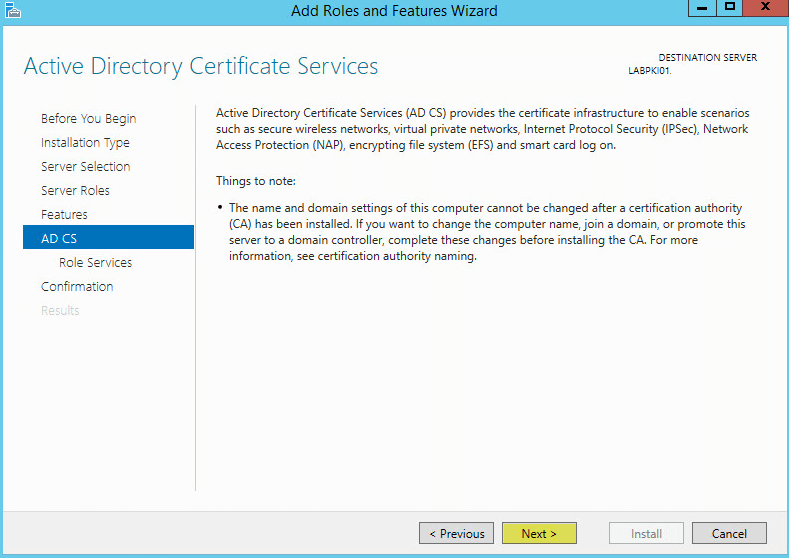
Active Directory Certificate Services (AD CS) provides customizable services for issuing and managing public key infrastructure (PKI) certificates used in software security systems that employ public key technologies. The digital certificates that AD CS provides can be used to encrypt and digitally sign electronic documents and messages.
More over, these digital certificates can be used for authentication of computer, user, or device accounts on a network. Digital certificates are used to provide:
- Confidentiality - through encryption
- Integrity - through digital signatures
- Authentication - by associating certificate keys with computer, user, or device accounts on a computer network.
These certificate services were available starting in Windows 2000 and continue to be available as a server role in Windows Server 2016.
This guide walks you through the steps to deploy a single Active Directory Certificate Server on a existing domain and configuring auto enroll group policy for workstation and servers. For an enterprise environment you will need to deploy subordinate CA’s and turnoff your root CA for security.
Installing Active Directory Certificate Services Role
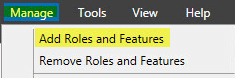
To begin, Open up Server Manager and click Manage > Add Roles and Features:
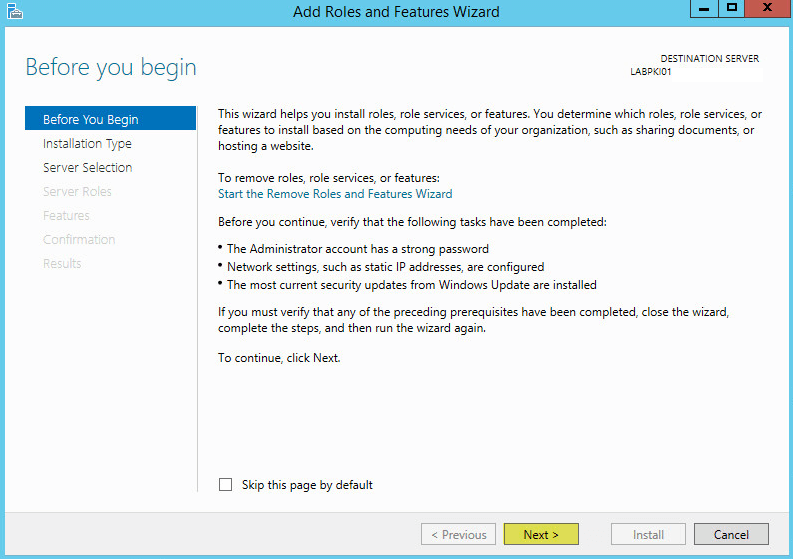
![](http://3.bp.blogspot.com/-Q731wLBEtmk/WFoeMa9NeYI/AAAAAAAANhI/bYLa6-w1KUEKowgZSeuMuuGFzC08nAZKACLcB/s1600/Active-Directory-Certificate-Services-1.png)
Click Next:
![](http://3.bp.blogspot.com/-hJomsv0W3qM/WFoeOY8RybI/AAAAAAAANh0/XuDjqzrYhd4yp22_1wZapBLH6f5BpjV8wCLcB/s1600/Active-Directory-Certificate-Services-2.png)
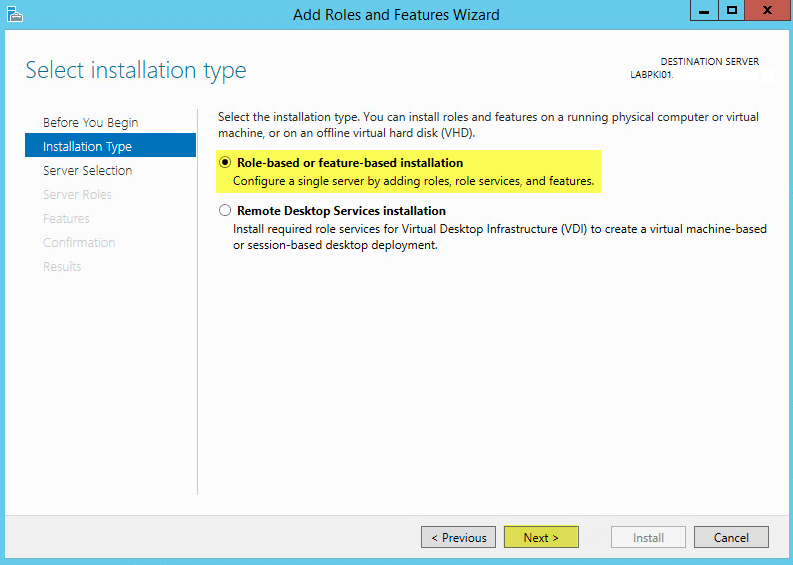
Select Role-based or feature-based installation then click Next:
![](http://3.bp.blogspot.com/-wpGC2s01AOo/WFoeQLy4YJI/AAAAAAAANik/iVlGBQ-XEsc7_az6HwQi3e8C0DLHNSC-gCLcB/s1600/Active-Directory-Certificate-Services-3.png)
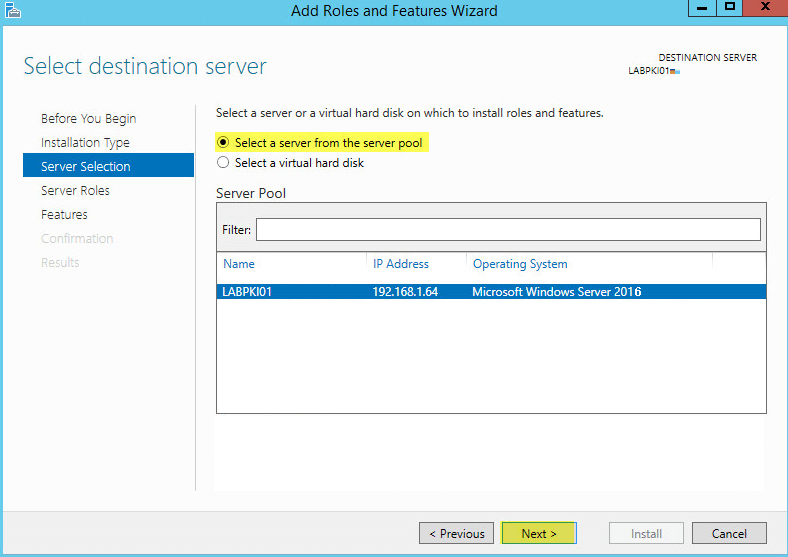
Select the server you want to install this role then click Next
![](http://3.bp.blogspot.com/-xgaH4KLSgdc/WFoeR3aiSnI/AAAAAAAANjM/yn7DjAOEkkUafpb6HD4DXOKjkMKMxMO_ACLcB/s1600/Active-Directory-Certificate-Services-4.png)
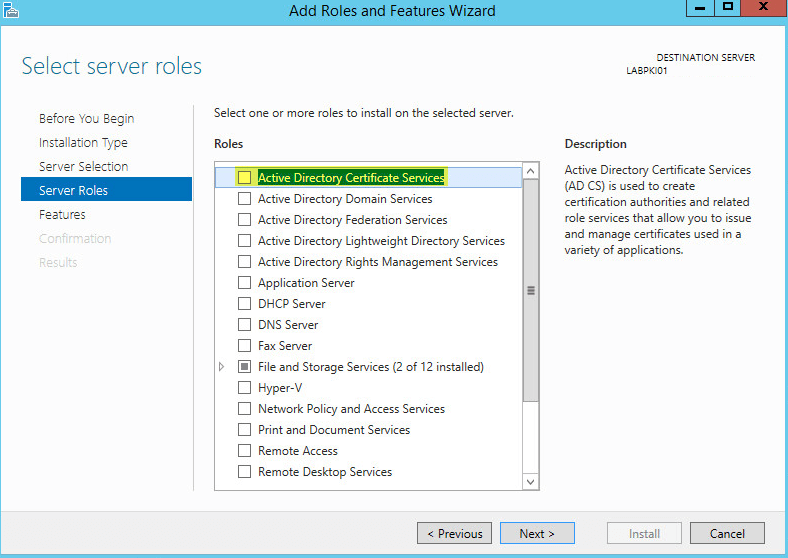
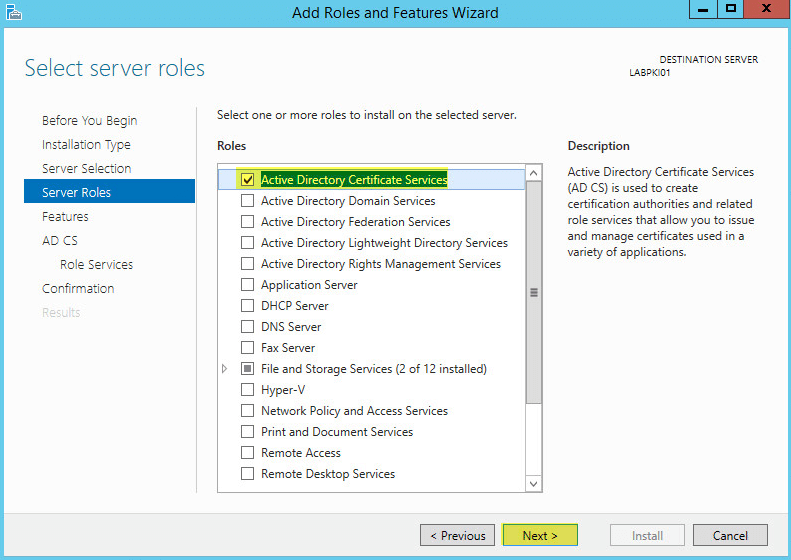
Select Active Directory Certificate Services then click Next:
![](http://1.bp.blogspot.com/-OKni6gzKt5U/WFoeTbgt44I/AAAAAAAANjw/SQK83veTtZclNoF_UhP1GQqqwP9aVcjkQCLcB/s1600/Active-Directory-Certificate-Services-5.png)
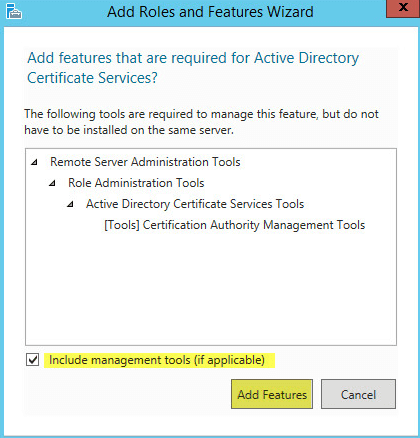
On the pop up window click the box Include management tools then Add Features:
![](http://3.bp.blogspot.com/-eL4W5XjazuQ/WFoeTUtTYJI/AAAAAAAANj0/aLu45q01YbojsJ7WAQ8qWM4vb-uzI3pVQCLcB/s1600/Active-Directory-Certificate-Services-6.png)
Click Next:
![](http://1.bp.blogspot.com/-W8p5QTL3RhE/WFoeTnZOewI/AAAAAAAANj4/W_nB7otDsAUOngQ_1yYpIqvB7eagOZL5gCLcB/s1600/Active-Directory-Certificate-Services-7.png)
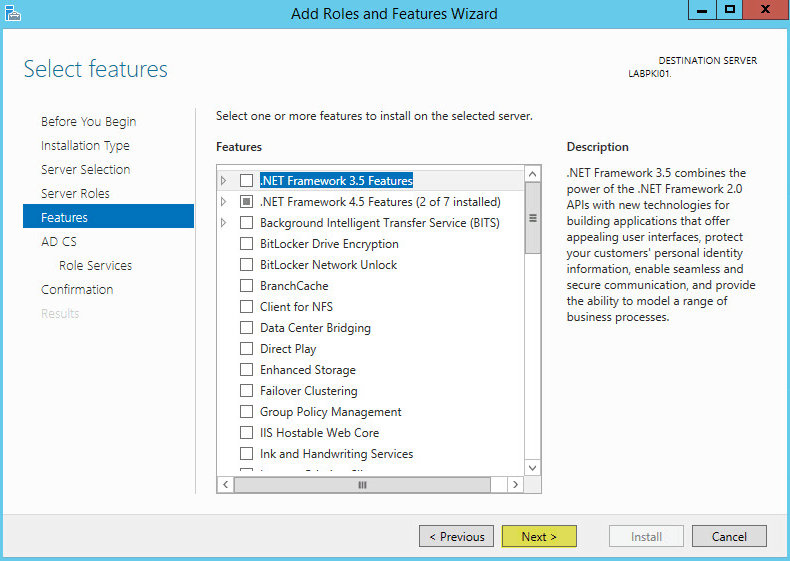
No additional Features are needed. Click Next:
![](http://2.bp.blogspot.com/-u0LD710APe4/WFoeTyk0aTI/AAAAAAAANkA/LDJ9dvMC4I0GFCAIhuAzZhmSSxF_ein6gCLcB/s1600/Active-Directory-Certificate-Services-8.png)
Click Next:
![](http://4.bp.blogspot.com/-63MFzDonhEY/WFoeT6ewjZI/AAAAAAAANj8/gga1WqCmME8wDvWC0tWhwUOG6JQq5noBwCLcB/s1600/Active-Directory-Certificate-Services-9.png)
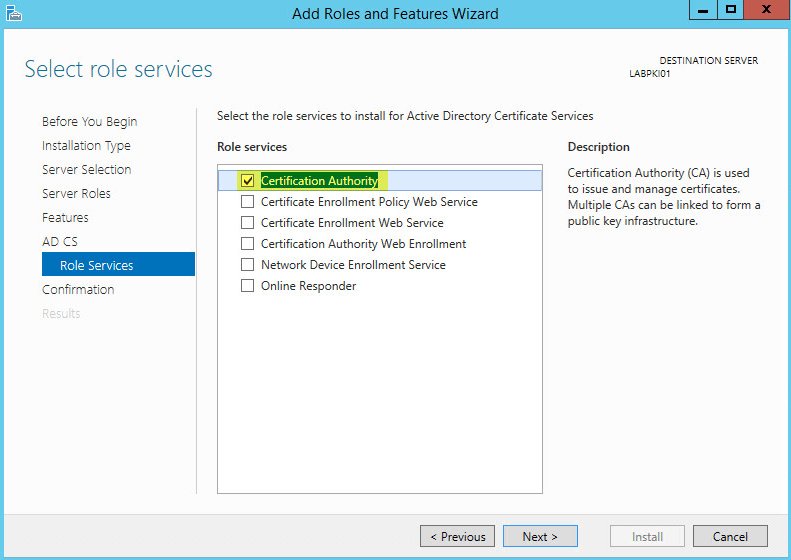
Select the services you want to enable. At a minimum enable Certificate Authority. Click Next:
![](http://3.bp.blogspot.com/-vffVcobWBYU/WFoeMkmNutI/AAAAAAAANhM/QVSs_hvMwnkWTNYJhmWROzTCLRuDU6IhQCLcB/s1600/Active-Directory-Certificate-Services-10.png)
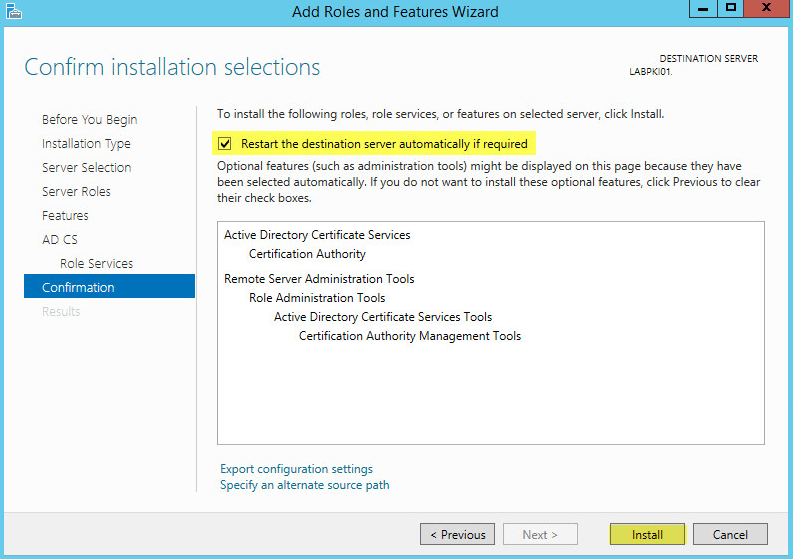
A reboot was not required. Click Install:
![](http://2.bp.blogspot.com/-mcUOj1nAQx4/WFoeMsLwuPI/AAAAAAAANhQ/tq8F6kbY9eEkGJc90BYmHw4TMiGr0aG0ACLcB/s1600/Active-Directory-Certificate-Services-11.png)
Once the installation is complete click Close:
![](http://1.bp.blogspot.com/-S9x6y4_9k7s/WFoeM5J3knI/AAAAAAAANhU/o-03WyUYdN49xU2bXcoe2G4o3fXxHGAZwCLcB/s1600/Active-Directory-Certificate-Services-12.png)
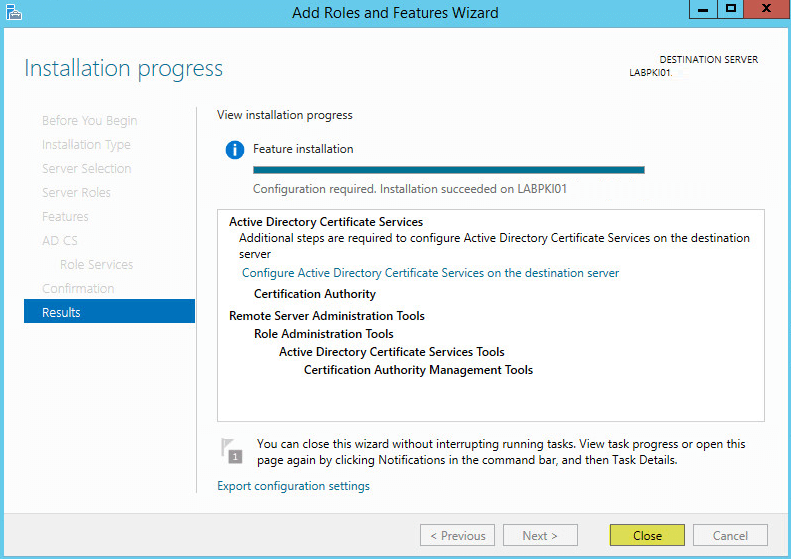
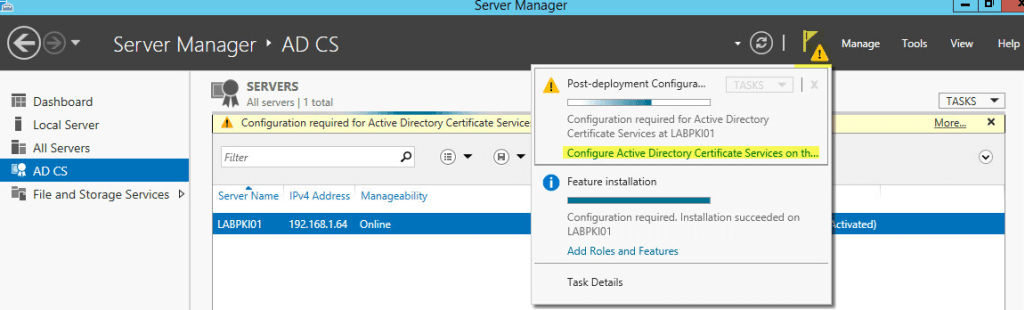
Back on Server Manager under Notifications click the message Configure the Active Directory Certificate Services on this server:
![](http://4.bp.blogspot.com/-jLQ_HkmxPUk/WFoeNPv5vxI/AAAAAAAANhY/iGtYTc34648m5gCFHbk_mW5VLYUkTC1MQCLcB/s1600/Active-Directory-Certificate-Services-13.png)
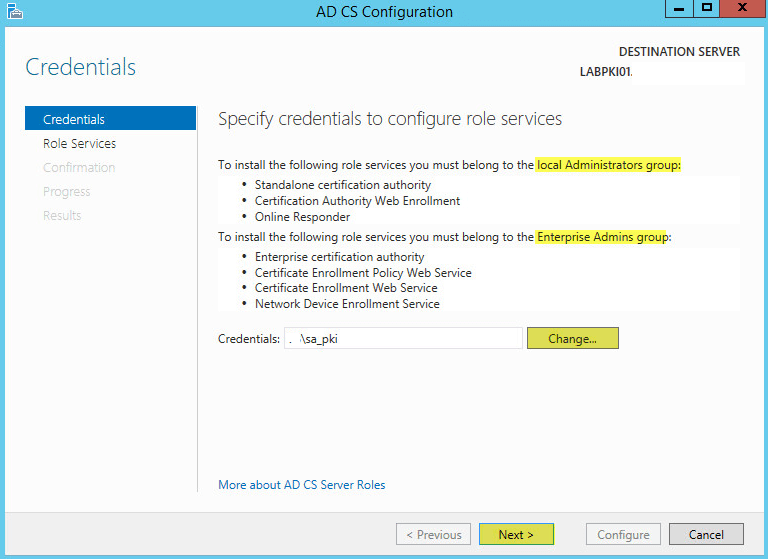
Select a user account that has the permissions depending on the role services you selected above. Click Next:
![](http://4.bp.blogspot.com/-jCyFnyo8tgQ/WFoeNLLCk2I/AAAAAAAANhc/t-lALVTxCeERmfxzWJcQdInBwaIYvQbmgCLcB/s1600/Active-Directory-Certificate-Services-14.png)
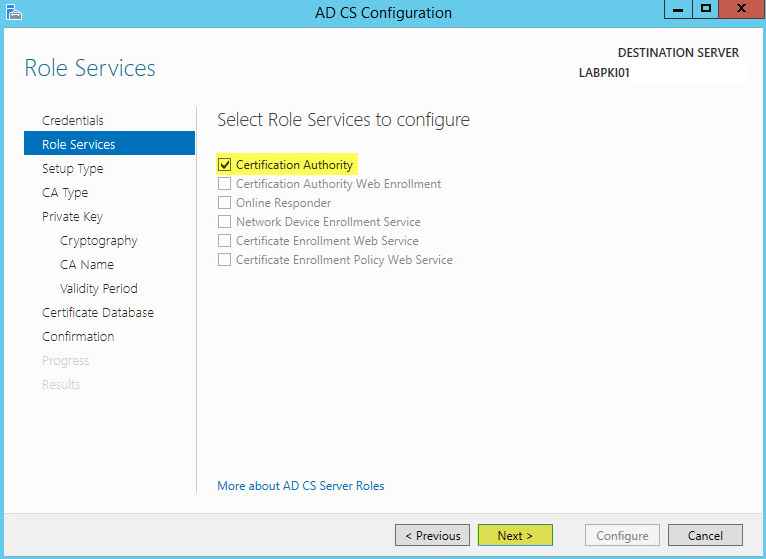
In my example I will be configuring the Certification Authority. Click Next:
![](http://3.bp.blogspot.com/-26d4XCr_o5U/WFoeNkyj7wI/AAAAAAAANhk/yl3HXMvAoWMeg5wMKJMGrcqBXk_-gqVqACLcB/s1600/Active-Directory-Certificate-Services-15.png)
Since I am using a domain controller for this particular role, I will select Enterprise CA. Click Next:
Note: If you are installing CS role on a standalone server then go with Standalone CA
![](http://4.bp.blogspot.com/-CZaqkxEyvWM/WFoeNt9MzZI/AAAAAAAANhg/12kZQ9gS0MAkcJS5wAyB_mRX3m00prI6gCLcB/s1600/Active-Directory-Certificate-Services-16.png)
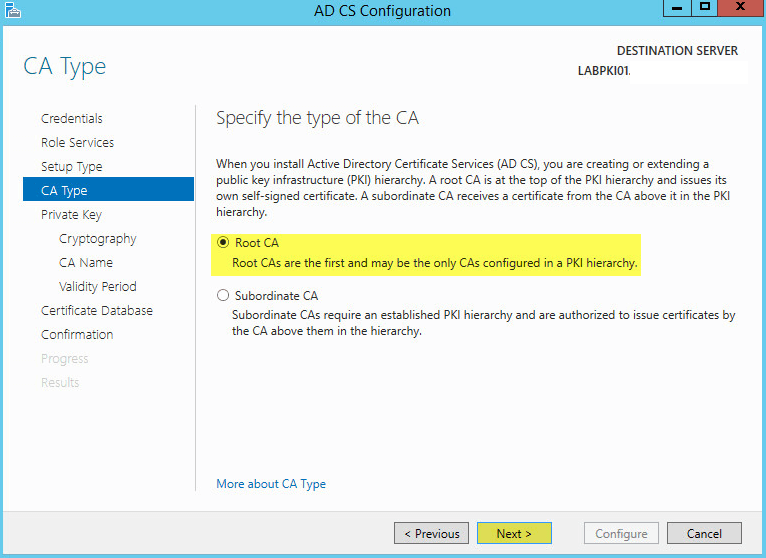
This is our first PKI server so I will select Root CA. Click Next:
![](http://1.bp.blogspot.com/-lr4lMvNlKZA/WFoeNy3Rj7I/AAAAAAAANho/b8J0SzvykrQ13vEYAOj0zT005DO-QasPwCLcB/s1600/Active-Directory-Certificate-Services-17.png)
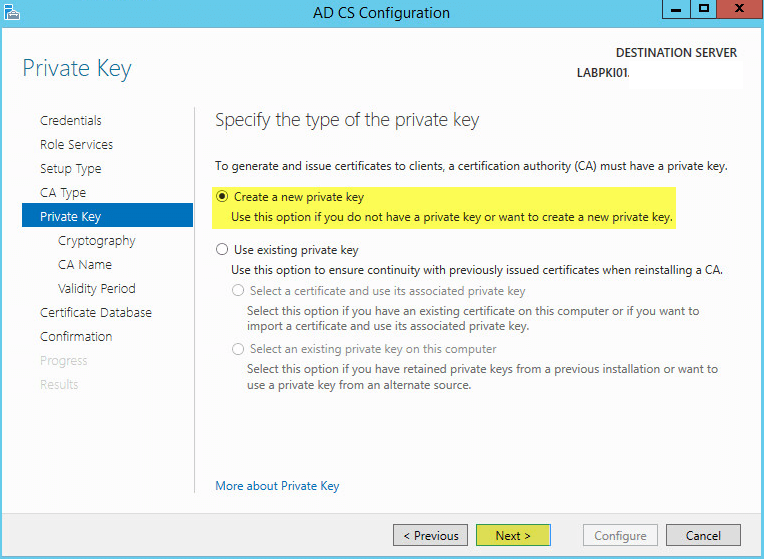
Create a new private key then click Next:
![](http://1.bp.blogspot.com/-6_IMIDXiOJo/WFoeOGCI8BI/AAAAAAAANhw/z-XNN7tCzLkEhm-gA2d655wA4p3t7xYhACLcB/s1600/Active-Directory-Certificate-Services-18.png)
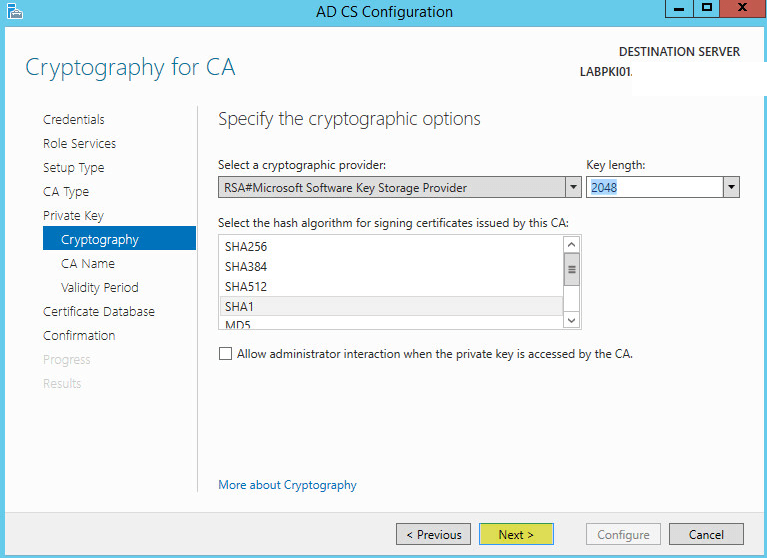
Enter your cryptographic options then click Next:
Note: Do not select SHA1 as it is being deprecated by all browsers and Microsoft Server Authentication; use SHA256 instead.
![](http://3.bp.blogspot.com/-3EgTdokO30g/WFoeOJABWEI/AAAAAAAANhs/WZai3w9M6SIe32Wiq8Bj1-gYsz98vbxvQCLcB/s1600/Active-Directory-Certificate-Services-19.png)
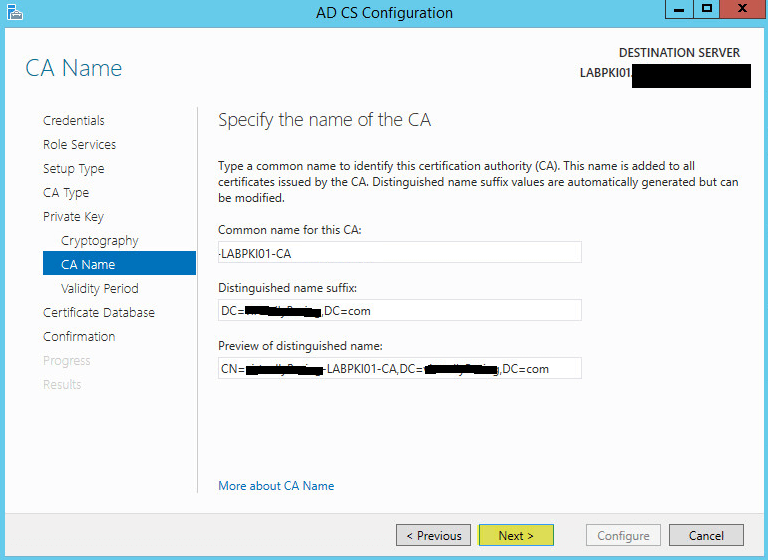
The fields should be pre-populated but you can change the Common name if you wish. Click Next:
![](http://2.bp.blogspot.com/-Wvuaqs5aevE/WFoeOdKpfDI/AAAAAAAANh4/V_tGmXkvvgU9P7w7cFqvFhNqHg-2waY1QCLcB/s1600/Active-Directory-Certificate-Services-20.png)
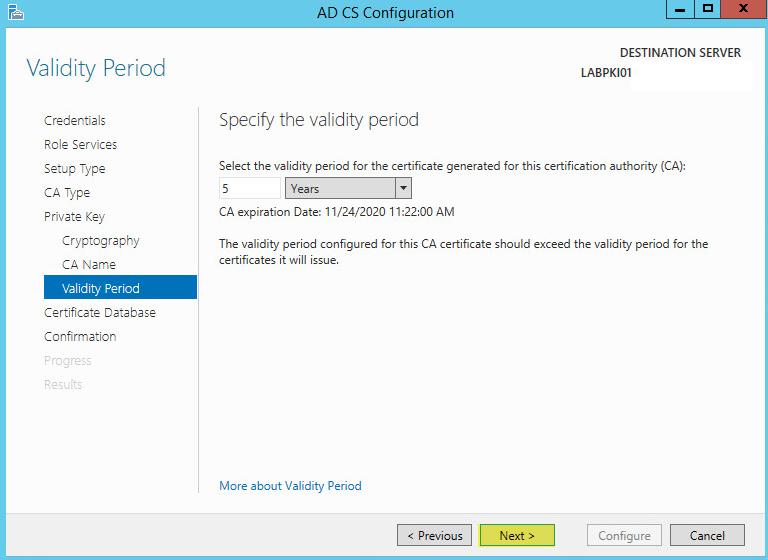
Enter a validity period. This is how often the CA certificate will expire and will need to be renew on subordinate CA (if applicable).
Take note of the message: The validity period configured for the CA certificate should exceed the validity period for certificates it will issue.
Click Next:
![](http://3.bp.blogspot.com/-_rXwcQfdv80/WFoeOoWvZ-I/AAAAAAAANh8/ASkZMAV8p8EbvFRM5CmywC3vlA82Ic78gCLcB/s1600/Active-Directory-Certificate-Services-21.png)
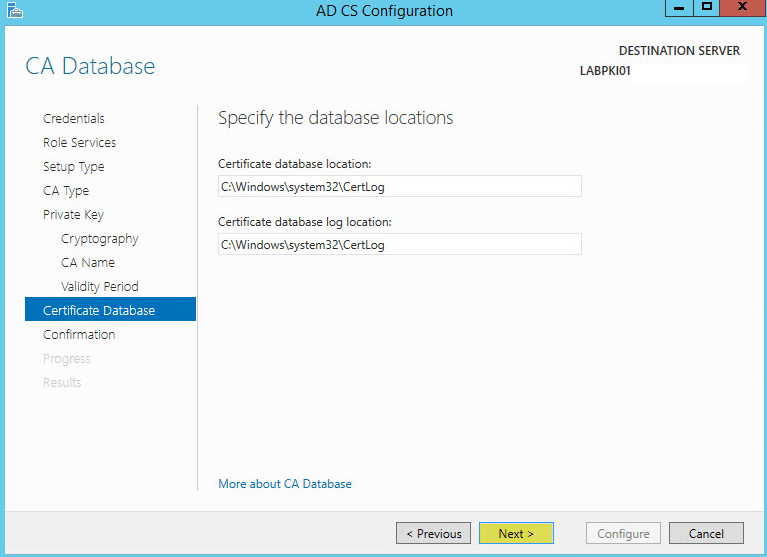
We recommend leaving these as defaults. Click Next:
![](http://3.bp.blogspot.com/-XxISVCTNZZ4/WFoeO4xxEjI/AAAAAAAANiA/mTIK3aLHVrEMC6pB5BcJbyp7QdD05rg-gCLcB/s1600/Active-Directory-Certificate-Services-22.png)
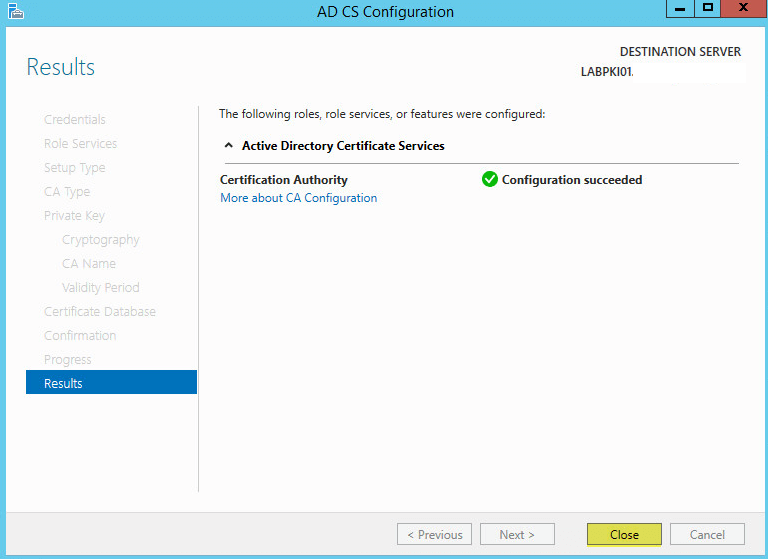
Make sure the summary is correct then click Configure:
![](http://1.bp.blogspot.com/-gFKsBjTqri4/WFoePG6pM3I/AAAAAAAANiI/sRV3dgsOON42V2mY8YvG0DmVn7Q29zh2QCLcB/s1600/Active-Directory-Certificate-Services-23.png)
Click Close:
![](http://4.bp.blogspot.com/-NANcChf1nuc/WFoePCxzaBI/AAAAAAAANiM/IJxJCBXhfwY1j2XsBd4sYZYHCjO_V7BCwCLcB/s1600/Active-Directory-Certificate-Services-24.png)
Creating Certificate Template for Workstation and Client Authentication
This step is to create a certificate template that will enable your domain computers to request certificates from your PKI server.
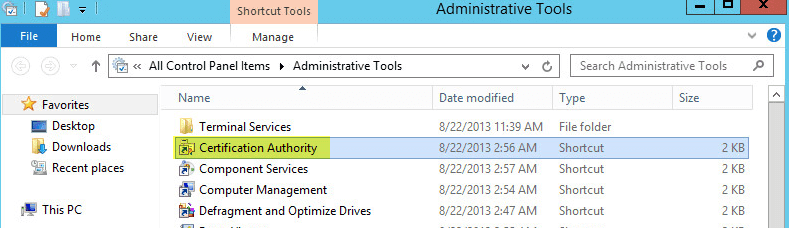
Open up Control Panel then go to Administrative Tools > Certification Authority:
![](http://2.bp.blogspot.com/-HmUTeLUqHbg/WFoePFpQkQI/AAAAAAAANiE/luZooOhwOV4EH5iyeXiZQdZXe2yDkyJCACLcB/s1600/Active-Directory-Certificate-Services-25.png)
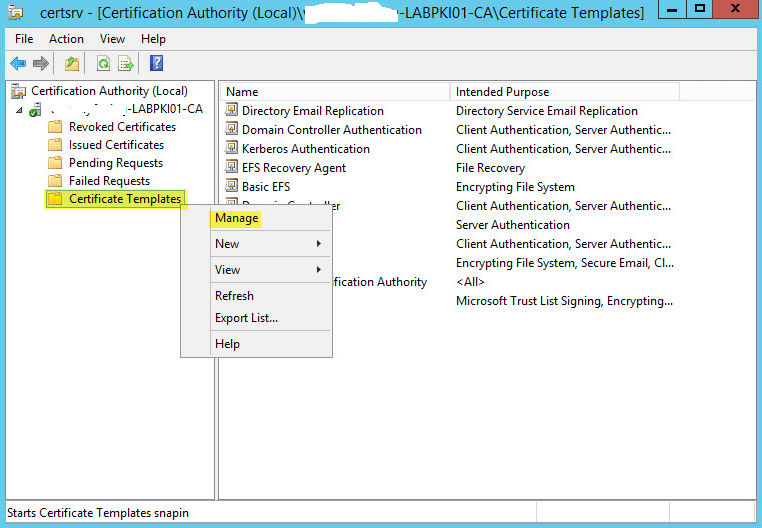
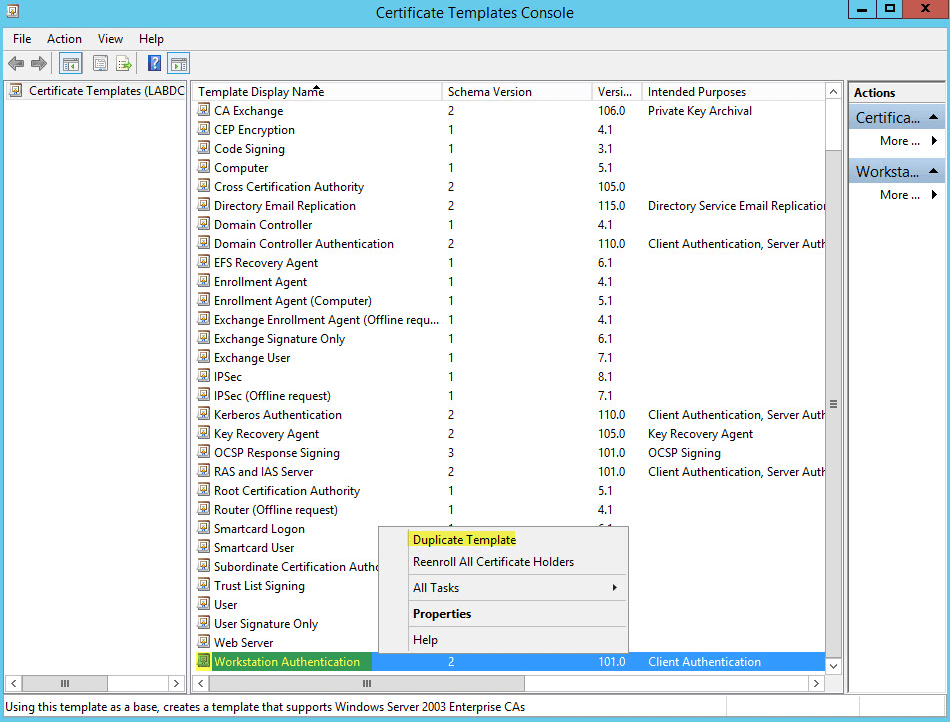
Right click Certificate Templates then Manage:
![](http://4.bp.blogspot.com/-95WqYe1JjQc/WFoePqxzEjI/AAAAAAAANiU/96QYBtndqhYZ8F5yhmhc2LD79fNd_zrsQCLcB/s1600/Active-Directory-Certificate-Services-26.png)
Scroll down to Workstation Authentication, right click then select Duplicate Template:
![](http://4.bp.blogspot.com/-pB2EsxEkM_g/WFoePgHND_I/AAAAAAAANiY/9yHublNSNLkCzcVVLG5AOALgO0tzYU9aACLcB/s1600/Active-Directory-Certificate-Services-27.png)
On the General Tab enter a template display name then select a validity period. Click the two boxed options:
![](http://4.bp.blogspot.com/-B54nI93nl3U/WFoePql2K-I/AAAAAAAANiQ/XfJSXiiWziIJ7Jm36wxuhcy97yg4z-M4ACLcB/s1600/Active-Directory-Certificate-Services-28.png)
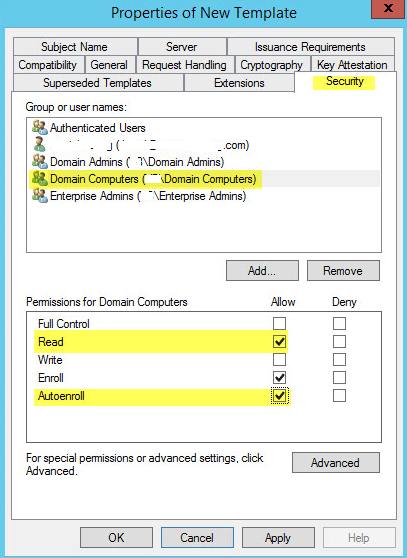
On the Security tab add Domain Computers as this will give permission to your Domain Computers. Check the boxes for Read and Autoenroll:
![](http://4.bp.blogspot.com/-FdR1G8lqCak/WFoeQLC2U_I/AAAAAAAANic/0uERUcA6J90Yr1d-j3otNtdWHOPfT8EYwCLcB/s1600/Active-Directory-Certificate-Services-29.png)
On the Extensions tab click Application Policies then Edit:
![](http://4.bp.blogspot.com/-SH8cOU3lUlw/WFoeQNKUmOI/AAAAAAAANig/Nyzz7Ycaod8NWLoSD6uS4liHwi_AngJtwCLcB/s1600/Active-Directory-Certificate-Services-30.png)
Click Add > Server Authentication then Ok
![](http://3.bp.blogspot.com/-av41_Vre_50/WFoeQVJ1z8I/AAAAAAAANio/08Wh827PFAMw8ZRV00DOSmqIpJdgqIj2QCLcB/s1600/Active-Directory-Certificate-Services-31.png)
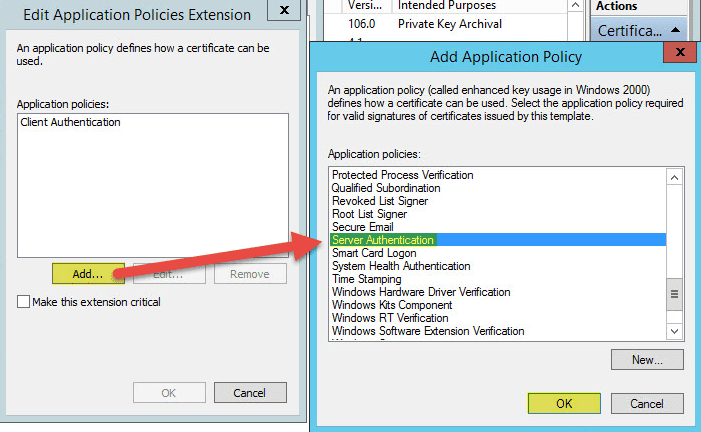
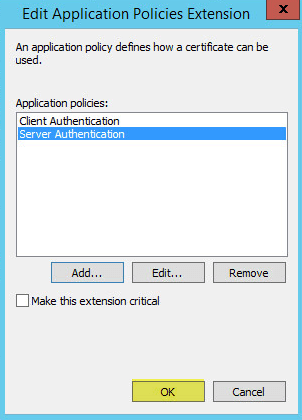
Make sure Server Authentication is selected then click OK
![](http://1.bp.blogspot.com/-iHoJnbcqrmg/WFoeQjDrykI/AAAAAAAANis/AbTuAYMETTgGRaBjp3QSilS1ZFv36GXXACLcB/s1600/Active-Directory-Certificate-Services-32.png)
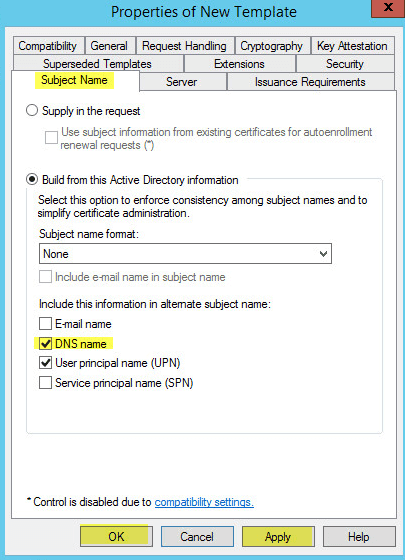
On the Subject Name tab click the DNS name box to add the DNS name to the SAN of the certificate. Click Apply and OK
![](http://1.bp.blogspot.com/-2iBQoTrwh50/WFoeQl7FL2I/AAAAAAAANiw/rqX1Qu4ijdMuGi1PuqVRNVby-Jzi8IvLgCLcB/s1600/Active-Directory-Certificate-Services-33.png)
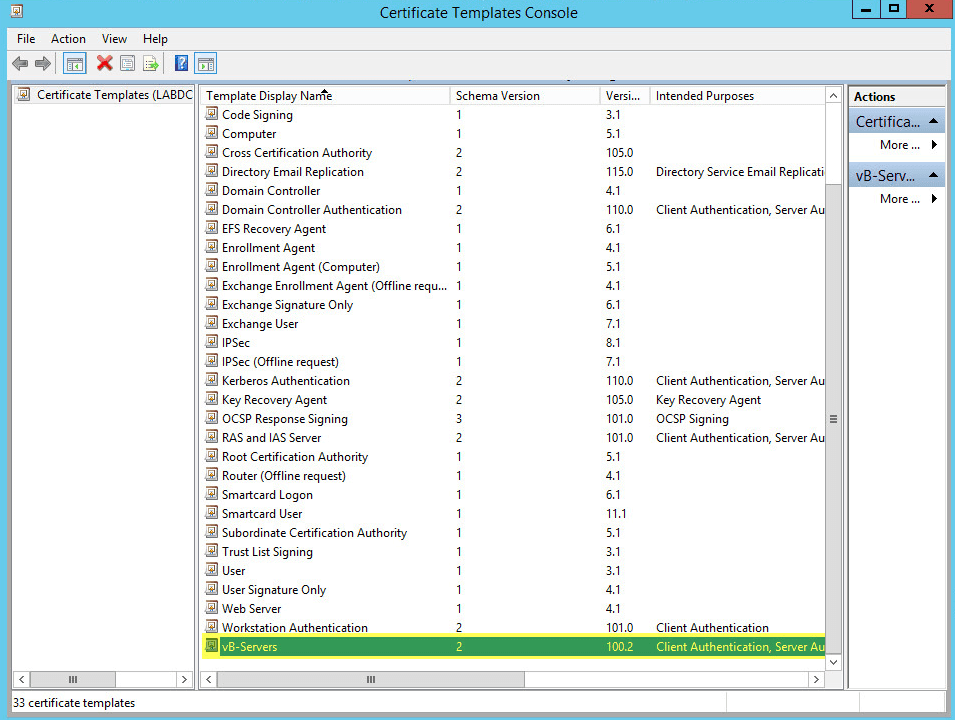
You will now have a new template with the intended purposes of Client Authentication, Server Authentication. You can now close the Certificate Templates Console window.
![](http://3.bp.blogspot.com/-_Irt9FXCywc/WFoeQ-vkTYI/AAAAAAAANi0/AhhA6psMRZAZjQmmKkEcdAWh9Mn6wkQ-wCLcB/s1600/Active-Directory-Certificate-Services-34.png)
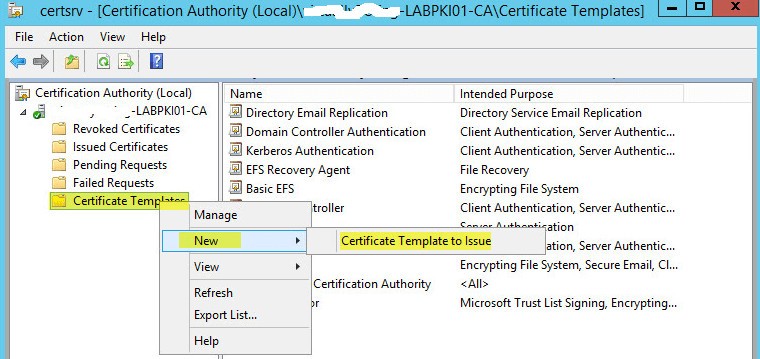
Back on the Certification Authority window, right click Certification Template > New > Certificate Template to Issue
![](http://2.bp.blogspot.com/-b-rayLoY-ZI/WFoeRNV31OI/AAAAAAAANi4/2xLlaPgMOigrq5KQed1X2WIJNlI0DRoAACLcB/s1600/Active-Directory-Certificate-Services-35.png)
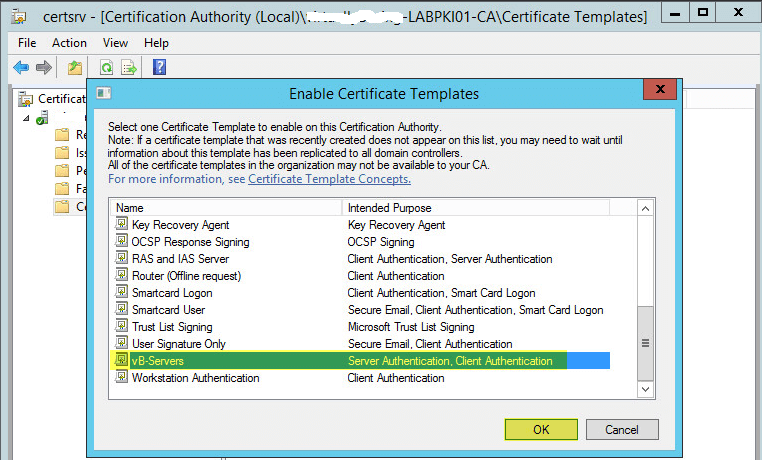
Select the Certificate Template we created then click OK. The custom template should now show under Certificate Templates.
![](http://2.bp.blogspot.com/-RXbS3H9enkg/WFoeRLYoNNI/AAAAAAAANi8/cHoRoEX_2XoZyUMLYK6n8bGeZd8XvIA-gCLcB/s1600/Active-Directory-Certificate-Services-36.png)
Configuring Group Policy for Automatic Certificate Enrollment:
This step is to create the group policy to automate certificate enrollment on computers through your PKI server.
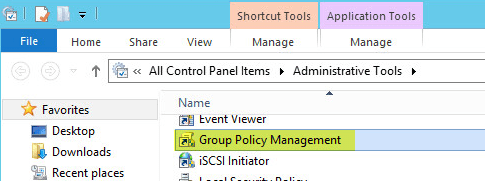
On your Domain Controller open Control Panel then Administrative Tools > Group Policy Management:
![](http://1.bp.blogspot.com/-bYwcGjRIFRw/WFoeRaU2dJI/AAAAAAAANjA/pti2ny7D2gwJL0qkPY_WTLuL7YJxAbiIwCLcB/s1600/Active-Directory-Certificate-Services-37.png)
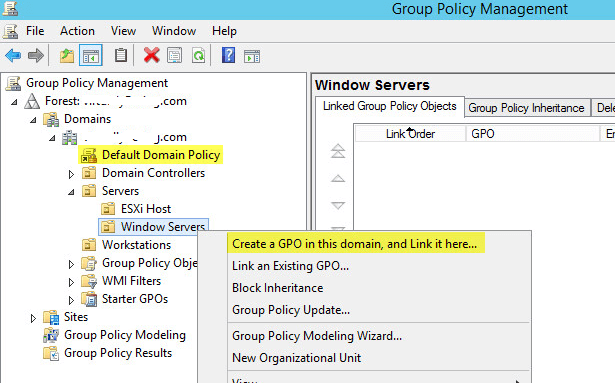
You can edit the Default Domain Policy so all computers are configured to request a certificate from your PKI or you can create a policy in a specific OU. I chose to create a new policy for my Windows Servers OU.
![](http://1.bp.blogspot.com/-sNpB8xbn9r0/WFoeRhtaiSI/AAAAAAAANjI/xsvBJxq3aRArX8Ffk4Vjx-07_R9767rbgCLcB/s1600/Active-Directory-Certificate-Services-38.png)
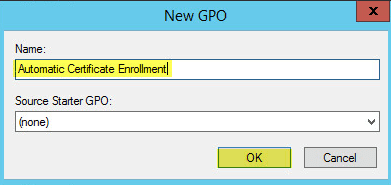
Enter a name and click OK
![](http://4.bp.blogspot.com/-AZMWDa4e56Y/WFoeRghmlLI/AAAAAAAANjE/AeiegNp32AYDMeOmByMowIIB8LhtyYJVgCLcB/s1600/Active-Directory-Certificate-Services-39.png)
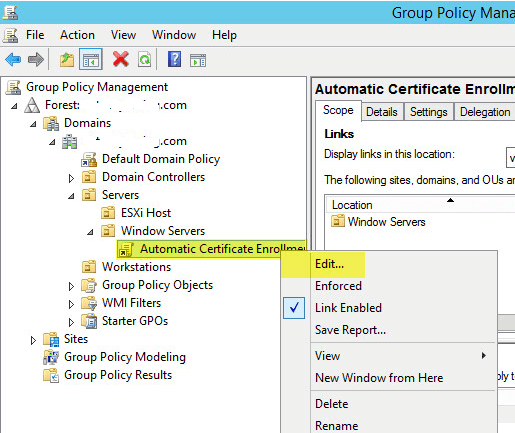
Now right click the new policy then click Edit:
![](http://2.bp.blogspot.com/-Tgd77y0pB2c/WFoeSGQ6UPI/AAAAAAAANjQ/a3n6GP7KEls5GFhnvkjABy5NNuXv8AX3QCLcB/s1600/Active-Directory-Certificate-Services-40.png)
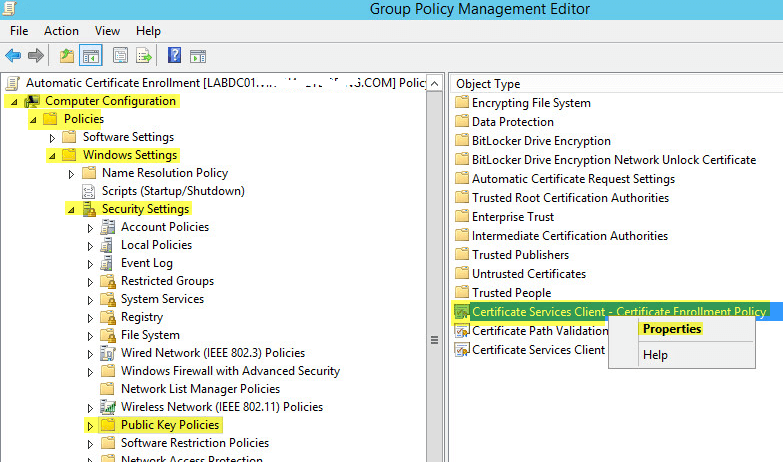
Scroll down to Public Key Policies. In the right pane right click Certificate Services Client > Certificate Enrollment Policy then Properties:
![](http://3.bp.blogspot.com/-S5KR5EJLOtk/WFoeSY0ovVI/AAAAAAAANjY/O4q5K2Ia_MM_kvFqzG6vzNZT4j3sNcj1wCLcB/s1600/Active-Directory-Certificate-Services-41.png)
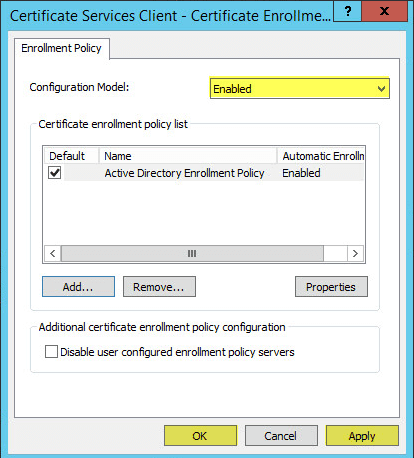
Change the drop down menu to Enabled then click Apply > OK
![](http://2.bp.blogspot.com/-SNKd9rPuQZs/WFoeSbJwZ9I/AAAAAAAANjU/GiEELp-Qr-M-j-6yqTJjcoY-TitMO5QkgCLcB/s1600/Active-Directory-Certificate-Services-42.png)
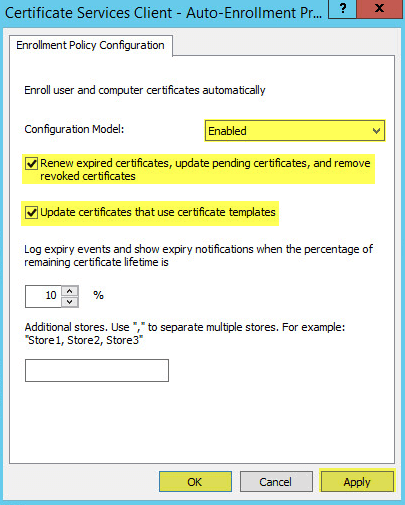
Now right click Certificate Services Client > Auto-Enrollment then Properties:
![](http://1.bp.blogspot.com/-_CsmTs80uEg/WFoeSR_l6hI/AAAAAAAANjc/WmfoTwLHz2cHluhZwor2uMnsHb8dISo_gCLcB/s1600/Active-Directory-Certificate-Services-43.png)
Change the drop down menu to Enabled and check the two boxes. Click Apply then Ok. You can now exit the Group Policy Management Editor:
![](http://4.bp.blogspot.com/-7pNPSYMUs0k/WFoeSsypWeI/AAAAAAAANjg/igR9K47ao3Evx2_oQLF51wVNseyksMwiQCLcB/s1600/Active-Directory-Certificate-Services-44.png)
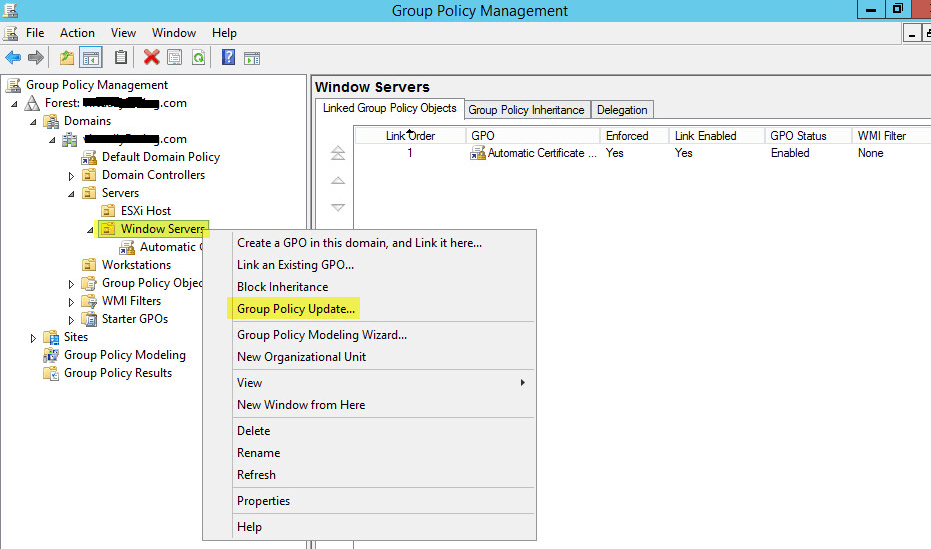
Right click your Policy then click Enforced to enable the policy:
![](http://4.bp.blogspot.com/-jrY4hoZx8LI/WFoeSqWhA-I/AAAAAAAANjk/oaJgjZrE--wIknBE8lmgh3fSJJ46l6rRQCLcB/s1600/Active-Directory-Certificate-Services-45.png)
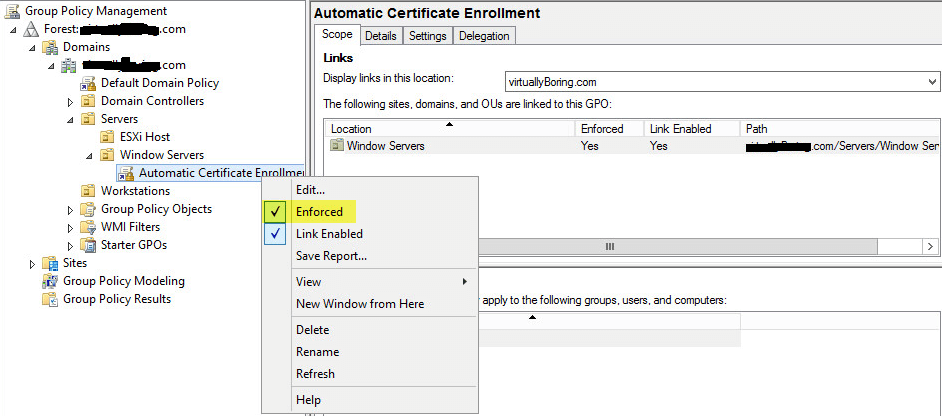
Again right click the OU and click Group Policy Update to accelerate getting the policy pushed out.
![](http://1.bp.blogspot.com/-TTrChEHX4dM/WFoeS-HCmoI/AAAAAAAANjo/TR1Ol2dmE8I_q1NwHS3buoguDLmk3HaEACLcB/s1600/Active-Directory-Certificate-Services-46.png)
Go back on your PKI server if you open Certification Authority and go to Issued Certificates you will start seeing your computers have requested and obtained a certificate. If you don’t see anything yet, give it some time and refresh later.
![](http://3.bp.blogspot.com/-Q6MHJ2_t5Xw/WFoeTGNXGzI/AAAAAAAANjs/aMQIqWoSOAsAm0unwnubhkMWC4TNiszdQCLcB/s1600/Active-Directory-Certificate-Services-47.png)
You have successfully set up Certificate Server in your environment.