This article demonstrates the installation steps of Hyper-V role on Windows Server 2016 and how to create a virtual switch and virtual machines in Hyper-V. To create and run virtual machines, first, you need to install the Hyper-V role on Windows Server 2016 by using either Server Manager or the Install-WindowsFeature cmdlet in Windows PowerShell.
Installing Hyper-V Role by using Server Manager
- In Server Manager, on the Manage menu, click Add Roles and Features.
- On the Before you begin page, verify that your destination server and network environment are prepared for the role and feature you want to install. Click Next.
- On the Select installation type page, select Role-based or feature-based installation and then click Next.
- On the Select destination server page, select a server from the server pool and then click Next.
- On the Select server roles page, select Hyper-V.
- To add the tools that you use to create and manage virtual machines, click Add Features. On the Features page, click Next.
- On the Create Virtual Switches page, Virtual Machine Migration page, and Default Stores page, select the appropriate options.
- On the Confirm installation selections page, select Restart the destination server automatically if required, and then click Install.
- When installation is finished, verify that Hyper-V installed correctly. Open the All Servers page in Server Manager and select a server on which you installed Hyper-V. Check the Roles and Features tile on the page for the selected server.
Installing Hyper-V Role by using the Install-WindowsFeature cmdlet
- On the Windows desktop, click the Start button and type any part of the name Windows PowerShell.
- Right-click Windows PowerShell and select Run as Administrator.
- To install Hyper-V on a server you're connected to remotely, run the following command and replace
Install-WindowsFeature -Name Hyper-V -ComputerName-IncludeManagementTools -Restart If you're connected locally to the server, run the command without-ComputerName. - After the server restarts, you can see that the Hyper-V role is installed and see what other roles and features are installed by running the following command:
Get-WindowsFeature -ComputerNameIf you're connected locally to the server, run the command without-ComputerName.
Note
If you install this role on a server that runs the Server Core installation option of Windows Server 2016 and use the parameter
-IncludeManagementTools, only the Hyper-V Module for Windows PowerShell will be installed. You can use the GUI management tool, Hyper-V Manager, on another computer to remotely manage a Hyper-V host that runs on a Server Core installation.A virtual switch allows virtual machines created on Hyper-V hosts to communicate with other computers. You can create a virtual switch when you first install the Hyper-V role on Windows Server 2016. To create additional virtual switches, use Hyper-V Manager or Windows PowerShell.
Create a virtual switch by using Hyper-V Manager
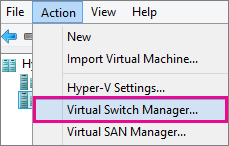
1. Open Hyper-V Manager, select the Hyper-V host computer name.
2. Select Action > Virtual Switch Manager.
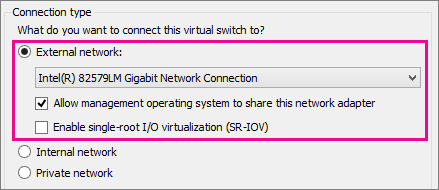
3. Choose the type of virtual switch you want.
| Connection type | Description |
|---|---|
| External | Gives virtual machines access to a physical network to communicate with servers and clients on an external network. Allows virtual machines on the same Hyper-V server to communicate with each other. |
| Internal | Allows communication between virtual machines on the same Hyper-V server, and between the virtual machines and the management host operating system. |
| Private | Only allows communication between virtual machines on the same Hyper-V server. A private network is isolated from all external network traffic on the Hyper-V server. This type of network is useful when you must create an isolated networking environment, like an isolated test domain. |
4. Select Create Virtual Switch.5. Add a name for the virtual switch.6. If you select External, choose the network adapter (NIC) that you want to use and any other options described in the following table.
| Setting name | Description |
|---|---|
| Allow management operating system to share this network adapter | Select this option if you want to allow the Hyper-V host to share the use of the virtual switch and NIC or NIC team with the virtual machine. With this enabled, the host can use any of the settings that you configure for the virtual switch like Quality of Service (QoS) settings, security settings, or other features of the Hyper-V virtual switch. |
| Enable single-root I/O virtualization (SR-IOV) | Select this option only if you want to allow virtual machine traffic to bypass the virtual machine switch and go directly to the physical NIC. |
7. If you want to isolates network traffic from the management Hyper-V host operating system or other virtual machines that share the same virtual switch, select Enable virtual LAN identification for management operating system. You can change the VLAN ID to any number or leave the default. This is the virtual LAN identification number that the management operating system will use for all network communication through this virtual switch.

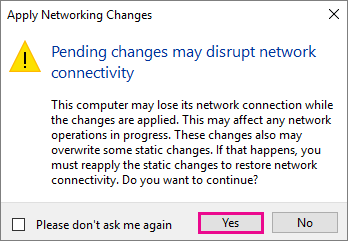
8. Click OK
9. Click Yes
Create a virtual switch by using Windows PowerShell
- On the Windows desktop, click the Start button and type any part of the name Windows PowerShell.
- Right-click Windows PowerShell and select Run as Administrator.
- Find existing network adapters by running the Get-NetAdapter cmdlet. Make a note of the network adapter name that you want to use for the virtual switch.
Get-NetAdapter - Create a virtual switch by using the New-VMSwitch cmdlet. For example, to create an external virtual switch named ExternalSwitch, using the ethernet network adapter, and with Allow management operating system to share this network adapter turned on, run the following command.
New-VMSwitch -name ExternalSwitch -NetAdapterName Ethernet -AllowManagementOS $trueTo create an internal switch, run the following command.New-VMSwitch -name InternalSwitch -SwitchType InternalTo create an private switch, run the following command.New-VMSwitch -name PrivateSwitch -SwitchType Private
Create a virtual machine by using Hyper-V Manager
- Open Hyper-V Manager.
- From the Action pane, click New, and then click Virtual Machine.
- From the New Virtual Machine Wizard, click Next.
- Make the appropriate choices for your virtual machine on each of the pages.
- After verifying your choices in the Summary page, click Finish.
- In Hyper-V Manager, right-click the virtual machine and select connect.
- In the Virtual Machine Connection window, select Action > Start.
Create a virtual machine by using Windows PowerShell
- On the Windows desktop, click the Start button and type any part of the name Windows PowerShell.
- Right-click Windows PowerShell and select Run as administrator.
- Get the name of the virtual switch that you want the virtual machine to use by using Get-VMSwitch. For example,
Get-VMSwitch * | Format-Table Name - Use the New-VM cmdlet to create the virtual machine. See the following examples.
- Existing virtual hard disk - To create a virtual machine with an existing virtual hard disk, you can use the following command where,
- -Name is the name that you provide for the virtual machine that you're creating.
- -MemoryStartupBytes is the amount of memory that is available to the virtual machine at start up.
- -BootDevice is the device that the virtual machine boots to when it starts like the network adapter (NetworkAdapter) or virtual hard disk (VHD).
- -VHDPath is the path to the virtual machine disk that you want to use.
- -Path is the path to store the virtual machine configuration files.
- -Generation is the virtual machine generation. Use generation 1 for VHD and generation 2 for VHDX.
- -Switch is the name of the virtual switch that you want the virtual machine to use to connect to other virtual machines or the network.
New-VM -Name-MemoryStartupBytes -BootDevice -VHDPath -Path -Generation -Switch For example:New-VM -Name Win10VM -MemoryStartupBytes 4GB -BootDevice VHD -VHDPath .\VMs\Win10.vhdx -Path .\VMData -Generation 2 -Switch ExternalSwitchThis creates a generation 2 virtual machine named Win10VM with 4GB of memory. It boots from the folder VMs\Win10.vhdx in the current directory and uses the virtual switch named ExternalSwitch. The virtual machine configuration files are stored in the folder VMData.
- New virtual hard disk - To create a virtual machine with a new virtual hard disk, replace the -VHDPath parameter from the example above with -NewVHDPath and add the -NewVHDSizeBytes parameter. For example,
New-VM -Name Win10VM -MemoryStartupBytes 4GB -BootDevice VHD -NewVHDPath .\VMs\Win10.vhdx -Path .\VMData -NewVHDSizeBytes 20GB -Generation 2 -Switch ExternalSwitch
- 5. Start the virtual machine by using the Start-VM cmdlet. Run the following cmdlet where Name is the name of the virtual machine you created.
Start-VM -Name<Name>
For example:
Start-VM -Name Win10VM- Connect to the virtual machine by using Virtual Machine Connection (VMConnect).
VMConnect.exeOptions in Hyper-V Manager New Virtual Machine Wizard
The following table lists the options you can pick when you create a virtual machine in Hyper-V Manager and the defaults for each.
| Page | Default for Windows Server 2016 and Windows 10 | Other options |
|---|---|---|
| Specify Name and Location | Name: New Virtual Machine. Location:C:\ProgramData\Microsoft\Windows\Hyper-V\. | You can also enter your own name and choose another location for the virtual machine. This is where the virtual machine configuration files will be stored. |
| Specify Generation | Generation 1 | You can also choose to create a Generation 2 virtual machine. |
| Assign Memory | Startup memory: 1024 MB Dynamic memory: not selected | You can set the startup memory from 32MB to 5902MB. You can also choose to use Dynamic Memory. |
| Configure Networking | Not connected | You can select a network connection for the virtual machine to use from a list of existing virtual switches. |
| Connect Virtual Hard Disk | Create a virtual hard disk Name: <vmname>.vhdx Location: C:\Users\Public\Documents\Hyper-V\Virtual Hard Disks\ Size: 127GB | You can also choose to use an existing virtual hard disk or wait and attach a virtual hard disk later. |
| Installation Options | Install an operating system later | These options change the boot order of the virtual machine so that you can install from an .iso file, bootable floppy disk or a network installation service, like Windows Deployment Services (WDS). |
| Summary | Displays the options that you have chosen, so that you can verify they are correct. - Name - Generation - Memory - Network - Hard Disk - Operating System | Tip: You can copy the summary from the page and paste it into e-mail or somewhere else to help you keep track of your virtual machines. |