
As an extra layer of security, you can use this article to enable write protection on windows 10 to prevent users from copying any kind of data to a USB drive from your Windows 10 PC. In this article, we'll show you how to edit the registry and enable the write protection feature in the Windows 10 to prevent users from saving data to a USB drive.

How to enable USB write protection
Note: editing the registry is risky, and it can cause irreversible damage to your installation if you are not much expert or don't do it correctly. It's best practice to take a full backup of your PC before proceeding.
- Use the Windows key + R keyboard shortcut to open the Run command.
- Type regedit, and click OK to open the registry.
- Browse the following path:
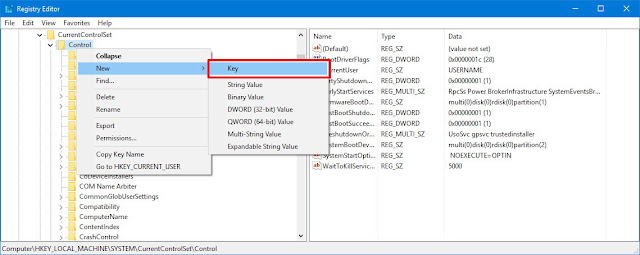
HKEY_LOCAL_MACHINE\SYSTEM\CurrentControlSet\Control - Right-click the Control (folder) key, select New, and click on Key.
- Name the new key StorageDevicePolicies and press Enter.
- Select the newly created key, and right-click on the right side, select New, and click on DWORD (32-bit) Value.

- Name the new DWORD WriteProtect and press Enter.
- Double-click the newly created DWORD and change its value from 0 to 1.
- Click OK.

- Close the Registry to complete the task.
Once you completed the steps, anyone who connects a USB drive to your computer will be denied copy privileges, and they'll get a "This disk is write-protected" message. As a result, no one will be able to edit, delete, create, or rename files in the external storage.
At any time you can revert the changes by following the steps mentioned above, but on step 8, make sure to change the DWORD value from 1 to 0.


![Vladimir Aćimović – Draeseke: Piano Works (2026) [FLAC 24bit/96kHz]](http://imghd.xyz/images/2026/06/27/jz9s92jaavhy5_600.jpg)