Vagrant being utilized by Developers and operations engineers for several years. It's often referred to as the Swiss Army knife for development environments. As more network devices are becoming available in a virtual form factor, it's only logical to investigate how we can integrate them into the Vagrant workflow for a full-stack experience.
You might also like to read How to Set Up Cisco ASAv Vagrant Box on VMware Fusion
You might also like to read How to Set Up Cisco ASAv Vagrant Box on VMware Fusion
Prerequisites
- OS X 10.11 (El Capitan)
- VMware Fusion 8.1 Professional
- Vagrant 1.8.1
- VMware provider for Vagrant
- Cisco VIRL license
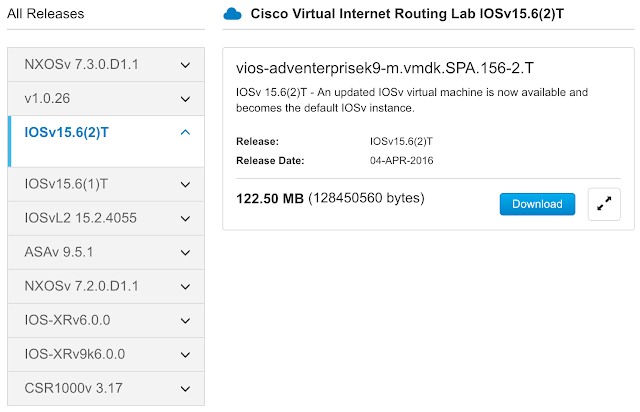
1. Sign in to your Cisco VIRL account and download the IOSv images.
- Sign in here.
- Select the Download VIRL link.
- Click the Download button for both IOSv and IOSv L2.
2. Create the Cisco IOSv virtual appliance base.
I will be creating an IOSv (L3) template for my example. The method for the IOSv L2 image essentially follows the same pattern.
- Click File -> New... from the VMware Fusion menu bar.
- Select the Create a custom virtual machine option.
- Click the Continue button.
- Select FreeBSD (Other -> FreeBSD) as the operating system.
- Click the Continue button.
- Select Use an existing virtual disk.
- Click the Choose virtual disk... button.
- Navigate to and select vios-adventerprisek9-m.vmdk.SPA.156-2.T.vmdk.
- Select Make a separate copy of the virtual disk.
- Click the Choose button.
- Click the Continue button.
- Click the Customize Settings button to modify the virtual appliance settings.
- Save As: IOSv-L3-156-2
- Click the Save button.
3. Modify/Verify the following attributes in the IOSv-L3-156-2 Settings:
| Component | Value |
|---|---|
| Processors | 1 processor core |
| Memory | 512 MB |
| Network Adapter | Share with my Mac |
| Hard Disk (IDE) | vios-adventerprisek9-m.vmdk.SPA.156-2.T.vmdk |
| CD/DVD (IDE) | Remove CD/DVD Drive |
| Sound Card | Remove Sound Card |
| USB & Bluetooth | Remove USB Controller |
4. Close the VMware Fusion application.
We will be working from the command line for the remainder of the tutorial.
5. Add a custom serial port (for management via console connection).
Append a serial port device to the virtual appliance configuration file.
$ printf 'serial0.present = "TRUE"\nserial0.yieldOnMsrRead = "TRUE"\nserial0.fileType = "network"\nserial0.fileName = "telnet://127.0.0.1:52099"\n'>> $HOME/Documents/Virtual\ Machines.localized/IOSv-L3-156-2.vmwarevm/IOSv-L3-156-2.vmx
Verify the component has been added.
$ tail -4 $HOME/Documents/Virtual\ Machines.localized/IOSv-L3-156-2.vmwarevm/IOSv-L3-156-2.vmx
serial0.present = "TRUE"
serial0.yieldOnMsrRead = "TRUE"
serial0.fileType = "network"
serial0.fileName = "telnet://127.0.0.1:52099"
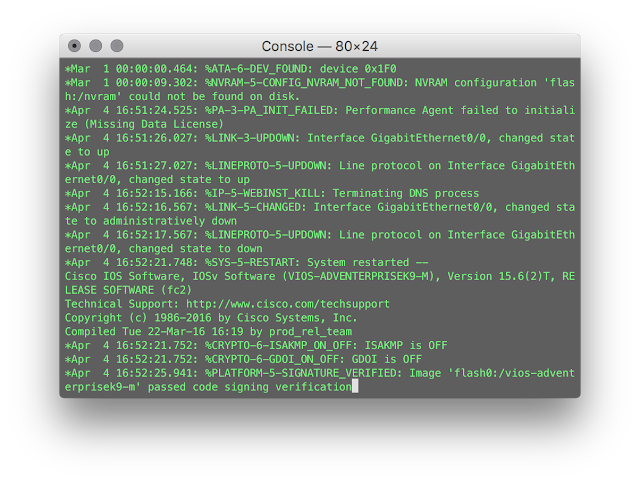
6. Start the IOSv virtual appliance.
Start the IOSv-L3-156-2 virtual appliance with the vmrun command.
$ /Applications/VMware\ Fusion.app/Contents/Library/vmrun start $HOME/Documents/Virtual\ Machines.localized/IOSv-L3-156-2.vmwarevm/IOSv-L3-156-2.vmx nogui
The IOSv-L3-156-2 virtual appliance should now be in the running state.
$ /Applications/VMware\ Fusion.app/Contents/Library/vmrun list
Total running VMs: 1
/Users/username/Documents/Virtual Machines.localized/IOSv-L3-156-2.vmwarevm/IOSv-L3-156-2.vmx
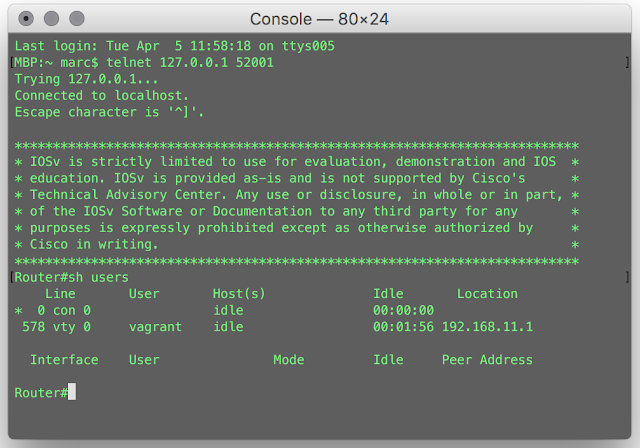
7. Initiate a console connection (via Telnet) to the IOSv virtual appliance.
Open a separate terminal window (or tab) and enter the following command:
$ telnet 127.0.0.1 52099
Create the vagrant user.
Router> en
Router# conf t
Router(config)# username vagrant privilege 15 secret vagrant
Enable AAA and define AAA method lists.
Router(config)# aaa new-model
Router(config)# aaa authentication login VTYS local
Router(config)# aaa authorization exec VTYS local
Disable DNS lookups.
Router(config)# no ip domain-lookup
Enable Cisco IOS.sh.
Router(config)# shell processing full
Configure the primary terminal line.
Router(config)# line con 0
Router(config-line)# privilege level 15
Router(config-line)# exec-timeout 0 0
Router(config-line)# logging synchronous
Router(config-line)# exit
Configure the virtual terminal lines.
Router(config)# line vty 0 4
Router(config-line)# no exec-banner
Router(config-line)# exec-timeout 0 0
Router(config-line)# logging synchronous
Router(config-line)# login authentication VTYS
Router(config-line)# authorization exec VTYS
Router(config-line)# transport input ssh
Router(config-line)# exit
Configure the management interface.
Router(config)# int g0/0
Router(config-if)# shut
Router(config-if)# !! Make routed port for IOSv L2
Router(config-if)# no switchport
Router(config-if)# ip addr dhcp
Router(config-if)# no cdp enable
Router(config-if)# no shut
Router(config-if)# exit
Configure SSH.
Router(config)# ip domain-name example.com
Router(config)# ip ssh version 2
Router(config)# ip ssh rsa keypair-name SSHKEYS
Router(config)# crypto key generate rsa usage-keys label SSHKEYS modulus 1024
Router(config)# ip ssh pubkey-chain
Router(conf-ssh-pubkey)# username vagrant
Router(conf-ssh-pubkey-user)# key-hash ssh-rsa DD3BB82E850406E9ABFFA80AC0046ED6
Router(conf-ssh-pubkey-user)# exit
Router(conf-ssh-pubkey)# exit
Create an EEM applet for regeneration of RSA keys triggered by network interface addition (or deletion).
Router(config)# event manager session cli username vagrant
Router(config)# event manager applet EEM_SSH_Keygen authorization bypass
Router(config-applet)# event syslog pattern SYS-5-RESTART
Router(config-applet)# action 0.0 info type routername
Router(config-applet)# action 0.1 set status none
Router(config-applet)# action 1.0 cli command enable
Router(config-applet)# action 2.0 cli command "show ip ssh | include ^SSH"
Router(config-applet)# action 2.1 regexp "([ED][^ ]+)" \$_cli_result result status
Router(config-applet)# action 2.2 syslog priority informational msg "SSH is currently \$status"
Router(config-applet)# action 3.0 if \$status eq Disabled
Router(config-applet)# action 3.1 cli command "configure terminal"
Router(config-applet)# action 3.2 cli command "crypto key generate rsa usage-keys label SSHKEYS modulus 1024"
Router(config-applet)# action 3.3 cli command "end"
Router(config-applet)# action 3.4 cli command "copy run start"
Router(config-applet)# action 3.5 syslog priority informational msg "SSH keys generated by EEM"
Router(config-applet)# action 4.0 end
Router(config-applet)# end
Save the running configuration to local NVRAM.
Router# copy run start
9. Stop the IOSv virtual appliance.
Stop the virtual appliance from the original terminal window (or tab).
$ /Applications/VMware\ Fusion.app/Contents/Library/vmrun stop $HOME/Documents/Virtual\ Machines.localized/IOSv-L3-156-2.vmwarevm/IOSv-L3-156-2.vmx
10. Create the Vagrant box.
Change the current directory to IOSv-L3-156-2.
$ cd $HOME/Documents/Virtual\ Machines.localized/IOSv-L3-156-2.vmwarevm
Remove all generated MAC addresses from the IOSv-L3-156-2 configuration file.
$ sed -i '''/generatedAddress/d' IOSv-L3-156-2.vmx
Create the metadata.json file for the VMware provider.
$ printf '{"provider": "vmware_desktop"}'> metadata.json
List the directory contents to verify the essential files are present.
$ tree -h
.
├── [8.5K] IOSv-L3-156-2.nvram
├── [ 588] IOSv-L3-156-2.plist
├── [ 0] IOSv-L3-156-2.vmsd
├── [2.1K] IOSv-L3-156-2.vmx
├── [ 268] IOSv-L3-156-2.vmxf
├── [ 30] metadata.json
├── [123M] vios-adventerprisek9-m.vmdk.SPA.156-2.T.vmdk
└── [255K] vmware.log
0 directories, 8 files
Defragment the virtual disk.
$ /Applications/VMware\ Fusion.app/Contents/Library/vmware-vdiskmanager -d vios-adventerprisek9-m.vmdk.SPA.156-2.T.vmdk
Defragment: 100% done.
Defragmentation completed successfully.
Shrink the virtual disk.
$ /Applications/VMware\ Fusion.app/Contents/Library/vmware-vdiskmanager -k vios-adventerprisek9-m.vmdk.SPA.156-2.T.vmdk
Shrink: 100% done.
Shrink completed successfully.
Create the Vagrant box file with tar.
$ tar cvzf cisco-iosv-l3-156-2.box ./*
11. Add the Vagrant box.
Add the Vagrant box to our local inventory.
$ vagrant box add --provider vmware_desktop --name cisco-iosv-l3-156-2 cisco-iosv-l3-156-2.box
==> box: Box file was not detected as metadata. Adding it directly...
==> box: Adding box 'cisco-iosv-l3-156-2' (v0) for provider: vmware_desktop
box: Unpacking necessary files from: file:///Users/marc/Documents/Virtual%20Machines.localized/IOSv-L3-156-2.vmwarevm/cisco-iosv-l3-156-2.box
==> box: Successfully added box 'cisco-iosv-l3-156-2' (v0) for 'vmware_desktop'!
Verify the box is now listed.
$ vagrant box list
arista-veos-4155M (vmware_desktop, 0)
cisco-asav-961 (vmware_desktop, 0)
cisco-iosv-l2-152 (vmware_desktop, 0)
cisco-iosv-l3-156-2 (vmware_desktop, 0)
cisco-xrv-6 (vmware_desktop, 0)
cumulus-vx-256 (vmware_desktop, 0)
juniper-vmx-141R48 (vmware_desktop, 0)
vmware-centos7 (vmware_desktop, 0)
vmware-ubuntu1404 (vmware_desktop, 0)
12. Try it out.
Create a directory for a test project and change to it.
$ mkdir $HOME/Documents/test-iosv-l3 && cd $_
Create the Vagrantfile with a text editor ...
$ vim Vagrantfile
that contains the following:
# -*- mode: ruby -*-
# vi: set ft=ruby :
VAGRANTFILE_API_VERSION = "2"
Vagrant.configure(VAGRANTFILE_API_VERSION) do |config|
config.ssh.insert_key = false
config.vm.box = "cisco-iosv-l3-156-2"
# Shorten timeout value for lack of "standard" Cisco shell
config.vm.boot_timeout = 40
# Disable default host <-> guest synced folder
config.vm.synced_folder ".", "/vagrant", disabled: true
# Modify telnet port number for console OOB management
config.vm.provider "vmware_fusion" do |v|
v.vmx["serial0.fileName"] = "telnet://127.0.0.1:52001"
end
end->
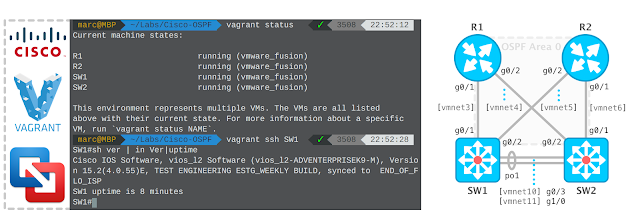
Show the current status of the vagrant machine.
$ vagrant status
Current machine states:
default not created (vmware_fusion)
The VMware machine has not yet been created. Run `vagrant up`
to create the machine. If a machine is not created, only the
default provider will be shown. Therefore, if a provider is not listed,
then the machine is not created for that provider.
13. Vagrant Up!
Note: After Vagrant establishes a SSH connection to the remote virtual instance, it expects to talk to a standard shell (e.g., Bash). Since Cisco IOS doesn't provide a standard shell, Vagrant will eventually time out. The current workaround is to adjust the vm.boot_timeout attribute value as included in the example Vagrantfile.
$ vagrant up
Bringing machine 'default' up with 'vmware_fusion' provider...
==> default: Cloning VMware VM: 'cisco-iosv-l3-156-2'. This can take some time...
==> default: Verifying vmnet devices are healthy...
==> default: Preparing network adapters...
==> default: Starting the VMware VM...
==> default: Waiting for machine to boot. This may take a few minutes...
default: SSH address: 192.168.11.189:22
default: SSH username: vagrant
default: SSH auth method: private key
default: Warning: Remote connection disconnect. Retrying...
default: Warning: Remote connection disconnect. Retrying...
Timed out while waiting for the machine to boot. This means that
Vagrant was unable to communicate with the guest machine within
the configured ("config.vm.boot_timeout" value) time period.
If you look above, you should be able to see the error(s) that
Vagrant had when attempting to connect to the machine. These errors
are usually good hints as to what may be wrong.
If you're using a custom box, make sure that networking is properly
working and you're able to connect to the machine. It is a common
problem that networking isn't setup properly in these boxes.
Verify that authentication configurations are also setup properly,
as well.
If the box appears to be booting properly, you may want to increase
the timeout ("config.vm.boot_timeout") value.
The status of the vagrant machine is now in the running state.
$ vagrant status
Current machine states:
default running (vmware_fusion)
The VM is running. To stop this VM, you can run `vagrant halt` to
shut it down, or you can run `vagrant suspend` to simply suspend
the virtual machine. In either case, to restart it again, run
`vagrant up`.
We can connect to the vagrant machine with SSH ...
$ vagrant ssh
Router# printf "The kernel is `uname -s` running version `uname -r`"
The kernel is IOSv running version IOS 15.6
Router# sh ip int br
Interface IP-Address OK? Method Status Protocol
GigabitEthernet0/0 192.168.11.189 YES DHCP up up
Router# sh processes memory | in Free:
Processor Pool Total: 359276416 Used: 66304288 Free: 292972128
I/O Pool Total: 26214400 Used: 20291248 Free: 5923152
or a console connection (out-of-band management) via Telnet.
$ telnet 127.0.0.1 52001
14. More Vagrant commands:
Stop the vagrant machine with the force option.
$ vagrant halt -f
Suspend the vagrant machine.
$ vagrant suspend
Resume the vagrant machine from a suspended state.
$ vagrant resume