Windows Server 2016 brought a new feature called “Setup and Boot Event Collection,” which allows you to remotely connect and start collecting events during the boot process of a Windows Server. That’s pretty useful, especially when it comes to troubleshooting problems that occur during the boot process.
One of the challenges during the Windows boot process is that you can’t actually see what’s going on under the hood. If your machine never booted, or you think the boot process takes tremendous time, it’s a challenge to start troubleshooting, as you have a limited number of ways to get boot events.
Here are the event types you can collect with Setup and Boot Event Collection:
In this Windows Server 2016 guide, I would like to show you how to configure the collector computer and remote nodes to start gathering setup and boot events in your environment.
Here are the event types you can collect with Setup and Boot Event Collection:
- Loading of kernel modules and drivers
- Enumerating devices and initialization of their drivers
- Verifying and mounting file systems
- Starting executable files
- Starting and completing system updates
In this Windows Server 2016 guide, I would like to show you how to configure the collector computer and remote nodes to start gathering setup and boot events in your environment.
Supported Operating Systems
First things first: The collector role is available only for Windows Server 2016—it can be either a Server with Desktop Experience or a Server Core.The target computers you want to collect data from must be running Windows Server 2016 or Windows 10. It also supports Nano Server as a target computer. You can also collect data from Windows Server 2016 boxes, even if they are running as a virtual machine in Windows Server 2012 R2 hosts.
Here is a table from TechNet to show supported virtualized collector and target computer OS types:
| Virtualization host | Collector virtual machine | Target virtual machine |
| Windows 8.1 | yes | yes |
| Windows 10 | yes | yes |
| Windows Server 2016 | yes | yes |
| Windows Server 2012 R2 | yes | no |
Collector Node Configuration
To receive and display ETL events collected from target computers, you need to configure a collector node.The first thing to do is to enable event collector service using one of the methods below:
With dism, you can do it with this command:
dism /online /enable-feature /featurename:SetupAndBootEventCollection
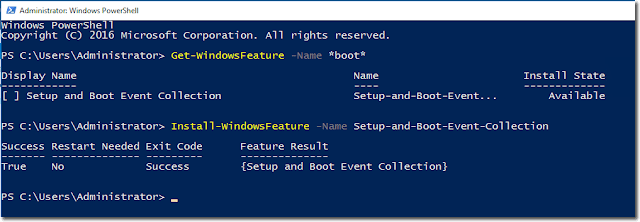
And the corresponding PowerShell commands look like this:
Get-WindowFeature -Name *boot*
Install-Windows -Name Setup-and-Boot-Event-Collection
Install Setup and Boot Event Collection feature
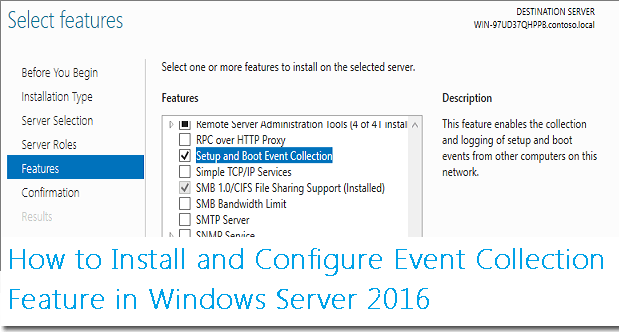
You can also install the feature with the Server Manager GUI:
Install Service using Server Manager
\Once you install the event collector service, you should be able to see a new service called BootEventCollector running under Network Service Account.

BootEventCollector service details
There is also a command line tool called bevtcol.exe that you can run with some useful parameters. This tool is useful if you want to test your configurations before installing the full service.

bevtcol.exe parameters
For instance, you can run “bevtcol.exe -config NewConfig.xml -checkOnly” just to check the validity of the configuration file and exit without running.
Next you need to check if the default configuration files were created on the collector node, which helps you create your first collector configuration file.
Under the C:\ProgramData\Microsoft\ BootEventCollector\Config folder, you should be able to see three XML configuration files created once you install service.
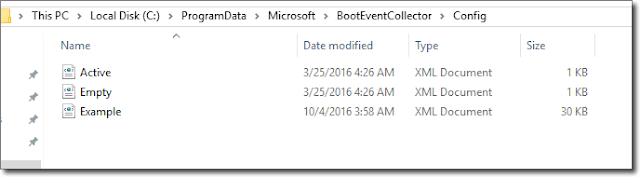
XML configuration files
Active.xml: This XML file has the same content as Empty.xml and contains your current configuration. Every new configuration must be saved to this file.
Empty.xml: This file contains the minimum configuration elements needed, with their default values set.
Example.xml: This file contains some useful samples to start with configuration.

Example XML file with some useful samples
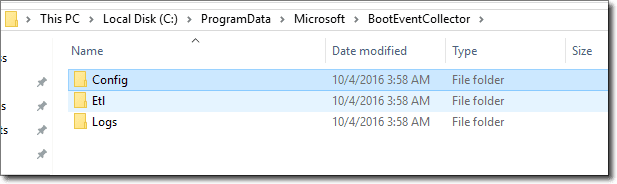
If you look at the folder structure under c:\ProgramData\Microsoft\BootEventCollector, you will see different folders for different purposes.
ETL and log file folders
- ETL is the actual directory for keeping collected ETL files.
- Logs, as name implies, keeps log files for the collector service.
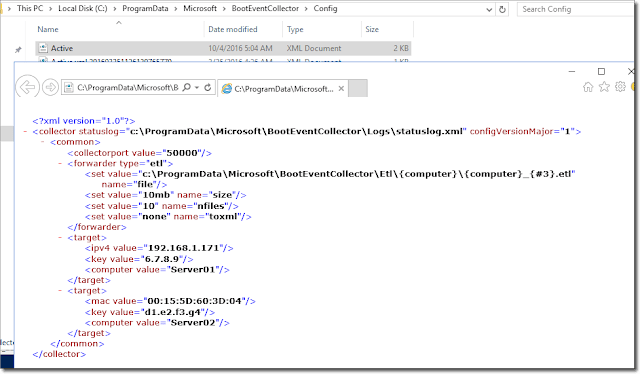
Here are some important points in our configuration file:
- File defines the file name pattern. {#3} is the three-digit index of the file in the rotation, such as 001, 002, etc. {computer} is used for the computer name. So in our example, our files will be collected under Etl\COMPUTERNAME\ folder with COMPUTERNAME_00x name.
- Size defines the size limit for each ETL file.
- Nfiles defines the number of ETL files created in the rotation. A new file will be created when each file fills up to the size limit.
- ToXML is an optional setting that determines the payload of which ETW events are converted to XML during the forwarding. None is the default setting and always forwards events as they are received in binary format. If you set it to “ALL,” the payload will be converted to XML all the time. That setting is actually a protection, as ETW events have been designed to be interpretable on the computer where they have been generated, but once you want to move events to another computer, there may be some mismatching. Converting to XML format makes events available for wider target nodes. The only downside is that converting to XML also adds a bit of overhead in the collector node.
- You can specify multiple target computers by adding additional
nodes. - In my case, I specified two target computers—one with an IP address and one with a MAC address.
- Key is the encryption keys we are going to retrieve later, while configuring target computers.
- Computer value is the name of the target computer to be inserted into the ETW records when they are converted to XML.
Configuring target computer
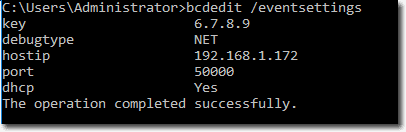
In order to configure target computers to send ETW events, you need to enable event transport. You can either enable it locally using the bcdedit command or remotely with PowerShell Remote and Enable-SbecBcd command.In my lab, I have access to my target computers, so I will leverage bcdedit locally.
bcdedit /event yes
bcdedit /eventsettings net hostip:192.168.1.172 port:50000 key:6.7.8.9
- HostIP is the collector computer name, which we configured before.
- Port is the port number we specified in the configuration file.
- Key is the encryption key we need to specify in the configuration file as well.

Enable event transport using bcdedit
Check BCD event configuration
$result = (Get-Content .\myconfig.xml | Set-SbecActiveConfig); $result

Apply configuration file on collector node
(Get-SbecActiveConfig).content

Retrieve applied configuration details
On the collector computer, run the following command:
Enable-SbecAutoLogger -ComputerName

Configure target computers to send ETW events
On the collector computer, my active.xml configuration file is updated with my settings.
Updated active.xml file
A new status log is also created:
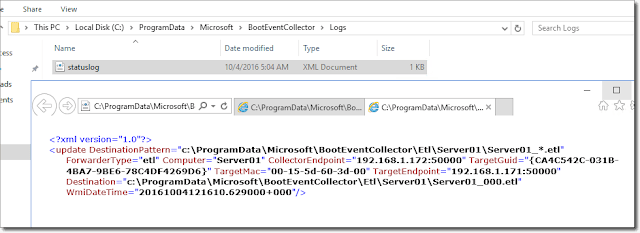
Updated log files
In addition, a new ETL file is created and ready for collecting setup and boot events from the target computer (Server01). You will see some content here once you restart one of your target servers:
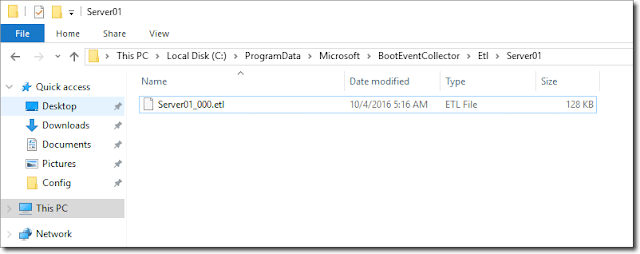
Collected ETL files
And finally, you can open collected ETL files in the event viewer.
I just restarted my target server and waited to collect some data. Here are some cool events collected from the boot process on the target computer:

Collected events after the first boot on target computers