Before deploying Office 2016 to client systems, most organizations will want to customize their installation to align with their unique business needs and use cases. In this article, I’ll cover how to customize the Windows Installer–based version of Office 2016 and fully remove Office 2013. I’ll also describe some of the settings you may want to consider for your install.
Contents:
- Customize the install
- Install the customized Office 2016
- Remove Office 2013 (if necessary)
- Additional customization options to consider
Customize the install
To begin, you’ll need a copy of the Microsoft Office 2016 ISO image (Windows Installer version, not the App-V version), as well as the Office Customization Toolkit (which also includes the Office 2016 Administrative Templates). Extract both the ISO and the contents of the ADMX/OCT download.
For my lab environment, I have a software file share on a file server, and I’ve created separate x86 and x64 folders inside my Office_2016 folder to store both installers. The network share and file permissions are configured so that Domain Computers have Read access and IT users have Full Control, but your permissions may vary based on your environment and software installation solution.
Copy the “admin” folder from the Office Customization Tool download into the folder where you’ve saved the Office 2016 install files. (In this tutorial, we’ll be using the x86 installer in a folder of that same name, but the process is the same for the x64 installer.) When you’re prompted, overwrite the files that are in the destination folder.
Copy the “admin” folder from the Office Customization Tool download into the folder where you’ve saved the Office 2016 install files. (In this tutorial, we’ll be using the x86 installer in a folder of that same name, but the process is the same for the x64 installer.) When you’re prompted, overwrite the files that are in the destination folder.
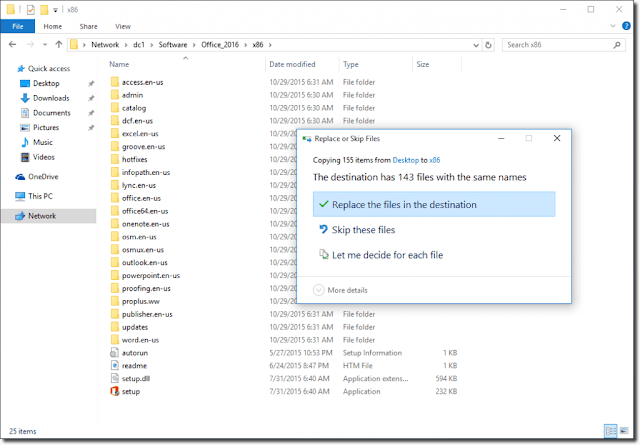
Copying the updated admin folder to the Office 2016 install files
Next, you’ll need to open a command prompt and run setup.exe /admin to run the Office Customization Tool. When the OCT opens, leave the default Create a new Setup customization file for the following product option selected and click OK.
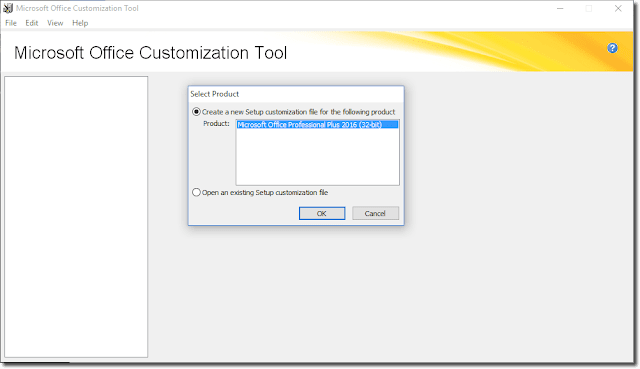
Creating a new Setup customization file for Office 2016
There are three main areas that you’ll definitely want to customize for your organization’s Office 2016 installation, at a minimum, inside the Setup section. Start by setting your organization name in the Install Location and Organization Name section.
Next, go to the Licensing and User Interface section. Most organizations with a licensing agreement will probably leave the default Use KMS client key option, but you can set a MAK key here if necessary.
Select the I accept the terms in the License Agreement check box so that end users won’t see the license agreement when Office is installed. Last, set the display level to None and select the Suppress modal and No cancel check boxes. Leave the Completion notice check box cleared. These options will give you a silent installation without a final confirmation.
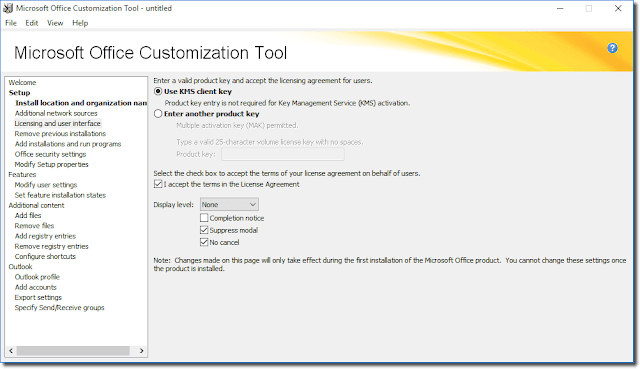
etting the product key, license agreement, and display level for Office 2016
Next, go to the Remove Previous Installations section. Here you can choose which previous versions of Office applications are uninstalled when Office 2016 is installed. I’ve had some unexpected results in the past when using the Default Setup behavior. So, I usually configure all of the applications to be removed unless I need to leave certain applications installed on the client system.
Removing previous Office installations when installing Office 2016
Once you’re done with your customization, click File and then Save and save your MSP file to the same network share where you’ve saved the Office 2016 installer. I usually like to put it in the root of the same folder as the installer.
Install the customized Office 2016
To install Office 2016 using the MSP file, you’ll need to run setup.exe with the /adminfile switch. Your command should end up looking something like this:\\fileserver\software\Office_2016\x86\setup.exe /adminfile \\fileserver\software\Office_2016\x86\Office_2016.MSP

Installing Office 2016 using the /adminfile switch and an MSP file
Remove Office 2013
Depending on which components of Office 2013 were previously installed on a client system, you may still need to run an uninstall to remove Office 2013 completely. To do this, you’ll need the setup.exe and install files for Office 2013.Create a new text file called SilentUninstallConfig.xml in the \Office_2013\ProPlus.WW\ folder with the following text (if the file already exists, make the following edits to the file):
\\fileserver\software\Office_2013\setup.exe /uninstall ProPlus /config \\fileserver\software\Office_2013\ProPlus.WW\SilentUninstallConfig.xml
Additional customization options to consider
In addition to the settings I’ve already covered, you can also pre-configure a number of user settings when Office is installed on a computer. These settings are included in the Group Policy ADMX files, but they can be useful if you don’t want to manage Office with Group Policy or if you need a pre-configured build for non-managed systems.There are quite a few settings in Features > Modify User Settings, but following are a few you might want to consider for your installation.
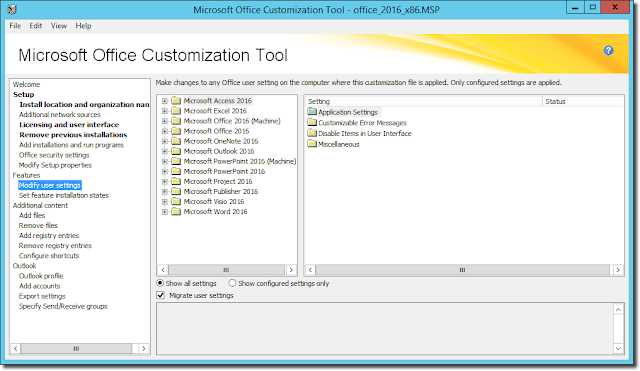
Modify User Settings section in the Office 2016 Office Customization Tool
| Application | Sub-Section | Setting Name | Notes |
| Microsoft Office 2016 | Privacy > Trust Center | Disable Opt-in Wizard on first run | When set to Enabled, suppresses a dialog end users don’t need to see |
| Microsoft Office 2016 | Privacy > Trust Center | Enable Customer Experience Improvement Program | Enables/disables Customer Experience Program; some organizations don’t want their PCs participating |
| Microsoft Office 2016 | Privacy > Trust Center | Send Office Feedback | Allows/prevents end users from sending feedback to Microsoft about Office; some organizations don’t want their PCs participating |
| Microsoft Office 2016 | Privacy > Trust Center | Allow including screenshot with Office Feedback | Allows/prevents PC from sending screenshots with Office Feedback |
| Microsoft Office 2016 | Services > Fax | Disable Internet Fax feature | Disables Internet Faxing in Office apps |
| Microsoft Office 2016 | Miscellaneous | Show OneDrive Sign In | Shows/removes option to sign into OneDrive |
| Microsoft Office 2016 | Miscellaneous | Control Blogging | Prevents end users from using Office apps to post to blogging platforms |
| Microsoft Office 2016 | Miscellaneous | Block signing into Office | Blocks/allows signing into Office (consumer) and Office 365 services; Org ID only only allows Office 365 access and blocks OneDrive consumer access |
| Microsoft Office 2016 | First Run | Disable First Run movie | When set to Enabled, suppresses a dialog end users don’t need to see |
| Microsoft Office 2016 | First Run | Disable Office First Run on application boot | When set to Enabled, suppresses a dialog end users don’t need to see |


