
Microsoft's been pretty busy integrating Docker containers into Windows Server 2016, and some of the terminology can be confusing. I'm going to show you what Hyper-V containers are and how to use them in the context of Windows Server 2016.
Understanding Hyper-V containers
First of all, recall that a Docker container is an isolated application and/or operating system instance with its own private services and libraries.Windows Server 2016 supports two types of Docker containers. Windows Server containers are containers intended for “high trust” environments, where you as a systems administrator aren’t as concerned about data leakage among containers running on the same host or leakage between the containers and the host operating system.
By contrast, Hyper-V containers are Docker containers that are more fully isolated from (a) other containers and (b) the container host computer. As you can see in the following architectural drawing, what sets Hyper-V containers apart from Windows Server containers is that Hyper-V containers have their own copy of the Windows operating system kernel and a dedicated user space.
Architectural diagram of Windows Server containers
The main confusion I’ve had in the past concerning Hyper-V containers is mistaking the containers for Hyper-V virtual machines. As you’ll see in a moment, Hyper-V containers do not appear to the container host’s operating system as VMs. Hyper-V is simply the tool Microsoft used to provide higher isolation for certain container workloads.
One more point before we get started with the demo: the container deployment model (Windows Server vs. Hyper-V containers) is irrespective of the underlying container instance and image. For instance, you can build a container running an ASP.NET 5 Web application and deploy containers from that image by using either the Windows Server or Hyper-V container type.
Preparing our environment
Okay, this is potentially confusing, so pay close attention to the following Visio drawing and my accompanying explanation. We’re using the Windows Server 2016 TP4 build, which I’ve downloaded to my Windows 8.1 administrative workstation.To enable the Docker container functionality in the TP4 image, we need to perform three actions:
- Build a Windows Server 2016 TP4 virtual machine on a hypervisor that supports nested virtualization. Windows 10 client Hyper-V supports nested virtualization, as does VMware Workstation
- Install the containers and Hyper-V roles in the TP4 VM
- Download and run Microsoft’s container host setup script
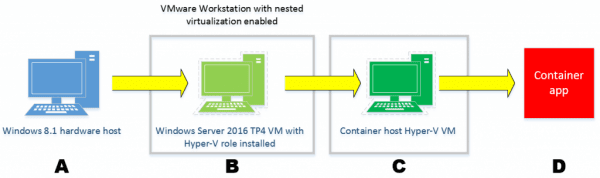
Our lab environment
Is your mind wrapped around what we plan to do? Starting from our hardware host (A), we deploy a Windows Server 2016 TP4-based VM (B), run the setup script, which creates a container host VM (C). Finally, we can play with containers themselves (D).
Creating the container host VM
Log into your Windows Server 2016 VM, start an elevated Windows PowerShell console, and install the two required roles:Install-WindowsFeature -Name Hyper-V
Install-WindowsFeature -Name containers
Restart the VM and open the Hyper-V Manager tool. We need to ensure we have an external switch defined; the container host VM creation script will fail if we don’t. I will show you my external switch, appropriately named External Switch, in the following screenshot:
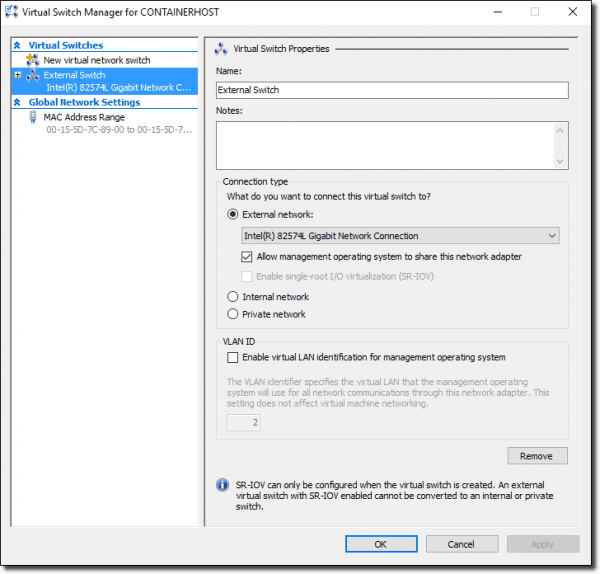
We need an external Hyper-V switch to build our container host
Next, we’ll download the VM creation script and save it to our C: drive as a .ps1 script file:
Invoke-WebRequest -Uri https://aka.ms/tp4/New-containerHost -OutFile 'C:\New-containerHost.ps1'
Okay! Assuming we’ve shifted our PowerShell console to the C:\ path, we’re ready to run the script. In this example, I’m naming the VM conhost1, running Windows Server 2016 TP4 Server Core, and preparing the VM to host Hyper-V containers:
.\New-containerHost.ps1 -VmName 'conhost1' -WindowsImage 'ServerDatacenterCore' -HyperV
The script performs four key actions, which I annotate in the following screenshot and describe each annotation afterward:
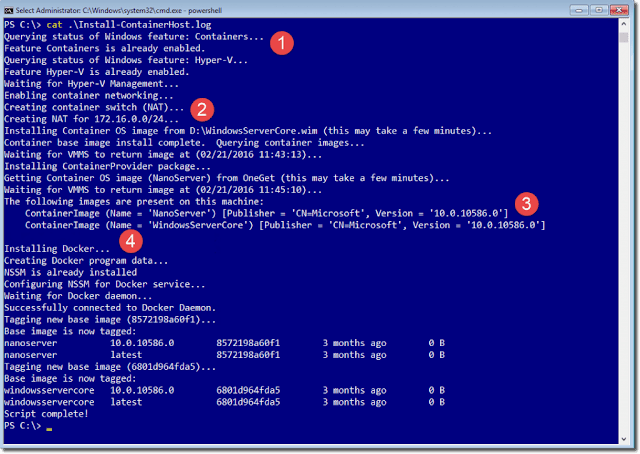
The container host script log file
- 1: Here the script verifies that the server has the containers and Hyper-V roles installed.
- 2: Here the script creates an internal Hyper-V switch that NATs the 172.16.0.0/24 range. This NAT allows the containers to interact with each other as well as the host.
- 3: Here the script downloads two container images: one is Windows Server Core and the other is Windows Server Nano.
- 4: Here the script installs the Docker runtime environment.
Creating a Hyper-V container
The preceding script created a new virtual machine in your Windows Server 2016 TP4 VM; hence the nested virtualization requirement.
Get-VM | Select-Object -Property Name, State, Status
Name State Status
---- ----- ------
Name State Status
---- ----- ------
conhost1 Running Operating normally
To play with Hyper-V containers, we’ll need to log into our nested virtual machine. You can do this in any number of ways:
- Connect via Hyper-V Manager
- Use the Remote Tab functionality in the PowerShell ISE
- Use PowerShell Direct
Although we can use either native Docker commands or Windows PowerShell to manage containers, I choose to stick with PowerShell for the sake of today’s example. Run the following statement to see all the container-related PowerShell commands:
Get-Command -Module containers
Get-containerImage
Name Publisher Version IsOSImage
---- --------- ------- ---------
NanoServer CN=Microsoft 10.0.10586.0 True
WindowsServerCore CN=Microsoft 10.0.10586.0 True
Note: I couldn’t get a new Hyper-V container to start in my environment (remember that at this point we’re dealing with super pre-release code). Thus, I’ll start by creating the container as a Windows Server container, and then we’ll convert it on the fly later.
New-container -Name 'corecont' -containerImageName 'WindowsServerCore' -SwitchName 'Virtual Switch' -RuntimeType Default
Name State Uptime ParentImageName
---- ----- ------ ---------------
corecont Off 00:00:00 WindowsServerCore
Start-container -Name corecont
Before we connect to the corecont container, let’s quickly check the container host’s IPv4 address (you’ll see why in a moment):
Get-NetIPAddress | Select-Object -Property IPv4Address
IPv4Address
-----------
172.16.0.1
In the preceding output, I decided to show you only the internal NAT address that the container host shares with its local containers.
Now we can use PowerShell remoting to log into the new container and check the container’s IPv4 address:
Enter-PSSession -containerName 'corecont' -RunAsAdministrator
[corecont]:PS C:\>Get-NetIPAddress | Select-Object -Property IPv4Address
IPv4Address
-----------
172.16.0.2
What I wanted to show you there is that the container is indeed a separate entity from the container host.
Let’s now exit our PowerShell remote session to return to the container host:
[corecont]:PS C:\>Exit-PSSession
Set-container -Name corecont -RuntimeType HyperV
Get-VM
We can also verify that our newly converted Hyper-V is indeed completely isolated from the host. The Csrss.exe process represents the user mode of the Win32 subsystem. You should find that Windows Server containers’ Csrss processes show up in a process list on the container host. By contrast, Hyper-V containers’ Csrss processes should not.
Sadly, as of this writing I simply could not get my Hyper-V containers to behave correctly. Alpha code and all. Sigh.
At the least, though, I can demonstrate the concept in opposite by testing another Windows Server container I build named corecont2.
I’ll connect to the corecont2 container and run a filtered process list:
[corecont4]: PS C:\> Get-Process -Name csrss | Select-Object -Property ProcessName, Id
ProcessName Id
----------- --
csrss 968
ProcessName Id
----------- --
csrss 968
Finally, I’ll exit the remote session and run the same command on the container host:
PS C:\> Get-Process -Name csrss | Select-Object -Property ProcessName, Id
ProcessName Id
----------- --
csrss 392
csrss 468
csrss 968
csrss 2660
ProcessName Id
----------- --
csrss 392
csrss 468
csrss 968
csrss 2660
You can see process ID 968 from the perspective of the container host. I submit to you that once Microsoft tunes their Hyper-V container code in a future Windows Server 2016 TP build, running the previous commands will reveal that Hyper-V containers’ Csrss process IDs do not show up from the perspective of the container host.