The VMware High Availability (HA) cluster supports two or more hosts (up to 64 per cluster) to reduce the risk of unplanned downtime. In this article, first I will introduce the basic concepts of VMware HA then I will to show you its configuration steps.
What can we do to reduce the impact of a host failing without prior notice? VMware’s answer to this is High Availability (HA) technology. There are two main reasons you’ll want to implement a VMware vSphere cluster and activate HA.
![]()
Shared storage means NAS or SAN that is populated with disks or SSDs. All hosts present in the cluster can access shared storage and run VMs from a shared data store. Such architecture has been commonplace for about 15 years and has proven reliable and efficient. However, it reaches its limits in large clusters, where the storage controller’s performance becomes the bottleneck of the cluster. So basically, after you hit that limit, you end up creating another silo where you can put some hosts together with new shared storage.
Recently, hyper-converged architectures have become popular and are available from different vendors (including VMware with VSAN), where shared storage devices are replaced with the local disks in the hosts of the cluster. These local disks are pooled together across the cluster in order to create a single virtual shared data store that is visible to all hosts.
This is a software-only solution that can leverage high-speed flash devices, optionally in combination with rotating media. It uses deduplication and compression techniques, coupled with erasure coding (Raid5/6) across the cluster, in order to save storage space. We’ll look at VMware VSAN in one of our future posts.
I remember that my first demo using VMware HA was with two servers only, while the third device was a small NAS box where we had a few VMs running. This tells us that even very small enterprises can benefit from this easy-to-use technology.
Let’s have a look at the different options that VMware HA offers.
Host Monitoring– You would enable this to allow hosts in the cluster to exchange network heartbeats and to allow vSphere HA to take action when it detects failures. Note that host monitoring is required for the vSphere Fault Tolerance (FT) recovery process to work properly. FT is another advanced, cool technology that allows you to protect your workflows in case of hardware failure. However, compared to HA, it does that in real time, without downtime and without the need for a VM restart!
![]()
Admission Control– You can enable or disable admission control for the vSphere HA cluster. If you enable it, you have to choose a policy of how it is enforced. Admission control will prevent the starting of VMs if the cluster does not have sufficient resources (memory or CPU).
Virtual Machine Options – What happens when a failure occurs? The VM options allow you to set the VM restart priority and the host isolation response.
VM Monitoring– Lets you enable VM monitoring and/or application monitoring.
Datastore Heartbeating– You have the possibility to check a secondary communication channel so vSphere can verify that a host is down. In this option, the heartbeats travel through a data store (or several). VMware datastore heartbeating provides an additional option for determining whether a host is in a failed state.
If the master agent present in a single host in the cluster cannot communicate with a slave (doesn’t receives heartbeats), but the heartbeat datastore answers, HA simply knows that the server is still working, but cannot communicate through one networking channel. In this case, we say “the host is partitioned.”
In such a case, the host is partitioned from the network or isolated; the datastore heartbeat then takes over and determines whether the host is declared dead or alive. The datastore heartbeat function helps greatly in determining the difference between a host which has failed and one that has merely been isolated from others.
Let’s first have a look at the minimum requirements for setting up a VMware High Availability (HA) cluster, before we get to configuring the network.
Two hosts running vSphere 6– As stated previously, you’ll need at least two hosts in order to have an HA redundancy and stay protected in case of a server failure. The latest version of vSphere is 6.0 U2.
Two network switches with 8-10 ports. By having a dedicated storage network, you can avoid VLANs.
iSCSI storage – You’ll need iSCSI storage with two storage processors and several NICs. I’m assuming that you either have your storage array configured or you plan to follow the network configuration of your hardware supplier.
To keep things simple while configuring maximum redundancy, I assume that we’ll be using a separate network for storage and for vSphere networking (for management, vMotion, etc). This means that each of your hosts will need at least four NICs (we’ll be using two for storage), while the storage array also has four (two per storage processor).
It is a small network configuration that I will place emphasis on today. The guide will work with the smallest possible redundant storage network configuration for two hosts connected to iSCSI storage.
Whether you’re just setting up a POC (prove of concept) environment or real deployment, you should have the following:
![]()
On the right, we have a storage array connected to two storage switches in order to provide redundancy. We’re using two completely different storage networks for the array.
There are only two hosts in the image, but you can easily add a third and, potentially, a fourth host in order to expand your cluster. This merely depends on the requirements for properly sizing the network switches with a correct number of network ports, in order to satisfy future growth.
The VMware vSphere configuration (for storage) isn’t difficult, but one has to keep in mind that only one NIC can be configured as active in the vSwitch, otherwise you can’t bind your iSCSI initiator to the iSCSI target.
All IP addresses of Network 1, marked in blue, will use a base address of the subnet 10.10.3.x. Then, we do the same thing for Network 2, which has a base address of 10.10.4.x. In the image, this network is marked in red.
As you can see, all the ESXi port groups are following this numbering scheme to stay within the same range. In this way, it’s very easy to assign IP addresses while constantly ensuring you’re “navigating” within the right network range.
![]()
If the array has less than four ports per SP, you can still assure redundancy by “cross-linking” the switches. I am aware that my guide represents a very generous storage array with four network ports per storage processor.
As we now have the networking hardware for our HA cluster in place, we can start by configuring vSphere.
As you can see in the screenshot below, I’m adding a separate virtual switch to our host. This is something that is not necessary (we can configure the iSCSI network on the existing vSphere switch), but I like to separate iSCSI from the other networks I’m using on each host, by creating a separate vSwitch – in our example, vSwitch 1.
![]()
You can also see that I’m selecting both NICs to be added to this switch. I’ll use both of those for our redundant iSCSI configuration.
Now, you just have to follow the Add Network Wizard.
![]()
In the next step, you have to assign an IP address. Finish the assistant and add an additional VMkernel adapter to this vSwitch by clicking the Properties link > Add > VMkernel > Put Network Label > Next > IP address and Network mask > Done.
![]()
Check Override switch failover order for active and unused NICs.
This concludes today’s post. We are about halfway through what’s required for a redundant iSCSI storage network.
Today we learned how to:
We have created two separate networks between each host and storage array, which gives us a backup in case we have any of the following issues:
In the above steps, we created a separate standard vSwitch to use for our iSCSI storage traffic. The vSwitch had been configured with 2 NICs.
Now we need to accomplish four steps:
Step 1: Enable the iSCSI initiator. Select your host > Configuration> Storage Adapters> Right-click in the blank area > Add Software iSCSI Adapter.
![]()
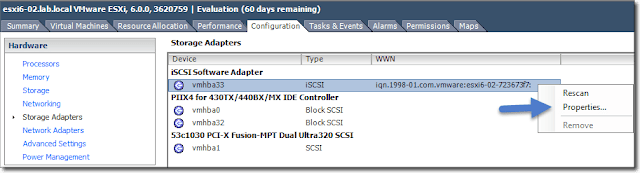
An assistant pops up to inform you that a new software iSCSI adapter will be added to the Storage Adapters list. After the adapter has been created, select the software iSCSI adapter in the list, right-click, and select Properties in order to configure it.
(Note: The iSCSI adapter is usually created as vmhba33.)
![]()
You will see a window open up. Select the second tab from the left: Network configuration. You’ll see both iscsi vmk adapters that you previously added to the vSwitch1.
Click Add> Select the first iSCSI adapter> OK. Repeat for the iscsi40.
![]()
Step 2: Configure the iSCSI target. Now that we have added our configuration, we need to point this initiator to our array. In my case, I have an array with 2 SP with a single NIC only each.
![]()
With the adapter selected, you should see the target appear on the below pane, like this:
![]()
Step 4: Set up a Round Robin storage policy. This policy will use both paths randomly and spread availability and VM storage traffic across both links (as we have two NICs on our storage network).
Select the Datastore > Properties > Manage paths
![]()
This brings up another window to which you’ll have to pay a bit of attention. Select the drop-down menu and choose Round Robin (VMware)> Click the Change button > Wait a second until the policy is applied > Then click the Close button.
![]()
We should see now multiple paths to the storage:
![]()
![]()
This ends part 3 of our VMware configuration through which we’re learning how to achieve redundancy from a networking and storage perspective and how to configure VMware High Availability (HA) for our VMs. In order to configure HA, it’s imperative to have some kind of shared storage.
This can be a SAN, NAS, or from the newest hyper-convergent technologies, VMware VSAN, allowing you to leverage local SSDs and disks to create a pool of shared storage. VMware VSAN do not need any separate hardware boxes as the whole cluster acts as a software RAID.
In the next and final step of this article, I will cover the HA configuration. This will allow our VMs to be restarted in case of unwanted hardware failure, such as a host that loses a CPU or motherboard or simply goes blue screen because of a faulty RAM.
After activating HA, our cluster will become fully resilient in case we have a hardware failure on one of our hosts. This can be a faulty NIC, CPU, or motherboard, or any other part of the host. Without HA, the VMs running on a failed host would just “die,” but with HA enabled, those VMs will restart automatically on another host within our cluster.
Note that you can configure all clustering capabilities, HA, Distributed Resources Scheduler (DRS), vMotion, and fault tolerance (FT) on the vCenter server. However, in case the vCenter server becomes unavailable, those functions continue to work. vCenter is there only to set things up and push the configuration to the hosts.
After the vCenter installation, which I’m not detailing here, you have to create a datacenter object:
The datacenter object is at the top-level object. Bellow you will have clusters, individual hosts, folders, VMs, etc.
![]()
Now, we are ready to create the cluster.
![]()
For now, don’t activate any of the cluster’s features (HA, DRS). We’ll do this later. As you can see in the screenshot above, the wizard looks quite similar in both management clients. However, you can configure the VSAN only through the vSphere web client.
![]()
After you create the DNS records, you’ll have to clear the cache on the vCenter server’s network card; otherwise, the server will not be able to find those hosts via fully qualified domain name (FQDN). You’ll need to open the command prompt and enter those two commands:
Ipconfig /flushdns
Ipconfig /registerdns
You should now be able to ping the hosts using the FQDN, and you are ready to add the hosts to the cluster.
![]()
![]()
![]()
Virtual Machine Options– The VM options allow you to configure the VM priority within the cluster. For instance, you could assign a high priority to database servers, a medium priority to file servers, and a low priority to web servers. This means that the database servers would be up and running before the file servers and webservers.
![]()
VM monitoring– If VM monitoring is enabled, the VM will restart if the VMware tools heartbeats are not received.
![]()
Datastore Heartbeating– In case the management network fails, Datastore Heartbeating allows you to determine if the host is in a failed state or just isolated from other hosts within the cluster.
![]()
VM Component Protection (VMCP)– VMCP protects virtual machines from storage-related events, specifically permanent device loss (PDL) and all paths down (APD) incidents.
When you enable VMCP, vSphere can detect Datastore accessibility failures, APD or PDL, and then recover affected virtual machines by restarting them on another host in the cluster that the Datastore failure did not affect.
VMCP allows the admin to determine how the vSphere HA reacts in case of a failure. This can be a simple alarm or the restart of VM on another host.
![]()
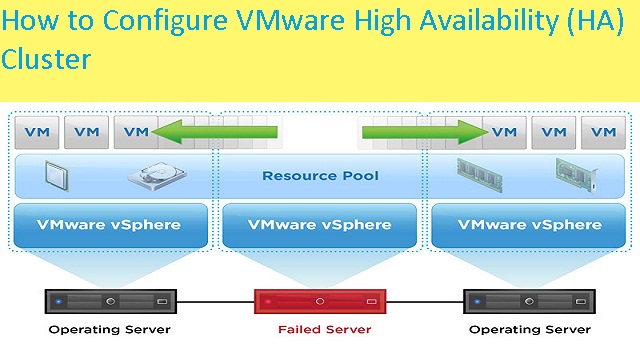
- You want to ensure high availability of your VMs. VMware HA will restart the VMs on the remaining hosts in the cluster in case of hardware failure of one of your hosts.
- You want to distribute your VMs evenly across the resources of the cluster. The distributed resource scheduler (DRS) (to be discussed later) will make sure that each host runs with the same level of memory and CPU utilization. If, for any reason, the use of memory or CPU rises (or falls), DRS kicks in and vMotion moves the VMs to other hosts within your cluster in order to guarantee an equal level of utilization of resources across the cluster.
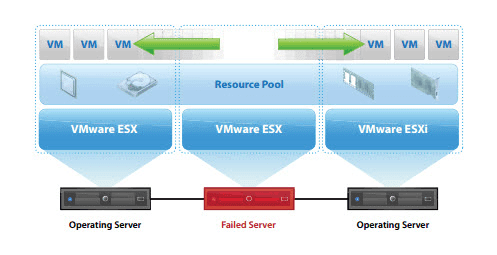
VMware HA moves VMs
Shared vs hyper-converged storage
VMware HA works well in traditional architectures with shared storage, but what about hyper-converged storage?Shared storage means NAS or SAN that is populated with disks or SSDs. All hosts present in the cluster can access shared storage and run VMs from a shared data store. Such architecture has been commonplace for about 15 years and has proven reliable and efficient. However, it reaches its limits in large clusters, where the storage controller’s performance becomes the bottleneck of the cluster. So basically, after you hit that limit, you end up creating another silo where you can put some hosts together with new shared storage.
Recently, hyper-converged architectures have become popular and are available from different vendors (including VMware with VSAN), where shared storage devices are replaced with the local disks in the hosts of the cluster. These local disks are pooled together across the cluster in order to create a single virtual shared data store that is visible to all hosts.
This is a software-only solution that can leverage high-speed flash devices, optionally in combination with rotating media. It uses deduplication and compression techniques, coupled with erasure coding (Raid5/6) across the cluster, in order to save storage space. We’ll look at VMware VSAN in one of our future posts.
I remember that my first demo using VMware HA was with two servers only, while the third device was a small NAS box where we had a few VMs running. This tells us that even very small enterprises can benefit from this easy-to-use technology.
HA configuration options
VMware HA is configurable through an assistant, allowing you to specify several options. You’ll need a VMware vCenter server running in your environment; VMware ESXi alone is not enough. For SMB, you’ll be fine with the vSphere Essentials Plus package, which covers you for up to three ESXi hosts and one vCenter server.Let’s have a look at the different options that VMware HA offers.
Host Monitoring– You would enable this to allow hosts in the cluster to exchange network heartbeats and to allow vSphere HA to take action when it detects failures. Note that host monitoring is required for the vSphere Fault Tolerance (FT) recovery process to work properly. FT is another advanced, cool technology that allows you to protect your workflows in case of hardware failure. However, compared to HA, it does that in real time, without downtime and without the need for a VM restart!
Enabling vSphere HA
Admission Control– You can enable or disable admission control for the vSphere HA cluster. If you enable it, you have to choose a policy of how it is enforced. Admission control will prevent the starting of VMs if the cluster does not have sufficient resources (memory or CPU).
Virtual Machine Options – What happens when a failure occurs? The VM options allow you to set the VM restart priority and the host isolation response.
VM Monitoring– Lets you enable VM monitoring and/or application monitoring.
Datastore Heartbeating– You have the possibility to check a secondary communication channel so vSphere can verify that a host is down. In this option, the heartbeats travel through a data store (or several). VMware datastore heartbeating provides an additional option for determining whether a host is in a failed state.
If the master agent present in a single host in the cluster cannot communicate with a slave (doesn’t receives heartbeats), but the heartbeat datastore answers, HA simply knows that the server is still working, but cannot communicate through one networking channel. In this case, we say “the host is partitioned.”
In such a case, the host is partitioned from the network or isolated; the datastore heartbeat then takes over and determines whether the host is declared dead or alive. The datastore heartbeat function helps greatly in determining the difference between a host which has failed and one that has merely been isolated from others.
In my next step, we’ll start with the network configuration of our VMware High Availability (HA) cluster, which is perhaps the toughest part of a VMware HA setup.
Requirements
vSphere Essentials Plus or higher– This entitles you to run vCenter Server (providing central management and configuration) and three VMware ESXi 6.x hosts. This packaged offer can be purchased online or through software resellers.Two hosts running vSphere 6– As stated previously, you’ll need at least two hosts in order to have an HA redundancy and stay protected in case of a server failure. The latest version of vSphere is 6.0 U2.
Two network switches with 8-10 ports. By having a dedicated storage network, you can avoid VLANs.
iSCSI storage – You’ll need iSCSI storage with two storage processors and several NICs. I’m assuming that you either have your storage array configured or you plan to follow the network configuration of your hardware supplier.
To keep things simple while configuring maximum redundancy, I assume that we’ll be using a separate network for storage and for vSphere networking (for management, vMotion, etc). This means that each of your hosts will need at least four NICs (we’ll be using two for storage), while the storage array also has four (two per storage processor).
Network configuration
The first thing to do when preparing for VMware vSphere deployment is to plan ahead in your network, not only in the network-only environment but also in the storage environment, as most storage-based solutions are Ethernet-based iSCSI or NFS.It is a small network configuration that I will place emphasis on today. The guide will work with the smallest possible redundant storage network configuration for two hosts connected to iSCSI storage.
Whether you’re just setting up a POC (prove of concept) environment or real deployment, you should have the following:
- A list of IP addresses you’ll be using
- An established naming convention for your ESXi hosts
- A base network service, such as AD, DNS, or DHCP, that is configured and running
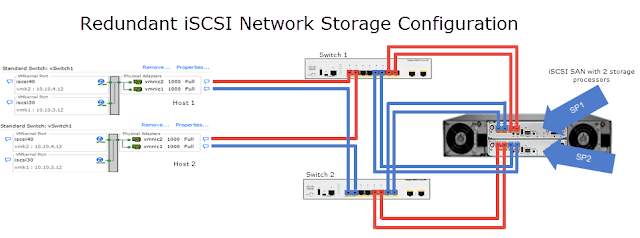
Redundant iSCSI Network Storage Configuration
On the right, we have a storage array connected to two storage switches in order to provide redundancy. We’re using two completely different storage networks for the array.
There are only two hosts in the image, but you can easily add a third and, potentially, a fourth host in order to expand your cluster. This merely depends on the requirements for properly sizing the network switches with a correct number of network ports, in order to satisfy future growth.
The VMware vSphere configuration (for storage) isn’t difficult, but one has to keep in mind that only one NIC can be configured as active in the vSwitch, otherwise you can’t bind your iSCSI initiator to the iSCSI target.
All IP addresses of Network 1, marked in blue, will use a base address of the subnet 10.10.3.x. Then, we do the same thing for Network 2, which has a base address of 10.10.4.x. In the image, this network is marked in red.
As you can see, all the ESXi port groups are following this numbering scheme to stay within the same range. In this way, it’s very easy to assign IP addresses while constantly ensuring you’re “navigating” within the right network range.
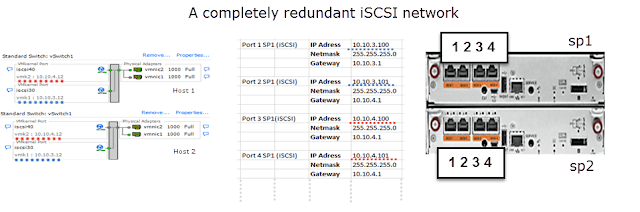
A completely redundant iSCSI network
If the array has less than four ports per SP, you can still assure redundancy by “cross-linking” the switches. I am aware that my guide represents a very generous storage array with four network ports per storage processor.
As we now have the networking hardware for our HA cluster in place, we can start by configuring vSphere.
Configuring VMware vSphere
First, we’ll need to add a VMkernel network port. Open the vSphere client and start the assistant: Select your host> Configuration TAB> Networking> Add Networking> Select VMkernel radio button.As you can see in the screenshot below, I’m adding a separate virtual switch to our host. This is something that is not necessary (we can configure the iSCSI network on the existing vSphere switch), but I like to separate iSCSI from the other networks I’m using on each host, by creating a separate vSwitch – in our example, vSwitch 1.

Create a New vSphere standard switch
You can also see that I’m selecting both NICs to be added to this switch. I’ll use both of those for our redundant iSCSI configuration.
Now, you just have to follow the Add Network Wizard.

Create a new vSphere standard switch – Network label
In the next step, you have to assign an IP address. Finish the assistant and add an additional VMkernel adapter to this vSwitch by clicking the Properties link > Add > VMkernel > Put Network Label > Next > IP address and Network mask > Done.
Make sure to have always one active and one unused VMnic adapter for each iSCSI VMkernel port. This is important, because otherwise you won’t be able to bind the VMkernel port adapters to a VMnic later on.
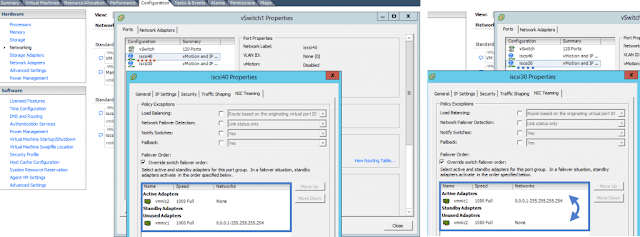
Override switch failover order
Check Override switch failover order for active and unused NICs.
This concludes today’s post. We are about halfway through what’s required for a redundant iSCSI storage network.
Today we learned how to:
- Plan a redundant iSCSI network for two or more VMware vSphere hosts.
- Assign static IP addresses to our iSCSI array. We did not demonstrate this in detail because we don’t have a spare array in the lab, but I think you got the idea or followed your vendor’s recommendations.
- We created a separate switch for iSCSI SAN network traffic and configured active and unused VMnic adapters on each vSwitch.
We have created two separate networks between each host and storage array, which gives us a backup in case we have any of the following issues:
- A switch failure
- Storage processor failure
- NIC card failure in our host
In the above steps, we created a separate standard vSwitch to use for our iSCSI storage traffic. The vSwitch had been configured with 2 NICs.
Now we need to accomplish four steps:
- Enable the iSCSI initiator
- Configure the iSCSI target
- Create a shared datastore
- Set up a Round Robin storage policy
Step 1: Enable the iSCSI initiator. Select your host > Configuration> Storage Adapters> Right-click in the blank area > Add Software iSCSI Adapter.
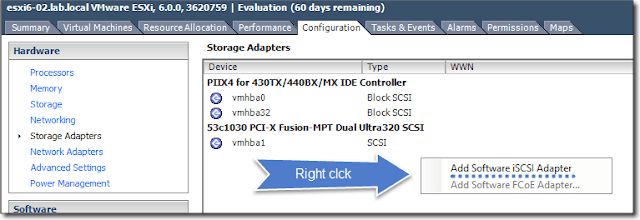
VMware Storage – Add software iSCSI adapter
An assistant pops up to inform you that a new software iSCSI adapter will be added to the Storage Adapters list. After the adapter has been created, select the software iSCSI adapter in the list, right-click, and select Properties in order to configure it.
(Note: The iSCSI adapter is usually created as vmhba33.)
iSCSI configuration
You will see a window open up. Select the second tab from the left: Network configuration. You’ll see both iscsi vmk adapters that you previously added to the vSwitch1.
Click Add> Select the first iSCSI adapter> OK. Repeat for the iscsi40.
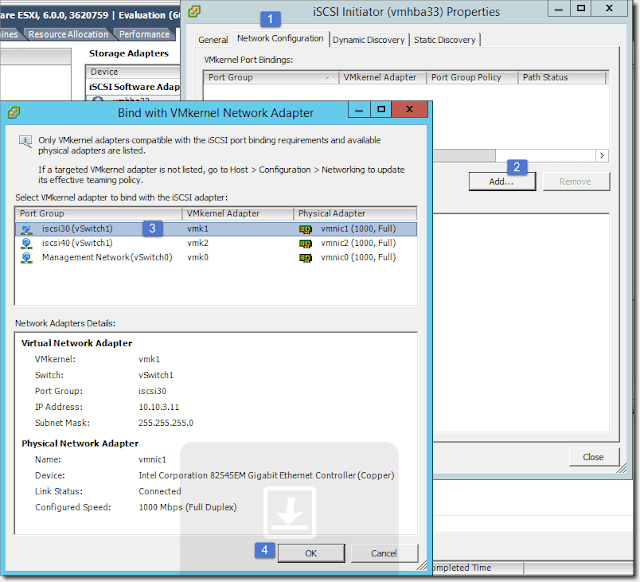
Bind VMkernel adapter with the iSCSI adapter
Step 2: Configure the iSCSI target. Now that we have added our configuration, we need to point this initiator to our array. In my case, I have an array with 2 SP with a single NIC only each.
Go back to the properties of the iSCSI initiator> Dynamic discovery tab> Add> enter the IP address of the first SP. Add all IP addresses of the array. > OK> Close> Click Yes on this message: “A rescan of the host bus adapter is recommended for this configuration change.”

Configuring vSphere Storage – iSCSI Target configuration
With the adapter selected, you should see the target appear on the below pane, like this:
VMware Storage – The iSCSI Target
Step 3: Create a shared datastore. Go to Configuration > Storage > Add Storage > Select Disk/LUN radio button > Next > Select the target iSCSI disk > Next > Next (a partition will be created and used) > Enter a meaningful name for the datastore > Leave the “Maximum available space” radio button checked > Next> Next.You should see a new datastore appear. For our lab test, we have named it shared_iSCSI.
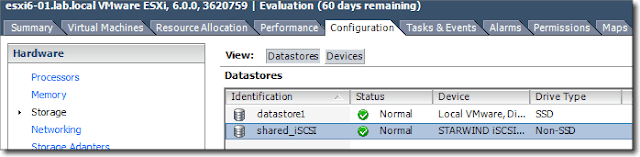
Shared datastore created
Step 4: Set up a Round Robin storage policy. This policy will use both paths randomly and spread availability and VM storage traffic across both links (as we have two NICs on our storage network).
Select the Datastore > Properties > Manage paths
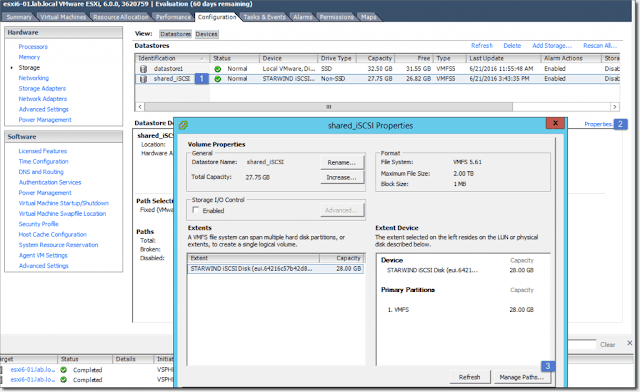
Managing paths
This brings up another window to which you’ll have to pay a bit of attention. Select the drop-down menu and choose Round Robin (VMware)> Click the Change button > Wait a second until the policy is applied > Then click the Close button.
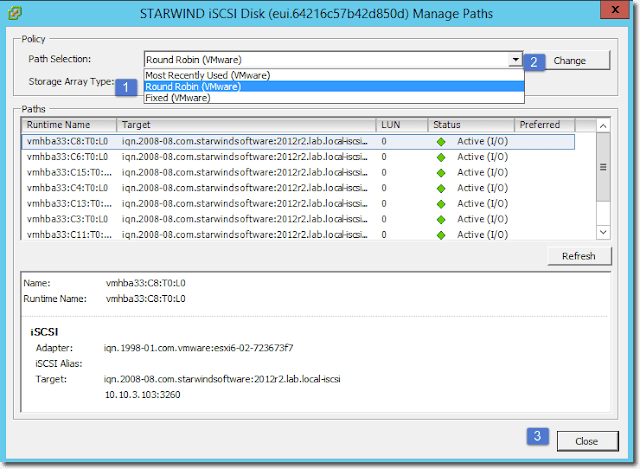
Specifying Round Robin as default path

All paths to the iSCSI SAN
From the networking view of the iSCSI initiator, we can see that both links are used and active for iSCSI traffic.
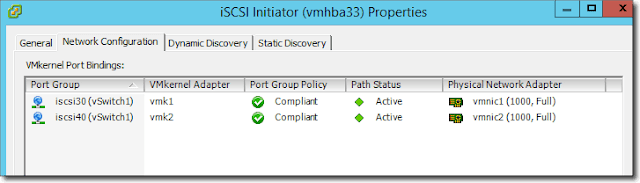
Both links used for iSCSI traffic
This can be a SAN, NAS, or from the newest hyper-convergent technologies, VMware VSAN, allowing you to leverage local SSDs and disks to create a pool of shared storage. VMware VSAN do not need any separate hardware boxes as the whole cluster acts as a software RAID.
In the next and final step of this article, I will cover the HA configuration. This will allow our VMs to be restarted in case of unwanted hardware failure, such as a host that loses a CPU or motherboard or simply goes blue screen because of a faulty RAM.
After activating HA, our cluster will become fully resilient in case we have a hardware failure on one of our hosts. This can be a faulty NIC, CPU, or motherboard, or any other part of the host. Without HA, the VMs running on a failed host would just “die,” but with HA enabled, those VMs will restart automatically on another host within our cluster.
vSphere requirements
Before I discuss the final configuration steps, I want to recap what’s necessary to activate the HA successfully:- A minimum of two hosts in the cluster– You can have up to 64 hosts in vSphere cluster.
- Shared Storage– Every server that is part of the HA cluster needs to have access to at least one shared storage.
- Network– You must connect all hosts to at least one management network. The VMkernel network with the Management Networkcheckbox has to be enabled; by default, the HA needs an accessible default gateway.
- Licensing – All hosts must have licenses for HA. HA won’t work with an ESXi free license. You need at least vSphere Essentials.
- VMware tools – It is highly recommended that you install VMware tools on all hosts, and it is required if you want to work with the VM monitoring feature.
Creating a VMware HA cluster
You can configure the HA cluster either with the vSphere client or with the vSphere web client. The vSphere web client also can activate the VM component protection (VMCP). This feature does not appear in the vSphere client.Note that you can configure all clustering capabilities, HA, Distributed Resources Scheduler (DRS), vMotion, and fault tolerance (FT) on the vCenter server. However, in case the vCenter server becomes unavailable, those functions continue to work. vCenter is there only to set things up and push the configuration to the hosts.
After the vCenter installation, which I’m not detailing here, you have to create a datacenter object:
Step 1: Create a Datacenter Object
The datacenter object is at the top-level object. Bellow you will have clusters, individual hosts, folders, VMs, etc.

Creating a datacenter object
Now, we are ready to create the cluster.
Step 2: Create a Cluster.
Select the datacenter object first and then right click> New cluster.
Creating cluster object
For now, don’t activate any of the cluster’s features (HA, DRS). We’ll do this later. As you can see in the screenshot above, the wizard looks quite similar in both management clients. However, you can configure the VSAN only through the vSphere web client.
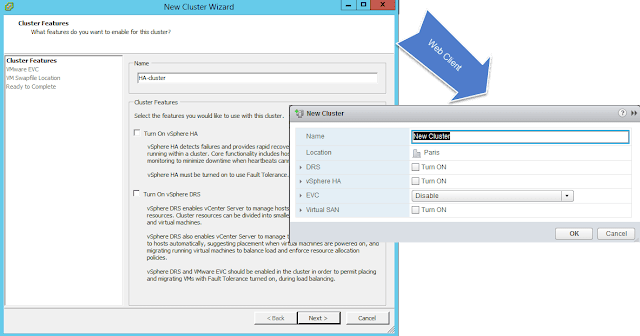
New Cluster Wizard
Step 3: Add a Host to the Cluster
It’s preferable to use DNS names for the hosts instead of IP addresses. But make sure that you create forward and reverse static DNS records on your DNS server first.After you create the DNS records, you’ll have to clear the cache on the vCenter server’s network card; otherwise, the server will not be able to find those hosts via fully qualified domain name (FQDN). You’ll need to open the command prompt and enter those two commands:
Ipconfig /flushdns
Ipconfig /registerdns
Select the newly created cluster and then right click > Add Host.
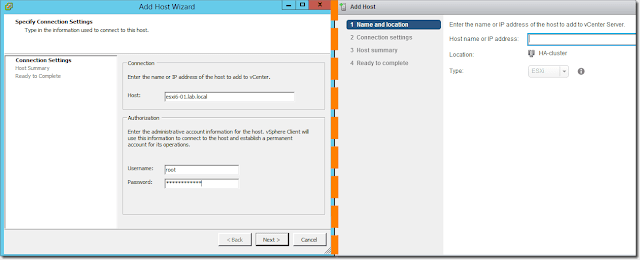
Adding a host with the Cluster Wizard
Enabling the vSphere HA cluster
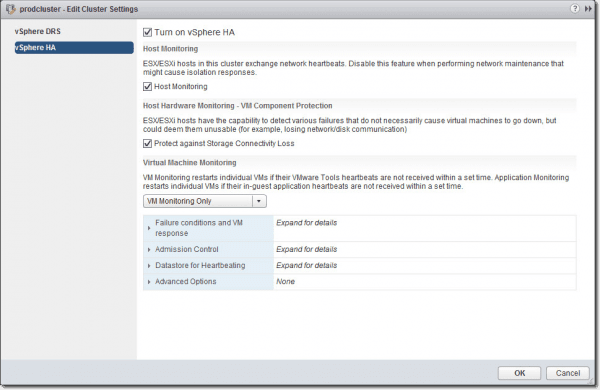
You can now enable the HA cluster in the vSphere client: Right click the cluster> Edit settings> check box Turn On vSphere HA.In the vSphere Web Client, you have to select cluster > Settings > vSphere HA > Edit Button. (Note: you can also navigate to this level manually by selecting the cluster on the left > Manage > vSphere HA > Edit).

Turn on vSphere HA cluster
vSphere HA cluster configuration options
Many options exist that allow you to adjust the behavior of the cluster in case of a hardware failure in one of your hosts. Only the vSphere web client offers the more advanced options:

vSphere HA cluster configuration in the web client
Virtual Machine Options– The VM options allow you to configure the VM priority within the cluster. For instance, you could assign a high priority to database servers, a medium priority to file servers, and a low priority to web servers. This means that the database servers would be up and running before the file servers and webservers.

vSphere HA Virtual Machine options
VM monitoring– If VM monitoring is enabled, the VM will restart if the VMware tools heartbeats are not received.

VM Monitoring
Datastore Heartbeating– In case the management network fails, Datastore Heartbeating allows you to determine if the host is in a failed state or just isolated from other hosts within the cluster.

Datastore Heartbeating
VM Component Protection (VMCP)– VMCP protects virtual machines from storage-related events, specifically permanent device loss (PDL) and all paths down (APD) incidents.
When you enable VMCP, vSphere can detect Datastore accessibility failures, APD or PDL, and then recover affected virtual machines by restarting them on another host in the cluster that the Datastore failure did not affect.
VMCP allows the admin to determine how the vSphere HA reacts in case of a failure. This can be a simple alarm or the restart of VM on another host.
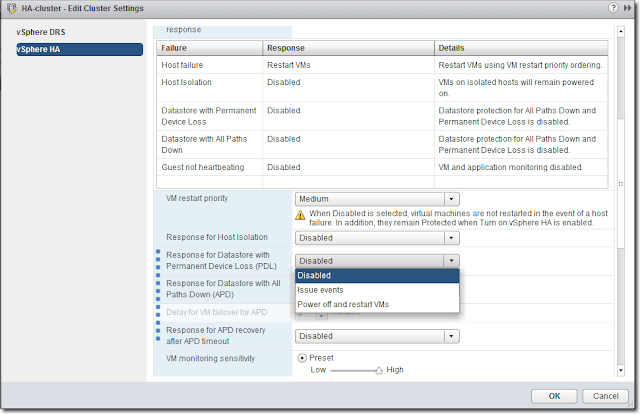
vSphere-HA-APD-PDL-options
This completes my VMware HA configurations steps.


