
In this article I will show you how to configure RAID 5/6 (erasure coding), deduplication, and compression on VMware vSAN.
Erasure coding is a general term that refers to any scheme of encoding and partitioning data into fragments in a way that allows you to recover the original data even if some fragments are missing. Any such scheme is referred to as an “erasure code.”
By activating erasure coding on a VSAN cluster, you’ll be able to spread chunks of the VM’s files to several hosts within the cluster.
As of version 6.2, Virtual SAN supports two specific erasure codes:
- RAID 5– 3 data fragments and 1 parity fragment per stripe
- RAID 6– 4 data fragments, 1 parity, and 1 additional syndrome per stripe
The Requirements: The hardware and HCL for VSAN requirements are the same as for other configuration types of VSAN: a minimum of 4 hosts for RAID 5 and a minimum of 6 hosts for RAID 6.
Make sure that each host has at least one SSD available for the cache tier and one or several SSDs available for the capacity tier. Note that erasure coding is only available for the VSAN All-Flash version.
The Configuration Steps: Basically, you’ll need hardware that is capable of running VSAN and a VSAN license. Then only a few configuration steps, including network configuration, are necessary.
I assume that you know how to create a Datacenter object and cluster object, how to add hosts to vCenter, and how to move the hosts that will be used for VMware VSAN into the VSAN cluster. Once you’ve completed these steps, select the VSAN cluster > Manage tab > Virtual SAN > Edit. The VSAN configuration assistant will launch.
You have the option of controlling how the local disks are claimed for VSAN. If this is done automatically (assuming that all disks are blank and have a similar vendor mark/capacity). Or you can do it manually and control which disks will be part of the cache tier and which will be part of the capacity tier.
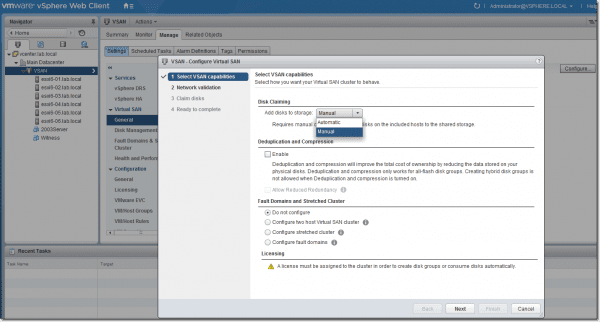
VMware VSAN erasure coding configuration
Then we have the networking requirements. Each host has to have one VMkernel adapter activated for VSAN traffic.
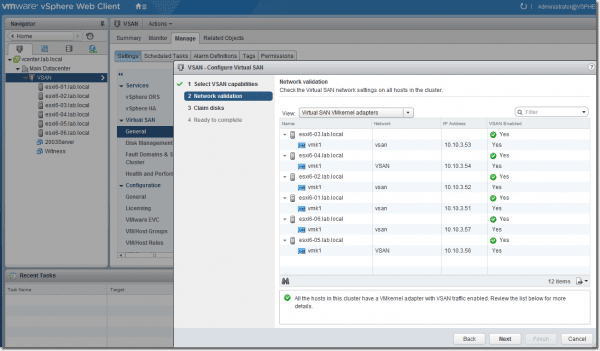
VMware VSAN erasure coding configuration – Networking requirements
Here you can see the disk claim page. This page is same for all versions of VSAN and allows you to tag/un-tag disks as Flash or as HDD. This is for cases in which VSAN does not recognize the hardware automatically.
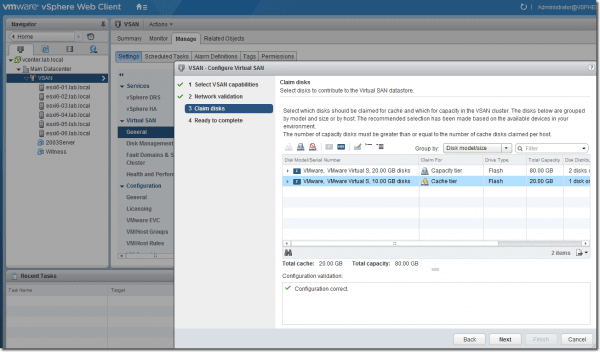
VMware VSAN erasure coding configuration – Disk claim
Then we have the overview page. As you can see, I have already claimed my disks for the previous use cases with VSAN, so I only added two new hosts to my cluster in order to show the erasure coding configuration. On the review screen, you can see that 160 Gb were already claimed.
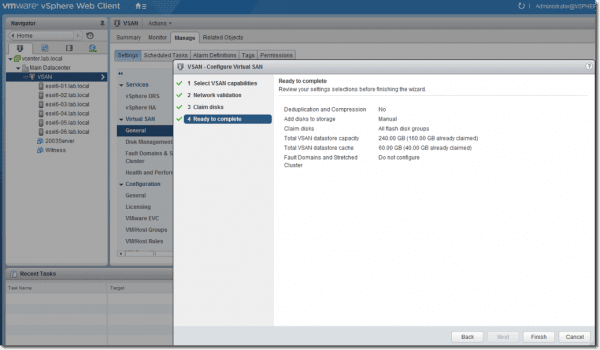
Overview of VMware VSAN erasure coding configuration
Click the Finish button and wait few minutes until the VSAN datastore is created and the system shows you that VSAN is on.
As you can see, so far we have just created a VSAN cluster. We now need to create a VM storage policy.
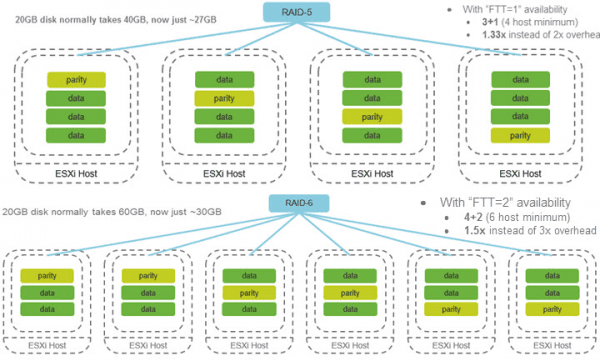
An overview of both policies is given below. Remember that failure to tolerate (FTT) refers to how many failures the VSAN cluster can tolerate.
Raid 5 configuration:
- Number of failures to tolerate (FTT) = 1
- Failure tolerance method = capacity
- Compared to RAID 1, VSAN uses only x1.33 rather than x2 capacity
- Requires a minimum of 4 hosts in the VSAN-enabled cluster
- Number of failures to tolerate (FTT) = 2
- Failure tolerance method = capacity
- Compared to RAID 1, VSAN uses only x1.5 rather than x3 capacity
- Requires a minimum of 6 hosts in the VSAN-enabled cluster
The diagram below illustrates the configurations (courtesy of VMware).
RAID 5 and RAID 6 configurations
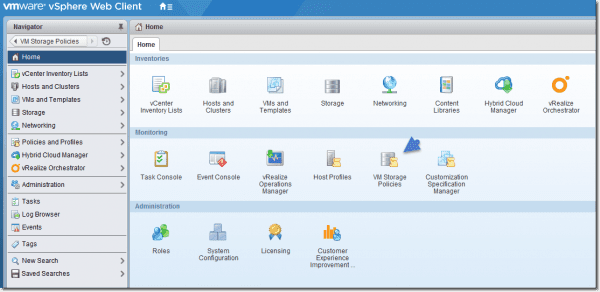
Then we can start and create the RAID 5 and RAID 6 policies. Connect via vSphere web client and click the VM Storage Policies icon on the Home tab.
Configure VM storage policies
On the next page, click Create a new VM storage policy.

Create a new VM storage policy
Then follow the assistant.
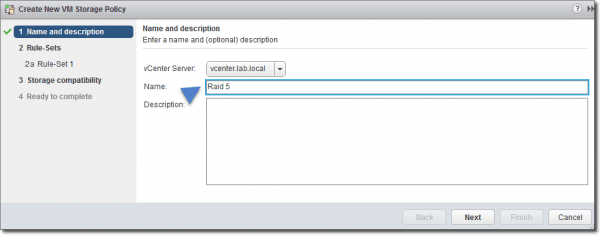
Create a new VM storage policy – Assign a name
Now you’ll see an overview page explaining what VM storage policy is and what the rules and requirements for the storage resources are.
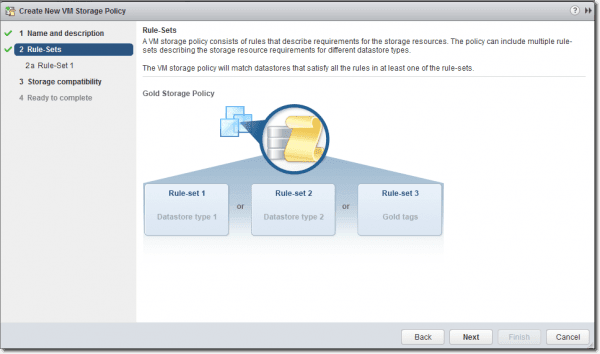
Create a New VM Storage Policy – Overview Page
We can now start adding rules. Make sure to select the VSAN from the Rules based on data services drop-down menu. Then choose Failure tolerance method to start with.
Create a new VM storage policy – Failure tolerance method
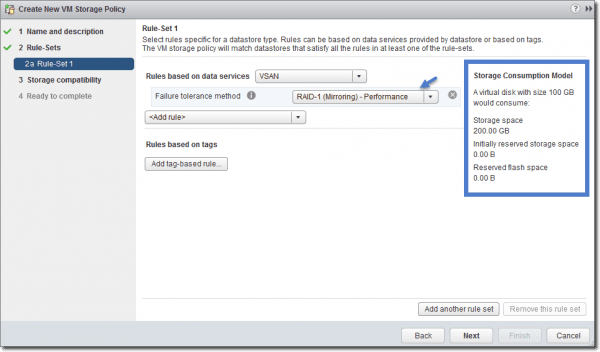
Next select Raid 5/6 (erasure coding) – Capacity from the drop-down menu. You’ll see an example calculation on the right telling you how much storage space the VM will consume. In our example, for a 100 Gb disk, you’ll consume 133.33 Gb of VSAN storage space.

Create a new VM storage policy – Add rule
Similarly, you can see that for RAID1 (if you want to test it), you will basically just have a mirror that uses 200 Gb of storage space on the VSAN datastore.

Create a new VM storage policy – RAID 1 example
Let’s continue with our RAID 5 policy. Add two more rules:
- Object space reservation = 0
- Number of failures to tolerate = 1
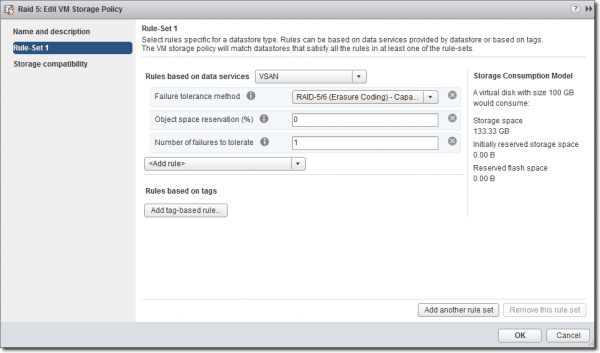
Create a new VM storage policy – RAID 5 policy
Click Finish to validate the rule.
The same you would do for RAID 6, follow the same steps but set the number of failures to tolerate to 2.
This RAID 6 options with FTT = 2 will more likely interest people who are cautious about protecting their data because with FTT = 2, you can lose two hosts and still be “on.”
Applying the VM storage policy to a VM
It is not enough to just create a VM storage policy; we also need to apply this policy to our VMs (VMDKs). It’s important to know that you can apply or change a policy on VM(s) that are running—no need to stop them. The VM’s objects get reconfigured and rebalanced across the cluster automatically and in real time.By default, there is a “Virtual SAN Default Storage Policy” only, which utilizes RAID 1. Once you create your own RAID 5 and RAID 6 policies, you can apply this policy to existing VMs or use this policy for VMs that you migrate to your new VSAN datastore.
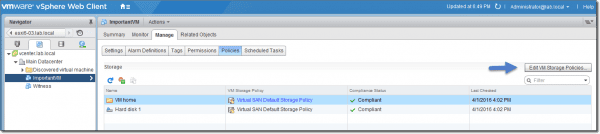
After you create or migrate VMs to your VSAN datastore, go to Select your VM> Policies tab > Edit VM Storage Policies button.
Create a new VM storage policy – Apply to VMs
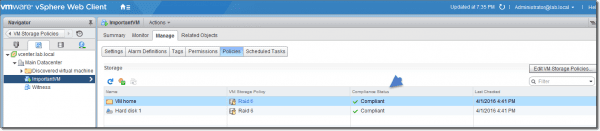
Then select the RAID 5 or RAID 6 policy from the drop-down menu > hit the Apply to All button > click OK.
Create a new VM storage policy – Apply VM storage policy
Then verify that your VM’s compliance status is Compliant. You can see that our RAID 5 VM storage policy is applied to this VM.
Create a new VM storage policy – Verify compliance
The last things to activate are deduplication and compression. The VSAN All-Flash version uses these features to reduce storage space in addition to the space savings present with RAID 5/RAID 6 compared to RAID 1.
The deduplication and compression activation are shown below:
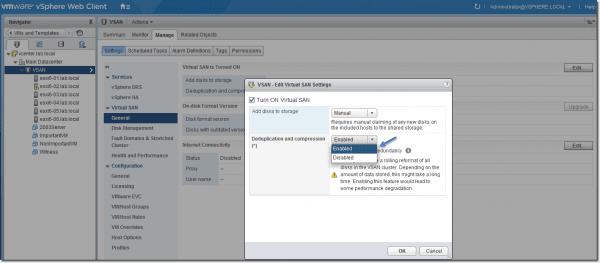
Create a new VM storage policy – Deduplication and compression
Click OK to validate. The conversion of the disk format will follow. When it finishes, we can see the capacity overview. (Note it’s a nested environment with only a single VM. Thus, not much deduplication is going on here.)
Select VSAN cluster object > Monitor TAB > Virtual SAN > Capacity
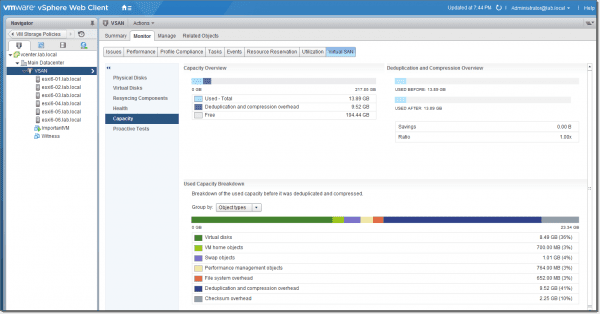
VMware VSAN erasure coding configuration – Deduplication and compression
I can show you a screenshot from a near production environment here:
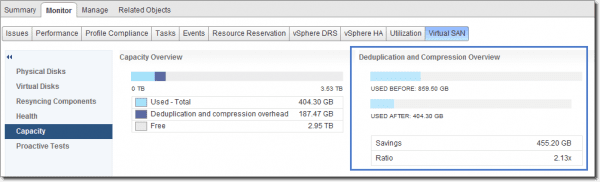
VMware VSAN erasure coding configuration – Deduplication and compression overview
We can also verify how the virtual disks are placed on our VSAN cluster. As you can see, the components are spread out through all 6 hosts.
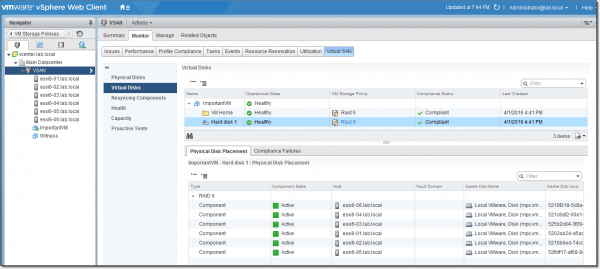
VMware VSAN erasure coding configuration – Physical disk placement
With RAID 5, there will be 3 data components and a parity component; with RAID 6, there will be 4 data components and 2 parity components.
Conclusion
As you can see, VMware VSAN is a software-only solution tightly integrated into the VMware stack. It’s a kernel module, so there is no need to install any virtual appliance to create shared storage. By only using local disks and SSDs, you can create a shared VSAN datastore visible to all hosts within a VSAN cluster with just a few clicks.
VSAN scales in a linear manner, which means that by adding more hosts to the cluster, you grow not only storage but also CPU and memory, making it a truly hyper-converged infrastructure.


