In this part of article series, we will walk you through Site Recovery Manager inventory mappings. Inventory mappings involves in mapping the resources (clusters and resource pools), folders, and networks of the Protected Site to the Recovery Site. This step is required because we use 2 differenet vCenter servers installed that are not linked by common data source.
When your Recovery Plan is invoked for testing or for real DR, the SRM server at the Recovery Site needs to know your preferences for bringing your replicated VMs online. Although the recovery location has the virtual machine files by virtue of third-party replication software, the metadata that comprises the vCenter inventory is not replicated. It is up to the SRM administrator to decide how this “soft” vCenter data is handled. The SRM administrator needs to be able to indicate what resource pools, networks, and folders the replicated VMs will use.
This means that when VMs are recovered they are brought online in the correct location and function correctly. Specifically, the important issue is network mappings. If you don’t get this right, the VMs that are powered on at the Recovery Site might not be accessible across the network. out of that we will going to discuss about SRM resource mapping in this particular post.
Resource mappings define which compute resources are used at the recovery site ,when virtual machines are recovered. For Example, You have the Specific cluster or Resource pool in which Exchange mailboxes are hosted in your protection site called “Exchange”. You need to define the mapping to bring that particular Exchange Mailboxes in the Specific Cluster or Resource Pool called “Exchange-DR” in recovery site during test recovery or in actual disaster recovery. For achieve this, you need to configure the Resource mapping at SRM.
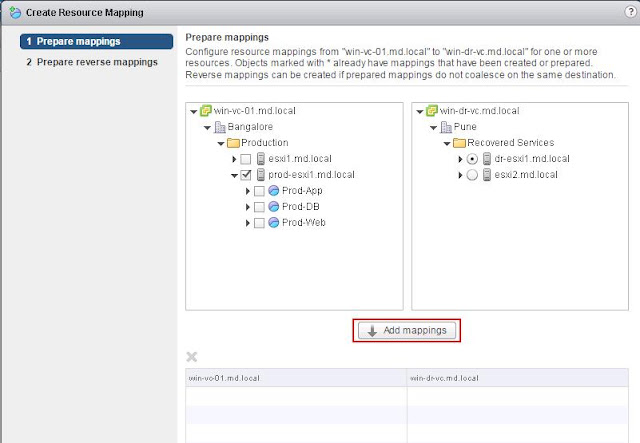
To configure resource mapping: Login to your Protected site vCenter using vSphere Web Client -> SRM plugin -> Select the Protected site and Click on Create Resource Mapping

This step involves in mapping the resources from your protected site to recovery site. For example, I have Production ESXi host called “Prod-esxi1” and I am going to creating resource mapping for my prod esxi host in DR site by mapping the esxi host “dr-esxi1” in my recovery site. This step will ensure that all the VM’s running in my Prod-esxi1 host will be powered on dr-esxi1 host with the help of storage replication. This is just an front end. We need to ensure that the replication LUN’s are mapped to the dr esxi host to bring the VM’s on the DR host.
To configure Mapping,Select the the Esxi host in protected site and Select the mapping object in the recovery site and click on Add Mapping.
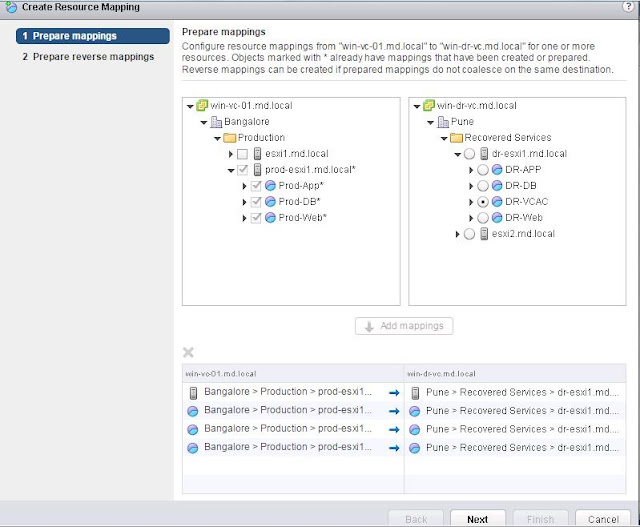
In specific cluster or host, you may be running various applications under resource pools for resource reservations or for manageability reasons. You may need the same structure of resource pools in your DR site to manage your recovered virtual machines. To achieve that, Create the resource pools in your DR site first and then configure the resource mapping between protected site and recovery site. For Example, I want the vm’s in the resource pools “prod-App”, “Prod-DB” & “Prod-web” in my protected site to be powered on under “DR-App”, “DR-DB” & “DR-web” during test recovery or actual DR recovery, So i have selected the resource pool in Protected site with the appropriate mapping object in recovery site and click on Add mappings.
Select the objects to configure the reverse mappings. This step automatically create reverse mapping on the paired site. This help you during failover of your vm’s from recovered site back to protected site. For examples, vm’s running under my DR-APP resource pool after recovery will be powered back on under Prod-App during failback from recovery to protected site. To configure reverse mapping for all the mapped objects, click on Select all applicable and click on Finish.

We can notice that resource mappings are created between protected site and recovery site. You can view or reconfigure the resource mappings by browsing Protected site ->Manage Tab -> Resource Mappings.

We have completed Site Recovery Manager Resource mapping configuration. Remember, whenever you create new resource pools or clusters in your protected site, we need to configure the resource mapping for that newly created object in your recovery site.
Configuring SRM Folder Mapping
In most vSphere environments, Virtual machines and data centers organized into folders in vCenter server. In real production environment, There are thousands of virtual machines running in your production vCenter server. Without folder mapping, all your virtual machines will be dumped under datacenter at recovery site during the test recovery or during actual DR recovery. Folder mapping will help you for better management and planning.This Folder hierarchies are used to help you organize which virtual machines are only local and whichones come from the protected site. These hierarchies also help you categorize virtual machines by their purpose, their recovery point objective and recovery time objective, or some other important factor.
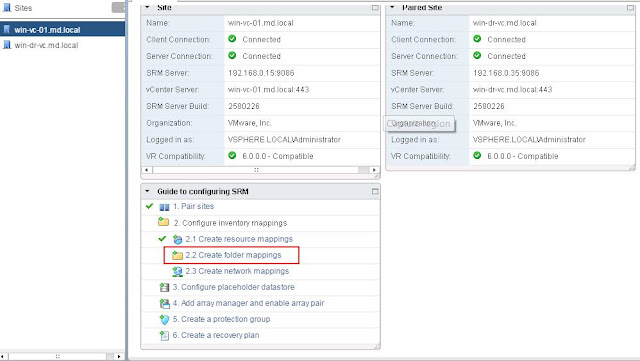
To configure the Folder mapping, Login to your Protected site vCenter server using vSphere web client.Click on SRM plugin -> Select Protected site vCenter and Click on Create Folder mapping under inventory mappings.
You have 2 options to configure the folder mapping either automatically prepare mappings for folders with matching names or to prepare mappings manually. I am choosing the option to prepare folder mappings manually and click on Next.

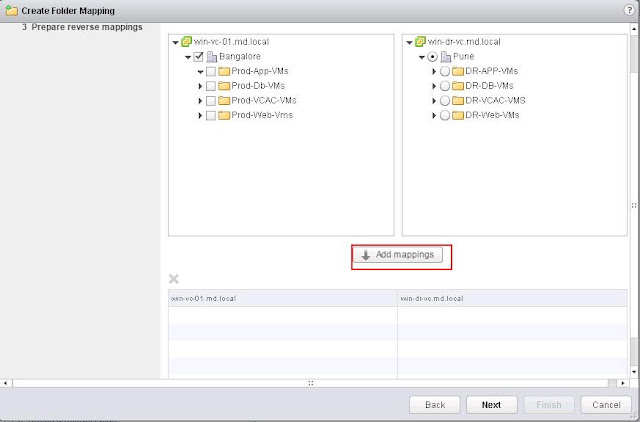
Select the Datacenter or folder from the protected site and select appropriate mapping folder in the right side from recovery site and click on Add Mappings to add the folder mappings.
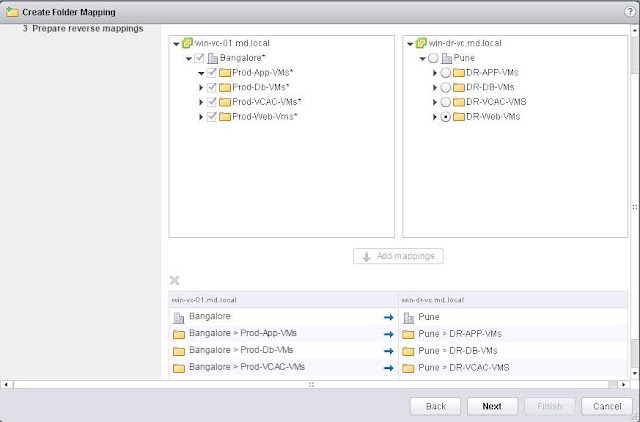
Below screen i have selected the folder mapping between my protected site and DR site. click on Next.
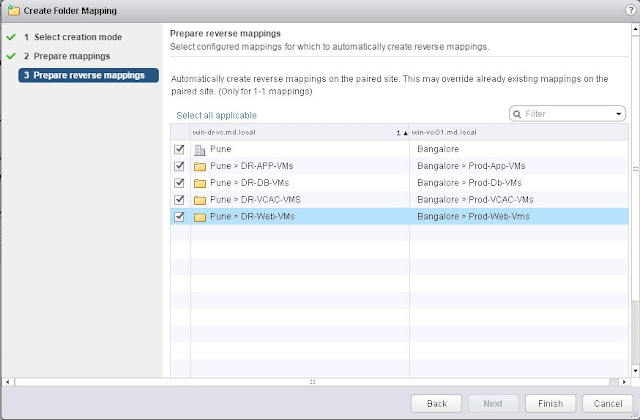
Select all applicable to configure the reverse mappings. Reverse mappings option will automatically create reverse mappings on the paired site. Click on Finish.
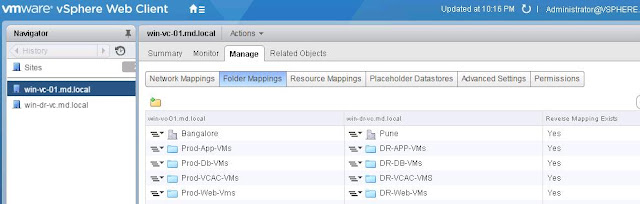
Once Folder mappings are created, you can view or edit the folder mappings under Manage tab -> Folder mappings.
We are done with configuring the SRM folder mappings. In the Next step, we will setup Site Recovery Manager Network mappings.
Configuring SRM Network Mapping
One of the important step in SRM inventory mappings. Network mapping needs to configured properly. If you don’t get this configured correctly, the VMs that are powered on at the Recovery Site might not be accessible across the network. Network mappings can only be related to Virtual machine port groups.You cannot map management network or VMkernel port groups.You need to more cautions with network mappings on recovery site because Site Recovery manager does not validate whether the port group that you map is correct portgroup or not. I would recommend you to create the similar Port groups names with some prefix like Prod_ or DR_ in the virtual machines Port group in protected site and recovery site. It will help you to easily configure the network mappings.
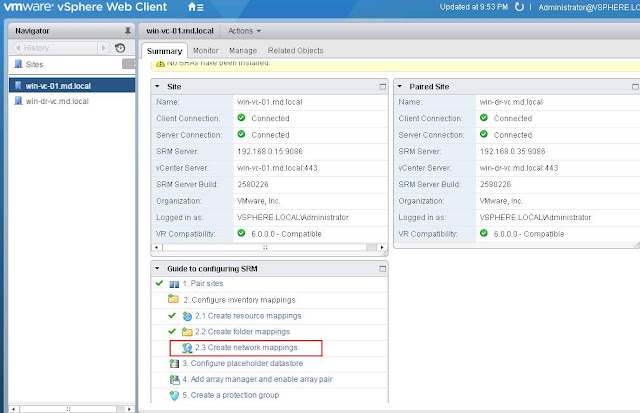
To configure the network mapping, Login to your Protected vCenter server using vSphere Web client and click on SRM in the home page, Select Protected site vCenter in the list and Select Configure Network mapping under inventory mapping.
There are two options to configure the network mapping first one is automatically prepare mappings for networks with matching names and second one is prepare mappings manually. I want to configure the networks mapping manually between protected site and recovery site.

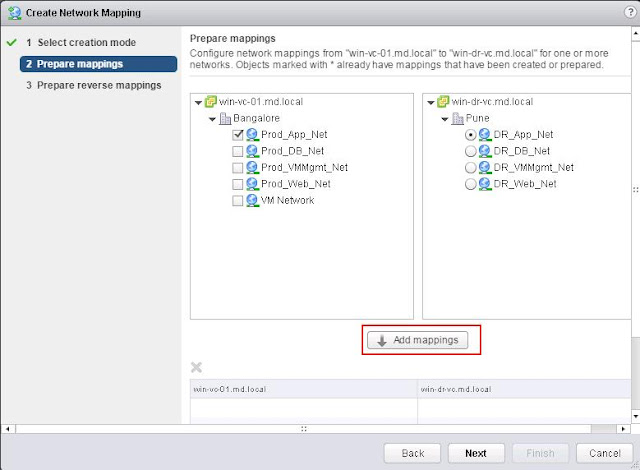
As i recommended earlier, it would be best to name your port which can be easliy identify from the port group names. I have named production network with prefix Prod_ and recovery site network with the prefix DR_. Select the network from the protected site in the left side and select the appropriate network port group in the recovery site and Click on Add mappings.
Similarly configure the network mappings between protected site and recovery site networks and click on next.
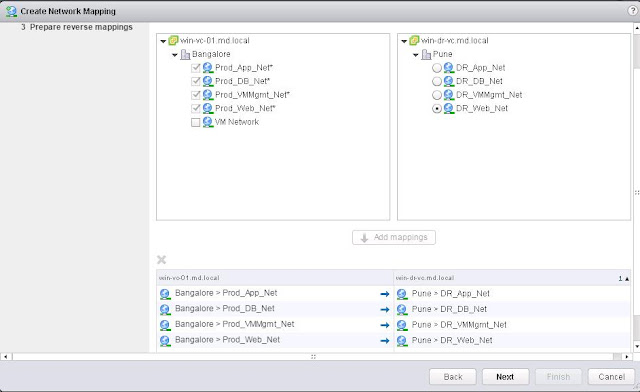
Select all applicable to configure the reverse mapping for the paired site. Which creates the network mapping between DR site and protected site. Click on Finish.

Once network mappings are created, you will be able to view and edit the network mappings under manage -> Network mappings.

We are done with configuring Site Recovery Manager Network mapping. In the next step, we will discuss about configuring Placeholder datastore.
Configuring SRM Placeholder Datastores
A placeholder datastore is used to store the placeholder virtual machines at the recovery site. A placeholder datastore reserves a place for protected virtual machines in the recovery sites inventory. Placeholder datastores does not need to be replicated and it must be visible to all esxi hosts in the cluster. Placeholder datastore needs to established in both primary and secondary sites to facilitate the reprotection.The placeholder datastore can be on local storage or shared storage available to all ESXi hosts in the cluster.A placeholder virtual machine is nothing but a subset of virtual machine files that is created ,when a virtual machine is added to a recovery plan. It cannot be powered on. A placeholder virtual machine provides a visual cue in the recovery site inventory that a virtual machine is protected. Only function of placeholder virtual machine is to reserve a place in the inventory of the recovery site. Placeholder virtual machines are composed only of very few files *.vmx, *.vmxf, and *.vmsd files. The disk files (*.vmdk) are not present. The placeholder virtual machine files have a size of approximately 1KB each.
When you add vm’s to the SRM protection group, SRM creates a placeholder virtual machine at recovery site . It also derives its folder and compute assignmnets from the inventory mappings which we have configured in our previous posts. You can easily identify the placeholder virtul machines by their unique icon on the recovery site.
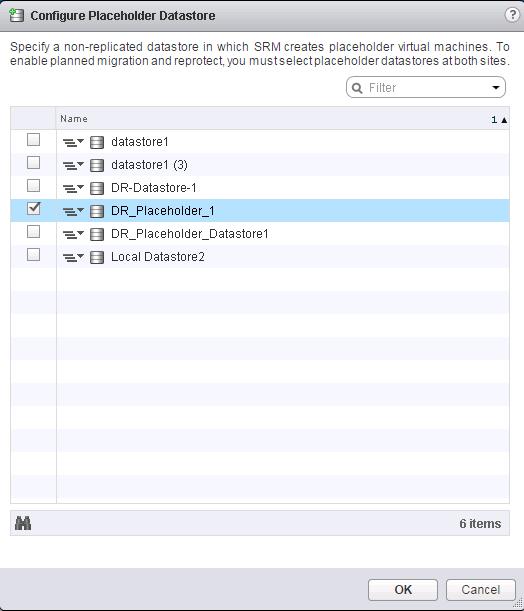
To configure the Site Recovery Manager Placeholder Datastore, Click on Configure Placeholder datastore option under guide to Configure SRM.
Select the datastore from the list to be used as Placeholder datastore for your production cluster. Placeholder datastore can be local or remote. You should use the non-replicated lun. I would recommend you to name the datastore to match up with the cluster name along with keyword “Placeholder” to easily identify it. Once you have selected the datastore, click on ok.

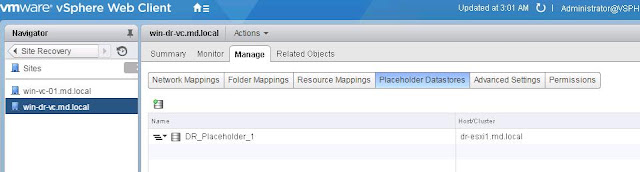
Placeholder is configured and it is appearing under Manage-> Placeholder Datastores.

We have done configuring Placeholder datastore for your protected site cluster. Similarly we need to choose the non-replicated datastore to configure placeholder datastore for your recovery site cluster. Click on Ok.
We are done with creating SRM placeholder datastore. In the next step, we will discuss about creating SRM protection groups.
Creating SRM Protection Group
Site Recovery Manager Protection groups can be created to group virtual machines for protection. SRM protection groups will be different for array-based replicated virtual machines and vSphere replication replicated virtual machines. You cannot create protection groups by grouping both types of replication. In simple terms, A protection group is a group of virtual machines that fail over together at the recovery site during a test or a actual recovery using VMware vCenter Site Recovery Manager. In actual Production environment, you can create protection group based on Cluster or application type or array based replication groups based on the datastore groups. An array-based protection group can contain one or more datastore groups.To create a new protection group, Click on “Create Protection Group” under guide to configure SRM in the SRM homepage of the vSphere Web Client. Specify the name and location for the protection group.

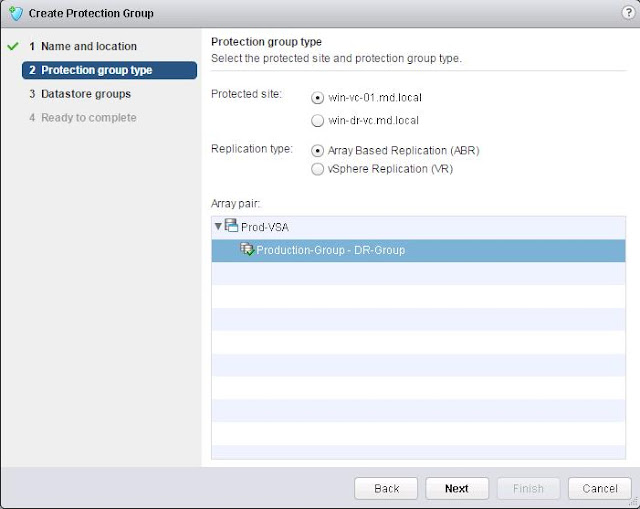
Select the Protected site and type of replication for this protection group. I have configured array based replication for my 3-Tier applications servers and all the 3 tier application virtual machines are stored on the datastores, which are configured as part of array based replication. So that I have selected Array based replication(ABR) under the replication type and select the array pair and click on Next.
Select the datastore groups from the below list to be grouped to use for this protection group. All the virtual machines stored on these datastore groups will be recovered together as part of this protection group. Click on Next.

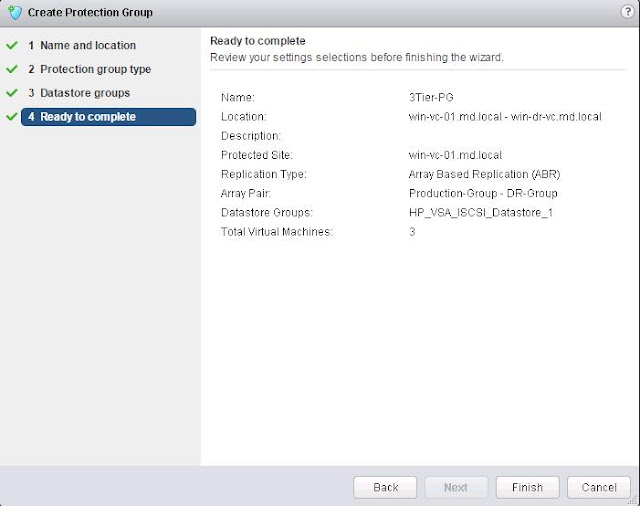
Review all the information, which you have selected to create this SRM protection group and click on Finish.
We are done with creating SRM protection group. In the next step, we will discuss in detail about creating SRM recovery plans.
Creating SRM Recovery Plans
vCenter Site recovery manager recovery plan is a automated plan for recovering protected virtual machines to the recovery site. SRM recovery plan includes one or more protection groups. You can include a protection group in more than one recovery plan. You create one recovery plan to handle a planned migration or other can be created only to recovery specific application or services by only including specific protection groups as part of the recovery plan. Recovery plans can be used for Test recovery,planned migration to the recovery site or for disaster recovery.A vCenter Site Recovery Manager recovery plan includes the following information:
- A list of virtual machines from protection groups
- A startup and priority order for those virtual machines
- Any custom steps added before or after virtual machine startup
To create SRM recovery plan, Click on Create Recovery plan under recovery plans in the SRM section of vSphere Web client. Enter the name and description for the recovery plan and select the location for this recovery plan. Click on Next.

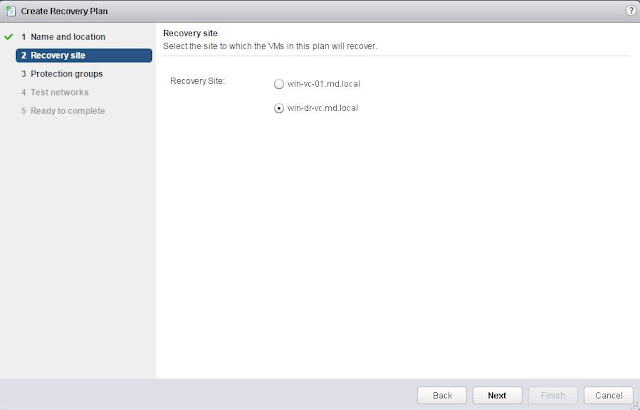
Select the recovery site in which the vm’s will be recovered as part of this recovery plan. My DR site is “win-dr-vc”. Si i have selected it as recovery site. Click on Next.
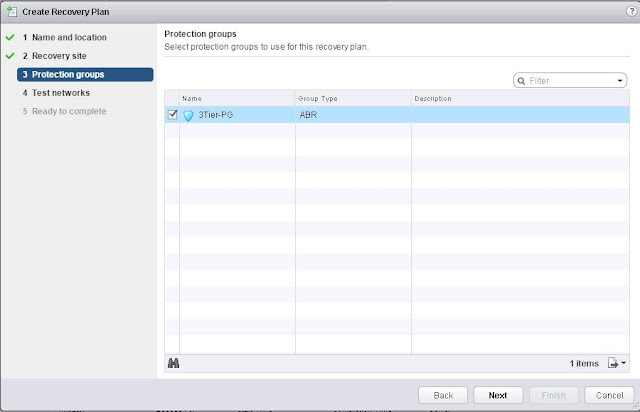
Select the list of protection groups which will be included as part of this recovery plan. I have created only one Protection group called “3Tier-PG”. So i have selected that protection group to use for this recovery plan. if you have multiple protection groups, please select the protection groups based on your need and click on next.
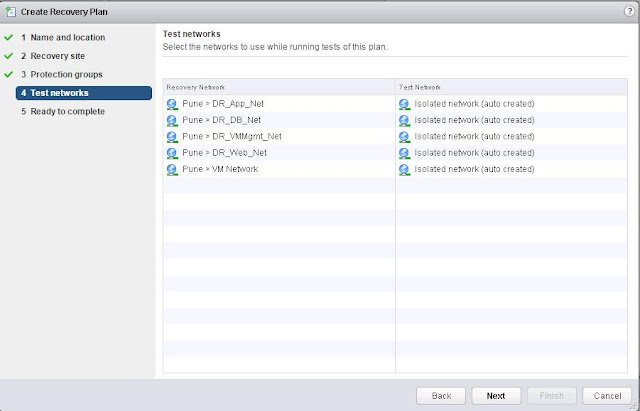
You can the specify the test networks to use while running tests of this recovery plan. You can manually select the test networks if you have created for the test purposes or you can leave the default auto created test network called “isolated network”. Automatically generated virtual switches have no physical adapters. When you are performing the test recovery, You can use the isolated network for the recovered virtual machines to connect to avoid disturbance to the production virtual machines. I am keeping the auto created isolated network as my test network. Click on Next.
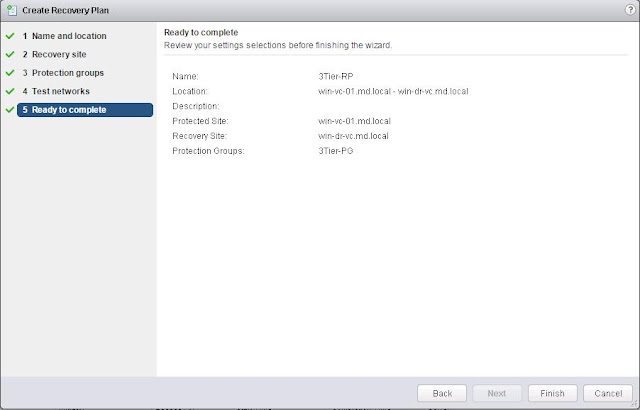
Review all the settings selections specified during the recovery plan creation and click on finish to create the recovery plans.
Once the recovery plan is created, you will be able to see the recovery plans created under the recovery plans. You can edit the recovery plans to include the custom steps and vm priority ,etc.

We are done with creating SRM recovery plan. In the next step, we will take a look at how to run a test recovery using this recovery plans.
Running SRM Test Recovery
Test recovery is nothing but a testing a recovery plan exercises with every aspect of recovery plan. Site recovery manager ensures that test recovery will avoid disruption in ongoing operations on the protected and recovery site. You can run test recovery at time like every hour, every day, every month or quarter. Recovery plans that suspend local virtual machines do so for tests and for actual recoveries. With this exception,running a test recovery does not disrupt replication or ongoing activities at either site. It is always recommended to run recovery plan test as often as needed to ensure that your actual DR plan is working as expected.
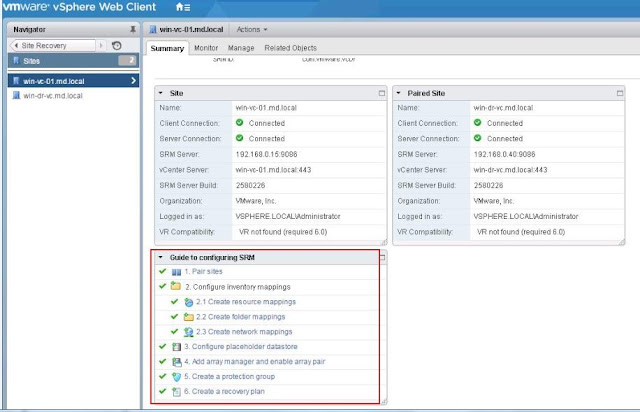
You can run the test recovery, once all the SRM configuration is done. You can verify in the summary tab that all the configuration steps for SRM is displayed with Green tickmark.
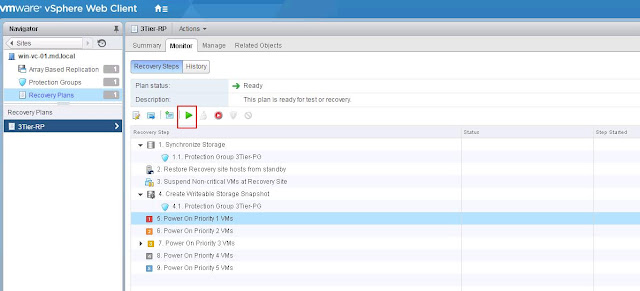
To run a test recovery, Select the recovery Plans -> Monitor tab -> Recovery Steps -> Click on Green Arrow (Play button) to run the test recovery. Please be cautious in selecting the Test recovery option. if you have selected the actual recovery instead of test recovery, will start recovery of your production virtual machines and it creates the impact to the production. You can view the lists of recovery steps which will be executed as part of this recovery plan.
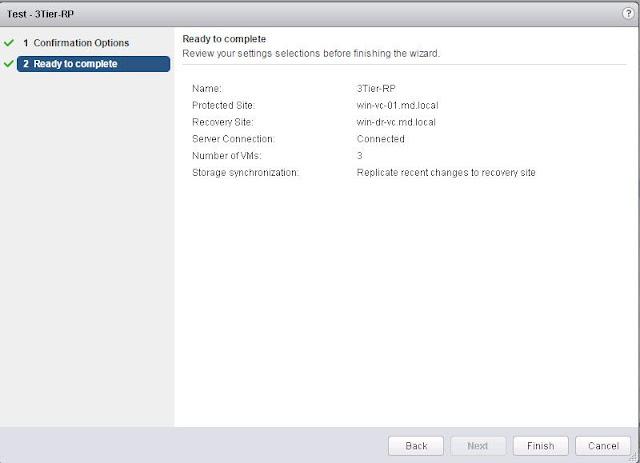
Once you have clicked on the Green Arrow button to start the test recovery, recovery will run in test mode and it will recover the virtual machines in a test environment on the recovery site. You have storage option whether to replicate recent changes to the recovery site or not. This process may take several minutes to complete the replication of recent changes to recovery site. It is up to you run the test recovery with recent changes or not. I have selected the option to replicate recent changes to recovery site. Click on Next.

Review your settings selections before initiating the recovery test and click on Finish.
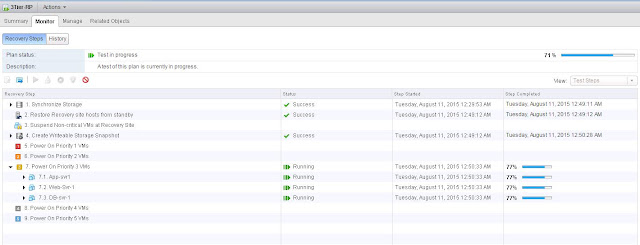
Once test recovery is executed, you will be able to see the series of recovery steps involved as part of this recovery plans and its progress percentage. Since i have selected the option to “Replicate recent changes to recovery site”, i can see that Synchronize Storage step is going on as part of this test recovery plan execution.

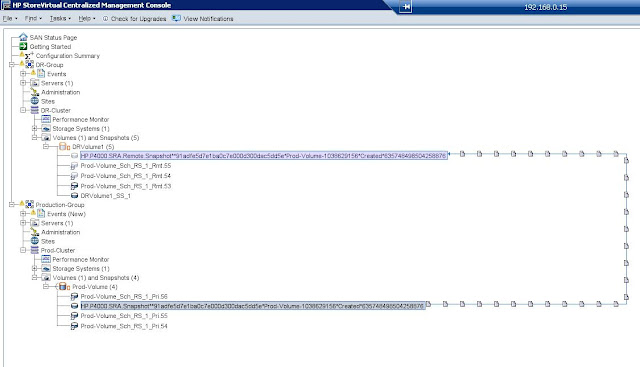
I am curious to monitor the background process of “Synchronize Storage” recovery step from the storage console. I have configured HP StoreVirtual VSA as my array based replication storage. When i monitor it from the HP StoreVirtual Centralized management console, It can notice that ongoing replication between my Production volume and DR volume. It can see the replication chain established between the Volumes.Replication and protection of the protected environment are not affected during tests.
Temporary snapshots of replicated storage are created at the recovery site. For array-based replication, the arrays are rescanned to discover replicated VMFS datastores.
You can monitor the Progress Percentage of each recovery steps before Test recovery is getting completed.
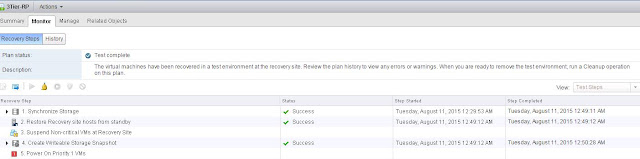
Once test recovery is completed, You can see the Plan status will display “Test Complete”. and status of each recovery steps will be Success.
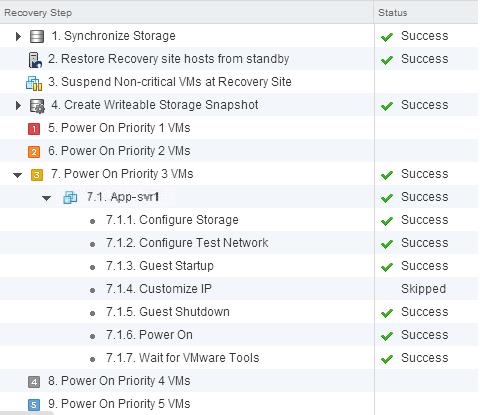
Each recovery steps in recovery plan will have substeps involved. For example, When i expan the Power on VMs will have around 7 sub steps including Configure storage, Test network, Guest startup, Customize IP if you have added, Guest shutdown, Power on and Wait for VMware tools. All this steps in test recovery don’t cause any distribution to actual virtual machines.
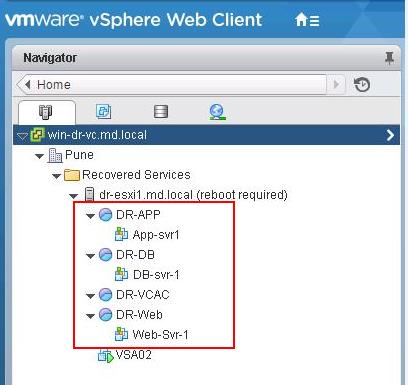
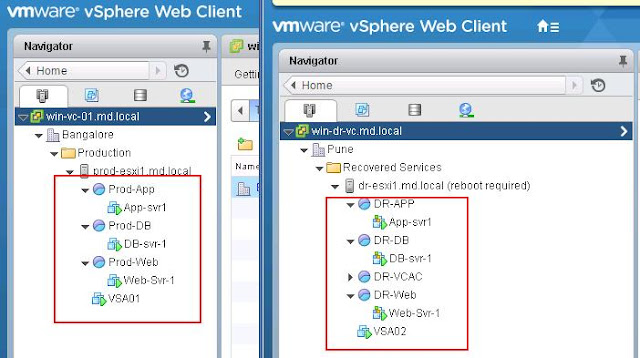
Once the test recovery is completed, I can see the virtual machines part of the protection group as part of this recovery plan is powered on in both protected and recovery site without interruption to your production virtual machines. This is beauty of the SRM.
We are done with running the test recovery and ensured that our DR recovery plan is working as expected. In the next step, we will see how to clean up the test recovery.
Cleaning up Test Recovery
Once your test recovery is completed and you have validated that your recovery plan is working as expected. You can run a recovery plan cleanup. Recovery plan cleanup returns virtual machines to their initial state before the recovery plan test was run. The recovery plan is reset to a ready state. You can run a forced cleanup, if you experience errors during a recovery plan.Recovery Plan Cleanup has series of steps and below are the cleanup steps:
- Test virtual machines that were started during recovery plan testing are powered off.
- Virtual machines that were suspended during the recovery plan test are resumed.
- The recovery site storage is reset to the pre-test state.
- Placeholder virtual machines are restored.
- Replicated storage snapshots that were used by the virtual machines during the test are discarded.

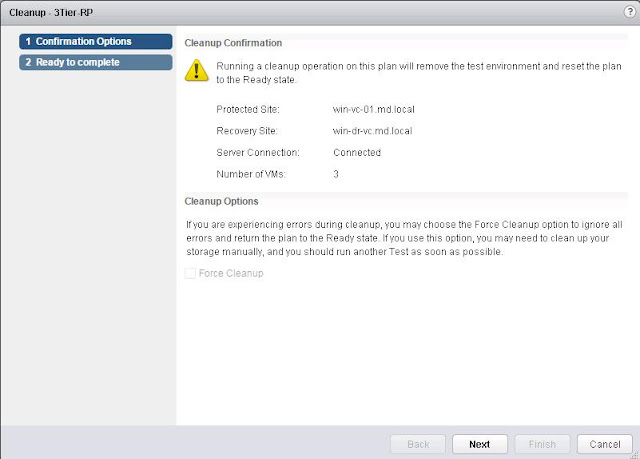
Running a cleanup operation on this plan will remove the test environment and remove the test environment and reset the plan to ready state. Click on Next after reading the Cleanup Confirmation.
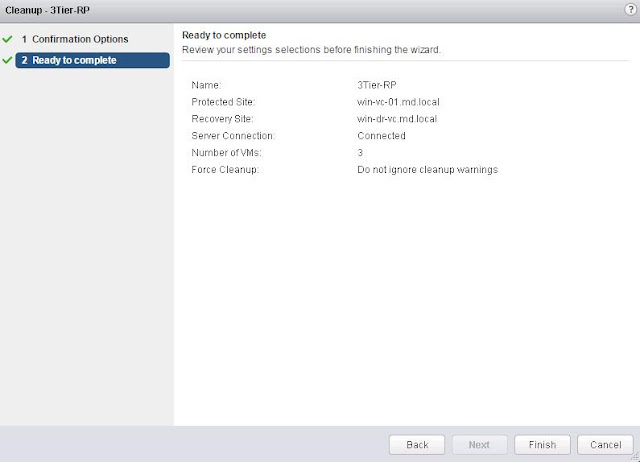
Review the clean information and click on Finish to start the start the Recovery test cleanup.
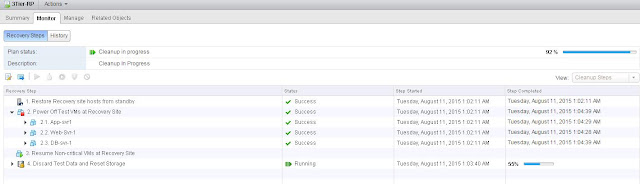
Monitor the progress of the test recovery cleanup process.
Recovery plan cleanup returns virtual machines to their initial state before the recovery plan test was run and it reset it to “Ready” state.
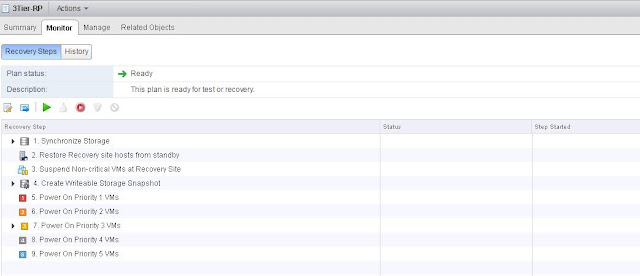
You can notice that Virtual machines recovered as part of the test recovery in recovered site are in powered off state now. All done. Recovery plan is ready to test again.

We are done with cleaning up our test recovery and recovery plan is ready to test again or for actual recovery.