Zabbix is open source monitoring software for networks and applications. It offers real-time monitoring of thousands of metrics collected from servers, virtual machines, and any other kind of network device. These metrics can help you determine the current health of your IT infrastructure and detect problems with hardware or software components before customers complain. Useful information is stored in a database so you can analyze data over time and improve the quality of provided services, or plan upgrades of your equipment.
Zabbix uses a client-server architecture and uses a small agent on the monitored client to gather data and send it to the Zabbix server. Zabbix version 3 supports encrypted communication between the server and connected clients, so your data is protected while it travels over insecure networks.
The Zabbix server stores its data in a relational database powered by MySQL, PostgreSQL, or Oracle. It also provides a web interface so you can view data and configure system settings.
In this tutorial, we will configure two machines. One will be configured as the server, and the other as a client which you'll monitor. The server will use a MySQL database to record monitoring data and use Apache to serve the web interface.
Prerequisites
To follow this tutorial, you will need:- Two CentOS 7 servers with a sudo non-root user.
- One the CentOS 7 servers needs Apache, MySQL, and PHP installed.
Step 1 — Installing the Zabbix Server
First, we need to install the Zabbix Server on our server with MySQL, Apache, and PHP. We'll refer to this machine as the Zabbix server. Log into this machine as your non-root user:
- ssh sammy@your_zabbix_server_ip_address
sudo rpm -ivh http://repo.zabbix.com/zabbix/3.0/rhel/7/x86_64/zabbix-release-3.0-1.el7.noarch.rpm
You will see the following output:
Output Retrieving http://repo.zabbix.com/zabbix/3.0/rhel/7/x86_64/zabbix-release-3.0-1.el7.noarch.rpm warning: /var/tmp/rpm-tmp.qLbOPP: Header V4 DSA/SHA1 Signature, key ID 79ea5ed4: NOKEY Preparing... ################################# [100%] Updating / installing... 1:zabbix-release-3.0-1.el7 ################################# [100%] Now you can run the following command to install the Zabbix server and web frontend with MySQL database support:
- sudo yum install zabbix-server-mysql zabbix-web-mysql
Let's also install the Zabbix agent, which will let us collect data about the Zabbix server itself.
- sudo yum install zabbix-agent
Step 2 — Configuring the MySQL Database For Zabbix
We need to create a new MySQL database and populate it with some basic information in order to make it suitable for Zabbix. We'll also create a specific user for this database so Zabbix isn't logging into MySQL with theroot account.Log into MySQL as the root user using the root password that you set up during the MySQL server installation:
- mysql -uroot -p
- create database zabbix character set utf8;
grant all privileges on zabbix.* to zabbix@localhost identified by 'your_password';
Then apply these new permissions:
- flush privileges;
- quit;
- cd /usr/share/doc/zabbix-server-mysql-3.0.4/
zabbix database. We'll use zcat since the data in the file is compressed.
- zcat create.sql.gz | mysql -uzabbix -p zabbix
This command will not output any errors if it was successful. If you see the error
ERROR 1045 (28000): Access denied for user 'zabbix'@'localhost' (using password: YES) then make sure you used the password for the zabbix user and not the root user.In order for the Zabbix server to use this database, you need to set the database password in the Zabbix server configuration file.
- sudo vi /etc/zabbix/zabbix_server.conf
/etc/zabbix/zabbix_server.conf
### Option: DBPassword
#       Database password. Ignored for SQLite.
#       Comment this line if no password is used.
#
# Mandatory: no
# Default:
# DBPassword=
These comments in the file explain how to connect to the database. We need to set the
DBPassword value in the file to the password for our database user. Add this line below those comments to configure the database:/etc/zabbix/zabbix_server.conf
DBPassword=your_zabbix_mysql_password
That takes care of the Zabbix server configuration, but we have to make some modifications to our PHP setup in order for the Zabbix web interface to work properly.
Step 3 — Configuring PHP For Zabbix
The Zabbix web interface is written in PHP and requires some special PHP server settings. The Zabbix installation process created an Apache configuration file that contains these settings. It is located in the directory/etc/httpd/conf.d/ and is loaded automatically by Apache. We need to make a small change to this file, so open it up.
- sudo vi /etc/httpd/conf.d/zabbix.conf
/etc/httpd/conf.d/zabbix.conf
    php_value max_execution_time 300
    php_value memory_limit 128M
    php_value post_max_size 16M
    php_value upload_max_filesize 2M
    php_value max_input_time 300
    php_value always_populate_raw_post_data -1
# php_value date.timezone Europe/Riga
Uncomment the timezone line, highlighted above, and change it to your time zone. You can use this list of supported time zones to find the right one for you. Then save and close the file.
Now restart Apache to apply these new settings.
- sudo systemctl restart httpd
- sudo systemctl start zabbix-server
- sudo systemctl status zabbix-server
Output zabbix-server.service - Zabbix ServerLoaded: loaded (/usr/lib/systemd/system/zabbix-server.service; disabled; vendor preset: disabled) Active: :active (running) since Fri 2016-08-05 07:16:35 UTC; 2s ago Process: 10033 ExecStart=/usr/sbin/zabbix_server -c $CONFFILE (code=exited, status=0/SUCCESS) ... Finally, enable the Zabbix server to start at boot time:
- sudo systemctl enable zabbix-server
Step 4 — Configuring Settings for the Zabbix Web Interface
The web interface lets us see reports and add hosts that we want to monitor, but it needs some initial setup before we can use it. Launch your browser and go to the address http://your_zabbix_server_ip_address/zabbix/. On the first screen, you will see a welcome message. Click Next step to continue.On the next screen, you will see the table that lists all of the prerequisites to run Zabbix.
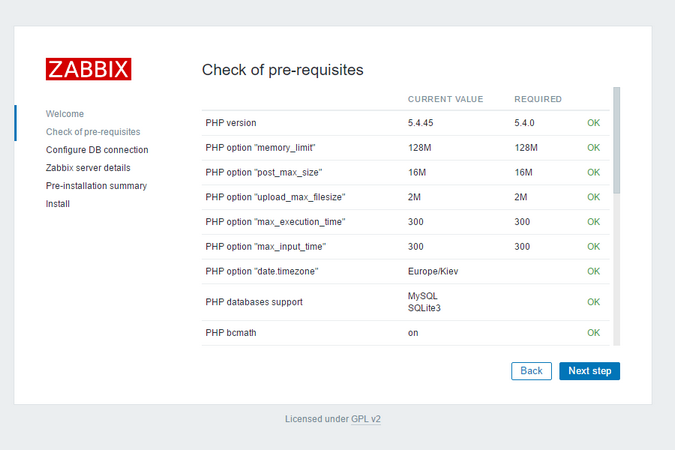
All of the values in this table must show OK, so verify that they do. Be sure to scroll down and look at all of the prerequisites. Once you've verified that everything is ready to go, click Next step to proceed.
The next screen asks for database connection information.

We told the Zabbix server about our database, but the Zabbix web interface also needs access to the database to manage hosts and read data so it can display it to us. Enter the MySQL credentials you configured in Step 2 and click Next step to proceed.
On the next screen, you can leave the options at their default values.
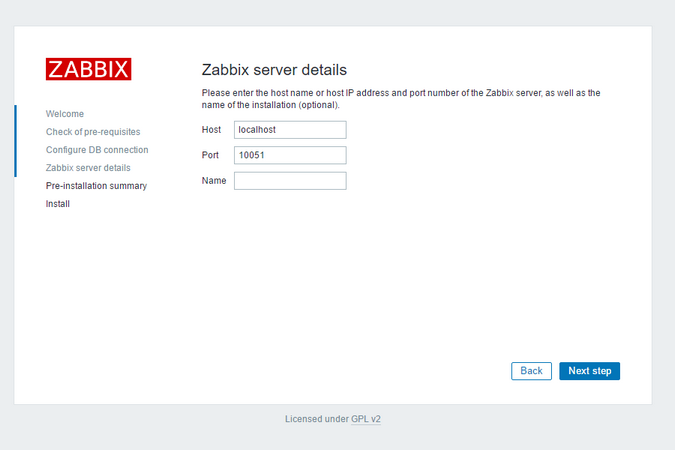
The Name is optional; it is used in the web interface to distinguish one server from another in case you have several monitoring servers. Click Next step to proceed.
The next screen will show the pre-installation summary so you can confirm everything is correct.
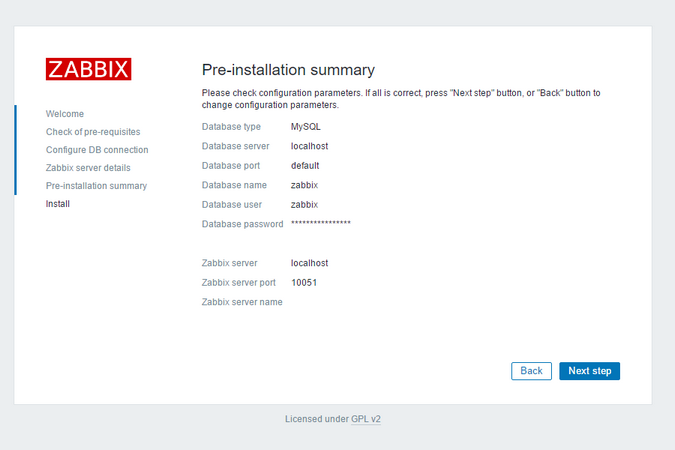
Click Next step to proceed to the final screen.
The web interface setup is complete! This process creates the configuration file
/etc/zabbix/web/zabbix.conf.php which you could back up and use in the future. Click Finish to proceed to the login screen. The default user is admin and the password is zabbix.Before we log in, let's set up the Zabbix agent on our other server.
Step 5 — Installing and Configuring the Zabbix Agent
Now we need to configure the agent software that will send monitoring data to the Zabbix server.Login to the second server, which we'll call the “monitored server”.
- ssh sammy@your_monitored_server_ip_address
sudo rpm -ivh http://repo.zabbix.com/zabbix/3.0/rhel/7/x86_64/zabbix-release-3.0-1.el7.noarch.rpm
You will see the following output:
Output Retrieving http://repo.zabbix.com/zabbix/3.0/rhel/7/x86_64/zabbix-release-3.0-1.el7.noarch.rpm warning: /var/tmp/rpm-tmp.jnLROO: Header V4 DSA/SHA1 Signature, key ID 79ea5ed4: NOKEY Preparing... ################################# [100%]
Updating / installing...
1:zabbix-release-3.0-1.el7 ################################# [100%]
- sudo yum install zabbix-agent
While Zabbix supports certificate-based encryption, setting up a certificate authority is beyond the scope of this tutorial, but we can use pre-shared keys (PSK) to secure the connection between the server and agent.
So first, generate a PSK:
- sudo sh -c "openssl rand -hex 32 > /etc/zabbix/zabbix_agentd.psk"
- cat /etc/zabbix/zabbix_agentd.psk
Output
bd7ebdc1ae80fb66e8102d6016671a4feabf489cf2692ee473512771c4903ed8
Now you have to edit the Zabbix agent settings to set up its secure connection to the Zabbix server. Open the agent configuration file:
- sudo vi /etc/zabbix/zabbix_agentd.conf
First, you must edit the IP address of the Zabbix server. Find the following section:
/etc/zabbix/zabbix_agentd.conf
### Option: Server
#       List of comma delimited IP addresses (or hostnames) of Zabbix servers.
#       Incoming connections will be accepted only from the hosts listed here.
#       If IPv6 support is enabled then '127.0.0.1', '::127.0.0.1',
# '::ffff:127.0.0.1' are treated equally.
#
# Mandatory: no
# Default:
# Server=
Server=127.0.0.1
Change the default value to the IP of your Zabbix server:
/etc/zabbix/zabbix_agentd.conf
Server=your_zabbix_server_ip_address
Next, find the section that configures the secure connection to the Zabbix server and enable pre-shared key support. Find the
TSLConnect section, which looks like this:/etc/zabbix/zabbix_agentd.conf
### Option: TLSConnect
#       How the agent should connect to server or proxy. Used for active checks.
#       Only one value can be specified:
#               unencrypted - connect without encryption
#               psk         - connect using TLS and a pre-shared key
#               cert        - connect using TLS and a certificate
#
# Mandatory: yes, if TLS certificate or PSK parameters are defined
#(even for 'unencrypted' connection)
# Default:
# TLSConnect=unencrypted
Then add this line to configure pre-shared key support:
/etc/zabbix/zabbix_agentd.conf
TLSConnect=psk
Next, locate the
TLSAccept section, which looks like this:/etc/zabbix/zabbix_agentd.conf
### Option: TLSAccept
#       What incoming connections to accept.
#       Multiple values can be specified, separated by comma:
#               unencrypted - accept connections without encryption
#               psk         - accept connections secured with TLS and a pre-shared key
#               cert        - accept connections secured with TLS and a certificate
#
# Mandatory: yes, if TLS certificate or PSK parameters are defined
#(even for 'unencrypted' connection)
# Default:
# TLSAccept=unencrypted
/etc/zabbix/zabbix_agentd.conf
TLSAccept=psk
Next, find the
TLSPSKIdentity section, which looks like this:/etc/zabbix/zabbix_agentd.conf
### Option: TLSPSKIdentity
#       Unique, case sensitive string used to identify the pre-shared key.
#
# Mandatory: no
# Default:
# TLSPSKIdentity=
Choose a unique name to identify your pre-shared key by adding this line:
/etc/zabbix/zabbix_agentd.conf
TLSPSKIdentity=PSK 001
You'll use this as the PSK ID when you add your host through the Zabbix web interface.
Then set the option which points to your previously created pre-shared key. Locate the
TLSPSKFile option:/etc/zabbix/zabbix_agentd.conf
### Option: TLSPSKFile
#       Full pathname of a file containing the pre-shared key.
#
# Mandatory: no
# Default:
# TLSPSKFile=
Add this line to point the Zabbix agent to your PSK file you created:
/etc/zabbix/zabbix_agentd.conf
TLSPSKFile=/etc/zabbix/zabbix_agentd.psk
- sudo systemctl start zabbix-agent
- sudo systemctl enable zabbix-agent
- sudo systemctl status zabbix-agent
Output ● zabbix-agent.service - Zabbix Agent Loaded: loaded (/usr/lib/systemd/system/zabbix-agent.service; disabled; vendor preset: disabled) Active: active (running) since Fri 2016-08-05 08:17:07 UTC; 5s ago Process: 9507 ExecStart=/usr/sbin/zabbix_agentd -c $CONFFILE (code=exited, status=0/SUCCESS) ...
Step 6 — Adding the New Host to the Zabbix Server
Installing an agent on a server we want to monitor is only half of the process. Each host we want to monitor needs to be registered on the Zabbix server, which we can do through the web interface.Log in to the Zabbix Server web interface by navigating to the address
http://your_zabbix_server_ip_address/zabbix/.
When you have logged in, click on the Configuration, and then Hosts in the top navigation bar. Then click Create host button in the top right corner of the screen. This will open the host configuration page.
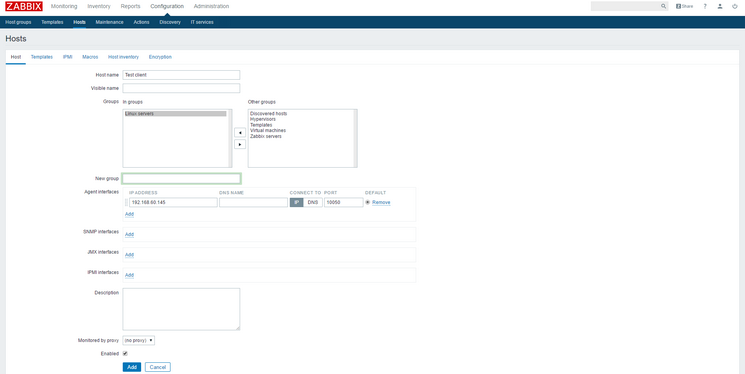
Adjust the Host name and IP ADDRESS to reflect the host name and IP address of your client machine. Then add the host to a group by selecting one of the groups from the list, or by creating your own group. The host can be in multiple groups. The Linux Servers group is a good default choice. Once you've added the group, click the Templates tab.
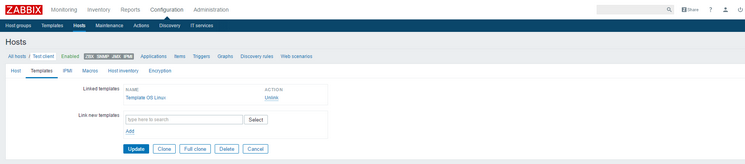
Type
Template OS Linux in the Search field and then click Add to add this template to the host. Next, navigate to Encryption tab. Select PSK for both Connections to host and Connections from host.
Then set PSK identity to
PSK 001, which is the value of the TLSPSKIdentity setting of the Zabbix agent we configured previously.Then set PSK value to the key you generated for the Zabbix agent. It's the one stored in the file
/etc/zabbix/zabbix_agentd.psk on the agent machine.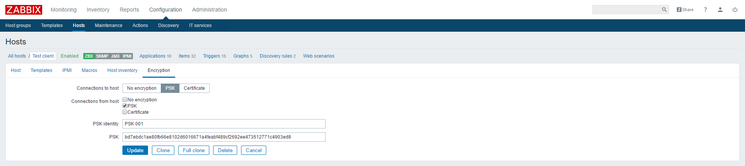
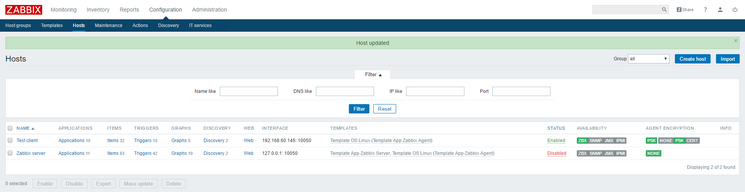
Finally, click the Add button at the bottom of the form to create the host.
You will see your new host with green labels indicating that everything is working fine and the connection is encrypted.
After several seconds you can navigate to Monitoring and then Latest data to see the data from your agent.
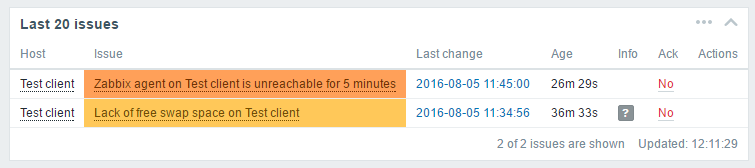
To ensure things are working, shut down your monitored server so you can see how Zabbix alerts you to problems. Once your monitored server is offline you will see the warning on the main dashboard:
If you have additional servers you need to monitor, log in to each host, install the Zabbix agent, generate a PSK, configure the agent, and add the host to the web interface following the same steps you followed to add your first host.