
In previous two articles I have installed vRealize Automation 7 simple and enterprise install. In next step we will get into the portal and start doing some configuration. Go to https://vrealizehostname-or-IP and enter the administrator login that you specified during your install. Unlike prior versions of vRealize Automation, no domain vsphere.local domain suffix is required to login.
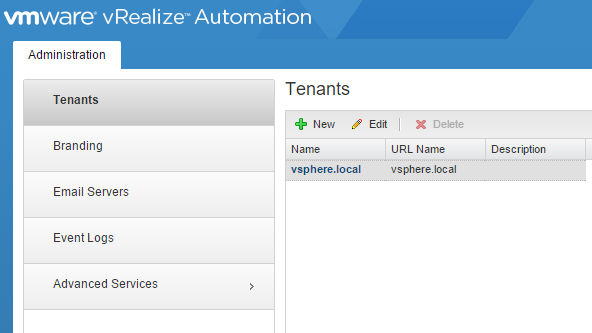
To start, Lets add some local users to our vSphere.local tenant. Click on the vsphere.local tenant.
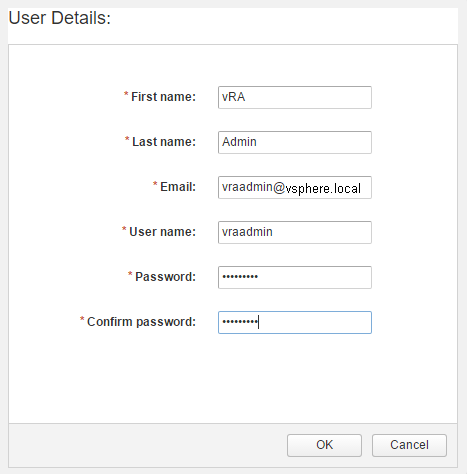
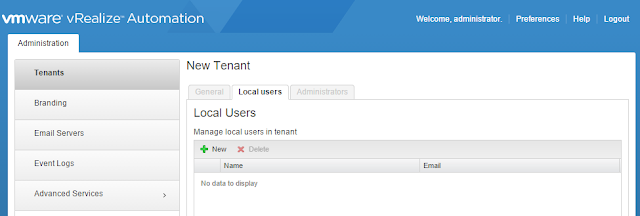
Click on the “Local users” tab and then click the “New” button to add a local account. I’ve created a vraadmin account that will be a local account only used to manage the default tenant configurations.
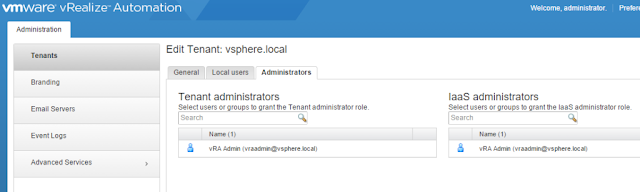
Click the Administrators Tab and add the account you just created to the Tenant Admins and IaaS Admins groups. Click Finish.
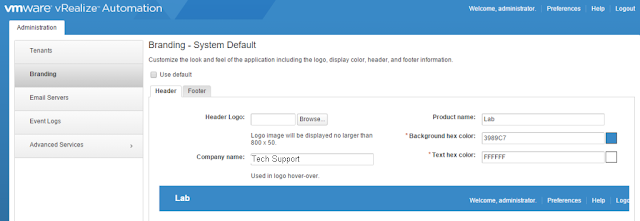
Click on the Branding Tab. If you want to change any of the look and feel of your cloud management portal, uncheck the “Use default” check box and upload headers, change colors to fit your needs.
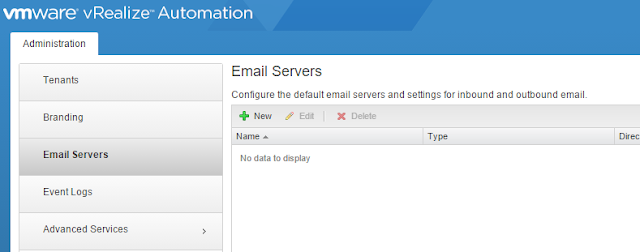
Click on the Email Servers tab.
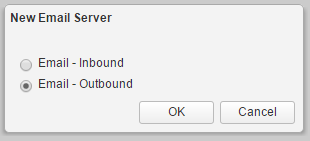
Click the “New” button to add your mail server. I’m adding an outbound server only at this time.
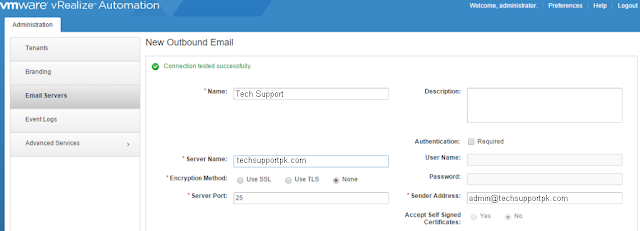
Add the information for your mail server and click the “Test Connection” button to ensure it works.
Log out of the portal and log back in as the new tenant administrator account.
We’ve provided some very basic information to vRealize Automation at this point in the series. In next step we will be adding a new tenant and to setup some authentication mechanisms other than local users.
Authentication
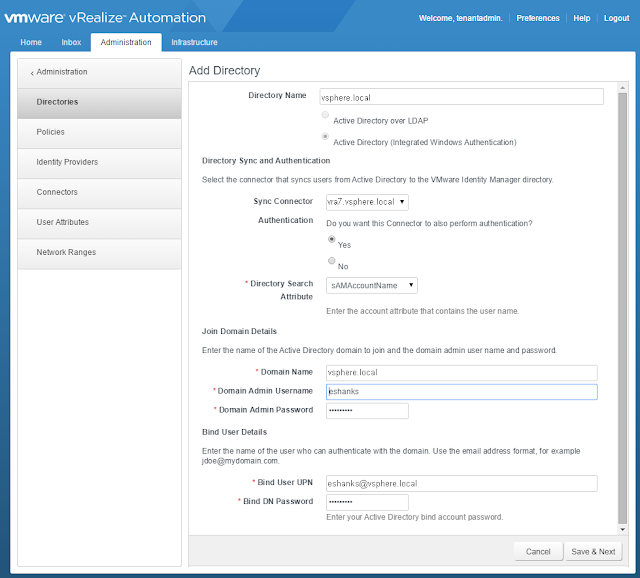
In order to setup Active Directory Integrated Authentication, we must login to our default tenant again but this time as our “Tenant Administrator” (we setup earlier) instead of the system administrator account that is created during initial setup.Once you’re logged in, click the Administration tab –> Directories Management –> Directories and then click the “Add Directory” button. Give the directory a descriptive name like the name of the ad domain for example. Then select the type of directory. I’ve chosen the “Active Directory (Integrated Windows Authentication)” option. This will add the vRA appliance to the AD Domain and use the computer account for authentication.
Note: you must setup Active Directory in the default (vsphere.local) tenant before it can be used in the subtenants.
Next choose the name of the vRA appliance for the “Sync Connector” and select “Yes” for the Authentication. I’ve chosen sAMAccountName for the Directory Search Attribute. After this, we need to enter an account with permissions to join the vRA appliance to the Active Directory Domain. Lastly, enter a Bind UPN that has permissions to search Active Directory for user accounts. Click “Save and Next”.
Now, select the domain you just added. Click Next

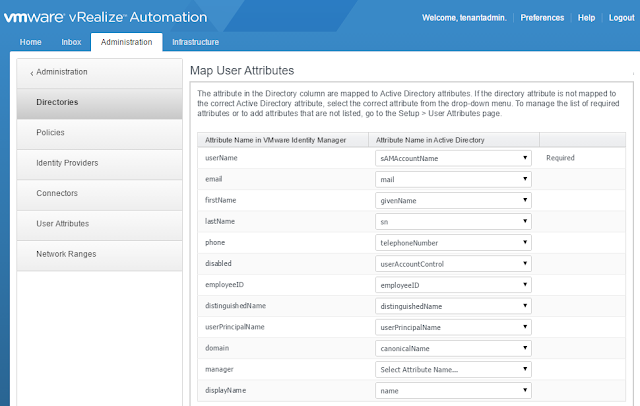
Now we can map vIDM properties to your active directory properties. The properties I used are shown in the screenshot below. I tweaked the default values a tad bit, but for the most part, all of the properties were already mapped correctly to start with.
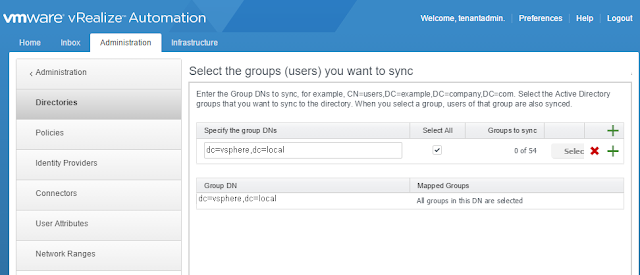
Now we enter a Distinguished Name to search for groups to sync with. I chose the root DN for my domain, and selected all of the groups. Click Next.
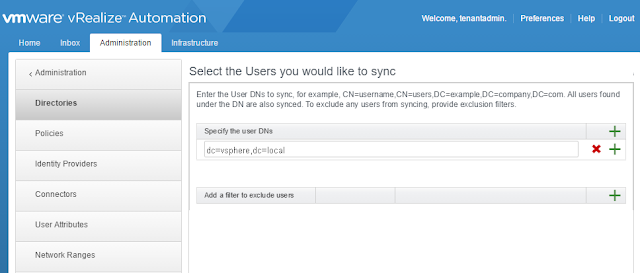
I repeated the process with user accounts. Click Next.
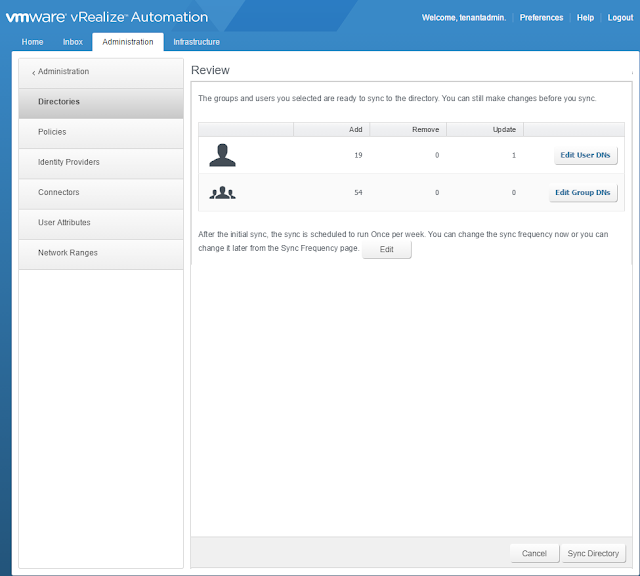
The next screen shows you details about the user and groups that will be synced. You can edit your settings or click “Sync Directory” to complete the setup.
We’ve added an external identity source to sync logins with. This is much more preferable than adding local user accounts and having to make your users remember multiple accounts. In next step, we’ll add these users to business groups, tenant administrators, fabric administrators and other custom groups.
Create Tenants
Now it’s time to create a new tenant in our vRealize Automation portal. Let’s login to the portal as the system administrator account as we have before. Click the Tenants tab and then click the “New” button.

Give the new tenant a name and a description. Then enter a URL name. This name will be appended to this string: https://[vraappliance.domain.name]/vcac/org/ and will be the URL that users will login to. In my example the url is https://vra7hostname/vcac/org/labtenant. Click “Submit and Next”.

Enter a local user account. I used the vraadmin account much like I did in the previous post about setting up authentication. Click Next.
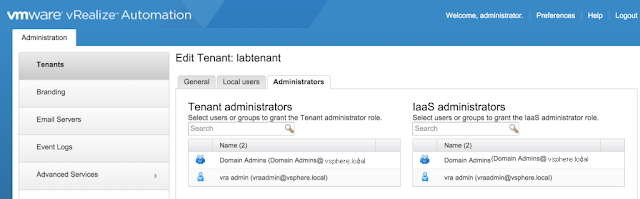
In the administrators tab, I added the vraadmin account as both a tenant administrator and an IaaS Administrator. I will admit, I’m omitting some information here. After I added the vraadmin account, I logged into the tenant as this account. I setup directory services for this account the same way I did for the default tenant. Once this was done, I added the “Domain Admins” group as a Tenant Administrator and IaaS Administrator. This end result is seen in the screenshot below.
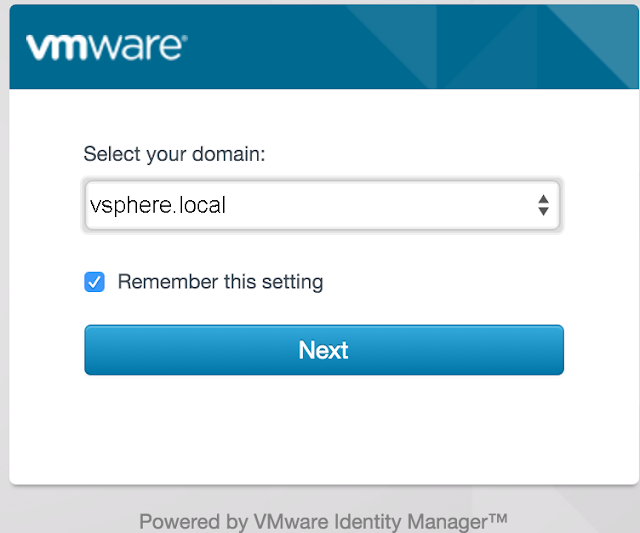
Thats it for setting up a new tenant. I did want to mention that in vRA7, when you login to a tenant with a directory configured, you’ll have the option to login to either the directory you setup or the default tenant domain. Be sure to select the right domain before trying to login.
There isn’t a ton of work to be done to setup a new tenant, but I’ve found that the most important lesson is to create a blank default tenant and then setup your new tenant under that where all your goodies will be.
We’ll be discussing some of these goodies in the next few posts.
Endpoints
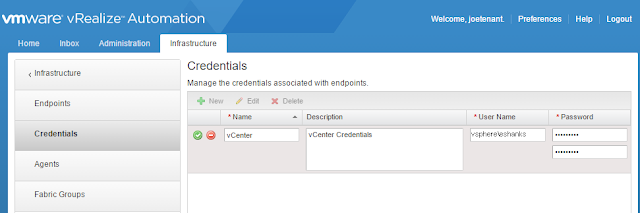
Now that we’ve setup our new tenant, lets login as an infrastructure admin and start assigning some resources that we can use. To do this we need to start by adding an endpoint. An endpoint is anything that vRA uses to complete it’s provisioning processes. This could be a public cloud resource such as Amazon Web Services, an external orchestrator appliance, or a private cloud hosted by Hyper-V or vSphere.In the example below, we’ll add a vSphere endpoint. Go to the Infrastructure Tab –> Credentials and then click the “New” button to add a login. Give it a name and description that will help you remember what the credentials are used for. I like to name my credentials the same as the endpoint in which they’re connecting. Enter a User Name and a password, which will be encrypted. When done, click the green check mark to save the credentials. DON’T FORGET TO DO THIS OR IT WON’T BE SAVED!
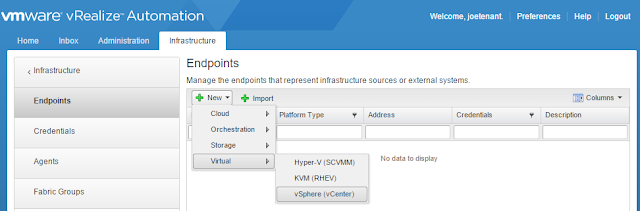
Now that we’ve got some credentials to use, go to Infrastructure Tab –> Endpoints and then click the “New” button again. Here I’m selecting Virtual –> vSphere (vCenter) because thats the type of endpoint I’m connecting to. Your mileage may vary.
Fill out the name which should match the agents that were created during the installation. If you kept all of the defaults during the install, the first vCenter agent is named “vCenter” spelled exactly like this with the capital “C”. Give it a description and then enter the address.
The address for a vCenter should be https://vcenterFQDN/sdk. Now click the ellipsis next to credentials and select the username/password combination that we created earlier.
Optional: If you’re using a product like VMware NSX or the older vCNS product, click the “Specify manager for network and security platform” and then enter an address and new set of credentials for this login.

In this post we connected vRealize Automation 7 to a vSphere environment and we added at least one set of credentials. This should allow us to start creating fabric groups and reservations in the next few steps, but first vRA will need to do a quick discovery on the endpoint.
Fabric Groups
In the above step we setup an vCenter endpoint that defines how our vRealize Automation solution will talk to our vSphere environment. Now we must create a fabric group. Fabric Groups are a way of segmenting our endpoints into different types of resources or to separate them by intent. These groups are mandatory before you can build anything so don’t think that since you don’t need to segment your resources, that you can get away with not creating one.To add a Fabric Group, login to your vRealize Automation tenant as a IaaS Administrator account which we setup in a previous post. Now go to the Infrastructure Tab –> Endpoints –> Fabric Groups. Click the “New Fabric Group” button to create a new group. Once the “New Fabric Group” screen opens, you should first check to see if there are any resources in the “Compute resources:” section. If there are no resources, check to make sure that all of your endpoint connections are correct and the credentials are working. If you need to dig into this more deeply, you can check the vRealize Automation logs to make sure the endpoints are being discovered properly.
I should note here that if you just setup your endpoints, go grab a cup of coffee before setting up the Fabric Group. The resources take a little bit to discover, but trust me on this. Version 7’s discover works MUCH faster that in previous version. My lab vCenter was discovered in under 5 minutes.
Now, once your compute resources have been discovered, enter a name for the fabric group, a description and some fabric administrators who will be able to modify the resources and reservations that we’ll create in our next post. Lastly, and most importantly, select the compute resources (Clusters in a vCenter) that will be used to deploy vRealize Automation workloads.

Fabric Groups are a necessary piece of a vRA7 installation and can be used to separate fabric administrators or simply to limit which compute resources in your endpoint can be used. In this step we added all of our vCenter resources, but we could just have easily selected only the “WorkloadCluster” and prevented vRA from ever deploying to the Management Cluster.
Business Groups
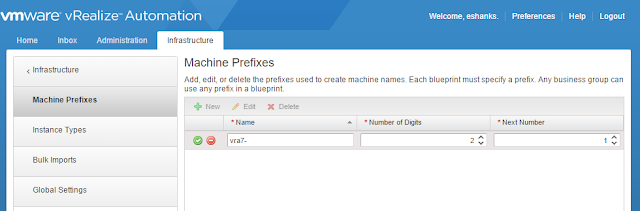
The job of a business group is to associate a set of resources with a set of users. Think of it this way, your development team and your production managers likely need to deploy machines to different sets of servers. I should mention that a business group doesn’t do this by itself. Instead it is combined with a reservation which we’ll discuss in the next post. But before we can build those out, lets setup our business groups as well as machine prefixes.A machine prefix lets us take some sort of string and prepend it to some set of numbers to give us a new machine name. We want to make sure that our machines don’t have the same names so we’ll need a scheme to set them up in some sort of pool like we do with IP addresses. To setup a machine prefix go to Infrastructure –> Administration –> Machine Prefixes. Click the “New” button with the plus sign on it to add a new prefix. Enter a string to be used in the name that will always be added to a new machine name. Next add a number of digits to append to the end of that string, and lastly enter a number for the next machine to start with. In my example below, my next machine would be named “vra7-01” without the quotes.
NOTE: Be sure to click the green check mark after adding this information. It’s easy to click OK at the bottom of the screen without saving the record.
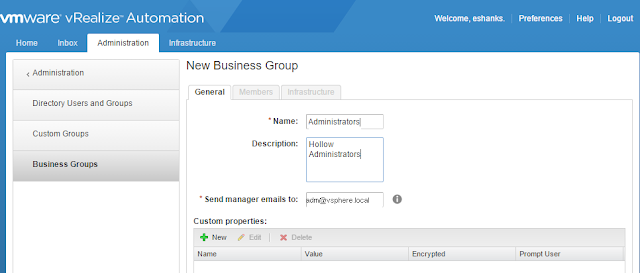
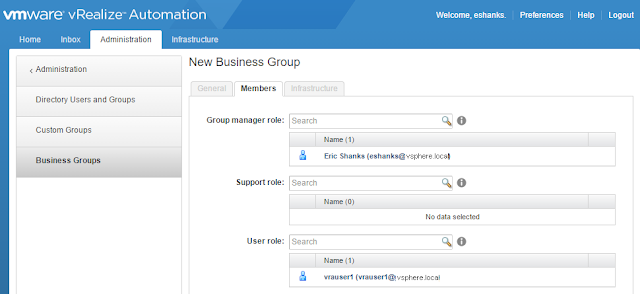
Now that we created the machine prefix, we can add our business group. Go to Administration –> Users and Groups –> Business Groups. Click the “New” button again to add a new group. When the first screen opens, Give the group a name, description and an email address in which to send business group activities. Click “Next”.
Next, we’re presented with a screen to add users to three different roles. The group manager role will entitle the users to blueprints and will manage approval policies. The support role will be users that can provision resources on behalf of the users, and the users role will be a list of users who can request catalog items. Click “Next”.
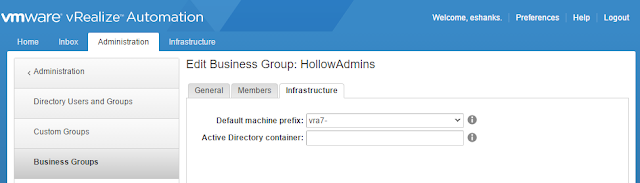
On the Infrastructure screen, select a machine prefix from the drop down. You don’t have to have a prefix for the group but this is a best practice in case so that each of your blueprints don’t have to have their own assigned. The default prefix can be overridden by the blueprint.
Optionally you can enter an Active Directory container which will house the computer objects if you’re using WIM provisioning. I’ve left this blank since we’re using VMware templates to deploy VMs.
The business groups are an important piece to deploying blueprints because if a user isn’t in a group, it can’t be entitled to a catalog item. These business groups will likely be your corporate teams that need to self-provision resources and their manager or team leads. In our next step, we’ll assign the business group with some resources, through the use of reservations.
Reservations
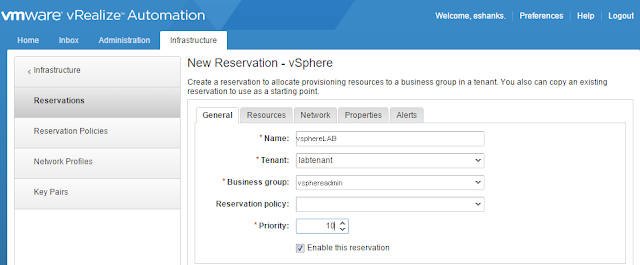
vRealize Automation 7 uses the concept of reservations to grant a percentage of fabric group resources to a business group. To add a reservation go to Infrastructure –> Reservations. Click the “New” button to add a reservation and then select the type of reservation to be added. Since I’m using a vSphere Cluster, I selected Virtual –> vCenter. Depending on what kind of reservations you’ve selected, the next few screens may be different, but I’m assuming many people will use vSphere so I’ve chosen this for my example.Enter a Name for the reservation and the tenant (which should already be selected). Next, in the dropdown select your business group that will have access to the reservation. Leave reservation policy empty for now but enter a priority. If a business group has access to more than one reservation, the priority is used to determine which to use up first. Lastly, select “Enable this reservation”. Click “Next”.
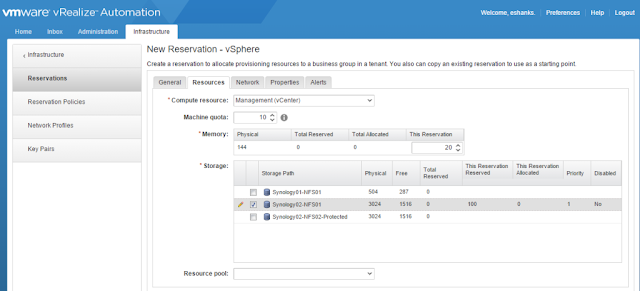
On the resources tab, select the compute resource and then we need to add some quotas. Quotas limit how large the reservation will be, so we can limit it by a number of machines, the amount of memory or how much storage is being used. Be sure to enter a memory amount and at least one datastore to be used for deploying cloud resources. Click “Next”.
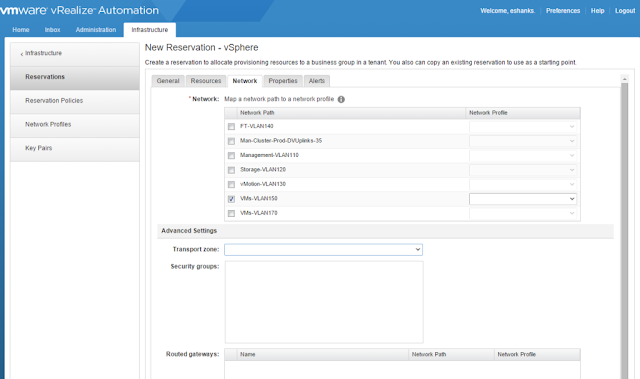
On the network tab, select the networks that can be used to deploy resources and for now leave the “Network Profile” blank.The bottom section is used with NSX or vCNS but we’ll leave that for another post.
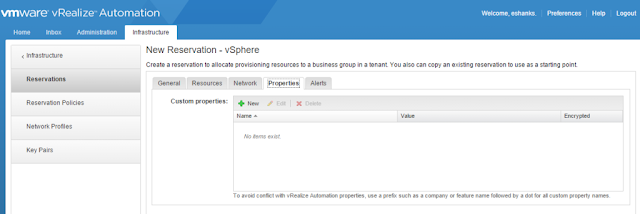
On the properties tab, you can add custom properties that will be associated with all catalog items deployed through this reservation. For now we’ll leave this empty. Click “Next”.
Lastly, the alerts page we can set the thresholds on when to alert our administrators about resource usage.

Reservations are how we limit our business groups to a certain amount of resources in our cloud. They are necessary to prevent our vSphere environment from being over provisioned with virtual machines and can empower business group managers to handle their own resources instead of the IT Administrators.
Services
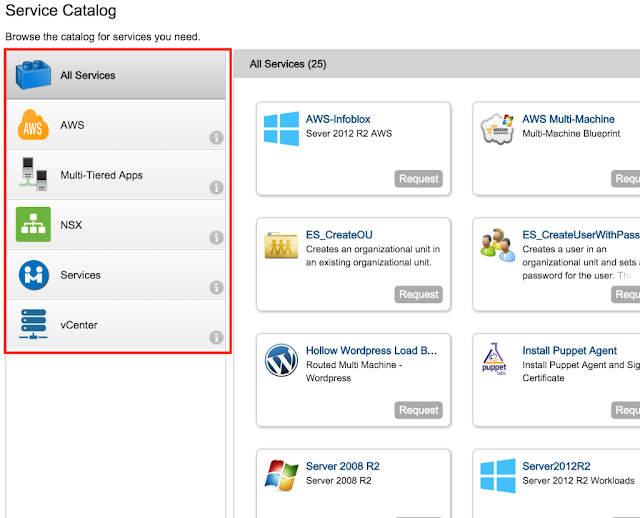
Services might be a poor name for this feature of vRealize Automation 7. When I think of a service, I think of some sort of activity that is being provided but in the case of vRA a service is little more than a category or type. For example, I could have a service called “Private Cloud” and put all of my vSphere blueprints in it and another one called “Public Cloud” and put all of my AWS blueprints in it. In the screenshot below you can see the services in a catalog. If you highlight the “All Services” service, it will show you all blueprints regardless of their service category. Otherwise, selecting a specific service will show you only the blueprints in that category.NOTE: if you only create a single service, the tab that is highlighted on the left side does not appear. Creating a second service forces this pane to be displayed.
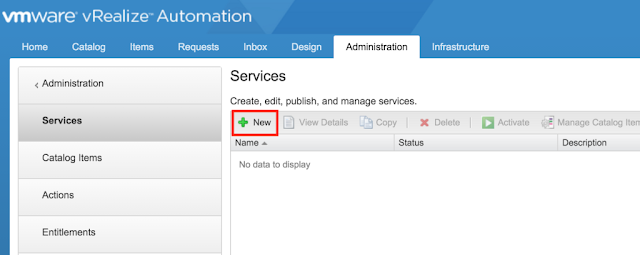
All blueprints must be part of a service for it to be provisioned. To create a service go to Administration tab –> Catalog Management –> Services. Click the “New” button to add a new service.
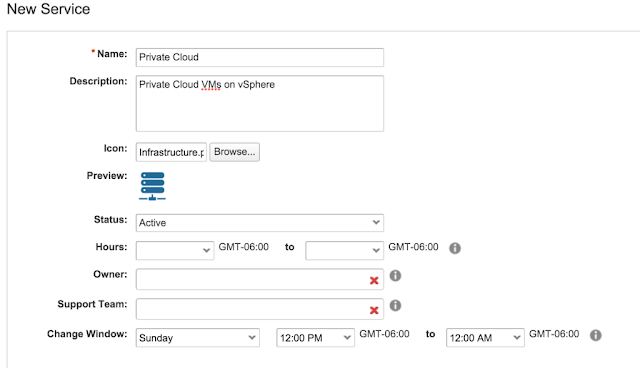
Give the service a name and description. Then click the browse button to add an icon for your service. If you’re looking for some standard icons to use, I recommend the vCAC icon pack from vmtocloud.com.
Change the status to Active and then give it an owner. You can also set which hours the service is available to your users and the default change window for the service if you’d like. Again, I’m in a small lab so I’m not messing with this much. Click “OK”.
Services are pretty simple to setup and there isn’t much to them once you understand that they are just a grouping for blueprints and not something more complex. We’ll add our blueprints to a service so that we can group them better later on.
Custom Groups
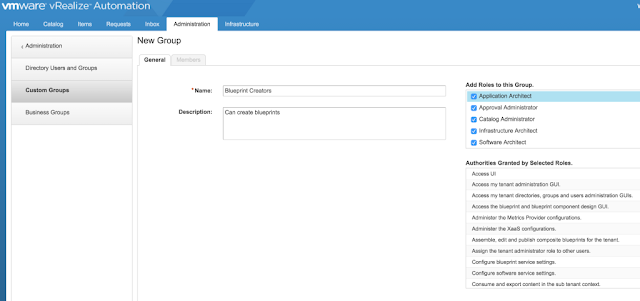
f you’ve been reading the whole series of posts on vRealize Automation 7, then you’ll know that we’ve already been setting up roles in our cloud portal, but we’re not done yet. If you need any permissions besides just requesting a blueprint, you’ll need to be added to a custom group first.To create a custom group, login as a tenant administrator and go to the Administration Tab –> Users and Groups –> Custom Groups. From there click the “New” button to add a new custom group.
Once the “New Group” screen appears give it a name and description. On the right hand side, select the built in roles that you’d like to assign to this group. In my case, this is a lab and I’m assigning all roles to the group and assuming that this group managed EVERYTHING in my vRA infrastructure. If you’re doing this for a corporation this information should be locked down by what tasks the group will be handing. To find out what each of the roles do, take a look in the bottom right hand corner of the “New Group” screen. The permissions will be listed as you click on each role. When you’re done, click “Next”.
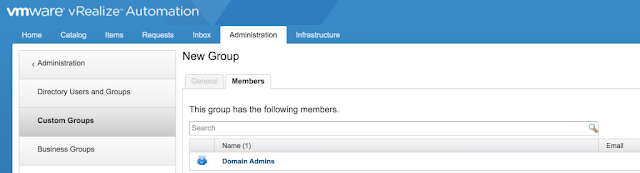
On the following screen select your users. Again this is my home lab and all of my Domain Admins will manage this vRA7 portal.
We’ve created a lot of permissions and roles already, but the custom groups are important for us to build blueprints and manage catalogs. If you’re moving on to the next post in the series, be sure you log out of vRA7 and back in before continuing since some of your permissions probably just changed!
Blueprints
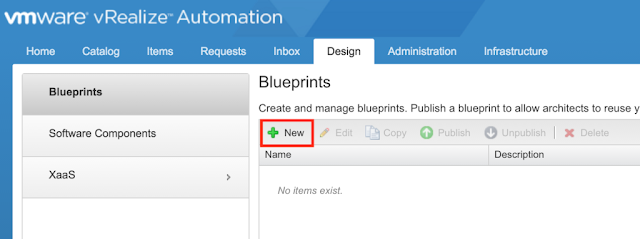
Blueprints are arguably the thing you’ll spend most of your operational time dealing with in vRealize Automation. We’ve finally gotten most of the setup done so that we can publish our vSphere templates in vRA.To create a blueprint in vRealize Automation 7 go to the “Design” tab. Note: If you’re missing this tab, be sure you added yourself to the custom group with permissions like we did in a previous post, and that you’ve logged back into the portal after doing so.
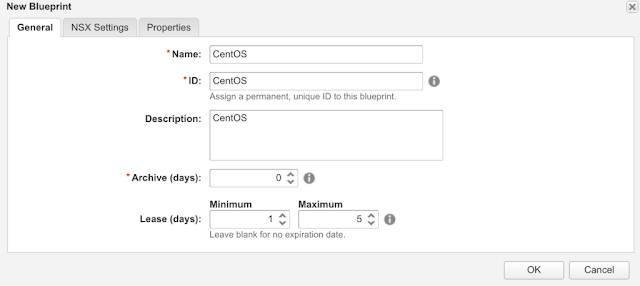
Click the “New” button to add a new blueprint.
Give the new blueprint a name and a Unique ID. The ID can’t be changed later so be sure to make it a good one. Next, enter a description as well as the lifecycle information. Archive (days) determines how long an item will be kept after a lease expires. The lease is how long an item can be provisioned before it’s automatically removed. Click OK.
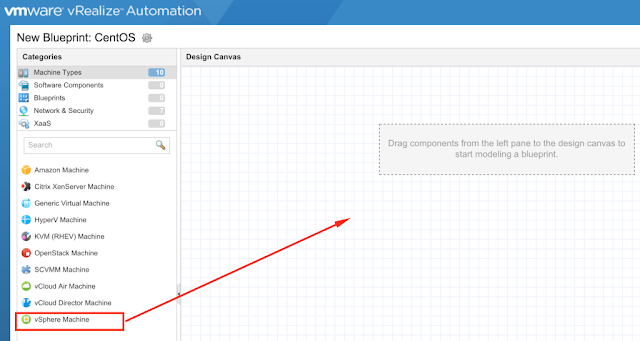
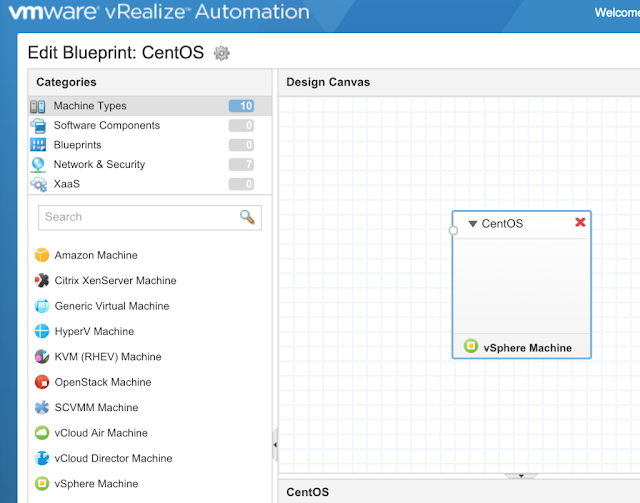
Now we’ve given our blueprint some basic characteristics. The next step is to put all of our “stuff” into the blueprint. For my very basic example, I’m going to drag the “vSphere Machine” object onto our design canvas. This adds a vCenter template into our blueprint. As you can see we have a lot of options to be added to our blueprint, such as multiple machine types, networks, software and other services. A really neat change to version 7 over version 6 if you ask me.
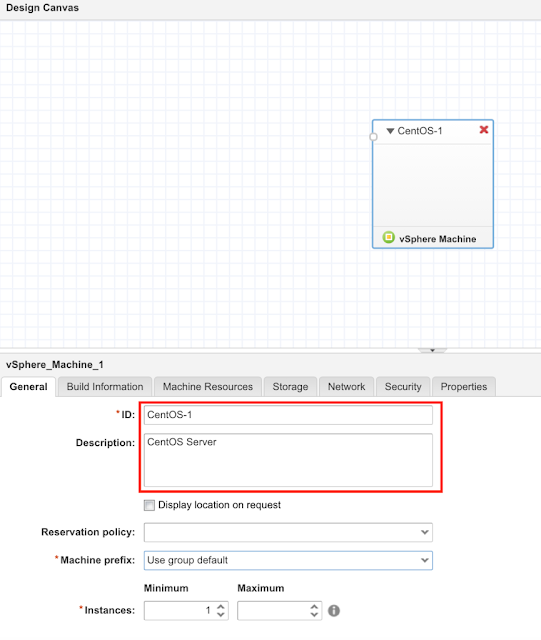
Once we’ve added our components into the blueprint, we need to give each of them some characteristics. To start, we’re going to give the component an ID and description.
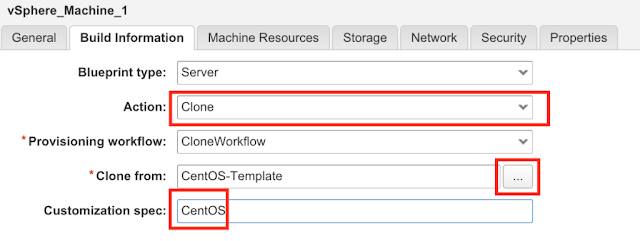
On the Build Information tab, I’m going to make sure the blueprint type is “Server” and I’m going to change the Action to “Clone”. Click the ellipsis and select one of your vSphere templates. And lastly on this tab enter a customization spec exactly how it is named in vSphere, including case sensitivity.
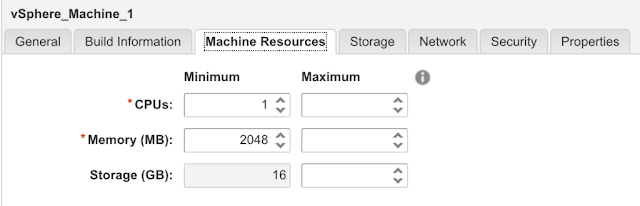
The next tab is the “Machine Resources” tab. Here we need to enter in the size of this virtual machine, or the max sizes that a user could request. Fill out your values and go to the next tab.
The storage tab will let us customize the sizes of our disks. I’ve left my disk sizes the same as my vSphere template, but you can change them if needed.

The network tab, I’ve also left blank. I’m letting the network in my vSphere template dictate what networks I’ll be deployed on. For a larger corporate installation, you’ll want to specify some network info here

The security tab is to be used specifically with NSX or vCNS. So fare we’re not using this so we’ll leave it blank for now.

Custom properties deserve their own blog post or series of blog posts. They will allow us to do lots of cool things during provisioning, but they are not required to deploy a machine from blueprint. If you understand them, you can enter them here for the blueprint.

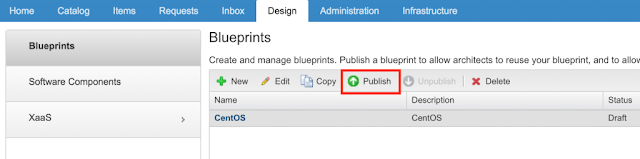
When you’re all done fiddling with your settings click “Finish”. When you’re done, you’ll see your blueprint listed in the grid. Before it can be assigned to people though, it must be published. Click the blueprint in the grid and then select the “Publish” button.
In this post we created our very first blueprint. Don’t worry if we messed up a step, I’m sure we’ll be creating lots of these little guys! In future posts we’ll be assigning this blueprint to our users and services so that we can request a server.
Entitlements
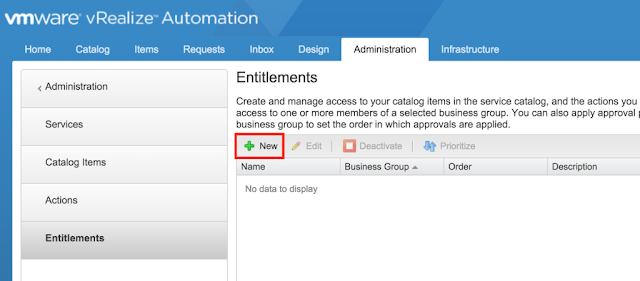
An entitlement is how we assign users a set of catalog items. Each of these entitlements can be managed by the business group manager or a tenant administrator can manage entitlements for all business groups in their tenant.To create a new entitlement go to Administration tab –> Catalog Management –> Entitlements. Click the “New” button to add a new entitlement.
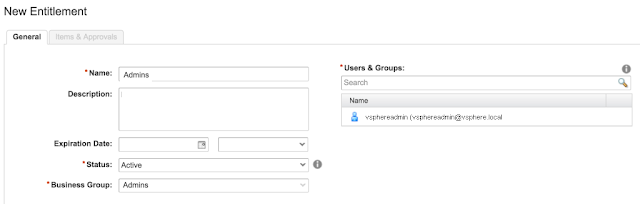
Under the General tab, enter a name for the entitlement and a description. Change the status to “Active” and select a Business Group. Note: If only a single business group has been created, this will not be selectable since it will default to the only available group. Then select the users who will be part of this entitlement.
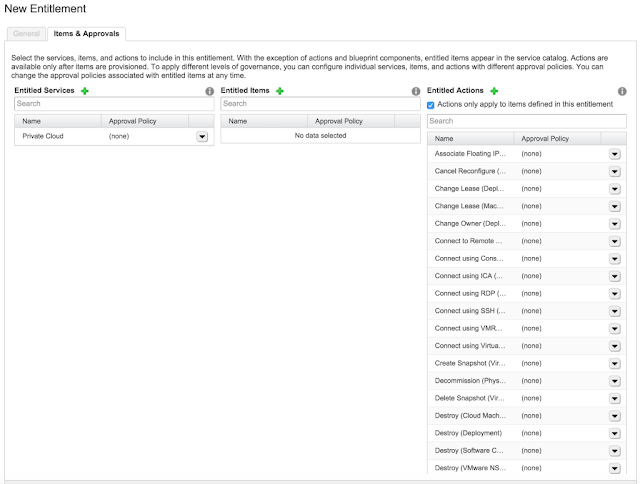
Next, under the “Items & Approvals” tab, we get to pick which things this user(s) will have access to. We do not need to fill out all of these types, but we can if we choose to do so.
We can entitle users to Services, Items, and/or Actions. I chose to entitle this user to my “Private Cloud” service that we created earlier. This will ensure that any catalog items I assign to that service will automatically be entitled.
If I chose an item, I’d need to do it for each item but this may be preferable in your use case. Lastly, I selected every action because the user I’m entitling is an administrator. As you might guess, if this user should have restricted access then not all items should be checked. For example, if you want your users to be able to build their own servers, but not destroy them, then don’t entitle them to the “Destroy” action.
Now we’ve setup our cloud management portal to assign our users catalog items and actions that they can execute on those items. Entitlements are a key piece to making sure that your users have access to the stuff they need, but not too much access or items that might be confusing to them.
Manage Catalog Items
ou’ve created your blueprints and entitled users to use them. How do we get them to show up in our service catalog? How do we make them look pretty and organized? For that, we need to look at managing catalog items. Log in as a tenant administrator and go to the Administration Tab –> Catalog Management –> Catalog Items. From here, we’ll need to look for the blueprint that we’ve previously published. Click on the blueprint.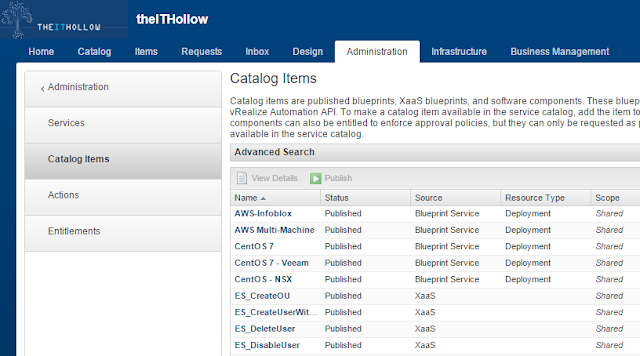
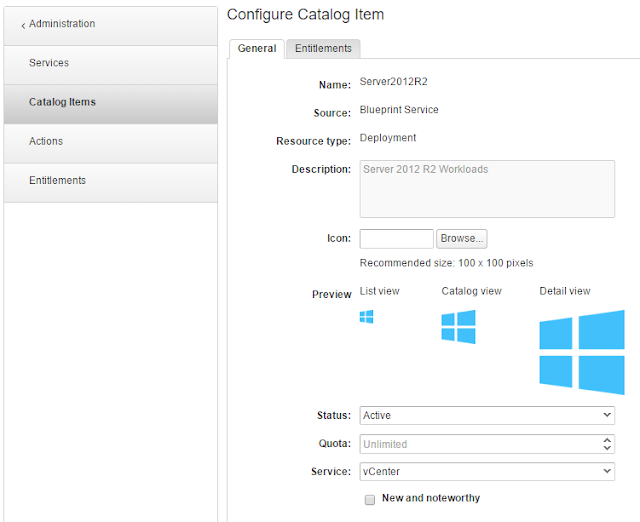
The configure catalog item screen will appear. Here, we can assign this catalog item an icon. If you’re looking for some great icons to use I would recommend starting with vmtocloud icon pack found here.
Next, change the status to Active so that it will show up in the catalog, and lastly, select which service this catalog item should be listed under. Remember that a service is like a group of catalog items. Also, if you want, there is a check box to show the item as “New and Noteworthy.” This just highlights the catalog item in the service catalog.
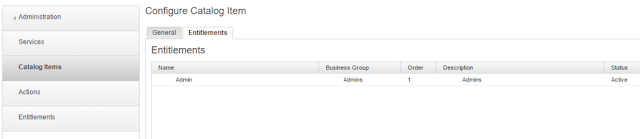
If we click the entitlements tab, we’ll see who has been entitled to the item. Click Finish.
When we go to the service catalog, we should see some nicely laid out items, with icons and grouped together by services. If you don’t see the correct things, check to make sure the user logged in has the correct entitlements.

A blueprint that is published has to get configured so that it shows up all nice and neat in the service catalog. Managing catalog items is the way to do this.
Subscriptions
In vRealize Automation 7 a new concept was introduced called a “Subscription.” A subscription is a way to allow you to execute a vRealize Orchestrator workflow based on some sort of event that has taken place in vRAThe truth is that stubs are still available in vRealize Automation 7 but are clearly being phased out and we should stop using them soon because they are likely to not be around in future versions. The idea of an event subscription is a lot like a stub when in the context of machine provisioning, but there are a lot more events that can be triggered than the stubs that have been around in previous versions.
To being we will go to the Administration Tab –> Events –> Subscriptions. Here we can add a new subscription by click the “New” button with the plus sign.

The first screen that shows up is the “Event Topic” screen. An event topic describes the type of event that we’re going to watch for. You can see that we can trigger an action from a variety of different types of events. It’s important to note that the machine provisioning events are similar to stubs, but the other events would be new concepts and can be triggered by vRA reconfigurations like changing a blueprint.
Maybe you trigger an email from vRO every time a business group is changed or something. For the purposes of this post, I’m using the “Machine Provisioning” event which would be very similar to a “Stub.” If you’d like to see what the other Event Topics are for, please check the official VMware vRealize Automation Documentation for Event Topics.
Once you’ve selected an Event Topic, you’ll notice that the schema will be displayed on the right hand side of the screen. This explains the data that will be passed to vRealize Orchestrator during the event. Once you’ve selected an Event Topic, click Next.

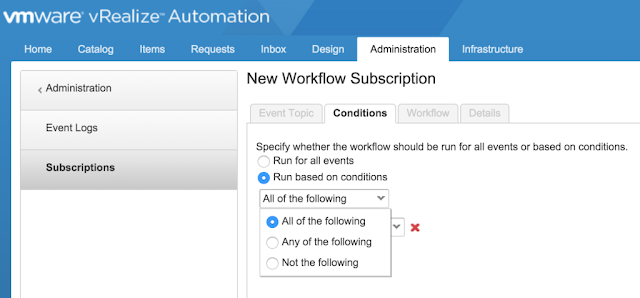
Now we get to the conditions tab. By default, the “Run for all events” option is selected. I encourage you to leave this alone and run it one time with some really basic “Hello World” type workflow just to see what it does but in the rest of this post we’re going to set some specific conditions.
Change the radio option to “Run based on conditions” and then choose “All of the following.” This will allow us to enter a list of conditions and every one of them must be met before the action is triggered.
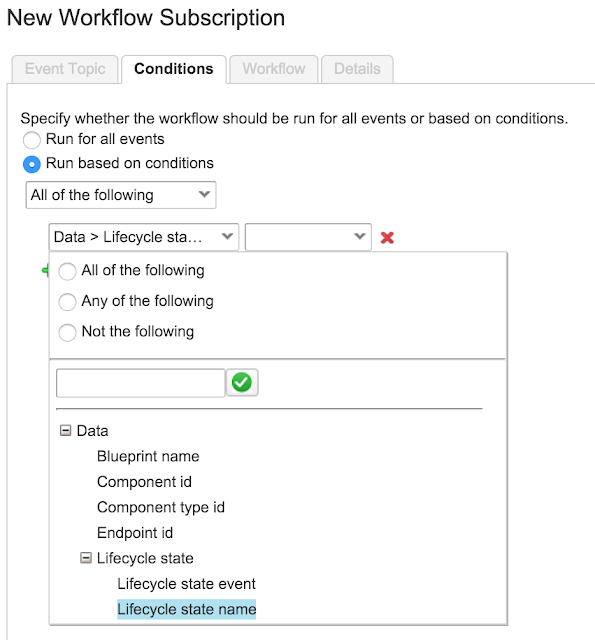
Next click the drop down and select “Lifecycle state name”.
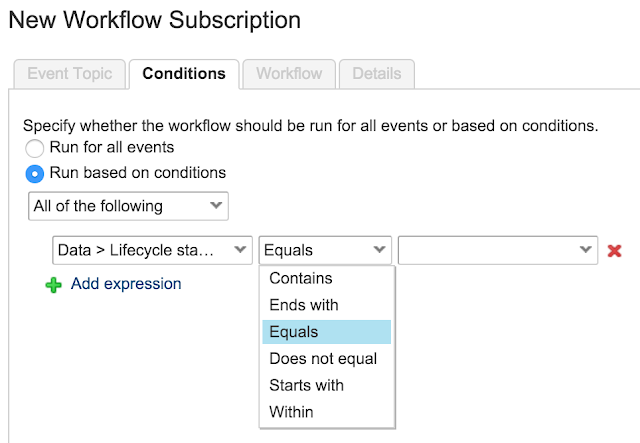
In the next box choose “Equals”.
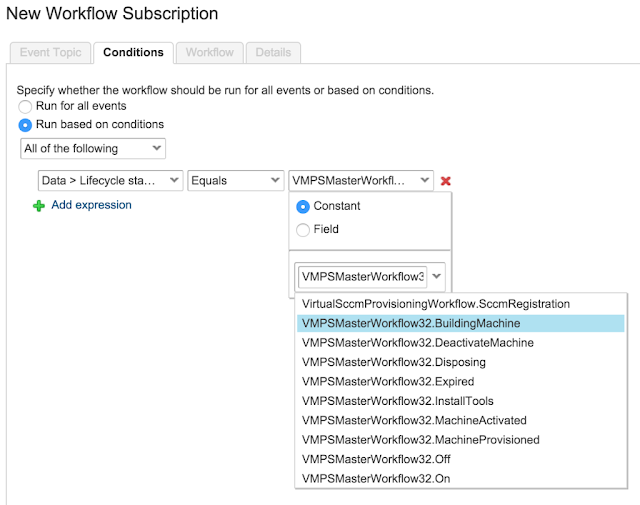
And in the last box leave the radio button on “Constant” and the select the “VMPSMasterWorkflow32.BuildingMachine.” This building machine lifecycle state should be familiar because its the same name as a stub in vRealize Automation 6 but if you’re new to this, it just means that this is the stage of the provisioning lifecycle where the machine is actually being built.
To recap what we’ve done in the past few steps, we said we only want our workflow to trigger when the lifecycle state = WMPSMasterWorkflow32.BuildingMachine.
We’re not finished yet, we’re going to add one more condition here. Click the “Add expression” link to add another condition.
This time select “state phase” and then “equals”.
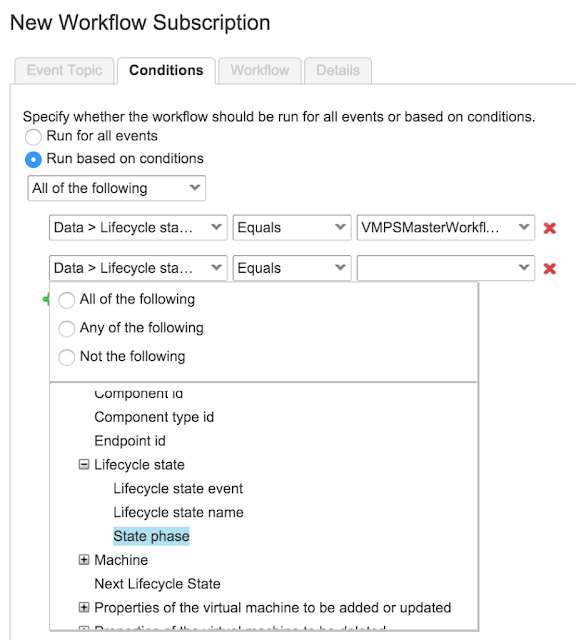
Then in the last dropdown leave the radio button on “Constant” and select “Event”.
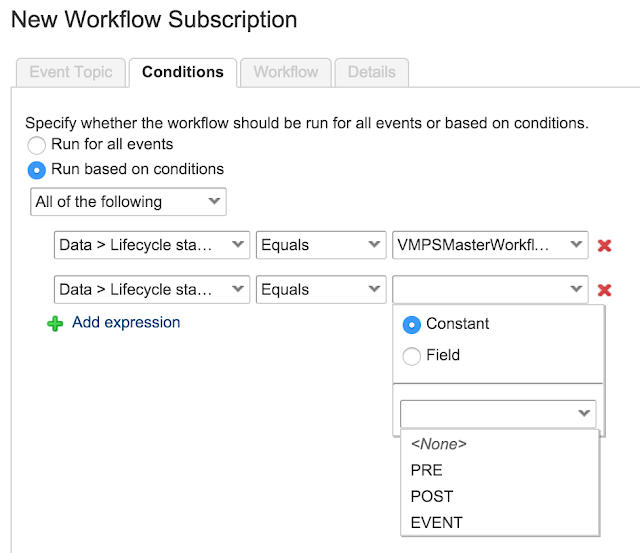
Ok, so what is a state phase? Well, in version 7 of vRealize Automation, we don’t have just one “Building Machine” option, but rather three! A pre-building machine, a post-building machine and the actual building machine event. If you didn’t specify the state phase and you build a new virtual machine from a blueprint, the “Building Machine” event subscription would trigger 3 times! One for each phase.
If you need to know more information about the lifecycle states, please check out the official VMware vRealize Automation Documentation on lifecycle states. If you’re looking for some really quick information about the order of lifecycle states goes for a clone from template operation, then check out the table below. This should give you an idea of all the things that would run if there are no conditions specified in your subscription.
vRealize Automation 7 Lifecycles
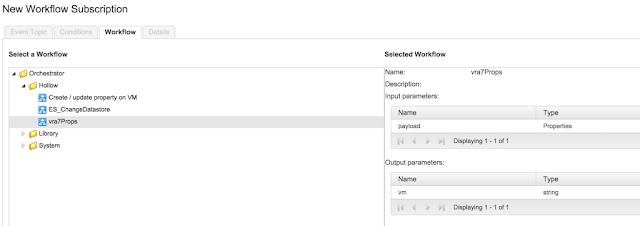
Once we’ve added all of our conditions, click next to go to the “Workflow” tab. Select the vRealize Orchestrator workflow that you want to run when the event occurs. Then click Next.
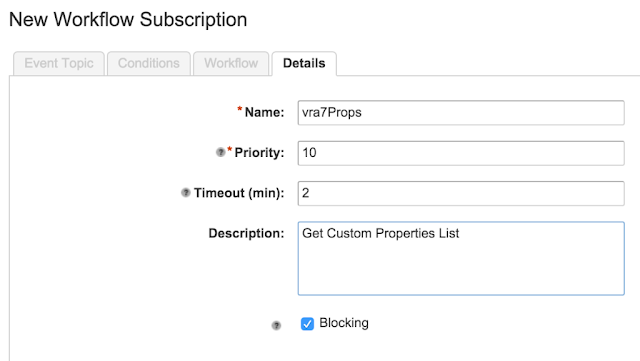
On the details tab, enter a name for the subscription, and a description.
There is also an option for blocking, which means that workflows have to wait on this workflow to finish before running. If you don’t click the “blocking” checkbox then any other subscriptions may run simultaneously.
To determine what order blocking tasks run in, you will then have to enter a priority. You’ll also be able to put in a timeout period to move on to the next workflow if your first one seems to have taken too long to execute.
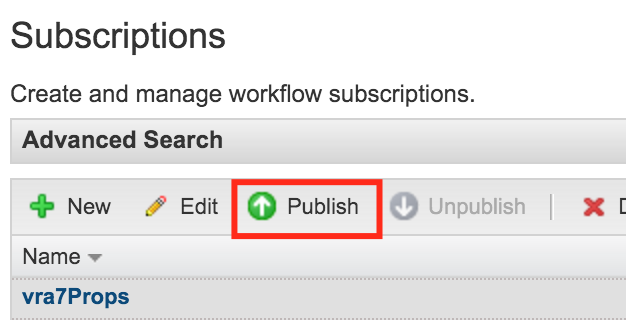
Once you’ve finished setting up your event, be sure to click on the subscription in the list and then click “Publish.” I always forget to do this piece.
Subscription events should be a pretty quick concept to grasp if you’re familiar with stub workflows in previous versions. They can be very powerful and there are many more opportunities to jump out of vRA and execute a task via Orchestrator now and that is a very good thing. More options are better but we need to take a few minutes to learn the new lifecycle states and phases before we can use them effectively.
Custom Properties
Custom Properties are used to control aspects of machines that users are able to provision. For example, memory and CPU are required information that are necessary for users to deploy a VM from a blueprint. Custom properties can be assigned to a blueprint or reservation to control how memory and CPU should be configured.Custom properties are really powerful attributes that can vastly change how a machine behaves. I like to think of custom properties as the “Windows Registry” of vRealize Automation. Changing one property can have a huge effect on deployments.
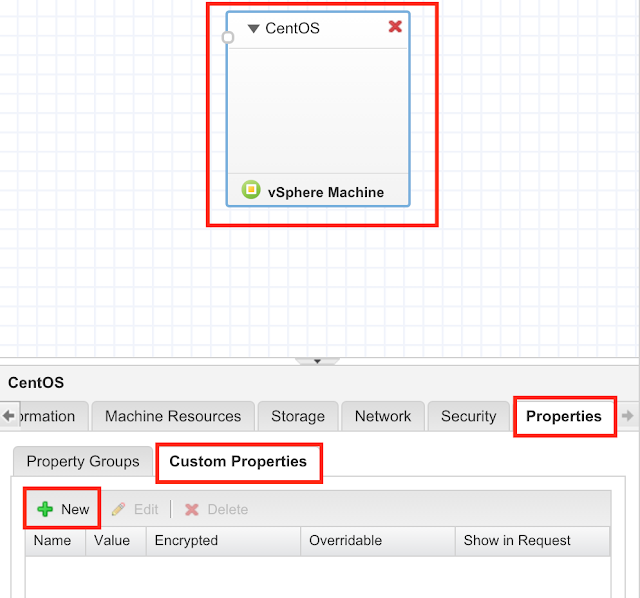
To add a custom property to a blueprint, open the blueprint in the “Design” tab. Select the blueprint we’re working with and then click the vSphere Machine that is on the “Design Canvas”.
Now click on the properties tab of the machine object and click the “Custom Properties” tab. Here we can click the “New” button to add a new property.
From here, we need to enter a name and a value. What you enter here will really vary but a list of the custom properties can be found at the official VMware vRealize Automation Documentation. I do want to call out a few custom properties that you may find very valuable, especially if you’re just getting started.
Not all of the virtual machine properties are passed to vRealize Orchestrator in vRA7 unless you add the following custom property to the blueprint. Extensibility.Lifecycle.Properties.VMPSMasterWorkflow32.[LIFECYCLESTATE]. Where Lifecycle state is the name of the lifecycle that the machine would be in.
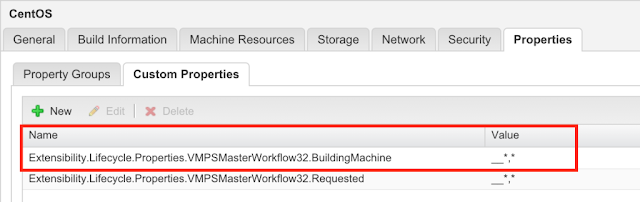
For instance Extensibility.Lifecycle.Properties.VMPSMasterWorkflow32.BuildingMachine with a Value of __*,* will pass all hidden properties as well as all of the normal properties.
If you didn’t figure it out, the __* (Double underscore, asterisk) denotes a hidden property. You can see the actual property that I’ve added to my blueprint in the screenshot below. Notice that I’ve added two custom properties so that all the attributes are passed during both the BuildingMachine and Requested Lifecycle states.
When the custom properties below are passed over to vRealize Orchestrator we can list all the properties of the machine to do custom workflows. The screenshot below shows a list of properties that are passed over by default.
[2016-01-05 11:42:40.016] [I] BlueprintName: CentOSYou can see from that list, there are a bunch of properties assigned to a VM by default and you can makeup your own properties if you’d like. Maybe you want a variable passed named “DR Server” and the value is either Yes or No. vRealize Orchestrator could read that property, if you add it to your blueprint, and you can make a decision based on that. In another case, maybe you want to make a decision about what datastore in which the vm should be placed, and you use vRO to update that property so the machine is deployed in a different datastore.
[2016-01-05 11:42:40.021] [I] ComponentId: CentOS
[2016-01-05 11:42:40.022] [I] ComponentTypeId: Infrastructure.CatalogItem.Machine.Virtual.vSphere
[2016-01-05 11:42:40.022] [I] EndpointId: 12250e26-da94-4c0a-b19d-5c5d7c73ebcb
[2016-01-05 11:42:40.023] [I] RequestId: 16d179cc-a1ce-4261-831e-cd54ed009c3f
[2016-01-05 11:42:40.024] [I] VirtualMachineEvent: null
[2016-01-05 11:42:40.025] [I] WorkflowNextState: null
[2016-01-05 11:42:40.028] [I] State: VMPSMasterWorkflow32.Requested
[2016-01-05 11:42:40.029] [I] Phase: PRE
[2016-01-05 11:42:40.030] [I] Event: null
[2016-01-05 11:42:40.030] [I] ID: 4e87d827-50b4-407a-b9b7-955db9d644af
[2016-01-05 11:42:40.033] [I] Name: HollowAdmin0003
[2016-01-05 11:42:40.034] [I] ExternalReference: null
[2016-01-05 11:42:40.034] [I] Owner: user@domain.local
[2016-01-05 11:42:40.035] [I] Type: 0
[2016-01-05 11:42:40.036] [I] Properties: HashMap:1409151584
[2016-01-05 11:42:40.040] [I] vRA VM Properties :
Cafe.Shim.VirtualMachine.TotalStorageSize : 16
Extensibility.Lifecycle.Properties.VMPSMasterWorkflow32.BuildingMachine : __*,*
Extensibility.Lifecycle.Properties.VMPSMasterWorkflow32.Requested : __*,*
VirtualMachine.Admin.TotalDiskUsage : 16384
VirtualMachine.CPU.Count : 1
VirtualMachine.Cafe.Blueprint.Component.Cluster.Index : 0
VirtualMachine.Cafe.Blueprint.Component.Id : CentOS
VirtualMachine.Cafe.Blueprint.Component.TypeId : Infrastructure.CatalogItem.Machine.Virtual.vSphere
VirtualMachine.Cafe.Blueprint.Id : CentOS
VirtualMachine.Cafe.Blueprint.Name : CentOS
VirtualMachine.Disk0.IsClone : true
VirtualMachine.Disk0.Label : Hard disk 1
VirtualMachine.Disk0.Size : 16
VirtualMachine.Disk0.Storage : Synology02
VirtualMachine.Memory.Size : 2048
VirtualMachine.Network0.Name : VMs-VLAN
VirtualMachine.Storage.Name : Synology02
__Cafe.Request.BlueprintType : 1
__Cafe.Request.VM.HostnamePrefix : Use group default
__Cafe.Root.Request.Id : 276b4854-db3b-4cca-9a06-fc070c1081d1
__Clone_Type : CloneWorkflow
__InterfaceType : vSphere
__Legacy.Workflow.ImpersonatingUser :
__Legacy.Workflow.User : user@domain.local
__VirtualMachine.Allocation.InitialMachineState : SubmittingRequest
__VirtualMachine.ProvisioningWorkflowName : CloneWorkflow
__api.request.callback.service.id : 6da9b261-33ce-495e-b91a-4f50c202635d
__api.request.id : 16d179cc-a1ce-4261-831e-cd54ed009c3f
__clonefrom : CentOS-Template
__clonefromid : 18ff68d0-5190-4b42-99b3-641145378a3a
__clonespec : CentOS
__request_reason :
__trace_id : FhP8UgRD
_number_of_instances : 1
There are three more things you need to add to a custom property besides “Name” and “Value.” These are Encrypted, Overridable and Show in Request. Lets take a look at these.
- Encrypted – Removes clear text from the vRealize Automation GUI. Hint: use this for passwords.
- Overridable – Allows the user to change the property during provisioning.
- Show in Request – Prompts the user to enter this property during provisioning.
Custom Actions
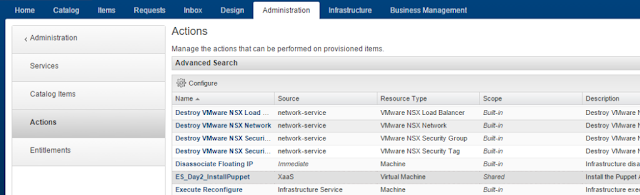
We’ve deployed a virtual machine from a vRA blueprint, but we still have to manage that machine. One of the cool things we can do with vRealize Automation 7 is to add a custom action. This takes the virtual machine object and runs a vRealize Orchestration blueprint against that input. We call these actions “Day 2 Operations” since they happen post provisioning.To create a new custom resource action go to the Design Tab –> Design –> Resource Actions. Click the “New” button to add a new action.
Select the Orchestrator workflow from the list.
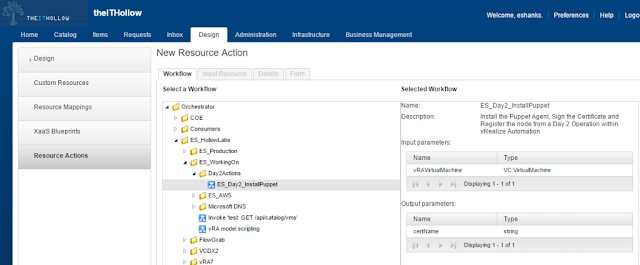
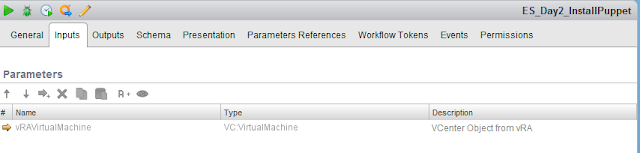
The vRO workflow should have an input parameter that can be passed from a server blueprint. I’m using a VC:VirtualMachine parameter because I know it will identify the virtual machine and is passed automatically.
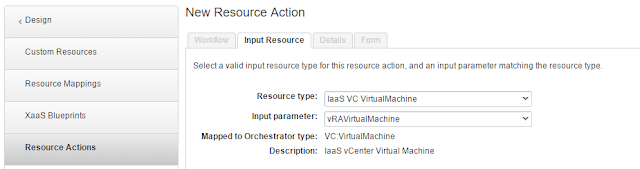
On the Input Resource tab, select the IaaS VC Virtual Machien as the resource type and the Input Parameter should be filled in already.
On the details tab enter the name and a description. The Type in my case is blank because i’m not using it for provisioning or deprovisioning.
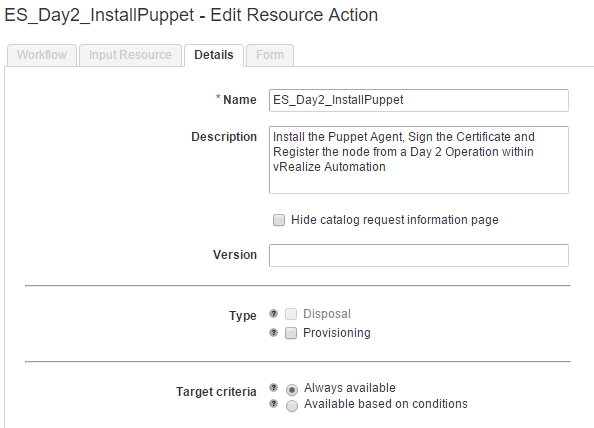
Change the form to match your requirements. I like to keep the form as empty as possible so that users are able to request the action from a blueprint and vRO attributes fill in the rest.

When you’re done, be sure to “Publish” the blueprint so that it can be used.
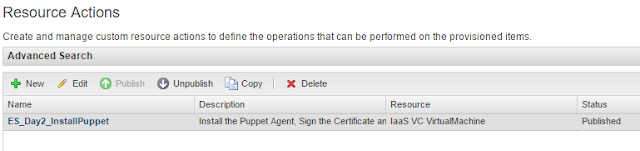
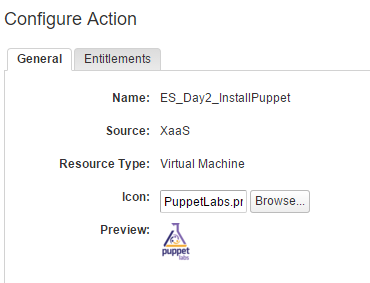
Now we need to configure the action, much like we’ve configured our catalog items in above step.
Give the action an icon and click Finish.
Now, when we provision a virtual machine, we can see the Action that we created in our list. We can now run this action from the Items screen.![]()
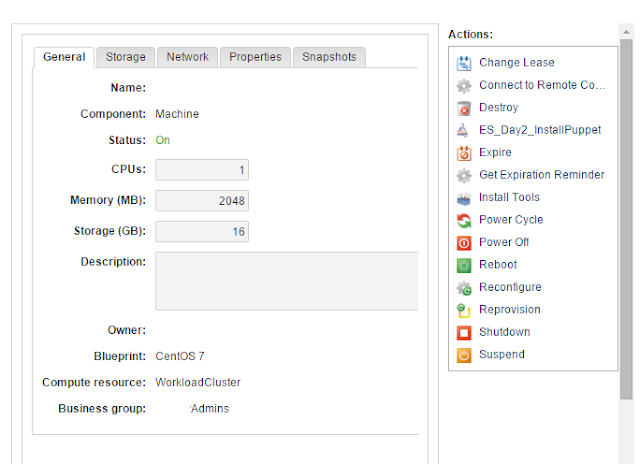
Custom Actions are a great way to allow our users to manage their own resources after they’ve provisioned them. Since its a vRealize Orchestrator workflow, we can use these actions to put guardrails on actions to protect users from themselves. For instance maybe we replace the “Snapshot” action with a custom action that also deletes the snapshots after 3 days. It certainly can reduce helpdesk tickets that come in and ask for a snapshot to be taken.
Load Balancer Rules
In a previous post we went over installing an Enterprise Install of vRealize Automation. This install required us to setup a Load Balancer with three VIPs but also required that we only had one active member in each VIP.After the installation is done, some modifications need to be made on the Load Balancer. The instructions on this can be found in the official vRealize Automation Load Balancing Configuration Guide if you want to learn more. There are several examples on how to setup load balancing on an F5 load balancer and NSX for example. This post will focus on a KEMP load balancer which is free for vExperts and it will all be shown through with GUI examples.
IaaS Manager Service
Let’s start with the Iaas Manager Service. Modify your IaaSmgmt service VIP and make sure the load balancing method is “Round Robin”. Then we want to add some health check parameters. the URL that we should check is located at /VMPSProvision and we’re going to run a “GET” command on this. The return response should be “ProvisionService” without the quotes. Lastly, look at the weight here and ensure that your Primary Manager Service Server is given more weight thatn the secondary server. The secondary server will be used only if there is a failure to the primary.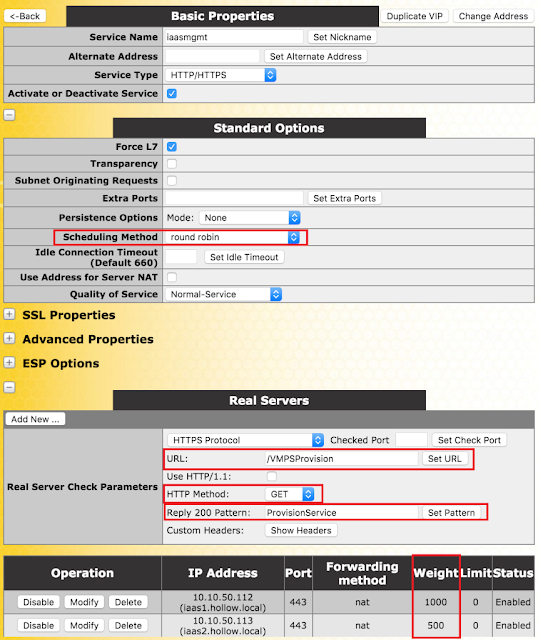
Web Services
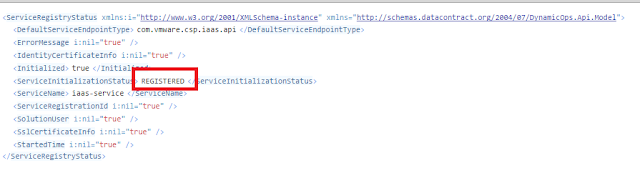
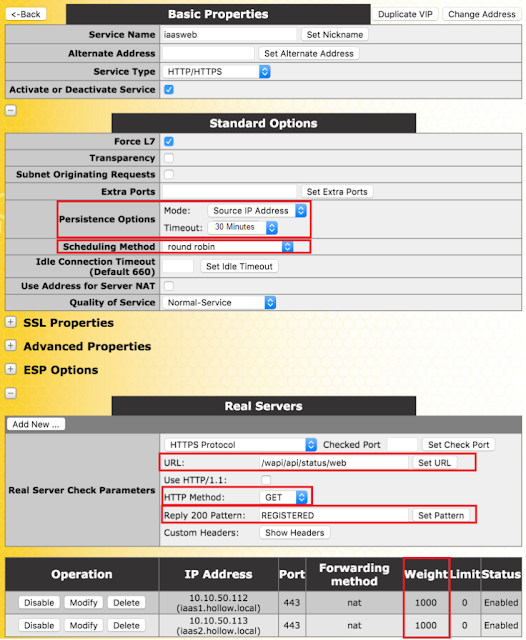
Now we’ll move onto the web services VIP. Let’s modify our IaaSweb VIP and start with updating the persistence options. We want session persistence to be based on the Source Address and have a timeout of 30 minutes. The Load Balancing policy should again be Round Robin and now we can move on to the health check.Well, the Web Services health check has the wrong case. Notice that the Monitor for the IaaS Web component says “registered” but it should actually be “REGISTERED.”

If we check the URL we can see the monitor clearly.
vRealize Appliance
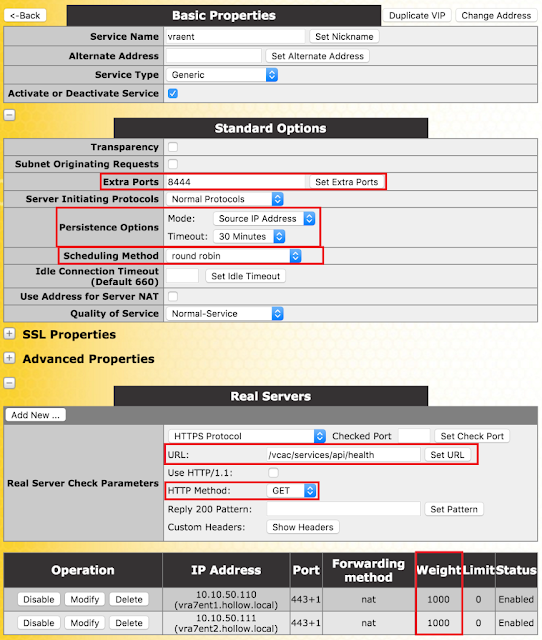
Now we can do the vRealize Appliance URL. Edit the VIP and add an additional port of 8444 to the existing 443. Port 8444 is used for remote console access which is a useful access method that you might want. Change the persistence options to a source based method, with a timeout of 30 minutes just like we did for the web services. The load balancing method is going to be “Round Robin” like it has been for our other services, and then it’s time to do our health check again.This time we want to look for a URL of /vcac/services/api/health with a GET method, and we’re only looking for a 200 or 204 response pattern back so nothing needs to be added in the “Reply Pattern” box.
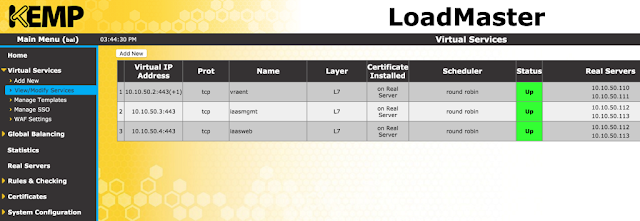
Now we’ve added all of our load balancing rules and we can see our VIPs are all up and happy with our members. The enterprise environment now has some failover capabilities that a simple installation is lacking.
XaaS Blueprints
XaaS isn’t a made up term, well maybe it is, but it supposed to stand for “Anything as a Service.” vRealize Automation will allow you to publish vRO workflows in the service catalog. This means that you can publish just about any thing you can think of, and not just server blueprints. If you have a workflow that can order your coffee and have it delivered to you, then you can publish it in your vRA service catalog. Side note, if you have that workflow, please share it with the rest of us.Create a XaaS Blueprint
Before you begin, make sure that the user who will be adding these new service blueprints is an XaaS Architect.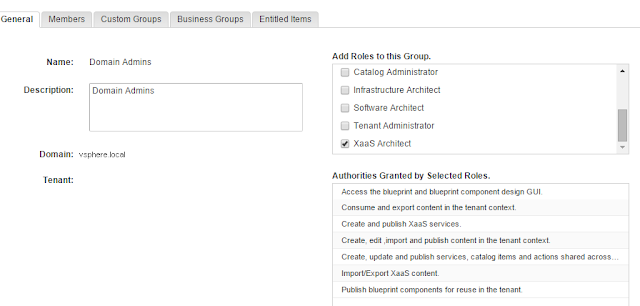
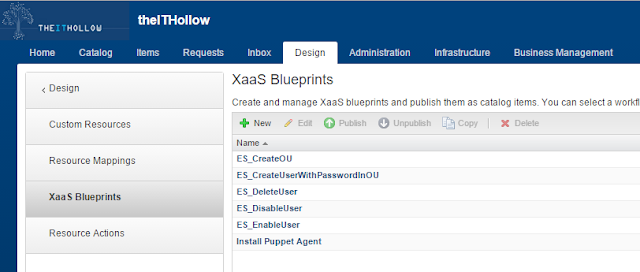
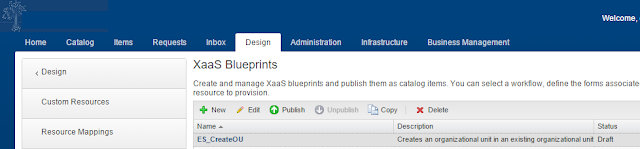
To create an XaaS Blueprint, go to the Design Tab –> XaaS –> XaaS Blueprints. Click the “New” button to add a new blueprint.
Select the vRO blueprint that should be added to the service catalog.

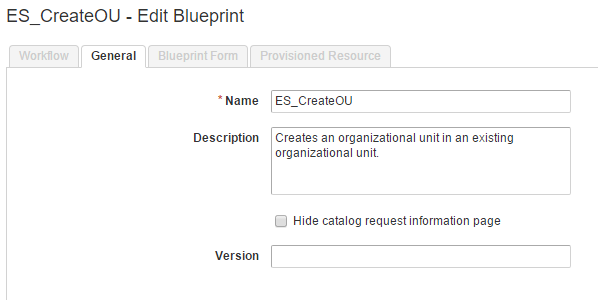
Give the blueprint a name and description. Click Next.
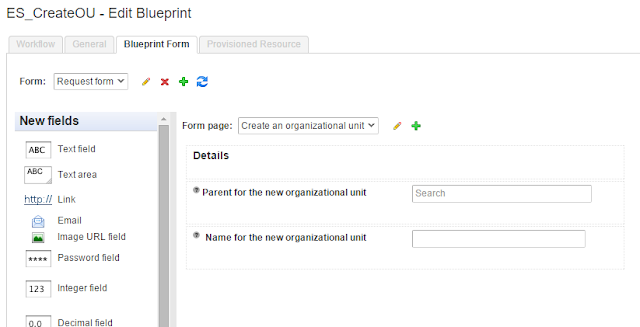
The inputs from the vRO blueprint should be added to the main form. It is possible to customize how the form will look when published to end users. Rearrange details, add or remove fields and click next when you’re ready.
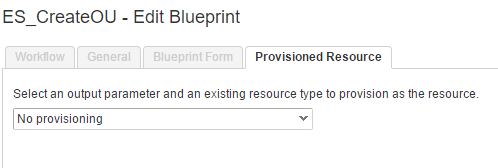
On the provisioned resource tab, leave the field at “No provisioning”.
When you’re done, you’ll see your XaaS blueprint in the list. Remember that before anything can be requested from that, it must be published.
An XaaS Blueprint is a great way to add functionality to your cloud portal. The cloud doesn’t need to be used for just server provisioning. Helpdesk requests, or any other types of automated services can also be made available to your users.
NSX Initial Setup
Its time to think about deploying our networks through vRA. Deploying servers are cool, but deploying three tiered applications in different networks is cooler. So lets add VMware NSX to our cloud portal and get cracking.The first step is to have NSX up and running in your vSphere environment. Once this simple task is complete, a Distributed Logical Router should be deployed with an Uplink interface configured. The diagram below explains what needs to be setup in vSphere prior to doing any configurations in vRealize Automation. A Distributed Logical Router with a single uplink to an Edge Services Gateway should be configured first, then any new networks will be built through the vRealize Automation integration.
While the section of the diagram that is manual, will remain roughly the same throughout, the section handled by vRealize Automation will change often, based on the workloads that are deployed. Note: be sure to setup some routing between your Provider Edge and the DLR so that you can reach the new networks that vRA creates.
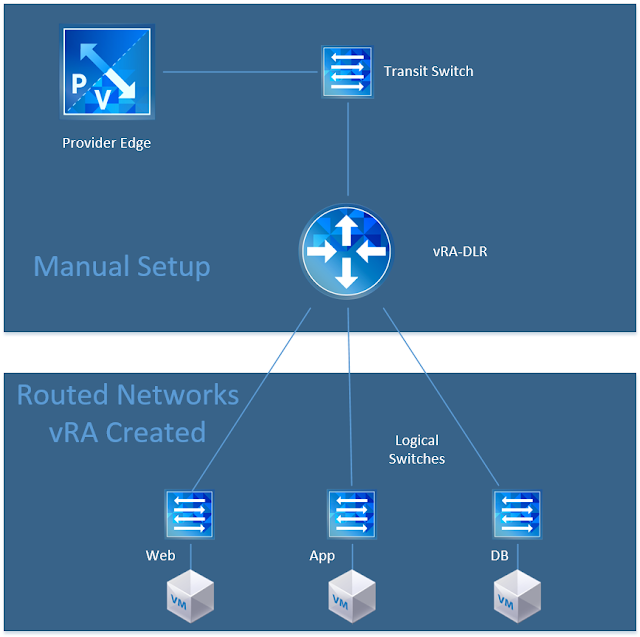
Below, you can also see my NSX DLR prior to any vRealize Automation configurations being done.

Now, make sure that your vRealize Orchestrator endpoint is setup correctly and configured. Before we do anything with NSX we need to make sure that the NSX plugin is installed on your vRO endpoint. NSX will utilize this plugin to setup new networks, switches etc. Be sure to do this before continuing.

Endpoint Setup
The first configuration that needs to happen in vRealize Automation is to re-configure your vCenter endpoint to add your NSX connection. Find the vCenter endpoint and add a URL and set of credentials that connect to the NSX manager.
Network Profiles
Now we need to setup some network profiles. For the purposes of this demonstration, I’ve setup four network profiles. My Transit network profile which is external and three routed network profiles. The transit network profile will be used in the reservations to show which uplink is used to get to the physical network. In this case it goes through our DLR to our Edge Services Gateway.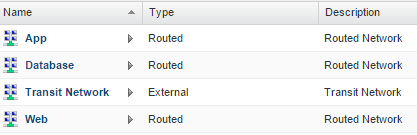
The transit network setup looks something like the example below where my gateway is the next hop route to our Edge Services Gateway.

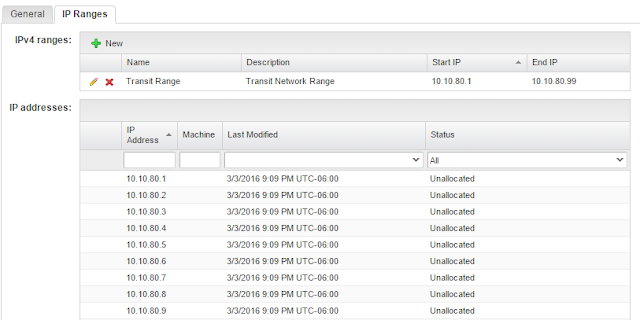
In the IP Ranges tab, I’ve added some IP Addresses that are available on my transit network
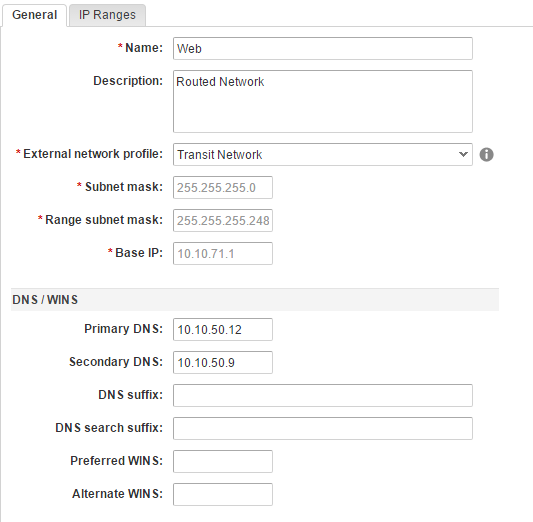
Now if we look at the Routed Network Profiles, here we’re added some networking information that probably doesn’t even exist yet in your networks. These networks will be automatically created by vRA by leveraging NSX. There are a couple of important things to review here, The first is the external network profile. This profile should be the external Transit profile that we created just a moment ago. This tells vRA which uplink will be used as a gateway network to the rest of the environment. The next thing is to determine the subnet mask for the whole profile, and then a range subnet mask which is a segment of that range.
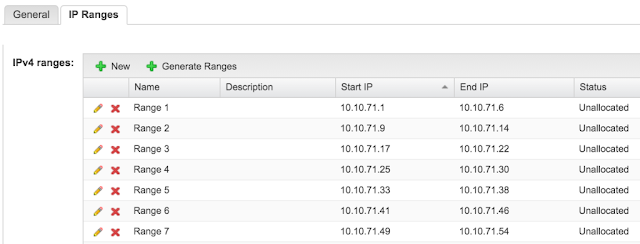
Once you’ve setup the details, click on the IP Ranges tab where you should be able to click “Generate Ranges.” This will create each of the subnets that can be used by vRA for your segmented applications.
Reservations
Now that we’ve setup the network profiles, we can create or modify our vRA reservation. The first step here is to map the external network profile we created earlier, to the port group that it belongs with. Next, under the advanced settings section, select the transport zone that was created in NSX. Below this you can add security groups to the reservation automatically if you would like. Lastly, under routed gateways, select the Distributed Logical Router that as created and then in the drop downs, select the interface and the network profile that corresponds with your external network.
In this step, we setup our basic configurations in vRealize Automation and connected it to our NSX manager. The reservations and network profiles are now ready for us to build some blueprints with on-demand networks, which we’ll discuss in the next step.
Deploy NSX Blueprints
In the previous step we went over how to get the basics configured for NSX and vRealize Automation integration. In this post we’ll build a blueprint and deploy it! Let’s jump right in and get started.Blueprint Designer
Login to your vRA tenant and click on the Design Tab. Create a new blueprint just like we have done in the above step. This time when you are creating your blueprint, click the NSX Settings tab and select the Transport zone. I’ve also added a reservation policy that can help define with reservations are available for this blueprint.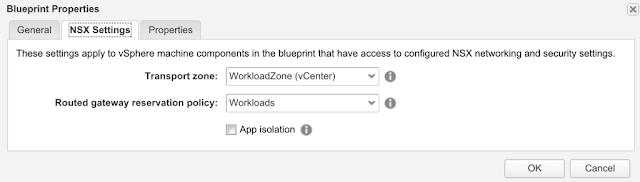
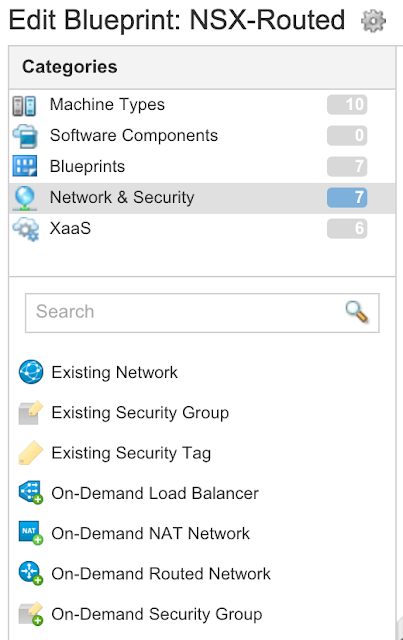
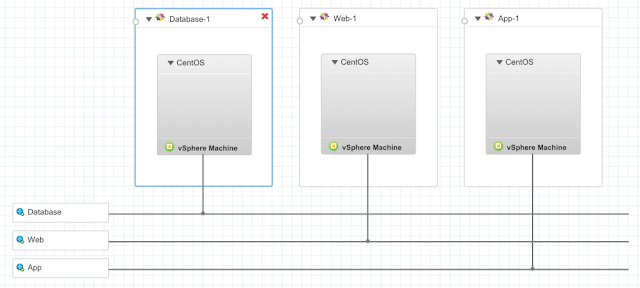
Now that you’ve got the designer open, you can drag and drop your blueprints into the grid just like you have always done. But now, once you’ve added your servers in, you can drag and drop in Network & Security components. I’ve decided to add three “On-Demand Routed Networks”
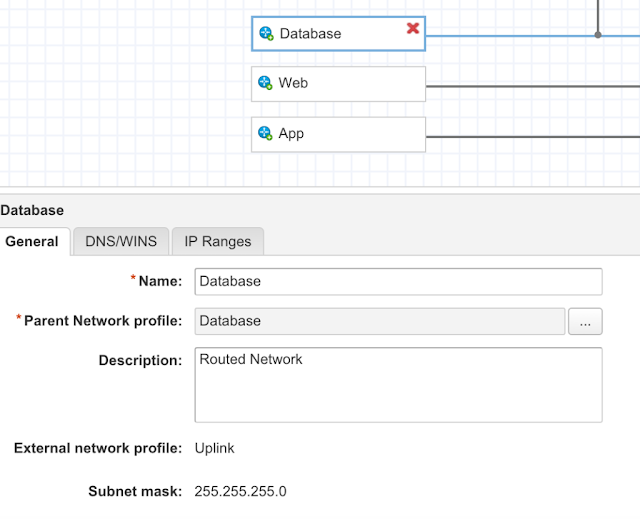
Once you’ve added your network to the grid, you’ll need to configure it. Give the network a name and then select the parent network profile that we created in the previous post. This should be a routed profile.
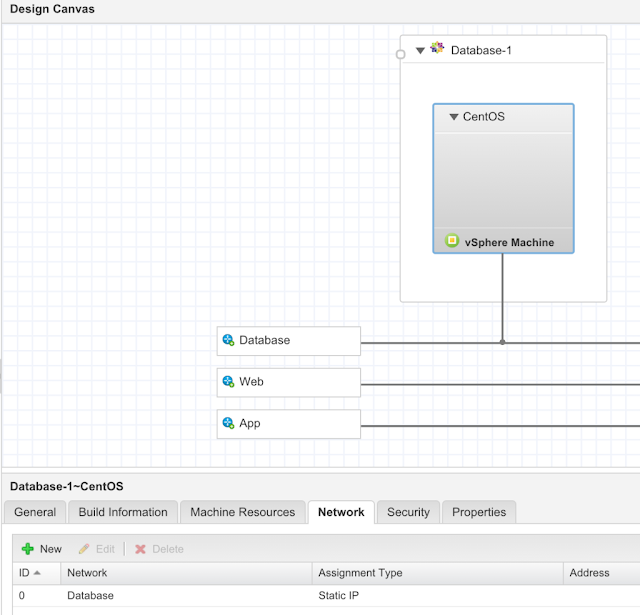
Once your networks have been configured, click on your blueprint and go to the network properties. Select the network in which to join the virtual machine.
When I was all done with my three-tiered routed app the blueprint designer looked like this.
Note: I do want to mention that you can not only add your networks into the designer, but can also add security configurations. Maybe your web server should be firewalled and only port 443 allowed. You can drag that security profile into the grid as well. Pretty neat!
Deploy the blueprint
I’m not going to go through the motions of requesting a new machine from blueprint, but publish your blueprint to the catalog and request a new one. When you’re done, you’ll see something similar to this in the items list.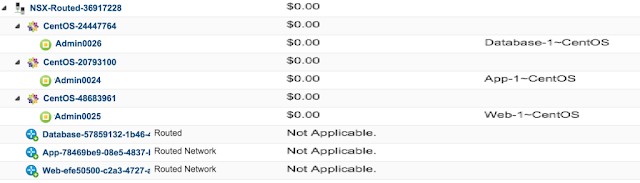
The Distributed Logical Router will have three additional interfaces added to it.

There will be three more switches added as well that correspond with the additional interfaces on the DLR.

The new designer makes things really easy to deploy multiple networks and security settings with your servers. The visual way that servers and networks can be deployed should really make network deployments more popular. If you’re building out vRA 7 in your environment and you’ve been considering using NSX for a while, this may be the tipping point.


