In this article we will show you how to setup vSAN using an ESXi nested environment. Before we dive into the nitty gritty of setting up VSAN, I’d first like to give a brief introduction of what VSAN is all about.
VSAN which is short for VMware Virtual SAN, has been with us since March 2014. It’s VMware’s take on hyper-convergence or the abstraction of storage from the underlying hardware while providing a single pane of glass (the vSphere client) to manage storage alongside your virtualized resources. VMware achieve this through
vSAN by pooling unassigned local drives on a number of ESXi hosts which it then presents as one single datastore. If that isn’t neat I don’t know what is!
vSAN by pooling unassigned local drives on a number of ESXi hosts which it then presents as one single datastore. If that isn’t neat I don’t know what is!
In practical terms, what this means is that you now have the option of choosing between an often complicated and expensive networked storage solution – think SAN, NAS and all the hybrids in between – and a one stop shop for all your storage, compute and virtualization needs.
Nested Virtualization
In this tutorial, I’ll be using a nested environment. I’ll briefly explain what nested virtualization is, just in case this is all new to you. Simply put, we’re talking about virtualizing hypervisors, implying that one or more hypervisors are running as virtual machines which in turn are hosted on a hypervisor running on a physical machine.
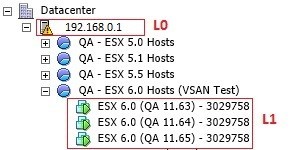
At a high level you have one or more physical servers running ESXi. We call these level 0 (L0) hypervisors. This is represented in Figure 1 namely by the physical ESXi server having IP address 192.168.0.1.
One or more virtual machines are created on the L0 hypervisor. These will act as the receptacles for our virtualized ESXi servers. We call these our level 1 (L1) guest hypervisors labelled L1 in Figure 1.
In theory you can keep going on but I cannot really justify any real-world use case, so time to move on. It is important to stress that this is an unsupported feature as far as VMware is concerned and is subject to a number of requirements in order to make it all work. The moral of this story is “do not use this for your production environments“.
So why should I bother, I hear you ask? Well, if you lack the financial resources, which generally translates to less hardware to play with, you will find that nested virtualization provides an excellent alternative for say setting up a home lab. Likewise, you can cheaply set up test environments for QA and Testing purposes which are relatively easy to set up and can be quickly disposed of and rebuilt from scratch.
The Testing Environment
My setup consists of a 3 node cluster comprising ESXi 6.0 U1 nested servers managed by a virtualized vCenter 6.0 server. Figure 2 shows the virtual machines created on a physical ESXi 5.5 server (L0). Figure 2 – Nested Hypervisors
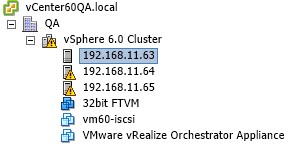
Once vCenter is installed, we can connect to it and create a cluster to which we add the 3 nested ESXi servers. This is illustrated in Figure 3.
VSAN Requirements
As per VMware’s VSAN requirements a cluster must contain a minimum of 3 ESXi hosts each having at least one SSD drive for caching. For every ESXi host, I applied the settings shown in Figure 4.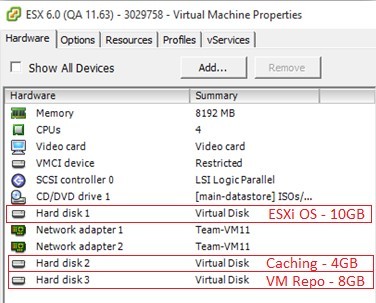
Figure 4 – VSAN ESXi Host Requirements
There’s a nifty trick you can use to emulate an SSD hard drive when creating a virtual machine. We do this by adding the line scsi0:1.virtualSSD = “1” to the “Configuration Parameters” list for the vm in question. In the example below, I’ve set the 2nd drive on controller 0 (0:1) to be of type SSD.
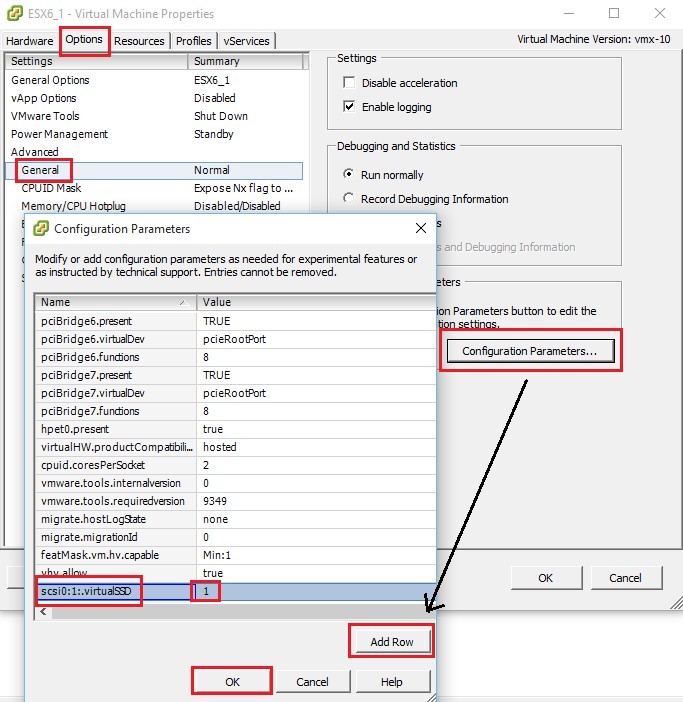 Figure 5 – Emulating an SSD drive Each host has a total of 3 drives, one for the ESXi OS, a second for caching and a third one acting as a repository for the virtual machines we eventually deploy. The hard drive capacities I chose are all arbitrary and should by no means be used for production environments.
Enabling VSAN
There is one final setting that needs doing on every ESXi host before we can provision VSAN. Basically we must allow virtual SAN traffic to pass over an existing or newly created VMkernel adapter.
To do so, connect to the vCenter server managing the cluster using the vSphere Web Client (Figure 6).
Once signed in, select each ESXi host one at a time and configure a VMkernel adapter. In the right-hand pane, navigate to the “Manage” tab and click on “Networking”. Click on “VMkernel adapters” and edit an existing VMkernel. You may wish to create a new one. Either way, make sure you tick on the ““Virtual SAN traffic” option (Figure 7).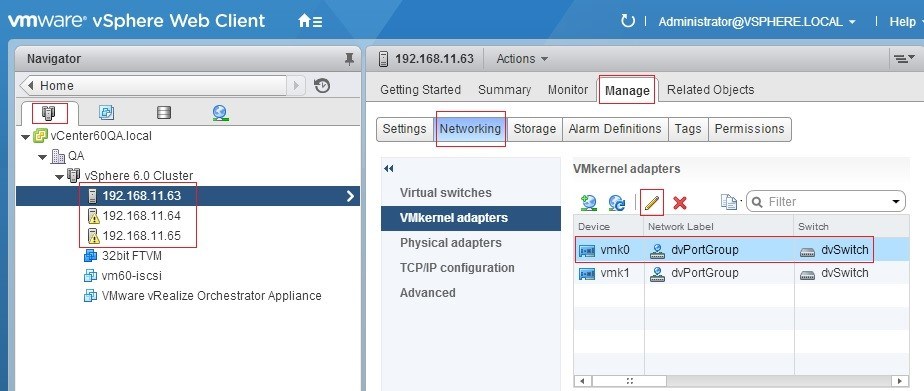 Figure 6 – VMkernel settings
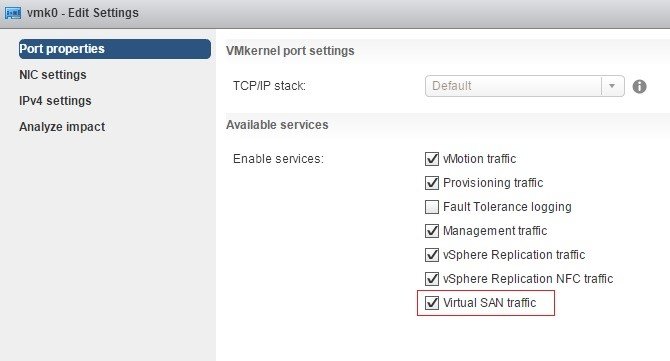 Figure 7 – Allowing VSAN traffic through
It’s important to emphasize that for production environments you will want to dedicate a VMkernel adapter for VSAN traffic. At the very least, each host should have a dedicated 1-Gbit NIC set aside for VSAN. VSAN also requires a private 1-Gbit network preferably 10-Gbit as per VMware’s best practices. However for testing purposes, our environment will work just fine.
Now that we have all of our ESXi hosts set up we can proceed and enable VSAN. Surprisingly, this is as easy as ticking a single check box.
Note: If enabled, vSphere DRS and HA must be turned off on the cluster before VSAN can be provisioned. DRS and HA can be turned back on once VSAN provisioning completes.
Without further ado, let’s enable VSAN.
Locate the cluster name from the Navigator pane using the vSphere Web client. Click on the cluster name and navigate to the “Manage” tab. Under “Settings”, select “General” under the “Virtual SAN” options. Click on the “Edit” button as shown in Figure 8.
![Figure 8 - Provisioning VSAN]() Figure 8 – Provisioning VSAN
Figure 8 – Provisioning VSAN
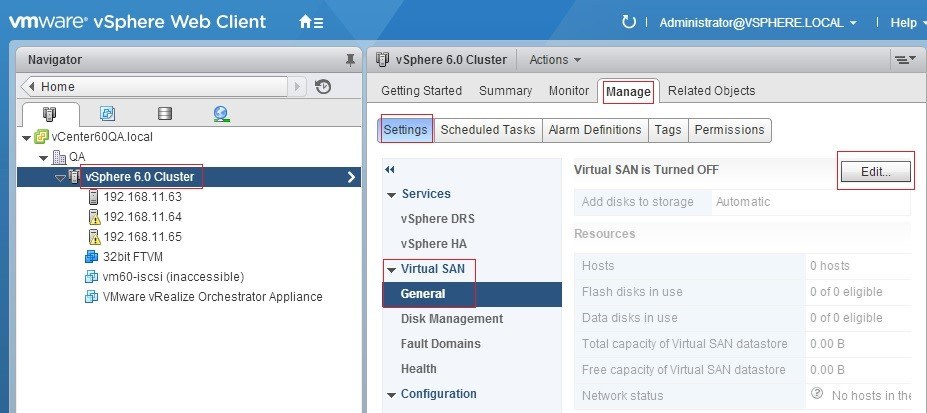 Figure 8 – Provisioning VSAN
Tick on the “Turn ON Virtual SAN” check box. The “Add disks to storage” can be left to “Automatic” as per default setting but in a production environment you will probably select which unassigned disks are added to the VSAN datastore (Figure 9).
![Figure 9 - Turning on VSAN (at last!)]()
Figure 9 – Turning on VSAN (at last!)
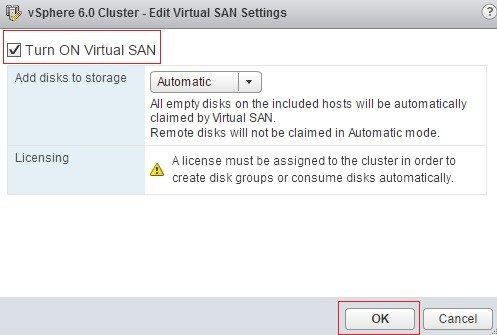
Figure 9 – Turning on VSAN (at last!)
Assuming that all the requirements have been met, the provisioning process will start. Shortly afterwards, you should find a newly created datastore called vsanDatatore (Figure 10).
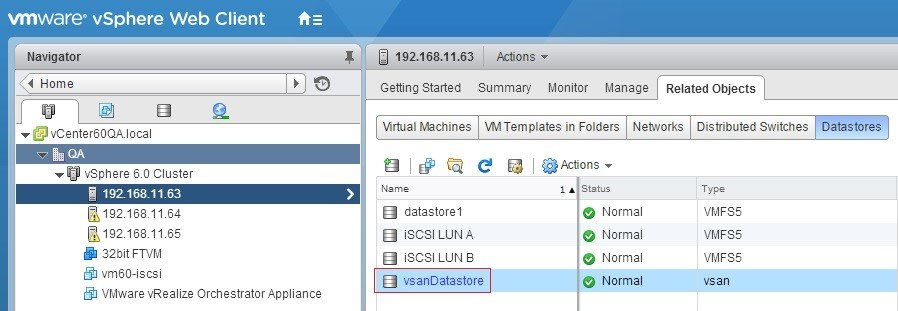 Figure 10 – VSAN datastore
When you’re finished setting up VSAN, you simply turn back on DRS and HA for the cluster and you’re done.
I’ve also included a 6 step video outlining the VSAN provisioning process I just reviewed.
- Check that “Virtual SAN Traffic” is enabled on a VMkernel on each ESXi host
- Turn ON Virtual SAN
- Verify that the vsanDatastore has been created
- Re-enable DRS and HA on the cluster
- Migrate a vm to the new VSAN datastore
- Browse the VSAN datastore and locate the folder of the vm just migrated
