In the previous article in this series, we began the post installation configuration of Exchange 2016 and made changes to client access. In this part of the series we will configure transport and mailbox databases, then begin preparing for the migration from Exchange 2010.
If you would like to read the other parts in this article series please go to:
Many organizations do allow users to relay mail through Exchange from application servers, so we will use this as an example to illustrate how the process is slightly different when compared to Exchange 2010.
To begin, launch the Exchange Admin Center and navigate to Mail Flow>Receive Connectors and after selecting the Exchange 2016 server from the list, then choose Add (+) to create a new Receive Connector:
![]()
Figure 1: Creating a new Receive Connector
On the first page of the wizard, enter the name for the receive connector. For consistency we’ve specified the server name after entering Anonymous Relay.
Select Frontend Transport as the role and choose Custom as the type:
![]() Figure 2: Naming the connector and specifying core options
Figure 2: Naming the connector and specifying core options
On the next page, we'll be provided with the opportunity to specify Network Adapter Bindings - the IP address and TCP/IP port that the receive connector will listen on. Our example receive connector will listen on the standard port for SMTP, port 25:
![]() Figure 3: Leaving TCP/IP listener settings as default
Figure 3: Leaving TCP/IP listener settings as default
On the final page of the wizard, we'll choose which IP addresses that the receive connector will accept mail for.
This allows multiple receive connectors to listen on the same TCP/IP port and IP address and perform an action depending on the remote IP address of a client.
As an example, if our anonymous connector on Exchange 2010 only allowed mail relay from the IP addresses 192.168.15.1-20, we'll specify that range here:
![]() Figure 4: Specifying IP addresses that can use this connector
Figure 4: Specifying IP addresses that can use this connector
After completing the wizard, we will then open the new Receive Connector’s properties page by selecting it from the list, then choosing Edit, as shown below:
![]() Figure 5: Editing connector settings after creation
Figure 5: Editing connector settings after creation
In the Exchange Receive Connector window, select the Security tab. Then within the Authentication section select Externally secured to indicate our anonymous relay is from secure IPs; then under Permission Groups, choose Exchange Servers and Anonymous users:
![]() Figure 6: Allowing anonymous relay
Figure 6: Allowing anonymous relay
To perform this action, we will perform a two-step process using the Exchange Management Shell.
First, launch the Exchange Management Shell and use the following command to rename the database to DB01:
Get-MailboxDatabase -Server | Set-MailboxDatabase -Name DB01
![]() Figure 7: Renaming the default database
Figure 7: Renaming the default database
In the example above you'll see that by executing the Get-MailboxDatabase cmdlet before making the change we see its default name – “Mailbox Database” with a random suffix. After making the change, the name is changed to something more appropriate.
With the database name changed, it still remains in the same location. Move both the Database file and the associated log files to their respective final destinations using the Move-DatabasePath cmdlet with the -EdbFilePath and -LogFolderPath parameters:
![]() Figure 8: Moving the default database path
Figure 8: Moving the default database path
When moving the database, it will be dismounted. The files will then be moved to the new location and the database and log locations updated in Active Directory. Finally the database will be re-mounted.
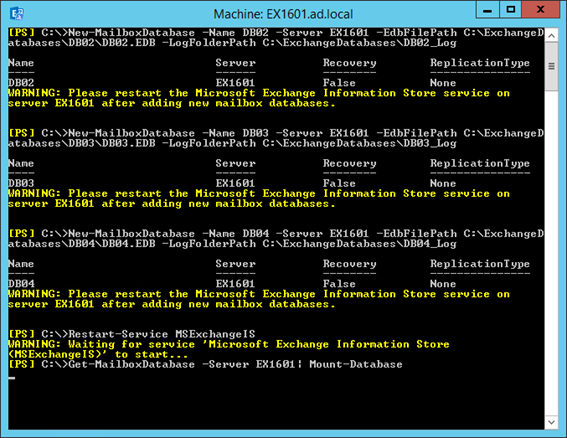
In this example we will use the Exchange Management Shell, which for a larger number of databases will be faster and more accurate.
The cmdlets used are New-MailboxDatabase, Restart-Service, Get-MailboxDatabase and Mount-Database.
In the example shown below we will use the first cmdlet to create the databases, restart the Information Store to ensure it allocates the correct amount of RAM, then after retrieving a list of all databases we will ensure they are mounted:
New-MailboxDatabase -Name DB02 -Server -EdbFilePath C:\ExchangeDatabases\DB02\DB02.EDB -LogFolderPath C:\ExchangeDatabases\DB02_Log
New-MailboxDatabase -Name DB03 -Server -EdbFilePath C:\ExchangeDatabases\DB03\DB03.EDB -LogFolderPath C:\ExchangeDatabases\DB03_Log
New-MailboxDatabase -Name DB04 -Server -EdbFilePath C:\ExchangeDatabases\DB04\DB04.EDB -LogFolderPath C:\ExchangeDatabases\DB04_Log
Restart-Service MSExchangeIS
Get-MailboxDatabase -Server| Mount-Database
![]() Figure 9: Creating additional databases
Figure 9: Creating additional databases
The limits chosen for our example environment are shown below, along with retention settings for mailboxes:
It’s possible to configure this using the Exchange Admin Center, but for multiple databases, use Exchange Management Shell to ensure consistency. Using a combination of the Get-MailboxDatabase cmdlet and Set-MailboxDatabase cmdlet make the changes, using the values from the table above:
Get-MailboxDatabase -Server | Set-MailboxDatabase -IssueWarningQuota 4.8GB -ProhibitSendQuota 4.9GB -ProhibitSendReceiveQuota 5GB -DeletedItemRetention "14:00:00" -MailboxRetention "30:00:00"
![]() Figure 10: Updating mailbox database settings
Figure 10: Updating mailbox database settings
We'll start by creating a test mailbox to use on Exchange 2016. To do this, navigate to the Exchange Admin Center and within Recipients choose Add, then User Mailbox:
![]() Figure 11: Creating a test mailbox
Figure 11: Creating a test mailbox
There is no prescriptive name for a basic test account, so enter suitable unique and identifiable details:
![]()
Figure 12: Specifying test mailbox settings
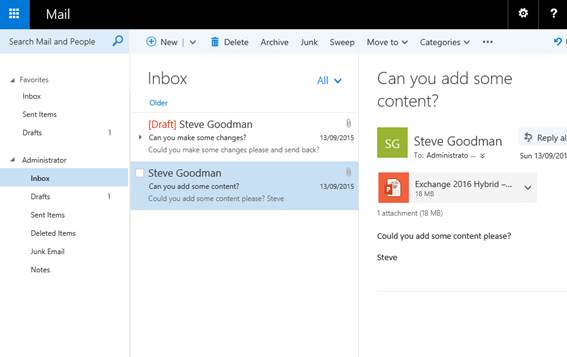
After creating our test mailbox we’ll now need to test that they are functional from a client perspective.
Navigate to OWA via the server’s name. As a minimum test mail flow works correctly between our new Exchange 2016 test user and existing Exchange 2010 users.
![]() Figure 13: Testing OWA and other services
Figure 13: Testing OWA and other services
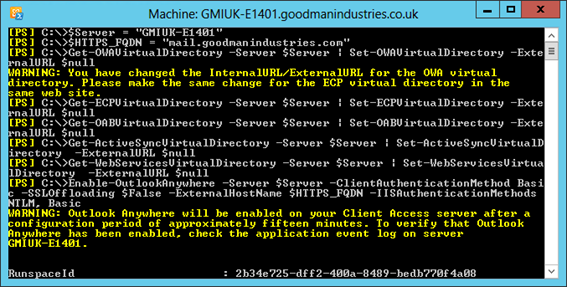
We decided earlier in this guide that we would use the same names for both Exchange 2016 and 2010.
It is now time to move the autodiscover.goodmanindustries.com and mail.goodmanindustries.com names across from Exchange 2010 to Exchange 2016.
This, along with the respective DNS / firewall changes, will result in HTTPS client traffic for Exchange 2010 going via the Exchange 2016 server.
We will update our core URLs for Exchange 2010 to remove the ExternalURL value. We'll also enable Outlook Anywhere, configuring it with the HTTPS name that will move to Exchange 2016.
To do this we will login to the Exchange 2010 server and launch the Exchange Management Shell. Enter the following PowerShell commands, substituting the $Server and $HTTPS_FQDN variables for appropriate values.
$Server = "EX1401"
$HTTPS_FQDN = "mail.goodmanindustries.com"
Get-OWAVirtualDirectory -Server $Server | Set-OWAVirtualDirectory -ExternalURL $null
Get-ECPVirtualDirectory -Server $Server | Set-ECPVirtualDirectory -ExternalURL $null
Get-OABVirtualDirectory -Server $Server | Set-OABVirtualDirectory -ExternalURL $null
Get-ActiveSyncVirtualDirectory -Server $Server | Set-ActiveSyncVirtualDirectory -ExternalURL $null
Get-WebServicesVirtualDirectory -Server $Server | Set-WebServicesVirtualDirectory -ExternalURL $null
Enable-OutlookAnywhere -Server $Server -ClientAuthenticationMethod Basic -SSLOffloading $False -ExternalHostName $HTTPS_FQDN -IISAuthenticationMethods NTLM, Basic
![]() Figure 14: Updating Exchange 2010 URL and Outlook Anywhere configuration
Figure 14: Updating Exchange 2010 URL and Outlook Anywhere configuration
From a client perspective this should not have any immediate effect. The Exchange 2016 server will provide External URL values via Autodiscover, but in the meantime client traffic will still be directed at the Exchange 2010 staging server.
On a server with access to DNS Manager, such as an Active Directory domain controller, update both records from the IP address of the Exchange 2010 server to the Exchange 2016 server:
![]() Figure 15: Updating internal DNS entries
Figure 15: Updating internal DNS entries
Clients will not be immediately redirected to use the Exchange 2016 server as the proxy for client access, and instead will do so once their cached records expire. As soon as clients can access the server retry login and client access to ensure no issues exist.
If internal access works without issue, update the external HTTPS publishing - which in our example organization is a NAT rule configured via the router.
If you would like to read the other parts in this article series please go to:
If you would like to read the other parts in this article series please go to:
- How to Migrate from Exchange 2010 to Exchange 2016 (Part 1)
- How to Migrate from Exchange 2010 to Exchange 2016 (Part 2)
- How to Migrate from Exchange 2010 to Exchange 2016 (Part 3)
Completing Post Installation Configuration
Configuring Receive Connectors
We’ll need to ensure that the same settings are applied to Receive Connectors on Exchange 2016 as per Exchange 2010. Default and Client connectors are already created and do not typically need to be altered. The defaults for Exchange Server 2016 allow email from the internet or spam filter to be delivered without adding an additional permission.Many organizations do allow users to relay mail through Exchange from application servers, so we will use this as an example to illustrate how the process is slightly different when compared to Exchange 2010.
To begin, launch the Exchange Admin Center and navigate to Mail Flow>Receive Connectors and after selecting the Exchange 2016 server from the list, then choose Add (+) to create a new Receive Connector:

Figure 1: Creating a new Receive Connector
On the first page of the wizard, enter the name for the receive connector. For consistency we’ve specified the server name after entering Anonymous Relay.
Select Frontend Transport as the role and choose Custom as the type:

On the next page, we'll be provided with the opportunity to specify Network Adapter Bindings - the IP address and TCP/IP port that the receive connector will listen on. Our example receive connector will listen on the standard port for SMTP, port 25:

On the final page of the wizard, we'll choose which IP addresses that the receive connector will accept mail for.
This allows multiple receive connectors to listen on the same TCP/IP port and IP address and perform an action depending on the remote IP address of a client.
As an example, if our anonymous connector on Exchange 2010 only allowed mail relay from the IP addresses 192.168.15.1-20, we'll specify that range here:

After completing the wizard, we will then open the new Receive Connector’s properties page by selecting it from the list, then choosing Edit, as shown below:

In the Exchange Receive Connector window, select the Security tab. Then within the Authentication section select Externally secured to indicate our anonymous relay is from secure IPs; then under Permission Groups, choose Exchange Servers and Anonymous users:

Moving Default Mailbox Databases
We will move the initial database created by Exchange Server 2016 setup and make it our first Mailbox Database.To perform this action, we will perform a two-step process using the Exchange Management Shell.
First, launch the Exchange Management Shell and use the following command to rename the database to DB01:
Get-MailboxDatabase -Server

In the example above you'll see that by executing the Get-MailboxDatabase cmdlet before making the change we see its default name – “Mailbox Database” with a random suffix. After making the change, the name is changed to something more appropriate.
With the database name changed, it still remains in the same location. Move both the Database file and the associated log files to their respective final destinations using the Move-DatabasePath cmdlet with the -EdbFilePath and -LogFolderPath parameters:
| Move-DatabasePath -Identity DB01 -EdbFilePath C:\ExchangeDatabases\DB01\DB01.EDB -LogFolderPath C:\ExchangeDatabases\DB01_Log |

When moving the database, it will be dismounted. The files will then be moved to the new location and the database and log locations updated in Active Directory. Finally the database will be re-mounted.
Creating Additional Mailbox Databases
Next, create additional Mailbox Databases to match our design specifications. We can create the mailbox databases using either the Exchange Admin Center or the Exchange Management Shell.In this example we will use the Exchange Management Shell, which for a larger number of databases will be faster and more accurate.
The cmdlets used are New-MailboxDatabase, Restart-Service, Get-MailboxDatabase and Mount-Database.
In the example shown below we will use the first cmdlet to create the databases, restart the Information Store to ensure it allocates the correct amount of RAM, then after retrieving a list of all databases we will ensure they are mounted:
New-MailboxDatabase -Name DB02 -Server
New-MailboxDatabase -Name DB03 -Server
New-MailboxDatabase -Name DB04 -Server
Restart-Service MSExchangeIS
Get-MailboxDatabase -Server
Configuring Mailbox Database Settings
After we have moved our first Mailbox Database and created our additional mailbox databases, we will now need to configure each database with the correct limits.The limits chosen for our example environment are shown below, along with retention settings for mailboxes:
| Warning Limit | Prohibit Send Limit | Prohibit Send/Receive Limit | Keep Deleted Items for (days) | Keep Deleted Mailboxes for (days) |
| 4.8GB | 4.9GB | 5GB | 14 | 30 |
It’s possible to configure this using the Exchange Admin Center, but for multiple databases, use Exchange Management Shell to ensure consistency. Using a combination of the Get-MailboxDatabase cmdlet and Set-MailboxDatabase cmdlet make the changes, using the values from the table above:
Get-MailboxDatabase -Server

Preparing for Exchange 2016 Migration
Testing base functionality
Before we can move namespaces and mailboxes across to Exchange Server 2016 we need to test that the new server is fully functional.We'll start by creating a test mailbox to use on Exchange 2016. To do this, navigate to the Exchange Admin Center and within Recipients choose Add, then User Mailbox:

There is no prescriptive name for a basic test account, so enter suitable unique and identifiable details:

Figure 12: Specifying test mailbox settings
After creating our test mailbox we’ll now need to test that they are functional from a client perspective.
Navigate to OWA via the server’s name. As a minimum test mail flow works correctly between our new Exchange 2016 test user and existing Exchange 2010 users.
Updating Exchange 2010 Virtual Directory URLs
Exchange 2016 supports acting as a proxy for Exchange 2010 services. This means that it is easy to allow Exchange 2010 and Exchange 2016 to co-exist using the same URLs.We decided earlier in this guide that we would use the same names for both Exchange 2016 and 2010.
It is now time to move the autodiscover.goodmanindustries.com and mail.goodmanindustries.com names across from Exchange 2010 to Exchange 2016.
This, along with the respective DNS / firewall changes, will result in HTTPS client traffic for Exchange 2010 going via the Exchange 2016 server.
We will update our core URLs for Exchange 2010 to remove the ExternalURL value. We'll also enable Outlook Anywhere, configuring it with the HTTPS name that will move to Exchange 2016.
To do this we will login to the Exchange 2010 server and launch the Exchange Management Shell. Enter the following PowerShell commands, substituting the $Server and $HTTPS_FQDN variables for appropriate values.
$Server = "EX1401"
$HTTPS_FQDN = "mail.goodmanindustries.com"
Get-OWAVirtualDirectory -Server $Server | Set-OWAVirtualDirectory -ExternalURL $null
Get-ECPVirtualDirectory -Server $Server | Set-ECPVirtualDirectory -ExternalURL $null
Get-OABVirtualDirectory -Server $Server | Set-OABVirtualDirectory -ExternalURL $null
Get-ActiveSyncVirtualDirectory -Server $Server | Set-ActiveSyncVirtualDirectory -ExternalURL $null
Get-WebServicesVirtualDirectory -Server $Server | Set-WebServicesVirtualDirectory -ExternalURL $null
Enable-OutlookAnywhere -Server $Server -ClientAuthenticationMethod Basic -SSLOffloading $False -ExternalHostName $HTTPS_FQDN -IISAuthenticationMethods NTLM, Basic
From a client perspective this should not have any immediate effect. The Exchange 2016 server will provide External URL values via Autodiscover, but in the meantime client traffic will still be directed at the Exchange 2010 staging server.
Updating Internal DNS records and switching external HTTPS connectivity
To direct traffic internally at the Exchange 2016 server we need to change internal DNS records so that both the Autodiscover name and HTTPS namespace (in our case, mail.goodmanindustries.com) are configured with the IP address of the new Exchange 2016 server.On a server with access to DNS Manager, such as an Active Directory domain controller, update both records from the IP address of the Exchange 2010 server to the Exchange 2016 server:

Clients will not be immediately redirected to use the Exchange 2016 server as the proxy for client access, and instead will do so once their cached records expire. As soon as clients can access the server retry login and client access to ensure no issues exist.
If internal access works without issue, update the external HTTPS publishing - which in our example organization is a NAT rule configured via the router.
Summary
In part four of this series, we’ve completed the post-install configuration and began preparation for the migration. Base functionality has been tested and we have updated records to direct client access to the server. In the next part of this series we’ll begin by updating mail flow.If you would like to read the other parts in this article series please go to:
- How to Migrate from Exchange 2010 to Exchange 2016 (Part 1)
- How to Migrate from Exchange 2010 to Exchange 2016 (Part 2)
- How to Migrate from Exchange 2010 to Exchange 2016 (Part 3)


