
In this multi-part article we will migrate from Exchange 2010 to Exchange 2016. In this series we will walk through the steps required to implement Exchange 2016 into your current Exchange 2010 organization and migrate mailboxes across.
If you would like to read the other parts in this article series please go to:
- How to Migrate from Exchange 2010 to Exchange 2016 (Part 2)
- How to Migrate from Exchange 2010 to Exchange 2016 (Part 3)
- How to Migrate from Exchange 2010 to Exchange 2016 (Part 4)
Introduction
The latest version of Exchange Server brings the latest cloud-based developments and reliability improvements to on-premises Exchange. In this series we will walk through the steps required to implement Exchange 2016 into your current Exchange 2010 organization and migrate mailboxes across.Planning for Deployment
In this short series we’ll be focusing on the implementation and migration steps to move from Exchange 2010 to Exchange 2016, rather than implementing features like Database Availability Groups or configuring load balancing. Therefore, we’ll focus on a smaller organization with a relatively simple deployment.Before you begin it’s important to understand that a key architectural change has been made in Exchange 2016. Exchange 2010 had a number of separate roles; Client Access, Hub Transport, Mailbox and Unified Messaging.
In Exchange 2016 only a single role is used, the Mailbox role. This contains all necessary components required.
Our example organization is Goodman Industries, who have a single Exchange 2010 multi-role server and will migrate over to a single Exchange 2016 mailbox server.
Figure 1: An overview of our topology
In the example above, you’ll see our source server EX1401 running Exchange 2010. Our target server will be EX1601. In a larger organization this would most likely be highly available, so we’d have multiple domain controllers (rather than just AD01) and use Database Availability Groups on the source and target.
Naming and Services
Our first step is to define names used by clients to access Exchange. Co-existence with Exchange 2010, 2013 and 2016 allows sharing of the same HTTPS names for Autodiscover, OWA, ActiveSync and other services, making it easy to transition across and reduce the risk of implementing co-existence.| Old Exchange 2010 Namespaces | New Exchange 2016 Namespaces |
| mail.goodmanindustries.com autodiscover.goodmanindustries.com | mail.goodmanindustries.com autodiscover.goodmanindustries.com |
Exchange Server Sizing
The environment we’ll be implementing Exchange 2016 on is virtualised, running Hyper-V in our example.| CPUs | Cores | SPECint_rate2006 score | Host RAM | Disks Available |
| 2 x Intel Xeon | 12 | 367 | 256GB | 24 x 4TB 3.5” 7.2K RPM SAS (RAID 10) |
We have also collected statistics from the existing environment:
| Number of mailboxes | Average Message Size | Average Received | Average Sent | Average Mailbox Size |
| 150 | 75KB | 30 | 15 | 1GB |
To calculate the requirements, we’ll use version 7.8 or higher of the Exchange Server Role Requirements Calculator. This supports both Exchange 2013 and Exchange 2016, so be sure to select the correct version when using the tool.
When sizing the solution two important factors will form design constraints:
- The solution will not have high availability and instead will use Hyper-V for high availability.
- The Exchange 2016 environment will provide quota limits of 5GB per user.
- We’ll configure the maximum number of databases to be 5.
- We’ll use a VSS-based backup solution rather than Exchange Native Protection – simply because it’s a non-HA simple environment.
| Hostname | Virtual CPU | RAM | OS Disk | Page file Disk | Physical disks required | Database virtual disks | Log virtual disks | Restore LUN |
| EX1601 | 1 x vCPU | 16GB | 100GB | 20GB | 4 x 4TB | 5 x 291GB | 5 x 5GB | 1 x 213GB |
The Virtual CPU specifies how many CPU cores should be assigned to the Virtual Machine used, as does the RAM. The OS disk will hold both Operating System Exchange install and transport databases.
The Physical Disks represents how many of the available physical disks are needed to actually support the deployment and meet requirements for performance and space. In the virtual environment, these will be presented as virtual disks and will be used for database and log files respectively.
You'll note that we're still splitting databases and logs. For an implementation making use of Exchange Native Protection we wouldn't look to do this, but for an implementation in a virtual environment that takes advantage of backups this is still required. We've also included an additional virtual disk to use as a restore LUN.
Splitting Databases from logs ensure that in the scenario of a log disk filling up, databases will not be corrupted. We also ensure that losing or the corruption of a virtual disk doesn't result in a full restore of Exchange.
Updating the environment
Updating Exchange Server 2010
The minimum supported patch level for Exchange Server 2010 is Service Pack three with Update Rollup 11.Exchange 2010 Service Pack 3 is available here.
Exchange 2010 SP3 Update Rollup 11 is available here. Install it, or a newer version if it is available.
Directory Service Requirements
The last few versions of Exchange had reasonably light requirements on AD functional levels. Now Windows 2003 R2 has finally went out of support the minimum Forest Functional Level and Domain Functional Level has been changed from 2003 and above. The minimum support FFL/DFL is now a minimum of Windows 2008 or above.Updating Outlook Clients
Exchange 2016 supports Outlook 2010 and above on Windows, and on the Mac Outlook 2011 and higher. Outlook 2007 is no longer supported, but may work.All versions of Outlook 2016 and Outlook 2013 are supported. Outlook 2010 is supported with the April 2015 update (KB2965295).
Update clients to the minimum supported version required before implementing Exchange 2016. Newer versions of Outlook will work with Exchange 2010 without issue.
Preparing the server for Exchange 2016
Exchange 2016 supports Windows 2012 and Windows 2012 R2. In our series we'll use Windows 2012 R2.We'll be using physical disks to support Exchange 2016 and then creating virtual disks atop our Hyper-V environment. In Hyper-V, our new VM looks like this:
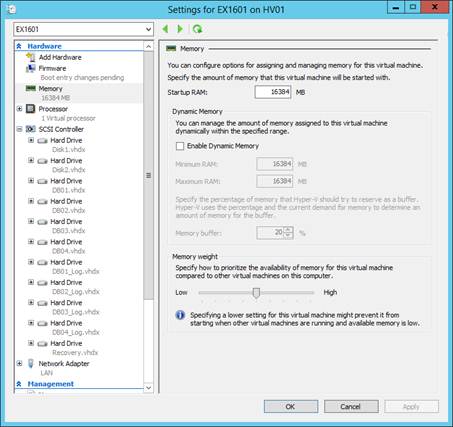
We'll then proceed and install Windows Server 2012 R2 on the virtual machine used for Exchange 2016, then configure it with correct network settings, install the latest Windows updates and join it to our domain.
Storage Overview
Exchange Server 2016 supports NTFS and ReFS for Exchange databases and log files, and supports NTFS for operating system and Exchange binaries.ReFS is recommended, with data integrity features switched off; therefore, we’ll format all Exchange database and log disks using this filesystem.
In addition to making sure we're using the recommended filesystem, we will create mount points to represent the disks and their purpose:
| Disk | Mount Point |
| Page file | E: |
| Database 1 | C:\ExchangeDatabases\DB01 |
| Database 2 | C:\ExchangeDatabases\DB02 |
| Database 3 | C:\ExchangeDatabases\DB03 |
| Database 4 | C:\ExchangeDatabases\DB04 |
| Database 1 Log | C:\ExchangeDatabases\DB01_Log |
| Database 2 Log | C:\ExchangeDatabases\DB02_Log |
| Database 3 Log | C:\ExchangeDatabases\DB03_Log |
| Database 4 Log | C:\ExchangeDatabases\DB04_Log |
| Restore LUN | C:\ExchangeDatabases\Restore |
Initializing Disks
We will then bring storage online, initialize and then format and mount the storage. Launch Disk Management by right-clicking the Start Button: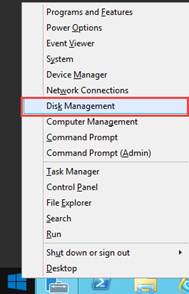
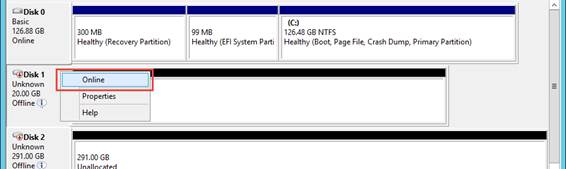
Within Server Manager, navigate to Disk Management. We will see in the upper panel the system disk, C: and the System Reserved Partition. These also display in the lower page, contained as partitions within the primary disk.
All newly added disks will typically be shown as offline. We'll need to first change each of these disks to an online state before we prepare them. This is accomplished by right clicking each disk and simply choosing online. Perform this step, as shown below, across all new disks before proceeding:
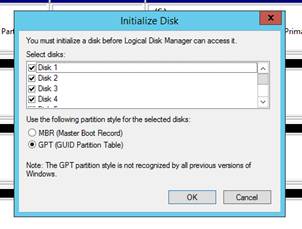
After bringing the disks online, we will now select one of the disks, right click and choose Initialize Disk:

Figure 5: Initializing disks for Exchange use
This will allow us to initialize all new disks in a single operation. We'll ensure all disks are selected (in our case all 12 additional disks), then select GPT (GUID Partition Table), which is recommended for Exchange and supports disk sizes over 2TB, should they be required:
Summary
In part one of this series we have planned our simple deployment, ensured our Exchange environment and clients are up to date and started the preparation of the virtual machine for Exchange 2016. In the next part of this series, we will complete the virtual machine configuration and install Exchange 2016.If you would like to read the other parts in this article series please go to:
- How to Migrate from Exchange 2010 to Exchange 2016 (Part 2)
- How to Migrate from Exchange 2010 to Exchange 2016 (Part 3)
- How to Migrate from Exchange 2010 to Exchange 2016 (Part 4)