
In this article we’ll configure full clones driven by automated pools. In this particular case we won’t use VMware Composer, reducing a bit the complexity of View, but on the other hand growing the storage needs. But there is also a time which plays a certain role as full clone gets more time to get created than linked clone.
- Identify floating vs. dedicated assignments
- Identify and configure the following:
- Pool settings
- 3D renderer
- Provisioning settings
- Templates
- vCenter Server resource settings
- Advanced storage settings
- Guest customization settings
- Horizon View Administration Guide
- Setting Up Desktop and Application Pools in Horizon
- Horizon View Administrator
Identify floating vs. dedicated assignments
When View Composer creates a linked clone, it takes a snapshot of the clone’s OS disk. The snapshot uniquely identifies the linked-clone virtual machine. A refresh operation reverts the OS disk to the snapshot. View Composer can refresh a linked clone in as little as half the time it takes to delete and recreate the clone.
- Dedicated Desktop Pool– each user is assigned to a desktop and each time user logs in he (she) obtains access to the same desktop.
- Floating Desktop Pool– In a floating assignment pool, it’s the opposite. Each user receive different desktops each time he (she) logs in. As simple as that.
You can see the option when start the assistant to create new Desktop Pool.

Identify and configure the following:
Pool settings– assistant of creation of desktop pool.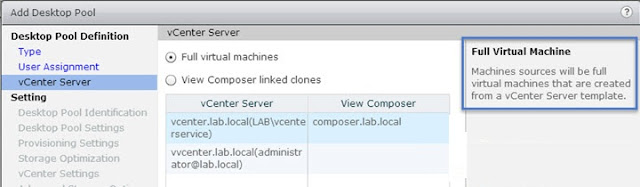
3D renderer– Virtual Shared Graphics Acceleration (vSGA) and Virtual Dedicated Graphics Acceleration (vDGA), which are vSphere features that use physical graphics cards installed on the ESXi hosts and manage the graphics processing unit (GPU) resources among the virtual machines.
When you select the 3D Renderer hardware-based options, users can take advantage of 3D applications for design, modeling, and multimedia, which typically require GPU hardware to perform well.
The 3D Renderer setting also offers a software option, which provides graphics enhancements that can support less demanding applications such as Windows AERO, Microsoft Office, and Google Earth.
Requirements:
- W7 or later
- PCoIP as default display protocol and users aren’t allowed to change
- for Hardware 3D: vSGA has to be on ESXi 5.1 or later with vCenter 5.1 and later (this will evolve for the exam, imho).
- vDGA single physical GPU on ESXi host on single VM. (GPU pass-through) and configure the individual virtual machines to use dedicated PCI devices after the desktop pool is created in View.
- You must install VIB corresponding to the graphic card you’re using (from HCL only !!)
- W7 has to be vmx8 and later, where W8 has to be vmx9 and later.
- To configure the Hardware 3D rendering > Power Of esixting VMs > reconfigure through vCenter > check > power On.
To configure the 3D renderer– you can configure the amount of VRAM that is assigned to the virtual machines in the pool by moving the slider in the Configure VRAM for 3D guests dialog box. The minimum VRAM size is 64MB. For virtual hardware version 9 virtual machines, the default VRAM size is 96MB, and you can configure a maximum size of 512MB. For virtual hardware version 8 virtual machines, the default VRAM size is 64MB, and you can configure a maximum size of 128MB.
Check Horizon View 6 setting up desktops PDF p. 117

When click the question mark next to the 3D renderer, you’ll get further explanation.

When you change the Allow users to chose protocol from Yes to No, you’ll “unlock” the grayed out option.
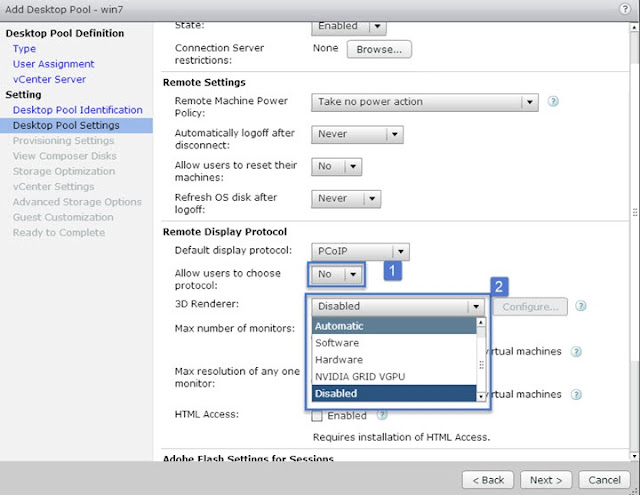
The different options bring different config options. For example the “Software” 3D renderer options allows you to configure the amount of memory available to your VMs.

When you click the question mark next to the 3D renderer, you’ll get a nice explanations.

So you can also change the settings on the virtual hardware, through vSphere Web client only when selecting the “Manage using vSphere client”

So then you go to your VM and allocate directly the video memory there.

Provisioning settings
Templates
You have to pick one of your templates (if you don’t have one you can clone a VM to template). Note that message saying that only supported OS can be selected. The latest version of View allows even server OS to be selected.

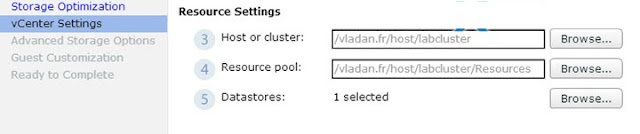
vCenter Server resource settings
The resource settings options allows to pick host/cluster and then resource pool and datastore.
Advanced storage settings
You can enable Storage Accelerator for a View desktop pool. A View Storage Accelerator is most useful for shared disks that are read frequently, such as View Composer OS disks.

Guest customization settings
Concerning Guest customization, the options are:
- Use this customization specification
- None – customization will be done manually

The customization of the OS is done through vSphere client and it’s vCenter relative.
There you can create customization files for Windows or Linux OS.


