In recent years, Linux distributions have increasingly transitioned from other init systems to
systemd. Thesystemd suite of tools provides a fast and flexible init model for managing an entire machine from boot onwards.In this guide, we'll give you a quick run through of the most important commands you'll want to know for managing a
systemd enabled server. These should work on any server that implements systemd (any OS version at or above Ubuntu 15.04, Debian 8, CentOS 7, Fedora 15). Let's get started.Basic Unit Management
The basic object that
systemd manages and acts upon is a "unit". Units can be of many types, but the most common type is a "service" (indicated by a unit file ending in .service). To manage services on asystemd enabled server, our main tool is the systemctl command.All of the normal init system commands have equivalent actions with the
systemctl command. We will use the nginx.service unit to demonstrate (you'll have to install Nginx with your package manager to get this service file).For instance, we can start the service by typing:
sudo systemctl start nginx.service
sudo systemctl start nginx.service
We can stop it again by typing:
sudo systemctl stop nginx.service
To restart the service, we can type:
sudo systemctl restart nginx.service
To attempt to reload the service without interrupting normal functionality, we can type:
sudo systemctl reload nginx.service
Enabling or Disabling Units
By default, most
systemd unit files are not started automatically at boot. To configure this functionality, you need to "enable" to unit. This hooks it up to a certain boot "target", causing it to be triggered when that target is started.To enable a service to start automatically at boot, type:
sudo systemctl enable nginx.service
sudo systemctl enable nginx.service
If you wish to disable the service again, type:
sudo systemctl disable nginx.service
Getting an Overview of the System State
There is a great deal of information that we can pull from a
systemd server to get an overview of the system state.For instance, to get all of the unit files that
systemd has listed as "active", type (you can actually leave off the list-units as this is the default systemctl behavior):
- systemctl list-units
To list all of the units that
systemd has loaded or attempted to load into memory, including those that are not currently active, add the --all switch:
- systemctl list-units --all
To list all of the units installed on the system, including those that
systemd has not tried to load into memory, type:
- systemctl list-unit-files
Viewing Basic Log Information
A
systemd component called journald collects and manages journal entries from all parts of the system. This is basically log information from applications and the kernel.To see all log entries, starting at the oldest entry, type:
- journalctl
By default, this will show you entries from the current and previous boots if
journald is configured to save previous boot records. Some distributions enable this by default, while others do not (to enable this, either edit the /etc/systemd/journald.conf file and set the Storage= option to "persistent", or create the persistent directory by typing sudo mkdir -p /var/log/journal).If you only wish to see the journal entries from the current boot, add the
-b flag:
- journalctl -b
To see only kernel messages, such as those that are typically represented by
dmesg, you can use the -kflag:
- journalctl -k
Again, you can limit this only to the current boot by appending the
-b flag:journalctl -k -b
Querying Unit States and Logs
While the above commands gave you access to the general system state, you can also get information about the state of individual units.
To see an overview of the current state of a unit, you can use the
status option with the systemctlcommand. This will show you whether the unit is active, information about the process, and the latest journal entries:
- systemctl status nginx.service
To see all of the journal entries for the unit in question, give the
-u option with the unit name to thejournalctl command:
- journalctl -u nginx.service
As always, you can limit the entries to the current boot by adding the
-b flag:journalctl -b -u nginx.service
Inspecting Units and Unit Files
By now, you know how to modify a unit's state by starting or stopping it, and you know how to view state and journal information to get an idea of what is happening with the process. However, we haven't seen yet how to inspect other aspects of units and unit files.
A unit file contains the parameters that
systemd uses to manage and run a unit. To see the full contents of a unit file, type:
- systemctl cat nginx.service
To see the dependency tree of a unit (which units
systemd will attempt to activate when starting the unit), type:
- systemctl list-dependencies nginx.service
This will show the dependent units, with
target units recursively expanded. To expand all dependent units recursively, pass the --all flag:
- systemctl list-dependencies --all nginx.service
Finally, to see the low-level details of the unit's settings on the system, you can use the
show option:
- systemctl show nginx.service
This will give you the value of each parameter being managed by
systemd.Modifying Unit Files
If you need to make a modification to a unit file,
systemd allows you to make changes from thesystemctl command itself so that you don't have to go to the actual disk location.To add a unit file snippet, which can be used to append or override settings in the default unit file, simply call the
edit option on the unit:
- sudo systemctl edit nginx.service
If you prefer to modify the entire content of the unit file instead of creating a snippet, pass the
--full flag:
- sudo systemctl edit --full nginx.service
After modifying a unit file, you should reload the
systemd process itself to pick up your changes:
- sudo systemctl daemon-reload
Using Targets (Runlevels)
Another function of an init system is to transition the server itself between different states. Traditional init systems typically refer to these as "runlevels", allowing the system to only be in one runlevel at any one time.
In
systemd, "targets" are used instead. Targets are basically synchronization points that the server can used to bring the server into a specific state. Service and other unit files can be tied to a target and multiple targets can be active at the same time.To see all of the targets available on your system, type:
- systemctl list-unit-files --type=target
To view the default target that
systemd tries to reach at boot (which in turn starts all of the unit files that make up the dependency tree of that target), type:
- systemctl get-default
You can change the default target that will be used at boot by using the
set-default option:
- sudo systemctl set-default multi-user.target
To see what units are tied to a target, you can type:
- systemctl list-dependencies multi-user.target
You can modify the system state to transition between targets with the
isolate option. This will stop any units that are not tied to the specified target. Be sure that the target you are isolating does not stop any essential services:
- sudo systemctl isolate multi-user.target
Stopping or Rebooting the Server
For some of the major states that a system can transition to, shortcuts are available. For instance, to power off your server, you can type:
- sudo systemctl poweroff
If you wish to reboot the system instead, that can be accomplished by typing:
- sudo systemctl reboot
You can boot into rescue mode by typing:
- sudo systemctl rescue
Note that most operating systems include traditional aliases to these operations so that you can simply type
sudo poweroff or sudo reboot without the systemctl. However, this is not guaranteed to be set up on all systems.Next Steps
By now, you should know the basics of how to manage a server that uses
systemd. However, there is much more to learn as your needs expand. Below are links to guides with more in-depth information about some of the components we discussed in this guide:How To Use Systemctl to Manage Systemd Services and Units
Introduction
Systemd is an init system and system manager that is widely becoming the new standard for Linux machines. While there are considerable opinions about whether systemd is an improvement over the traditional SysV init systems it is replacing, the majority of distributions plan to adopt it or have already done so.Due to its heavy adoption, familiarizing yourself with
systemd is well worth the trouble, as it will make administrating these servers considerably easier. Learning about and utilizing the tools and daemons that comprise systemd will help you better appreciate the power, flexibility, and capabilities it provides, or at least help you to do your job with minimal hassle.In this guide, we will be discussing the
As we mentioned above,
Although you may use the above format for general administration, for clarity, we will use the
To stop a currently running service, you can use the
If the application in question is able to reload its configuration files (without restarting), you can issue the
If you are unsure whether the service has the functionality to reload its configuration, you can issue the
Otherwise, it will restart the service so the new configuration is picked up:
To start a service at boot, use the
This will create a symbolic link from the system's copy of the service file (usually in
To disable the service from starting automatically, you can type:
This will remove the symbolic link that indicated that the service should be started automatically.
Keep in mind that enabling a service does not start it in the current session. If you wish to start the service and enable it at boot, you will have to issue both the
This will provide you with the service state, the cgroup hierarchy, and the first few log lines.
For instance, when checking the status of an Nginx server, you may see output like this:
This gives you a nice overview of the current status of the application, notifying you of any problems and any actions that may be required.
There are also methods for checking for specific states. For instance, to check to see if a unit is currently active (running), you can use the
This will return the current unit state, which is usually
To see if the unit is enabled, you can use the
This will output whether the service is
This will return
This will show you a list of all of the units that
We can tell
This will show any unit that
Another common filter is the
Units are representations of resources that
We will cover what "masked" means momentarily.
The output is the unit file as known to the currently running
This will display a hierarchy mapping the dependencies that must be dealt with in order to start the unit in question. Dependencies, in this context, include those units that are either required by or wanted by the units above it.
This will prevent the Nginx service from being started, automatically or manually, for as long as it is masked.
If you check the
To unmask a unit, making it available for use again, simply use the
This will return the unit to its previous state, allowing it to be started or enabled.
The
This will be a blank file that can be used to override or add directives to the unit definition. A directory will be created within the
If you wish to edit the full unit file instead of creating a snippet, you can pass the
This will load the current unit file into the editor, where it can be modified. When the editor exits, the changed file will be written to
To remove any additions you have made, either delete the unit's
To remove a full modified unit file, we would type:
After deleting the file or directory, you should reload the
If you wish to set a different default target, you can use the
Unlike runlevels, multiple targets can be active at one time. An active target indicates that
For instance, if you are operating in a graphical environment with
You may wish to take a look at the dependencies of the target you are isolating before performing this procedure to ensure that you are not stopping vital services:
When you are satisfied with the units that will be kept alive, you can isolate the target by typing:
For instance, to put the system into rescue (single-user) mode, you can just use the
This will provide the additional functionality of alerting all logged in users about the event.
To initiate a full shutdown, you can use the
A restart can be started with the
These all alert logged in users that the event is occurring, something that simply running or isolating the target will not do. Note that most machines will link the shorter, more conventional commands for these operations so that they work properly with
For example, to reboot the system, you can usually type:
systemctl command, which is the central management tool for controlling the init system. We will cover how to manage services, check statuses, change system states, and work with the configuration files.Service Management
The fundamental purpose of an init system is to initialize the components that must be started after the Linux kernel is booted (traditionally known as "userland" components). The init system is also used to manage services and daemons for the server at any point while the system is running. With that in mind, we will start with some simple service management operations.
In
systemd, the target of most actions are "units", which are resources that systemd knows how to manage. Units are categorized by the type of resource they represent and they are defined with files known as unit files. The type of each unit can be inferred from the suffix on the end of the file.For service management tasks, the target unit will be service units, which have unit files with a suffix of
.service. However, for most service management commands, you can actually leave off the .servicesuffix, as systemd is smart enough to know that you probably want to operate on a service when using service management commands.Starting and Stopping Services
To start a
systemd service, executing instructions in the service's unit file, use the start command. If you are running as a non-root user, you will have to use sudo since this will affect the state of the operating system:sudo systemctl start application.service
As we mentioned above,
systemd knows to look for *.service files for service management commands, so the command could just as easily be typed like this:sudo systemctl start application
Although you may use the above format for general administration, for clarity, we will use the
.servicesuffix for the remainder of the commands to be explicit about the target we are operating on.To stop a currently running service, you can use the
stop command instead:sudo systemctl stop application.service
Restarting and Reloading
To restart a running service, you can use the
restart command:sudo systemctl restart application.service
If the application in question is able to reload its configuration files (without restarting), you can issue the
reload command to initiate that process:sudo systemctl reload application.service
If you are unsure whether the service has the functionality to reload its configuration, you can issue the
reload-or-restart command. This will reload the configuration in-place if available.Otherwise, it will restart the service so the new configuration is picked up:
sudo systemctl reload-or-restart application.service
Enabling and Disabling Services
The above commands are useful for starting or stopping commands during the current session. To tell
systemd to start services automatically at boot, you must enable them.To start a service at boot, use the
enable command:sudo systemctl enable application.service
This will create a symbolic link from the system's copy of the service file (usually in
/lib/systemd/systemor /etc/systemd/system) into the location on disk where systemd looks for autostart files (usually/etc/systemd/system/some_target.target.wants. We will go over what a target is later in this guide).To disable the service from starting automatically, you can type:
sudo systemctl disable application.service
This will remove the symbolic link that indicated that the service should be started automatically.
Keep in mind that enabling a service does not start it in the current session. If you wish to start the service and enable it at boot, you will have to issue both the
start and enable commands.Checking the Status of Services
To check the status of a service on your system, you can use the
status command:systemctl status application.service
This will provide you with the service state, the cgroup hierarchy, and the first few log lines.
For instance, when checking the status of an Nginx server, you may see output like this:
● nginx.service - A high performance web server and a reverse proxy server
   Loaded: loaded (/usr/lib/systemd/system/nginx.service; enabled; vendor preset: disabled)
   Active: active (running) since Tue 2015-01-27 19:41:23 EST; 22h ago
 Main PID: 495 (nginx)
   CGroup: /system.slice/nginx.service
├─495 nginx: master process /usr/bin/nginx -g pid /run/nginx.pid; error_log stderr;
└─496 nginx: worker process

Jan 27 19:41:23 desktop systemd[1]: Starting A high performance web server and a reverse proxy server...
Jan 27 19:41:23 desktop systemd[1]: Started A high performance web server and a reverse proxy server.
This gives you a nice overview of the current status of the application, notifying you of any problems and any actions that may be required.
There are also methods for checking for specific states. For instance, to check to see if a unit is currently active (running), you can use the
is-active command:systemctl is-active application.service
This will return the current unit state, which is usually
active or inactive. The exit code will be "0" if it is active, making the result simpler to parse programatically.To see if the unit is enabled, you can use the
is-enabled command:systemctl is-enabled application.service
This will output whether the service is
enabled or disabled and will again set the exit code to "0" or "1" depending on the answer to the command question.A third check is whether the unit is in a failed state. This indicates that there was a problem starting the unit in question:
systemctl is-failed application.service
This will return
active if it is running properly or failed if an error occurred. If the unit was intentionally stopped, it may return unknown or inactive. An exit status of "0" indicates that a failure occurred and an exit status of "1" indicates any other status.System State Overview
The commands so far have been useful for managing single services, but they are not very helpful for exploring the current state of the system. There are a number of
systemctl commands that provide this information.Listing Current Units
To see a list of all of the active units that
systemd knows about, we can use the list-units command:systemctl list-units
This will show you a list of all of the units that
systemd currently has active on the system. The output will look something like this:UNIT LOAD ACTIVE SUB DESCRIPTION
atd.service loaded active running ATD daemon
avahi-daemon.service loaded active running Avahi mDNS/DNS-SD Stack
dbus.service loaded active running D-Bus System Message Bus
dcron.service loaded active running Periodic Command Scheduler
dkms.service loaded active exited Dynamic Kernel Modules System
getty@tty1.service loaded active running Getty on tty1
. . .
The output has the following columns:
- UNIT: The
systemdunit name - LOAD: Whether the unit's configuration has been parsed by
systemd. The configuration of loaded units is kept in memory. - ACTIVE: A summary state about whether the unit is active. This is usually a fairly basic way to tell if the unit has started successfully or not.
- SUB: This is a lower-level state that indicates more detailed information about the unit. This often varies by unit type, state, and the actual method in which the unit runs.
- DESCRIPTION: A short textual description of what the unit is/does.
Since the
list-units command shows only active units by default, all of the entries above will show "loaded" in the LOAD column and "active" in the ACTIVE column. This display is actually the default behavior of systemctl when called without additional commands, so you will see the same thing if you call systemctl with no arguments:systemctl
We can tell
systemctl to output different information by adding additional flags. For instance, to see all of the units that systemd has loaded (or attempted to load), regardless of whether they are currently active, you can use the --all flag, like this:systemctl list-units --all
This will show any unit that
systemd loaded or attempted to load, regardless of its current state on the system. Some units become inactive after running, and some units that systemd attempted to load may have not been found on disk.You can use other flags to filter these results. For example, we can use the
--state= flag to indicate the LOAD, ACTIVE, or SUB states that we wish to see. You will have to keep the --all flag so thatsystemctl allows non-active units to be displayed:systemctl list-units --all --state=inactive
Another common filter is the
--type= filter. We can tell systemctl to only display units of the type we are interested in. For example, to see only active service units, we can use:systemctl list-units --type=service
Listing All Unit Files
The
list-units command only displays units that systemd has attempted to parse and load into memory. Since systemd will only read units that it thinks it needs, this will not necessarily include all of the available units on the system. To see every available unit file within the systemd paths, including those that systemd has not attempted to load, you can use the list-unit-files command instead:systemctl list-unit-files
Units are representations of resources that
systemd knows about. Since systemd has not necessarily read all of the unit definitions in this view, it only presents information about the files themselves. The output has two columns: the unit file and the state.UNIT FILE STATE
proc-sys-fs-binfmt_misc.automount static
dev-hugepages.mount static
dev-mqueue.mount static
proc-fs-nfsd.mount static
proc-sys-fs-binfmt_misc.mount static
sys-fs-fuse-connections.mount static
sys-kernel-config.mount static
sys-kernel-debug.mount static
tmp.mount static
var-lib-nfs-rpc_pipefs.mount static
org.cups.cupsd.path enabled
. . .
The state will usually be "enabled", "disabled", "static", or "masked". In this context, static means that the unit file does not contain an "install" section, which is used to enable a unit. As such, these units cannot be enabled. Usually, this means that the unit performs a one-off action or is used only as a dependency of another unit and should not be run by itself.
We will cover what "masked" means momentarily.
Unit Management
So far, we have been working with services and displaying information about the unit and unit files that
systemd knows about. However, we can find out more specific information about units using some additional commands.Displaying a Unit File
To display the unit file that
systemd has loaded into its system, you can use the cat command (this was added in systemd version 209). For instance, to see the unit file of the atd scheduling daemon, we could type:systemctl cat atd.service
[Unit]
Description=ATD daemon

[Service]
Type=forking
ExecStart=/usr/bin/atd

[Install]
WantedBy=multi-user.target
The output is the unit file as known to the currently running
systemd process. This can be important if you have modified unit files recently or if you are overriding certain options in a unit file fragment (we will cover this later).Displaying Dependencies
To see a unit's dependency tree, you can use the
list-dependencies command:systemctl list-dependencies sshd.service
This will display a hierarchy mapping the dependencies that must be dealt with in order to start the unit in question. Dependencies, in this context, include those units that are either required by or wanted by the units above it.
sshd.service
├─system.slice
└─basic.target
├─microcode.service
├─rhel-autorelabel-mark.service
├─rhel-autorelabel.service
├─rhel-configure.service
├─rhel-dmesg.service
├─rhel-loadmodules.service
├─paths.target
├─slices.target

. . .
The recursive dependencies are only displayed for
.target units, which indicate system states. To recursively list all dependencies, include the --all flag.To show reverse dependencies (units that depend on the specified unit), you can add the
--reverse flag to the command. Other flags that are useful are the --before and --after flags, which can be used to show units that depend on the specified unit starting before and after themselves, respectively.Checking Unit Properties
To see the low-level properties of a unit, you can use the
show command. This will display a list of properties that are set for the specified unit using a key=value format:systemctl show sshd.service
Id=sshd.service
Names=sshd.service
Requires=basic.target
Wants=system.slice
WantedBy=multi-user.target
Conflicts=shutdown.target
Before=shutdown.target multi-user.target
After=syslog.target network.target auditd.service systemd-journald.socket basic.target system.slice
Description=OpenSSH server daemon

. . .
If you want to display a single property, you can pass the
-p flag with the property name. For instance, to see the conflicts that the sshd.service unit has, you can type:systemctl show sshd.service -p Conflicts
Conflicts=shutdown.target
Masking and Unmasking Units
We saw in the service management section how to stop or disable a service, but
systemd also has the ability to mark a unit as completely unstartable, automatically or manually, by linking it to /dev/null. This is called masking the unit, and is possible with the mask command:sudo systemctl mask nginx.service
This will prevent the Nginx service from being started, automatically or manually, for as long as it is masked.
If you check the
list-unit-files, you will see the service is now listed as masked:systemctl list-unit-files
. . .

kmod-static-nodes.service              static
ldconfig.service                       static
mandb.service                          static
messagebus.service                     static
nginx.service                          masked
quotaon.service                        static
rc-local.service                       static
rdisc.service                          disabled
rescue.service                         static

. . .
If you attempt to start the service, you will see a message like this:
sudo systemctl start nginx.service
Failed to start nginx.service: Unit nginx.service is masked.
To unmask a unit, making it available for use again, simply use the
unmask command:sudo systemctl unmask nginx.service
This will return the unit to its previous state, allowing it to be started or enabled.
Editing Unit Files
While the specific format for unit files is outside of the scope of this tutorial,
systemctl provides builtin mechanisms for editing and modifying unit files if you need to make adjustments. This functionality was added in systemd version 218.The
edit command, by default, will open a unit file snippet for the unit in question:sudo systemctl edit nginx.service
This will be a blank file that can be used to override or add directives to the unit definition. A directory will be created within the
/etc/systemd/system directory which contains the name of the unit with .dappended. For instance, for the nginx.service, a directory called nginx.service.d will be created.Within this directory, a snippet will be created called
override.conf. When the unit is loaded, systemdwill, in memory, merge the override snippet with the full unit file. The snippet's directives will take precedence over those found in the original unit file.If you wish to edit the full unit file instead of creating a snippet, you can pass the
--full flag:sudo systemctl edit --full nginx.service
This will load the current unit file into the editor, where it can be modified. When the editor exits, the changed file will be written to
/etc/systemd/system, which will take precedence over the system's unit definition (usually found somewhere in /lib/systemd/system).To remove any additions you have made, either delete the unit's
.d configuration directory or the modified service file from /etc/systemd/system. For instance, to remove a snippet, we could type:sudo rm -r /etc/systemd/system/nginx.service.d
To remove a full modified unit file, we would type:
sudo rm /etc/systemd/system/nginx.service
After deleting the file or directory, you should reload the
systemd process so that it no longer attempts to reference these files and reverts back to using the system copies. You can do this by typing:sudo systemctl daemon-reload
Adjusting the System State (Runlevel) with Targets
Targets are special unit files that describe a system state or synchronization point. Like other units, the files that define targets can be identified by their suffix, which in this case is
.target. Targets do not do much themselves, but are instead used to group other units together.This can be used in order to bring the system to certain states, much like other init systems use runlevels. They are used as a reference for when certain functions are available, allowing you to specify the desired state instead of the individual units needed to produce that state.
For instance, there is a
swap.target that is used to indicate that swap is ready for use. Units that are part of this process can sync with this target by indicating in their configuration that they are WantedBy= orRequiredBy= the swap.target. Units that require swap to be available can specify this condition using the Wants=, Requires=, and After= specifications to indicate the nature of their relationship.Getting and Setting the Default Target
The
systemd process has a default target that it uses when booting the system. Satisfying the cascade of dependencies from that single target will bring the system into the desired state. To find the default target for your system, type:systemctl get-default
multi-user.target
If you wish to set a different default target, you can use the
set-default. For instance, if you have a graphical desktop installed and you wish for the system to boot into that by default, you can change your default target accordingly:sudo systemctl set-default graphical.target
Listing Available Targets
You can get a list of the available targets on your system by typing:
systemctl list-unit-files --type=target
Unlike runlevels, multiple targets can be active at one time. An active target indicates that
systemd has attempted to start all of the units tied to the target and has not tried to tear them down again. To see all of the active targets, type:systemctl list-units --type=target
Isolating Targets
It is possible to start all of the units associated with a target and stop all units that are not part of the dependency tree. The command that we need to do this is called, appropriately,
isolate. This is similar to changing the runlevel in other init systems.For instance, if you are operating in a graphical environment with
graphical.target active, you can shut down the graphical system and put the system into a multi-user command line state by isolating themulti-user.target. Since graphical.target depends on multi-user.target but not the other way around, all of the graphical units will be stopped.You may wish to take a look at the dependencies of the target you are isolating before performing this procedure to ensure that you are not stopping vital services:
systemctl list-dependencies multi-user.target
When you are satisfied with the units that will be kept alive, you can isolate the target by typing:
sudo systemctl isolate multi-user.target
Using Shortcuts for Important Events
There are targets defined for important events like powering off or rebooting. However,
systemctl also has some shortcuts that add a bit of additional functionality.For instance, to put the system into rescue (single-user) mode, you can just use the
rescue command instead of isolate rescue.target:sudo systemctl rescue
This will provide the additional functionality of alerting all logged in users about the event.
To halt the system, you can use the
halt command:sudo systemctl halt
To initiate a full shutdown, you can use the
poweroff command:sudo systemctl poweroff
A restart can be started with the
reboot command:sudo systemctl reboot
These all alert logged in users that the event is occurring, something that simply running or isolating the target will not do. Note that most machines will link the shorter, more conventional commands for these operations so that they work properly with
systemd.For example, to reboot the system, you can usually type:
sudo reboot
Conclusion
By now, you should be familiar with some of the basic capabilities of the
systemctl command that allow you to interact with and control your systemd instance. The systemctl utility will be your main point of interaction for service and system state management.While
Because of this, before we get started with the journal, we will make sure the timezone is set up correctly. The
First, see what timezones are available with the
This will list the timezones available on your system. When you find the one that matches the location of your server, you can set it by using the
To ensure that your machine is using the correct time now, use the
The first line should display the correct time.
You may notice that all of the timestamps being displayed are local time. This is available for every log entry now that we have our local time set correctly on our system. All of the logs are displayed using this new information.
If you want to display the timestamps in UTC, you can use the
This will help you identify and manage information that is pertinent to your current environment.
In cases where you aren't using this feature and are displaying more than one day of boots, you will see that
Or you can edit the journal configuration file:
Under the
When saving previous boots is enabled on your server,
This will display a line for each boot. The first column is the offset for the boot that can be used to easily reference the boot with
To display information from these boots, you can use information from either the first or second column.
For instance, to see the journal from the previous boot, use the
You can also use the boot ID to call back the data from a boot:
You can filter by arbitrary time limits using the
The time values can come in a variety of formats. For absolute time values, you should use the following format:
For instance, we can see all of the entries since January 10th, 2015 at 5:15 PM by typing:
If components of the above format are left off, some defaults will be applied. For instance, if the date is omitted, the current date will be assumed. If the time component is missing, "00:00:00" (midnight) will be substituted. The seconds field can be left off as well to default to "00":
The journal also understands some relative values and named shortcuts. For instance, you can use the words "yesterday", "today", "tomorrow", or "now". You do relative times by prepending "-" or "+" to a numbered value or using words like "ago" in a sentence construction.
To get the data from yesterday, you could type:
If you received reports of a service interruption starting at 9:00 AM and continuing until an hour ago, you could type:
As you can see, it's relatively easy to define flexible windows of time to filter the entries you wish to see.
For instance, to see all of the logs from an Nginx unit on our system, we can type:
Typically, you would probably want to filter by time as well in order to display the lines you are interested in. For instance, to check on how the service is running today, you can type:
This type of focus becomes extremely helpful when you take advantage of the journal's ability to interleave records from various units. For instance, if your Nginx process is connected to a PHP-FPM unit to process dynamic content, you can merge the entries from both in chronological order by specifying both units:
This can make it much easier to spot the interactions between different programs and debug systems instead of individual processes.
To do this we can filter by specifying the
At other times, you may wish to show all of the entries logged from a specific user or group. This can be done with the
Afterwards, you can use the ID that was returned to filter the journal results:
The
The leading underscore indicates that the
We will be discussing some of these in this guide. For now though, we will go over one more useful option having to do with filtering by these fields. The
For instance, to see which group IDs the
This will show you all of the values that the journal has stored for the group ID field. This can help you construct your filters.
If the path leads to an executable,
Usually, if a unit is available for the executable, that method is cleaner and provides better info (entries from associated child processes, etc). Sometimes, however, this is not possible.
To display only these messages, we can add the
By default, this will display the kernel messages from the current boot. You can specify an alternative boot using the normal boot selection flags discussed previously. For instance, to get the messages from five boots ago, you could type:
You can use
For instance, to show only entries logged at the error level or above, you can type:
This will show you all messages marked as error, critical, alert, or emergency. The journal implements the standard
By default,
If you'd rather have the output truncated, inserting an ellipsis where information has been removed, you can use the
You can also go in the opposite direction with this and tell
For instance, you can output the journal entries in JSON by typing:
You can specify the number of entries you'd like to see with a number after the
If you use the
Another way that you can shrink the journal is providing a cutoff time with the
For instance, to keep entries from the last year, you can type:
The following items can be used to limit the journal growth:
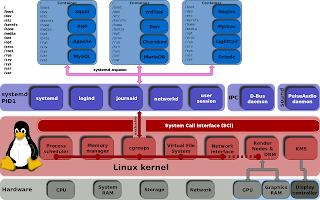
systemctl operates mainly with the core systemd process, there are other components to thesystemd ecosystem that are controlled by other utilities. Other capabilities, like log management and user sessions are handled by separate daemons and management utilities (journald/journalctl andlogind/loginctl respectively). Taking time to become familiar with these other tools and daemons will make management an easier task.How To Use Journalctl to View and Manipulate Systemd Logs
Introduction
Some of the most compelling advantages of
systemd are those involved with process and system logging. When using other tools, logs are usually dispersed throughout the system, handled by different daemons and processes, and can be fairly difficult to interpret when they span multiple applications.Systemd attempts to address these issues by providing a centralized management solution for logging all kernel and userland processes. The system that collects and manages these logs is known as the journal.The journal is implemented with the
journald daemon, which handles all of the messages produced by the kernel, initrd, services, etc. In this guide, we will discuss how to use the journalctl utility, which can be used to access and manipulate the data held within the journal.General Idea
One of the impetuses behind the
systemd journal is to centralize the management of logs regardless of where the messages are originating. Since much of the boot process and service management is handled by the systemd process, it makes sense to standardize the way that logs are collected and accessed. Thejournald daemon collects data from all available sources and stores them in a binary format for easy and dynamic manipulation.This gives us a number of significant advantages. By interacting with the data using a single utility, administrators are able to dynamically display log data according to their needs. This can be as simple as viewing the boot data from three boots ago, or combining the log entries sequentially from two related services to debug a communication issue.
Storing the log data in a binary format also means that the data can be displayed in arbitrary output formats depending on what you need at the moment. For instance, for daily log management you may be used to viewing the logs in the standard
syslog format, but if you decide to graph service interruptions later on, you can output each entry as a JSON object to make it consumable to your graphing service. Since the data is not written to disk in plain text, no conversion is needed when you need a different on-demand format.The
systemd journal can either be used with an existing syslog implementation, or it can replace thesyslog functionality, depending on your needs. While the systemd journal will cover most administrator's logging needs, it can also complement existing logging mechanisms. For instance, you may have a centralized syslog server that you use to compile data from multiple servers, but you also may wish to interleave the logs from multiple services on a single system with the systemd journal. You can do both of these by combining these technologies.Setting the System Time
One of the benefits of using a binary journal for logging is the ability to view log records in UTC or local time at will. By default,
systemd will display results in local time.Because of this, before we get started with the journal, we will make sure the timezone is set up correctly. The
systemd suite actually comes with a tool called timedatectl that can help with this.First, see what timezones are available with the
list-timezones option:timedatectl list-timezones
This will list the timezones available on your system. When you find the one that matches the location of your server, you can set it by using the
set-timezone option:sudo timedatectl set-timezone zone
To ensure that your machine is using the correct time now, use the
timedatectl command alone, or with the status option. The display will be the same:timedatectl status
Local time: Thu 2015-02-05 14:08:06 EST
  Universal time: Thu 2015-02-05 19:08:06 UTC
        RTC time: Thu 2015-02-05 19:08:06
       Time zone: America/New_York (EST, -0500)
     NTP enabled: no
NTP synchronized: no
 RTC in local TZ: no
      DST active: n/a
The first line should display the correct time.
Basic Log Viewing
To see the logs that the
journald daemon has collected, use the journalctl command.When used alone, every journal entry that is in the system will be displayed within a pager (usually
less) for you to browse. The oldest entries will be up top:journalctl
-- Logs begin at Tue 2015-02-03 21:48:52 UTC, end at Tue 2015-02-03 22:29:38 UTC. --
Feb 03 21:48:52 localhost.localdomain systemd-journal[243]: Runtime journal is using 6.2M (max allowed 49.
Feb 03 21:48:52 localhost.localdomain systemd-journal[243]: Runtime journal is using 6.2M (max allowed 49.
Feb 03 21:48:52 localhost.localdomain systemd-journald[139]: Received SIGTERM from PID 1 (systemd).
Feb 03 21:48:52 localhost.localdomain kernel: audit: type=1404 audit(1423000132.274:2): enforcing=1 old_en
Feb 03 21:48:52 localhost.localdomain kernel: SELinux: 2048 avtab hash slots, 104131 rules.
Feb 03 21:48:52 localhost.localdomain kernel: SELinux: 2048 avtab hash slots, 104131 rules.
Feb 03 21:48:52 localhost.localdomain kernel: input: ImExPS/2 Generic Explorer Mouse as /devices/platform/
Feb 03 21:48:52 localhost.localdomain kernel: SELinux:  8 users, 102 roles, 4976 types, 294 bools, 1 sens,
Feb 03 21:48:52 localhost.localdomain kernel: SELinux:  83 classes, 104131 rules

. . .
You will likely have pages and pages of data to scroll through, which can be tens or hundreds of thousands of lines long if
systemd has been on your system for a long while. This demonstrates how much data is available in the journal database.The format will be familiar to those who are used to standard
syslog logging. However, this actually collects data from more sources than traditional syslog implementations are capable of. It includes logs from the early boot process, the kernel, the initrd, and application standard error and out. These are all available in the journal.You may notice that all of the timestamps being displayed are local time. This is available for every log entry now that we have our local time set correctly on our system. All of the logs are displayed using this new information.
If you want to display the timestamps in UTC, you can use the
--utc flag:journalctl --utc
Journal Filtering by Time
While having access to such a large collection of data is definitely useful, such a large amount of information can be difficult or impossible to inspect and process mentally. Because of this, one of the most important features of
journalctl is its filtering options.Displaying Logs from the Current Boot
The most basic of these which you might use daily, is the
-b flag. This will show you all of the journal entries that have been collected since the most recent reboot.journalctl -b
This will help you identify and manage information that is pertinent to your current environment.
In cases where you aren't using this feature and are displaying more than one day of boots, you will see that
journalctl has inserted a line that looks like this whenever the system went down:. . .
-- Reboot --
. . .
This can be used to help you logically separate the information into boot sessions.
Past Boots
While you will commonly want to display the information from the current boot, there are certainly times when past boots would be helpful as well. The journal can save information from many previous boots, so
journalctl can be made to display information easily.Some distributions enable saving previous boot information by default, while others disable this feature. To enable persistent boot information, you can either create the directory to store the journal by typing:
- sudo mkdir -p /var/log/journal
Or you can edit the journal configuration file:
- sudo nano /etc/systemd/journald.conf
Under the
[Journal] section, set the Storage= option to "persistent" to enable persistent logging:/etc/systemd/journald.conf
. . .
[Journal]
Storage=persistent
When saving previous boots is enabled on your server,
journalctl provides some commands to help you work with boots as a unit of division. To see the boots that journald knows about, use the --list-boots option with journalctl:journalctl --list-boots
-2 caf0524a1d394ce0bdbcff75b94444fe Tue 2015-02-03 21:48:52 UTC—Tue 2015-02-03 22:17:00 UTC
-1 13883d180dc0420db0abcb5fa26d6198 Tue 2015-02-03 22:17:03 UTC—Tue 2015-02-03 22:19:08 UTC
 0 bed718b17a73415fade0e4e7f4bea609 Tue 2015-02-03 22:19:12 UTC—Tue 2015-02-03 23:01:01 UTC
This will display a line for each boot. The first column is the offset for the boot that can be used to easily reference the boot with
journalctl. If you need an absolute reference, the boot ID is in the second column. You can tell the time that the boot session refers to with the two time specifications listed towards the end.To display information from these boots, you can use information from either the first or second column.
For instance, to see the journal from the previous boot, use the
-1 relative pointer with the -b flag:journalctl -b -1
You can also use the boot ID to call back the data from a boot:
journalctl -b caf0524a1d394ce0bdbcff75b94444feTime Windows
While seeing log entries by boot is incredibly useful, often you may wish to request windows of time that do not align well with system boots. This may be especially true when dealing with long-running servers with significant uptime.
You can filter by arbitrary time limits using the
--since and --until options, which restrict the entries displayed to those after or before the given time, respectively.The time values can come in a variety of formats. For absolute time values, you should use the following format:
YYYY-MM-DD HH:MM:SS
For instance, we can see all of the entries since January 10th, 2015 at 5:15 PM by typing:
journalctl --since "2015-01-10 17:15:00"
If components of the above format are left off, some defaults will be applied. For instance, if the date is omitted, the current date will be assumed. If the time component is missing, "00:00:00" (midnight) will be substituted. The seconds field can be left off as well to default to "00":
journalctl --since "2015-01-10" --until "2015-01-11 03:00"
The journal also understands some relative values and named shortcuts. For instance, you can use the words "yesterday", "today", "tomorrow", or "now". You do relative times by prepending "-" or "+" to a numbered value or using words like "ago" in a sentence construction.
To get the data from yesterday, you could type:
journalctl --since yesterday
If you received reports of a service interruption starting at 9:00 AM and continuing until an hour ago, you could type:
journalctl --since 09:00 --until "1 hour ago"
As you can see, it's relatively easy to define flexible windows of time to filter the entries you wish to see.
Filtering by Message Interest
We learned above some ways that you can filter the journal data using time constraints. In this section we'll discuss how to filter based on what service or component you are interested in. The
systemd journal provides a variety of ways of doing this.By Unit
Perhaps the most useful way of filtering is by the unit you are interested in. We can use the
-u option to filter in this way.For instance, to see all of the logs from an Nginx unit on our system, we can type:
journalctl -u nginx.service
Typically, you would probably want to filter by time as well in order to display the lines you are interested in. For instance, to check on how the service is running today, you can type:
journalctl -u nginx.service --since today
This type of focus becomes extremely helpful when you take advantage of the journal's ability to interleave records from various units. For instance, if your Nginx process is connected to a PHP-FPM unit to process dynamic content, you can merge the entries from both in chronological order by specifying both units:
journalctl -u nginx.service -u php-fpm.service --since today
This can make it much easier to spot the interactions between different programs and debug systems instead of individual processes.
By Process, User, or Group ID
Some services spawn a variety of child processes to do work. If you have scouted out the exact PID of the process you are interested in, you can filter by that as well.
To do this we can filter by specifying the
_PID field. For instance if the PID we're interested in is 8088, we could type:journalctl _PID=8088
At other times, you may wish to show all of the entries logged from a specific user or group. This can be done with the
_UID or _GID filters. For instance, if your web server runs under the www-data user, you can find the user ID by typing:id -u www-data
33
Afterwards, you can use the ID that was returned to filter the journal results:
journalctl _UID=33 --since today
The
systemd journal has many fields that can be used for filtering. Some of those are passed from the process being logged and some are applied by journald using information it gathers from the system at the time of the log.The leading underscore indicates that the
_PID field is of the latter type. The journal automatically records and indexes the PID of the process that is logging for later filtering. You can find out about all of the available journal fields by typing:man systemd.journal-fields
We will be discussing some of these in this guide. For now though, we will go over one more useful option having to do with filtering by these fields. The
-F option can be used to show all of the available values for a given journal field.For instance, to see which group IDs the
systemd journal has entries for, you can type:journalctl -F _GID
32
99
102
133
81
84
100
0
124
87
This will show you all of the values that the journal has stored for the group ID field. This can help you construct your filters.
By Component Path
We can also filter by providing a path location.
If the path leads to an executable,
journalctl will display all of the entries that involve the executable in question. For instance, to find those entries that involve the bash executable, you can type:journalctl /usr/bin/bash
Usually, if a unit is available for the executable, that method is cleaner and provides better info (entries from associated child processes, etc). Sometimes, however, this is not possible.
Displaying Kernel Messages
Kernel messages, those usually found in
dmesg output, can be retrieved from the journal as well.To display only these messages, we can add the
-k or --dmesg flags to our command:journalctl -k
By default, this will display the kernel messages from the current boot. You can specify an alternative boot using the normal boot selection flags discussed previously. For instance, to get the messages from five boots ago, you could type:
journalctl -k -b -5
By Priority
One filter that system administrators often are interested in is the message priority. While it is often useful to log information at a very verbose level, when actually digesting the available information, low priority logs can be distracting and confusing.
You can use
journalctl to display only messages of a specified priority or above by using the -poption. This allows you to filter out lower priority messages.For instance, to show only entries logged at the error level or above, you can type:
journalctl -p err -b
This will show you all messages marked as error, critical, alert, or emergency. The journal implements the standard
syslog message levels. You can use either the priority name or its corresponding numeric value. In order of highest to lowest priority, these are:- 0: emerg
- 1: alert
- 2: crit
- 3: err
- 4: warning
- 5: notice
- 6: info
- 7: debug
The above numbers or names can be used interchangeably with the
-p option. Selecting a priority will display messages marked at the specified level and those above it.Modifying the Journal Display
Above, we demonstrated entry selection through filtering. There are other ways we can modify the output though. We can adjust the
journalctl display to fit various needs.Truncate or Expand Output
We can adjust how
journalctl displays data by telling it to shrink or expand the output.By default,
journalctl will show the entire entry in the pager, allowing the entries to trail off to the right of the screen. This info can be accessed by pressing the right arrow key.If you'd rather have the output truncated, inserting an ellipsis where information has been removed, you can use the
--no-full option:journalctl --no-full
. . .

Feb 04 20:54:13 journalme sshd[937]: Failed password for root from 83.234.207.60...h2
Feb 04 20:54:13 journalme sshd[937]: Connection closed by 83.234.207.60 [preauth]
Feb 04 20:54:13 journalme sshd[937]: PAM 2 more authentication failures; logname...ot
You can also go in the opposite direction with this and tell
journalctl to display all of its information, regardless of whether it includes unprintable characters. We can do this with the -a flag:journalctl -a
Output to Standard Out
By default,
journalctl displays output in a pager for easier consumption. If you are planning on processing the data with text manipulation tools, however, you probably want to be able to output to standard output.You can do this with the
--no-pager option:journalclt --no-pager
This can be piped immediately into a processing utility or redirected into a file on disk, depending on your needs.
Output Formats
If you are processing journal entries, as mentioned above, you most likely will have an easier time parsing the data if it is in a more consumable format. Luckily, the journal can be displayed in a variety of formats as needed. You can do this using the
-o option with a format specifier.For instance, you can output the journal entries in JSON by typing:
journalctl -b -u nginx -o json
{ "__CURSOR" : "s=13a21661cf4948289c63075db6c25c00;i=116f1;b=81b58db8fd9046ab9f847ddb82a2fa2d;m=19f0daa;t=50e33c33587ae;x=e307daadb4858635", "__REALTIME_TIMESTAMP" : "1422990364739502", "__MONOTONIC_TIMESTAMP" : "27200938", "_BOOT_ID" : "81b58db8fd9046ab9f847ddb82a2fa2d", "PRIORITY" : "6", "_UID" : "0", "_GID" : "0", "_CAP_EFFECTIVE" : "3fffffffff", "_MACHINE_ID" : "752737531a9d1a9c1e3cb52a4ab967ee", "_HOSTNAME" : "desktop", "SYSLOG_FACILITY" : "3", "CODE_FILE" : "src/core/unit.c", "CODE_LINE" : "1402", "CODE_FUNCTION" : "unit_status_log_starting_stopping_reloading", "SYSLOG_IDENTIFIER" : "systemd", "MESSAGE_ID" : "7d4958e842da4a758f6c1cdc7b36dcc5", "_TRANSPORT" : "journal", "_PID" : "1", "_COMM" : "systemd", "_EXE" : "/usr/lib/systemd/systemd", "_CMDLINE" : "/usr/lib/systemd/systemd", "_SYSTEMD_CGROUP" : "/", "UNIT" : "nginx.service", "MESSAGE" : "Starting A high performance web server and a reverse proxy server...", "_SOURCE_REALTIME_TIMESTAMP" : "1422990364737973" }

. . .
This is useful for parsing with utilities. You could use the
json-pretty format to get a better handle on the data structure before passing it off to the JSON consumer:journalctl -b -u nginx -o json-pretty
{
"__CURSOR" : "s=13a21661cf4948289c63075db6c25c00;i=116f1;b=81b58db8fd9046ab9f847ddb82a2fa2d;m=19f0daa;t=50e33c33587ae;x=e307daadb4858635",
"__REALTIME_TIMESTAMP" : "1422990364739502",
"__MONOTONIC_TIMESTAMP" : "27200938",
"_BOOT_ID" : "81b58db8fd9046ab9f847ddb82a2fa2d",
"PRIORITY" : "6",
"_UID" : "0",
"_GID" : "0",
"_CAP_EFFECTIVE" : "3fffffffff",
"_MACHINE_ID" : "752737531a9d1a9c1e3cb52a4ab967ee",
"_HOSTNAME" : "desktop",
"SYSLOG_FACILITY" : "3",
"CODE_FILE" : "src/core/unit.c",
"CODE_LINE" : "1402",
"CODE_FUNCTION" : "unit_status_log_starting_stopping_reloading",
"SYSLOG_IDENTIFIER" : "systemd",
"MESSAGE_ID" : "7d4958e842da4a758f6c1cdc7b36dcc5",
"_TRANSPORT" : "journal",
"_PID" : "1",
"_COMM" : "systemd",
"_EXE" : "/usr/lib/systemd/systemd",
"_CMDLINE" : "/usr/lib/systemd/systemd",
"_SYSTEMD_CGROUP" : "/",
"UNIT" : "nginx.service",
"MESSAGE" : "Starting A high performance web server and a reverse proxy server...",
"_SOURCE_REALTIME_TIMESTAMP" : "1422990364737973"
}

. . .
The following formats can be used for display:
- cat: Displays only the message field itself.
- export: A binary format suitable for transferring or backing up.
- json: Standard JSON with one entry per line.
- json-pretty: JSON formatted for better human-readability
- json-sse: JSON formatted output wrapped to make add server-sent event compatible
- short: The default
syslogstyle output - short-iso: The default format augmented to show ISO 8601 wallclock timestamps.
- short-monotonic: The default format with monotonic timestamps.
- short-precise: The default format with microsecond precision
- verbose: Shows every journal field available for the entry, including those usually hidden internally.
These options allow you to display the journal entries in the whatever format best suits your current needs.
Active Process Monitoring
The
journalctl command imitates how many administrators use tail for monitoring active or recent activity. This functionality is built into journalctl, allowing you to access these features without having to pipe to another tool.Displaying Recent Logs
To display a set amount of records, you can use the
-n option, which works exactly as tail -n.By default, it will display the most recent 10 entries:
journalctl -n
You can specify the number of entries you'd like to see with a number after the
-n:journalctl -n 20
Following Logs
To actively follow the logs as they are being written, you can use the
-f flag. Again, this works as you might expect if you have experience using tail -f:journalctl -f
Journal Maintenance
You may be wondering about the cost is of storing all of the data we've seen so far. Furthermore, you may be interesting in cleaning up some older logs and freeing up space.
Finding Current Disk Usage
You can find out the amount of space that the journal is currently occupying on disk by using the
--disk-usage flag:journalctl --disk-usage
Journals take up 8.0M on disk.
Deleting Old Logs
If you wish to shrink your journal, you can do that in two different ways (available with
systemd version 218 and later).If you use the
--vacuum-size option, you can shrink your journal by indicating a size. This will remove old entries until the total journal space taken up on disk is at the requested size:sudo journalctl --vacuum-size=1G
Another way that you can shrink the journal is providing a cutoff time with the
--vacuum-time option. Any entries beyond that time are deleted. This allows you to keep the entries that have been created after a specific time.For instance, to keep entries from the last year, you can type:
sudo journalctl --vacuum-time=1years
Limiting Journal Expansion
You can configure your server to place limits on how much space the journal can take up. This can be done by editing the
/etc/systemd/journald.conf file.The following items can be used to limit the journal growth:
SystemMaxUse=: Specifies the maximum disk space that can be used by the journal in persistent storage.SystemKeepFree=: Specifies the amount of space that the journal should leave free when adding journal entries to persistent storage.SystemMaxFileSize=: Controls how large individual journal files can grow to in persistent storage before being rotated.RuntimeMaxUse=: Specifies the maximum disk space that can be used in volatile storage (within the/runfilesystem).RuntimeKeepFree=: Specifies the amount of space to be set aside for other uses when writing data to volatile storage (within the/runfilesystem).RuntimeMaxFileSize=: Specifies the amount of space that an individual journal file can take up in volatile storage (within the/runfilesystem) before being rotated.
By setting these values, you can control how
journald consumes and preserves space on your server.Conclusion
As you can see, the
*
*
*
*
*
*
*
*
*
*
*
In the event of an override file (such as those contained in a
The
In general,
Some common directives in the
Template unit files are, in most ways, no different than regular unit files. However, these provide flexibility in configuring units by allowing certain parts of the file to utilize dynamic information that will be available at runtime.
When an instance is created from a template, an instance identifier is placed between the
An instance file is usually created as a symbolic link to the template file, with the link name including the instance identifier. In this way, multiple links with unique identifiers can point back to a single template file. When managing an instance unit,
systemd journal is incredibly useful for collecting and managing your system and application data. Most of the flexibility comes from the extensive metadata automatically recorded and the centralized nature of the log. The journalctl command makes it easy to take advantage of the advanced features of the journal and to do extensive analysis and relational debugging of different application components.Understanding Systemd Units and Unit Files
Introduction
Increasingly, Linux distributions are adopting or planning to adopt the
systemd init system. This powerful suite of software can manage many aspects of your server, from services to mounted devices and system states.In
systemd, a unit refers to any resource that the system knows how to operate on and manage. This is the primary object that the systemd tools know how to deal with. These resources are defined using configuration files called unit files.In this guide, we will introduce you to the different units that
systemd can handle. We will also be covering some of the many directives that can be used in unit files in order to shape the way these resources are handled on your system.What do Systemd Units Give You?
Units are the objects that
systemd knows how to manage. These are basically a standardized representation of system resources that can be managed by the suite of daemons and manipulated by the provided utilities.Units in some ways can be said to similar to services or jobs in other init systems. However, a unit has a much broader definition, as these can be used to abstract services, network resources, devices, filesystem mounts, and isolated resource pools.
Ideas that in other init systems may be handled with one unified service definition can be broken out into component units according to their focus. This organizes by function and allows you to easily enable, disable, or extend functionality without modifying the core behavior of a unit.
Some features that units are able implement easily are:
- socket-based activation: Sockets associated with a service are best broken out of the daemon itself in order to be handled separately. This provides a number of advantages, such as delaying the start of a service until the associated socket is first accessed. This also allows the system to create all sockets early in the boot process, making it possible to boot the associated services in parallel.
- bus-based activation: Units can also be activated on the bus interface provided by
D-Bus. A unit can be started when an associated bus is published. - path-based activation: A unit can be started based on activity on or the availability of certain filesystem paths. This utilizes
inotify. - device-based activation: Units can also be started at the first availability of associated hardware by leveraging
udevevents. - implicit dependency mapping: Most of the dependency tree for units can be built by
systemditself. You can still add dependency and ordering information, but most of the heavy lifting is taken care of for you. - instances and templates: Template unit files can be used to create multiple instances of the same general unit. This allows for slight variations or sibling units that all provide the same general function.
- easy security hardening: Units can implement some fairly good security features by adding simple directives. For example, you can specify no or read-only access to part of the filesystem, limit kernel capabilities, and assign private
/tmpand network access. - drop-ins and snippets: Units can easily be extended by providing snippets that will override parts of the system's unit file. This makes it easy to switch between vanilla and customized unit implementations.
There are many other advantages that
systemd units have over other init systems' work items, but this should give you an idea of the power that can be leveraged using native configuration directives.Where are Systemd Unit Files Found?
The files that define how
systemd will handle a unit can be found in many different locations, each of which have different priorities and implications.The system's copy of unit files are generally kept in the
/lib/systemd/system directory. When software installs unit files on the system, this is the location where they are placed by default.Unit files stored here are able to be started and stopped on-demand during a session. This will be the generic, vanilla unit file, often written by the upstream project's maintainers that should work on any system that deploys
systemd in its standard implementation. You should not edit files in this directory. Instead you should override the file, if necessary, using another unit file location which will supersede the file in this location.If you wish to modify the way that a unit functions, the best location to do so is within the
/etc/systemd/system directory. Unit files found in this directory location take precedence over any of the other locations on the filesystem. If you need to modify the system's copy of a unit file, putting a replacement in this directory is the safest and most flexible way to do this.If you wish to override only specific directives from the system's unit file, you can actually provide unit file snippets within a subdirectory. These will append or modify the directives of the system's copy, allowing you to specify only the options you want to change.
The correct way to do this is to create a directory named after the unit file with
.d appended on the end. So for a unit called example.service, a subdirectory called example.service.d could be created. Within this directory a file ending with .conf can be used to override or extend the attributes of the system's unit file.There is also a location for run-time unit definitions at
/run/systemd/system. Unit files found in this directory have a priority landing between those in /etc/systemd/system and /lib/systemd/system. Files in this location are given less weight than the former location, but more weight than the latter.The
systemd process itself uses this location for dynamically created unit files created at runtime. This directory can be used to change the system's unit behavior for the duration of the session. All changes made in this directory will be lost when the server is rebooted.Types of Units
Systemd categories units according to the type of resource they describe. The easiest way to determine the type of a unit is with its type suffix, which is appended to the end of the resource name. The following list describes the types of units available to systemd:.service: A service unit describes how to manage a service or application on the server. This will include how to start or stop the service, under which circumstances it should be automatically started, and the dependency and ordering information for related software.*
.socket: A socket unit file describes a network or IPC socket, or a FIFO buffer that systemd uses for socket-based activation. These always have an associated .service file that will be started when activity is seen on the socket that this unit defines.*
.device: A unit that describes a device that has been designated as needing systemd management byudev or the sysfs filesystem. Not all devices will have .device files. Some scenarios where .deviceunits may be necessary are for ordering, mounting, and accessing the devices.*
.mount: This unit defines a mountpoint on the system to be managed by systemd. These are named after the mount path, with slashes changed to dashes. Entries within /etc/fstab can have units created automatically.*
.automount: An .automount unit configures a mountpoint that will be automatically mounted. These must be named after the mount point they refer to and must have a matching .mount unit to define the specifics of the mount.*
.swap: This unit describes swap space on the system. The name of these units must reflect the device or file path of the space.*
.target: A target unit is used to provide synchronization points for other units when booting up or changing states. They also can be used to bring the system to a new state. Other units specify their relation to targets to become tied to the target's operations.*
.path: This unit defines a path that can be used for path-based activation. By default, a .service unit of the same base name will be started when the path reaches the specified state. This uses inotify to monitor the path for changes.*
.timer: A .timer unit defines a timer that will be managed by systemd, similar to a cron job for delayed or scheduled activation. A matching unit will be started when the timer is reached.*
.snapshot: A .snapshot unit is created automatically by the systemctl snapshot command. It allows you to reconstruct the current state of the system after making changes. Snapshots do not survive across sessions and are used to roll back temporary states.*
.slice: A .slice unit is associated with Linux Control Group nodes, allowing resources to be restricted or assigned to any processes associated with the slice. The name reflects its hierarchical position within the cgroup tree. Units are placed in certain slices by default depending on their type.*
.scope: Scope units are created automatically by systemd from information received from its bus interfaces. These are used to manage sets of system processes that are created externally.As you can see, there are many different units that
systemd knows how to manage. Many of the unit types work together to add functionality. For instance, some units are used to trigger other units and provide activation functionality.We will mainly be focusing on
.service units due to their utility and the consistency in which administrators need to managed these units.Anatomy of a Unit File
The internal structure of unit files are organized with sections. Sections are denoted by a pair of square brackets "
[" and "]" with the section name enclosed within. Each section extends until the beginning of the subsequent section or until the end of the file.General Characteristics of Unit Files
Section names are well defined and case-sensitive. So, the section
[Unit] will not be interpreted correctly if it is spelled like [UNIT]. If you need to add non-standard sections to be parsed by applications other than systemd, you can add a X- prefix to the section name.Within these sections, unit behavior and metadata is defined through the use of simple directives using a key-value format with assignment indicated by an equal sign, like this:
[Section]
Directive1=value
Directive2=value

. . .
In the event of an override file (such as those contained in a
unit.type.d directory), directives can be reset by assigning them to an empty string. For example, the system's copy of a unit file may contain a directive set to a value like this:Directive1=default_value
The
default_value can be eliminated in an override file by referencing Directive1 without a value, like this:Directive1=
In general,
systemd allows for easy and flexible configuration. For example, multiple boolean expressions are accepted (1, yes, on, and true for affirmative and 0, no off, and false for the opposite answer). Times can be intelligently parsed, with seconds assumed for unit-less values and combining multiple formats accomplished internally.[Unit] Section Directives
The first section found in most unit files is the
[Unit] section. This is generally used for defining metadata for the unit and configuring the relationship of the unit to other units.Although section order does not matter to
systemd when parsing the file, this section is often placed at the top because it provides an overview of the unit. Some common directives that you will find in the[Unit] section are:Description=: This directive can be used to describe the name and basic functionality of the unit. It is returned by varioussystemdtools, so it is good to set this to something short, specific, and informative.Documentation=: This directive provides a location for a list of URIs for documentation. These can be either internally availablemanpages or web accessible URLs. Thesystemctl statuscommand will expose this information, allowing for easy discoverability.Requires=: This directive lists any units upon which this unit essentially depends. If the current unit is activated, the units listed here must successfully activate as well, else this unit will fail. These units are started in parallel with the current unit by default.Wants=: This directive is similar toRequires=, but less strict.Systemdwill attempt to start any units listed here when this unit is activated. If these units are not found or fail to start, the current unit will continue to function. This is the recommended way to configure most dependency relationships. Again, this implies a parallel activation unless modified by other directives.BindsTo=: This directive is similar toRequires=, but also causes the current unit to stop when the associated unit terminates.Before=: The units listed in this directive will not be started until the current unit is marked as started if they are activated at the same time. This does not imply a dependency relationship and must be used in conjunction with one of the above directives if this is desired.After=: The units listed in this directive will be started before starting the current unit. This does not imply a dependency relationship and one must be established through the above directives if this is required.Conflicts=: This can be used to list units that cannot be run at the same time as the current unit. Starting a unit with this relationship will cause the other units to be stopped.Condition...=: There are a number of directives that start withConditionwhich allow the administrator to test certain conditions prior to starting the unit. This can be used to provide a generic unit file that will only be run when on appropriate systems. If the condition is not met, the unit is gracefully skipped.Assert...=: Similar to the directives that start withCondition, these directives check for different aspects of the running environment to decide whether the unit should activate. However, unlike theConditiondirectives, a negative result causes a failure with this directive.
Using these directives and a handful of others, general information about the unit and its relationship to other units and the operating system can be established.
[Install] Section Directives
On the opposite side of unit file, the last section is often the
[Install] section. This section is optional and is used to define the behavior or a unit if it is enabled or disabled. Enabling a unit marks it to be automatically started at boot. In essence, this is accomplished by latching the unit in question onto another unit that is somewhere in the line of units to be started at boot.Because of this, only units that can be enabled will have this section. The directives within dictate what should happen when the unit is enabled:
WantedBy=: TheWantedBy=directive is the most common way to specify how a unit should be enabled. This directive allows you to specify a dependency relationship in a similar way to theWants=directive does in the[Unit]section. The difference is that this directive is included in the ancillary unit allowing the primary unit listed to remain relatively clean. When a unit with this directive is enabled, a directory will be created within/etc/systemd/systemnamed after the specified unit with.wantsappended to the end. Within this, a symbolic link to the current unit will be created, creating the dependency. For instance, if the current unit hasWantedBy=multi-user.target, a directory calledmulti-user.target.wantswill be created within/etc/systemd/system(if not already available) and a symbolic link to the current unit will be placed within. Disabling this unit removes the link and removes the dependency relationship.RequiredBy=: This directive is very similar to theWantedBy=directive, but instead specifies a required dependency that will cause the activation to fail if not met. When enabled, a unit with this directive will create a directory ending with.requires.Alias=: This directive allows the unit to be enabled under another name as well. Among other uses, this allows multiple providers of a function to be available, so that related units can look for any provider of the common aliased name.Also=: This directive allows units to be enabled or disabled as a set. Supporting units that should always be available when this unit is active can be listed here. They will be managed as a group for installation tasks.DefaultInstance=: For template units (covered later) which can produce unit instances with unpredictable names, this can be used as a fallback value for the name if an appropriate name is not provided.
Unit-Specific Section Directives
Sandwiched between the previous two sections, you will likely find unit type-specific sections. Most unit types offer directives that only apply to their specific type. These are available within sections named after their type. We will cover those briefly here.
The
device, target, snapshot, and scope unit types have no unit-specific directives, and thus have no associated sections for their type.The [Service] Section
The
[Service] section is used to provide configuration that is only applicable for services.One of the basic things that should be specified within the
[Service] section is the Type= of the service. This categorizes services by their process and daemonizing behavior. This is important because it tellssystemd how to correctly manage the servie and find out its state.The
Type= directive can be one of the following:- simple: The main process of the service is specified in the start line. This is the default if the
Type=andBusname=directives are not set, but theExecStart=is set. Any communication should be handled outside of the unit through a second unit of the appropriate type (like through a.socketunit if this unit must communicate using sockets). - forking: This service type is used when the service forks a child process, exiting the parent process almost immediately. This tells
systemdthat the process is still running even though the parent exited. - oneshot: This type indicates that the process will be short-lived and that
systemdshould wait for the process to exit before continuing on with other units. This is the defaultType=andExecStart=are not set. It is used for one-off tasks. - dbus: This indicates that unit will take a name on the D-Bus bus. When this happens,
systemdwill continue to process the next unit. - notify: This indicates that the service will issue a notification when it has finished starting up. The
systemdprocess will wait for this to happen before proceeding to other units. - idle: This indicates that the service will not be run until all jobs are dispatched.
Some additional directives may be needed when using certain service types. For instance:
RemainAfterExit=: This directive is commonly used with theoneshottype. It indicates that the service should be considered active even after the process exits.PIDFile=: If the service type is marked as "forking", this directive is used to set the path of the file that should contain the process ID number of the main child that should be monitored.BusName=: This directive should be set to the D-Bus bus name that the service will attempt to acquire when using the "dbus" service type.NotifyAccess=: This specifies access to the socket that should be used to listen for notifications when the "notify" service type is selected This can be "none", "main", or "all. The default, "none", ignores all status messages. The "main" option will listen to messages from the main process and the "all" option will cause all members of the service's control group to be processed.
So far, we have discussed some pre-requisite information, but we haven't actually defined how to manage our services. The directives to do this are:
ExecStart=: This specifies the full path and the arguments of the command to be executed to start the process. This may only be specified once (except for "oneshot" services). If the path to the command is preceded by a dash "-" character, non-zero exit statuses will be accepted without marking the unit activation as failed.ExecStartPre=: This can be used to provide additional commands that should be executed before the main process is started. This can be used multiple times. Again, commands must specify a full path and they can be preceded by "-" to indicate that the failure of the command will be tolerated.ExecStartPost=: This has the same exact qualities asExecStartPre=except that it specifies commands that will be run after the main process is started.ExecReload=: This optional directive indicates the command necessary to reload the configuration of the service if available.ExecStop=: This indicates the command needed to stop the service. If this is not given, the process will be killed immediately when the service is stopped.ExecStopPost=: This can be used to specify commands to execute following the stop command.RestartSec=: If automatically restarting the service is enabled, this specifies the amount of time to wait before attempting to restart the service.Restart=: This indicates the circumstances under whichsystemdwill attempt to automatically restart the service. This can be set to values like "always", "on-success", "on-failure", "on-abnormal", "on-abort", or "on-watchdog". These will trigger a restart according to the way that the service was stopped.TimeoutSec=: This configures the amount of time thatsystemdwill wait when stopping or stopping the service before marking it as failed or forcefully killing it. You can set separate timeouts withTimeoutStartSec=andTimeoutStopSec=as well.
The [Socket] Section
Socket units are very common in
systemd configurations because many services implement socket-based activation to provide better parallelization and flexibility. Each socket unit must have a matching service unit that will be activated when the socket receives activity.By breaking socket control outside of the service itself, sockets can be initialized early and the associated services can often be started in parallel. By default, the socket name will attempt to start the service of the same name upon receiving a connection. When the service is initialized, the socket will be passed to it, allowing it to begin processing any buffered requests.
To specify the actual socket, these directives are common:
ListenStream=: This defines an address for a stream socket which supports sequential, reliable communication. Services that use TCP should use this socket type.ListenDatagram=: This defines an address for a datagram socket which supports fast, unreliable communication packets. Services that use UDP should set this socket type.ListenSequentialPacket=: This defines an address for sequential, reliable communication with max length datagrams that preserves message boundaries. This is found most often for Unix sockets.ListenFIFO: Along with the other listening types, you can also specify a FIFO buffer instead of a socket.
There are more types of listening directives, but the ones above are the most common.
Other characteristics of the sockets can be controlled through additional directives:
Accept=: This determines whether an additional instance of the service will be started for each connection. If set to false (the default), one instance will handle all connections.SocketUser=: With a Unix socket, specifies the owner of the socket. This will be the root user if left unset.SocketGroup=: With a Unix socket, specifies the group owner of the socket. This will be the root group if neither this or the above are set. If only theSocketUser=is set,systemdwill try to find a matching group.SocketMode=: For Unix sockets or FIFO buffers, this sets the permissions on the created entity.Service=: If the service name does not match the.socketname, the service can be specified with this directive.
The [Mount] Section
Mount units allow for mount point management from within
systemd. Mount points are named after the directory that they control, with a translation algorithm applied.For example, the leading slash is removed, all other slashes are translated into dashes "-", and all dashes and unprintable characters are replaced with C-style escape codes. The result of this translation is used as the mount unit name. Mount units will have an implicit dependency on other mounts above it in the hierarchy.
Mount units are often translated directly from
/etc/fstab files during the boot process. For the unit definitions automatically created and those that you wish to define in a unit file, the following directives are useful:What=: The absolute path to the resource that needs to be mounted.Where=: The absolute path of the mount point where the resource should be mounted. This should be the same as the unit file name, except using conventional filesystem notation.Type=: The filesystem type of the mount.Options=: Any mount options that need to be applied. This is a comma-separated list.SloppyOptions=: A boolean that determines whether the mount will fail if there is an unrecognized mount option.DirectoryMode=: If parent directories need to be created for the mount point, this determines the permission mode of these directories.TimeoutSec=: Configures the amount of time the system will wait until the mount operation is marked as failed.
The [Automount] Section
This unit allows an associated
.mount unit to be automatically mounted at boot. As with the .mount unit, these units must be named after the translated mount point's path.The
[Automount] section is pretty simple, with only the following two options allowed:Where=: The absolute path of the automount point on the filesystem. This will match the filename except that it uses conventional path notation instead of the translation.DirectoryMode=: If the automount point or any parent directories need to be created, this will determine the permissions settings of those path components.
The [Swap] Section
Swap units are used to configure swap space on the system. The units must be named after the swap file or the swap device, using the same filesystem translation that was discussed above.
Like the mount options, the swap units can be automatically created from
/etc/fstab entries, or can be configured through a dedicated unit file.The
[Swap] section of a unit file can contain the following directives for configuration:What=: The absolute path to the location of the swap space, whether this is a file or a device.Priority=: This takes an integer that indicates the priority of the swap being configured.Options=: Any options that are typically set in the/etc/fstabfile can be set with this directive instead. A comma-separated list is used.TimeoutSec=: The amount of time thatsystemdwaits for the swap to be activated before marking the operation as a failure.
The [Path] Section
A path unit defines a filesystem path that
systmed can monitor for changes. Another unit must exist that will be be activated when certain activity is detected at the path location. Path activity is determined thorugh inotify events.The
[Path] section of a unit file can contain the following directives:PathExists=: This directive is used to check whether the path in question exists. If it does, the associated unit is activated.PathExistsGlob=: This is the same as the above, but supports file glob expressions for determining path existence.PathChanged=: This watches the path location for changes. The associated unit is activated if a change is detected when the watched file is closed.PathModified=: This watches for changes like the above directive, but it activates on file writes as well as when the file is closed.DirectoryNotEmpty=: This directive allowssystemdto activate the associated unit when the directory is no longer empty.Unit=: This specifies the unit to activate when the path conditions specified above are met. If this is omitted,systemdwill look for a.servicefile that shares the same base unit name as this unit.MakeDirectory=: This determines ifsystemdwill create the directory structure of the path in question prior to watching.DirectoryMode=: If the above is enabled, this will set the permission mode of any path components that must be created.
The [Timer] Section
Timer units are used to schedule tasks to operate at a specific time or after a certain delay. This unit type replaces or supplements some of the functionality of the
cron and at daemons. An associated unit must be provided which will be activated when the timer is reached.The
[Timer] section of a unit file can contain some of the following directives:OnActiveSec=: This directive allows the associated unit to be activated relative to the.timerunit's activation.OnBootSec=: This directive is used to specify the amount of time after the system is booted when the associated unit should be activated.OnStartupSec=: This directive is similar to the above timer, but in relation to when thesystemdprocess itself was started.OnUnitActiveSec=: This sets a timer according to when the associated unit was last activated.OnUnitInactiveSec=: This sets the timer in relation to when the associated unit was last marked as inactive.OnCalendar=: This allows you to activate the associated unit by specifying an absolute instead of relative to an event.AccuracySec=: This unit is used to set the level of accuracy with which the timer should be adhered to. By default, the associated unit will be activated within one minute of the timer being reached. The value of this directive will determine the upper bounds on the window in whichsystemdschedules the activation to occur.Unit=: This directive is used to specify the unit that should be activated when the timer elapses. If unset,systemdwill look for a.serviceunit with a name that matches this unit.Persistent=: If this is set,systemdwill trigger the associated unit when the timer becomes active if it would have been triggered during the period in which the timer was inactive.WakeSystem=: Setting this directive allows you to wake a system from suspend if the timer is reached when in that state.
The [Slice] Section
The
[Slice] section of a unit file actually does not have any .slice unit specific configuration. Instead, it can contain some resource management directives that are actually available to a number of the units listed above.Some common directives in the
[Slice] section, which may also be used in other units can be found in the systemd.resource-control man page. These are valid in the following unit-specific sections:[Slice][Scope][Service][Socket][Mount][Swap]
Creating Instance Units from Template Unit Files
We mentioned earlier in this guide the idea of template unit files being used to create multiple instances of units. In this section, we can go over this concept in more detail.
Template unit files are, in most ways, no different than regular unit files. However, these provide flexibility in configuring units by allowing certain parts of the file to utilize dynamic information that will be available at runtime.
Template and Instance Unit Names
Template unit files can be identified because they contain an
@ symbol after the base unit name and before the unit type suffix. A template unit file name may look like this:example@.service
When an instance is created from a template, an instance identifier is placed between the
@ symbol and the period signifying the start of the unit type. For example, the above template unit file could be used to create an instance unit that looks like this:example@instance1.service
An instance file is usually created as a symbolic link to the template file, with the link name including the instance identifier. In this way, multiple links with unique identifiers can point back to a single template file. When managing an instance unit,
systemd will look for a file with the exact instance name you specify on the command line to use. If it cannot find one, it will look for an associated template file.Template Specifiers
The power of template unit files is mainly seen through its ability to dynamically substitute appropriate information within the unit definition according to the operating environment. This is done by setting the directives in the template file as normal, but replacing certain values or parts of values with variable specifiers.
The following are some of the more common specifiers will be replaced when an instance unit is interpreted with the relevant information:
%n: Anywhere where this appears in a template file, the full resulting unit name will be inserted.%N: This is the same as the above, but any escaping, such as those present in file path patterns, will be reversed.%p: This references the unit name prefix. This is the portion of the unit name that comes before the@symbol.%P: This is the same as above, but with any escaping reversed.%i: This references the instance name, which is the identifier following the@in the instance unit. This is one of the most commonly used specifiers because it will be guaranteed to be dynamic. The use of this identifier encourages the use of configuration significant identifiers. For example, the port that the service will be run at can be used as the instance identifier and the template can use this specifier to set up the port specification.%I: This specifier is the same as the above, but with any escaping reversed.%f: This will be replaced with the unescaped instance name or the prefix name, prepended with a/.%c: This will indicate the control group of the unit, with the standard parent hierarchy of/sys/fs/cgroup/ssytemd/removed.%u: The name of the user configured to run the unit.%U: The same as above, but as a numericUIDinstead of name.%H: The host name of the system that is running the unit.%%: This is used to insert a literal percentage sign.
By using the above identifiers in a template file,
systemd will fill in the correct values when interpreting the template to create an instance unit.Conclusion
When working with
systemd, understanding units and unit files can make administration simple. Unlike many other init systems, you do not have to know a scripting language to interpret the init files used to boot services or the system. The unit files use a fairly simple declarative syntax that allows you to see at a glance the purpose and effects of a unit upon activation.Breaking functionality such as activation logic into separate units not only allows the internal
By learning how to leverage your init system's strengths, you can control the state of your machines and more easily manage your services and processes.
systemdprocesses to optimize parallel initialization, it also keeps the configuration rather simple and allows you to modify and restart some units without tearing down and rebuilding their associated connections. Leveraging these abilities can give you more flexibility and power during administration.By learning how to leverage your init system's strengths, you can control the state of your machines and more easily manage your services and processes.